1
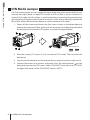
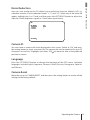
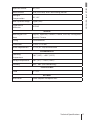
Analog Video Camera
User’s Guide
Before attempting to set up or operate this camera,
please read this user's guide and retain it for future
reference.
Model No.
CP180
V1-110607
P/N: 3GA0310721
Copyright
© 2011 Compro Technology, Inc. All rights reserved.
Trademark
Compro Technology is the registered trademark of Compro Technology
Inc. All other company and product names mentioned in this document are registered
trademarks of the respective companies.
Restriction
No part of this document may be copied or reproduced in any form or by any means
without the prior written consent of Compro Technology, Inc.
Disclaimer
Compro Technology makes no warranties with respect to this documentation and
disclaims any implied warranties of merchantability, quality, or fitness for any particular
purpose. The information in this document is subject to change without notice.
COMPRO reserves the right to make revisions to this publication without obligation to
notify any person or entity of any such changes.
Revision History
2011/01/27 Original version
Compro Technology Inc.
www.comprosecurity.com
Tel. +886 2 2918 0169, Fax +886 2 2915 2389
3F, No.12, Alley 6, Lane 45, Pao Shin Road,
Hsintien District, New Taipei City 231, Taiwan
Support e-mail: [email protected]
Contents
Compro CP180 - User's Guide
Table of Contents
Important Notices. . . . . . . . . . . . . . . . . . . . . . . . . . . . . . . . . . . . . . . . 2
Product Overview. . . . . . . . . . . . . . . . . . . . . . . . . . . . . . . . . . . . . . . . 3
Package Contents . . . . . . . . . . . . . . . . . . . . . . . . . . . . . . . . . . . . . . . . 3
Hardware Overview. . . . . . . . . . . . . . . . . . . . . . . . . . . . . . . . . . . . . . . 3
IR Connector Pinout . . . . . . . . . . . . . . . . . . . . . . . . . . . . . . . . . . . . . . 4
Power Connector Pinout . . . . . . . . . . . . . . . . . . . . . . . . . . . . . . . . . . . 4
Installation & Connections . . . . . . . . . . . . . . . . . . . . . . . . . . . . . . . . . .
Installing Lens. . . . . . . . . . . . . . . . . . . . . . . . . . . . . . . . . . . . . . . . . . Connecting Video and Power . . . . . . . . . . . . . . . . . . . . . . . . . . . . . . . . D/N Mode Jumper . . . . . . . . . . . . . . . . . . . . . . . . . . . . . . . . . . . . . . . 5
5
5
6
Operating the Camera . . . . . . . . . . . . . . . . . . . . . . . . . . . . . . . . . . . . . 7
Setup Menus. . . . . . . . . . . . . . . . . . . . . . . . . . . . . . . . . . . . . . . . . . . 7
Camera Operation Setting . . . . . . . . . . . . . . . . . . . . . . . . . . . . . . . . . . 9
Technical Specifications . . . . . . . . . . . . . . . . . . . . . . . . . . . . . . . . . . . 16
Contents
1
Important Notices
Compro CP180 - User's Guide
Regulatory Notice
This device complies with Part 15 of the FCC Rules. Operation is subject to the following
two conditions: (1) This device may not cause harmful interference, and (2) This device
must accept any interference received, including interference that may cause undesired
operation.
FCC Interference Statement
This equipment has been tested and found to comply with the limits for a Class B
digital device, pursuant to Part 15 of the FCC Rules. These limits are designed to provide
reasonable protection against harmful interference in a residential installation.
This equipment generates, uses and can radiate radio frequency energy and, if not
installed and used in accordance with the instructions, may cause harmful interference
to radio communications. However, there is no guarantee that interference will not
occur in a particular installation. If this equipment does cause harmful interference to
radio or television reception, which can be determined by turning the equipment off
and on, the user is encouraged to try to correct the interference by one of the following
measures:
• Reorient or relocate the receiving antenna.
• Increase the separation between the equipment and receiver.
• Connect the equipment into an outlet on a circuit different from that to which the
receiver is connected.
• Consult the dealer or an experienced radio/TV technician for help.
To assure continued compliance, any changes or modifications not expressly approved
by the party responsible for compliance could void the user's authority to operate this
equipment.
Safety Rules
• The camera ought to be installed by a qualified technician.
• Place the camera on a level surface whenever possible.
• Do not drop the camera body to the ground; it may cause the damage to main parts.
• Please do not disassemble or remodel the product; it may cause damage or fire.
• Do not shake, move or disturb the camera when it is in operation, as such actions
may result in the malfunction of the device.
• Power off the camera as soon as it is found smoking or smelt unusual.
• Please do not place the camera around the heat sources, such as television or
microwave oven.
2
Important Notices
Product Overview
Compro CP180 - User's Guide
Package Contents
Contact your local distributor should you find anything missing from the package.
1
2
3
4
Analog camera (with body cap) x 1
Power terminal block x 1
IR terminal block x 1
User's guide x 1
Hardware Overview
Body cap – Remove the body cap to mount the lens you purchased.
Screw hole – For ceiling mount and bracket.
Screw hole – For ceiling mount and bracket.
DC auto iris lens connector – Connect to the cable from your DC auto iris lens.
Operation buttons – Used to perform OSD settings.
Video output terminal – Connect to a BNC video cable.
IR connector – Connect to a switch to control IR-cut filter externally. Under external
D/N mode, when the positive and negative pole are connected (with a jumper or
otherwise), the IR-cut filter will be used; when they are disconnected, the IR-cut filter
will be removed.
Power input terminal – A 3-pin power connector.
Product Overview
3
Compro CP180 - User's Guide
Note:
The camera is configured in digital day/night mode by default,
which does not use IR cut filter during daytime and nighttime.
And once the positive and negative pole of the IR connector are
disconnected, camera image will turn monochromatic. To switch to
external day/night mode, refer to the 'D/N Mode Jumper' section.
IR Connector Pinout
The following describes the pinout of the IR connector used to control IR-cut filter.
2 1
Pin
Function
1
3.3V DC or floating: camera switches to night
mode with IR-cut filter removed.
Ground or connection to pin-2: camera
switches to day mode with IR-cut filter in use.
2
Ground
Power Connector Pinout
The following describes the pinout of the terminal power connector.
3 2 1
Pin
4
Product Overview
Function
1
+ 12V DC
2
COM
3
24V AC
Installing Lens
The following describes how to attach your lens to the camera.
1. Remove the body cap at the front of the camera.
2. Screw the lens into the camera body. While you’re gently turning the lens
clockwise, you will hear a 'click'. Then twist the lens by another one-third inch to
firmly secure the lens. If you are installing a DC auto iris lens, connect the lens'
control cable to the DC iris connector located at the back of the camera.
Connecting Video and Power
1. Use a BNC video cable to connect the terminal BNC connector from the camera
to a mating BNC connector.
2. Attach the Power adapter (optional accessory) to the terminal power connector
on the camera. The recommended adapter specifications is DC 12V/500mA or AC
24V/500mA. Then connect the power plug to a power outlet.
Monitor
Analog Camera
Power Adapter
Installation & Connections
5
Compro CP180 - User's Guide
Installation & Connections
Compro CP180 - User's Guide
D/N Mode Jumper
The D/N mode jumper lets you toggle between digital day/night mode (default) and
external day/night mode. In digital D/N mode, the IR-cut filter is always removed. In
external D/N mode, the IR-cut filter is used/removed by connecting/disconnecting the
positive pole and negative pole of the IR connector. If you wish to externally control the
IR-cut filter, follow the description below to switch to external D/N mode.
1. Power off the camera and loosen the four screws shown in the below figure to
remove the back panel. Then gently pull out the main circuit board connected to
the back panel to reveal the D/N jumper as circled in the figure below.
D/N Jumper (J7)
2 1
Digital D/N
(Default)
3 2
Ext. D/N
2. Reset the jumper (J7) to pins 2-3 to use external D/N mode. Then re-attach the
back panel.
3. Connect the IR connector on the back panel to an external switch or light sensor.
4. Connect the camera to a monitor and power. Press the setting button on the
back panel to enter the OSD menu. Select 'DAY/NIGHT' item and set it as 'COLOR'
(in digital D/N mode, set the 'DAY/NIGHT' item as 'AUTO').
6
Installation & Connections
Operating the Camera
Prior to using this camera, enter the setup menu and make the appropriate settings
for each item in accordance with the condition of the camera's monitoring area. Listed
below is the structure of the setup menu.
Setup Item
Description
LENS
Lets you select the iris
adjustment mode of your
lens.
SHUTTER /
AGC
Available
Options
Submenu Items
AUTO /
MANUAL
Under 'AUTO': type,
mode, speed
Allows you to configure
the shutter speed and
auto gain control function.
AUTO /
MANUAL
Under 'AUTO': mode
and brightness for
high/low luminance
Under 'Manual': mode,
shutter, AGC
WHITE BAL
Provides adjustment on
white balance.
ATW / PUSH
/ USER1 /
USER2 /ANTI
CR / MANUAL /
PUSH LOCK
Under 'ATW': speed,
delay cnt, atw frame,
environment
Under 'USER1/2':
b-gain, r-gain
Under 'MANUAL': level
BACKLIGHT
Enables or disables the
back light compensation
function.
OFF / BLC / HLC
N/A
PICT
ADJUST
Specifies video properties.
MIRROR /
BRIGHTNESS
/ CONTRAST /
SHARPNESS /
HUE / GAIN
Under 'MIRROR': off, on
Under 'BRIGHTNESS/
CONTRAST/
SHARPNESS/HUE/
GAIN': 0~255
ATR
Lets you switch on/off
the ATR (Adaptive Tone
Reproduction) function.
OFF / ON
Under 'ON': luminance,
contrast
OFF / ON
Under 'ON': detect
sense, block disp,
monitor area, area sel,
top, bottom, left, right,
right
MOTION
DET
Configures the motion
detection mode.
Operating the Camera
7
Compro CP180 - User's Guide
Setup Menus
Compro CP180 - User's Guide
Setup Item
8
Description
Available
Options
Submenu Items
PRIVACY
Protects sensitive areas in
the scene.
OFF / ON
Under 'ON': area sel,
top, bottom, left, right,
color, transp, mosaic
DAY /
NIGHT
Configures the day/night
function.
AUTO / COLOR/
B/W
Under 'AUTO': burst,
delay cnt, day > night,
night > day
Under 'B/W': burst
NR
Provides settings for the
digital noise reduction
function.
NR MODE
off, y, c, y/c
CAMERA ID
Creates a camera title
to be displayed on the
screen.
OFF / ON
Under 'ON': key-in ID,
chr1, chr2, clr, pos
LANGUAGE
Changes the language of
the setup menu
ENGLISH /
DEUTSCH /
FRANCAIS /
PУCCKИЙ /
PORTUGUĔS /
ESPAÑOL
N/A
CAMERA
RESET
Restores all the settings to
the default value
N/A
N/A
Operating the Camera
Entering and Navigating the Setup Menu
To enter the camera setup menu, press the setting button on the back panel. Press UP/
DOWN/LEFT/RIGHT button to navigate the menu. The currently selected menu item
will be highlighted in pink on screen. To modify the setting of a highlighted menu item,
simply press the LEFT/RIGHT button. A menu item with the
icon indicates it has a
submenu. To enter a submenu, select an item with the icon and press the setting
button.
Button
Operation
UP
Move the cursor up
DOWN
Move the cursor down
LEFT
Change to the previous setting for the
selected menu item
RIGHT
Change to the next setting for the
selected menu item
Setting button
( )
Call up the OSD menu; set; enter a
submenu
After you finish adjusting the settings, move the cursor to 'SAVE ALL' and press the
setting button, and then move the cursor to 'EXIT' and press the setting button again to
exit the setup menu.
Restore to Default Settings
To restore all the settings to default, press the setting button to enter the OSD menu.
Move the cursor to [NEXT] and press the setting button, and then move the cursor to
[CAMERA RESET] and hit the setting button again.
Operating the Camera
9
Compro CP180 - User's Guide
Camera Operation Setting
Compro CP180 - User's Guide
Lens
Select the iris aperture control method between 'AUTO' and 'MANUAL' by pressing LEFT
or RIGHT button. When 'AUTO' is selected, you can press the setting button to enter its
submenu, as shown below.
SETUP MENU
TYPE
MODE
SPEED
DC
AUTO
080
RETURN
'TYPE' lets you select between DC iris and video iris. However, video iris mode is not
supported on this camera. For the item 'MODE', you can select 'AUTO' to let the camera
automatically adjust the diameter of aperture. You can also set the camera to open the
aperture to the maximum degree, or use the minimum aperture. The 'SPEED' item allows
you to set aperture adjustment speed.
Shutter / AGC
Configure the shutter and auto gain control function here.
Automatic Shutter / AGC
Selecting 'AUTO', which is recommended when using a DC-iris lens, will allow the
camera to adjust shutter speed automatically based on the lighting conditions.
Configure the function under different lighting conditions in the submenu of 'AUTO',
as shown below.
AUTO SETUP
HIGH LUMINANCE
MODE
AUTO IRIS
BRIGHTNESS
026
LOW LUMINANCE
MODE
AGC
BRIGHTNESS
x0.75
RETURN
Under 'HIGH LUMINANCE', you can choose 'AUTO IRIS' mode (default setting) to use
a fixed shutter while making the camera adjust iris level according to the brightness
of the scene. Choose 'SHUT+AUTO IRIS' mode to have the camera adjust iris level
according to the brightness, and control the exposure with DC iris. If you have
10
Operating the Camera
Under 'LOW LUMINANCE', you can choose 'AGC' mode (default setting) to have the
camera automatically increase the gain when in low light conditions to produce a
brighter image. The 'BRIGHTNESS' item allows you to tailor brightness level to your
needs.
Manual Shutter / AGC
Opt for manual shutter / AGC option when you have selected 'MANUAL' for the 'LENS'
item, which then provides a submenu that contains mode, shutter and AGC setting.
'SHUTTER' item lets you specify the shutter time (between 1/50 sec and 1/10000 sec).
Adjust 'AGC' level according to your lighting conditions.
White Balance
You can fine-tune the color of the image here. 'ATW' (Auto White Balance) is the default
setting. Besides 'ATW', there are also 'PUSH', 'USER1', 'USER2', 'ANTI CR', 'MANUAL', and
'PUSH LOCK'.
ATW (Auto White Balance)
ATW allows the camera to adjust white balance in accordance with the color
temperature of the light source. 'ATW' contains a submenu (shown below). 'SPEED'
controls the speed of ATW. Changing the 'ATW FRAME' and 'ENVIRONMENT' setting
will affect the color temperature range. Smaller value for 'ATW FRAME' leads to a
smaller range of color temperature. The color temperature ranges from 2500K to
9500K for indoor environment, and 1800K to 10500K for outdoor environment.
ATW
SPEED
DELAY CNT
ATW FRAME
ENVIRONMENT
026
026
x1.00
INDOOR
RETURN
Selecting 'USER1/2' mode will allow you to adjust the blue gain and red gain individually.
'MANUAL' mode will let you adjust the blue gain and red gain simultaneously. The 'ANTI
CR' (anti color rolling suppression) mode uses a smaller range of color temperature than
ATW mode does.
Operating the Camera
11
Compro CP180 - User's Guide
previously selected 'MANUAL' for the 'LENS' item, the mode will be forced as 'SHUT'.
The 'BRIGHTNESS' item let you adjust the aperture to tailor the brightness to your
preference.
Compro CP180 - User's Guide
Backlight
Switch on/off the backlight compensation function. 'BLC' helps correct the problem of
subjects being darker than expected in the image when there are bright lights directly
shining behind them. In addition, selecting 'HLC' (High light compensation) will display
the extreme bright areas in the scene in black.
Picture Adjustment
Press the setting button when the
icon is highlighted to enter picture adjustment
menu. Enabling 'MIRROR' mode will flip the image horizontally. Press the UP/DOWN
button to select any of the video properties and then press LEFT/RIGHT to adjust the
slider.
PICT ADJUST
MIRROR
BRIGHTNESS
CONTRAST
SHARPNESS
HUE
GAIN
OFF
042
154
138
128
154
RETURN
ATR (Adaptive Tone Reproduction)
Similar to Wide Dynamic Range, ATR can compensate for gradation of the subjects to
the optimal level and thereby improve contrast in both bright and dark areas in the
picture. Switch on ATR and then press the setting button to enter its submenu. Use the
operation buttons to select 'LUMINANCE' or 'CONTRAST' and then adjust the level to
your preference.
ATR
LUMINANCE
CONTRAST
RETURN
12
Operating the Camera
MID
MID
You can configure the motion detection function here. Switch to 'ON' and then press
the setting button to enter its submenu. You can create up to 4 motion detection areas
by enabling 'MONITOR AREA' and adjusting the 'TOP/BOTTOM/LEFT/RIGHT' slider
separately. You can also adjust the detection sensitivity. 'BLOCK DISP', when switched on,
will highlight moving objects in the scene with color blocks; when switched to 'ENABLE
', it allows you to enter a grid screen in which you will use the operation buttons to
move the translucent square and, by pressing the setting button, specify areas in the
scene that will not be detected (which then will become transparent). To exit the grid
screen, press and hold the setting button for 2 seconds before releasing it.
MOTION DET
DETECT SENSE
BLOCK DISP
MONITOR AREA
AREA SEL
TOP
BOTTOM
LEFT
RIGHT
RETURN
111
OFF
ON
1/4
000
000
000
000
Privacy
Privacy function can create up to 4 masks to protect sensitive areas in the scene. Switch
to 'ON' to enter its submenu as shown below. Select an area and adjust the 'TOP/
BOTTOM/LEFT/RIGHT' slider separately to create a mask on screen. You can also specify
the color, transparency (1 being opaque) and mosaic setting (not effective on opaque
masks).
PRIVACY
AREA SEL
TOP
BOTTOM
LEFT
RIGHT
COLOR
TRANSP
MOSAIC
RETURN
1/4
000
000
000
000
1
1.00
OFF
Operating the Camera
13
Compro CP180 - User's Guide
Motion Detection
Compro CP180 - User's Guide
Day/Night
Configure the day/night function by selecting between 'AUTO', 'COLOR' and 'B/W'. When
'AUTO' is selected, press the setting button to enter its submenu as shown below. The
'DELAY CNT' specifies the delay before a switchover. 'DAY NIGHT' and 'NIGHT DAY'
determines the lux level at the switching point.
Note:
Having switched to external day/night mode, please set 'DAY/
NIGHT' as 'COLOR'. Refer to the 'D/N Mode Jumper' section for
how to switch to external D/N mode to control the camera's IRcut filter externally.
DAY/NIGHT
BURST
DELAY CNT
DAY NIGHT
NIGHT DAY
OFF
010
004
005
RETURN
When 'COLOR' is selected, color image is always displayed. When 'B/W' is selected,
the picture is always displayed in black/white (the burst setting in its submenu is
synchronized with the burst setting in the submenu of 'AUTO').
14
Operating the Camera
Here you can configure the 2D digital noise reduction function (default: off ). Its
submenu includes 3 noise reduction mode: 'Y', 'C', and 'Y/C'. Select any of the three NR
modes, highlight the Y or C level, and then press the LEFT/RIGHT button to adjust the
slider for Y level (brightness signal) or C level (color signal return).
NR
NR MODE
Y LEVEL
C LEVEL
OFF
-
RETURN
Camera ID
You can create a camera title to be displayed on the screen. Switch to 'ON' and press
the setting button to input a custom title. The camera title can be named with up to 52
characters in two lines. Highlight and select 'POS ' to move the title to the preferred
position on screen.
Language
Press the LEFT/RIGHT button to change the language of the OSD menu. Available
languages include English, Japanese, German, French, Russian, Portuguese, Spanish,
and Chinese.
Camera Reset
Move the cursor to 'CAMERA RESET' and then press the setting button to restore all the
settings to the factory default.
Operating the Camera
15
Compro CP180 - User's Guide
Noise Reduction
Technical Specifications
Compro CP180 - User's Guide
CP180
VIDEO
Image
Device
Authentic SONY 1/3" 960H EXview HAD CCD II
Digital Signal
Processor
Authentic SONY Effio-E DSP 12-bit
Effective Pixel
976 x 494 / 976 x 582
System
Scanning
Interlaced
Synchronization
Internal
Resolution
Horizontal
Color: > 680 TV Lines
Black/White: > 700 TV Lines
Day & Night
Minimum Illumination
0.01 Lux (F1.2, 30 IRE)
True D/N
Mechanical IR cut filter
External IR Control
Yes
Video Output
BNC out x 1
S/N Ratio
> 50 dB
LENS
Lens Type
CS Mount
Auto Iris
DC drive
FUNCTION
16
OSD
Yes
Camera ID
Yes
Lens Control
Yes
Image Optimization
Mirror, Brightness, Contrast, Sharpness, Hue, Gain
Motion Detection
Yes (4 zones)
Privacy Mask
Yes (4 zones)
Technical Specifications
AES, AGC
White Balance
ATW, Push Lock, Anti-Color Rolling, Manual
Backlight
Compensation
BLC, HLC
Wide Dynamic Range
Digital (ATR)
Digital Noise
Reduction
2D DNR
Compro CP180 - User's Guide
Exposure Control
GENERAL
Multi-lingual OSD
Menu
English, Japanese, German, French, Russian, Portuguese,
Spanish, Chinese
Casing
Cast aluminum
Dimensions
55 X 55 x 113 mm
Power Requirement
DC 12V, AC 24V, terminal block
ENVIRONMENTAL
Operating
Temperature
-10°C (14°F) ~ +50°C (122°F)
Storage Temperature
-20°C (-4°F) ~ +60°C (140°F)
Humidity
20% ~ 80% (non-condensing)
CERTIFICATIONS
Listed
CE / FCC
OPTIONAL
Accessories
Power adapter and optical lens
Technical Specifications
17
www.comprosecurity.com
Compro Technology Head Office
3F, No.12, Alley 6, Lane 45, Pao Shin Road, Hsintien District, New Taipei City 231, Taiwan
Tel. +886 2 29180169 Fax. +886 2 29152389