1
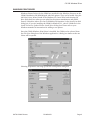
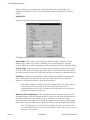
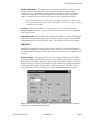
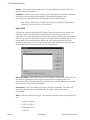
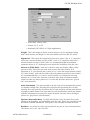
SATO America, Inc.
545 Weddell Drive
Sunnyvale, CA 94089
Main Phone: (408) 745-1300
Tech Support Hot Line: (408) 745-1379
Fax: (408) 745-1309
http://www.satoamerica.com
© Copyright 1998
SATO America, Inc.
Warning: This equipment has been tested and found to comply with the limits for a
Class B computing device pursuant to Part 15 of the FCC rules. These limits are
designed to provide reasonable protection against harmful interference in a
residential installation. This equipment generates, uses, and can radiate radio
frequency energy and, if not installed in accordance with the instruction may cause
harmful interference to radio communications.However, there is no guarantee that
interference will not occur in a particular installation. If this equipment does cause
harmful interference to to radio or television reception, which can be determined by
turning the equipment off and on, the user is encouraged to try and correct the
interference by one or more of the following measures:
• Reorient or relocate the receiving antenna.
• Increase the separation between the equipment and the receiver.
• Connect the equipment into an outlet or a circuit different from that to
which the receiver is connected.
• Consult an experienced radio/TV technician for help.
Caution: The FCC warns the users that changes or modifications of the unit not
expressly approved by the party responsible for compliance could void the user’s
authority to operate the equipment.
All rights reserved. No part of this document may be reproduced or issued to third
parties in any form whatsoever without the express permission of SATO America, Inc.
The material in this document is provided for general information and is subject to
change without notice. SATO America, Inc. assumes no responsibility for any errors
that might appear.
CX200 WINDOWS DRIVER
INTRODUCTION
The CX200 Print Driver for Windows 3.1/95/NT lets you print labels using virtually
any Windows 3.1, Windows 95 or Windows NT application program. The driver is
loaded like any other Windows printer and is located in the Windrive directory on the
CD-ROM. After the driver is installed, you can send data to the CX200 just like any
other printer on your system: simply specify CX200 in the Print dialog box of your
Windows application. Printer configuration is managed using the Advanced dialog
box. To print bar codes, you must first define a bar code font using the Barcodes
dialog box.
Using the CX200 Print Driver, you can:
• Print to the CX200 from any Windows 3.1 or Windows 95 application
program
• Print bar codes using the CX200 bar code fonts
• Change the CX200 Printer Configuration
• Calibrate the CX200 for various types of media
• Print Test and Printer Status labels
CONFIGURATION
The CX200 oprinters are different from other SATO models in that they do not use
DIP switches for printer configuration. Instead, all printer configuration is done via
software commands. The parameters that can be configured are:
• Sensor Calibration
• Protocol Codes
• Print Darkness Range
• Sensor Type
• RS232 Parameters
Because there are no DIP switches to indicate the current printer settings, a Test
Label can be printed that lists the active settings in the printer. This Test Label lists all
of the information a user needs to ascertain the printer configurtation. Test Labels
can be printed out by sending a command via software (see page 93 of the CX200
Programming Guide) or by using the FEED and On-LINE/Off-Line Indicator buttons
on the control panel (see page 7 of the CX200 User’s Guide).
The CX200 comes from the factory set up to provide the optimum print quality with
the SATO media supplied. When using the parallel cable supplied, you should not
have to change any of the settings to print excellent quality labels.
Page 1
PN 9001051
SATO CX200 Printers
CX 200 Windows Driver
WINDOWS PRINT DRIVER
Windows Printer Drivers for the CX200 are provided in the Windrive directory on the
CX200 Distribution CD-ROM shipped with each printer. They can be loaded using the
Add New Printer Wizard found in the Windows 95 Control Panel and selecting the
Have Disk check box when you are asked for the printer manufacturer and model.
Enter X:\Windrive (where X is the CD-ROM drive disignation) in the Install from Disk
dialog box. If you are installing the CX200 in Windows 3.1, enter X:\Windrive in the
Install Unlisted or Updated Printer:Install Driver dialog box. Please refer to your
Windows manuals for instructions for adding a new printer.
Once the CX200 Windows Print Driver is installed, the CX200 can be selected from
the File:Print dialog box of the Windows application. A dialog box similar to the one
below will be opened.
Selecting Propertities will bring up the first SATO printer dialog box.
SATO CX200 Printers
PN 9001051
Page 2
CX 200Windows Driver
This box allows you to set the basic operating characterics of the CX200. Two
additional Dialog boxes can be selected using the Advanced and Barcodes selection
buttons.
ADVANCED
Selecting Advanced takes you to the Advanced Printer Setup box.
This Dialog Box allows you to set the print configuration of the printer.
Print Mode - Selects the use of either Direct thermal media or thermal Transfer
media using a ribbon. If you have a CX200DT Direct Thermal printer, selecting
Transfer will have no effect as the printer always defaults to the direct thermal setting.
Sensor Type - Selects the type of sensing used for indexing the labels. The choices
are Gap for die cut labels with a gap between them, Bar for labels with an Eye-Mark
bar printed on the reverse side of the liner and None for the use of continuous media.
Backfeed - Enables the label backfeed. When Backfeed is enabled, the printer will
print a label and feed it out to the tear-off/cut position. Before the next label is
printed, it will retract the label to the first print position.
Note: When Backfeed is enabled, the printer thruput will be drastically reduced
since the printer must stop and retract before each label is printed. It is
recommended that this selection be made only if single labels are to be printed
and manually taken by the operator.
Darkness Fine Adjustment - This adjustment select the amount of heat used to
develop the image on direct thermal media or transfer the ink from the ribbon in the
thermal transfer mode. The middle (or 50%) position is set up to provide the
optmium results when using the SATO media supplied with the printer. When using
other media, it may be necessary to adjust this setting to get acceptable print quality.
Note: The human-eye is not well suited to gauging the quality level of bar codes.
It is recommended that you use a bar code verifier to ensure that you are printing
usable bar code symbols.
Page 3
PN 9001051
SATO CX200 Printers
CX 200 Windows Driver
Media Adjustment - This adjustment uses the print dot history to adjust the heat
used to image the first print line. It can be used to optimize the print quality of
rotated bar codes. The middle (or 50%) position is set up to provide the optmium
results when using the SATO media supplied with the printer. When using other
media, it may be necessary to adjust this setting to get acceptable print quality.
Note: The human-eye is not well suited to gauging the quality level of bar codes.
It is recommended that you use a bar code verifier to ensure that you are printing
usable bar code symbols.
Overlays - This selection allows you to use forms Overlays (see page 40 of the
CX200 Programming Guide). If you select this option, you cannot use the Expanded
Print Length feature.
Expanded Print- The standard label length for the CX200 is 7 inches. Selecting this
option will allow you to print labels up to 14 inches long (see page 51 of the CX200
Programming Guide). If you select this option, you cannot use the Overlays feature.
IMMEDIATE
Selecting the immediate button will bring up the Immediate Commands Dialog Box.
Immediate commands are configuration settings that are sent once to the printer and
are stored in the flash memory. They remain active until another set of commands are
received.
Serial Settings - These paramters set the serial receive parameters of the CX200.
They must match the RS232 Serial settings on the COM port selected for the printer.
If they do not, the printer will ignore any attempt to communicate with it. Once the
desired settings are selected, the Send button will transmitt the settings immediately
to the printer. The printer settings can be verified by printing a Test Label. These
settings have no effect if a parallel port is used to communicate with the printer.
Test - Selecting this button will print a simple test label to verify that the computer
and printer are communicating properly.
SATO CX200 Printers
PN 9001051
Page 4
CX 200Windows Driver
Status - Selecting this button will print a Test Label listing the status of all of the
current settings in the printer.
Calibrate - Selecting this button will cause the CX200 printer to perform calibration
functions on the currently installed media. These functions measure the
characteristics of the media used and store the results in flash memory.
Note: When calibrating the CX200TT for use with a ribbon, the ribbon must be
installed in the printer before it is calibrated.
BARCODES
The Barcodes selection from the SATO Printer Dialog box allows you to define a bar
code font. Once a bar code font has been defined, it will show up in the Font
drop-Down List of the application as a Printer Font under the name that you assigned
when it was created. The font will appear in the application as standard text, but it is
transmitted to the CX200 using the printer bar code commands rather than as a
graphic bit map image. This not only speeds up the label transmission time, but also
ensures that the bar code will conform to the specifications.
Bar Code Fonts - This List Box lists all of the currently defined bar code fonts. They
are listed in alphabetical order using the names that you assisgned when they
wercreated. When selecting Barcodes for the first time, it will be blank until you select
New and create a bar code font definition.
Font Name - This is the name you assign to this font. Remember, this name will
show up in the Font List of you application, so assign a name that is easily
recognizable.
Kind - This select the bar code type. The selections available from the drop down list
are:
• EAN-8 or EAN-13
• UPC-A or UPC-E
• Interleaved 2 of 5
• Code 39
Page 5
PN 9001051
SATO CX200 Printers
CX 200 Windows Driver
• Code 128A, 128B or 128C
• Postnet 32, 37, or 52
• Bookland (UPC/EAN 2 or 5 digit supplements)
Height - This is the height of the bar code in inches or cm. For optimum reading
with a hand scanner, the height of a bar code should not be less than 0.5 inches.
Expansion - This selects the expansion factor used to create a bar. A “1” expansion
will create a narrow element one dot (0.005") wide. A “2” expansion will create a
narrow element two dots (0.010") wide. It is recommended that the minimum
expansion chosen is “2”. Anything less may impair the readability of the bar code.
Narrow to Wide Ratio - Some bar codes have only two element widths, either
narrow or wide. This selects the ratio used to create the wide element. If an
Expansion of “2” was selected and a ration of 1 to 3, then the narrow element would
be 2 dots (0.010") wide and the width of the wide element would be 6 dots (0.030").
It is recommended that a 1:3 ratio be used if possible as it will provide twice the
tolerance of a 1:2 bar code. Some bar codes have more than two element widths.
These bar codes are alswys printed in a 1:2 ratio and the other choices are “greyed
out” (non-selectable).
Auto Translation - The data encoded in the bar code can be automatically printed
in a human readable font. Selecting Below will print the data below the bar code,
selecting Above will print the data above the bar code and None will not print the data
in human readable format. Note that some bar code specifications specify the human
readable information to be printed in certain locations. For these cases, the illegal
choices are “greyed out” (non-selectable).
Options: Descender Bars - For UPC and EAN bar codes, Descender Bars can be
printed at the beginning, end and middle of the bar code. These bars generally bound
the human readable information. This option is not selectable for other bar codes.
Rotation - Any of the bar codes can be printed in any one of four rotated positions.
The choices are 0°, 90°, 180° and 270°.
SATO CX200 Printers
PN 9001051
Page 6