1
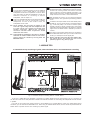
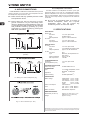
GM110
V-TONE
User’s Manual
Version 1.4
May 2006
V-TONE GM110
IMPORTANT SAFETY PRECAUTIONS
DETAILED SAFETY INSTRUCTIONS:
1) Read these instructions.
2) Keep these instructions.
3) Heed all warnings.
4) Follow all instructions.
CAUTION:
WARNING:
To reduce the risk of electric shock, do not remove
the top cover (or the rear section). No user
serviceable parts inside; refer servicing to qualified
personnel.
To reduce the risk of fire or electric shock, do not
expose this appliance to rain and moisture. The
apparatus shall not be exposed to dripping or
splashing and no objects filled with liquids, such
as vases, shall be placed on the apparatus.
This symbol, wherever it appears, alerts you to the
presence of uninsulated dangerous voltage inside
the enclosure—voltage that may be sufficient to
constitute a risk of shock.
This symbol, wherever it appears, alerts you to
important operating and maintenance instructions
in the accompanying literature. Please read the
manual.
5) Do not use this apparatus near water.
6) Clean only with dry cloth.
7) Do not block any ventilation openings. Install in
accordance with the manufacturer’s instructions.
8) Do not install near any heat sources such as radiators,
heat registers, stoves, or other apparatus (including
amplifiers) that produce heat.
9) Do not defeat the safety purpose of the polarized or
grounding-type plug. A polarized plug has two blades
with one wider than the other. A grounding type plug
has two blades and a third grounding prong. The wide
blade or the third prong are provided for your safety. If
the provided plug does not fit into your outlet, consult
an electrician for replacement of the obsolete outlet.
10) Protect the power cord from being walked on or
pinched particularly at plugs, convenience receptacles,
and the point where they exit from the apparatus.
11) Only use attachments/accessories specified by the
manufacturer.
12) Use only with the cart, stand, tripod, bracket, or table
specified by the manufacturer, or sold with the
apparatus. When a cart is used, use caution when moving
the cart/apparatus combination to avoid injury from
tip-over.
13) Unplug this apparatus during lightning storms or
when unused for long periods of time.
14) Refer all servicing to qualified service personnel.
Servicing is required when the apparatus has been
damaged in any way, such as power supply cord or plug
is damaged, liquid has been spilled or objects have fallen
into the apparatus, the apparatus has been exposed to
rain or moisture, does not operate normally, or has been
dropped.
15) CAUTION - These service instructions are for use by
qualified service personnel only. To reduce the risk of
electric shock do not perform any servicing other than
that contained in the operation instructions unless you
are qualified to do so.
2
V-TONE GM110
V-TONE
True Analog Modeling 30-Watt Guitar Amp with
10" BUGERA™ Speaker
V Original heavy-duty 10" BUGERA™ guitar speaker for classic sound
GM110
V Powerful 30-Watt guitar workstation with authentic V-TONE analog modelling
V Authentic V-TONE analog modeling for 3 classic guitar amps, 3 speaker simulation models plus 3 gain
modes—providing you with 27 modeled sounds
V Clean channel and full-featured modeling channel offering everything you need from clean to crunch to
super-fat distortion sounds
V Patented* DYNAMIZER circuitry captures every nuance of your playing and lends tube-like compression
to your tone
V Dedicated 3-band EQ and Master level control for ultimate sound shaping
V Additional loudspeaker and separate Headphone output with integrated speaker simulation
V Balanced direct out with XLR connector and ground lift for direct recording and live applications
V Insert facility for external effects devices (rack effects, stomp boxes, wah-wah pedals, etc.)
V High-quality components and exceptionally rugged construction ensure long life
V Conceived and designed by BEHRINGER Germany
* German Patent No.: 100 15 833
3
V-TONE GM110
TABLE OF CONTENTS
FOREWORD
Dear Customer,
welcome to the team of
BEHRINGER users, and
thank you very much for
expressing your confidence in us by purchasing the BEHRINGER
V-TONE.
Writing this foreword for
you gives me great
pleasure, because it
represents the culmination of many months
of hard work delivered
by our engineering team
to achieve a very
ambitious goal: to develop an outstanding
guitar amp that is at the
forefront of what is
technically possible and that can be used in many different
applications. Our guitar amps offer you strong performance,
their sound is amazingly clear, and they are easy to use both as
direct recording amps as well as stage amps. The task of designing
our new V-TONEs certainly meant a great deal of responsibility,
which we assumed by focusing on you, the discerning user and
musician. Meeting your expectations also meant a lot of work
and night shifts. But it was fun, too. Developing a product usually
brings a lot of people together, and what a great feeling it is
when all who participated in such a project can be proud of
what they’ve achieved.
1. INTRODUCTION ......................................................... 4
1.1 The design concept ........................................................ 5
1.2 DYNAMIZER technology and analog modeling .............. 5
1.3 Before you get started ................................................... 5
1.3.1 Shipment .............................................................. 5
1.3.2 Initial operation ..................................................... 5
1.1.3 Online registration ............................................... 5
2. CONTROL ELEMENTS ............................................... 6
2.1 Front panel ...................................................................... 6
2.2 Rear panel ....................................................................... 6
3. WIRING TIPS .............................................................. 7
3.1 Standard set-up consisting of guitar, external effects ....
device and simultaneous recording ................................ 7
4. AUDIO CONNECTIONS ............................................... 8
4.1 Loudspeaker connection ................................................ 8
5. SPECIFICATIONS ....................................................... 8
7. WARRANTY ................................................................ 9
It is our philosophy to share our enjoyment with you, because
you are the most important member of the BEHRINGER team.
With your highly competent suggestions for new products you’ve
made a significant contribution to shaping our company and making
it successful. In return, we guarantee you uncompromising quality
as well as excellent technical and audio properties at an extremely
reasonable price. All of this will enable you to give free rein to
your creativity without being hampered by budget constraints.
We are often asked how we manage to produce such highquality devices at such unbelievably low prices. The answer is
quite simple: it’s you, our customers! Many satisfied customers
mean large sales volumes enabling us to get better purchasing
terms for components, etc. Isn’t it only fair to pass this benefit on
to you? Because we know that your success is our success
too!
I would like to thank all of you who have made the V-TONE
Series possible. You have all made your own personal
contributions, from the developers to the many other employees
at this company, and to you, the BEHRINGER user.
My friends, it’s been worth the effort!
Thank you very much,
Uli Behringer
1. INTRODUCTION
Thank you for purchasing the V-TONE GM110. The GM110 is
a modern Guitar Workstation that sets new standards in practice
amp engineering.
When developing the GM110, our primary objective was to
reproduce the authentic sound of analog guitar amplifiers and at
the same time provide you with a tool for straightforward
recording. The concept of intuitive operation remained a central
consideration. Many people contributed to this intense
development project: studio musicians, collectors of vintage guitar
amps, music and guitar lovers alike.
We even invited guitar amp tuning experts to help us develop
an amplifier that unites the very best of both worlds.The demands
placed on a guitar amp are nowadays very broad. A guitarist
should offer a wide array of sounds, but at the same time be
able to quickly adapt to specific requirements of various
applications—be it home recording, studio, live perfor-mances,
etc. That’s why it is very important to us to be able to offer you
a maximal sound diversity as well as diverse connection
possibilities with our V-TONE. Fret not: you will quickly master
the V-TONE and will be able to quickly learn how to use all of its
capabilities easily and intuitively.
With its up-to-date circuitry, the V-TONE features the
functionality and dependability of a truly modern guitar amp. Yet
it is user-friendly and problem-free as if it were a classic tube
combo. We highly recommend taking your time to truly learn all of
the V-TONE’s functions so you can reach its maximum potential.
4
1. INTRODUCTION
V-TONE GM110
1.3.2 Initial operation
1.1 The design concept
The philosophy behind BEHRINGER products guarantees a
no-compromise circuit design and employs the best choice of
components.
The operational amplifiers employed by BEHRINGER and used
in the V-TONE GM110 are exceptional: they boast extreme
linearity and very low distortion characteristics. To complement
this, the choice of components includes low-tolerance resistors
and capacitors, high-quality potentiometers and switches, and
several other carefully selected elements.
The robust housing of your V-TONE, with its oversize power
supply, gives you the peace of mind that the V-TONE will hold its
own even under the most demanding stage conditions. The
housing is made of high-grade, environment-friendly MDF wood
consisting of multiply impregnated layers.
1.2 DYNAMIZER technology and
analog modeling
When an electric instrument is amplified, that’s where you
either make it or break it. Unlike the signals that have been mixed
and mastered, the signals of electric instruments have extremely
high signal peaks, placing the dynamic range of the amp’s circuitry
under immense strain. How your amp reacts to these signal
peaks is one of its most defining characteristics.
That’s why we’ve equipped all V-TONE Series amps with our
unique DYNAMIZER preamplifier circuitry. It guarantees a lively
sound with a lot of punch, even when the amp is pushed to its
limits. Combine that with our V-TONE analog modeling, and not
only do you have amazingly authentic tube sounds at your
fingertips, you also get the dynamic performance typical of the
respective amp type. Crystal-clear guitar tones come through
with transparency, warmth and the compression typical of tube
amps. Even as distortion increases, the sound remains lively
and full of power, without losing any of its assertiveness.
All along, you have full control over the volume. Plainly talking,
you can take the same sound you are used to at your practice
room and replicate it in your bedroom at much more reasonable
volume levels, or you can even record yourself while playing.
The following user’s manual will familiarize you with
the control elements of your new V-TONE and let
you learn all of its functions. After reading this
manual, store it somewhere where you can easily
find in the future, should you need to look up some
information.
1.3 Before you get started
1.3.1 Shipment
The V-TONE was carefully packed at the assembly plant to
assure secure transport.
Should the condition of the cardboard box suggest that your
V-TONE may have been damaged in transport, please inspect
the unit immediately and look for physical indications of damage.
Please make sure that your V-TONE is provided with sufficient
ventilation, and never place it on other amplifiers or in the vicinity
of a heater to avoid the risk of overheating.
Before plugging your V-TONE into a power socket,
please make sure you have selected the correct
voltage:
The fuse mount near the power cord connector has three
triangular markings. Two of these triangles are facing opposite
one another. Your V-TONE is set up for the voltage indicated
near these markings, and can be altered by turning the fuse
mount by 180 degrees. ATTENTION: This does not apply to
export models built for 120 V, for example!
If you use your V-TONE unit with a different voltage,
you must change the fuses accordingly. The correct
value of the fuses needed can be found in the
chapter “SPECIFICATIONS”.
Faulty fuses must be replaced with fuses of
appropriate rating, without exception! The correct
value of the fuses needed can be found in the
chapter “SPECIFICATIONS”.
Power is delivered via the cable that was delivered with the VTONE. All mandatory safety precautions have been adhered to.
Please make sure that all your equipment is
grounded at all times. For your own protection, you
should never tamper with the grounding of the cable
or the unit itself. The unit shall always be connected
to a mains socket outlet with a protective earthing
connection. You can eliminate humming problems
caused by grounding at the D.I. OUT by pressing the
GND switch (Groundlift,
).
1.1.3 Online registration
Please, do remember to register your new BEHRINGER
equipment right after your purchase by visiting
www.behringer.com (alternatively www.behringer.de) and
kindly read the terms and conditions of our warranty carefully.
Should your BEHRINGER product malfunction, our goal is to
have it repaired as quickly as possible. To arrange for warranty
service, please contact the retailer from whom the equipment
was purchased. Should your BEHRINGER dealer not be located
in your vicinity, you may directly contact one of our subsidiaries.
Corresponding contact information is included in the original
equipment packaging (Global Contact Information/European
Contact Information). Should your country not be listed, please
contact the distributor nearest you. A list of distributors can be
found in the support area of our website (www.behringer.com).
Registering your purchase and equipment with us helps us
process your repair claims quicker and more efficiently.
Thank you for your cooperation!
Damaged equipment should NEVER be sent directly
to us. Please inform the dealer from whom you
acquired it immediately as well as the
transportation company from which you took
delivery. Otherwise, all claims for replacement/
repair may be rendered invalid.
2. CONTROL ELEMENTS
5
V-TONE GM110
2. CONTROL ELEMENTS
2.1 Front panel
Fig. 2.1: Front panel control elements
INPUT is the GM110’s 1/4" jack input for your guitar. Use a
commercial 1/4" jack mono cable (not from a DIY shop, but
from a specialist music dealer).
The SPEAKER switch provides you with simulations of
two classic guitar loudspeakers: 4x12"-loudspeakers in a
closed back enclosure (U.K.), and 2x12" loudspeakers,
open back (U.S.). In addition, we have also installed a
further frequency response correction (FLAT) that is
specially adapted to the GM110 enclosure.
The DRIVE control determines the amplification in the input
section. It allows you to finely tune the GM110 preset to the
output level of your guitar pick-up (depending on selected
amp, mode and speaker combination) in order to achieve
the desired degree of distortion.
The LOW control in the EQ section enables you to boost or
cut the bass frequencies.
Use the DRIVE control to set the desired sound and
use the MASTER control to set the desired volume!
With the MID control, you can boost/cut the midrange
frequencies.
The AMP switch enables you to emulate the basic sounds
from three guitar amp designs; these are based on classic
amp models and will be familiar to you from numerous
recordings. The TWEED setting delivers transparent
sounds, clear as a bell, with dynamic bass response. The
BRITISH setting has an aggression that comes straight from
the heart and is powerful with an unmistakable ability to
make itself heard. Fuller and more balanced, and yet subtly
differentiated, the CALIF(ORNIAN) setting is particularly
suitable for singing lead sounds.
The HIGH control governs the upper frequency range.
With the MODE switch, you choose between one of three
possible gain settings (CLEAN, HI GAIN and HOT) to achieve
the basic sound selected with the AMP switch.
With the MASTER control, you determine the overall and
headphone volume of your V-TONE GM110. It should be
set fully to the left when you operate the POWER switch or
disconnect the instrument cable from the guitar or amp.
Use the POWER switch to put the GM110 into operation.
The POWER switch should always be in the “Off” position
when you are about to connect your unit to the mains.
Attention: The POWER switch does not fully
disconnect the unit from the mains. Unplug the
power cord completely when the unit is not used
for prolonged periods of time.
2.2 Rear panel
Fig. 2.2: Rear panel connectors
FUSEHOLDER / VOLTAGE SELECTION. Before you connect the device to the network, please make sure that your local
voltage matches the voltage indicated on the unit. Blown fuses may only be replaced by fuses of the same type and rating.
Some models allow for inserting the fuse holder in two different positions in order to switch over from 230 V to 120 V operation,
and vice versa. Please note that, for 120 V operation outside Europe, you need to use a fuse of a higher rating. The network
connection is made via a STANDARD IEC INLET SOCKET. Use the enclosed power cord to connect the unit to the mains.
6
2. CONTROL ELEMENTS
V-TONE GM110
SERIAL NUMBER.
At the D.I. OUT output (balanced XLR socket), you can tap
the audio signal of the V-TONE GM110 in order, for example,
to feed it into a mixing console and record it. This audio
signal is frequency-corrected (Speaker Simulation). The
level of the D.I. OUT (max. +22 dBu) is designed to provide
simple connection to mixers or other audio devices.
You can use the SPEAKER socket to connect an additional
loudspeaker to your V-TONE GM110. The external
loudspeaker should have an impedance of 4 Ohms. When
using this socket, the internal loudspeaker is muted. For
additional information on connecting an external
loudspeaker, refer to chapter 4.1.
With the GND LIFT switch, you can unplug the electrical
bonding of the D.I. OUT, if ground loop or humming problems
occur.
The 6.3 mm PHONES jack allows you to monitor the GM110’s
audio signal with a pair of commercially available
headphones. As soon as this socket is used, the
loudspeaker will be muted.
FX SEND is the output socket for the serial effects path of
the GM110. You can use this to loop in the external effects
(e.g. a wah-wah pedal) or to connect an external power
amplifier, should you require a greater output. The internal
signal path will not be interrupted. The frequency-corrected
signal at the FX SEND socket is affected by all GM110
controls.
Since speakers can have quite an impact on the
sound of a guitar amp, both the headphones and
D.I. OUT signals are frequency-corrected (with
speaker correction). Without this frequency
correction extreme treble frequencies would
deteriorate the sound.
Low-impedance headphones may begin to produce
distortion at certain volume levels. In such cases,
please reduce the volume by turning back the
MASTER control.
The output of the looped-in effects device is connected to
the FX RETURN socket. When you connect a cable to this
socket, you interrupt the internal signal path.
Please note that, when using the serial effects path,
the effects device will control the level of wet
(affected) signal to dry (direct) signal.
3. WIRING TIPS
3.1 Standard set-up consisting of guitar, external effects device and simultaneous recording
Fig. 3.1: Standard set-up for recording with the V-TONE GM110
To use your V-TONE GM110 for rehearsals, in the studio or on stage, please wire up the unit as shown in fig. 2.1. Of course, you
can also use a wah-wah or other pedal effect instead of the external 19" effects unit. Connecting the headphones will mute the builtin speaker.
If you wish to use a guitar tuner, please connect it to the FX SEND of your V-TONE GM110. If there is no further effects device
connected, you can leave the FX RETURN as it is. When using an external effects device, the tuner should be placed before the
effects device to prevent the tuner from receiving any effects signal.
3. WIRING TIPS
7
V-TONE GM110
4.1 Loudspeaker connection
4. AUDIO CONNECTIONS
The BEHRINGER V-TONE GM110 is fitted with audio inputs and
outputs in the form of 1/4" mono jacks. The exceptions to this are
the headphones output and the D.I. OUT.
Please ensure that only qualified personnel install
and operate the device.
Please make sure that all units have a proper
ground connection. For your own safety, never
remove or disable the ground conductor of the unit
or of the AC power cable. Instead, you can eliminate
hum problems caused by grounding (e.g. when
connected to a mixing console) by pressing the
).
GND switch (Groundlift,
The GM110 features a loudspeaker connection (mono jack
socket) that allows you to hook up a supplementary speaker.
Optimum adaptation of the amp to the loudspeaker is ensured
with an 4 Ω loudspeaker. With too high an impedance load, the
maximum power output will drop in proportion to the resistance
connected.
Do not use an instrument cable to connect an
external loudspeaker, rather use a special
loudspeaker cable. This will prevent any
unnecessary losses of sound and output.
5. SPECIFICATIONS
AUDIO INPUTS
Guitar input
Connector
Type
Input impedance
FX return
Connector
Input impedance
Fig. 4.1: 1/4" TS connector (input, FX send, FX return,
speaker)
AUDIO OUTPUTS
FX send
Connector
Type
Output impedance
D.I. Out
Connector
Type
Output impedance
Max. output level
1/4" mono jack socket
approx. 1 MΩ unbalanced
1/4" mono jack socket
Low-impedance line level output
approx. 100 Ω unbalanced
XLR
Balanced, low-impedance line
level output
approx. 100 Ω
+22 dBu
LOUDSPEAKER OUPUT
Connector
Load impedance (nom.)
1/4" mono jack socket
4Ω
SYSTEM SPECIFICATIONS
Power amp output
30 Watts RMS into 4 Ω
LOUDSPEAKER
Type
Impedance
Power handling
4.2: Wiring of a stereo headphones plug
1/4" mono jack socket
RF filtered input
approx. 1 MΩ unbalanced
POWER SUPPLY
Mains voltage
Power consumption
Fuse
Mains connection
DIMENSIONS/WEIGHT
Dimensions (H x W x D)
Weight
10" Vintage loudspeaker, model
BUGERATM loudspeaker
4Ω
60 Watts (BUGERATM)
USA/Canada 120 V~, 60 Hz
China/Korea
220 V~, 50 Hz
U.K./Australia 230 V~, 50 Hz
Europe
230 V~, 50 Hz
Japan
100 V~, 50 - 60 Hz
70 W maximum
100 - 120 V~: T 2 A H 250 V
200 - 240 V~: T 1 A H 250 V
Standard IEC receptacle
approx. 15" (381 mm) x 14 ½"
(369 mm) x 9 ½" (242 mm)
approx. 12.5 kg
Fig. 4.3: XLR connectors (D.I. Out)
BEHRINGER is constantly striving to maintain the highest quality standards. Modifications
may be made to existing products without prior notice. Specifications and appearance may differ
from those listed or illustrated.
8
5. SPECIFICATIONS
V-TONE GM110
7. WARRANTY
§ 1 OTHER WARRANTY RIGHTS AND NATIONAL LAW
1. This warranty does not exclude or limit the buyer’s statutory
rights provided by national law, in particular, any such rights
against the seller that arise from a legally effective purchase
contract.
2. The warranty regulations mentioned herein are applicable
unless they constitute an infringement of national warranty law.
2. If the product needs to be modified or adapted in order to
comply with applicable technical or safety standards on a national
or local level, in any country which is not the country for which
the product was originally developed and manufactured, this
modification/adaptation shall not be considered a defect in
materials or workmanship. The warranty does not cover any
such modification/adaptation, irrespective of whether it was
carried out properly or not. Under the terms of this warranty,
BEHRINGER shall not be held responsible for any cost resulting
from such a modification/adaptation.
Please do remember to register your new BEHRINGER
equipment right after your purchase by visiting
www.behringer.com (alternatively www.behringer.de) and
kindly read the terms and conditions of our warranty carefully.
3. Free inspections and maintenance/repair work are expressly
excluded from this warranty, in particular, if caused by improper
handling of the product by the user. This also applies to defects
caused by normal wear and tear, in particular, of faders,
crossfaders, potentiometers, keys/buttons, tubes, guitar strings,
illuminants and similar parts.
Registering your purchase and equipment with us helps us
process your repair claims quicker and more efficiently.
4. Damages/defects caused by the following conditions are
not covered by this warranty:
§ 2 ONLINE REGISTRATION
Thank you for your cooperation!
V
improper handling, neglect or failure to operate the unit in
compliance with the instructions given in BEHRINGER user
or service manuals.
V
connection or operation of the unit in any way that does
not comply with the technical or safety regulations
applicable in the country where the product is used.
V
damages/defects caused by force majeure or any other
condition that is beyond the control of BEHRINGER.
§ 3 WARRANTY
1. BEHRINGER (BEHRINGER International GmbH including all
BEHRINGER subsidiaries listed on the enclosed page, except
BEHRINGER Japan) warrants the mechanical and electronic
components of this product to be free of defects in material and
workmanship for a period of one (1) year* from the original date
of purchase, in accordance with the warranty regulations
described below. If the product shows any defects within the
specified warranty period that are not excluded from this
warranty as described under § 5, BEHRINGER shall, at its
discretion, either replace or repair the product using suitable
new or reconditioned parts. In the case that other parts are used
which constitute an improvement, BEHRINGER may, at its
discretion, charge the customer for the additional cost of these
parts.
2. If the warranty claim proves to be justified, the product will
be returned to the user freight prepaid.
3. Warranty claims other than those indicated above are
expressly excluded.
§ 4 RETURN AUTHORIZATION NUMBER
1. To obtain warranty service, the buyer (or his authorized
dealer) must call BEHRINGER (see enclosed list) during normal
business hours BEFORE returning the product. All inquiries must
be accompanied by a description of the problem. BEHRINGER
will then issue a return authorization number.
2. Subsequently, the product must be returned in its original
shipping carton, together with the return authorization number to
the address indicated by BEHRINGER.
5. Any repair or opening of the unit carried out by unauthorized
personnel (user included) will void the warranty.
6. If an inspection of the product by BEHRINGER shows that
the defect in question is not covered by the warranty, the
inspection costs are payable by the customer.
7. Products which do not meet the terms of this warranty will
be repaired exclusively at the buyer’s expense. BEHRINGER will
inform the buyer of any such circumstance. If the buyer fails to
submit a written repair order within 6 weeks after notification,
BEHRINGER will return the unit C.O.D. with a separate invoice
for freight and packing. Such costs will also be invoiced
separately when the buyer has sent in a written repair order.
§ 6 WARRANTY TRANSFERABILITY
This warranty is extended exclusively to the original buyer
(customer of retail dealer) and is not transferable to anyone
who may subsequently purchase this product. No other person
(retail dealer, etc.) shall be entitled to give any warranty promise
on behalf of BEHRINGER.
3. Shipments without freight prepaid will not be accepted.
§ 5 WARRANTY REGULATIONS
1. Warranty services will be furnished only if the product is
accompanied by a copy of the original retail dealer’s invoice.
Any product deemed eligible for repair or replacement under the
terms of this warranty will be repaired or replaced.
§ 7 CLAIM FOR DAMAGES
Failure of BEHRINGER to provide proper warranty service shall
not entitle the buyer to claim (consequential) damages. In no
event shall the liability of BEHRINGER exceed the invoiced value
of the product.
* Customers in the European Union please contact BEHRINGER
Germany Support for further details.
Technical specifications and appearance subject to change without notice. The information contained herein is correct at the time of printing.
WINDOWS ® as well as the names of companies, institutions or publications pictured or mentioned and their respective logos are registered
trademarks of their respective owners. Mac ® and the Mac ® logo are registered trademarks of Apple Computers Inc. , registered in the USA and
other countries. Their use neither constitutes a claim of the trademarks by BEHRINGER nor affiliation of the trademark owners with
BEHRINGER. BEHRINGER accepts no liability for any loss which may be suffered by any person who relies either wholly or in part upon any
description, photograph or statement contained herein. Colours and specification may vary slightly from product. Products are sold through our
authorised dealers only. Distributors and dealers are not agents of BEHRINGER and have absolutely no authority to bind BEHRINGER by any
express or implied undertaking or representation. No part of this manual may be reproduced or transmitted in any form or by any means,
electronic or mechanical, including photocopying and recording of any kind, for any purpose, without the express written permission of
BEHRINGER Spezielle Studiotechnik GmbH. BEHRINGER is a registered trademark.
ALL RIGHTS RESERVED. © 2006 BEHRINGER Spezielle Studiotechnik GmbH,
Hanns-Martin-Schleyer-Str. 36-38, 47877 Willich-Muenchheide II, Germany.
Tel. +49 2154 9206 0, Fax +49 2154 9206 4903
6. WARRANTY
9