1
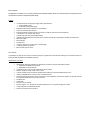
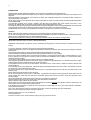
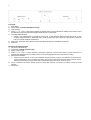
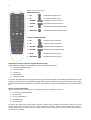
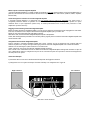
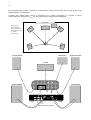
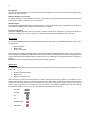
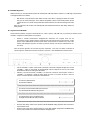
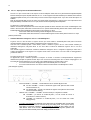
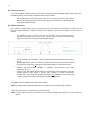
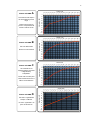
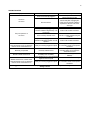
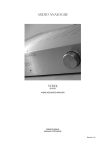
AUDIO ANALOGUE
Crescendo Integrated Amplifier
50W INTEGRATED AMPLIFIER
OWNER’S MANUAL
MANUALE D’ISTRUZIONI
Manual rev 1.2
2
3
Dear Audiophile,
Congratulations and thank you for choosing the Crescendo Integrated Amplifier, where all of Audio Analogue’s technology has been
concentrated on the task of integrated amplifier design.
Features
•
•
•
•
•
•
•
•
•
•
•
•
•
Toroidal transformer analog power supply with 2 separated lines:
1. Power amplifier supply.
2. All Preamp section power supply.
Separated charge reserve capacitors for each channel
Low noise solid state input selectors.
Integrated-resistance network volume controls with no buffer for maximum sound transparency.
Low distortion Low noise pre amp section.
Low IMD, high slew rate, power amplifier stages.
Calibrated and integrated electronic protection for electric overloads and overheating to minimize sound distortion.
REC OUT Output.
Phones Output.
Frontal Line In.
“Trigger In” Input to turn on the unit by a 12VDC trigger.
Top-quality passive components.
Microcontroller system control.
Caro Audiofilo,
congratulazioni e grazie per aver scelto il Crescendo Integrato, un apparecchio nel quale Audio Analogue ha concentrato tutta la sua
tecnologia nella progettazione di amplificatori integrati.
Caratteristiche costruttive:
•
•
•
•
•
•
•
•
•
•
•
•
Alimentazione analogica realizzata con trasformatore toroidale e 2 linee di alimentazione distinte:
1. Alimentazione amplificatori di potenza.
2. Alimentazione circuiti stadio pre.
Condensatori per la riserva di carica dedicati per ciascun canale.
Selettori di ingresso a stato solido a basso rumore.
Controlli di volume a rete di resistenze integrate senza buffer per la massima trasparenza del suono.
Stadio di preamplificazione a basso rumore e bassa distorsione.
Protezioni elettroniche integrate contro sovraccarichi e surriscaldamento ad intervento calibrato sul segnale musicale
per la minima interferenza con le prestazioni sonore.
Uscita Rec Out.
Uscita cuffie.
Ingresso Linea sul frontale.
Ingresso trigger In che permette di accendere l’apparecchio con un segnale di trigger da 12VDC.
Componenti passivi di elevatissima qualità.
Gestione di sistema a microcontrollore.
4
INTRODUCTION
AF GROUP SRL, AUDIO ANALOGUE distributor, does not take any responsibility in the following cases:
Whenever the operational procedures related to the use and the maintenance of the equipment as described in this manual are not
respected.
Whenever damage to the equipment occurs because of repairs and modifications made form non-authorized staff or because of
normal deterioration of the system.
No part of this manual can be reproduced by any means, transmitted or copied for private or public use without private authorization
from AF GROUP SRL.
The information contained in this manual is related to the data kept by AF GROUP SRL at the moment of the issue o f this
publication; AF GROUP SRL has the right to make changes to this document without prior notice.
The equipment has been projected and manufactured according to the Regulations of the Community 89/336/CEE and is marked CE.
This equipment cannot be used for different purposes other than those for which it has been manufactured.
AF GROUP SRL does not take any responsibilities for accidents or damage due to improper use of the equipment.
WARNING
Please respect the safety standards contained in this manual before starting to operate the equipment.
Do not open the equipment. No further interventions than those described in this manual should be made. For technical assistance,
please consult a qualified technician or an AUDIO ANALOGUE dealer.
Not respecting the instructions contained in this manual will invalidate the terms and conditions of the guarantee.
NECESSARY PRECAUTIONS FOR SAFETY AND MAINTENANCE
ATTENTION: before starting any operation, using or maintaining the equipment, it is strictly necessary to understand the following
manual.
To avoid any accidents or hazards it is necessary to follow the following regulations.
Activate the equipment only prior to checking that the installation has been done properly, and conforms to the instructions contained
in this manual.
Avoid installing the equipment in places subjected to extremely high temperatures or humidity.
Check that the labels containing information about safety are always visible and in good condition.
Ensure not to obstruct ventilation and to avoid excessive overheating. The equipment should be kept to a minimal distance of 15 cm
from any object and not to be placed on carpet or other soft surfaces. Also installation close to radiators or in closed spaces without
ventilation should be avoided.
Do not switch on the equipment until it has been correctly and completely installed.
Only supply the equipment with the kind of the electric supply as stated on the appropriate label. If in doubt about the kind of supply
available, please consult an expert technician for technical assistance.
The equipment needs to be wired to an earth terminal. The external case is made of metal; a defective connection with the earth
may be dangerous.
In case damage occurs to the supply cable, it should be replaced immediately with the same kind of cable. This operation should be
only made prior to disconnecting the main supply.
Do not place objects on the supply cable and check that this is not positioned lying across a walk way. The cable should not be
knotted or curly.
Always replace the fuses with others of the same type.
Do not use the equipment close to water or other liquids. If liquid enters the equipment, the plug should be disconnected from the
socket avoiding any contact with the metal parts. Competent technical staff should be asked to check the equipment before
operating it again.
Do not place receptacles containing liquid on the equipment, even when it is switched off.
Keep the equipment far from sources of heat such as solar light, kitchens, radiators etc…
Always unplug the supply cable during rainy weather.
Always switch off and unplug the supply cable before cleaning the equipment externally: this operation should be made using a dry
and soft cloth. Never use alcohol based cleaning material.
If the amplifier was carried from an extremely cold environment to and extremely hot one, it could create internal condensation,
causing possible malfunction.
If this occurs, please wait for at least an hour before using it again, to allow it to gradually reach room temperature.
When not used for long periods, please unplug the equipment.
INSTRUCTIONS TO PUT IT OUT OF SERVICE
Consult qualified staff
Follow the regulations of the current legislation regarding recycling and waste disposal.
5
PREMESSA
AF GROUP SRL, distributore AUDIO ANALOGUE, non accetta responsabilità nei casi in cui:
Le procedure operative di utilizzo e manutenzione dell’apparato descritte nel manuale non siano rispettate.
I danni si verifichino in seguito a riparazioni o modifiche dell’apparato eseguite da personale non autorizzato o a seguito di normale
deterioramento dell’apparato.
Nessuna parte del presente manuale può essere riprodotta con alcun mezzo, trasmessa o copiata per usi pubblici e/o privati senza
la previa autorizzazione di AF GROUP SRL. Le informazioni contenute nel presente manuale sono relative ai dati in possesso di AF
GROUP SRL al momento della pubblicazione; AF GROUP SRL si riserva il diritto di apportare cambiamenti al presente documento
senza alcun preavviso.
L’apparato è progettato e realizzato in conformità alle Direttive Comunitarie 89/336/CEE e 72/23/CEE e risulta marcato CE.
L’apparato non può essere utilizzato per scopi diversi da quelli per cui è stato progettato.
AF GROUP SRL non si assume alcuna responsabilità per incidenti o danni causati da un utilizzo improprio dell’apparato.
AVVERTENZA
Prima di compiere qualunque operazione attenersi alle norme di sicurezza contenute all’interno del manuale
Non aprire l’apparecchio. Nessun ulteriore intervento oltre a quelli descritti in questo manuale dovrebbe essere effettuato. Per
l’assistenza tecnica, rivolgersi a un tecnico qualificato o a un rivenditore AUDIO ANALOGUE.
Il mancato rispetto delle prescrizioni del seguente manuale implica il decadimento della garanzia.
PRECAUZIONI PER LA SICUREZZA E MANUTENZIONE
ATTENZIONE: prima dell’utilizzo o manutenzione dell’apparato o di qualsiasi operazione sullo stesso è necessario prendere visione
del seguente manuale.
Al fine di prevenire ogni pericolo di incidente si impongono le seguenti prescrizioni:
Attivare l’apparato solo dopo aver verificato l’adeguatezza dell’installazione e la conformità alle indicazioni contenute nel presente
manuale.
Non installare l’apparecchiatura in luoghi soggetti a sbalzi eccessivi di temperatura e umidità.
Verificare che le etichette contenenti informazioni sulla sicurezza siano sempre ben visibili ed in buono stato.
Le fessure di ventilazione non devono assolutamente essere ostruite per evitare surriscaldamento dell’apparato. A tal fine,
posizionare l’unità ad una distanza minima di 15 cm da ogni altro ostacolo e non su tappeti, moquette o altre superfici morbide.
Evitare inoltre di installarlo nei pressi di caloriferi o in ambienti chiusi, privi di una appropriata ventilazione.
Non accendere l’apparato finché non è completamente installato in maniera corretta.
Alimentare l’apparato con il tipo di alimentazione elettrica riportato sull’apposita targhetta. In caso di dubbi sul tipo di alimentazione
disponibile, consultare il servizio di assistenza tecnica.
L’apparecchio deve essere sempre collegato a terra. Poiché l’involucro è costituito in metallo, una connessione di terra difettosa o
mancante potrebbe essere pericolosa.
In caso di danneggiamenti al cavo di alimentazione, provvedere immediatamente alla sostituzione con un altro dello stesso tipo.
Questa operazione deve essere effettuata dopo aver disconnesso l’alimentazione primaria.
Non posizionare oggetti sul cavo di alimentazione e verificare che questo non si trovi in una zona di passaggio. Il cavo non deve
essere arrotolato o annodato.
Sostituire i fusibili sempre con altri dello stesso tipo.
Non usare l’apparato in prossimità di acqua o altri tipi di liquidi. Se nell’unità dovesse entrare del liquido, scollegare immediatamente
il cavo di rete dalla presa a muro evitando di toccare le parti metalliche dell’apparecchiatura e rivolgersi al personale tecnico per un
controllo prima del riutilizzo.
Non appoggiare recipienti contenenti liquidi di qualsivoglia natura sopra l’apparato. Anche quando questo è spento.
Tenete l’apparecchio lontano da fonti di calore come la luce solare, cucine, radiatori, etc…
Scollegare sempre il cavo di alimentazione dalla presa durante i temporali.
Spegnere e scollegare sempre l’alimentazione prima di effettuare la pulizia esterna dell’apparato: questa operazione deve essere
effettuata utilizzando un panno asciutto e morbido. Non usare mai solventi o detergenti a base di alcool.
Se l’amplificatore viene trasportato da un ambiente freddo ad un altro caldo, si potrebbe formare condensa al suo interno, causando
possibili malfunzionamenti. Se ciò si dovesse verificare, si prega di attendere almeno un’ora prima dell’uso in modo da permettergli
di raggiungere la temperatura ambiente gradualmente.
In caso di lunghi periodi di inutilizzo, staccare la spina dalla presa di rete.
ISTRUZIONI PER LA MESSA FUORI SERVIZIO
Rivolgersi a personale specializzato.
Seguire le prescrizioni della corrente legislazione in materia di riciclaggio e smaltimento dei rifiuti.
6
5
1
2
3
4
6
7
Front panel
1) Power button.
2) Phones output (see Note on HeadPhones output)
3) Front Line Input
4) Front In, 1, 2, 3, 4, 5/ByPass. Blue leds that indicate the selected input. A fix light indicates the selected source and the normal
operative status of the unit, while a blinking light indicates the unit is in mute mode.
5) Volume/Input Selection knob.
• Volume: If you rotate the knob you change the volume level. A slight clockwise rotation increases the volume, an anticlockwise rotation decreases it. Attenuation level is shown by leds on the right of the Knob. Input selection: pushing the
knob you cyclically change the selected input.
6) Volume leds. 15 blue leds on the right side of the knob progressively light up to indicate the volume level.
7) IR receiver.
Descrizione del pannello frontale
1) Interruttore di alimentazione.
2) Uscita cuffie (vedi Nota sull’uscita cuffie).
3) Ingresso Linea Frontale.
4) Front In, 1, 2, 3, 4, 5/ByPass. Led per l’indicazione dell’ingresso selezionato. La luce blu fissa indica la sorgente selezionata e il
funzionamento dell’apparecchio in modalità normale, la luce blu lampeggiante indica che è stato attivato il muting.
5) Manopola Volume/Select:
• Volume: Una lieve rotazione in senso orario determina l’aumento di volume, quella in senso antiorario la sua diminuzione.
Il livello di attenuazione viene visualizzato dal numero di led accesi a destra della manopola Select: Selettore ingressi:
Permette di selezionare la sorgente da ascoltare visualizzandola tramite l’accensione di uno dei sei led.
6) Led per l’indicazione del volume. Quindici led posti a destra della manopola si accendono per indicare il livello di volume
impostato.
7) Ricevitore IR.
7
5
3
1
2
7
8
4
6
Back panel
1) RIGHT SPEAKER OUT. Right speaker out connector.
2) LEFT SPEAKER OUT. Left speaker out connector.
3) 1, 2, 3, 4 Line inputs.
4) 5/Bypass: Line Input or ByPass Input, see further the “5/BYPASS Input By Pass mode Selection/Activation” section for details.
5) REC. Tape out.
6) Trigger IN Input (see Note on Trigger In Input)
7) IEC standard power inlet. Connect here the provided power cord.
8) Fuses. If necessary, replace with others of the same kind (see back panel for details).
Descrizione del pannello posteriore
1) RIGHT SPEAKER OUT. Connettori di uscita casse right.
2) LEFT SPEAKER OUT. Connettori di uscita casse left.
3) 1, 2, 3, 4, Ingressi linea.
4) 5/ByPass: Ingresso Linea o ingresso per il ByPass, si veda la sezione “ Selezione/Attivazione dell’Ingresso “5/BYPASS“ in modalità
By-Pass” per ulteriori dettagli.
5) REC. Uscita tape.
6) Ingresso Trigger IN (vedi Nota sull’ Ingresso Trigger In)
7) Presa di rete a norma IEC. Collegare il cavo di alimentazione di rete fornito in dotazione.
8) Fusibili. In caso di necessità ripristinare con fusibili dello stesso tipo (come indicato sul pannello posteriore).
8
Remote controller description
AMPLIFIER Functions
•
IN+
: it changes the selected source.
•
IN-
: it changes the selected source.
•
VOLUME+
: it increases the volume of the unit.
•
VOLUME-
: it decreases the volume of the unit.
•
MUTE
: it activates/de-activates the mute function.
•
AMP SETUP
: it activates/de-activates the setup function
Funzioni dell’AMPLIFICATORE
•
IN+
: cambia la sorgente selezionata.
•
IN-
: cambia la sorgente selezionata.
•
VOLUME+
: aumenta il volume dell’apparecchio.
•
VOLUME-
: diminuisce il volume dell’apparecchio.
•
MUTE
: attiva/disattiva la funzione mute.
•
AMP SETUP
: attiva/disattiva la funzione setup.
Unpacking and checking Crescendo Integrated Amplifier package
Carefully open the package to avoid damaging the content. The package should contain:
•
•
•
•
•
1 Crescendo Integrated Amplifier
1 remote controller
1 power cord
2 AAA batteries
1 instruction manual
If one of the items listed above is missing, please contact your Audio Analogue retailer. After extracting the smallest items from the
package, pull out the unit carefully. Separate the package from the anti-shock expanded-foam protection. If batteries are not already
placed in the remote controller battery slot, open the slot; insert batteries according to the indicated polarity, then close the battery
slot.
Apertura e ispezione dell’imballo
Aprire la scatola di cartone con cautela per non danneggiare il contenuto. L’imballo deve contenere:
•
•
•
•
•
Un Crescendo Integrated Amplifier
Un telecomando
Un cavo di alimentazione
Due batterie AAA
Questo manuale
Se qualcuno degli oggetti sopra elencati dovesse mancare, contattate il Vostro rivenditore Audio Analogue di fiducia. Dopo avere
estratto le parti di minori dimensioni, estrarre con cautela l’apparecchio dall’imballo. Separare l’imballo dalle imbottiture antiurto in
schiuma espansa. Aprire il coperchio del vano portapile del telecomando ed inserirle nelle posizioni corrette; quindi chiudere il
coperchio del vano portapile.
9
Where to place Crescendo Integrated Amplifier
Crescendo Integrated Amplifier is a complex unit that may generate a lot of heat. Please locate the unit in a well-ventilated place. In
particular, leave at least 5cm around and above the unit and avoid placing it close to heat sources (radiators, heaters, amplifiers,
television sets).
Scelta del luogo dove collocare il Crescendo Integrated Amplifier
Il Crescendo Itegrated Amplifier è un apparecchio che può generare calore in misura non trascurabile. Per questo motivo è
consigliabile posizionarlo laddove sia garantita una corretta circolazione d’aria. In particolare, è opportuno garantire uno spazio
sufficiente attorno e sopra l’apparecchio (almeno 5cm), ed evitare posizionamenti vicino a fonti di calore (termosifoni o stufe,
amplificatori di potenza, televisori).
Plugging in and connecting Crescendo Integrated amplifier
Before connecting Crescendo Integrated Amplifier to a sound source, please be sure that they’re both unplugged from wall outlets.
First of all, connect the source’s outputs to the Crescendo Integrated Amplifier inputs you want to use.
Please use only high-quality cables with gold plated connectors.
When this is done, connect Crescendo Integrated Amplifier outputs to the speakers.
At last, after checking that the power button is in the OFF position, plug the power cord into the Crescendo Integrated Amplifier inlet
and into the wall outlet.
Collegamento del Crescendo Integrated Amplifier
Prima di collegare il Crescendo Integrated Amplifier alle sorgenti, verificare che tutti gli apparecchi siano scollegati dalla rete
elettrica. Per prima cosa, collegare le sorgenti audio agli ingressi del Crescendo Integrated Amplifier che si desiderano utilizzare.
Utilizzare solo cavi della migliore qualità, terminati con connettori dorati.
Quindi, collegare le uscite casse del Crescendo Integrated Amplifier ai diffusori.
Infine, inserire il cavo di alimentazione fornito in dotazione al Crescendo Integrated Amplifier nella apposita vaschetta. La spina del
cavo di alimentazione andrà poi collegata ad una presa di rete, assicurandosi prima che il pulsante di accensione dell’apparecchio
sia nella posizione di “spento”.
Connection Examples
A) Connection with a source such as the Crescendo CD Player with the Trigger IN connection.
A) Collegamento con una sorgente ad esempio Crescendo CD Player con collegamento del Trigger IN.
Right Channel
Left Channel
settanta
settanta
_______ Input ________ Out
1
2
3
4
5/ByP
Left Out
Right Out
REC
Crescendo
Integrated
Amplifier
L
R
SPDIF Out
Left Out
Right Out
Trigger
IN
Crescendo
CD Player
Trigger
OUT
Back View / Visuale Posteriore
Trigger
IN
10
B) Use of Bypass mode: example of connection to a HomeTheatre 5.1 system. See the section “5/BYPASS Input By Pass mode
Selection/Activation” for further details.
B) Utilizzo della modalità Bypass: esempio di collegamento ad un impianto HomeTheatre 5.1. Consultare la sezione
“Selezione/Attivazione dell’Ingresso 5/BYPASS” per ulteriori informazioni sul settaggio della modalità Bypass.
Video Screen
FL: Front left
FR: Front Right
LS: Left Surround
RS: Right Surround
C: Central
S: Subwoofer
S
C
FR
FL
LS
RS
PLeft Surround
Subwoofer
PRight Surround
settanta
settanta
settanta
PCentral
settanta
Multi Channel
Audio Processor + Multi
Channel Power Amplifier
PRight Channel
settanta
Left
Front
Central
Left Snd
Right
Front
SubWoofer
Pre Out
Right Snd
FL
FR
_______ Input ________ Out
1
2
3
4 5/ByP
L
L
R
R
Left Out
Right Out
REC
Crescendo
Integrated
Amplifier
Back View / Vista Posteriore
Trigger
IN
PLeft Channel
settanta
11
Powering up Crescendo Integrated Amplifier
The unit is turned on pushing the front power button. If after pushing the button nothing happens, please refer to the troubleshooting
section of the present manual.
Accensione del Crescendo Integrated Amplifier
L’apparecchio si accende premendo il pulsante di accensione. Qualora ciò non dovesse accadere, consultare la sezione dedicata
alla risoluzione dei problemi.
Note on HeadPhones output
When a jack is inserted in the front headphone connector the power stages are muted so there is no sound coming from them. If the
Headphones are removed the power stages are driven out from mute mode and the music is reproduced by the loudspeakers again.
The headphone stage gain has been designed to give about the same sound level of the loudspeakers for an equal volume level, but
it depends of course on the sensitivity of the loudspeakers and headphones used.
Nota sull’uscita cuffie
Quando vine inserito un jack nel connettore cuffie i finali di potenza vengono messi in mute per cui non si ha più suono dalle casse.
Quando il jack cuffie viene rimosso i finali di potenza escono dal mute e i diffusori tornano a riprodurre la musica. Il guadagno dello
stadio di uscita cuffie è stato scelto in modo da avere circa lo stesso livello sonoro che si ha con le casse a parità di volume,
ovviamente tutto dipende dalla sensibilità delle casse e della cuffia usate.
Note on Trigger In Input
The Crescendo Integrated Amplifier has a Trigger IN Input which can be used to allow the integrated amplifier be switched on by an
other unit such as the Crescendo CD Player – Crescendo Integrated Amplifier pair. To switch on the Crescendo Integrated Amplifier
with the Trigger In you have to supply 12VDC volts into the connector with the proper polarity (refer to the drawing on the back
panel). Warning: the maximum input current allowed is 160mA (a fuse inside the unit protects the Tigger In circuit). To switch on and
off the Crescendo Integrated Amplifier by the trigger connection leave the main power supply button placed on the front panel in the
off state.
Nota sull’Ingresso Trigger In
Il Crescendo Integrated Amplifier è dotato di un ingresso Trigger In grazie al quale può essere acceso da un altro apparecchio come
ad esempio nel caso della coppia Crescendo CD Player – Crescendo Integrated Amplifier. Per accendere il Crescendo Integrated
Amplifier con il Trigger In si deve fornire una tensione di 12VDC con la corretta polarità (fare riferimento al disegno riportato sul
pannello posteriore del Crescendo Integrated Amplifier). Attenzione: la massima corrente di ingresso consentita è di 160mA (un
fusibile all’interno dell’apparecchio protegge il circuito di Trigger IN). Per accendere e spegnere il Crescendo Integrated Amplifier
mediante la connessione Trigger, lasciare l’interruttore di alimentazione principale posto sul forntale in posizione OFF.
Hints on using Crescendo Integrated Amplifier
It is preferable to turn the unit off when unused and unplugging it from the outlet when unused for long periods and during lightning
and electric storms
Consigli sull’utilizzo del Crescendo Integrated Amplifier
E’ consigliabile spegnere l’apparecchio quando non lo si usa e scollegare la spina del cavo di alimentazione di rete quando non
viene utilizzato per lunghi periodi di tempo e comunque in occasione di temporali e tempeste elettriche.
Volume settings and silencing (mute)
The volume knob on the front panel and the Vol+/Vol- buttons on the remote controller change the general sound level. It means that
the volume of the two channels is altered identically.
The mute button on the remote controller allows you to set the music level to zero. This function is useful any time you have to
suddenly turn down the volume, such as when you have a phone call, when you are talking or when you are changing the CD in the
player. When the unit is in MUTE mode, the volume leds starts blinking. Mute deactivation will restore the previous volume settings.
Regolazione del volume e silenziamento (mute)
La manopola del volume sul pannello frontale e i pulsanti Vol+/Vol- sul telecomando agiscono sul livello generale di ascolto. Ciò
significa che il volume di entrambi i canali viene modificato dello stesso valore.
Il pulsante di mute sul telecomando permette il silenziamento totale dei due canali. Questa funzione è utile qualora sia
improvvisamente necessario abbassare il volume di ascolto, per esempio per rispondere al telefono o per parlare con qualcuno o
ancora quando si desidera cambiare il CD nel lettore. Quando l’apparecchio è in stato di muting, i led del volume lampeggiano. La
disattivazione del mute ripristinerà comunque il normale livello di ascolto.
12
Input selection
Is possible to select the desired audio input by pressing the Volume/Select knob on the front panel or by pressing the “IN+/IN-“
buttons on the remote controller.
Selezione dell’ingresso per l’ascolto
La selezione dell’ingresso audio desiderato per l’ascolto avviene tramite la pressione della manopola Volume/Select sul pannello
frontale oppure mediante i pulsanti IN+ o IN- del telecomando.
Recorder outputs
The Crescendo Integrated Amplifier has two output connectors for recording. The signal you have on the REC OUT is the same you
have on the input selected. Connect the tape outs to the inputs of your recorder.
Uscita per il registratore
Il Crescendo Integrated Amplifier è dotato di una coppia di connettori di uscita per la registrazione. Il segnale sull’uscita REC è lo
stesso che si ha sull’ingresso selezionato. Collegare i connettori dell’uscita tape all’ingresso (REC) del vostro registratore.
Other features
The Crescendo Integrated Amplifier has other interesting new functions that permit you to set different parameters of the product.
The functions are:
•
•
•
Balance regulation.
Bypass mode.
Volume scale selection.
Some functions are managed by switches on the remote that behave differently depending function involved. You can enter into a
function setting procedure pushing the “AMP SETUP” switch on the remote or by a particular state of the Volume/Select knob placed
on the front panel (see below the specific section for each function). Every configuration is saved and reloaded every time the unit is
turned on.
Below there is a picture showing the remote switches used in the setting procedures.
Altre Funzioni
Il Crescendo Integrated Amplifier presenta altre funzioni che permettono di personalizzare alcuni parametri dell’apparecchio, tali
funzioni sono:
•
•
•
Regolazione del bilanciamento.
Bypass mode.
Selezione della scala volume.
Alcune funzioni sono gestite da tasti del telecomando il cui utilizzo cambia a seconda di quale parametro si sta configurando. Si può
accedere alle procedure di settaggio o mediante la pressione del tasto “AMP SETUP” sul telecomando oppure con una particolare
configurazione dello stato della manopola di Volume/Select posta sul pannello frontale (vedi in seguito la procedura per ciascuna
funzione). Ogni configurazione una volta impostata è salvata in memoria ed è richiamata automaticamente dopo la riaccensione
dell’apparecchio. Nella figura sotto sono riportati i tasti del telecomando utilizzati nelle fasi di setup.
-
VOLUME+
-
VOLUME-
-
IN+
-
IN-
-
STANDBY AMP
-
AMP SETUP
13
BALANCE Regulation
With this function you can adjust the level of the two channels with 1dB steps within a maximum of a 7dB range. The procedure
to change the balance is as follows:
-
With the unit in normal function mode select an audio source which is playing and select the volume
level you are used to listening to. Then, keep the “Amp Setup” button on the remote pressed until the
volume leds turn on as shown in the picture below which shows the L/R channels as being at the same
level.
Note: the “input leds” will continue to be indicating the input selected when the the “Amp Setup” button has
been pressed.
Regolazione del BALANCE
Questa funzione permette di regolare il bilanciamento fra i canali a passi di 1dB (7dB max), la procedura per attivare questa
modalità e configurare lo sbilanciamento è la seguente:
-
Durante il normale funzionamento dell’apparecchio selezionare una sorgente audio che sta
riproducendo musica e settate il livello di volume al quale siete soliti ascoltare il vostro impianto. Tenete
premuto il tasto “AMP SETUP” del telecomando finché i led del volume non cambiano il loro stato come
indicato nella immagine seguente, che indica la posizione centrale, ossia nessuno sbilanciamento fra i
due canali.
Note: Per quanto riguarda il led che indica l’ingresso selezionato, il suo stato non cambia: continuerà ad
indicare l’ingresso selezionato al momento nel quale si è premuto il tasto “AMP SETUP” del telecomando.
-
Use the “VOLUME +” switch on the remote to decrease Left channel compared to Right, and use the
“VOLUME –“ switch on the remote to decrease Right channel compared to Left one. The central
illuminated leds will move showing the L/R balance.
Utilizzare i tasti del telecomando “VOLUME +” per attenuare il canale di sinistra rispetto al destro e
“VOLUME –“ per attenuare il canale di destra rispetto al sinistro. Il led acceso al centro si muove a
destra o a sinistra indicando visivamente lo sbilanciamento.
Es: Nessuno Sbilanciamento
Ex: Central L/R balance
Es: Canale di sinistra Sinistra 4dB minore del destro
Ex: Left channel 4dB lower then the rght one
Es. Canale Destro minore di 7dB del sinistro
Ex: Right channel 7dB lower then the left one.
-
Push the “Amp Setup” switch on the remote to exit the BALANCE setting procedure and come back to
normal function mode.
Premere il tasto “Amp Setup” da telecomando per uscire dalla modalità di Regolazione del BALANCE e
ritornare nella condizione di normale funzionamento dell’apparecchio.
14
“5/BYPASS“ Input By Pass mode Selection/Activation
The “5/BYPASS“ input can be used as Line input or can be set in ByPass mode, that’s to say the Crescendo Integrated Amplifier
behaves exactly like a power amplifier. After the “5/BYPASS“ is set in Bypass mode when the fifth input is selected, the Crescendo
Integrated Amplifier will ask you to confirm that you want to use that input in Bypass mode. If you don’t confirm the input is not
selected.
Note: we have decided that you have to confirm your choice before using the 5/BYPASS input to avoid a Line output level source
being inadvertently connected to the 5/BYPASS input, which would seriously damage the loudspeakers.
To set the 5/BYPASS input in By pass mode:
With the unit turned off keep the the knob on the front panel pushed and at the same time turn on the unit switching the main
switch in the front panel. After about a second the 5/BYPASS input led will start blinking and the three central volume leds will
indicate with their status if the Bypass mode is active or not for the 5/BYPASS input:
- If the central volume leds are blinking it means the Bypass mode is not active
- If the central volume leds are turned on it means that the bypass mode is already active for the 5/BYPASS input.
(See the picture below)
Selezione/Attivazione dell’Ingresso “5/BYPASS“ in modalità By-Pass
L’ingresso “5/BYPASS“ oltre ad essere un ingresso di linea, può essere settato in modalità By-Pass nella quale il Crescendo
Integrated Amplifier diventa a tutti gli effetti un amplificatore finale sull’ingresso 5/BYPASS.
Una volta che la modalità By-Pass è stata attivata, quando si seleziona l’ingresso 5/BYPASS viene richiesta conferma per
l’abilitazione dell’ingresso in By-Pass Mode, se non viene data la conferma di abilitazione l’ingresso 5/BYPASS non verrà
selezionato.
Nota: abbiamo aggiunto la richiesta di conferma di abilitazione dell’ingresso 5/BYPASS configurato in Bypass per evitare che si
colleghi inavvertitamente a tale ingresso una sorgente avente livello di uscita linea. In tal caso infatti si danneggerebbero
gravemente i diffusori.
Per settare l’ingresso 5/BYPASS in By Pass mode:
Ad apparecchio spento, mantenere premuta la manopola sul frontale e accendere contemporaneamente l’apparecchio
dall’interruttore principale sul pannello frontale. Dopo circa un secondo il led dell’ingresso 5/BYPASS inizierà a lampeggiare e i tre
led centrali del volume indicheranno con il loro stato se la modalità By-Pass è al momento attiva o meno:
- se i tre led centrali del volume lampeggiano allora la modalità By-Pass non è attivata.
- se i tre led centrali del volume sono accesi in maniera continua allora la modalità By-Pass è attiva.
(Vedi immagine seguente)
-
-
-
Use the “VOLUME +”, “VOLUME-” remote switches to set or unset the By pass mode:
• Use the “VOLUME +” remote to activate the bypass mode (then the three central
volume leds will turn on)
• Use the“VOLUME -” remote to de-activate the bypass mode (then the three central
volume leds will start blinking)
Utilizzare i tasti: “VOLUME +”, “VOLUME-” del telecomando per configurare la modalità:
• “VOLUME +” per attivare la modalità By-Pass (i tre led centrali del volume si
accenderanno in maniera continua);
• “VOLUME-” per disattivare la modalità By-Pass (i tre led centrali del volume
lampeggeranno).
To confirm and memorize the selected By Pass setting keep the “STANDBY AMP” remote switch
pushed for about 1 second until the unit exits the By pass setting mode, in this way the new By
pass setting is memorized. Otherwise, to not memorize the selected By Pass setting, push the
“AMP SETUP” switch on the remote, in this way the By pass mode configuration present at the
time you have entered in the By Pass mode setting procedure will remain.
15
-
Per confermare e memorizzare l’impostazione settata per il By-Pass tenere premuto il tasto
“STANDBY AMP” dal telecomando per circa un secondo finché non si esce dalla modalità di
attivazione, in questo modo la configurazione relativa alla modalità di By-Pass verrà memorizzata.
Per annullare e non memorizzare l’impostazione settata, premere il tasto “AMP SETUP” del
telecomando, in questo ultimo caso rimarrà memorizzata la configurazione del By Pass mode
presente al momento nel quale si è entrati nella procedura di settaggio del By Pass mode.
Note:
• If the By Pass mode hasn’t been activated (default setting) the unit will always interpret the
5/BYPASS input as a Line input and will behave as an integrated amplifier with it.
•
If the By Pass mode has been activated the unit will use the 5/BYPASS input in By Pass mode
and will ask you to confirm that you are going to use that input in bypass mode. The
confirmation will be asked every time you select the 5/BYPASS input. After you have given your
confirmation the unit will behave like a Power amplifier so the volume controls will be disabled.
•
•
Se la modalità By-Pass non è stata attivata (condizione di default), l’apparecchio utilizzerà
l’ingresso “5/BYPASS“ sempre come un ingresso di linea e si comporterà da Amplificatore
Integrato.
Se la modalità By-Pass è stata attivata, l’apparecchio utilizzerà l’ingresso “5/BYPASS“ in modalità
By-Pass chiedendo conferma della abilitazione dello ingresso quando questo viene
selezionato. Avuta la conferma il Crescendo Integrated Amplifier si comporterà da
amplficatore finale.
Procedure to select the 5/BYPASS input and to confirm the By Pass mode use:
-
-
Use the front knob or the “IN+” and “IN-“ switches on the remote to select the 5/BYPASS input.
If the By Pass mode is not active the 5/BYPASS input will function like the other input lines.
If the By pass mode function is active, when you select the 5/BYPASS input , the relative input led
will start blinking waiting for your confirmation.
If you want to use the 5/BYPASS input in By Pass mode keep the “STANDBY AMP” switch pushed
on the remote for some seconds until the unit activates the the 5/BYPASS in By Pass mode, which
will be shown as described in the picture below (with the three central volume leds turned on).
If you don’t want to use the 5/BYPASS input in By Pass mode or you want switch to an other input
just push the front knob or push the “IN+” and “IN-“ switch on the remote.
Note: when you have set the By Pass mode you can use the 5/BYPASS input only in By Pass mode, if
you need to use it as Line Input you have to deactivate the By Pass mode.
Procedura di Selezione dell’ingresso ”5/BYPASS” e conferma della modalità BY Pass
-
-
Utilizzare la manopola “SELECT” posta sul pannello frontale oppure i tasti “IN+” e “IN-“ del
telecomando per selezionare l’ingresso 5/BYPASS .
Se la modalità By-Pass non è stata attivata, l’ingresso “5/BYPASS“ funzionerà come un normale
ingresso di linea.
Se la modalità By-Pass è stata attivata, commutando sull’ingresso “5/BYPASS“, il led dell’ingresso
“5/BYPASS“ inizierà a lampeggiare, in attesa di conferma della selezione dell’ingresso.
Per confermare la selezione dell’ingresso “5/BYPASS“ e il suo utilizzo in modalità By Pass mantenere
premuto il tasto “STANDBY AMP” del telecomando per qualche secondo finché l’amplificatore non
attiverà l’ingresso in modalità By-Pass indicandolo come descritto nella figura seguente (i tre led
centrali dei led del livello del volume vengono accesi).
Se non si vuole usare l’ingresso 5/BYPASS in By Pass mode o se si vuole selezionare un altro
ingresso premere la manopola posta sul pannello frontale oppure i tasti “IN+” e “IN-“ del
telecomando.
Nota: quando l’ingresso 5/BYPASS è configurato in By Pass mode lo si può utilizzare solo in modalità By
Pass, se si ha bisogno di utilizzarlo come ingresso Linea si deve disattivare la funzionalità BY Pass.
16
Volume scale selection
You can choose between 4 different volume scales (A,B,C,D), to match the Crescendo Integrated Amplifier volume scale to your
loudspeakers efficiency. The procedure to change the volume scale is as follows:
-
With the unit turned on and with the volume set to zero (no volume led turned on), keep the knob
placed on the front panel pushed for a few seconds until the volume leds and one of the input leds turn
on as shown in the picture below.
Selezione scala Volume
Si può scegliere tra Quattro differenti scale di volume (A,B,C,D) per avere la migliore corrispondenza tra la scala volume del
Crescendo Integrated Amplifier e la efficienza dei diffusori che si utilizzano. La procedura per scegliere la scala volume è la
seguente:
-
Con apparecchio acceso e volume a zero (tutti i led del volume spenti), mantenere premuta la
manopola sul frontale per alcuni secondi finché i leds del volume e uno dei led di selezione degli
ingressi non si accendono come indicato nella immagine seguente.
ABCD
-
Use the “VOLUME +” and “VOLUME –“ switches on the remote to select the desired volume scale (A,
B, C, D)
Push the “AMP SETUP” switch on the remote to activate the new volume scale and exit the procedure
or push the knob on the front to not modify the volume scale and return to normal functionn mode.
Utilizzare i tasti del telecomando “VOLUME +” e “VOLUME –“ per selezionare la scala volume
desiderata (A, B, C, D)
Premere il tasto “AMP SETUP” da telecomando per memorizzare la scala selezionata e uscire dalla
modalità Selezione Scala Volume e ritornare nella condizione di normale funzionamento
dell’apparecchio, oppure premere la manopola sul frontale per non modificare la selezione della scala
volume e ritornare nella condizione di normale funzionamento dell’apparecchio.
The graphics of the four available volume scales are shown below.
NOTE: the selected volume scale will be loaded every time the unit is turned on until a new scale is activated!
I grafici delle Quattro scale volume disponibili sono mostrati di seguito.
NOTA: la scala volume selezionata verrà ricaricata ad ogni accensione dell’apparecchio finchè non ne verrà settata una
diversa.
17
A
This scale has lower steps in
the normal listening volume
range.
Questa scala ha passi più
piccoli in corrispondenza del
normale volume di ascolto.
2
3
4
5
6
1
2
3
4
5
6
1
2
3
4
5
6
1
2
3
Volume Leds
7 8 9 10
11
12
13
14
15
11
12
13
14
15
11
12
13
14
15
14
71
15
76
0
10
Attenuation (-dB)
SCALA VOLUME
11
20
30
40
50
60
70
80
90
100
Volume Leds
7
8
9
10
0
B
This is the default scale
Questa è la scala di default
10
Attenuation (-dB)
SCALA VOLUME
20
30
40
50
60
70
80
90
100
Volume Leds
C
This scale with its low
beginning steps is well suited
to high efficiency
loudspeakers.
Questa scala con bassi passi
iniziali si adatta molto bene ai
diffusori ad alta efficienza.
7
8
9
10
0
10
Attenuation (-dB)
SCALA VOLUME
20
30
40
50
60
70
80
90
100
Volume Leds
0
D
The scale is organized with
79 steps of 1dB each.
La scala è organizzata in 79
passi da 1dB ciascuno
10
Attenuation (-dB)
SCALA VOLUME
20
30
40
50
60
70
80
90
100
4
5 26 6 31 7 36 8 41 9 46 10511156 1261 13
66
18
Tecnichal information
To have detailed technical information please visit the website: www.audioanalogue.com where you can also register for the
newsletter service to be continually informed about all of Audio Analogue’s new products, news and all technical stuff published on
the website.
Informazioni tecniche
Per ricevere informazioni tecniche dettagliate visitate il sito www.audioanalogue.com dove potrete iscrivervi al servizio newsletter
mediante il quale essere sempre aggiornati riguardo ai nuovi prodotti Audio Analogue, inoltre vi verranno segnalate tutte le
documentazioni tecniche pubblicate sul sito.
Technical Data
Parameter
Channels:
Line gain:
Power Amp gain:
Line Input Impedance:
Power on 8Ohm load:
Power on 4Ohm load:
Frequency Responce
Noise level:
Signal/noise ratio:
Power requirements:
Power consumption:
Measurement conditions
Attenuation 0dB, -3dB band
Band limits 0Hz-40kHz
Attenuation: 0dB A weighted referred to 8
Ohm load nominal power
-
Value
2
6dB
27dB
40KOhm
50W @ 0.05% THD + N
80W @ 0.05% THD + N
150KHz
<-100dBV
>100 dB
100V or 120V or 200V or 220V or 230V 50-60Hz
350VA
Specifiche Tecniche
Parametro
Numero di canali:
Guadagno stadio linea
Guadagno stadio Finale
Impedenza di ingresso di Linea
Potenza su carico da 8Ohm
Potenza su carico da 4Ohm
Risposta in frequenza
Livello di rumore
Rapporto Segnale Rumore (SNR)
Alimentazione:
Assorbimento:
Condizioni di misura
Attenuazione 0dB, Banda a -3dB
Limiti di Banda 0Hz-40kHz
Attenuation: 0dB A weighted referred to 8
Ohm load nominal power
-
Valore
2
6dB
27dB
40KOhm
50W @ 0.05% THD + N
80W @ 0.05% THD + N
150KHz
<-100 dBV
>100dB
100V or 120V or 200V or 220V or 230V 50-60Hz
350VA
19
TROUBLESHOOTING
Symptom
Cause
Power cord incorrectly plugged in
No led on
No sound
Burned-out fuses
Low volume
Faulty or incorrectly plugged signal
connectors between integrated amp. and
the sources
Only one input led is on
No sound
Check cords and their connection
Off or incorrectly selected source
Check if the source is on and active
and if it is correctly selected using the
in selector
Faulty or incorrectly plugged power cords
between the integrated amplifier and the
speakers
Check cords and their connection
Selected in leds are on, volume control
works but the leds are off, or selected in
leds are off and volume leds are on
Faulty or incorrectly plugged front panel
Recording is impossible
Incorrectly selected source
Remote controller doesn’t work
No battery/ worn-out battery
Selected in leds are on, volume control
works but the leds are off, or selected in
leds are off and volume leds are on
Remedy
Make sure the power cord is correctly
plugged into the wall outlet
Check fuses in the fuse panel above
the IEC inlet (after unplugging the
power cord from the wall outlet)and
replace them with new ones of the
same type
Turn volume knob right
You’re standing too far or on an exceeding
angle from the front panel
Contact your Audio Analogue retailer
for connections check and front panel
substitution
Select the right source using the
recording selector and increase the
volume above 0 level
Place/replace battery (2 ‘AAA’
batteries)
Get closer to the unit or reduce angle
Contact your Audio Analogue retailer
for connections check and front panel
substitution
If the suggested remedies do not work or the problem is not shown in the list above, please contact your local Audio
Analogue retailer.
Faulty or incorrectly plugged front panel
20
RICERCA GUASTI
Sintomo
Causa
Cavo di alimentazione non inserito
correttamente
Nessun led acceso
Nessun suono
Fusibili bruciati
Volume regolato al minimo
Cavi di segnale tra sorgente e
amp.integrato non connessi correttamente
oppure difettosi
Led di un ingresso acceso
Nessun suono
Led dell’ingresso selezionato acceso, il
controllo del volume funziona ma led
indicatori spenti, oppure led degli ingressi
spenti e indicatori di volume accesi
Rimedio
Controllare che il cavo di alimentazione
di rete sia ben inserito nell’amplificatore
e nella presa di rete
Controllare i fusibili nel portafusibili
(dopo aver staccato il cavo di
alimentazione dalla presa di rete) sopra
la presa IEC ed eventualmente
sostituire con altri dello stesso tipo
Alzare il volume
Controllare lo stato dei cavi e/o la
corretta connessione
Sorgente spenta o non selezionata
correttamente
Controllare che la sorgente sia accesa
e attiva, e che sia selezionata
correttamente con il selettore degli
ingressi
Cavi di potenza tra amp.integrato e
diffusori non connessi correttamente
oppure difettosi
Controllare lo stato dei cavi e/o la
corretta connessione
Contattare il vostro rivenditore Audio
Analogue per una verifica dei
collegamenti ed eventuale sostituzione
della scheda
Selezionare la sorgente giusta con il
La registrazione è impossibile
Sorgente non correttamente selezionata selettore degli ingressi e alzare sopra lo
zero il livello del volume.
Inserire o sostituire le batterie (2
Batterie scariche o mancanti
ministilo tipo ‘AAA’)
Il telecomando non funziona
Eccessiva distanza dal pannello frontale
Avvicinarsi di più all’apparecchio o
dell’apparecchio o angolo non corretto
cambiare angolo
Se i rimedi suggeriti non dovessero funzionare oppure il problema non è riportato nella lista, contattate il vostro
rivenditore Audio Analogue
Scheda frontale non collegata
correttamente oppure difettosa
21
A. INFORMATION ON DISPOSAL FOR USERS (PRIVATE HOUSEHOLDS)
1 In The European Union
Attention: If you want to dispose of this equipment, please do not use the ordinary dust bin.
Used electrical and electronic equipment must be treated separately and in accordance with legislation that requires
proper treatment, recovery and recycling of used electrical and electronic equipment.
Following the implementation by member states, private households within the EU states may return their used electrical
and electronic equipment to designated collection facilities free of charge*. In some countries* your local retailer may
also take back your old product free of charge if your purchase a similar new one.
*) Please contact your authority for further details.
If your used electrical or electronic equipment has batteries or accumulator, please dispose of these separately before
and according to local requirements.
By disposing of this product correctly you will help ensure that the waste undergoes the necessary treatment, recovery
and recycling and thus prevent potential negative effects on the environment and human health which could otherwise
arise due to inappropriate waste handling.
2. In other countries outside the EU
If you wish to discard this product, please contact your local authorities and ask for the correct method of disposal.
For Switzerland: Used electrical or electronic equipment can be returned free of charge to the dealer, even if you don’t
purchase a new product. Further collection facilities are listed on the home page of www.swisco.ch or www. Sens.ch
Attention: Your product is marked with this symbol. It
means that used electrical and electronic products
should not be mixed with general household waste.
There is a collection system for these products.
Attenzione: il dispositivo è contrassegnato da questo
simbolo, che segnala di non smaltire le
apparecchiature elettriche ed elettroniche insieme ai
normali rifiuti domestici. Per tali prodotti è previsto un
sistema di raccolta a parte.
B. Information on Disposal for Business Users
1.
In the European Union
If this product is used for business purposes and you want to discard it:
Please contact your Audio Analogue dealer who will inform you about the take-back and recycling. Small products (and
small amounts) might be taken back by your local collection facilities.
For Spain: Please contact the established collection system or your local authority foer take-back (I don’t undertand what
this means!!)of your used products.
2.
In other Countries outside the EU
If you wish to discard this product, please contact your local authorities and ask for the current method of disposal.
A. INFORMAZIONI SULLO SMALTIMENTO PER GLI UTENTI (PRIVATI)
1 Nell’Unione europea
Attenzione: Per smaltire il presente dispositivo, non utilizzare il normale bidone della spazzatura!
Le apparecchiature elettriche ed elettroniche usate devono essere gestite a parte in conformità alla legislazione che
richiede il trattamento, il recupero e il riciclaggio adeguato dei suddetti prodotti.
In seguito alle disposizioni attuate dagli Stati membri, i privati residenti nella UE possono conferire gratuitamente le
apparecchiature elettriche ed elettroniche usate a centri di raccolta designati*.
In alcuni paesi*, anche il rivenditore locale può ritirare gratuitamente il vecchio prodotto se l’utente acquista un altro
nuovo di tipologia simile.
*) Per maggiori informazioni di prega di contattare l’autorità locale competente.
Se le apparecchiature elettriche o elettroniche usate hanno batterie o accumulatori, l’utente dovrà smaltirli a parte
preventivamente in conformità alle disposizioni locali.
Lo smaltimento corretto del presente prodotto contribuirà a garantire che i rifiuti siano sottoposti al trattamento, al
recupero e al riciclaggio necessari prevenendone il potenziale impatto negativo sull’ambiente e sulla salute umana, che
potrebbe derivare da un’inadeguata gestione dei rifiuti.
2 In paesi che non fanno parte dell’UE
Se si desidera eliminare il presente prodotto,contattare le autorità locali e informarsi sul metodo di smaltimento corretto.
Per la Svizzera: Le apparecchiature elettriche o elettroniche possono essere restituite gratuitamente al rivenditore, anche
se non si acquista un prodotto nuovo. Altri centri di raccolta sono elencati sulla homepage www.swiso.ch o di
www.sens.ch.
B. INFORMAZION SULLO SMALTIMENTO PER GLI UTENTI COMMERCIALI
1. Nell’Unione Europea
Se il prodotto è impiegato a scopi commerciali. Procedere come segue per eliminarlo.
Contattare il proprio rivenditore Audio Analogue che fornirà informazioni circa il ritiro del prodotto. Potrebbero essere
addebitate le spese di ritiro e riciclaggio. Prodotti piccoli e quantitativi ridotti potranno essere ritirati anche dai centri di
raccolta locali.
Per la Spagna: Contattare il sistema di raccolta ufficiale o l’ente locale preposto al ritiro dei prodotti usati
2. In paesi che non fanno parte dell’UE
Se si desidera eliminare il presente prodotto, contattare le autorità locali e informarsi sul metodo di smaltimento corretto.
22
23
24
Audio Analogue
Distributed by:
AF GROUP srl
www.audioanalogue.com
[email protected]