1
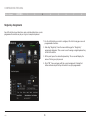
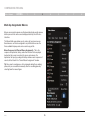
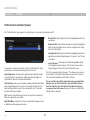
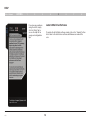
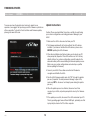
n52te™
User Manual
P75561
F8GFPC200
Table of Contents
Table of Contents
sections
1
2
Introduction . . . . . . . . . . . . . . . . . . . . . . . . . . . . . . . . . . . . . . . . . . . 1
Features
1
System Requirements
1
Package Contents
1
Getting Started . . . . . . . . . . . . . . . . . . . . . . . . . . . . . . . . . . . . . . . . . 2
Driver Installation
2
Installation Verification
2
Configuring the n52te . . . . . . . . . . . . . . . . . . . . . . . . . . . . . . . . . . . 3
The n52te Editor
3
n52te Editor Interface
4
Profiles
4
Single-Key Assignments
5
Multi-Key Assignments: Macros
6
Creating and Assigning a Macro
9
Using the n52te . . . . . . . . . . . . . . . . . . . . . . . . . . . . . . . . . . . . . . . 10
Keymaps
10
Profile Management
10
Profile Selection and Razer Synapse
11
Importing and Exporting Profiles
12
Using the n52te as a Default HID Device
12
Help . . . . . . . . . . . . . . . . . . . . . . . . . . . . . . . . . . . . . . . . . . . . . . . . . 13
Latest n52te Driver Software
13
Ergonomic Adjustments . . . . . . . . . . . . . . . . . . . . . . . . . . . . . . . . 14
D-Pad Thumb-Stick
14
Palm Rest
14
n52te
3
4
5
6
7
8
Firmware Updates . . . . . . . . . . . . . . . . . . . . . . . . . . . . . . . . . . . . . 15
Update Instructions
15
Information . . . . . . . . . . . . . . . . . . . . . . . . . . . . . . . . . . . . . . . . . . . 16
Introduction
Table of Contents
sections
1
2
3
4
5
6
7
8
Thank you for purchasing the Belkin n52 Tournament Edition (n52te) SpeedPad, the only purpose-built hybrid gaming tool you need
to dominate any game. Whether your passion is rooted in FPS, MMORPG, or RTS, the n52te will give you the winning edge!
The n52te is designed to work out of the box as a standard Human Interface Device (HID) keyboard. Please install and use the n52te
Editor and driver package for advanced programmability and portability.
Features
•
15 programmable rapid-response buttons
•
Programmable 8-way direction-pad (d-pad) with removable joystick
•
Programmable 3-way scroll wheel
•
Adjustable soft-touch handrest
•
Button and scroll-wheel backlighting
•
Razer Synapse™ onboard memory
System Requirements
•
Windows® XP/XP 64-bit or Windows Vista®/Vista 64-bit
•
CD or DVD drive
•
Mac OS® X v10.2.8 or higher
•
35MB free hard-disk space
•
A free USB port
•
DirectX® Compatible Video Card
Package Contents
•
Belkin n52te
•
Quick Start Guide
•
n52te Editor Programming Software, Powered by Razer
n52te
1
GETTING STARTED
Table of Contents
sections
1
2
3
4
5
6
7
8
Driver Installation
Installation Verification
1. Insert the n52te Installation CD into your PC’s CD/DVD drive.
1. T
o check if installation was successful, right-click on “My Computer”
and left-click on “Properties”. Then left-click on “Hardware” and then
on the “Device Manager” button.
2. D
river installation will begin shortly. If it does not, click the
“Start” button and choose “Run”. Click “Browse” and choose
your CD drive. Select “setup.exe” and click “OK”.
2. Check to make sure that the Device Manager list includes:
3. F
ollow the on-screen instructions to continue with the driver
installation.
4. A
fter the installation is complete, click “Finish” and reboot
when prompted.
5. A
fter your PC boots up, connect the n52te to an available USB
port on your computer.
6. P
lease allow Windows to detect and fully initialize the n52te.
Do not disconnect or reboot/shut down your system during
this process.
7. O
nce driver initialization has finished, please reboot your
system when prompted to do so by the installer.
n52te
2
a. A new entry under Human Interface Devices, “n52te”.
b. A new entry under Human Interface Devices, “Virtual HID Device”.
CONFIGURING THE n52te
Table of Contents
sections
1
2
3
4
5
6
7
8
The n52te Editor
The n52te Editor is the main programming and management tool for your
n52te. The n52te Editor allows you to customize the n52te to provide you
with the best gaming experience possible. Examples of programmable
functions are:
Mouse – Program n52te to emulate mouse clicks or scroll-wheel
functions.
Single Key – Assign a single keyboard key to an n52te button.
Tip: You need to reduce the polling rate if your computer does not
support USB 2.0.
Polling Rate – Sets the polling rate to: 125Hz, 500Hz, or 1000Hz.
Macros – Record a sequence of keyboard keystrokes, and/or mousebutton presses that can be saved and played back by the n52te at a
later time.
Razer Synapse – Store one of your profiles in the onboard memory
to take it with you. The custom profile stored in the Synapse onboard
memory will be available on any PC or Mac computer, even without the
n52te driver or Editor application installed!
Keymap Selector – Switch between the three color Keymaps (Blue,
Green, Red) and effectively triple the number of functions you can
program in a single profile. The default Keymap is Blue.
n52te
Tip: You will still need the driver and Editor software installed on the
host system if you want to make any changes to the stored profile.
3
CONFIGURING THE n52te
Table of Contents
sections
1
2
3
4
5
6
7
8
n52te Editor Interface
This is the user interface for the n52te Editor application.
The main screen consists of:
View of the Device – Displays which keys you are programming.
Macro Editor – Allows you to define and edit sequences of keyboard
keystrokes, and/or mouse-button presses to generate your own custom
macros.
Profile Selection – Allows you to select and load pre-saved
customizations to your n52te. For more profile management information,
please see the “Profile Management” section of this manual.
Help – Displays the Help guide for the n52te Editor.
Profiles
Profiles are customized button mappings and programmable functions
for a specific application that can be saved and loaded to the n52te.
This section will walk you through typical profile-creation steps using the
n52te Editor. In general, creating a profile consists of mapping button
functions, recording and assigning macros, configuring Auto-Switching
options, and saving those customizations as a profile.
n52te
4
CONFIGURING THE n52te
Table of Contents
sections
1
2
3
4
5
6
7
8
Single-Key Assignments
Any n52te button, d-pad directions, and scroll-wheel directions can be
programmed to emulate any key on a typical computer keyboard.
1. F
or the n52te button you wish to configure, left-click to bring up a menu of
programmable functions.
2. S
electing “Single Key” from the menu will bring up the “Single Key”
assignment dialog box. This screen is used to assign a single keyboard key
to that n52te button.
3. A
t this point, press the desired keyboard key. The screen will display the
name of the key you just pressed.
4. C
lick “OK” if you are happy with the current assignment. Pushing that
button will now output the key with which it was just programmed.
n52te
5
CONFIGURING THE n52te
Table of Contents
sections
1
2
3
4
Multi-Key Assignments: Macros
Macros are recorded sequences of keyboard keystrokes and/or mousebutton presses that can be saved and played back by the n52te at a
later time.
The Macro Editor pane allows you to create, edit, and save macros.
Saved macros can then be assigned to any n52te button across the
three available Keymaps and can be used in any profile.
Macro Sequence List (Current Macro Assignment) – This is the
sequence of keystrokes, delays, and other functions that are played
back when the macro is executed. As you record a macro, the
keystrokes that you type, along with delays between each sequence of
events, will be listed in the “Current Macro Assignment” window.
Tip: You cannot record mouse-click commands during the recording
phase, but you can add them manually after the recording phase by
selecting from the mouse figure.
n52te
6
5
6
7
8
CONFIGURING THE n52te
Table of Contents
sections
1
2
3
4
Record – Begins macro recording.
Stop – Stops macro recording.
Move Up – Move a macro event UP in the sequence list. Select the desired
event with your mouse and left-click on “Move Up” until it is in the desired
position.
Move Down – Move a macro event DOWN in the sequence list. Select the
desired event with your mouse and left-click on “Move Down” until it is in the
desired position.
Select All – Selects all events in the “Current Macro Assignment” sequence list.
Select All Delays – Selects all time delays in the sequence list.
Insert Delay – Allows you to manually insert a time delay in the sequence
list. Simply select the macro event you want the delay to follow, choose the
desired duration from the drop-down menu, and click the “Insert Delay”
button.
Ignore Delays Between Events – Toggles whether or not time delays
between each macro event should be played back when the macro is
executed. This feature is off by default.
Mouse Button – Allows you add mouse-button emulation into a macro by
choosing the desired button from the mouse figure.
n52te
7
5
6
7
8
CONFIGURING THE n52te
Table of Contents
sections
1
2
3
4
5
6
7
8
Macro Behavior
The n52te can provide even deeper customization by allowing you to
determine how you want your macros to be played back when triggered.
1. R
un Times: X – This setting determines how many times the macro
will be executed when triggered. The default is 1, meaning that the
macro will play back one time when triggered.
2. R
epeat while pressed. – This setting will force the macro to repeat
continuously while the assigned button is held down.
3. R
epeat until next key is pressed. – This setting will force the macro
to repeat continuously until the next n52te button is pressed.
Advanced – This is a list of advanced macro functions that can be
inserted into the macro sequence list.
Advanced functions that can be inserted into the “Current Macro
Assignment” sequence list from this window include:
1. B
asic Commands – Allows you to insert operations from a list of basic
commands supported in Windows OS.
2. A
dditional Commands – Allows you to insert operations from a list of
additional commands supported in Windows OS.
3. M
edia Functions – Allows you to insert operations for the default
media player using a list of media commands.
4. M
acro – Allows you to insert existing macros into the current one, thus
creating a complex nested macro.
n52te
8
CONFIGURING THE n52te
Table of Contents
sections
1
2
3
4
5
6
7
8
Creating and Assigning a Macro
6. O
ptionally, you can click on the “Advanced” button to display a list of
Advanced Options, which you can insert into the macro.
1. Open the “Macro Editor” pane by left-clicking on the arrow on the tab.
2. Left-click on the “Record” button to start recording keyboard events.
7. If you are done editing your macro, return to the main n52te Editor
screen.
3. U
sing the keyboard, type in the key-press combination of the macro
you want to create. This will normally be linking spells to create a
new combo, or phrases such as “cover me” you would send to your
teammate. Notice that the keys you press and release are recorded in
the “Current Macro Assignment” sequence list.
8. Left-click on a desired button to open its context menu.
9. Y
ou will see your new macro listed in the menu; left-click on it to
assign it.
4. Left-click on the “Stop” button to stop macro recording.
5. Click “Save” to save your newly created macro.
n52te
9
USING THE n52te
Table of Contents
sections
1
2
3
4
5
6
7
8
Keymaps
Profile Management
The n52te Editor allows you to program three Keymaps: Blue, Red,
and Green. A Keymap allows you to add another layer of programming
to each button. In order to switch between Keymaps during play, you
must either dedicate a button for switching to the desired Keymap, or
dedicate one to cycle through all three Keymaps. Because the second
option of cycling through Keymaps requires only one button, two extra
buttons are free for further customization.
Using the n52te with multiple applications has never been easier. You
can manage profiles by using the following buttons on the main Editor
Window.
Note: Buttons that are selected for one of these Keymap switching
options will be dedicated to this function across all three Keymaps in the
current profile.
Save As – Saves all changes to the current profile under a user-defined
filename.
•
•
Save – Saves all changes to the current profile.
Import – Allows you to import a shared or downloaded profile into the
n52te Editor and default profile folder.
To program a Keymap-switching function to a button,
left-click on the desired button and select Blue, Red, or
Green, or “Cycle Keymaps”. For Blue, Red, and Green,
you can select either “Momentary” or “Toggle”.
Apply Changes – Activates recent changes made with the n52te Editor.
This is different than saving in that the changes are made usable,
but your profile is not overwritten. This is useful for testing out new
programmable functions or macros without permanently changing
existing profiles.
If you select “Momentary”, the n52te will only load the desired
Keymap while you hold that button down. If you select
“Toggle”, the button acts like a switch and n52te will remain
in the desired Keymap until another Keymap is selected.
•
You can view and edit different Keymaps by clicking
on Blue, Red, or Green labels above the device-view
graphic located at the main n52te Editor screen.
•
Please make sure to save your work.
n52te
New – Creates a new profile with default name “Untitled Profile 0x”.
Thereafter, you can specify a name for the profile.
Reset Keymap – Resets all key assignments in the current Keymap
to their default settings. Note that they are not active until saving or
pressing the “Apply Changes” button.
10
USING THE n52te
Table of Contents
sections
1
2
3
4
5
6
7
8
Profile Selection and Razer Synapse™
The “Profile Selection” pane displays the entire library of custom profiles located on your PC.
Delete Profile: Selecting this will delete the highlighted profile from
your system.
Rename Profile: Selecting this will allow you to give the highlighted
profile a new name (make sure to save any changes before closing
out of the n52te Editor).
Link Application: Selecting this will link the highlighted profile to an
application executable. Simply browse to the desired “.exe” file and
click “Open”.
Load to Synapse™: Selecting this will load the highlighted profile
to the Synapse onboard memory. This functions the same as the
“Apply Changes” button on the main n52te Editor screen.
To change the currently active profile, click the “Profile Selection” tab to
open the pane and choose the desired profile from the list.
The n52te is powered by Razer Synapse ™. This allows you to save one
of your profiles to the n52te’s onboard memory and use it on another
PC, even without installing the n52te Editor software.
Linked Application – Displays which application executable the profile
is currently linked to. Launching the linked application will trigger the
n52te Editor to switch to that profile automatically.
To load a profile to the n52te’s onboard memory powered by Razer
Synapse, open the “Profile Selection” pane and double-click on
the desired profile. The profile will be loaded when the Synapse
icon appears next to the name. Now you can take your custom n52te
settings with you anywhere.
Auto-Switching – Allows you to enable or disable profile Auto-Switching
when the linked application is launched. To enable or disable, click the
Auto-Switching check box next to the desired profile. An “x” indicates
that Auto-Switching is enabled.
Tip: In order for Auto-Switching to function, the profile must already be
linked to an application executable.
Right-Click Menu – Right-click on the desired profile to bring up a menu
of additional profile management options.
n52te
11
USING THE n52te
Table of Contents
sections
1
2
3
4
5
6
7
8
Importing and Exporting Profiles
Using the n52te as a Default HID Device
With the n52te Editor, it is easy to import custom user-made profiles
and upload yours to share with others.
If you choose not to install the software or create custom profiles, then
by default your n52te will use the following functions:
To import a newly acquired profile, simply drag and drop the file
into the “Profile Selection” pane to add the profile to your library for
immediate use.
1. Tab
8. S
15. SPACE BAR
2. Q
9. D
16. ALT
3. W
10. F
4. E
11. SHIFT
D-pad. Keyboard
arrow keys.
5. R
12. Z
6. CAPS
13. X
7. A
14. C
To export your custom profile(s), drag the desired profile from the
“Profile Selection” pane to any location on your system.
Scroll Wheel.
Standard 3-way
scroll wheel.
This default configuration works well with the default keyboard setup of
most first-person shooter games.
n52te
12
HELP
Table of Contents
sections
1
2
3
4
6
7
8
Latest n52te Driver Software
If you have any problems
using the n52te, simply
click the “Help” tab to
access the help file for
usage and configuration
tips.
n52te
5
To update the n52te Editor software, simply click on the “Update” button
to be taken to the latest driver software and firmware on www.n52te.
com.
13
ERgonomic adjustments
Table of Contents
sections
1
2
3
4
5
6
7
8
D-Pad Thumb-Stick
Palm Rest
The n52te comes equipped with a removable thumb-stick for enhanced
movement control when using the 8-way D-pad. Simply pull the thumbstick up away from the D-pad to remove it if preferred.
The n52te is designed to adapt to hands of different sizes. There are
three different hand-size adjustments that can be made to the palm rest
in order to help you easily reach all of the n52te’s buttons and keys.
1. F
or average-sized hands, no adjustment is necessary. The n52te’s
palm rest comes configured for the average-sized hand.
2. F
or larger hands, you can easily increase the distance between the
palm rest and the main keys. Simply pull the palm rest straight up
away from the n52te’s main chassis until it pops free. On the chassis
you will see two sets of holes. Reinsert the palm rest into the holes
farthest from the main keys and snap it down firmly.
For smaller hands, you can simply remove the palm rest completely for
easier access to the n52te’s array of buttons and keys.
n52te
14
FIRMware updates
Table of Contents
sections
1
2
3
4
5
6
7
8
Update Instructions
To ensure you have the absolute best and most complete user
experience, we suggest that you keep your n52te firmware up to date as
often as possible. To check for the latest driver and firmware updates,
please go to www.n52te.com.
Caution: Please read and follow these steps carefully to avoid losing
your custom configurations and risking permanent damage to your
n52te!
1. Make sure the n52te is disconnected from your PC.
2. T
he firmware updater will not function without the n52te drivers
installed. If you have not installed the n52te drivers, please do so
BEFORE updating the n52te firmware.
3. A
fter driver installation has finished, make sure to reboot your PC
when prompted. (Important: Your n52te will be reset to its factory
default settings. Any custom configuration currently loaded in the
onboard memory will be erased during the firmware update process.
Make sure your custom configurations are backed up as profiles
before updating the firmware.)
4. C
onnect your n52te. Please allow some time for Windows to
recognize and initialize the n52te.
5. R
un the n52te firmware updater and click “OK” to begin the update
process. (Important: To avoid permanent damage to your n52te,
make sure NOT to disconnect or interrupt power during the update
process.)
6. W
hen the update process has finished, disconnect and then
reconnect your n52te, only when prompted to do so by the firmware
updater.
7. If the update process fails, disconnect the n52te and reboot your PC.
Then try updating again from a different USB port, preferably one that
is physically located on the PC or Mac computer.
n52te
15
INFORMATION
Table of Contents
sections
1
2
3
4
5
6
7
8
What the period of coverage is.
FCC Statement
DECLARATION OF CONFORMITY WITH FCC RULES FOR
ELECTROMAGNETIC COMPATIBILITY
Belkin warrants the Belkin product for the lifetime of the product.
What will we do to correct problems?
We, Belkin International, Inc., of 501 West Walnut Street, Compton, CA
90220, declare under our sole responsibility that the product:
Product Warranty.
F8GFPC200
Complies with Part 15 of the FCC Rules. Operation is subject to
the following two conditions: (1) this device may not cause harmful
interference, and (2) this device must accept any interference received,
including interference that may cause undesired operation. This
equipment may only be operated indoors. Operation outdoors is in
violation of 47 U.S.C. 301 and could subject the operator to serious legal
penalties.
Belkin will repair or replace, at its option, any defective product free of
charge (except for shipping charges for the product). Belkin reserves the
right to discontinue any of its products without notice, and disclaims any
limited warranty to repair or replace any such discontinued products.
In the event that Belkin is unable to repair or replace the product (for
example, because it has been discontinued), Belkin will offer either a
refund or a credit toward the purchase of another product from Belkin.
com in an amount equal to the purchase price of the product as
evidenced on the original purchase receipt as discounted by its natural
use.
CE Declaration of Conformity
What is not covered by this warranty?
We, Belkin International, Inc., declare under our sole responsibility that
the F8GFPC200, to which this declaration relates, is in conformity with
Generic Emissions Standard EN55022:1998 Class B, EN50081-1, and
with Generic Immunity Standard EN50082-1:1992.
All above warranties are null and void if the Belkin product is not
provided to Belkin for inspection upon Belkin’s request at the sole
expense of the purchaser, or if Belkin determines that the Belkin product
has been improperly installed, altered in any way, or tampered with.
The Belkin Product Warranty does not protect against acts of God such
as flood, lightning, earthquake, war, vandalism, theft, normal-use wear
and tear, erosion, depletion, obsolescence, abuse, damage due to low
voltage disturbances (i.e. brownouts or sags), non-authorized program,
or system equipment modification or alteration.
to which this declaration relates:
Belkin International, Inc., Limited Lifetime Product Warranty
What this warranty covers.
Belkin International, Inc. (“Belkin”) warrants to the original purchaser of
this Belkin product that the product shall be free of defects in design,
assembly, material, or workmanship.
n52te
16
INFORMATION
Table of Contents
sections
1
2
3
4
5
6
7
8
How to get service.
How state law relates to the warranty.
To get service for your Belkin product you must take the following steps:
THIS WARRANTY CONTAINS THE SOLE WARRANTY OF BELKIN.
THERE ARE NO OTHER WARRANTIES, EXPRESSED OR, EXCEPT AS
REQUIRED BY LAW, IMPLIED, INCLUDING THE IMPLIED WARRANTY
OR CONDITION OF QUALITY, MERCHANTABILITY OR FITNESS FOR A
PARTICULAR PURPOSE, AND SUCH IMPLIED WARRANTIES, IF ANY,
ARE LIMITED IN DURATION TO THE TERM OF THIS WARRANTY.
1. C
ontact Belkin International, Inc., at 501 W. Walnut St., Compton CA
90220, Attn: Customer Service, or call (800)-223-5546, within 15 days
of the Occurrence. Be prepared to provide the following information:
a. The part number of the Belkin product.
b. Where you purchased the product.
c. When you purchased the product.
d. Copy of original receipt.
Some states do not allow limitations on how long an implied warranty
lasts, so the above limitations may not apply to you.
IN NO EVENT SHALL BELKIN BE LIABLE FOR INCIDENTAL, SPECIAL,
DIRECT, INDIRECT, CONSEQUENTIAL OR MULTIPLE DAMAGES SUCH
AS, BUT NOT LIMITED TO, LOST BUSINESS OR PROFITS ARISING
OUT OF THE SALE OR USE OF ANY BELKIN PRODUCT, EVEN IF
ADVISED OF THE POSSIBILITY OF SUCH DAMAGES.
2. Y
our Belkin Customer Service Representative will then instruct you on
how to forward your receipt and Belkin product and how to proceed
with your claim.
This warranty gives you specific legal rights, and you may also have
other rights, which may vary from state to state. Some states do not
allow the exclusion or limitation of incidental, consequential, or other
damages, so the above limitations may not apply to you.
Belkin reserves the right to review the damaged Belkin product. All
costs of shipping the Belkin product to Belkin for inspection shall be
borne solely by the purchaser. If Belkin determines, in its sole discretion,
that it is impractical to ship the damaged equipment to Belkin, Belkin
may designate, in its sole discretion, an equipment repair facility to
inspect and estimate the cost to repair such equipment. The cost, if any,
of shipping the equipment to and from such repair facility and of such
estimate shall be borne solely by the purchaser. Damaged equipment
must remain available for inspection until the claim is finalized.
Whenever claims are settled, Belkin reserves the right to be subrogated
under any existing insurance policies the purchaser may have.
n52te
17
Belkin Tech Support
US: 800-223-5546, ext. 2263
310-898-1100, ext. 2263
UK: 0845 607 77 87
Australia: 1800 235 546
New Zealand: 0800 235 546
Singapore: 65 64857620
Europe: www.belkin.com/support
Belkin International, Inc.
501 West Walnut Street
Los Angeles, CA 90220, USA
310-898-1100
310-898-1111 fax
Belkin Ltd.
Express Business Park, Shipton Way
Rushden, NN10 6GL,
United Kingdom
+44 (0) 1933 35 2000
+44 (0) 1933 31 2000 fax
Belkin B.V.
Boeing Avenue 333
1119 PH Schiphol-Rijk,
The Netherlands
+31 (0) 20 654 7300
+31 (0) 20 654 7349 fax
Belkin Ltd.
4 Pioneer Avenue
Tuggerah Business Park
Tuggerah, NSW 2259, Australia
+61 (0) 2 4350 4600
+61 (0) 2 4350 4700 fax
© 2008 Belkin International, Inc. All rights reserved. All trade names are registered trademarks
of respective manufacturers listed. Windows and Windows Vista are either registered trademarks
or trademarks of Microsoft Corporation in the United States and/or other countries. Mac and
Mac OS are trademarks of Apple Inc., registered in the U.S. and other countries.