1
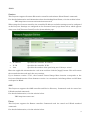
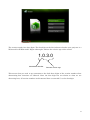
Projector Wired LAN
Version 1.03
Keep this manual in a safe place future reference.
•
PJLink trademark and logo are trademarks applied for registration or are already registered in
Japan, the United States of America and other countries and areas.
•
Crestron is a registered trademark of Crestron Electronics, Inc. of the United States.
•
AMX is a registered trademark of AMX LLC of the United States.
•
Extron is a registered trademark of Extron Electronics of the United States.
•
Other company and product names may be registered product names or trademarks of their
respective owners.
•
The contents of this manual are subject to change without notice.
•
This manual is published under strict quality control standards. Should you notice any errors or
other problems, please feel free to contact us about them.
•
Copying of this manual, either in part or its entirety is forbidden. You are allowed to use these
instructions for your own personal use. Any other use is forbidden without the permission of
CASIO COMPUTER CO., LTD.
•
CASIO COMPUTER CO., LTD. shall not be held liable for any lost profits or claims from third
parties arising out of the use of this product or this manual.
•
CASIO COMPUTER CO., LTD. shall not be held liable for any loss or lost profits due to loss of
data due to malfunction or maintenance of this product, or any other reason.
•
The sample screens shown in this manual are for illustrative purposes only, and may not be
exactly the same as the screens actually produced by the product.
•
Unless specifically stated otherwise, all illustrations in this manual show the XJ-H1650 projector.
The XJ-M145, XJ-M155, XJ-M245, XJ-M255, XJ-H1650, XJ-H1750, XJ-H2650, XJ-ST145, and
XJ-ST155 (hereinafter referred to collectively as "the Projector" or "this Projector") can be controlled
from an external device via its LAN port.
The operation of the wireless LAN control function differs depending on the Projector's firmware
version Differences are explained in detail as required in each section of this manual.
For information about how to check the firmware version of your projector, refer to "Checking the
Current Firmware Version".
Connection
Connect the LAN port of the Projector to the LAN hub to which the device to be linked to via a wired
LAN connection is connected.
In a configuration like the one in the illustration above, you should normally use straight type LAN
cables. If you are connecting the Projector's LAN port directly to the LAN port of an external device,
use a cross type LAN cable.
Supported Devices and Standards
Web Browser
This Projector supports control using a computer web browser.
For details, see "Controlling the Projector from a Computer" in the User's Guide on the CD that
comes with this Projector.
PJLink
This Projector supports the PJLInk Class1 standard formulated by the Japan Business Machine
and Information System Industries Association (JBMIA).
For detailed information about PJLink, visit the website below.
URL http://pjlink.jbmia.or.jp/english/
1
•
The following shows input switching instruction and input switching query parameters and
their corresponding input sources.
Parameter
11
Input
COMPUTER
Source
Terminal Setting
Computer
Remarks
Auto
On the XJ-H1650, XJ-H1750, XJ-H2650,
XJ-ST145, and XJ-ST155 the input source is
Computer 1.
12
Computer
RGB
''
13
Computer
Component
''
14
Computer2
Auto
XJ-H1650, XJ-H1750, XJ-H2650, XJ-ST145,
XJ-ST155 only
15
Computer2
RGB
''
16
Computer2
Component
''
21
Video
22
S-video
31
HDMI
41
USB
•
Image only mute is not supported by the AV mute instruction and AV mute state query.
•
The cover open error and filter error are not supported by the error state query.
•
A projector name query returns the projector name specified on the System Admin Page. For
details about the System Admin page, see "System Admin Page Operations and Settings" in
the "Wireless Function Guide" on the CD-ROM that comes with the projector.
•
A manufacturer name query returns CASIO.
CASIO
•
A device name query returns XJXJ-NP.
NP
•
The password used for the connection authentication process is the same as the System
Admin page password. The Projector can be configured to enable or disable authentication. To
do so, use [Wired LAN Settings]-[PJLink authentication] on the Projector's Setup Menu.
Enable : PJLink connection authentication enabled. (Default)
Disable
Disable : PJLink connection authentication disabled.
•
Up to firmware version *.0.3.1, when the digest generated by the password is appended to the
command and sent to the projector during the authentication process, all of the letters
included in the digest must be upper-case.
Example:
a6bb86c8a36e251485e539e7abb71b50%1POWR
↓
A6BB86C8A36E251485E539E7ABB71B50%1POWR
From firmware version *.0.3.2 onwards, the digest is accepted even if it contains lower-case
letters.
For information about the functions of other commands, see the PJLink specifications issued by
2
JBMIA.
Crestron
This Projector supports Crestron Electronics controller and software (RoomView®) commands.
For detailed information and information about downloading RoomView®, visit the website below.
URL http://www.crestron.com/roomviewconnected/
When using the Crestron controller, the controller IP address and other settings must be configured
on the Projector. Settings are configured on the Crestron Control page shown below, which appears
when your click [Crestron Control] on the System Admin page.
•
IP address
Specifies the controller IP address.
•
IP ID
Specifies the controller IP ID.
•
Port
Specifies the number of the port being used. (Always 41794)
Enter the applicable information for each item and then click the [Apply] button. This will restart
the network function and apply the new settings.
Up to firmware version *.0.3.7, the Crestron Control Image Mute function corresponds to the
Projector's Blank function. From firmware version *.0.3.8 onwards, both Image Mute and AV Mute
correspond to Blank.
AMX
This Projector supports the AMX controller and Device Discovery. Commands used for control are
PJLink standard commands.
For detailed information, visit the website below.
URL http://www.amx.com/
Extron
This Projector supports the Extron controller. Commands used for control are PJLink standard
commands.
For detailed information, visit the website below.
3
URL http://www.extron.com/
4
Caution
•
The Projector can be configured to enable or disable power via wired LAN on from the
standby state. To do so, use [Wired LAN Settings]-[Remote On] on the Projector's Setup
Menu.
Enable : Power on enabled.
Disable : Power on disabled. (Default)
Initializing network settings or performing a "Restore All Defaults" operation with the Setup
Menu will cause this setting to change to "Disable". If you are operating the Projector using a
wired LAN setting, be sure to change this setting back to "Enable" after initialization.
•
Up to firmware version *.0.3.2, when the IP address is set manually using the System Admin
screen, the default gateway setting is configured by the Projector, regardless of the input
value. When performing connection from an external network, allow acquisition of the IP
address and default gateway address under a DHCP environment.
From firmware version *.0.3.3 onwards, the default gateway setting is configured in
accordance with the input setting.
Checking the Current Firmware Version
Perform the following procedure to check a Projector's current firmware version.
1. Turn on the Projector and plug USB memory into the USB port. Memory contents do not matter.
2. Under initial Projector default settings, Viewer should start up automatically, unless plug and
play has been disabled on your Projector. If Viewer does not start up, press the INPUT key to
switch input to USB.
3. When the main Viewer window is projected, press the Projector's [▲] and [◄] cursor keys at the
same time.
4. This will cause the Projector's current firmware version number to appear in the lower left
corner of the screen.
5
The version number has four digits. The first digit on the left indicates whether your projector is a
XGA model or WXGA model. Digits 2 through 4 indicate the relative age of the version.
1.0.3.0
XGA/WXGA identifier
Firmware version age
This means that you need to pay attention to the final three digits of the version number when
determining how functions are affected. Since the first digit has no relation to what we are
discussing here, all version numbers in this manual have an asterisk (*) as the first digit.
6
NG120528E-D