1
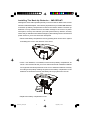
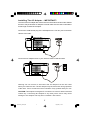
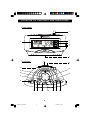
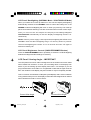
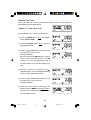
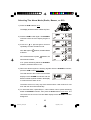
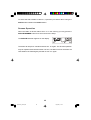
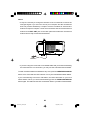
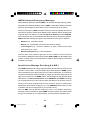
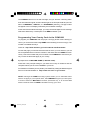
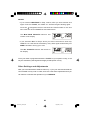
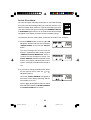
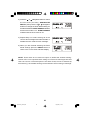
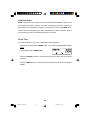
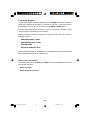
R
All-Alert System Clock Radio
With Dual Alarms, Digital Tuning
And Specific Area Message Encoding
OWNER’S MANUAL
CKW2000
Visit our web site at www.emersonradio.com
CKW2000_041207.p65
42
12/4/2007, 11:56
CAUT I ON
TO PREVENT FIRE OR SHOCK HAZARD, DO NOT USE THIS PLUG WITH AN
EXTENSION CORD, RECEPTACLE OR OTHER OUTLET UNLESS THE BLADES
CAN BE FULLY INSERTED TO PREVENT BLADE EXPOSURE. TO PREVENT FIRE
OR SHOCK HAZARD, DO NOT EXPOSE THIS APPLIANCE TO RAIN OR MOISTURE.
C AU T I O N
!
RISK OF ELECTRIC SHOCK
DO NOT OPEN
The lightning flash with arrowhead symbol, within an equilateral triangle is intended to
alert the user to the presence
of uninsulated ‘dangerous voltage’
within the product’s enclosure
that may be of sufficient
magnitude to constitute a risk
of electric shock to persons.
WARNING: TO REDUCE THE
RISK OF ELECTRIC SHOCK
DO NOT REMOVE COVER
(OR BACK), NO USER
SERVICEABLE PARTS INSIDE
REFER SERVICING TO
QUALIFIED SERVICE
PERSONNEL.
The exclamation point within
an equilateral triangle is intended to alert the user to
the presence of important
operating and maintenance
(ser vi ci ng) instr ucti ons in
the liter ature accompanying the appl iance.
The Caution Marking maybe located at the bottom enclosure of the apparatus.
IMPORTANT SAFETY INSTRUCTIONS
1.) Read these instructions. Keep these instructions. Follow all instructions. Heed all warnings.
2.) Do not use this apparatus near water.
3.) Clean only with dry cloth.
4.) Do not block any ventilation openings. Install in accordance with the manufacturer’s instructions.
5.) Do not install near any heat sources such as radiators, heat registers, stoves, or other apparatus
(including amplifiers) that produce heat.
6.) Do not defeat the safety purpose of the polarized or grounding-type plug. A polarized plug has two
blades with one wider than the other. A grounding type plug has two blades and a third grounding
prong. The wide blade or the third prong is provided for your safety. If the provided plug does not
fit into your outlet, consult an electrician for replacement of the obsolete outlet.
7.) Protect the power cord from being walked on or pinched particularly at plugs, convenience
receptacles, and the point where they exit from the apparatus.
8.) Only use attachments / accessories specified by the manufacturer.
9.) Unplug this apparatus during lightning storms or when unused for long periods of time.
10.) Refer all servicing to qualified service personnel. Servicing is required when the apparatus has
been damaged in any way, such as power-supply cord or plug is damaged, liquid has been spilled
or objects have fallen into the apparatus, the apparatus has been exposed to rain or moisture,
does not operate normally, or has been dropped.
11.) This appliance shall not be exposed to dripping or splashing water and no object filled with liquids
such as vases shall be placed on the apparatus.
12.) Use only with the cart, stand, tripod, bracket, or table specified by the
manufacturer, or sold with the apparatus. When a cart is used, use caution
when moving the cart/apparatus combination to avoid injury from tip-over.
13.) Do not overload wall outlet. Use only power source as indicated.
14.) Use replacement parts as specified by the manufacturer.
15.) The product may be mounted to a wall only if recommended by the manufacturer.
16.) Upon completion of any service or repairs to this product, ask the service technician to perform
safety checks.
1
CKW2000_041207.p65
1
12/4/2007, 11:56
Thank you for purchasing this All-Alert Clock Radio from
Emerson Research.
This model incorporates the All-Alert messaging system that will be used
by the National Oceanic and Atmospheric Administration of the U.S.
Government to alert the public about weather emergencies and a whole
range of other emergency situations that may occur in your area. In addition,
this model includes the Specific Area Message Encoding (SAME) system
that will prevent you from receiving messages that do not apply to your
specific geographic area.
The CKW2000 also includes a digital tuning AM/FM clock radio with dual
alarms to keep you on time and entertained as well as informed.
This is a high technology product with many more features than usually
found in a typical clock radio. It is absolutely essential that you read and
understand this instruction manual in order to operate this product correctly,
and to get the maximum benefit out of all the features we have included in
this model.
If after reading this manual you are still having problems with the set-up
and operation of this model, please do not return it to the retail store.
Please call the Emerson Research Customer Service Hot-Line, toll free,
at 800-898-9020, between the hours of 9:00 AM and 5:00 PM, Central
Time, Monday through Friday. One of our technicians will try to trouble
shoot and solve your problems by phone.
Once again, thank you for purchasing this All-Alert Clock Radio from
Emerson Research.
The serial number of your unit is located on a label on the bottom cabinet.
Please take a moment now to locate the number and to write the number
in the space provided on the warranty page of this manual. This number
provides information regarding the date of manufacture of your unit. You
may be asked to provide this number when calling for customer service.
2
CKW2000_041207.p65
2
12/4/2007, 11:56
I M P O R TAN T N O T E S
• Operate controls and switches as
• Avoid installing this unit in places
described in the manual.
exposed to direct sunlight or close to
heat radiating appliances such as
• Before turning on the power, make
electric heaters, on top of other stereo
certain that the AC power cord is
equipment that radiates too much
properly installed.
heat, places lacking ventilation or
• When moving the set, be sure to first
dusty areas, places subject to
disconnect the AC power cord.
constant vibration and/or humid or
moist areas.
FCC Information
This equipment has been tested and found to comply with the limits for a Class B
digital device, pursuant to Part 15 of the FCC Rules. These limits are designed to
provide reasonable protection against harmful interference in a residential
installation. This equipment generates, uses, and can radiate radio frequency energy
and, if not installed and used in accordance with the instructions, may cause harmful
interference to radio communications. However, there is no guarantee that
interference will not occur in a particular installation. If this equipment does cause
harmful interference to radio or television reception, which can be determined by
turning the equipment off and on, the user is encouraged to try to correct the
interference by one or more of the following measures:
• Reorient or relocate the receiving antenna.
• Increase the separation between the equipment and receiver.
• Connect the equipment into an outlet on a circuit different from that to which
the receiver is connected.
• Consult the dealer or an experienced radio/TV technician for help.
This device complies with Part 15 of the FCC Rules. Operation is subject to the
following two conditions:
(1) This device may not cause harmful interference, and
(2) This device must accept any interference received, including interference
that may cause undesired operation.
Changes or modifications not expressly approved by the party responsible for
compliance could void the user’s authority to operate the equipment.
3
CKW2000_041207.p65
3
12/4/2007, 11:56
P R E PAR AT I O N F O R U S E
Unpacking and Set Up
• The display carton contains the clock radio, the AC adapter, and the external
antenna wire. Please make sure that all of the components are removed from
the carton before disposal. We recommend that you retain the carton and
packing materials, if possible, in the event that your unit ever needs to be returned
for service. Using the original carton and packing materials is the only way to
properly protect your unit from damage in transit. If you do dispose of the carton
and packing materials, please do so properly. Emerson cares about our
environment.
• Place the clock radio on a stable, level surface such as a table, desk, shelf or
stand, convenient to an AC outlet, out of direct sunlight, and away from sources
of excess heat, dust, moisture, or strong magnetic fields.
Protect Your Furniture
This model is equipped with non-skid rubber ‘feet’ to prevent the product from
moving when you operate the controls. These ‘feet’are made from non-migrating
rubber material specially formulated to avoid leaving any marks or stains on your
furniture. However certain types of oil based furniture polishes, wood preservatives,
or cleaning sprays may cause the rubber ‘feet’ to soften, and leave marks or a
rubber residue on the furniture. To prevent any damage to your furniture we strongly
recommend that you purchase small self-adhesive felt pads, available at hardware
stores and home improvement centers everywhere, and apply these pads to the
bottom of the rubber 'feet' before you place the product on fine wooden furniture.
4
CKW2000_041207.p65
4
12/4/2007, 11:56
Installing The Back-Up Batteries – IMPORTANT!
Although this clock radio operates primarily on normal 120V AC 60Hz house current
with the included AC adapter, it is extremely important that you install 4 “AA”batteries
in the back up battery compartment located on the bottom cabinet. The back up
batteries not only maintain the time and alarm settings in the event of a power
interruption, but they also maintain your radio preset memory stations, and they
insure that you will still receive NOAA emergency alert warnings even if the electrical
power service to your home has been interrupted.
• Remove the battery compartment cover by pressing down on the ‘arrow’symbol
and sliding the cover in the direction of the arrow.
• Insert 4 “AA” batteries, not included, into the back up battery compartment, as
shown. We recommend that you use a well-known brand of Alkaline batteries
for longest life and best performance. Be sure to install the batteries correctly
according to the polarity markings engraved in the battery compartment. If the
batteries are inserted incorrectly the battery back up system will not work.
• Replace the battery compartment cover.
5
CKW2000_041207.p65
5
12/4/2007, 11:56
After installing the batteries the LCD panel will show the Time and Date display.
The LCD panel backlighting will remain on for 5 seconds and then shut off
automatically to preserve the battery life.
Remember that if the back up batteries are not installed, or are installed incorrectly,
the clock and alarm time memory, and all of the preset radio station memories, will
have to be reset after every power interruption.
Replacing The Back-Up Batteries
When the back-up batteries need to be replaced
a “Low Battery Warning” Indicator will begin to
flash in the LCD panel.
When you see this indicator you should replace all 4 batteries with 4 fresh batteries.
Do not mix old and new batteries, and do not mix different types of batteries such
as Heavy-Duty, Alkaline, and Lithium together.
If weak or exhausted batteries are left in the radio for an extended period of time
they may eventually leak and cause corrosion or other damage to your radio, and
such corrosion damage from leaking batteries is not covered by your warranty.
Battery Precautions
•
•
•
•
•
•
•
•
•
Replacement of batteries must be done by an adult.
Do not mix old and new batteries.
Do not mix alkaline, standard (carbon-zinc) or rechargeable (nickel-cadmium) batteries.
The supply terminals are not to be short-circuited.
Non-rechargeable batteries are not to be recharged.
Exhausted batteries are to be removed.
Only batteries of the equivalent type are to be used.
Batteries are to be inserted with the correct polarity.
Dispose of batteries properly. Do not dispose of batteries in fire. The batteries may explode
or leak.
6
CKW2000_041207.p65
6
12/4/2007, 11:56
Installing The AC Adapter – IMPORTANT!
The wire of the AC adapter also functions as the FM antenna of this model. Please
be sure to fully unwind the AC adapter cord and make sure the cord is extended to
its full length for best FM reception.
Connect the small female plug of the AC adapter to the “DC 6V” jack on the back
cabinet of the radio.
Connect the AC adapter block to your 120V AC 60Hz household outlet.
Warning: Do not connect or disconnect the AC adapter from the AC outlet
while your hands are wet. The AC adapter may become warm during operation
of the radio. This is normal and not an indication of any problem with your unit.
CAUTION: This adapter is designed for connection to 120V AC 60Hz household
outlets only. Connecting this adapter to any other power source may cause
damage to the adapter and may also constitute a fire hazard.
7
CKW2000_041207.p65
7
12/4/2007, 11:56
L O C AT I O N O F C O N T R O L S AN D I N D I C AT O R S
Front Panel
2
R
3
4
5
6
1
7
Top Panel
13
14
12
15
11
10
16
9
8
23
22
21
20
19 18
17
8
CKW2000_041207.p65
8
12/4/2007, 11:56
1.) Multi-Function LCD Display.
2.) Weather Band Telescopic Antenna.
3.) WARNING Indicator.
4.) WATCH Indicator.
5.) VOLUME Control.
6.) STATEMENT Indicator.
7.) Battery Compartment (Bottom Cabinet).
8.) ALM (Alarm) 1 Button.
9.) MENU Button.
10.)
LEFT Button.
11.)
TUNING UP Button.
12.) DC 6V 300mA Input Jack.
13.) Speaker.
14.) Ext. ANT. Jack.
15.)
RIGHT Button.
16.) SELECT Button.
17.)
POWER (On/Off) Button.
18.) WEATHER/HAZARD Button.
19.) SLEEP Button.
20.)
TUNING DOWN Button.
21.) SNOOZE / DIMMER Button.
22.) BAND Button.
23.) ALERT OFF/ALM 2 Button.
9
CKW2000_041207.p65
9
12/4/2007, 11:56
O P E R AT I N G I N S T R U C T I O N S
OPERATING INSTRUCTIONS FOR CLOCK AND RADIO
• Make sure that you have installed the back up batteries.
• Make sure that you have connected the AC adapter to the back of this
unit and to your AC outlet.
• Make sure that the cord of the AC adapter is fully unwound and
extended to its full length.
BASIC OPERATION / EXPLANATION OF CONTROLS
In order to minimize the number of controls on the top panel of this radio we have
designed this radio with a MENU button, a SELECT button and four NAVIGATION
buttons (
/
/
/
) similar to the navigation controls that you probably already
use on your cell phone, PDA, or home computer. Most of the adjustments and
changes in settings will be made with these three controls.
10
CKW2000_041207.p65
10
12/4/2007, 11:56
MENU Button
Press the MENU button to enter the Menu mode. Press again to exit the Menu
mode and return to the normal Time and Date display. After 30 seconds with no
user input the LCD will return to the normal Time and Date mode automatically.
NAVIGATION Buttons (
/
/
/
)
After pressing the MENU button once the display will show “SETUP TIME” which
is the first menu option.
Pressing the TUNING UP
or TUNING DOWN
buttons allows you to scroll
through the various menu options in the following order:
SETUP TIME
SETUP DATE
SETUP WEATHER CHANNEL
Input COUNTY CODE (ALL / SINGLE / MULTIPLE) CODE #
Select ALERT MODE (SIREN / VOICE)
DEFEAT SIREN
Select ALERT VOLUME (SIREN HIGH / SIREN LOW)
Select BACKLIGHT Operation Mode (CONTINUOUS / NORMAL)
ADD ALERT
SIREN TEST
SELECT Button
When the desired Menu appears on the display press the SELECT button to select
that specific menu and then use the NAVIGATION buttons (
/
/
/
) to change
that Menu’s settings as desired.
The options and adjustments for each of these menus will be discussed in detail in
separate sections of this manual.
11
CKW2000_041207.p65
11
12/4/2007, 11:56
LCD Panel Backlighting (NORMAL Mode / CONTINUOUS Mode)
When you install the 4 back-up batteries in this unit the display backlighting
automatically switches to the NORMAL mode to extend the battery life. In the
NORMAL mode the backlighting will come ‘on’when you press any one of the top
panel control buttons and will go ‘off’after 5 seconds with no further control input.
After you connect the AC adapter the display mode setting changes to
CONTINUOUS automatically so that the display backlighting remains ‘on’
continuously.
NOTE: If the AC power supply is interrupted the backlighting will default to the
NORMAL mode and the backlighting will go ‘off’until any button is pressed.
Then the backlighting will remain ‘on’for 5 seconds and shut ‘off’again to
extend the battery life.
LCD Panel Brightness Control (SNOOZE/DIMMER Button)
Press the SNOOZE/DIMMER button repeatedly to switch the LCD backlighting
between the Bright and Dim settings if necessary.
LCD Panel Viewing Angle – IMPORTANT
The LCD panel in this clock radio is designed to be the clearest and most visible
when viewed from ‘head-on’ or when you are looking down on the display from
above. If you are looking up at the display from below – for example, if you are
lying in bed and the clock radio is on a nightstand or table that is higher than the
bed – the numbers on the display may seem to fade or may be completely invisible.
This is a common characteristic of all liquid crystal displays and is not an indication
of any problem with your unit. The display in this model was designed to be clearest
when viewed from head-on or from above.
Correct View Angle
Incorrect View Angle
12
CKW2000_041207.p65
12
12/4/2007, 11:56
Setting The Time
When you install the 4 back up batteries the display comes ‘on’and shows the
initial default time and date setting:
“SUNDAY, 01 – JAN – 2006, 12:00”.
Set the display to the correct time as follows:
1.) Press the MENU button once. The display
shows “SETUP TIME”
2.) Press the SELECT button once. The Hour
digits begin flashing.
or
Navigation buttons to set
3.) Press the
the display to the correct hour.
Example: 2:00 PM.
Be sure to observe the AM indicator to confirm
that you have set the hour correctly. If the AM
indicator is ‘on’the time displayed is AM. If
the AM indicator is ‘off’the time displayed is
PM.
4.) When the correct hour is flashing, press
navigation button. The hour digits stop flashing
and the minute digits begin to flash.
5.) Press the
or
Navigation buttons to set
the display to the correct minute.
Example: 2:30 PM.
6.) When the correct minute is flashing on the
display press the MENU button once more to
exit the SETUP TIME mode and return to the
Time and Date display.
13
CKW2000_041207.p65
13
12/4/2007, 11:56
Setting The Date
1.) Press the MENU button once. The display
shows “SETUP TIME”.
2.) Press the
(TUNING UP) Navigation button.
The display shows “SETUP DATE”. The first
time you enter the Setup Date mode the
display will show “01 – JAN – 2006”, which is
the initial default date.
3.) Press the SELECT button once. The Date
indicator begins flashing.
4.) Press the
or
Navigation buttons to set
the display to the correct date.
Example: “15”.
5.) Press
(RIGHT) Navigation button. The
Month indicator begins flashing.
or
Navigation buttons to set
6.) Press the
the display to the correct month.
Example: “March”.
7.) Press
(RIGHT) Navigation button. The last
two digits of the Year indicator begin flashing.
8.) Press the
(TUNING UP) Navigation button
to set the display to the correct Year.
Example: “2007”.
9. When the correct Date, Month, and Year
appear in the display press the MENU button
to exit the Setup mode. The correct Day will
appear in the display corresponding to the
Date you selected.
NOTE: After you press the MENU, (
/
/
/
) , and SELECT buttons to
enter the Time or Date Setup modes you must make your adjustments within
30 seconds. If no adjustments are made within 30 seconds the LCD will exit
the Setup mode and return to the normal Time and Date display.
14
CKW2000_041207.p65
14
12/4/2007, 11:56
Setting The Alarm Times
This model has two alarms that can be set and used independently. You may set
both alarms for Radio or Buzzer operation, or set one alarm for Radio and the
other for Buzzer.
Setting The Alarm 1 Wake Up Time
1.) Depress and hold the ALM 1 button for
approximately 1 second.
The “SET ALARM 1” indicator appears and
the Hour digits begin flashing.
2.) Press the
or
Navigation buttons to set
the display to the correct Alarm 1 wake up
hour.
Example: 6:00 AM
Be sure to observe the AM indicator to confirm
that you have set the hour correctly. If the AM
indicator appears the hour displayed is AM. If
the AM indicator does not appear the hour
displayed is PM.
3.) Press
(RIGHT) Navigation button. The
Minute digits begin flashing.
4.) Press the
or
Navigation buttons to set
the display to the correct wake up minute.
Example: 6:30 AM
5.) When the LCD is showing the correct Alarm 1
Wake-Up Time press the MENU button or the
SELECT button to return to the correct time
and date display.
15
CKW2000_041207.p65
15
12/4/2007, 11:56
Setting The Alarm 2 Wake Up Time
1.) Depress and hold the ALM 2 button for
approximately 1 second.
The “SET ALARM 2” indicator appears and
the Hour digits begin flashing.
2.) Press the
or
Navigation buttons to set
the display to the correct Alarm 2 wake up
hour.
Example: 9:00 AM
Be sure to observe the AM indicator to confirm
that you have set the hour correctly. If the AM
indicator appears the hour displayed is AM. If
the AM indicator does not appear the hour
displayed is PM.
3.) Press
(RIGHT) Navigation button. The
Minute digits begin flashing.
4.) Press the
or
Navigation buttons to set
the display to the correct wake up minute.
Example: 9.15 AM.
5.) When the LCD is showing the correct Alarm 2
Wake-Up Time press the MENU button or the
SELECT button to return to the correct time
and date display.
16
CKW2000_041207.p65
16
12/4/2007, 11:56
Selecting The Alarm Mode (Radio, Buzzer, or Off)
1.) Press the ALM 1 button once.
The display shows the Alarm 1 Wake Up Time.
2.) Press the ALM 1 button again. The ALARM 1
indicator below the time display begins to
flash.
3.) Press the
or
Navigation buttons
repeatedly to select the alarm mode.
If the ‘Bell’symbol
flashes, the Alarm Mode
is Buzzer.
If the ‘Musical Notes’symbol
flashes, the
Alarm Mode is Radio.
If no symbol is flashing below the ALARM 1
indicator, the Alarm Mode is ‘Off’.
4.) When the desired symbol is flashing together with the ALARM 1 indicator,
press the ALM 1 button once more.
The LCD returns to the correct Time and Date
display but the ALARM 1 indicator and the
Buzzer or Radio symbols remain in the display
to confirm that the alarm is set.
The alarm will turn on every day at the selected time. It will continue for one
hour and then shut off automatically.
5.) To cancel the alarm, repeat Steps 1, 2 and 3 above until no symbol is flashing
below the ALARM 1 indicator, then press the ALM 1 button once more. The
LCD returns to the correct Time and Date display but the ALARM 1 indicator
disappears.
17
CKW2000_041207.p65
17
12/4/2007, 11:56
To select the Alarm Mode for Alarm 2, repeat the procedure above using the
ALM 2 button instead of the ALM 1 button.
Snooze Operation
When the Radio or Buzzer alarm turns ‘on’ in the morning you may press the
SNOOZE/DIMMER button for a few minutes more sleep.
The SNOOZE indicator appears on the display.
The alarm will stop for 9 minutes and then turn ‘on’again. The Snooze operation
may be repeated several times within one hour, but after one hour the alarm will
reset itself for the following day and will not turn ‘on’again.
18
CKW2000_041207.p65
18
12/4/2007, 11:56
Listening To The Radio
This clock radio features a digital tuning AM/FM receiver that allows you to tune to
the exact frequency of your desired station for the best possible reception. You
may also store up to 10 of you favorite FM stations and 10 of your favorite AM
stations in the preset memories for immediate and easy recall.
1.) Press the POWER
button to turn the radio ‘On’.
The first time you turn the radio on the display
will show “CH 01 WB-CH 01 FM 87.5 MHZ”.
To switch between FM and AM bands, press
the BAND button repeatedly.
2.) Press the
TUNING UP or
TUNING DOWN Navigation buttons to tune to
the exact frequency of the desired station as follows:
• Automatic Tuning
Depress and hold the
or
Navigation button until the frequency display
begins to move, then release the buttons. The receiver will scan until it finds the
next strong frequency and stop on that frequency. Repeat this procedure until
the display stops on the frequency of your desired station.
• Manual Tuning
Repeatedly press the
or
Navigation buttons to manually advance the
frequency display up or down to your desired frequency.
NOTE: Use the Manual Tuning method to tune to weaker stations that may
be bypassed by the Automatic Tuning method.
3.) Adjust the VOLUME control to the desired level.
4.) When you are finished listening press the POWER
button to turn the radio
‘Off’. The LCD returns to the correct Time and Date display.
19
CKW2000_041207.p65
19
12/4/2007, 11:56
Antenna Information
AM
The AM bar antenna is inside the cabinet. If AM reception is unsatisfactory try
rotating or repositioning the radio until you find the position that provides the best
AM reception.
R
FM
The AC adapter wire serves as the FM antenna. Make sure that the adapter wire
is completely unwound and extended to its full length. You may have to change the
position or direction of this wire to find the position that provides the best FM
reception.
20
CKW2000_041207.p65
20
12/4/2007, 11:56
Presetting Stations In the Tuner Memory
1.) Follow steps 1 and 2 of “Listening To The
Radio”, on page 19, to tune to the first station
you wish to memorize.
Example: FM 88.3 MHZ.
2.) Press the MENU button once.
The CH 01 indicator “01” begins to flash
indicating that you can store the station in
Preset Memory Channel 01.
3.) Press the SELECT button to store the selected
station in Preset Memory Channel 01.
The “01” indicator stops flashing to confirm
that the station is stored.
4.) Tune to the next station you wish to memorize.
Example: FM 93.1 MHZ.
5.) Press the MENU button. The “01” Indicator
will flash.
TUNING UP Navigation button
Press the
once to advance the Preset Memory Channel
Number from “CH 01” to “CH 02”.
6.) When the “02” indicator is flashing press the
SELECT button to store the selected station
in Preset Memory Channel 02.
The “02” indicator stops flashing and remains
‘on’to confirm that the station is stored.
7.) Repeat Steps 4, 5 and 6, selecting a different Preset Channel Memory Number
each time until you have stored up to 10 FM stations in the tuner memory.
8.) Press the BAND button to switch to the AM band and repeat the above procedure
to store up to 10 AM stations in the tuner memory.
21
CKW2000_041207.p65
21
12/4/2007, 11:56
Recalling Preset Memory Stations
• Turn the Radio ‘On’and press the BAND button to select the desired band.
• Press the
or
Navigation buttons to move to lower or higher numbered
Preset Station Memory Numbers.
Changing Preset Station Memories
• Tune to the new station that you wish to memorize and press the MENU button.
The Preset Memory Channel Number flashes.
• Press the
or
Navigation buttons to select the Preset Memory Channel
Number that you wish to change.
• When the desired Preset Memory Channel Number is flashing, press the
SELECT button. The new station will be entered into the memory and the
previously stored station will be deleted.
22
CKW2000_041207.p65
22
12/4/2007, 11:56
Sleep To Music Timer
The Sleep To Music Timer can be programmed to play the radio for up to 90
minutes and then shut ‘off’automatically. The Sleep Timer can be activated while
the radio is ‘on’or ‘off’.
• Tune to the desired station and set the VOLUME control to the desired level.
Remember that the radio station and the volume level you select for the Sleep
Timer is the same station and volume level that you will hear in the morning if
you are using the Wake To Radio alarm mode.
• Press the SLEEP button. The LCD will show:
“SET SLEEP TIME – 90 MIN” and the number
“90” will flash for several seconds.
The radio will play for 90 minutes and then shut off automatically.
• To reduce the amount of Sleep Timer operation continue pressing the SLEEP
button.
The display will count down from 90 > 60 > 30 > 15 > 00 as you continue to
press the SLEEP button.
Release the SLEEP button when the display
shows the desired amount of minutes.
The radio will play until the timer counts down
to “00” and then shut off automatically.
• To shut the radio off before the Sleep Timer counts down to “00” press the
POWER
button at any time.
23
CKW2000_041207.p65
23
12/4/2007, 11:56
WEATHER BAND AND HAZARD ALERT OPERATION
Instant Weather Band Reception
The National Weather Service (NWS) currently operates 940 transmitters around
the country to provide continuous 24-hour weather reports for all 50 states and
surrounding coastal waters. These broadcasts are transmitted on seven different
channels with the following frequencies:
Channel #
Frequency
1.
162.400 MHz
2.
162.425 MHz
3.
162.450 MHz
4.
162.475 MHz
5.
162.500 MHz
6.
162.525 MHz
7.
162.550 MHz
Your Emerson All-Alert Clock Radio receives all 7 of these frequencies clearly,
and thanks to the sensitive digital tuner there is no cumbersome ‘fine-tuning’
required.
You must select the weather channel that provides coverage for your geographic
area. This set-up is only done once and then your radio will automatically tune to
the correct frequency whenever you press the WEATHER/HAZARD button.
24
CKW2000_041207.p65
24
12/4/2007, 11:56
To set up the radio to receive your local weather station:
1.) Fully extend the telescoping rod antenna. This
antenna is only for the weather channel
reception.
2.) Press the WEATHER/HAZARD button.
The LCD will show the Time and Date display
and “WB – CH 1” indicating that the radio is
receiving weather channel #1.
If you are receiving a strong, clear signal on
channel #1, there is noting else to do.
Every time you press the WEATHER/HAZARD button your radio will tune to
weather channel #1. If you are listening to an AM or FM station when you press
the WEATHER/HAZARD button the radio will automatically switch to the weather
channel.
3.) If you receive a weak signal or no signal on
channel #1, press the MENU button to access
the Menu mode and then press the
Navigation button two (2) times until the
display shows “SETUP WEATHER CH 1”
4.) Press the SELECT button once. The CH “1”
indicator begins flashing.
5.) Press the
Navigation button slowly to advance the weather channel from #1
to #2 to #3 and so on. When you hear the clearest, strongest broadcast you
have found the station that is covering your geographic area.
Press the SELECT button again to make that your default station. Once this is
done whenever you press the WEATHER/HAZARD button your radio will
automatically tune to that station.
25
CKW2000_041207.p65
25
12/4/2007, 11:56
Notes:
• It may be necessary to change the direction of the rod antenna to receive the
strongest signal. If you live in an area of poor reception and the rod antenna
does not provide satisfactory reception we have included an external wire
antenna to improve reception. Lower the rod antenna and connect the external
antenna to the EXT. ANT. jack on the back panel and make sure the external
antenna wire is fully unwound and extended.
• If you are using this clock radio on a bedside table and you find that extending
the rod antenna is not convenient, you may use the external antenna instead.
To listen to NOAA weather broadcasts at any time, press the WEATHER/HAZARD
button once. If the radio was ‘Off’it will turn ‘On to your local NOAA weather station.
If you were listening to an AM or FM station, the radio will switch to your local
NOAA station. When you are finished listening press the WEATHER/HAZARD
button again. The radio will shut ‘Off’or will switch back to your AM or FM broadcast.
26
CKW2000_041207.p65
26
12/4/2007, 11:56
NWR All Hazards Emergency Messages
NOAA Weather Radio All Hazards (NWR) is an all-hazards public warning system,
operated by the National Weather Service (NWS), broadcasting weather forecasts,
warnings, and emergency information 24 hours a day directly to the public.
During an emergency, NWS forecasters interrupt routine broadcasts and send a
special tone signal to activate local weather radios. Weather radios equipped with
a special alarm tone feature, such as this Emerson Research model CKW2000,
sound an alert to give you immediate information about a life-threatening situation.
NWR broadcasts warnings and post-event information for all types of hazards:
• Weather (e.g., tornadoes, floods),
• Natural (e.g., earthquakes, forest fires and volcanic activity),
• Technological (e.g., chemical releases, oil spills, nuclear power plant
emergencies, etc.), and...
• National emergencies (e.g., terrorist attacks).
Working with other Federal agencies and the Federal Communications
Commission’s (FCC) Emergency Alert System (EAS), NWR is an all-hazards radio
network, making it the most comprehensive weather and emergency information
available to the public.
Specific Area Message Encoding (S.A.M.E.)
Each NRW transmitter has a range of approximately 40 miles and may cover several
counties in some cases. A normal weather alert radio without the SAME system
will be activated by every alert signal from the nearest transmitter. As a result you
could be receiving alert signals intended for people up to 80 miles away that do not
apply to your area at all. The SAME system was developed to help eliminate these
false alarms. The Emerson Research model CKW2000 with SAME technology
can be programmed to receive only the alerts that apply to the specific county in
which you live. When programmed correctly you will no longer be awakened or
disturbed by alerts that do not apply to you. Your CKW2000 will then alert you only
of weather and other emergencies for your specific county.
When an NWS office broadcasts a warning, watch or non-weather emergency
message, it also broadcasts a digital SAME code that contains information about
the type of message, the county(s) affected, and the message expiration time.
27
CKW2000_041207.p65
27
12/4/2007, 11:56
The CKW2000 will turn on for that message, and you will hear a warning alarm
tone as an attention signal, and an indicator light on the front panel will tell you if the
alert is a ‘WARNING’, a ‘WATCH’, or a ‘STATEMENT’(Advisory). The type of alert
will appear in the LCD display, followed by the broadcast message.
At the end of the broadcast message, you may hear a brief digital end-of-message
static burst followed by a resumption of the NWR broadcast cycle.
Programming Your County Code In the CKW2000
To program your CKW2000 with the proper county(s) and/or marine area(s) of
choice, you need to know the 6-digit SAME code number(s) for that county(s). The
number is available two ways:
Online at: http://www.weather.gov/nwr/indexnw.htm#sametable
On this web page you will first select the state in which you live and then you will
see an alphabetical list of all the counties in that state with the SAME# for each
county. This is the number that you must enter in the CKW2000 to ensure that you
only receive the alerts that apply to your county.
By telephone at 1-888-NWR-SAME (1-888-697-7263).
Follow the voice prompts asking for your state and county of residence and the
computer will tell you the correct SAME# in your area.
For residents of Canada you may obtain your SAME# by visiting the Meteorological
Service of Canada website at: http://www.msc-smc.ec.gc.ca/msb/
NOTE: Although the SAME encoding system allows you to eliminate alerts
that do not apply to your specific area, the CKW2000 still gives you the option
to receive alerts for MULTIPLE counties (maximum 20), or to receive ALL
alerts broadcast from the NWR transmitter serving your area.
28
CKW2000_041207.p65
28
12/4/2007, 11:56
Once you have obtained your county’s SAME# from the website or by phone,
enter that number, or numbers, in the CKW2000 as follows:
1.) If the radio is ‘On’, press the POWER
button to turn the radio ‘Off’.
2.) Press the MENU button to enter the Menu mode.
3.) Press the
Navigation button three (3) times
until the LCD is showing:
“COUNTY CODE – MULTIPLE”
The Multiple county mode is the factory
default setting.
4.) Press the SELECT button. The “MULTIPLE”
indicator begins ‘flashing’.
Press the
Navigation button to change
the selection from MULTIPLE > ALL >
SINGLE > MULTIPLE,etc.
5.) When the SINGLE indicator is flashing, press
the SELECT button again to confirm that you
want to program just one Single SAME code
for your specific county.
The display will show “CODE 01 000000” and
the “01” indicator will be flashing.
6.) Press the
RIGHT Navigation button to
move the cursor to the first “0”. The “0” begins
flashing. Press the or Navigation buttons
to select the first digit of your SAME#.
7.) When the desired number is flashing press the
RIGHT Navigation button to
move the cursor to the second “0”, then press the
or
Navigation buttons
to select the second digit of your SAME#.
8.) Repeat Step 7 until you have entered all 6
digits of the desired SAME#, then press the
MENU button to confirm your selection and
return to the correct TIME and DATE display.
A SINGLE COUNTY indicator will remain in
the bottom of the display window.
29
CKW2000_041207.p65
29
12/4/2007, 11:56
NOTES:
• If you selected “MULTIPLE” in Step 4 above, after you have entered all 6
digits of the first SAME#, the CODE “01” indicator begins flashing again.
Press the
Navigation button to advance the CODE number to “02” and
then enter the second SAME# as described above.
The MULTIPLE COUNTY indicator will
remain in the display.
• If you selected “ALL” in Step 4 above you will not be asked to enter any
SAME#. Your radio will be activated by every alert signal broadcast by the
NWR transmitter serving your area.
The ALL COUNTY indicator will remain in
the display.
Once your radio is programmed with the SAME# for your specific county, it will
only be activated by alert signals that apply to that specific county.
Other Settings and Adjustments
After you have selected the weather channel (1 –7) for your area and entered the
correct SAME county code or codes, there are a few other adjustments that you
can make to customize the operation of your CKW2000.
30
CKW2000_041207.p65
30
12/4/2007, 11:56
Select Alert Mode (Siren or Siren/Voice)
When the SIREN mode is selected and an alert is received, the Siren will continue
for approximately 5 minutes and then shut off automatically. To stop the Siren
sooner, press the ALERT OFF/ALM 2 button.
When the VOICE mode is selected and an alert is received the Siren will sound for
about 8 seconds and then the weather broadcast will turn on and continue for
about 5 minutes.
To change the Alert Mode, make sure the radio is “Off’, and then:
• Press the MENU button and then press the
or
Navigation buttons until the LCD is
showing “ALERT MODE” and the current
setting.
• Press the SELECT button. The current setting
or
Navigation
flashes. Then press the
buttons to switch between SIREN and VOICE
settings.
When the desired setting is flashing press the
MENU button to confirm the setting and exit
the menu mode.
The LCD returns to the Time and Date display
but the indicator for the selected setting
remains at the bottom of the display.
NOTE: If you selected VOICE alert mode
both the SIREN and VOICE indicators
remain ‘On’.
31
CKW2000_041207.p65
31
12/4/2007, 11:56
Defeat Siren Mode
You have the option of shutting off the Siren or Voice Alert warning
for some of the alert messages that your radio may receive. If you
select the Defeat Siren mode for a specific message type, when
your radio receives that type of message the WARNING, WATCH,
or STATEMENT lights will turn ‘On’as usual and the alert message
will appear in the display, but there will be no audible warning.
To Defeat the Siren for certain alerts, make sure the radio is “Off”, and then:
1.) Press the MENU button; press the
or
Navigation buttons until the LCD is showing
“DEFEAT SIREN”, then press the SELECT
button.
The alert messages will scroll across the
display in alphabetical order beginning with
“ADMINISTRATIVE MESSAGE” which is
currently the first message on the list. The
ALERT DISABLE indicator will appear at the
bottom of the display indicating that for this
specific message the default Siren Mode is
‘Off’.
2.) If you wish to change the default Siren Mode
or
for that specific alert, press the
Navigation buttons.
The words “ALERT ENABLE” will appear at
the bottom of the display indicating that the
Siren Mode is now ‘On’.
Use the
or
Navigation buttons to switch
back and forth between the ALERT DISABLE
and ALERT ENABLE siren modes.
32
CKW2000_041207.p65
32
12/4/2007, 11:56
3.) Press the
or Navigation buttons to select
the next alert (currently “AVALANCHE
WATCH”) then press the
or
Navigation
buttons to change the Siren Mode setting for
that alert if desired. ALERT ENABLE indicates
that the siren mode is ‘on’. ALERT DISABLE
indicates that the siren mode is ‘off’.
4.) Repeat Step 3 to select among all of the
current alert messages and either Enable or
Disable the siren mode for each message.
5.) When you are finished selecting the Siren
Mode settings press the MENU button to
return to the correct Time and Date display.
NOTE: Some alerts do not allow the option to defeat the audible warning.
Please refer to the separate table listing all of the alert messages that this
radio can receive. If the description in the Alert Sound column is followed by
an asterisk (*), the audible warning can be switched ‘off’for that type message.
33
CKW2000_041207.p65
33
12/4/2007, 11:56
Select Siren Volume
You can select between a High or Low volume siren level.
• With the radio ‘off’, press the MENU button,
then press the
or
Navigation buttons
until the display shows “ALERT VOLUME”
and the current setting.
Press the SELECT button and the current
setting starts flashing.
• Press the
or
Navigation buttons to switch
between the High and Low siren levels. You
will hear two ‘beeps’ at either High or Low
volume to confirm your selection, and the “HI”
or “LO” indicator will remain in the bottom of
the display.
NOTE: This adjustment only applies to the Siren Alert. The level of the Voice
Alert is adjusted by the radio VOLUME control.
34
CKW2000_041207.p65
34
12/4/2007, 11:56
Backlight Operation (Normal / Continuous)
If the AC adapter is properly connected to your 120V AC outlet and to the “DC 6V”
jack on the back of this radio, the display backlight defaults to the CONTINUOUS
mode and is ‘On’continuously.
If the AC power is interrupted and the radio is running on the 4 “AA” back-up
batteries, the display backlight defaults to the NORMAL mode and shuts off to
conserve the battery power.
In the NORMAL mode, pressing any button will switch the display backlight ‘on’for
5 seconds, and then it goes ‘off’again.
When AC power is restored the backlighting changes back to the CONTINUOUS
mode automatically.
You may change the backlight from CONTINUOUS to NORMAL if you wish.
• With the radio ‘off’press the MENU button,
or
Navigation buttons until the
press the
display is showing “BACKLIGHT” and the
current setting.
• Press the SELECT button. The current setting
flashes.
Press the
or
Navigation buttons to switch
to the desired setting, the press the MENU
button to exit the Menu mode and return to
the Time and Date display.
NOTE: The Continuous mode cannot be selected if there is no AC power to
the radio.
35
CKW2000_041207.p65
35
12/4/2007, 11:56
Add New Alert
NOTE: This feature is provided in the event that the National Weather Service and
the authorities decide to add any new alert messages in the future. However at
this moment your CKW2000 is capable of receiving all of the current NWR alerts.
If future alerts are established, you may contact Emerson Radio Customer Service
for detailed instructions for adding new alerts to this radio.
Siren Test
To confirm that the siren in your CKW2000 is working properly:
• With the radio ‘off’press the MENU button, then press the
Navigation button
once.
The display shows “SIREN TEST”.
• Press the SELECT button to activate the siren and confirm that it is working
properly.
• Press the MENU button to cancel the siren test and return to the Time and Date
display.
36
CKW2000_041207.p65
36
12/4/2007, 11:56
Receiving NOAA Hazard Alert Messages
When the NWR transmitter covering your area sends out an alert message that
applies to your county, your CKW2000 will react as follows:
• One of the 3 indicators on the front panel will turn on depending on whether the
message is considered a “WARNING”, a “WATCH”, or a “STATEMENT”
(Advisory).
• Depending on the Siren Alert Mode that you selected, the siren will sound
for 5 minutes, or the siren will sound for 8 seconds and then you will hear
the actual alert announcement from the NWR transmitter for approximately
5 minutes.
You can stop the siren sooner by pressing the ALERT OFF/ALM 2 or POWER
button. To stop the announcement you must press the WEATHER/HAZARD
button.
• The actual message text will scroll
across the top line of the LCD display.
The second line of the display will
show the ending time of the current
alert.
The message will continue to scroll across the display until the alert is
over, or until you cancel the message by pressing the ALERT OFF/ALM 2
or POWER
button.
Receiving/Storing Overlapping Alerts
In certain instances you may receive a new alert message while the first message
is still in effect. The CKW2000 can store up to 15 different alert messages with
overlapping effective times. When the new message is received it immediately
appears on the display and the previous message is stored in the memory.
To review the last 15 alert messages stored in the memory, make sure the radio is
‘Off’and then press the
Navigation button to scroll through the last 15 received
messages. If any of the stored messages has already expired, the word
“EXPIRATION” appears in the display below the scrolling message text.
37
CKW2000_041207.p65
37
12/4/2007, 11:56
Test Alert Signals
In most of the USA the National Weather Service (NWS) broadcasts a test alert
signal every Wednesday between 11:00 AM and 1:00 PM. To find out the exact
test schedule in your area you can call your local NOAA or NWS office.
You can find the telephone numbers in you local telephone directory under
“US Government, Department of Commerce”.
When the test alert signal is received your radio will ‘beep’ and you will see a
message such as:
REQUIRED WEEKLY TEST
REQUIRED MONTHLY TEST
SYSTEM DEMO
NATIONAL PERIODIC TEST
As the NWS adds new alert capabilities your CKW2000 is set to receive them and
alert you automatically with no modifications.
Additional Information
For additional info about the NOAA, the NWS, and All Hazards Radio please visit
the following websites:
www.noaa.gov
www.weather.gov/nwr/
38
CKW2000_041207.p65
38
12/4/2007, 11:56
CARE AND MAINTENANCE
There are no user serviceable parts inside this radio.
Please refer all service problems to a qualified service facility.
Care Of Cabinet
If the cabinet becomes dusty, wipe the exterior with a soft dust cloth only.
Never use dusting sprays or polishes on the cabinet.
If the cabinet becomes dirty or smudged with fingerprints it may be wiped
with a soft cloth that has been slightly dampened with a mild soap and
water solution.
Always disconnect the AC/DC adapter from the AC outlet before cleaning,
and never allow any liquid to get inside the cabinet.
R
SERVICE
TO FIND THE LOCATION AND PHONE
NUMBER OF YOUR NEAREST SERVICE
CENTER PERMITTED TO PERFORM
WARRANTY...
CALL TOLL FREE: 1-800-695-0098
FOR ADDITIONAL SET-UP OR OPERATING ASSISTANCE
PLEASE CALL:
1-800-898-9020
FOR CUSTOMER SERVICE, PLEASE WRITE TO:
Emerson Radio Corp.,
Consumer Affairs Dept.,
5101 Statesman Drive,
Irving, TX 75063.
39
CKW2000_041207.p65
39
12/4/2007, 11:56
LIMITED WARRANTY
Emerson Radio Corp. warrants manufacturing defects in original material, including
original parts and workmanship, under normal use and conditions, for a period of
ninety (90) days from the date of original purchase in the U.S. With your dated
proof of purchase, we will provide repair service at no charge for labor and parts
at an authorized Depot Repair Facility, or replace the product in our discretion.
For repair or replacement, pack your unit in a padded box, enclose your check or
money order payable to Emerson Radio Corp. in the amount of $9.00 (not required
by California residents) to cover shipping and handling costs, and enclose a copy
of your proof of purchase. Send your unit to:
Emerson Radio Corp.,
5101 Statesman Drive,
Irving, TX 75063.
This warranty does not cover damage from negligence, misuse, abuse, accident,
failure to follow operating instructions, commercial use, rental, repairs by an
unauthorized facility, or products purchased, used, serviced or damaged outside
of the United States.
THIS WARRANTY GIVES YOU SPECIFIC LEGAL RIGHTS, AND YOU MAY
ALSO HAVE OTHER RIGHTS WHICH VARY FROM STATE TO STATE.
AU898M
The Serial Number can be found on the bottom cabinet. We suggest that you
record the Serial Number of your unit in the space below for future reference.
Model Number: CKW2000
Serial Number:
40
CKW2000_041207.p65
40
12/4/2007, 11:56
R
Printed in China
CKW2000-041207-02
CKW2000_041207.p65
41
12/4/2007, 11:56