1
사양 확인 및 배포
2010.02.11
CONTACT INFORMATION
세)생산기술팀
Website : http://www.e-daewoo.com
Call : 1-877-393-7823(1-877-DWESVC3)
Washing Machine OWNER'S Manual
DWD-WD3011WW/RR, DWD-WD31WW, DWD-WD33WS / SS / RS
Features
" Economic wash system
With artificial intelligence, the washer uses minimum energy and water by
selecting optimal water level and washing time.
" Low noise system
The washer minimizes the washing and spinning noises by sensing the
amount of laundry.
" Child-Lock
The Child-Lock system is adopted to prevent children from pressing any
button to change the program during operation.
CONTENTS
Page
IMPORTANT SAFETY GUIDE..................................................................................................................................2
PARTS AND FEATURES ..........................................................................................................................................3
INSTALLATION INSTRUCTIONS.............................................................................................................................4
INSTALLATION OF ACCESSORIES .......................................................................................................................8
OPERATING YOUR WASHER...............................................................................................................................10
USING THE DISPENSER .......................................................................................................................................12
THE FUNCTION OF CONTROL PANEL ...............................................................................................................14
WASHING PROGRAM ............................................................................................................................................16
WASHING PROCEDURE AND SELECTION........................................................................................................18
GUIDE FOR OTHER USEFUL PROGRAMS ........................................................................................................29
MAINTENANCE .......................................................................................................................................................32
HOW TO CLEAN THE FILTER...............................................................................................................................33
REMOVING STAINS................................................................................................................................................34
TROUBLE SHOOTING............................................................................................................................................35
SPECIFICATION......................................................................................................................................................36
A NOTE TO YOU
Thank you for buying a DAEWOO appliance.
DAEWOO washers are easy to use, save time, and help you manage your home better.
This manual contains valuable information about how to operate and maintain your washer property and safely.
Please read it carefully.
IMPORTANT SAFETY INSTRUCTIONS
READ ALL INSTRUCTIONS BEFORE USE
WARNING!
For your safety, the information in this manual must be followed to minimize the risk of fire or explosion, electric shock, or to
prevent property damage, personal injury, or loss of life
IMPORTANT SAFETY INSTRUCTIONS
WARNING! - To reduce the risk of fire, electric shock, or injury to persons when using your appliance, follow basic precautions,
including the following :
1. Read all instructions before using the appliance.
2. Do not wash or dry articles that have been previously cleaned in, washed in, soaked in, or spotted with gasoline, dry-cleaning
solvents, other flammable or explosive substances as they give off vapors that could ignite or explode.
3. Do not allow children to play on or in the appliance. Close supervision of children is necessary when the appliance is used near
children.
4. Before the appliance is removed from service or discarded, remove the door to the washing or drying compartment.
5. Do not reach into the appliance if the drum is moving.
6. Do not install or store this appliance where it will be exposed to the weather.
7. Do not tamper with controls
8. Do not repair or replace any part of the appliance or attempt any servicing unless specifically recommended in the usermaintenance instructions or in published user-repair instructions that you understand and have the skills to carry out.
9. Do not add gasoline, dry-cleaning solvents, or other flammable or explosive substances to the wash water. These substances
give off vapors that could ignite or explode.
10. Under certain conditions, hydrogen gas may be produced in a hot water system that has not been used for 2 weeks or more.
HYDROGEN GAS IS EXPLOSIVE. If the hot water system has not been used for such a period, before using a washing machine
or combination washer-dryer, turn on all hot water faucets and let the water flow from each for several minutes.
This will release any accumulated hydrogen gas. As the gas is flammable, do not smoke or use an open flame during this time.
11. Keep area around the exhaust opening and adjacent surrounding areas free from the accumulation of lint, dust, and dirt.
12. Do not place items exposed to cooking oils in your dryer. Items contaminated with cooking oils may contribute to a chemical
reaction that could cause a load to catch fire
13. Do not use heat to dry articles containing foam rubber or similarly textured rubber-like materials.
14. Do not use fabric softeners or products to eliminate static unless recommended by the manufacturer of the fabric softener or
product.
SAVE THESE INSTRUCTIONS
GROUNDING INSTRUCTIONS
This appliance must be grounded. In the event of malfunction or breakdown, grounding will reduce the risk of electric shock by
providing a path of least resistance for electric current. This appliance is equipped with a cord having an equipment-grounding
conductor and a grounding plug. The plug must be plugged into an appropriate outlet that is properly installed and grounded in
accordance with all local codes and ordinances.
WARNING! - Improper connection of the equipment-grounding conductor can result in a risk of electric shock. Check with a
qualified electrician or serviceman if you are in doubt as to whether the appliance is properly grounded. Do not modify
the plug provided with the appliance - if it will not fit the outlet, have a proper outlet installed by a qualified electrician
OPERATION INSTRUCTIONS
"WARNING - To reduce the risk of fire, electric shock, or injury to persons, read the IMPORTANT SAFETY INSTRUCTIONS before
operating this appliance." This statement is omitted when the operating instructions are preceded by the safety instructions and are
included in the same manual.
Understanding your responsibilities when using the washer.
1. Do not use chlorine bleach ancd ammonida or acid(such as vingar or rust remover) in the same wash. Hazardous fumes can form.
2. Unplug power supply cord before attemping to service your washer.
3. Do not wash fiberglass material. small particles can stick to fabrics washed in following loads and cause skin irritation.
4. Do not spray water on the control panel of the washer. It could cause fire or an electric shock.
5. In case of the dual valve model, If you connect only cold water inlet valve, while water temperature is selected as hot or warm, there
can be water leakage form unconnected water inlet valve.
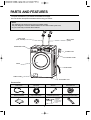
PARTS AND FEATURES
The parts and features of your washer are illustrated on the page.
Become familiar with all parts and features before using your washer.
NOTE
The drawings in the book may vary from your washer model.
They are designed to show the different features of all models coverd by this book,
So your model may not include all the features.
INLET HOSE
(HOT, OPTION)
INLET HOSE
(COLD)
DETERGENT CASE
POWER PLUG
CONTROL PANEL
DOOR
DRAIN HOSE
PUMP COVER
ADJUSTABLE LEG
Accessories
Drain hose
Inlet hose
Wrench
Unit leveler as
Owner's Manual
Cap holder (4EA)
Pedestal (OPTION)
Stacking Kit (OPTION)
❈ Design of
pedestals is
subject to
change without
manufacturers
notice.
3
INSTALLATION INSTRUCTIONS
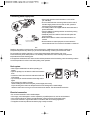
Removing transit bolts
1. Before operating the washer,
remove the transit bolts(4ea)
along with the rubber.
#If the bolts are not removed, it
may cause heavy vibration,
noise and malfunction.
2. Unscrew the 4 bolts with the
spanner supplied. Keep the 4
bolts and spanner for future use.
#Whenever the appliance is
transported, the
transit bolts must be refitted.
3. Close holes with supplied cap
holders.
Location of your washer
• Check location where the washer will be installed. Make sure you have everything necessary for correct installation.
• Do not place or store your washer below 0°C (32°F) to avoid any damage from freezing.
Drain Hose
• Do not place or store laundry products on top of washer at any times.
Washer
• Install the washer on the horizontal solid floor. If the washer is installed on an unsuitable floor,
it could make considerable noise, vibrate severely and cause a malfunction.
If the washer is not level, adjust leg up or down for horizontal installation.
• Ventilation openings must not be obstructed by carpeting when the
Laundry
washer is installed on a carpeted floor.
Tub
• Leave some space (right & left : 1 inch, rear : 4 inch).
• In case of built-in installation, the distance between top of the washer
Approx.
1 inch
and bottom of upper plate should be at least 3mm.
Level adjustment
$ If the washer is installed on an unsuitable floor, it could make
considerable noise, vibrate and cause a malfunction.
% Adjust the level of washer using adjustable legs.
• Please check if there is any gap between the four adjustable legs and the floor.
• Turning adjustable legs by the enclosed spanner and adding UNIT LEVELER AS, adjust the level of washer and
make it sure that there is no swaying of washer.
• After the adjustment is finished, turn the fixing nuts up
tightly so that the washer maintains the adjustment.
Fixing Nut
adjustable leg
& Make it sure that the washer does not sway when
you press down the four corners of the washer's top plate.
NOTE
There should be no swaying of washer and all the
adjustable legs should stick to the floor closely.
4
Connecting water supply hose
(Connect to the water
valve of the washer)
• Water supply pressure must be between 4.5 and 145 PSI
(30~1000 kPa).
• Do not crossthread when connecting inlet hose to the valve. If
the water supply pressure is more than 145 PSI, a pressure
reducing device should be installed.
• Two Sealing washers are supplied with the water inlet hoses to
prevent water leaks.
• Check for leakage of washing machine connections by turning
the tap completely on.
• Periodically check the condition of the hose and replace the
hose if necessary.
• Make sure that there is no kink in the hose and that it is not
crushed.
• Be sure that the two water input ports are connected to the
correct water faucets. The connector for hot water is colored red.
(Connect to the faucet)
Repairs to the washing machine must only be carried out by qualified personnel. Repairs carried out by
inexperienced persons may cause injury or serious malfunctioning. Contact your local service center.
Do not install your washing machine in a room where temperatures below freezing may occur.
Frozen hoses may burst under pressure. The reliability of the electronic control unit may be impaired at
temperatures below the freezing point
If the appliance is delivered in the winter months and temperatures are below freezing, store the washing machine
at room temperature for a few hours before putting it into operation.
Drain system
max. 40inch
min. 24inch
• Never forget to install drain hose before operating your
washer.
• Open the packing box, and there is a drain hose inside the
drum.
• Connect the drain hose to the drain outlet at the back side
of the washer.
• Top of laundry tub must be at least 24 inches high and no
higher
than 40 inches from bottom of washer.
• When installing the drain hose to tub(sink), secure it tightly with a string.
• Proper securing of the drain hose will protect the floor from damage due to water leakage.
• When the drain hose is too long, do not force it back into the washer. This will cause abnormal noise.
max. 40inch
min. 24inch
Electrical connection
• Do not use an extension cord or double adaper.
• If the supply cold is damaged, it must be replaced by a qualified person in order to avoid a hazard.
• If the machine will not be used for an extended time, unplug it and shut off the water supply.
• Connect the machine to a grounded outlet in occordance with current wiring regulations.
• The appliance must be positioned so that the plug is easily accesible.
5
max. 40inch
min. 24inch
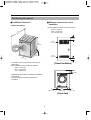
Positioning the washer
■ Installation Clearances
■ Minimum clearances for closet
installation
• Washer dimensions
• Closet installations require a minimum clearance.
Sides - 1 in(2.5cm)
Rear - 1 in(10.2cm)
Top - 32 in(81.3cm)
.9"
40 cm)
4
(10
3"
(7.6cm)
48 in.2*
(310 cm2)
40.1
(102cm)
31.8
(80.9cm)
27
(68.6 "
cm
24 in.2*
(155 cm2)
3"
(7.6cm)
)
• The location must be large enough to fully open the
washer door.
• Most installations require a minimum clearance.
Sides - 1 in(2.5cm)
Rear - 4 in(10.2cm)
Top - 32 in(81.3cm)
[Closet Ventilation]
32"
(81.3cm)
• Additional spacing should be considered for installation
and servicing.
• Companion appliance spacing should also be
considered.
1"
(2.5 cm)
27"
(68.6 cm)
[Front view]
6
1"
(2.5 cm)
31.8"
(80.9cm)
1"
(2.5 cm)
1"
(2.5 cm)
[Side view]
■ Level floor
• Allowable slope under entire washer is 1°.
• To minimize noise and vibration, the washer
MUST be installed on a solidly constructed
floor.
• Carpeting and soft tile surfaces are not
recommended.
• Never install the washer on a platform or weakly
supported structure
NOTE: A firm, solid floor is even more critical to a
front-loading washer than to a top-loader.
If your floor is wood and/or frame
construction, you may need to reinforce it.
Front-loaders use substantially faster spin
speeds than top-loaders, causing greater
vibration. If the floor is not solid, your washe
will vibrate. You will hear and feel the
vibration throughout your house.
■ Power outlet
• Must be within 60 in. (1.5 m) of either side of the
washer. Do not overload the outlet with more than
one appliance.
• Time-delay fuse or circuit breaker is
recommended.
NOTE: It is the personal responsibility and
obligation of the customer to have a proper
outlet installed by a qualified electrician.
7
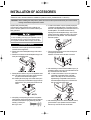
INSTALLATION OF ACCESSORIES
*Please be sure to read and follow the installation operation manual. (Pedestal Model : P-W151W)
CAUTION : When installing the said product, please be sure to let the expert with electrictiy & machine related
training and sufficient experiences install it.
People's safety is the first priority.
There are many safety particulars in the guidebook and
product. Therefore, please be sure to read and abide by all
safety particulars.
6. In order for the washer or dryer to operate properly the
combination of adjustable cases on the bottom must be
balanced. If the adjustable legs are not balanced due to a
unstable platform, it is needed to balance them by
adjusting the horizontal adjustment legs. And, to fix the
position of these legs, tighten the bolts by using wrench
provided as much as possible. This would result in a
balanced operation.
Excessive load is dangerous.
In case of installing and carrying the adjustable cases of
the washer and dryer, more than two persons should
do it together. Please let children not play on the cases.
Installation methods
1. Please take out the height-high shelf and its installation
manual from the wrapped box.
2. Please untie 4 horizontal adjustment legs of the washer
and dryer.
3. Please turn and insert 4 horizontal adjustment legs in the
lower part of adjustable cases.
7. Take out the back cover and screw from the left part of
the height-high shelf drawer.
Assemble 10 svrews at the holes back of the shelf.
8. After transferring it into the desired installation spot, try to
operate the washer or dryer and check whether there are
any mechanial noises and vibration.
N.B : In order for the washer or dryer to be operate the
combination of adjustable cases on the plain
bottom. When they are not at a level with each
adjustment legs of adjustable cases, leave the
horizontal adjustment legs as it is, and fasten the
lock nut towards the cases solidly.
4. Please place the washer or dryer on the adjustable cases.
N.B : The washer and dryer are heavy so that more than
two persons have to raise them together.
N.B : Please pull out the plugs of the washer and dryer in
use, lock the faucet and divide the supply hose and
drainage hose. Then, please pull out water from all
hoses.
5. After pulling out and opening the drawers of adjustable
cases forwards, pull out the accessory bags for bolts from
the drawer sand insert the spring washer (b) and plain
washer (c) into the joint
BOLT (a) in order.
9. After transferring them in the desired installation location,
get the washer or dryer operated and check whether
there are any mechanical noises and vibration.
8
* Please be sure to read and follow the installation operation manual(Stacking Kit Model : K-ST1*)
CAUTION : When installing the said product, please be sure to let the expert with electrictiy & machine related
training and sufficient experiences install it.
4. Push and fix the front and rear bracket of the
stacking kit as shown in the picture.
People's safety is the first priority.
There are many safety particulars in the guidebook
and product. Therefore, please be sure to read and
abide by all safety particulars.
Excessive load is dangerous.
In case of installing and carrying the adjustable cases of
the washer and dryer, more than two persons should
do it together. Please let children not play on the cases.
Stacking kit(K-ST1*) allows the dryer to be fitted to
the top of washing machine.
Model DWD-WD31WW
DWD-WD33WS
DWD-WD33SS
DWD-WD33RS
5. Drill a hole in the both sides of stacking kit and
the both sides of top plate.
(hole Dia. 3.5mm)
The kit contains, all the nessary brackets and
screws.
Tools needed - Screwdriver, drill tip(ø3.5mm,
Length < 80mm), power or hand drill.
Installation methods
1. Place washer firmly on a stable, even and solid
floor as product installation instructions decribes
in owner's manual.
2. Lift and place the dryer on top of the washer
6. Screw both sides of the rear bracket.
3. Peel protectie paper off the double sided tape
from the rear bracket of the stacking kit.
9
OPERATING YOUR WASHER
To obtain the best washing results, you must operate your washer properly.
This section gives you this important information.
Preparing clothes for washing
• Close zippers, snaps, and hooks to avoid snagging other
items.
Remove pin, buckles, and other hard objects to avoid
scratching the washer interior.
• Empty pockets and pull them inside out.
• Turn down cuffs and turn synthetic knits inside out to
avoid pilling.
• Tie strings and sashes to avoid tangling.
• Treat spots and stains.
(See “Removing stains”)
Sorting
• Separate heavily soiled items from lightly soiled ones, even if they would normally be washed together.
• Separate dark colors from light colors, colorfast items from non-colorfast item.
Soil (Heavy, Normal, Light)
Separate clothes according to amount of soil.
Color (White, Lights, Darks)
Separate white clothes from colored clothes.
Lint (Lint producers, Collectors) Wash lint producers and lint collectors separately.
10
Loading
• Drop items into washer loosely.
Items should move easily through wash water for best
cleaning and wrinkle-free results.
• Load washer properly and select correct load size
setting. Overloading and selecting a setting too
small for the wash load can :
- Cause poor cleaning
- Increase wrinkling
- Create excessive lint
- Wear out items faster (because of pilling)
• Mix large and small items in each load.
Load evenly to maintain washer balance.
An unbalanced load can make the washer vibrate
during spin.
• Reduce wash time when using a small load size
setting. Load with only a few small items needs less
wash time.
• Use a large load size setting to reduce wrinkling with
permanent press clothes and some synthetic knits.
These items should have more room to move in the
water than heavy items. (towels, jeans)
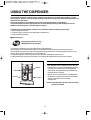
Adding detergent
$ Detergent case
% Adding fabric softner or bleach or liquid detergent
• If desired, add measured liquid softner or bleach or
liquid detergent to the softner or bleach or liquid
detergent inlet.
• Pour liquid softner or bleach or liquid detergent into
the dispenser
using the amount recommended on the package.
• Do not exceed the maximum fill line.
Overfilling can cause early dispensing of the
softner or bleach or liquid detergent which could
stain clothes.
• Do not open the detergent case when water is
supplied.
• Avoid pouring softner or bleach or liquid detergent
directly on the clothes.
• Check to see if the liquid case are even.
softener
Bleach
Main-wash
[Option:
Liquid Case]
Pre-wash
11
USING THE DISPENSER
The automatic dispenser consists of four compartments which hold 1) liquid chlorine bleach, 2) liquid
fabric softener, 3) liquid or powdered detergent for prewash and 4) liquid or powdered detergent and color
safe bleach for main wash.
All laundry products can be added at once in their respective dispenser compartments.
They will be dispensed at the appropriate time for most effective cleaning. After loading the laundry
additives into the dispenser, close the dispenser drawer.
Add detergent, bleach and fabric softener to the automatic dispenser following these steps:
1. Open the dispenser drawer.
2. Load the laundry products into the appropriate compartments.
3. Close the dispenser drawer.
■ About detergent
Designed specially to use only
HE(High Efficiency) detergent
Your washer is designed to use only High Efficiency (HE) detergents.
HE detergents are formulated specifically for front load washers and contain suds reducing components.
HE detergents make less suds, improve washing and rinsing performance, and help to keep the interior of your
washer clean. Use the manufacture’s recommend amount.
If a regular detergent is used, it may cause oversudsing and unsatisfactory performance.
For the best washing and rinsing performance, low-sudsing HE detergents are strongly recommended.
1. Prewash Detergent Compartment
• Add detergent to this compartment when using the
Prewash option. Liquid or powdered detergent may
be used in this compartment. The detergent will
automatically be dispensed during Prewash if the
Prewash option in selected.
softener
Bleach
Main-wash
• Add 1/2 the recommended amount of detergent to
the Prewash compartment and the recommended
amount of detergent to the main wash
compartment.
Pre-wash
NOTE: Liquid detergent will drain into the washer
drum as it is added.
12
2. Main Wash Detergent Compartment
3. Liquid Bleach Compartment
• Add measured detergent to this compartment for Main
wash. Detergent is flushed from the dispenser at the
beginning of the cycle. Either powdered or liquid
detergent can be used.
• Add measured liquid chlorine bleach to this
compartment. The bleach will be automatically
dispensed at the proper time during the wash cycle.
• Do not exceed the maximum fill line. Overfilling can
cause early dispensing of the bleach which could result
in damaged clothes.
• Do not pour undiluted liquid chlorine bleach directly
onto the load or into the drum. Fabric damage can
occur.
• Do not use powdered bleach in this compartment.
• Liquid or powdered color-safe bleach may be added to
the main wash compartment along with the same type
of liquid or powdered detergent.
• When using liquid detergent, make sure the liquid
detergent box and insert are in place. Do not exceed
the maximum fill line.
4. Fabric Softener Compartment
• For powered detergent, remove both the liquid
detergent box and insert.
• Add recommended amount of fabric softener to this
compartment.
• Dilute concentrated softeners with warm water to the
fill line.
• Do not exceed the maximum fill line. Overfilling can
cause early dispensing of the fabric softener which
could result in stained clothes.
• Do not pour fabric softener directly on the wash load.
• The fabric softener will be automatically dispensed
during the last rinse cycle.
NOTE: Do not place, store, or spill laundry products
(Soap, detergent, bleach, softener, etc.) on
the top of your washer or dryer. These
products can damage the finish or controls if
left there too long. Design capicity of fabric
softener compartment shall be such as to
maintain a minimum pressure of 10 pounds
per square inch(psi).
• Powdered detergent will not dispense with the liquid
detergent box and insert in place.
Designed specially to use only
HE(High Efficiency) detergent
13
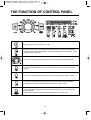
THE FUNCTION OF CONTROL PANEL
Press this switch to turn the power “ON” or “OFF”.
Operation and temporary stop is repeated as it is pressed. When you want to change program in
operating; Press the “Start / Pause” button ' Select the program that you want to change ' Press
the “Start / Pause” button again.
You can select the course you want and each lamp is turned on when that course is selected.
You can select the wash/rinse course you want and each lamp is turned on when that course is
selected.
You can select the soil level you want and each lamp is turned on when that course is selected.
You can select the soil level you want and each lamp is turned on when that level is selected.
As this button is pressed, the soil level is selected by 'Normal'-->'Heavy'-->'Light'
You can select the volume of beeper you want and each lamp is turned on when that volume of
bepper is selected.
As this button is pressed, the volume of beeper is selected by 'Low'-->'High'-->'Off'
14
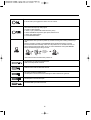
If can be used to pre-engaged in for wash 1 hour to 12 hours.
use to memorize frequently used program
To make a Custom Program.
1. Select a cycle. ('18:88'or'CEP' will be showen by turns)
2. Select Wash/Rinse Temperature, Spin Speed, and Soil Level.
3. Select other desired Options.
4. Press Start/Pause Button.
Use this function when you want to protect any accident occurring from handling of washer by a
child.
During an operation of washer, press 'BEEPER' buttons simultaneously during 3 second.
If this mode will be set successfully, Child Lock Lamp will be burn out. In Child Lock mode, no
button functions except Power button. And if you want to release this mode, press 'BEEPER'
buttons simultaneously again during 3 second.
'
'
Change
the desired
program
'
*The Child Lock will be cancelled when power is off.
Use this option for loads that need pretrement.
Adds 16 minutes prewash and drain.
Adds time to the wash for better stain removal.
This option provides an additional rinse.
Use this option to ensure the removal of detergent or bleach residue from garments.
Use this option to rinse and then spin.
The NIGHTTIME cycle reduce the noise.
15
WASHING PROGRAM
Program
Fabric type
Proper Temp.
Default data
Maximum Load
White
First check whether laundry is
machine washable.
(white cotton, linen, towel and
sheets..)
Warm / Cold
Wash: main wash
Rinse: 2
Spin: Medium
soil level : light
Refer to
rating label
Wool
Machine washable woolens with
pure new wool only
Cold / Cold
Wash: main wash
Rinse: 1
Spin: Low
soil level : light
Refer to
rating label
Delicated laundry easily damaged.
(silk, curtains,..)
Cold / Cold
Wash: main wash
Rinse: 1
Spin: Low
soil level : light
Refer to
rating label
Perm
Press
Dress shirts/ pants, wrinkle free
clothing, poly/cotton blend
clothing, table cloths
Warm / Cold
Wash: main wash
Rinse: 2
Spin: Medium
soil level : normal
Refer to rating
label
Cotton
Cotton, Linen, Towels, Shirts,
Sheets
Warm / Cold
Wash: main wash
Rinse: 2
Spin: Extra High
soil level : normal
Refer to
rating label
Mixed loads, Work Clothes,
Jeans, Shirts.
Warm / Cold
Wash: main wash
Rinse: 2
Spin: Medium
soil level : light
Refer to
rating label
Wash: main wash
Rinse: 2
Spin: Medium
soil level : light
Refer to
rating label
Refer to
rating label
Delicate
Normal
Bulky/Large This selection is used for washing
blankets, curtain etc.
Heavy
Duty
Cold / Cold
Heavy soiled clothes (bluejean,climbing clothes, ruck sack,
sports wear,...)
Warm / Warm
Wash: pre wash + main
wash Rinse: 3
Spin: High
soil level : normal
Sanitary
Heavy soiled underwear, work
clothes, diapers, etc.
Extra hot/cold
(Hot/Warm)
Wash: main wash
Rinse: 2
Spin: Medium
soil level : light
Refer to rating
label
Speed
Wash
Lightly soiled clothes and
frequently washing clothes and
small amount of clothes.
Wash.
Cold / Cold
Wash: main wash
Rinse: 1
Spin: Low
soil level : light
Less than 3 kg
Use to clean the Tub
and Drum.
Cold / Cold
Wash: soak
Rinse: 2
Spin: Low
Drum
Cleaning
16
Without load.
Program
Soak
White
Delay
Wash
PreWash
Extra
Wash
Extra
Rinse
Rinse
+Spin
Night
Time
O
O
O
O
O
O
O
O
O
O
O
O
Wool
Delicate
O
Permpress
O
O
O
O
O
O
Cotton
O
O
O
O
O
O
Normal
O
O
O
O
O
O
Heavy
Duty
O
O
O
O
O
O
O
O
O
O
O
O
O
O
O
O
O
O
Bulk
Sanitary
O
Speed
wash
O
Drun
Cleanign
O
17
WASHING PROCEDURE AND SELECTION
1. WHITE PROGRAM
1
Put the laundry into the Drum and put the detergent and softerner into the detergent
case.
Then close the Door.
• Put the detergent into the main wash room(I I marking) and prewash room(I marking)
in the detergent case.
• Liquid detergent, Softner and Bleach should be below ‘MAX’ level.
• Put the detergent into the pre wash room(I marking) only if you want to add prewash.
2
Press the Power button.
• The LED shows only ‘- --’ signal.
3
Select the ‘WHITE’ program using the program selection dial.
• If you press ‘Start/Pause’ button aftrer pressing Power button without selecting
program, the ‘Normal’ program is selected as default program.
• ‘Main wash’ and ‘2’ times rinse and ‘Medium’ spin speed and ‘ Warm/Cold’
water temperature and ‘light’ soil level are selected automatically.
• If you want to change the 'Wash/Rinse' and 'Water Temperature' and 'Spin Speed'
and 'Soil Level' and 'Beeper' , select program what you want to change by pressing
each button.
4
Press the ‘Start/Pause’ button.
• The washer will be operated with locking Door and supplying water after sensing the
amount of laundry automatically.
Note
• If you want to change the setting program during operation, press the ‘Start/Pause’ button to hold the
operation and change the program you want to change by pressing each corresponding button.
• The water temperature 'Cold/Cold'~'Hot/Cold' are only selectable.
18
2. WOOL PROGRAM
1
Put the laundry into the Drum and put the detergent and softerner into the detergent
case.
Then close the Door.
• Put the detergent into the main wash room(I I marking) in the detergent case.
• Liquid detergent, Softner and Bleach should be below ‘MAX’ level.
2
Press the Power button.
• The LED shows only ‘- --’ signal.
3
Select the ‘WOOL’ program using the program selection dial.
• If you press ‘Start/Pause’ button aftrer pressing Power button without selecting
program, the ‘Normal’ program is selected as default program.
• ‘Cold/Cold’ water temperature and ‘Light’ soil level and ‘Main Wash’ and ‘1’ time rinse
and ‘Low’ spin speed are selected automatically.
• If you want to change the 'Spin Speed' and 'Beeper', select program what you want to
change by pressing each button.
4
Press the ‘Start/Pause’ button.
• The washer will be operated with locking Door and supplying water after sensing the
amount of laundry automatically.
Note
• If you want to change the setting program during operation, press the ‘Start/Pause’ button to hold the operation
and change the program you want to change by pressing each corresponding button.
• Water Temperature 'Cold/Cold' is only selected, in order to prevent clothes from damaging.
• ‘Time Delay’ is not selected.
• Soil Level 'Light' is only selected, in oreder to prevent clothes from damaging.
• Spin speed 'no spin'~'Low' are only selectable.
19
3. DELICATE PROGRAM
1
Put the laundry into the Drum and put the detergent and softerner into the detergent
case.
Then close the Door.
• Put the detergent into the main wash room(I I marking) and prewash room(I marking)
in the detergent case.
• Liquid detergent, Softner and Bleach should be below ‘MAX‘ level.
• Put the detergent into the pre wash room(I marking) only if you want to add prewash.
2
Press the Power button.
• The LED shows only ‘- --’ signal.
3
Select the ‘DELICATE’ program using the program selection dial.
• If you press ‘Start/Pause’ button aftrer pressing Power button without selecting
program, the ‘NORMAL’ program is selected as default program.
• ‘Cold / Cold’ Water temperature and ‘Normal’ soil level and ‘Main Wash’ and ‘1’
times rinse and ‘Low’ spin speed are selected automaically.
• If you want to change the 'Spin Speed' and 'Soil Level' and 'Beeper' , select program
what you want to change by pressing each button.
4
Press the ‘Start/Pause‘ button.
• The washer will be operated with locking Door and supplying water after sensing the
amount of laundry automatically.
Note
• If you want to change the setting program during operation, press the ‘Start/Pause’ button to hold the operation
and change the program you want to change by pressing each corresponding button.
• Time Delay is not selected.
• Spin speed ‘no spin ~ ‘Medium’ are only selectable.
• Wash/Rinse water Temperature 'cold/cold' is only selected, in oreder to prevent clothes from damaging.
20
4. PERM PRESS PROGRAM
1
Put the laundry into the Drum and put the detergent and softerner into the detergent
case.
Then close the Door.
• Put the detergent into the main wash room(I I marking) and prewash room(I marking)
in the detergent case.
• Liquid detergent, Softner and Bleach should be below ‘MAX’ level.
• Put the detergent into the pre wash room(I marking) only if you want to add prewash.
2
Press the Power button.
• The LED shows only ‘- --’ signal.
3
Select the ‘Perm Press’ program using the program selection dial.
• If you press ‘Start/Pause’ button aftrer pressing Power button without selecting
program, the ‘NORMAL’ program is selected as default program.
• ‘Warm / Cold’ Water temperature and ‘Normal’ soil level and ‘Main Wash’ and ‘2’
times rinse and ‘High’ spin speed are selected automaically.
• If you want to change the 'Wash/Rinse Water Temperature' and 'Spin Speed' and 'Soil
Level' and 'Beeper', select program what you want to change by pressing each button.
4
Press the ‘Start/Pause’ button.
• The washer will be operated with locking Door and supplying water.
Note
• If you want to change the setting program during operation, press the ‘Start/Pause’ button to hold the operation
and change the program you want to change by pressing each corresponding button.
• The water temperature 'Cold/Cold'~'Hot/Cold' are only selectable.
21
5. COTTON PROGRAM
1
Put the laundry into the Drum and put the detergent and softerner into the detergent
case.
Then close the Door.
• Put the detergent into the main wash room(I I marking) and prewash room(I marking) in
the detergernt case.
• Liquid detergent, Softner and Bleach should be below ‘MAX’ level.
• Put the detergent into the pre wash room (I marking) only if you want to add prewash.
2
Press the Power button.
• The LED shows only ‘- --’ signal.
3
Select the ‘Normal’ program using the program selection dial.
• If you press ‘Start/Pause’ button aftrer pressing Power button without selecting
program, the ‘Cotton’ program is selected as default program.
• ‘Warm/Cold’ water temperature and ‘Normal’ soil level and ‘Main Wash’ and ‘2’ times
rinse and ‘Extra High’ spin speed are selected automatically.
• If you want to change the 'Wash/Rinse Water Temperature' and 'Spin Speed' and 'Soil
Level' and 'Beeper' , select program what you want to change by pressing each button.
4
Press the ‘Start/Pause’ button.
• The washer will be operated with locking Door and supplying water.
Note
• If you want to change the setting program during operation, press the ‘Start/Pause’ button to hold the operation
and change the program you want to change by pressing each corresponding button.
• The water temperature 'Cold/Cold'~'Hot/Cold' are only selectable.
22
6. NORMAL PROGRAM
1
Put the laundry into the Drum and put the detergent and softerner into the detergent
case.
Then close the Door.
• Put the detergent into the main wash room(I I marking) and prewash room(I marking) in
the detergernt case.
• Liquid detergent, Softner and Bleach should be below ‘MAX’ level.
• Put the detergent into the pre wash room (I marking) only if you want to add prewash.
2
Press the Power button.
• The LED shows only ‘- --’ signal.
3
Select the ‘NORMAL‘ program using the program selection dial.
• If you press ‘Start/Pause’ button aftrer pressing Power button without selecting
program, the ‘Normal’ program is selected as default program.
• ‘Warm/Cold’ water temperature and ‘Normal’ soil level and ‘Main Wash’ and ‘2’ times
rinse and ‘Medium’ spin speed are selected automatically.
• If you want to change the 'Wash/Rinse Water Temperature' and 'Spin Speed' and 'Soil
Level' and 'Beeper' , select program what you want to change by pressing each button.
4
Press the ‘Start/Pause’ button.
• The washer will be operated with locking Door and supplying water.
Note
• If you want to change the setting program during operation, press the ‘Start/Pause’ button to hold the operation
and change the program you want to change by pressing each corresponding button.
• The water temperature 'Cold/Cold'~'Hot/Cold' are only selectable.
23
7. HEAVY DUTY PROGRAM
1
Put the laundry into the Drum and put the detergent and softerner into the detergent
case.
Then close the Door.
• Put the detergent into the main wash room(I I marking) and prewash room(I marking)
in the detergent case.
• Liquid detergent, Softner and Bleach should be below ‘MAX’ level.
• Put the detergent into the pre wash room(I marking) only if you want to add prewash.
2
Press the Power button.
• The LED shows only ‘- --’ signal.
3
Select the ‘HEAVY DUTY’ program using the program selection dial.
• If you press ‘Start/Pause’ button aftrer pressing Power button without selecting
program, the ‘Normal’ program is selected as default program.
• ‘Warm/Warm’ water temperature and ‘Heavy’ soil level and ‘Main Wash' and ‘2’ times
rinse and ‘Medium’ spin speed are selected automatically.
• If you want to change the 'Wash/Rinse Water Temperature' and 'Spin Speed' and 'Soil
Level' and 'Beeper', select program what you want to change by pressing each button.
4
Press the ‘Start/Pause’ button.
• The washer will be operated with locking Door and supplying water.
Note
• If you want to change the setting program during operation, press the ‘Start/Pause’ button to hold the operation
and change the program you want to change by pressing each corresponding button.
• The water temperature 'Cold/Cold'~'Hot/Cold' are only selectable.
24
8. BULKY / LARGE PROGRAM
1
Put the laundry into the Drum and put the detergent and softerner into the detergent
case.
Then close the Door.
• Put the detergent into the main wash room(I I marking) and prewash room(I marking) in
the detergernt case.
• Liquid detergent, Softner and Bleach should be below ‘MAX’ level.
• Put the detergent into the pre wash room (I marking) only if you want to add prewash.
2
Press the Power button.
• The LED shows only ‘- --’ signal.
3
Select the ‘BULKY / LARGE’ program using the program selection dial.
• If you press ‘Start/Pause’ button aftrer pressing Power button without selecting
program, the ‘Normal’ program is selected as default program.
• ‘Cold/Cold’ water temperature and ‘Normal’ soil level and ‘Main Wash’ and ‘2’ times
rinse and ‘Medium’ spin speed are selected automatically.
• If you want to change the 'Wash/Rinse Water Temperature' and 'Spin Speed' and 'Soil
Level' and 'Beeper', select program what you want to change by pressing each button.
4
Press the ‘Start/Pause’ button.
• The washer will be operated with locking Door and supplying water.
Note
• If you want to change the setting program during operation, press the ‘Start/Pause’ button to hold the operation
and change the program you want to change by pressing each corresponding button.
• ‘Time Delay’ is not selected.
• The water temperature 'Cold/Cold'~'Warm/Warm' are only selectable.
The spin speed 'No Spin'~'High' are only selectable.
25
9. SANITARY PROGRAM
1
Put the laundry into the Drum and put the detergent and softerner into the detergent
case.
Then close the Door.
• Put the detergent into the main wash room(I I marking) and prewash room(I marking)
in the detergernt case.
• Liquid detergent, Softner and Bleach should be below ‘MAX’ level.
• Put the detergent into the pre wash room (I marking) only if you want to add prewash.
2
Press the Power button.
• The LED shows only ‘- --’ signal.
3
Select the ‘Sanitary’ program using the program selection dial.
• If you press ‘Start/Pause’ button aftrer pressing Power button without selecting
program, the ‘Normal’ program is selected as default program.
• ‘Extra Hot/Cold (Hot/Warm)’ water temperature and ‘Normal’ soil level and ‘Main Wash’
and ‘2’ times rinse and ‘Medium’ spin speed are selected automatically.
• If you want to change the 'Wash/Rinse Water Temperature' and 'Spin Speed' and 'Soil
Level' and 'Beeper', select program what you want to change by pressing each button.
4
Press the ‘Start/Pause’ button.
• The washer will be operated with locking Door and supplying water.
Note
• If you want to change the setting program during operation, press the ‘Start/Pause’ button to hold the
operation and change the program you want to change by pressing each corresponding button.
26
10. SPEED-WASH PROGRAM
1
Put the laundry into the Drum and put the detergent and softerner into the detergent
case.
Then close the Door.
• Put the detergent into the main wash room(I I marking) in the detergent case.
• Liquid detergent, Softner and Bleach should be below ‘MAX’ level.
2
Press the Power button.
• The LED shows only ‘- --’ signal.
3
Select the ‘Speed-wash’ program using the program selection dial.
• If you press ‘Start/Pause’ button aftrer pressing Power button without selecting
program, the ‘Normal’ program is selected as default program.
• ‘Cold/Cold’ water temperature and ‘Light’ soil level and ‘Main Wash’ and ‘1’ times
rinse and ‘Low’ spin speed are selected automatically.
• If you want to change the 'Wash/Rinse Water Temperature' and 'Spin Speed' and 'Soil
Level' and 'Beeper', select program what you want to change by pressing each button.
4
Press the ‘Start/Pause’ button.
• The washer will be operated with locking Door and supplying water.
Note
• The appropriate amount of laundry is below 3 kg.
• If you want to change the setting program during operation, press the ‘Start/Pause’ button to hold the
operation and change the program you want to change by pressing each corresponding button.
• The water temperature 'Cold/Cold'~'Warm/Warm' are only selectable.
The spin speed 'No Spin'~'Medium' are only selectable.
27
11. DRUM CLEANING PROGRAM
1
Press the Power button.
• The LED shows only ‘- --’ signal.
2
Select the ‘DRUM CLEANING’ program using the program selection dial.
• If you press ‘Start/Pause’ button aftrer pressing Power button without selecting
program, the ‘Normal’ program is selected as default program.
• ‘Cold/Cold’ water temperature and ‘soak’ washing course and ‘2’ times rinse and
‘Low’ spin speed are selected automatically.
3
Press the ‘Start/Pause’ button.
• The washer will be operated with locking Door and supplying water.
Note
• 'Time Delay' is not selected.
• Use this program without load.
• The appropriate cleaning time is one time per a month.
28
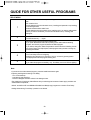
GUIDE FOR OTHER USEFUL PROGRAMS
DELAY WASH
1
Put the laundry into the Drum and put the detergent and softerner into the detergent
case.
Then close the Door.
• Put the detergent into the main wash room(I I marking) and prewash room(I marking)
in the detergent case.
• Softener should be below ‘MAX’ level.
• Put the detergent into the pre wash room(I marking) only if you want to add prewash.
• When you want to use bleach, put it into the main wash room (I I marking) with
detergent.
2
Press the Power button.
• The LED shows only ‘- --’ signal.
3
Select the program using the program selection dial.
• If you press ‘Start/Pause’ button aftrer pressing Power button without selecting
program, the ‘Normal’ program is selected as default program.
• If you want to change the ‘Water Temperature’ and ‘Soil level’ and ‘Washing Course’
and ‘Rinse Time(s)’ and ‘Spin Speed’, select program what you want to change by
pressing each button.
4
Press the ‘Time Delay’ button.
• The ‘Time Delay’ LED is to be lighting.
• Select the time delay time you want from 1 hour to 12 hours by pressing button.
• The displayed time shows program finishing time.
5
Press the ‘Start/Pause’ button.
• If you make this program successfully, only ‘Time Delay’ and ‘Lock’ LED are lighting.
Note
• If you want to check the selected program, press the ‘Start/Pause’ button again.
• Preparing washing before starting ‘Time Delay’;
- Turn on the water tap.
- Load laundry and close Door.
- Place the detergent and fabric softner in the detergent case.
• The actual time of finishing is a little different with your selecting time because of water supply condition and
selected water temperature,....
• ‘WOOL’ and ‘DELICATE’ and ‘DRUM CLEANING’ and 'Bulky/Large' program are not select ‘Time Delay’.
• Adding clothes during ‘Time Delay’ operation is not allowed.
29
CUSTOM PROGRAM
1
Put the laundry into the Drum and put the detergent and softerner into the detergent case.
Then close the Door.
• Put the detergent into the main wash room(I I marking) and prewash room(I marking) in the
detergent case.
• Softener should be below ‘MAX’ level.
• Put the detergent into the pre wash room(I marking) only if you want to add prewash.
• When you want to use bleach, put it into the main wash room (I I marking) with detergent.
2
Press the Power button.
• The LED shows only ‘- --’ signal.
3
Press the Custom button
• '18:88' or 'CEP' will be showen by turns.
4
Press Start/ pause Button
Note :
use to memorize frequently used program
To make a Custom Program.
1. Select a cycle. ('18:88'or'CEP' will be showen by turns)
2. Select Wash/Rinse Temperature, Spin Speed, and Soil Level.
3. Select other desired Options.
4. Press Start/Pause Button.
ONLY SPIN
1
Put the laundry into the Drum and close the Door.
2
Press the Power button.
• The LED shows only ‘- --’ signal.
3
Select the ‘SPIN CONDITION’ you want by pressing ‘SPIN’ button.
• The ‘Normal’ program is selected automatically.
• The water temperature is selected to ‘Cold/Cold’ automatically.
4
Press the ‘Start/Pause’ button.
• The washer will be operated with locking Door.
30
RINSE+SPIN
1
Put the laundry into the Drum and put softerner into the detergent case.
Then close the Door.
• Softener should be below ‘MAX’ level.
2
Press the Power button.
• The LED shows only ‘- --’ signal.
3
Select the program you want using the program selection dial.
• If you press ‘RINSE+SPIN’ button without selecting program, the ‘Cotton’ program is selected
as default program.
4
Press the ‘RINSE+SPIN’ button.
• ‘1’ time rinse and ‘Medium’ rpm spin speed and ‘Cold/Cold’ water temperature are selected
automatically.
• ‘Low’ rpm spin speed is selected in ‘WOOL’ and ‘DELICATE’ program.
• If you want to change the Rinse time(s) and Spin condition, press each corresponding button.
5
Press the ‘Start/Pause’ button.
• The washer will be operated with locking Door.
Note :
• The water temperature selecting is possible during this process.
31
MAINTENANCE
Proper care of your washer can extend its life. This section explains how to care for your washer properly and
safely.
Cleaning your washer
Exterior
Interior
Wipe up detergent, bleach, and other spills with
a soft, damp cloth or sponge as they occur.
Occasionally wipe the outside of the washer to
keep its looking like new one.
Clean interior with 250ml of chlorine bleach
mixed with 500ml of detergent.
Run washer through a complete cycle.
Repeat this process if necessary.
Do not put sharp or metal object in your washer, or they can damage
the finish.
Check all pockets for pins, clips, money, bolts, nuts, etc.
Do not lay these objects in your washer after emptying pockets.
Winter storage or moving care
IInstall and store your washer where it will not freeze. Because some water may stay in the hoses, freezing can
damage your washer.
If you store or move your washer during freezing weather, winterize it.
To winterize washer
To use washer again
• Turn off water faucet.
• Flush water pipes and hoses.
• Disconnect and drain water inlet hoses.
• Reconnect water inlet hoses.
• Run washer on a drain and spin setting
for 1 minute.
• Turn on water faucet.
• Reconnect power supply cord.
• Unplug the power supply cord.
Non-use or vacation care
Operate your washer only when you are at home.
If you are on vacation or don‘t use your washer for an extended period of time, you should:
• Unplug the power supply cord or turn off eletrical power to the washer.
• Turn off the water supplier to the washer.
This helps avoid accidental flooding (due to a water pressure surge) while you are away.
32
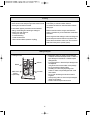
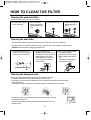
HOW TO CLEAN THE FILTER
Cleaning the water inlet filter
Clean the filter when water leaks from the water inlet.
$ Pull the power plug out
before cleaning it.
% Turn off the water
supply to the washer
and separate the inlet
hose.
& Pull the inlet filter out.
( Remove the dirt from
the inlet filter with a
brush.
Cleaning the drain filter
• This drain filter is used to screen the foreign stuffs such as threads, coins, pins, buttons etc..
• If the drain filter is not cleaned at proper time(every 10 times of use), drain problem could be caused.
CAUTION : Be careful when draining if the water is hot.
$ Open the lower cover(1) by
using a coin. Remove the cap
hose(2) to pull out the hose.
% Unplug the cap hose(2),
allowing the water to flow out. At
this time use a vessel to prevent
water flowing on to the floor.
When water does not flow any
more, turn the pump filter(3)
open to the left.
& Remove any foreign material
from the pump filter(3).
After cleaning, turn the pump
filter clockwise and insert the
cap
hose(2) to the original place.
Close the lower cover.
Cleaning the detergent case
After a while detergent and fabric softeners leave a deposit in the case;
- It should be cleaned from time to time with a jet of running water.
- If necessary it can be removed completely from the machine by pressing the catch downwards
and by pulling it out.
- To facilitate cleaning, the upper part of the fabric softener compartment can be removed.
• Detergent can also accumulate inside the recess which should be cleaned
occasionally with a brush.
• Once you have finished cleaning, replace the case and run a rinse cycle
without laundry.
33
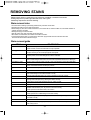
REMOVING STAINS
Stained, heavily-soiled, or greasy items may need to be prewashed or soaked for best results.
Soaking helps remove protein-type stains like blood, milk or grass.
Prewashing helps loosen soil before washing.
Stain removal rules
• Use warm water for soaking or prewashing stained laundry. Hot water can set stains.
• Most stains are easier to remove when they are fresh.
• Before treating any stain, find out what kind of stain it is, how old the stain is, what kind of fabric it is, and whether the fabric is
colorfast. (Check the care label)
• Washing and drying can set some stains.
• Start with cold or warm water. Hot water can set some stains.
• When bleach is recommended, use a bleach that is safe for the fabric.
• Put the stained area face down on a paper towel or white cloth. Apply the stain remover to the back of the stain.
This forces the stain off fabric instead of through it.
Stain removal guide
TO REMOVE
STAIN
Blood
Rinse immediately in COLD water.
If stain remains, soak in cold water with an enzyme prewash.
Chewing gum
Use ice in plastic bag to harden the gum.
Scrape off what you can and the sponge with white spirits.
Cocoa, Chocolate
Sponge with COLD water and soak in an enzyme prewash.
If stains persist, rub in a little detergent and rinse in cold water.
Coffee
Blot up quickly and rinse out in COLD water.
Rub in a little detergent and wash in the maximum temperature allowed for the fabric type.
Cream/Milk/Ice cream
Rinse in COLD water and wash normally. If stain is still apparent, sponge with white spirits.
Deodorant
Rub affected area with white vinegar and then rinse out in COLD water. Sponge with white
spirits. Treat stiffened areas with enzyme prewash.
Egg
Soak in a COLD enzyme prewash, rinse and wash normally.
Fabric/Softener
Rub affected area with bar soap and wash normally.
Fruit stains
Treat as soon as possible by sponging with COLD water.
Rub a little detergent on the stain and wash normally.
Grass
Sponge with white spirits. Rub in an enzyme prewash and wash as normally.
Grease and oil
Lay the affected area face down on an absorbent cloth and work from the back.
Sponge with white spirits or dry cleaning fluid. Wash normally.
Iron or rust
Apply lemon juice and salt and place in the sun. Wash normally.
Lipstick
Sponge with white methylated spirits and wash normally.
Mildew
Wash in WARM water and detergent.
Moisten area with lemon juice, dry in the sun and wash normally.
If stain persists and the fabric allows, use a bleach.
Mud
Brush off any dry mud. Rinse in cold water.
If stain persists rub in a little detergent and wash normally.
Paint-oil based
Scrape off any fresh paint and sponge with a non flammable dry cleaning fluid
and wash normally.
Paint-water based
Treat while still wet, rinse in WARM water and wash normally.
Scorch marks
Dampen a cloth with hydrogen peroxide, lay it over the affected area and press
with a fairly hot iron.
34
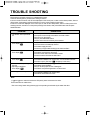
TROUBLE SHOOTING
Most problems are easily solved if you understand the cause.
Check the following list for problem before calling for service.
If the error mode such as IE, OE, UE were displayed on the control part, in order to solve these problem, first turn
off the power of the washing machine and then turn on the power pressing Power button.
If PFE error mode was displayed on the control part, in order to solve this problem, first turn off the power of the
washing machine, second turn on the power pressing Power button, third press SPIN button and last press
Start/Hold button.
PROBLEM
CHECK POINT
• The washer will not operate at
all.
• Is there a power failure?
• Is the power cord correctly connected to an electric outlet?
• Did you turn on the power?
• Did you press Start/Hold button?
• Is there correct amount of laundry in the washer?
• Water is not supplied
Error display
• Did you connect the inlet hose and open the water tap?
• Is the inlet hose or the water tap frozen?
• Is the water supply shot off?
• Is there any foreign matter blocking up the inlet hose filter?
• The washer will not drain
Error display
• Is the drain hose frozen or blocked up by dirt?
• Is the drain hose kinked or deformed?
• Is the end of the drain hose immersed in water?
• Is there excessive dirt inside the drain filter?
• The washer will not spin
Error display
• Is the clothes in the drum collected on one side?
• Is the washer installed on an uneven floor or is the vibration serious?
• Is the door open? (The lamp “
” will light up in this case.)
• The washer will stop during
spinning .
• Spinning is insufficient.
Error display
• Is the filter of the drain pump clogged?
• Is the drain pump operated?
• Did you use the proper amount of detergent?
• Is the drain hose placed higher than 1m above floor?
• Vibrating and too noisy
• Is the washer installed on an uneven floor?
• Have all the transit bolts removed?
Note
• If
and
error mode are showed on LED panel, please contact service center.
These cases are not malfunctions;
• The sound “wing” heard during water supply is the operating sound made by the water inlet valve.
35
SPECIFICATION
MODEL
DWD-WD3011WW/RR
DWD-WD31WW
DWD-WD33WS/SS/RS
Dimensino (Inches)
27 x 31.8 x 40.1 (W x D x H) (Door open D : 40.9)
Unit Weight (lbm)
198.4(Net) / 227(Gross)
Spin Speed (RPM)
1000 RPM
Operating Water Pressure
Wash capacity
Electrical Spec.
1200 RPM
4.5~145 PSI (30~1000 kPa)
3.52 cu.ft. DOE, 4.0 cu.ft. IEC,
120V/60Hz, 6.6A
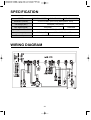
WIRING DIAGRAM
36
3.85 cu.ft. DOE, 4.2 cu.ft. IEC,
120V / 60Hz, 10 A
ABOUT THIS MANUAL
)*+*,-!./012*)03!*-.4
56 789 :;<
=>? @ABC DE
F
G
HIJ KLM
N O P
Q10R,,
S
T
UT
V4!W,Q0X
YZ[ R\]^_`!W1-a1X
b4!W,Q0X
QRQcRQdeffRRg//3!RQdfRR3!RQddR+!g!++!g!/+
fh
ih
J
j
dh
Dh
kh
l
m
o
n
p
qPr
W0W,!stu!vwd=xy
fe4ei4fec‚?3!d=xƒ!„… ix
z{|
)*+*,- F G
} ~ t
20Xu •dece==e!V1€u •decd•••