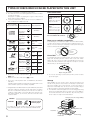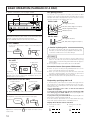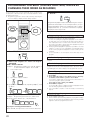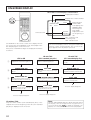
1
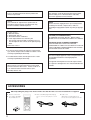
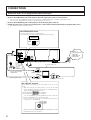
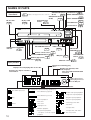
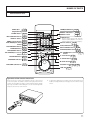
Natural Sound CD/CDV/LD Player
' L
NTSC
OWNER’S MANUAL
IMPORTANT!
CAUTION
Please record the serial number of this unit in the space
below.
RISK OF ELECTRIC SHOCK
DO NOT OPEN
CAUTION: TO REDUCE THE RISK OF ELECTRIC
SHOCK, DO NOT REMOVE COVER (OR BACK)
NO USER-SERVICEABLE PARTS INSIDE, REFER
SERVICING TO QUALIFIED SERVICE
PERSONNEL.
Model : CDV-W901
Serial No. :
The serial number is located on the rear of the unit.
Retain this Owner’s Manual in a safe place for future
reference.
WARNING
To reduce the risk of fire or electric shock, do not expose
this unit to rain or moisture.
÷ Explanation of Graphical Symbols
The lightning flash with arrowhead symbol, within an
equilateral triangle, is intended to alert you to the presence
of uninsulated “dangerous voltage” within the product's
enclosure that may be of sufficient magnitude to constitute
a risk of electric shock to persons.
This unit is designed for your enjoyment in your home.
We cannot be liable for the quality of the unit if you use it
for business use.
So please do not use this unit for business use.
The exclamation point within an equilateral triangle is
intended to alert you to the presence of important
operating and maintenance (servicing) instructions in the
literature accompanying the appliance.
CONTENTS
ACCESSORIES .......................................................................... 4
PRECAUTIONS ......................................................................... 5
TYPES OF DISCS WHICH CAN BE PLAYED
WITH THIS UNIT ....................................................................... 6
GLOSSARY ............................................................................... 7
CONNECTIONS ......................................................................... 8
NAMES OF PARTS
Front panel ......................................................................... 10
Display window .................................................................. 10
Remote control unit ........................................................... 11
BASIC OPERATION (PLAYBACK OF A DISC) ........................ 12
MOVIE DISC ENTERTAINMENT ............................................. 14
SINGING ALONG WITH KARAOKE ENTERTAINMENT .......... 15
APPLIED OPERATIONS .......................................................... 16
QUICK SCANNING OF DISC CONTENTS ............................... 20
RANDOM PLAYBACK (PLAYBACK IN ORDER
SELECTED BY THE PLAYER) ................................................. 20
TO SEARCH FOR A DESIRED FRAME ................................... 21
PROGRAMMED PLAYBACK (PLAYING CHAPTERS /
TRACKS BY CHANGING THEIR ORDER AS REQUIRED) ....... 22
REPEAT PLAYBACK ................................................................ 23
ON-SCREEN DISPLAY ............................................................ 24
TROUBLESHOOTING ............................................................. 25
SPECIFICATIONS .................................................................... 27
1
ENGLISH
s CDV-W901
SAFETY INSTRUCTIONS
1 Read Instructions – All the safety and operating
instructions should be read before the appliance is
operated.
2 Retain Instructions – The safety and operating
instructions should be retained for future reference.
3 Heed Warnings – All warnings on the appliance and in
the operating instructions should be adhered to.
4 Follow Instructions – All operating and use instructions
should be followed.
5 Cleaning – Unplug this video product from the wall
outlet before cleaning. Do not use liquid cleaners or
aerosol cleaners. Use a damp cloth for cleaning.
Exception: A product that is meant for uninterrupted
service and that for some specific reason, such as the
possibility of the loss of an authorization code for a
CATV converter, is not intended to be unplugged by the
user for cleaning or any other purpose, may exclude the
reference to unplugging the appliance in the cleaning
description otherwise required in item 5.
6 Attachments – Do not use attachments not
recommended by the video product manufacturer as
they may cause hazards.
7 Water and Moisture – Do not use this video product
near water – for example, near a bath tub, wash bowl,
kitchen sink, or laundry tub, in a wet basement, or near
a swimming pool, and the like.
8 Accessories – Do not place this video product on an
unstable cart, stand, tripod, bracket, or table. The video
product may fall, causing serious injury to a child or
adult, and serious damage to the appliance. Use only
with a cart, stand, tripod, bracket, or table
recommended by the manufacturer, or sold with the
video product. Any mounting of the appliance should
follow the manufacturer's instructions, and should use a
mounting accessory recommended by the
manufacturer.
9 Ventilation – Slots and openings in the cabinet are
provided for ventilation and to ensure reliable operation
of the video product and to protect it from overheating,
and these openings must not be blocked or covered.
The openings should never be blocked by placing the
video product on a bed, sofa, rug, or other similar
surface. This video product should never be placed
near or over a radiator or heat register. This video
product should not be placed in a built-in installation
such as a bookcase or rack unless proper ventilation is
provided of the manufacturer's instructions have been
adhered to.
10 Power Sources – This video product should be
operated only from the type of power source indicated
on the marking label. If you are not sure of the type of
power supply to your home, consult your appliance
dealer or local power company. For video products
intended to operate from battery power, or other
sources, refer to the operating instructions.
11 Grounding or Polarization – This video product is
equipped with a polarized alternating-current line plug
(a plug having one blade wider than the other). This
plug will fit into the power outlet only one way. This is a
safety feature. If you are unable to insert the plug fully
into the outlet, try reversing the plug. If the plug should
still fail to fit, contact your electrician to replace your
obsolete outlet. Do not defeat the safety purpose of the
polarized plug.
Alternate Warnings – This video product is equipped
with a 3-wire grounding-type plug, a plug having a third
(grounding) pin. This plug will only fit into a groundingtype power outlet. This is a safety feature. If you are
unable to insert the plug into the outlet, contact your
electrician to replace your obsolete outlet. Do not
defeat the safety purpose of the grounding-type plug.
12 Power-Cord Protection – Power-Supply cords should be
routed so that they are not likely to be walked on or
pinched by items placed upon or against them, paying
particular attention to cords at plugs, convenience
receptacles, and the point where they exit from the
appliance.
8A An appliance and cart combination
should be moved with care. Quick
stops, excessive force, and
uneven surfaces may cause the
appliance and cart combination to
overturn.
13 Lightning – For added protection for this video product
receiver during a lightning storm, or when it is left
unattended and unused for long periods of time, unplug
it from the wall outlet and disconnect the antenna or
cable system. This will prevent damage to the video
product due to lightning and power-line surges.
14 Power Lines – An outside antenna system should not
be located in the vicinity of overhead power lines or
other electric light or power circuits, or where it can fall
into such power lines or circuits. When installing an
outside antenna system, extreme care should be taken
to keep from touching such power lines or circuits as
contact with them might be fatal.
2
extension cords as this can result in a risk of fire or
electric shock.
16 Object and Liquid Entry – Never push objects of any
kind into this video product through openings as they
may touch dangerous voltage points or short-out parts
that could result in a fire or electric shock. Never spill
liquid of any kind on the video product.
17 Servicing – Do not attempt to service this video product
yourself as opening or removing covers may expose
you to dangerous voltage or other hazards. Refer all
servicing to qualified service personnel.
18 Damage Requiring Service – Unplug this video product
from the wall outlet and refer servicing to qualified
service personnel under the following conditions:
a. When the power-supply cord or plug is damaged.
b.If liquid has been spilled, or objects have fallen into
the video product.
c. If the video product has been exposed to rain or
water.
d.If the video product does not operate normally by
following the operating instructions. Adjust only those
controls that are covered by the operating instructions
as an improper adjustment of other controls may
result in damage and will often require extensive work
by a qualified technician to restore the video product
to its normal operation.
e. If the video product has been dropped or the cabinet
has been damaged.
f. When the video product exhibits a distinct change in
performance – this indicates a need for service.
19 Replacement Parts – When replacement parts are
required, be sure the service technician has used
replacement parts specified by the manufacturer or
have the same characteristics as the original part.
Unauthorized substitutions may result in fire, electric
shock or other hazards.
20 Safety Check – Upon completion of any service or
repairs to this video product, ask the service technician
to perform safety checks to determine that the video
product is in proper operating condition.
We Want You Listening For A Lifetime
YAMAHA and the Electronic Industries Association's
Consumer Electronics Group want you to get the most out
of your equipment by playing it at a safe level.
One that lets the sound come through loud
and clear without annoying blaring or
distortion – and, most importantly, without
affecting your sensitive hearing. Since
hearing damage from loud sounds is often
We
Want You
undetectable until it is too late, YAMAHA
LISTENING
For A Lifetime
and the Electronic Industries Association's
Consumer Electronics Group recommend
you avoid prolonged exposure to excessive
volume levels.
FCC INFORMATION (U.S.A.)
1. IMPORTANT NOTICE: DO NOT MODIFY THIS
UNIT!
This product, when installed as indicated in the
instructions contained in this manual, meets FCC
requirements. Modifications not expressly approved
by Yamaha may void your authority, granted by the
FCC, to use the product.
2. IMPORTANT: When connecting this product to
accessories and/or another product use only high
quality shielded cables. Cable/s supplied with this
product MUST be used. Follow all installation
instructions. Failure to follow instructions could void
your FCC authorization to use this product in the
USA.
3. NOTE: This product has been tested and found to
comply with the requirements listed in FCC
Regulations, Part 15 for Class "B" digital devices.
Compliance with these requirements provides a
reasonable level of assurance that your use of this
product in a residential environment will not result in
harmful interference with other electronic devices.
This equipment generates/uses radio frequencies
and, if not installed and used according to the
instructions found in the users manual, may cause
interference harmful to the operation of other
electronic devices. Compliance with FCC
regulations does not guarantee that interference will
not occur in all installations. If this product is found
to be the source of interference, which can be
determined by turning the unit "OFF" and "ON",
please try to eliminate the problem by using one of
the following measures:
Relocate either this product or the device that is
being affected by the interference.
Utilize power outlets that are on different branch
(circuit breaker or fuse) circuits or install AC line
filter/s.
In the case of radio or TV interference, relocate/
reorient the antenna. If the antenna lead-in is 300
ohm ribbon lead, change the lead-in to coaxial type
cable.
If these corrective measures do not produce
satisfactory results, please contact your local retailer
authorized to distribute this type of product. If you
can not locate the appropriate retailer, please
contact Yamaha Electronics Corp., U.S.A. 6600
Orangethorpe Ave, Buena Park, CA90620
The above statements apply ONLY to those
products distributed by Yamaha Corporation of
America or its subsidiaries.
3
ENGLISH
15 Overloading – Do not overload wall outlets and
DANGER
The use of optical instrument with this product will
increase eye hazard.
CAUTION
Use of controls or adjustments or performance of
procedures other than those specified herein may
result in hazardous radiation exposure.
CAUTION
The apparatus is not disconnected from the AC power
source so long as it is connected to the wall outlet,
even if the apparatus itself is turned off.
NOTE:
Please check the copyright laws in your country before
recording from records, compact discs, radio, etc.
Recording of copyrighted material may infringe copyright
laws.
Laser Diode properties
Material: GaAlAs
Wavelength: 780 nm
● Emission Duration: Continuous
● Laser Output Power: less than 44.6 µW*
* This out-put value measured at a distance 200 mm
from the objective lens surface on the optical pick-up
block.
ANSI Class: Class 1
●
●
CAUTION (FOR CANADA MODEL)
TO PREVENT ELECTRIC SHOCK , MATCH WIDE
BLADE OF PLUG TO WIDE SLOT AND FULLY INSERT.
ATTENTION (POUR LE MODELE CANADIEN):
POUR ÉVITER LES CHOCS ÉLECTRIQUES,
INTRODUIRE LA LAME LA PLUS LARGE DE LA FICHE
DANS LA BORNE CORRESPONDANTE DE LA PRISE
ET POUSSER JUSQU’AU FOND.
As the laser beam used in this player is harmful to the
eyes, do not attempt to disassemble the cabinet. Refer
servicing to qualified personnel only.
●
To avoid electrical shock, do not open the unit. Refer
servicing to qualified personnel only.
●
This unit has been designed for use with the NTSC
format, which is the television format used in North
America and some other areas. Do not use discs or
a TV made for other television formats (PAL,
SECAM) with this unit.
This Class B digital apparatus meets all requirements of
the Canadian Interference-Causing Equipment
Regulations.
Cet appareil numérique de la Classe B respecte toutes
les exigences du Règlement sur le matériel brouilleur du
Canada.
ACCESSORIES
When unpacking the player, first check to make sure that all of the accessories listed below are supplied.
●
●
4
Remote control unit
Size "AAA" (IEC R03)
dry cell batteries x 2
●
Video cord (RCA plug Ô RCA plug)
Use to connect the player to a TV
etc.
●
Audio cord
(RCA plug × 2 Ô RCA plug × 2)
Use to connect the player to a TV etc.
If it becomes necessary to transport or ship this unit in the
future, be sure to first remove the disc (if loaded), and retract the disc table to its closed position. Then turn the
power off, and, after the “OFF” display goes out on the
display, disconnect the power cord.
INSTALLING THE PLAYER
÷
Place the player on a stable platform next to the television
and stereo system to be used with the player.
÷
Do not place heavy objects such as a television or TV
monitor on top of the player.
÷
Do not place the player on top of your TV set or TV monitor. Also, keep the player away from devices such as cassette
decks which are sensitive to magnetic fields.
DO NOT INSTALL THE PLAYER IN THE FOLLOWING LOCATIONS
÷
÷
÷
÷
÷
÷
In a place subject to direct sunlight.
In humid or poorly ventilated places.
In extremely hot or cold places.
In a place subject to vibrations.
In a dusty place.
In a place subject to soot, steam or heat (in a kitchen, etc.)
AVOID SOURCES OF HEAT
Do not put the player on sources of heat, such as an amplifier.
When installing with audio components on a rack, avoid components that generate heat, by placing the player below such components where there is adequate ventilation and not much dust.
Avoid placing the player on surfaces such as shaggy carpets, beds,
and sofas which may block ventilation under the player and cause
damage.
CAUTION
Even when the player is in the pause mode, the disc-drive motor is
still revolving. Since leaving the player in this condition can shorten
the lifetime of the motor, do not leave the player in the pause
mode for long periods of time. Also, to prevent the damage to the
screen, do not use the unit for long periods of time under conditions in which the screen display (monitor) continuously displays
characters (for example, power-ON mode, CD PLAY, PAUSE or
DEMO mode).
With LD discs, if playback is paused for about 20 minutes, the
player will automatically enter stop mode.
STRIPE PATTERNS APPEARING ON A TV PROGRAM
Stripe patterns may appear during a TV program if the player unit is
turned on, depending on the quality of reception of the TV station. This is neither a malfunction of the television nor the player. If
stripes appear while watching the TV, or when watching the TV for
long periods of time, turn the player off.
When FM or AM stations are being received, signal noise may be
generated if the player is turned on. Turn off the player when not
in use. Also, if there is signal noise when receiving radio stations
with an indoor antenna, adjust the position or direction of the
antenna.
CONDENSATION
Moisture will form in the operating section of the player if the player is brought from cool surroundings into
a warm room or if the temperature of the room rises
suddenly. When this happens, the player’s performance
will be impaired.
To prevent this, let the player stand in its new surroundings for about an hour before switching it on, or
make sure that the room temperature rises gradually.
Condensation may also form during the summer if the player is
exposed to the breeze from an air conditioner. In such cases,
change the location of the player.
POWER-CORD CAUTION
Handle the power cord by the plug. Do not pull out the plug by
tugging the cord and never touch the power cord when your hands
are wet as this could cause a short circuit or electric shock. Do not
place the unit, a piece of furniture, etc., on the power cord, or
pinch the cord. Never make a knot in the cord or tie it with other
cords. The power cords should be routed such a way that they are
not likely to be stepped on. A damaged power cord can cause fire
or give you an electrical shock. Check the power cord regularly.
When you find it damaged, ask your nearest authorized YAMAHA
service center or your dealer for a replacement.
CLEANING CARE
Use a soft, dry cloth for cleaning. For stubborn dirt, soak the cloth
in a weak detergent solution; wring well first and wipe. Use a dry
cloth to wipe it dry. Do not use any volatile agents such as
benzine or paint thinner, as they may damage the surface of the
player.
LD/CD lens cleaner
The player's pickup lens should not become dirty in normal use,
but if for some reason it should malfunction due to soiling, ask
your nearest authorized YAMAHA service center. Lens cleaners
for LD/CD players are commercially available, but special care should
be exercised in their use since some may cause damage to the
lens.
Abnormal functioning of this unit may be caused
by lightning, static electricity, or other external inter-ference. To restore normal operation, unplug
the AC power cord and then plug it in again.
Only one disc can be loaded at any one time. Loading
LaserDisc, Compact Disc, 8 cm Compact Disc or Compact Disc with Video on top of one another may result
in a breakdown, or in scratching of the discs. Please
only load one disc at a time.
This player is to be used exclusively with the NTSC color system. Please use NTSC LaserDiscs only. PAL and
SECAM system discs cannot be used with this player.
5
ENGLISH
PRECAUTIONS
TYPES OF DISCS WHICH CAN BE PLAYED WITH THIS UNIT
This unit is a CD/CDV/LD compatible laserdisc player.
÷ The marks shown in the following table are found on the label
or jacket of each disc.
This player is capable of playing the 7 types of discs listed
below without using an adapter.
÷ To prevent a malfunction, do not use an 8-cm (3 in.) adapter (for
CD) or a 20-cm (8 in.) adapter (for LD).
Types of playable
Diameter/Playable sides
discs and their marks
Max. playback time
CD
CD
12 cm (5 in.)/
single-side
'
CD single
8 cm (3 in.)/
single-side
CDV
Æ
74 minutes
**
CDV
12 cm (5 in.)/
single-side
VSD
VIDEO
SINGLE
DISC
VSD
LASER DISC
LD
12 cm (5 in.) /
single-side
L
*
;
*
30 cm
(12 in.)/
double-side
20 minutes
Digital audio 20 min.
Digital audio
+ Video
5 min.
Digital audio
+ Video
LD single
**
æ
20 cm (8 in.)/
single-side
LD
CD , CDV
Holding with two
hands
Hold by two opposite
edges of the disc.
Holding with one
hand
Hold by hooking two
fingers across the
center hole and edge.
Do not attach paper.
Do not touch the disc surfaces.
Never use a cracked or warped disc.
To avoid danger, never attempt to play a cracked or deformed disc,
or a disc which has been mended using an adhesive agent, etc.
Also do not use an analog record spray or static prevention agent
for these will crack the laserdisc surface.
5 min.
CAV
1 hour
CLV
2 hours
Care of disc
CAV
28 min.
CLV
40 min.
To maintain high video and audio quality, clean the disc if it gets
dirty clean by wiping the disc surface with a soft cloth. When
wiping, be sure to move the cloth in straight directions from the
center of the disc toward the outer edge. Do not wipe in a circular
direction like you do with analog records.
CAV
14 min.
CLV
20 min.
LD
20 cm (8 in.)/
double-side
How to hold a disc
Wipe along the radii.
÷ There are some discs marked with the L mark instead of the
Æ mark.
÷ There are some discs without the æ mark.
÷ Do not use an analog record cleaner, benzine, thinner or static
prevention agent.
* This is the unified symbol mark of LASERDISC (LaserVision
videodisc).
LaserDisc players and discs which bear this symbol and use the
same television system, are mutually compatible.
Storage
** A Digital Audio with Multi Audio Disc (CD VIDEO LD) and a CDV
(CD Video CDV) are referred to as CD Video discs. CD Videodiscs are recorded with subcodes, which are the non-audio recordings of TOC (Table of Contents) data such as track numbers, index numbers, etc. However, there are some discs without these marks.
After playback, be sure to take out the disc from the player, put
the disc in the jacket or case and store it vertically. To prevent the
discs from warping, do not store jackets or cases at an angle or
stack them horizontally. Also do not store them in a place subject
to direct sunlight or under high temperature and humidity.
÷ If a LaserDisc is deformed, place it in the inner bag, put the bag
between two flat boards, place a weight of 4 to 5 kg (10 lbs) on
the boards and leave them for about a day. This may sometimes reduce the warp or other deformation.
Heavy books (4 to 5 kg (10 lbs))
Caution
VIDEO CD
or
cannot be played
with this player.
The Video CD is a disc holding up to 74 minutes of digital
video and audio signals, when recorded in the MPEG format.
Flat board
LaserDisc
Inner bag
6
Flat board
LD terms
LD (LaserDisc)
Chapter number
Just like the numbers assigned to chapters of a book, the
LD disc is divided into several chapters and each of them is
assigned a chapter number. If the chapter numbers are
recorded on the disc, it is possible to perform operations
such as the chapter search which quickly searches the desired chapter.
÷ Some LD discs do not contain recorded chapter numbers.
LaserDiscs include a standard play disc (CAV) and an extended play disc (CLV) depending on the signal recording
formats.
Frame number
A frame number is assigned to every frame on a CAV disc.
This makes possible operations such as the frame search
which searches desired images based on their frame numbers.
Time number
This refers to the elapsed playing time from the beginning
of the disc that is recorded on CLV discs as well as on CAV
discs with a TOC*1. This allows operations such as the
time number search which searches desired images based
on their time numbers.
CDV/CD terms
Track number
The CDV or CD disc is divided into several tracks and each
of them is assigned a track number. With the CDV disc, the
track numbers are recorded across the audio and video
parts. This allows operations such as the track search which
quickly searches the desired track.
TOC (*1)
CD and CDV discs contain non-audio information called TOC
the (Table Of Contents) at the beginning of the disc. As this
name implies, the TOC contains information on the number
of tracks and their playing time just like the table of contents of a book.
÷ Some LD discs are not provided with a TOC section.
÷ The LD with TOC and the CDV belong to the same
category of "optical video disc systems with digital audio".
CAV
[Standard Play/CAV] or simply [Standard Play] is indicated
on the jacket or label of the disc.
CLV
[Extended Play/CLV] or simply [Extended Play] is indicated
on the jacket or label of the disc.
LaserDisc with digital audio
This type of disc contains the recording of a digital audio
signal in addition to an analog audio signal. It allows you to
enjoy the high-quality video of an LD and digital sound at
the same time.
¬
or
:
Multi-audio disc with digital audio
This type of disc contains different audio information in
digital audio and analog audio.
¬
and MULTI AUDIO or
:K
The digital and analog audio can be switched over to enjoy
different audio information.
CDV (Compact Disc with Video)
÷ This CD contains the video part. Among the 25-minute
playing time of the CDV, 20 minutes contain a similar
digital audio to an ordinary CD (audio part) and the remaining 5 minutes contain a video plus digital audio (video part).
CD video system
The CD video system is the unified name given to "optical
video disc systems with digital audio".
The systems belonging to this category include;
÷ CDV disc (CD VIDEO, CDV)
÷ LD with subcode and digital audio
÷ CD/CDV compatible player
÷ CD/CDV/LD compatible player
Æ
7
ENGLISH
GLOSSARY
CONNECTIONS
Connection with a TV set equipped with Video/Audio inputs
Connection method (Be sure to plug the cords securely deep into the connectors.)
1 Connect the VIDEO OUT jack of the player to the video input jack of a TV (or a TV monitor).
•
If the TV set has an S VIDEO input jack, connect it using an S VIDEO cable which is available in audio/video stores.
For use of the S VIDEO cable, also read the operating instructions of the TV,
2 Connect the AUDIO OUT jacks of the player to the audio input jacks of the TV.
3 Finally plug the power cord into a household power outlet (which should permanently be supplied with power).
•
Also read the instruction manual of the TV.
7 ATTENUATOR switch
Usually, set this switch to the OFF position.
Set to ON when the audio is distorted during karaoke singing.
ATTENUATOR
OFF
ON
Usually OFF
V
Plug into a
household power
outlet after
completing all
connections.
VIDEO
OUT
1
2
1
S-VIDEO
OUT
AUDIO OUT
2
2/R
1/L
OPTICAL
DIGITAL OUT
2
AC-3 RF OUT
ATTENUATOR
OFF
Check the
positions of
the holes of
the S VIDEO
jack before
insertion.
ON
1
R
Accessory audio cord
L
S VIDEO
S VIDEO plug
Commercially-available
S VIDEO cable
S VIDEO input jack
VIDEO
OUT
V
AUDIO
L
L
R
R
Accessory video cord
VIDEO input jack
AUDIO input jacks (A/V TV)
AC-3 RF OUT terminal:
This terminal is intended for use with Dolby* AC-3 (*1) components
• With this terminal, you will be able to connect an AC-3 RF
input to amplifiers and surround processors, and playback laser
discs formatted with Dolby AC-3 (*2).
(∗1) Indicated with
(For hardware)
(∗2) Indicated with
(For software)
• You cannot playback currently available laser discs, laser disc
players, AV amplifiers, etc., with this terminal.
• Do not connect this terminals to the audio input terminal of a
normal stereo or AV amplifiers.
* "Dolby", "AC-3" and the double-D symbol are trademarks of Dolby
Laboratories Licensing corporation.
8
Connection of an additional stereo amplifier
This connection diagram shows how to connect the audio output to a stereo amplifier while the video output is connected to a TV as shown on
page 8.To reproduce the audio of a Compact Disc or an LaserDisc with improved quality, it is recommended to connect the player to a stereo
amplifier.
Connect the AUDIO OUT jacks to the input jacks labeled LD, CD or AUX, etc. (Never connect to the PHONO input
jacks.)
•
Also read the operating instructions of your stereo amplifier.
Plug into a
household power
outlet after
completing all
connections.
Commercially-available
optical cable
Accessory audio cord
Stereo amplifier
INSERTING BATTERIES INTO THE REMOTE
CONTROL UNIT
1
1 Open the battery compartment cover on the back of the remote control unit. Press the tab and open the cover in the
direction of the arrow.
2 Take out the two accessory size "AAA" (IEC R03) dry cell batteries, and insert them into the battery compartment in accordance with the display (ª, ·) inside the compartment.
3 Close the cover of the battery compartment.
Incorrect use of batteries may cause leakage or rupture.
Always be sure to follow these guidelines:
A. Always insert batteries into the battery compartment correctly matching the positive ª an negative · polarities, as
shown by the display inside the compartment.
B. Never mix new and used batteries.
C. Batteries of the same size may have different voltages, depending on brand. Do not mix different brands of batteries.
2
3
9
ENGLISH
CONNECTIONS
NAMES OF PARTS
Front Panel
P.
OPEN/CLOSE button 7: STOP button P. 13
(0 LD)
P. 12
4¢: CHAPTER buttons
OPEN/CLOSE button
P. 17
(0 CD)
1¡: SEARCH buttons
P. 12
DISC SIDE A/B
P. 17
button
P. 12
8: PAUSE button P. 13
indicates the page where the control is
explained.
LD disc table
CD disc table
P. 12
P. 12
3: PLAY button
SIDE
s
NATURAL SOUND
CD CDV LD PLAYER
A
CDV-W901
LAST
MEMORY
OPEN/CLOSE
CD
B
7 STOP
LD
4
1
'
STANDBY
QUICK
TURN
¢
¡
3 PLAY
L
RF
AC-3 OUT
P. 12
ONETOUCH
KARAOKE
8 PAUSE
KEY CONTROL
I
i
DISPLAY
BASS
OFF EXTENSION
ECHO
1
MIC
2
MIC
LEVEL
1
2
KARAOKE
POWER
°
0
Remote control sensor
QUICK TURN button
10
MIC jacks
P. 14
P. 14
0
10
ONE-TOUCH
KARAOKE button
P. 15
P. 11
BASS EXTENSION button P. 14
DISPLAY OFF button
0
ECHO controls
P. 15
KEY CONTROL buttons
P. 15
POWER button/STANDBY
indicator
P. 12
10
LAST MEMORY
button P. 16
P. 15
MIC VOL controls P. 15
Display window
Displays the remaining play
time.
Displays the channel(s) with
audio output(s).
Displays the total playing time of one side.
Displays the chapter number or
track number.
Lights when ONE-TOUCH KARAOKE
is activated.
CHP / TRK
TOTAL
REMAIN
1/L
2/R
ONE-TOUCH
KARAOKE
Lights when a microphone plug is inserted
into the MIC jack.
Displays the frame number or elapsed time.
●
: Disc table open/close
: Play
Displays the functions being operated, etc.
: Disc table being opened
: Disc table being closed
: End of LD
: Intro Scan
: Highlight Scan
10
: Single-side repeat playback
: Program repeat playback
: Start of playback
: Pause
: Double-side repeat playback
: Random repeat playback
: Switching power OFF
: LaserDisc
: Random playback
: Compact Disc
: Programmed playback
: Compact Disc with Video
: 1-chapter (1-track) repeat
: Disc not present
playback
Remote Control Unit
P. 16
AUDIO D/A
(Digital/Analog) button
POWER button
P. 12
KEY CONTROL buttons
P. 15
DISPLAY button
P. 24
OPEN/CLOSE button P. 12
POWER
KEY CONTROL
I
OPEN/CLOSE
AUDIO
REPEAT
0
A-B
i
D/A•CX
1
2
3
C
4
5
6
+10
7
8
9
0
CLEAR
DISPLAY
PROGRAM
PGM(Program) button P. 22
CHP/TM(Chapter/Time) P. 17
button
LAST MEMORY button P. 16
RANDOM button
P. 20
HILITE/INTRO button
1: SEARCH (Fast reverse)
button
P. 17
JOG MODE button
P. 19
JOG MODE indicator
P. 19
P. 21
P. 20
CHP/TIME
LAST
MEMORY
MULTI-SPEED
2
3
RANDOM
HILITE
/INTRO
STILL/STEP
w
∑
CHAPTER/SKIP
4
SEARCH
PLAY
1
3
JOG
MODE
SIDE
A
B
¢
SEARCH
¡
STOP
PAUSE
7
8
JOG/SHUTTLE
REVERSE 2 3 FORWARD
REPEAT A-B buttons
P. 23
REPEAT button
P. 23
CLEAR button
÷ Press to cancel repeat mode, program
mode or random playback or to correct a
mistake made with the numeric buttons.
Numeric buttons
P. 15
STILL/STEP buttons P. 18
MULTI-SPEED buttons P. 18
CHAPTER/SKIP buttons P. 17
¡: SEARCH (Fast forward) P. 17
button
3: PLAY button P. 12
8: PAUSE button P. 13
7: STOP button P. 13
DISC SIDE A/B buttons
P. 12
SHUTTLE ring P. 17
P. 19
JOG dial P. 19
s
L
Operation of the remote control unit
Point the remote control unit toward the remote control sensor
on the front panel. The distance between the player and remote
control unit should be less than 7 meters (23feet) and the operating angle should be within 30 degrees to the left and right with
respect to the remote control sensor.
÷ To prevent a malfunction, avoid the entry of strong light, such
as direct sunlight and fluorescent light, into the remote control
sensor.
s
30°
30°
7 m ft.
23
11
ENGLISH
NAMES OF PARTS
BASIC OPERATION (PLAYBACK OF A DISC)
÷ For the connections, refer to pages 8 and 9.
3
Disc placing position
The CD/CDV or single-sided LD should be placed with the label
side facing up and the double-sided LD should be placed so that
the label of the side to be played faces up. Place any disc correctly
along the guide groove provided for each size.
2 4
LD disc table :
7
s
4
1
3
¢
¡
LD
CD single:8 cm (3 in.)
8
CD, CDV, video single:12 cm (5 in.)
I
i
LD, LD single:20 cm (8 in.)
8 c m /3in. C D
12c
m /5in . C D / C D V
20c m/8in. L D
1
The buttons with the same name on the front panel and
remote control unit have the same functions.
●
LD:30 cm (12 in.)
30cm/12in. LD
CD disc table :
CD
CD single:8 cm (3 in.)
The STANDBY indicator is lit while the power is OFF.
CD, CDV, video single:12 cm (5 in.)
8 cm
/3in. C D
1. Press POWER.
12 c
Set the TV to the function (input) to which the player is
connected.
Caution in placing a disc
Be careful not to deviate a disc from the guide groove on the
disc table, for this will make proper playback impossible and
could cause a malfunction such as disc damage.
STANDBY
POWER
POWER
Front Panel
m /5in . C D / C D V
For safety!
2. Press appropriate OPEN/CLOSE to open the
disc table.
To play an LD
●
To play a CD
●
LD
Be careful not to catch your finger in the disc table when it
draws in. Also take care to prevent a small child from opening
the disc table cover and inserting their hand inside the player to
prevent injury.
Do not place an object other than a disc on the disc table.
CD
Convenient feature (Auto power-ON function)
●
0
Front Panel
Front Panel
After using a CD, the CD tray opens when you press OPEN/
CLOSE on the remote control unit. To playback an LD, use
OPEN/CLOSE on the front panel.
●
●
When the power is OFF, pressing OPEN/CLOSE turns on the
power automatically and opens the disc table.
When you have turned the power OFF with a disc left inside
the player, simply press 3 on the front panel; the power turns
ON automatically and playback of the disc starts.
The above features cannot be operated with the remote control
unit.
3. Place a disc on the disc table.
To place an LD
To place a CD
s
s
Place only one disc, LD or CD, at a time.
●
4. Press 3.
●
Playback of the CDV starts with the video part.
Front Panel
PLAY
3 PLAY
3
Playback by specifying side A or B
In this description, side A refers to the surface facing up when the
disc is placed on the disc table, and side B refers to the other side.
Note that they are not always the same as disc sides A and B as
recorded on the disc.
It is recommended to place a disc so that the side labeled
"SIDE A" faces upward.
To play side A only: When the disc with the side labeled "SIDE
A" is facing up, press DISC SIDE A without pressing 3. The
player will stop after having played side A.
To play side B only; Press DISC SIDE B without pressing 3 . The
player will stop after having played side B.
If the disc has been placed with the recorded "SIDE B" facing up,
DISC SIDE A plays side B and DISC SIDE B plays side A.
Display when the disc side is switched
●
Operations marked with [
control unit.
12
] are made from the remote
Turning from side A
to side B
B
●
Turning from side B to
side A
A
1, 3 7
2
To stop playback (7)
STOP
7
s
4
1
3
7
7 STOP
¢
¡
8
I
Press 7.
i
To pause playback temporarily (8)
8
PAUSE
8 PAUSE
8
To stop playback and take out the disc
1. Press OPEN/CLOSE.
With LD
With CD
LD
Front Panel
CD
0
Front Panel
2. Take out the disc.
Notes on playback of the LD single
With CD
With LD
When playing back a one-sided (20 cm) LD single, the player sometimes enters side B mode after playing back side A and then
enters stop mode. “U1, F5..., ” appears on the TV and the player’s
display but this occurs because there is no signal on side B, not
because of a malfunction.
s
s
Press 8. The audio and video disappear and the 8 indicator lights on the display. Pressing 8 again resumes playback from the position where it was paused.
● A still image is displayed during pause with a LD.
● Leaving the player in pause mode for a long period of
time may shorten the life of the motor. Therefore,
the player automatically enters stop mode when pause
mode has lasted for about 20 minutes. (Pause timer)
3. Press OPEN/CLOSE to close the disc table.
With LD
With CD
LD
Front Panel
CD
0
Front Panel
13
ENGLISH
BASIC OPERATION (PLAYBACK OF A DISC)
MOVIE DISC ENTERTAINMENT
The on-screen display can be defeated to enhance the ambience
of movie entertainment. In addition, the Quick-Turn function reduces the time required before starting playback or changing disc side
and the Bass Extension function which allows selection of the
audio response of each movie are also provided.
To select the audio that matches the ambience of the movie (BASS EXTENSION)
The indicator lights when the bass extension function is on.
BASS
EXTENSION
To turn off the display
Press DISPLAY OFF.
Press repeatedly
DISPLAY
OFF
The indicator lights.
The bass sound is adjusted every time BASS EXTENSION is
pressed. Set the button to the desired position according to the
atmosphere of the movie you are watching.
∞
÷ The display window as well as the on-screen display turns off.
However, when a button on the player or remote control unit is
pressed, the operation mode is displayed for about 1.5 seconds.
÷ The TV screen color while the disc is turned or stopped changes from a blue background to a black background.
Off : Original audio
∞
Once LEVEL-1: Bass is enhanced
∞
Twice LEVEL-2: Bass is enhanced more
than LEVEL-1
NOTE :
When DISPLAY OFF is pressed, the display window turns off
even while the power is ON. The display OFF state is held in
memory even after the power is switched off so the display
window is off when the power is switched on later. To turn on
the display window, press DISPLAY OFF again.
∞
Three times LEVEL-3: Bass is enhanced more
than LEVEL-2
To reduce the playback start time and turn
time (QUICK-TURN)
The level is displayed on the top right of the screen.
The indicator lights when the quick-turn function is on.
BASS
LEVEL-1
QUICK
TURN
÷ Press QUICK TURN to turn this function off.
÷ When the quick-turn is on, the TOC recorded on the disc is not
read so the time required before starting playback or turning
the disc can be reduced.
As a result, even when the LD being played contains TOC
information, the random playback, total time display, remaining time display and the elapsed time display of CAV (standard play) disc will not function.
NOTES :
÷ When the AC cord is plugged into a power outlet and the
power of the player is switched on, the quick-turn is automatically turned on and the indicator lights.
÷ The quick-turn is turned off automatically when a CD is inside the player. If an LD is placed in it, the previous state is
recalled from the memory and the quick-turn is turned on
again.
÷ The quick-turn on or off state is held in memory even after
the power is switched off so the same state is recalled
when the power is switched on later.
14
NOTES:
÷ Turning on bass extension may distort the dialog portion of a
sound track when used with certain discs or system configurations. If this occurs, either turn down the bass extension
level or turn bass extension off.
÷ The bass extension is turned off automatically with a CD
inside the player. If an LD placed in it, the previous state is
recalled from the memory and the bass extension is turned
on again.
÷ The bass extension on or off state is held in memory even
after the power is switched off so the same state is recalled
when the power is switched on later.
÷ The bass extension function is switched off automatically
when the microphone is plugged in. The bass extension is
switched back on as soon as the microphone is unplugged.
÷ The bass extension function is switched off automatically
when One-Touch Karaoke is switched on. In this case, return to the bass extension does not occur.
B:To set a desired pitch (Key control function)
A
B
2
3
B
4 1
1. Insert the microphone plug(s) into the MIC
jack(s).
●
KEY CONTROL
I
i
KEY CONTROL
I
i
# : Pitch is heightened each time this button is pressed (up to 5
steps from normal).
I : Pitch is lowered each time this button is pressed (up to 5
steps below normal).
● The current pitch position is shown by the lit indicator.
● The key control is possible only while a microphone is
plugged in.
The KARAOKE indicator lights on the display.
1
MIC
2
The karaoke audio varies as shown below according to the type of
disc.
CD , CDV
2. Select music with the numeric buttons on the
remote control unit.
To select No. 10 or beyond:
Use the +10 and 0 buttons.
(Examples) 17: +10 , 7
20: +10 , +10 , 0
Multiplexed
audio disc
Stereo audio disc
LD
3. Adjust the microphone volume with the MIC
LEVEL control(s). Also adjust the listening level
of the TV set.
MIC
LEVEL
1
The volume of the singer's voice (vocal)
is reduced.
The karaoke music recorded in the L
(Left) channel is played. (This is monaural audio.)
When an ordinary stereo disc is played,
the singer's voice (vocal) is reduced.
D i g i t a l m u l t i - The karaoke music is played in stereo.
plexed audio disc (However, if the analog audio is
Digital audio :
selected with AUDIO D/A•CX, the
Stereo
effect becomes the same as the
Analog audio :
multiplexed audio disc described
Multiplexed
above.)
2
NOTES :
0
10
0
10
4. Adjust the echo with the ECHO control.
ECHO
0
●
●
10
●
●
●
●
Now start singing!
When the selected music has been played, the player enters
pause mode. To continue karaoke singing, select another
song with the numeric buttons.
●
A:To mute the voice(s) of the singer(s) from a disc :
Press ONE TOUCH KARAOKE.
ONE TOUCH
● The ONE TOUCH KARAOKE indicator will
KARAOKE
light on the display.
Stereo audio disc :
● The voice(s) of the singer(s) is lare reduced so
that you can practice karaoke singing.
Multiplexed audio disc :
● Karaoke play starts.
●
In case the audio is distorted, set the ATTENUATOR switch
on the rear panel to ON. P. 8
In case playback is started with 3 , the player does not
pause after having played the music.
If you do not want the player to pause, press and hold 7 on
the front panel for more than 2 seconds until the KARAOKE
indicator turns off.
The pause after playback also occurs after programmed playback P. 22 and random playback P. 20 . If you do not want
the player to pause after programmed or random playback,
press and hold 3 for more than 2 seconds during programmed or random playback.
During the operation of the ONE TOUCH KARAOKE function, it is not possible to switch the L (Left) and R (Right)
channels with AUDIO D/A•CX.
The voice(s) of the singer(s) may not be reduced with certain discs, even if you press ONE TOUCH KARAOKE.
15
ENGLISH
SINGING ALONG WITH KARAOKE ENTERTAINMENT
APPLIED OPERATIONS
NOTES :
÷ The last memory playback function is available only with
LDs. It is not available with CD and CDV discs.
÷ If playback was last stopped in the middle of side B of a
double-sided disc, the last-memory playback starts from side
B.
÷ When 3 is pressed to start playback after it has been
stopped with 7, playback starts from the beginning of the
disc.
÷ Be sure to leave the disc inside the player. Last-memory
playback is not possible once the disc has been taken out
of the player.
÷ Be sure to plug the AC power cord into a power outlet to
which power is supplied permanently.
AUDIO
D/A•CX
LAST
MEMORY
Audio switching
To play an LD from the position where
playback was last stopped
If 7 or POWER is pressed during playback, and playback has not
reached the middle of the disc, it is possible to restart playback
from the position where it was stopped.
When playback of an LD is stopped by pressing 7 or POWER, the
address where the playback is stopped is stored in memory and,
provided that the disc is left in the LD disc table, the stored address is held in memory even after the power is switched off.
When you switch the power on and press LAST MEMORY, playback starts from the position where it was last stopped.
LAST
MEMORY
LAST
MEMORY
To start playback directly from the position where it was
stopped:
Every time AUDIO D/A•CX is pressed during playback, the played
audio is switched. This makes it possible to;
÷ listen to the analog audio of a disc with digital audio;
÷ listen to only one of the two channels of a stereo disc;
÷ select the audio to be played from multiplexed audio disc.
LD
LD with digital audio
It is possible to switch between the digital and analog audio and
between the L (Left) and R (Right) channels of stereo audio.
3
AUDIO
Digital audio
(stereo)
D/A•CX
3
Analog audio
(stereo)
Digital audio 2
R CH
3
Analog audio
L CH
Digital audio 2
L CH
Analog audio
2
R CH
÷ In a case of a disc recorded with Dolby AC-3 signal, only
the left channel signal is heard in monaural mode when an
analog audio is selected.
LD with analog audio
÷ Disc containing CX auto ON (OFF) switching codes
AUDIO
3 Stereo audio
L CH
3
3
R CH
D/A•CX
÷ Disc without CX auto ON (OFF) switching codes
Position slightly before
Position where playback
was stopped
Press LAST MEMORY once. Playback starts from the position
slightly before the position where it was last stopped.
To start playback after reviewing the plot from the beginning
to the position where it was last stopped:
Start
Short playback
and fast forward
are repeated.
Press LAST MEMORY consecutively twice. A short period of playback and fast forward operations are repeated from the beginning
of the disc until slightly before the position where playback was
last stopped, and normal playback starts from there. By pressing
LAST MEMORY again during the fast forward operation, playback
can be started directly from slightly before the position where it
was last stopped.
16
AUDIO
3
CX OFF
(stereo)
3
CX ON
(stereo)
3
CX ON
(L CH)
D/A•CX
CX OFF 2
(R CH)
CD
and
AUDIO
CX OFF 2
(L CH)
CX ON 2
(R CH)
CDV
3 Stereo audio
3
L CH
3
R CH
D/A•CX
LD with ° mark
° functions on the analog audio of LD.
With an LD carrying the ° mark, audio can be played with reduced noise using the CX noise reduction system.
Some of the discs carrying the ° mark do not contain the codes
for automatic ON/OFF switching of the CX system. With such
discs, turn CX ON by pressing AUDIO D/A•CX on the remote
control unit.
÷ ° is a trademark of CBS. This player conforms to the extended
specifications of CX.
Scan (Manual Search)--Search using fast
forward or fast reverse
Front Panel
SEARCH
SEARCH
1
¡
CHP/TIME
or
CHAPTER/SKIP
¢
4
SEARCH
PLAY
1
3
SEARCH
SHUTTLE ring
¡
Searching the beginning of a chapter/track
Front Panel
CHAPTER/SKIP
4
Press and hold ¡ or 1 during playback to start a slow scan of
the image. The scan speed increases to high speed if the button is
held depressed for more than 4 seconds after starting the scan.
However, the high speed scan does not function during playback
of a CDV (video part).
Rotate the SHUTTLE ring on the remote control unit clockwise
during playback to fast forward the video. Rotating the ring counterclockwise fast-reverses the video. Normal-speed playback resumes when the ring is released.
● The speed varies depending on the angle the SHUTTLE ring is
rotated. From slow speed in the beginning to higher speeds
when the ring is rotated further, the speed varies in 4 steps. P. 19
¢
When a disc is scanned until the beginning:
Normal playback will start.
To skip to the beginning of a chapter/track,
¢ : Press to advance to the next chapter or track.
4 : Press to return to the beginning of the chapter or track being
played.
● Press repeatedly to move further to other chapters/tracks.
Searching the desired scene directly
During fast forward or fast reverse, the audio is:
Not heard.
NOTES:
Specify the chapter number or track number.
Example: Playing an LD from the beginning of chapter No. 3
<Direct search>
Press numeric button "3".
3
Note on CAV (standard play disc):
During scanning, noise may appear on the screen. This is not a
malfunction.
Note on CLV (extended play disc):
● The scan speed is different between inner chapters and
outer chapters depending on the positions they are recorded
on the disc.
To select chapter No. 10 or beyond:
Use the +10 and 0 buttons.
(Examples) 17 : +10 , 7
30 :
When a disc is scanned until the end:
With an LD, the player will pause at the end of the disc.
With the video part of a CDV, the audio part will be searched.
+10 , +10 , +10 , 0
<Normal search>
It is also possible to specify a chapter or track number with CHP/
TIME as shown below.
(Examples)
PLAY
17 :
30 :
CHP/TIME CHP/TIME
,
,
CHP/TIME CHP/TIME
,
,
1 , 7 ,
3
PLAY
3 , 0 ,
3
To stop search in the middle:
Press CLEAR during search.
NOTE :
Some discs do not contain the chapter numbers. Direct search and
normal search are not available with these discs.
17
ENGLISH
APPLIED OPERATIONS
APPLIED OPERATIONS
STILL/STEP
w
∑
MULTI-SPEED
2
3
Multi-speed playback by varying the playback speed and direction (LD and CDV video
parts only)
Still image/frame advance
(LD and CDV video parts only)
Freezing an image – Still image
Press either w or ∑ to display a still image.
MULTI-SPEED
2
3
For reverse
playback
For forward
playback
STILL/STEP
e
E
The first press of either MULTI SPEED 2 or 3 changes the playback speed to 1/8 the normal speed. Further pressing of the same
button changes the playback speed as shown below.
●
A still image can also be displayed with 8 .
3
Displaying image frame by frame – Frame advance
While a still image is displayed, press either w or ∑.
\
|
Each press reverses
one frame.
Each press forwards
one frame.
STILL/STEP
w
∑
Display
1/8
1/2
x2
1/2
1/8
1/30
Speed
1/8 the normal speed
Half the normal speed
Twice the normal speed
Half the normal speed
1/8 the normal speed
1/30 the normal speed
NOTES :
●
●
Press 3 to return to normal playback.
The audio is not heard during still image, frame advance and
multi-speed playback.
Press and hold for continuous frame advance.
In case a still image appears automatically during playback:
Some discs contain special recorded signals called picture stop
codes. When playing such a disc, you can continue playback without displaying still images on the positions where picture stop
codes are recorded by pressing and holding 3 on the front panel
for more than 2 seconds to activate the picture stop cancel function. On-screen display "PSC ON" is displayed for a few seconds
when this function is activated. To cancel this function, press and
hold 3 for more than 2 seconds until "PSC OFF" is displayed on
the screen for a few seconds.
18
Searching a scene using special playback which can vary the playback speed
and direction with one-touch operation
(LD and CDV video parts only)
JOG MODE
button
JOG MODE
indicator
JOG dial
Use the SHUTTLE ring and JOG dial.
SHUTTLE ring
Press JOG MODE. The JOG MODE indicator
lights. Frame advance, 1/2-speed, normalspeed and x2-speed playback in both forward
and reverse directions are possible according
to the direction and angle in which the JOG
dial is rotated.
x2-sp
ee
revers d
e
play
Even
faster
x1-sp
ee
revers d
e
play
Faste
r
JOG
MODE
1/2-sp
ee
revers d
e
play
Fast
rotatio
n
Plays v
ide
in reve o
rs
Slow directi e
on.
counte
rclockw
JOG
ise
rotatio
Norm
n
al pla
y
dial
Plays v
ide
in forw o
1/2-sp
ard
eed
directi
on.
play
Slow
clock
wis
rotati e
on
Fast ro
tation
x1-sp
eed
play
Faste
r
Stop
ro
SHUTTLE ring:
still-im tation for
age p
lay.
x2-speed, x5-speed, x10-speed and fast forward/reverse (scan)
x2-sp
eed
play
Even
faster
in both forward and reverse directions are possible according
to the direction and angle in which the SHUTTLE ring is rotated.
Fast
revers
e
Even
mo
rotati re
on
x10-sp
ee
revers d
e
play
More
rotatio
n
x5-sp
ee
revers d
e
play
Sligh
tly
more
rotat
ion
x2-sp
ee
revers d
e
play
Coun
terSHUTTLE
clockw
is
rotatio e
Norm
n
al pla
y
Remo
for no ve hand
rmal p
lay.
Audio is not output during special playback using the JOG dial or
SHUTTLE ring. (Audio is not output even at normal speed.)
With special playback of the video part of a CDV using the
SHUTTLE ring:
Up to x10-speed playback is possible. Fast forwarding or fast reversing at a with higher speed are not possible.
To return to normal playback after JOG dial operation:
Press 3.
ring
x2-sp
eed
play
Clock
wis
rotati e
on
x5-sp
eed
play
Slight
more
rotati
on
x10-s
peed
play
More
rotat
ion
Fast
forwa
rd
Even
mo
rotati re
on
Set JOG MODE on the remote control unit to off when the
JOG dial is not used:
JOG MODE turns off automatically in about 5 minutes after the
JOG dial is last operated (JOG MODE indicator also goes off).
However, to save the batteries in the remote control unit, it is
recommended to press JOG MODE to off after completing JOG
dial operation.
When a disc has been scanned until the end:
A still image is displayed.
When the video part of a CDV has been scanned until the end, its
audio part starts to be searched.
19
ENGLISH
APPLIED OPERATIONS
QUICK SCANNING OF DISC
CONTENTS
HILITE
/INTRO
Intro Scan (Available on LD and CDV video
parts)
RANDOM PLAYBACK
(PLAYBACK IN ORDER
SELECTED BY THE PLAYER)
RANDOM
Random playback (CD, CDV and LD with
TOC only)
HILITE
/INTRO
When the button is pressed during playback or in stop mode:
The first 8 seconds of every chapter will be played in order. When
3 is pressed, normal playback starts from that position.
When the disc has been scanned until the last chapter, normal
playback starts from chapter No. 1.
Highlight Scan (Available on CD and CDV
audio parts)
HILITE
/INTRO
When the button is pressed in stop mode:
Highlight Scan starts, with which on 8-second section starting 1
minute after the beginning of every track, will be played in order.
When the button is pressed during playback:
Assuming that the time elapsed from the beginning of the track
being played until the position where the button is pressed is
called the Highlight Scan starting period, the 8-second section will
be played after this starting period, on every track beginning with
track No.1.
NOTES :
÷ With a CDV, the operation begins with Intro Scan of the
video part and continues to Highlight Scan of the audio part.
÷ Intro Scan is not available with discs which do not contain
recorded chapter numbers.
÷ When a track is shorter than 1 minute or than the set starting period, Highlight Scan of that track starts at the beginning and lasts for 8 seconds. If a track is shorter than 8
seconds, it will be played entirely from the beginning.
20
RANDOM
Press RANDOM.
With an LD, first press QUICK TURN to turn the quick-turn off,
then press 3 and finally press RANDOM.
All chapters/tracks in the disc are played in a random order selected by the player. Random playback stops after all of the chapters/
tracks on the disc have been played.
During random playback:
÷ Pressing ¢ plays the next selected track.
÷ Pressing 4 replays the track being played from the beginning.
÷ Pressing CLEAR cancels random playback and starts normal
playback.
÷ Pressing RANDOM again restarts random playback with a newly selected order of tracks.
To stop random playback:
Press 7.
NOTES :
÷ Chapter 0 is not included in random playback.
÷ Random playback of programmed chapters/tracks is not possible.
÷ Random playback is not possible with an LD without a
TOC. P. 7
÷ While the quick-turn is on, random playback is not possible even with an LD containing a TOC.
In this case, stop playback and turn off the quick-turn
function before starting random playback. P. 14
1
ENGLISH
TO SEARCH FOR A DESIRED FRAME
1
2
CHP/TIME
2
CHP/TIME
3
3
PLAY
PLAY
3
3
This function is available on LDs only.
This function is available on LDs only.
With a CAV (standard play) disc, the desired image can be searched
by specifying the frame number (refer to page 7 for definitions).
With a CLV (extended play) disc, a desired image can be searched
by specifying the time number (refer to page 7 for definitions).
(Example) To search the image at frame No.
1234:
1. Press CHP/TIME during playback.
(Example) To search the image at 12 min, 34
sec.:
1. Press CHP/TIME during playback.
CHP/TIME
CHP/TIME
2. Press numeric buttons 1, 2, 3 and 4.
2. Press numeric buttons 1, 2, 3 and 4.
1
1
2
3
2
3
4
4
3. Press 3 .
3. Press 3 .
PLAY
PLAY
3
3
Still image of the specified time is displayed.
●
The specified frame is searched and a still image is
displayed.
● Press 3 again to restart normal playback.
Press 3 again to restart normal playback.
NOTES :
●
●
With a disc which does not contain time information in seconds, specify the time in minutes (2 digits).
If the time number or frame number specified is greater
than the last number on the disc, the player pauses at the
end of the disc.
21
PROGRAMMED PLAYBACK (PLAYING CHAPTERS/TRACKS BY
CHANGING THEIR ORDER AS REQUIRED)
Desired chapters (LD) or tracks (CDV/CD) can be programmed to
be played in a desired order. Up to 24 chapters/tracks can be
programmed at a time.
÷ Programming operation can be made easier by observing the
on-screen display or display window during operation.
1
PLAY
3
Programmed playback starts after searching the first programmed track/chapter. In the examples above, the programmed playback starts from chapter/track No. 9. When
chapter/track Nos. 9, 7, and then 18 have been played,
the player enters stop mode.
2
PROGRAM
3. Press 3 .
Programming of pause
3
Programming pauses together with chapter/track numbers is very
convenient for recording the programmed playback.
÷ In case of recording the programmed playback on two sides of
an audio tape, it is recommended to program a pause after the
last chapter/track to be recorded on the first side of the tape.
This makes it possible to flip the tape while playback is paused
and avoid making a recording mistake.
÷ While programmed playback is paused, it is possible to record a
narration or create a non-recorded blank. Pressing 8 in pause
mode resumes programmed playback so that recording can be
restarted.
÷ It is not possible to record a pause as the final step of the
program.
PLAY
3
1. Press PROGRAM.
PROGRAM
Indication of programmed pause
2. Select the chapters or tracks to be programmed.
<With a double-sided LD>
Example : Programming chapter 9 on side B, chapter 7
on side A and then chapter 18 on side B
1 Select side A or B.
"8" appears on the TV screen and "PA" appears on the display
window.
To check the programmed contents
When PGM is pressed during or after programmed playback, the
programmed contents can be displayed on the TV screen. Pressing PGM again turns off the display of the programmed contents.
To modify programmed content
B
2
Specify the chapter number.
9
÷ Program the next chapter by repeating steps 1 and
2 above.
=
7
A
B
+10
8
To clear the entire program
<With a single-sided LD, CD or CDV>
Example : Programming CD tracks 9, 7, and then 18
÷ Press numeric buttons 9, 7, +10, and then 8.
9
7
+10
8
If you press a wrong numeric button :
Press CLEAR, then press the correct numeric button(s).
22
To delete a programmed chapter number, track number or pause :
1. Press PGM.
2. Press either 4 or ¢ to move ‰ (the cursor) to the chapter number, track number or pause to be modified.
If you want to replace that content, press the numeric button. If
you want to program a pause, press 8.
If you want to clear content, press CLEAR.
3. Press PGM to complete.
If you press 3 in place of PGM, programmed playback starts
from the first programmed chapter or track.
÷ It is not possible to replace or clear the chapter or track being
played.
÷ Open the disc table.
÷ Press CLEAR in stop mode.
÷ When CLEAR is pressed during playback, the programmed playback is canceled and normal playback starts. Pressing CLEAR
again also clears the programmed contents.
To repeat a chapter/track being played
÷ Press REPEAT once during playback of the chapter or
track to be repeated.
REPEAT
A–B
REPEAT
Press once
PLAY
3
To repeat programmed playback
It is possible to play programmed chapters or tracks repeatedly in the order they were programmed.
Press REPEAT once during programmed playback.
÷ For programming, refer to
.
P. 22
To repeat random playback
To return to the specified position
A–B
\
PLAY
3
It is possible to play tracks in a randomly selected order
repeatedly.
Press REPEAT once during random playback.
÷ For random playback, refer to
P. 20
.
To repeat the entire side of a disc
PLAY
During playback, press
REPEAT A-B at the desired position.
To return to the specified position, press 3.
Press REPEAT twice.
÷ When one side of the disc has played back, the same
side is repeated from the beginning.
REPEAT
÷ Press CLEAR if you want to cancel the command.
To repeat the desired section repeatedly
A–B
A–B
\
Press twice
To repeat both sides of a disc (double-sided
LD only)
Press REPEAT 3 times.
÷ Playback starts with side A and continues on side B.
When both sides of the disc have played back, both
sides are repeated alternately.
REPEAT
Press 3 times
PLAY
Press REPEAT A-B at the
beginning of the section to
be repeated.
Press REPEAT A-B at
the end of the section
to be repeated.
÷ The repeat playback above is not possible if the section
extends over both the audio and video parts of a CDV.
Repeat playback extending over sides A and B of a double-sided LD is also impossible.
To stop repeat playback :
Press CLEAR, or press REPEAT so that the REPEAT indicator turns off. The repeat mode is canceled but playback
continues as normal playback.
With an LD which does not contain chapter numbers :
It is not possible to repeat a chapter. With such a disc,
press REPEAT once for one-side repeat playback.
23
ENGLISH
REPEAT PLAYBACK
ON-SCREEN DISPLAY
The actual on-screen display is a shown below.
Chapter/track number
Elapsed time or frame number
DISPLAY
3 12 . 49
REMAIN TIME
ALL 28.12
PLAY
DIGITAL
STEREO
Selected sound
PLAY indication
TOTAL TIME :
Total playing time
REMAIN TIME :
Remaining time
DISC TIME :
Elapsed time from
the beginning of
disc
ALL : Indicates total
(remaining time).
TRK : Indicates track.
Use DISPLAY on the remote control unit to display information such as the current playback mode, track/chapter number and playing time on the TV screen.
Each press of DISPLAY changes the displayed information
as follows:
LD with TOC
(CAV standard play disc)
CDV or CD
1
∞
2
Remaining time of the track being
played.
∞
REMAIN TIME ALL
3
Remaining time from the position
being played until the end of the disc.
∞
TOTAL TIME
4
Total playing time from the beginning to the end of the disc.
LD with TOC
(CLV extended play disc)
Elapsed time from the beginning of
the disc
Frame number being played.
Elapsed time of track being played.
REMAIN TIME TRK
If the on-screen display is left for a long period (about 80
minutes), it turns off automatically. The on-screen display re-appears when any button is pressed.
∞
∗
DISC TIME
∗
Elapsed time from the beginning of
the disc.
∗
∞
REMAIN TIME ALL
Remaining time from the position
being played until the end of the disc.
∗
∗
∞
REMAIN TIME ALL
Remaining time from the position
being played until the end of the disc.
∞
TOTAL TIME
Total playing time from the beginning to the end of the disc.
∞
∞
TOTAL TIME
On-screen display disappears.
Total playing time from the beginning to the end of the disc.
∞
∞
On-screen display disappears.
On-screen display disappears.
LD without TOC :
NOTE :
Only the frame number (CAV standard play disc) or the
elapsed time from the beginning of the disc (CLV extended
play disc) is displayed on the TV screen.
The DISC TIME, REMAIN TIME ALL, TOTAL TIME, and elapsed
time displays, cannot be displayed when using quick turn on,
even if the LD has TOC. P. 14 To display the information, stop
playback, turn off the quick-turn function and restart playback.
24
Incorrect operations are often mistaken for trouble and malfunctions. If you think that there is something wrong with this component, check
the points below. Sometimes the trouble may lie in another component. Inspect the other components and electrical appliances being used. If
the trouble cannot be rectified even after exercising the checks listed below, ask your nearest YAMAHA authorized service center or your
dealer to carry out repair work.
Common for LD and CD
Causes
Symptom
Ref. Page
Operation
1. The disc table closes and then
re-opens.
÷ The disc is extremely dirty.
÷ The disc is not placed properly on the disc table.
÷ Dew is condensed inside the player.
p. 6
p. 12
p. 5
Remote control
2. Remote control is not possible.
÷ The remote control unit is too far from the player or it is operated at too great an angle with respect to the remote control
sensor.
÷ The batteries are run out.
÷ Some TV sets incorporating the wireless remote control function may function improperly due to the remote control unit of
the player.
p. 11
3. The TV, etc., functions improperly.
Audio
4. Audio is not output or audio is
distorted.
÷
÷
÷
÷
÷
Connection plugs are inserted insufficiently or disconnected.
Connection plugs or jacks are dirty.
The player is in pause mode.
The connection with the stereo amplifier is erroneous.
The stereo amplifier is operated improperly. (Refer to the amplifier's instruction manual.)
÷ The player is connected to the PHONO input jacks of the stereo
amplifier.
÷ ONE TOUCH KARAOKE is turned on.
p. 9
p. 9
p. 15
LD
Causes
Symptom
Video, picture
quality
Audio (LD)
Skip, search
Ref. Page
5. Video is not displayed.
÷ The TV power is off.
6. Video is not displayed or the
displayed video is of a lowquality or is noisy.
7. A part of the still image is
shaking.
÷ The disc is extremely deformed (warped, etc.).
÷ The connection plug is not fully inserted or is disconnected.
8. Audio is “breathing” (the Level varies with frequency).
9. Audio is not heard.
÷ A disc without the ° mark is being played with the CX system
turned on.
÷ Audio is not output during multi-speed playback, still image and
frame advance playback.
p. 16
10.Skip, programming and search
are not possible.
÷ The disc being played does not contain recorded chapter numbers. (The functions utilizing the chapter numbers do not work
on discs which do not contain chapter numbers.)
÷ Some discs need a longer time to read data.
p. 17
p. 22
11.Search takes a long time
(more than 40 seconds).
12.The time taken to start playback is sometimes long.
13.Other image than specified is
played back.
p. 6
÷ Even with the standard disc, a part of the still image may shake
in the case it is a scene containing quick action.
p. 18
÷ Error in data readout does occur sometimes. (This is not a
malfunction.)
÷ Error in data readout does occur sometimes. (This is not a
malfunction.)
25
ENGLISH
TROUBLESHOOTING
TROUBLESHOOTING
CD
Causes
Symptom
Operation (CD)
14. Playback stops immediately
after it has been started.
Ref. Page
÷ The disc is extremely dirty.
÷ The disc is placed upside down.
÷ The disc is not placed properly on the disc table.
p. 6
p. 12
p. 12
ONE TOUCH KARAOKE
Symptom
Causes
15.The voice of the singer is not
muted even when ONE
TOUCH KARAOKE is pressed.
÷ The voice of the singer is not muted unless it is located on the
center of the acoustic image.
16.Playback will not stop when
one chapter or track is finished.
÷ Chapters or tracks are not selected with the numeric buttons.
Ref. Page
p. 15
CAUTION :
Abnormal functioning of this unit may be caused by static electricity or other external interference. To restore normal operation, unplug the
AC power cord and then plug it in again.
When troubles occur :
When some trouble occurs during use of the player, the following display (service number) appears on the display window of the player and the
TV screen. If you experience this kind of trouble, follow the "Remedy" below.
Display window of the player
TV screen
U1
Service
number
Service number
26
Service
number
Condition of the player
Remedy
U1
U2
÷ The disc is not loaded properly on the disc
table. Or, the disc is dirty.
÷ Reload the disc along the disc guide groove on the disc
table.
÷ Wipe the disc with a soft cloth.
Open the disc table and press 3 again.
F5
÷ Two discs are loaded on the disc table. Or,
the disc is dirty.
÷ Load only one disc on the disc table.
÷ Wipe the disc with a soft cloth.
P2
L3
E4
(The displayed number after P, F, L and E differs
depending on the condition of the player.)
÷ Open the disc table and press 3 again.
÷ If the same service number is displayed, the player is in
abnormal condition.
÷ When requesting servicing, please mention the displayed
number on the display window of the player or on the TV
screen (for example, 'service number E4').
H0
H1
H2
A0
÷ The player is in abnormal condition.
÷ When requesting servicing, please mention the displayed
number on the display window of the player or on the TV
screen (for example, 'service number H1').
General
Other terminals
System ............................................... LaserVision Disc system and
Compact Disc digital audio system
Laser ............................... Semiconductor laser wavelength 780 nm
Power requirement ................................................ AC 120 V, 60 Hz
Power consumption ................................................................. 37 W
Weight .................................................................. 7.1 kg (15.65 lbs)
Dimensions .................................... 430 (W) x 407 (D) x 132 (H) mm
16-15/16 (W) x 16 (D) x 5-3/16 (H) in
Operating temperature .............................................. +5ºC ~ +35ºC
(41ºF ~ 95ºF)
Operating humidity ......................................................... 5% ~ 85%
(There should be no condensation of moisture.)
Optical digital output ............................................ Optical digital jack
AC–3 RF OUT .................................................................... RCA jack
Video characteristics (2 outputs)
Accessories
Remote control unit ........................................................................ 1
Size "AAA" (IEC R03) dry cell batteries ........................................... 2
Video cord ...................................................................................... 1
Audio cord ...................................................................................... 1
NOTE :
The specifications and design of this product are subject to change
without notice, due to improvement.
Format .............................................................. NTSC specifications
Video output
Level .......................... 1 Vp-p nominal,sync.negative,terminated
Impedance ....................................................... 75 Ω unbalanced
Jacks ........................................................................... RCA jacks
S VIDEO output (2 outputs)
Y output level ............................................................... 1 Vp-p (75Ω)
C output level ........................................................ 286 mVp-p (75Ω)
Jacks ......................................................................... S VIDEO jacks
Audio characteristics (2 outputs)
Output level
During analog audio output ...................................... 200 mVrms
(1 kHz, 40%)
During digital audio output ....................................... 200 mVrms
(1 khz, –20 dB)
Jacks ....................................................................... Both RCA jacks
Number of channels ......................................................... 2 (Stereo)
Digital Audio Characteristics
Frequency response
SN ratio
Dynamic range
Total harmonic distortion
Wow and flutter
4 Hz - 20 kHz
115 dB (EIAJ)
96 dB (EIAJ)
Below 0.0035%
Below measurable limit (± 0.001%
W.PEAK) (EIAJ)
LD is in compliance with EIAJ.
27
ENGLISH
SPECIFICATIONS
s
YAMAHA
YAMAHA
YAMAHA
YAMAHA
YAMAHA
YAMAHA
YAMAHA
28
ELECTRONICS CORPORATION, USA 6660 ORANGETHORPE AVE., BUENA PARK, CALIF. 90620, U.S.A.
CANADA MUSIC LTD. 135 MILNER AVE., SCARBOROUGH, ONTARIO M1S 3R1, CANADA
ELECTRONIK EUROPA G.m.b.H. SIEMENSSTR, 22-34, 25462 RELLINGEN, BEI HAMBURG, F.R. OF GERMANY
ELECTRONIQUE FRANCE S.A. RUE AMBROISE CROIZAT, BP70 CROISSY-BEAUBOURG,77312 MARNE-LA-VALLEE, CEDEX02, FRANCE
ELECTRONICS (UK) LTD. YAMAHA HOUSE, 200 RICKMANSWORTH ROAD WATFORD, HERTS WD1 7JS, ENGLAND
SCANDINAVIA A.B. J A WETTERGRENS GATA 1, BOX 30053, 400 43 VASTRA FRÖLUNDA, SWEDEN
MUSIC AUSTRALIA PTY, LTD. 17-33 MARKET ST., SOUTH MELBOURNE, 3205 VIC., AUSTRALIA