1
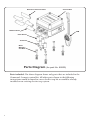
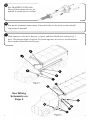
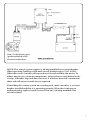
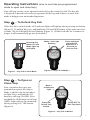
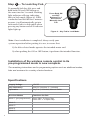
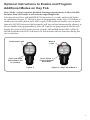
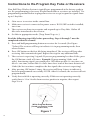
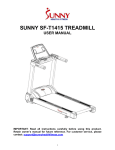
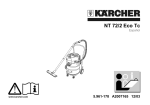
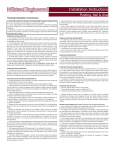
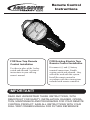
Remote Control
Instructions
FOR New Tarp Remote
Control Installation
FOR Existing Electric Tarp
Remote Control Installation
Use these in place of the “rocker
switch and solenoid “section of
instructions in your roll tarp
owner’s manual.
Disconnect (+) and (-) battery
terminal connections. Disable
existing switch and solenoid - they
will not be used with this system.
Install the remote control in
accordance with these instructions
included with remote control kit.
IMPORTANT!
READ AND UNDERSTAND THESE INSTRUCTIONS, WITH
REMOTE KIT FOR SAFETY, INSTALLATION, DANGER, OPERATION, MAINTENANCE AND PROGRAMING FOR YOUR REMOTE
CONTROL PRODUCT. SAVE ALL INSTRUCTIONS WITH YOUR
ROLL TARP OWNERS MANUAL FOR FUTURE REFERENCE
Dielectric Grease Packet
Control Box
Rubber Boots
FOB
Heat Shrink
Terminals
Bolts
Washers
and Nuts
Parts Diagram (for part No. 80000)
Parts included: The above diagram shows only parts that are included in the
Command-5 remote control kit. All other parts shown in the following
instructions would be found in a new electric tarp kit or would be already
installed on an existing electric tarp system.
2
Wiring Instructions
1
Note: There is ample heavy gauge wire supplied with each kit for standard installs. Before
cutting wire, always preplan wire routing and make necessary adjustments as needed.
Note: Use dielectric grease (packet included) at all ellectrical connections throughout installation.
Route heavy gauge wire from battery to tarp motor. Allow ample wire where
cutting and mounting connections take place. SEE Figure 1, box with hoist.
Figure 2, semi-trailer box. Prepare wire ends for terminals, heat shrink tubes
and rubber boots.
Typical For All Heavy
1/2 Eyelet For (+) Battery Post
Gauge Wire Eyelets
3/8 Eyelet For (-) Battery Post
5/16 Eyelet For Motor Terminals
#10 Eyelet For Circuit Breaker
1/4 Eyelet For Control Box Terminals
Typical Heat Shrink Tube
For All Heavy Gauge Wire
Connections
Rubber Terminal Boots For
Control Box Connections Only
2
NOTE: Always hold base nuts
when tightening top nuts on
terminals.
3
4
Install Box
With Terminals
Pointing Down.
Mount remote control box to a rigid
location at least 4 feet away from
tarp motor. With terminals pointed
down, use control box as template to
mark hole drilling locations. Use bolts,
nuts and washers to finish mounting.
Attach heavy gauge wires to terminals
on control box as shown. Slide
Black Motor 1
rubber boots over terminals.
Black –
Red +
Red Motor 2
When on new tarp install attach tarp caution/operating decal to front driver side
corner of truck box.
Attach heavy gauge wire to circuit breaker
as shown near positive post on battery.
Remember to seal with heat shrink first
and slip wires through rubber circuit
breaker cover (not shown).
IMPORTANT: Make sure system
has a 40 amp modified reset circuit breaker installed as shown.
Battery
This Red Striped
Wire to Battery (+)
Aux.
This Red Striped Wire
to Control Box (+)
Circuit Breaker
3
5
6
7
For TRAILER UNITS with
Heavy Duty connector use terminals to attach wire to socket.
For motor terminal connections, if needed refer to electrical section of roll
tarp owner’s manual.
Now connect red wire to battery (+) post and then black wire to battery (-)
post. Check operation of system. If system operates in reverse, switch motor
wires under control box and retest.
6
1
4
3
2
7
6
1
See Wiring
Schematic on
Page 5
3
4
5
2
7
4
4
DUAL POLE CONNECTOR
(USED IN SOME APPLICATIONS)
Note: Use dielectric grease
(packet included) at all
electrical connections.
NOTE: This remote system requires a 40 amp modified reset circuit breaker.
When operating, holding switch until circuit breaker trips is TOO LONG.
When this occurs, breaker will trip and reset if overloaded by the motor. To
reduce unnecessary strain on components, always release switch before breaker trips. If breaker trips and does not reset, it may have detected a continuous
short and will not reset until short is repaired.
If installing this remote system on a existing unit, make sure there is a circuit
breaker installed and that it is operating properly. If breaker is missing or
malfunctioning, replace it with a correct new one. (40 amp modified reset
circuit breaker)
5
Learning How to Use and Operate Your AGRICOVER® Command-5™ Wireless Remote
Introduction
This wireless controller provides push-button wireless control. The key fob
transmitter is simple to use and provides convenient reliable operation and is
suitable for a wide variety of applications. The following instructions are directed
to electric tarp installation and operation.
Safety Instructions
Do not install or use this product before you read and understand these instructions and the information contained in them. Only allow persons who know and
understand the safety rules to use this remote control.
1.
2.
3.
4.
6
Never allow children to operate or play around with remote tarp system.
The tarp should only be operated when operator has clear visibility of the
entire tarp.
Lock-out the wireless remote when you are not operating the tarp to avoid
unintended operation.
Disconnect power from the motor before servicing tarp system.
Operating Instructions (how to use fobs pre-programmed
mode to open and close tarp)
Your roll tarp system can be operated wirelessly by the remote key fob. The key fob
is designed to provide safe and easy operation of the tarp and features an auto-lock
mode to help prevent unintended operation.
Step 1 – To Unlock Key Fob
When key fob is in lock mode, all 5 indicator lights will light up when pressing any button
(Figure 1). To unlock fob, press and hold both ON and OFF buttons at the same time for 3
seconds. The far left light will start blinking (Figure 2). (If fob is left idle for 3 minutes or
longer, it will automatically go into lock mode.)
Pressing Any
Button In Lock
Mode lights up
all 5 lights
Figure 1 – Key Fob in Lock Mode
Step 2 – To Open or
Close Tarp
Your system has been pre-programmed to operate the tarp in
Mode 1 which is the far left indicator light. Press and hold the ON
button to roll tarp CLOSED. Press
and hold the OFF button to roll tarp
OPEN. Light will stay lit continuous
when pressing ON / OFF button
(Figure 3).
Mode 1 Left Light
Blinking
Press and Hold
ON and OFF
Buttons For 3
Seconds to
Un-Lock Fob
Figure 2 – Key Fob in Mode 1
Mode 1
Continuous
Light
Press ON
To Roll Tarp
Closed
Press OFF To
Roll Tarp Open
Figure 3 – Key Fob in Mode 1
7
Step 3 – To Lock Key Fob
To manually lock key fob, press and
hold both ON and OFF buttons at
the same time for 3 seconds. Flashing
light indicator will stop, indicating
fob is in lock mode (Figure 4). If fob
is unlocked and left idle for 3 minutes
or more, it will automatically go into
lock mode. Fob is in lock mode when
pressing any button and all 5 indicator
lights light up.
Press Both ON
and OFF
Buttons For 3
Seconds to
Manually Lock
Fob
Figure 4 – Key Fob in Lock Mode
Note: Once installation is completed, always verify your
systems operation before putting it to use, to ensure that:
1) the fobs selected mode operates the intended motor and
2) when pushing the ON or OFF button, it performs the intended function.
Installation of the wireless remote control in its
pre-programmed mode is now complete.
The remaining instructions are for programming options such as additional modes,
fobs and receivers for a variety of extra functions.
Specifications
Supply Voltage
12V DC
Key fob battery
23A 12V (requires 2 – included)
Operation
Key Fob (1 included) Manual Switch
Receiver Modes
Functions On Fob
Mode 1 (pre-programmed)
Press ON = To Close Tarp
Press OFF = To Open Tarp
Mode 2
Mode 3
Mode 4
Mode 5
8
Optional Instructions to Enable and Program
Additional Modes on Key Fob
Note: Mode 1 (tarp) cannot be disabled. During program mode, if fob is left idle
for more than 10 seconds, it will return to operating mode.
Turn key fob on. Press and hold SELECT button for 10 seconds until far left light is
on continuous (Figure 5). The fob is now in programming mode. Press ON button to
enable current mode shown by lit LED or press OFF button to disable current mode
shown by lit LED. Indicator light for modes will turn off and automatically advance to
the next mode when programming. After all 5 modes are programmed, the fob will
display the status of all 5 modes for ten seconds. All enabled mode LED’s will be lit
and all disabled mode LED’s will not be lit. Fob buttons will not function during this
ten second time.
Mode 2
Light
Continuous Light
Press Select 1
Time to Activate
Next Mode
Press and Hold
Select Button For
10 seconds
Figure 5
Figure 6 – Key Fob in Mode 2
9
Instructions to Re-Program Key Fobs or Receivers
Your Roll Tarp Wireless System is typically pre-programmed at the factory ready to
use. Re-programming is necessary if replacement fobs or receivers are installed. Use
programming method below to program receiver to accept/respond to signals from
up to 5 key fobs.
1. 2. 3. 4. Gain access to receiver inside control box.
Make sure receiver is connected to power source. If ON/OFF switch is installed,
turn it on.
The receiver can learn to recognize and respond up to 5 key fobs. Gather all
fobs to be introduced to the receiver.
Set fobs to appropriate mode. (Tarp, Front Trap, etc.)
Read the following steps fully before proceeding. Steps 6 through 7 must be
completed within 10 seconds.
5. Press and hold programming button on receiver for 3 seconds. (See Figure
7 below) The receiver will beep to indicate it is in programming mode, then
release button.
6. Press ON button on the first fob being introduced. The receiver will beep after
receiving fobs transmitted signal. Repeat this step for any additional fobs.
7. The receiver is expecting 5 signals. If you are programming less than 5 fobs, press
the ON button a total of 5 times. Example: If programming 3 fobs, each
with 1 functioning signal, you would press ON button on fob #1= one time, on
fob #2= one time, and on fob #3= three times for a total of five times between all
3 fobs (the last two times completes the five signals the receiver is expecting).
8. After pressing ON button 5 times, the receiver will beep 2 times to indicate it
has been programmed successfully. NOTE: After 10 seconds, the receiver will exit
program mode.
9. Verify that each fob is operating correctly. If fobs are not operating correctly,
verify there is 12 to 14 volts from receiver positive to negative, then repeat
Steps 3 to 8.
White Program Button
(found on receiver inside
control box)
Figure 7
10
Instructions to Program a Receiver (To More Than 1 Fob)
To program a receiver that controls the tarp motor to recognize more than 1 fob. Example
given below does 3 fobs.
1.
2.
3.
4.
5.
6.
7.
8.
9.
Remove control box cover. Turn 3 fobs on.
Set all 3 fobs to same tarp motor.
Press and hold programming button on receiver for 5 seconds. Receiver will beep
to indicate it is in Programming Mode. Release programming button.
Press ON button on 1st fob. Receiver will beep to indicate it has received a signal,
and memory slot #1 has been filled.
Press ON button on 2nd fob. Receiver will beep to indicate is has received a signal
and memory slot #2 has been filled.
Press ON button on 3rd fob. Receiver will beep to indicate it has received a signal
and memory slot #3 has been filled.
Press ON button on 3rd fob again. Receiver will beep to indicate it has received
a signal and memory slot #4 has been filled. (this is needed to clear any
pre-existing memory in #4)
Press ON button on 3rd fob again. Receiver will beep twice to indicate it has
received a signal and memory slot #5 has been filled. The double beep also
indicates receiver has exited programming mode. (this is needed to clear any preexisting memory in #5)
Verify that tarp motor Open and Close operations function correctly on all 3
fobs. Re-attach cover on control box. (Fob button functions: Push ON button to
CLOSE tarp, push OFF button to OPEN tarp.)
11
Battery Replacement
NOTE: The COMMAND-5 Remote will indicate low battery levels by flashing all 5
LEDs when both the ON and the OFF buttons are pressed at the same time.
Your wireless key fob is powered by two 23A 12V batteries. If key fob becomes unresponsive replace batteries.
To change batteries, remove 4 screws from back of fob using a small phillips
screwdriver. Carefully remove front of fob exposing two batteries. Replace both
batteries with two of same brand and size. Reassemble key fob by carefully placing
both halves together. Make sure grey colored gland in front half stays in place during assembly. Reassemble all four screws.
Screw
Locations
Front Half
Back Half
Battery
Location
-
12
+
-
+
+
+
Trouble Shooting Receiver
Problem Issue:
Check or Try...
1. Two different motors operate at
the same time when using fob remote.
.….reprogram receiver that is malfunctioning. (Review receiver programming page
10 with attention to Step 7)
2. System will not operate with fob
remote or toggle switch. (Cannot
hear a clicking noise from receiver
inside control box.)
….. if system has a master control switch,
make sure it is turned to “ON” position.
.…. auto circuit breaker may have tripped.
Wait several minutes and try again. If it
still does not work circuit breaker may
have have detected a continous short and
must be repaired
….. check vehicle’s battery, charge or replace if dead.
….. check all wire connections on vehicles
battery. Check all wiring for loose or corroded connections. Verify that battery has
at least 12 volts on battery terminals under
control box.
….. check for loose or shorted together
connections on receiver. Verify there is at
least 12 volts power from positive to negative terminal post.
..... verify that positive and negative wires
from battery are connected to correct terminals at control box. See wire schematic
page 5.
13
Trouble Shooting Receiver Cont’d
Problem Issue:
3. System will not operate with fob
remote or toggle switch. (Can hear
a clicking noise from inside receiver
control box—but nothing happens.)
4. The key fob and toggle switch will
operate the tarp motor, but motor
turns freely and tarp doesn’t move.
14
Check or Try...
…..verify there is at least 12 volts on back
side of receiver on battery hookup posts.
….. remove control box cover and check
connections on receiver, making sure they
are tight and none are shorted
together. Verify there is at least 12 volts
from positive to negative terminal post on
relay.
….. push toggle switch in Open or Close
position while checking voltage across IN
and OUT terminal posts. Should have 12
volts between these posts while holding
switch down. When releasing switch, there
should be close to 0 volts between posts. If
not, replace receiver solenoid.
….. if above checked okay, then motor
may be damaged.
Replace motor.
…..check bolt connections in shaft
between motor and tarp tube. If missing,
replace sheared bolt with grade 5 of same
size.
….. check tarp system for damaged or
misaligned parts and correct as needed.
Trouble Shooting Key Fob
Problem Issue:
Check or Try...
1. Key fob transmitter doesn’t
work. None of the lights turn on
when remote is turned on.
…..check fob for dead batteries, make
sure batteries are loaded correctly in
remote.
….. remove batteries and make sure contacts are tight and not corroded. Reinsert
batteries and try again.
…..batteries may be dead, replace with
new quality high capacity batteries.
…..damaged fob transmitter, replace fob.
2. Key fob transmitter doesn’t
work. System operates with toggle
switch but not with remote fob. The
key fob channel light (tarp system,
for example) is blinking, and when
pressing ON button, the light blinks
continuously.
….. make sure fob is set to correct mode.
If fob cannot be set to correct mode,
reprogramming is needed (see fob programming instructions).…..make sure
no other fobs are being used near this
system.
…..to determine if fob transmitter is the
problem, test with a different receiver
or by using a second fob. If receiver is
the problem, try reprogramming. If that
doesn’t work, replace receiver inside
control box.
…..be sure to be within several feet of
receiver and try again. If fob transmitter
works at short range but not long range,
replace battery. If battery is not the problem, replace remote fob.
3. Key fob transmitter doesn’t
…..remove batteries and make sure con-
work. Key fob mode light is blinking, but when pressing ON or OFF
button, the light goes out or just
continues to blink at same speed.
tacts are tight and not corroded. Reinsert
batteries and try again.
….. batteries may be dead, replace with new
high capacity batteries.
…..fob transmitter is damaged. Replace fob.
15
Trouble Shooting System
Problem Issue:
Check or Try...
1. System will not operate with
.…. if system was just installed, check to
toggle switch or with fob transmitter. Motor engages but stalls and tarp
does not turn.
see if tarp operates in opposite direction.
If so, see wiring installation about reversing wires.
…..check condition of tarp and alignment.
2. Key fob transmitter doesn’t work.
System operates with toggle switch
but not remote fob. The key fob channel light (tarp system, for example) is
blinking, and when pressing the ON
button, the light blinks continuously.
…..shut off power to system and remove
bolt that engage
motor shaft to tarp tube. Restore power to
system.
…..if motor doesn’t begin to run, press
toggle switch to engage motor.
….. if motor begins to run and will not
stop, pull center wire from toggle switch.
If motor stops, the toggle switch is faulty
and must be replaced. If motor keeps running, make sure all receiver connections
on are tight and not shorting together.
Verify there is at least 12 volts from positive to negative post. If connections are
good, then receiver is faulty and must be
replaced.
3. Motor keeps running after toggle
switch is released. Toggle switch is
sticking.
….. check switch for excessive dirt, debris
etc. Clean if dirty. Replace toggle switch if
it continues to stick after cleaning.
4. System has a motor running in
wrong direction.
…..if system was just installed, reverse
wires connected on tarp motor terminals.
Part No. 70810_E
Copyright 2013, All Rights Reserved. Agri-Cover, Inc.
042313