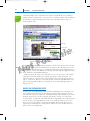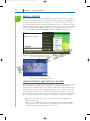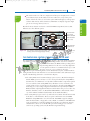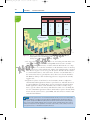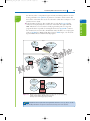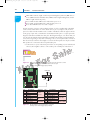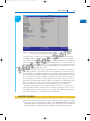
1
1435487389_ch03_CTP.qxd
7/30/09
CHAPTER
3
In this chapter,
you will learn:
• About the different types and
features of
motherboards
• How firmware
on the motherboard controls
what happens
when you first
turn on a PC
before the OS is
loaded
• How to install,
configure, and
maintain a
motherboard
5:21 PM
Page 99
All About Motherboards
I
n the last chapter, you learned about form factors and power
supplies. You also learned how to work inside a computer. In this
chapter, we build on all that knowledge to learn about motherboards,
which techies sometimes call the mobo. You’ll learn about the many
different features of a motherboard and how to match one up with
other components in a system. The firmware on the motherboard
controls the beginning of the boot, so we’ll look at the details of that
process. Then you’ll learn how to support a motherboard and that
includes installing, replacing, configuring, and maintaining it.
A motherboard is considered a field replaceable unit, so it’s important
to know how to replace one, but the good news is you don’t need
to know how to repair one that is broken. Troubleshooting a
motherboard works hand in hand with troubleshooting the
processor, so we’ll leave troubleshooting both until the end of
Chapter 4, Supporting Processors.
99
1435487389_ch03_CTP.qxd
7/30/09
100
5:21 PM
CHAPTER 3
Page 100
All About Motherboards
MOTHERBOARD TYPES AND FEATURES
A+
220-701
1.2
A motherboard is the most complicated component in a computer. When you put together a
computer from parts, generally you start with deciding on which processor and motherboard
you will use. Everything else follows those decisions. Take a look at the details of Figure 3-1,
which shows a motherboard designed with gamers in mind. If you were shopping for a motherboard for a gaming system, you’d have to compare many features among numerous boards.
Generally, you’d need to pay attention to form factor, processor sockets, chipsets, buses and
number of bus slots, and other connectors, slots, and ports. In this part of the chapter, we’ll
look at the details of each of these features so that in the future you’ll be able to read a mobo
ad with the knowledge of a pro. We’ll also look at how configuration information is stored on
a motherboard and the best strategies to use when selecting a motherboard.
Socket LGA1366
X58 North
Bridge
Four DDR3
DIMM slots
South Bridge
PCIe x16 slots for two
video cards
Figure 3-1 Intel DX58SO motherboard is designed with the gamer in mind
Courtesy: Course Technology/Cengage Learning
Notes If you are interested in learning about legacy motherboards and their features, see the
content “Facts about Legacy Motherboards” on the CD that accompanies this book.
MOTHERBOARD FORM FACTORS
You learned about motherboard form factors in the last chapter, so we won’t repeat
that here. To summarize, recall that a motherboard form factor determines the size
of the board and its features that make it compatible with power supplies, cases,
processors, and expansion cards. The most popular motherboard form factors are
ATX, MicroATX, FlexATX, BTX, and NLX, in that order. ATX motherboards have
been around for a long time and have seen many improvements. Figure 3-1 shows an
ATX motherboard and Figure 3-2 shows a MicroATX board. A BTX motherboard is
shown in Figure 3-3. Each form factor has several sizes for motherboards which are
listed in Table 2-1 in Chapter 2. In addition to these form factors, you might encounter
the ITX form factor. It’s smaller than a MicroATX and sometimes used in home
theatre systems.
1435487389_ch03_CTP.qxd
7/30/09
5:21 PM
Page 101
Motherboard Types and Features
101
A+
220-701
1.2
Two DDR2
DIMM slots
Two PCI slots
North Bridge
Figure 3-2 This MicroATX motherboard by Biostar has an AM2 socket that supports an AMD processor
Courtesy: Course Technology/Cengage Learning
Socket 775
Figure 3-3 A BTX motherboard with an LGA 775 Land socket that supports an Intel processor
Courtesy of Intel Corporation
A+ Exam Tip The A+ 220-701 Essentials exam expects you to know about the ATX, BTX, MicroATX,
and NLX form factors.
PROCESSOR SOCKETS
Another important feature of a motherboard is the processor socket. This socket and the
chipset determine which processors a board can support. A socket will hold either an Intel or
AMD processor. Some older processors were installed on the motherboard in a long narrow
slot, but all processors sold today use sockets. Table 3-1 lists the sockets currently used by
Intel processors for desktop systems. The types of memory listed in the table that are used
with these sockets are explained in detail in Chapter 5. Also know that Intel makes several
Itanium and Xeon processors designed for servers. These server processors use different
sockets than those listed in the table.
A+ 220-701
PCIe x 16 slot
Socket AM2+
3
1435487389_ch03_CTP.qxd
102
7/30/09
5:21 PM
CHAPTER 3
Page 102
All About Motherboards
A+
220-701
Intel Socket Names
Used by Processor Family
1.2
LGA1366 or Socket B
Core i7
Description
1366 pins that touch pads on the
processor
Works with DDR3 memory
Expected to replace LGA771 and
LGA775 sockets
LGA771 or Socket J
Core 2 Extreme
771 pins that touch pads on the
processor
Used on high-end workstations and
low-end servers
Works with DDR2 memory on boards
that have two processor sockets
LGA775 or Socket T
Core 2 Extreme
775 lands or pads
Core 2 Quad
Works with DDR3 and DDR2 memory
Core 2 Duo
Most popular Intel socket
Pentium Dual-Core
Pentium Extreme Edition
Pentium D
Pentium
Pentium 4
Many Celeron processors
Socket 478
Pentium 4
478 holes for pins
Celeron processors
Uses a dense micro PGA (mPGA)
No longer sold
Socket 423
Pentium 4
423 holes for pins
39 x 39 SPGA grid
No longer sold
Table 3-1 Sockets for Intel processors used for desktop computers
Earlier Pentiums used a pin grid array (PGA) socket, with pins aligned in uniform rows
around the socket. Later sockets used a staggered pin grid array (SPGA), with pins staggered
over the socket to squeeze more pins into a small space. Small pins can easily be bent as the
processor is installed in the socket. Later Intel sockets use a land grid array (LGA) that uses
lands rather than pins. The first LGA socket is the LGA775 socket. It has 775 lands and is
shown with the socket lever and top open in Figure 3-4. The lands look like tiny pads that
the pins on the processor contact.
The latest Intel socket is the LGA1366 socket. It’s called a land grid array socket, but the
lands in the socket are actually more like pins that connect with lands on the bottom of the
processor. Figure 3-5 shows an LGA1366 socket with the load plate and load lever lifted so
that the socket is open and ready to receive the processor.
PGA, SPGA, and LGA sockets are all square or nearly square. So that even force is applied
when inserting the processor in the socket, all current processor sockets have a lever on the side
of the socket. These sockets are called zero insertion force (ZIF) sockets, and this lever is used to
lift the processor up and out of the socket. Push the lever down and the processor moves into its
pin or land connectors with equal force over the entire housing. With this method, you can easily
1435487389_ch03_CTP.qxd
7/30/09
5:21 PM
Page 103
Motherboard Types and Features
A+
220-701
1.2
103
Plastic cover
protects the
socket when
it's not in use
Figure 3-4 Socket LGA775 is the first Intel socket to use lands rather than pins
Courtesy: Course Technology/Cengage Learning
Load plate
Open socket
Load lever
Figure 3-5 Socket LGA1366 is the latest Intel socket used by desktop, workstation, and low-end server systems
Courtesy: Course Technology/Cengage Learning
3
A+ 220-701
remove and replace the processor if necessary. However, know that processors generally should
not be removed or replaced repeatedly because this can damage the delicate pins or socket holes.
Table 3-2 lists the AMD sockets for desktop systems. AMD has chosen to use the PGA
socket architecture for its desktop processors. (Some of AMD’s server processors use Socket F,
which is an LGA socket.) Figure 3-6 shows the AM2+ socket. The lever on the side of the
socket is lifted, and an Athlon 64 processor is about to be inserted. If you look closely near the
lower edge of the processor, you can see the small pins that will seat into the holes of the socket.
As you glance over Tables 3-1 and 3-2, you’ll notice the same processor family listed
under several different sockets. For example, the AMD Athlon family of processors offers
many versions of the Athlon. Among these are the Athlon X2 Dual-Core, the Athlon Neo,
and the Athlon 64 X2 Dual-Core. Because these various processors within the same
processor family use different sockets, you must be careful when matching a processor to a
motherboard. To be certain you have a good match, search the Intel (www.intel.com) or
AMD (www.amd.com) Web site for the exact processor you are buying and make sure the
socket it uses is the same as the socket on the motherboard you plan to use.
1435487389_ch03_CTP.qxd
104
7/30/09
5:21 PM
CHAPTER 3
Page 104
All About Motherboards
A+
220-701
AMD Socket
Used by Processor Family
1.2
AM3 or AMD3
Phenom II
Description
938 holes for pins (PGA)
Works with DDR3 memory
AM2+ or AMD2+
Phenom II, Phenom, and Athlon
940 holes for pins (PGA)
Works with DDR2 memory
Faster than AMD2
AM2 or AMD2
Athlon and Sempron
940 holes for pins (PGA)
Works with DDR2 memory
Socket 754
Athlon and Sempron
754 holes for pins (PGA)
Works with DDR memory
Socket 940
Athlon
940 holes for pins (PGA)
Works with DDR memory
Socket 939
Athlon and Sempron
939 holes for pins (PGA)
Works with DDR memory
No longer sold
Socket A
Athlon, Sempron, and Duron
462 holes for pins (PGA)
Works with DDR memory
Rarely sold today
Table 3-2
Sockets for AMD processors used for desktop computers
Also, look at the motherboard documentation for a list of processors that the
motherboard supports. It is not likely to support every processor that uses its socket
because the motherboard chipset is designed to only work with certain processors.
Figure 3-6 AMD Athlon 64 processor to be inserted into an AM2+ socket
Courtesy: Course Technology/Cengage Learning
1435487389_ch03_CTP.qxd
7/30/09
5:21 PM
Page 105
Motherboard Types and Features
A+
220-701
1.2
105
A+ Exam Tip The A+ 220-701 Essentials exam expects you to be familiar with the desktop processor
sockets in use today. You also need to know about notebook processor sockets, which are covered in Chapter 11.
3
Recall from Chapter 1 that a chipset is a set of chips on the motherboard that collectively
controls the memory, buses on the motherboard, and some peripherals. A few motherboard
manufacturers, such as Intel and AMD, make their own chipsets. But other motherboard
manufacturers use chipsets made by another manufacturer. The major chipset manufacturers
are Intel (www.intel.com), AMD (www.amd.com), NVIDIA (www.nvidia.com), and SiS
(www.sis.com), in that order.
Intel has produced far too many chipsets to list them here. To see a complete comparison
chart of all Intel chipsets, start at the Intel link http://compare.intel.com/PCC/intro.aspx.
A few of the more popular chipsets are listed here:
High-performance chipsets. The X58 chipset supports the Intel LGA1366 socket, the Core
i7 processors, and PCI Express Version 2. It can also support either SLI or CrossFire technologies. (SLI and CrossFire are two competing technologies that allow for multiple video
cards installed in one system.) The X58 chipset does not control memory because the memory controller is embedded in the Core i7 processor. The 975X Express chipset supports the
Pentium Extreme Edition processor, multiple video cards, and up to 8 GB of memory.
Mainstream desktop chipsets. The P45, P43, P35, G45, and G31 chipsets support Core
2 Quad and Core 2 Duo Intel processors. P45, P43, and G45 can support up to 16 GB
of DDR3 or DDR2 memory. The P35 chipset supports up to 8 GB of DDR3 or DDR2
memory. It also supports the Core 2 Extreme processor. The G31 chipset supports up to
4 GB of DDR2 memory. The Q45 chipset uses DDR3 or DDR2 memory and supports
the Core 2 Duo and Core 2 Quad processors. All these chipsets use socket LGA775.
Value desktops. The 910GL, 845E, 845G, and 865G chipsets support the Pentium 4,
Celeron, and Celeron D processors in low-end systems. The 910GL chipset uses the
LGA775 socket. The 845E, 845G, and 865G chipsets use the 478PGA socket. All
these chipsets use DDR memory.
Older value desktops. The 845 and 845GL chipsets support the Pentium 4 or Celeron
processors in a low-end system using the 478PGA socket. They support up to 2 GB of
DDR memory.
Beginning with the Intel i800 series of chipsets, a hub is used to connect buses. All I/O buses
(input/output buses) connect to a hub, which connects to the system bus. This hub is called the
hub interface, and the architecture is called Accelerated Hub Architecture (see Figure 3-7). The
fast end of the hub, which contains the graphics and memory controller, connects to the system bus and is called the hub’s North Bridge. The slower end of the hub, called the South
Bridge, contains the I/O controller hub. All I/O devices, except display and memory, connect
to the hub by using the slower South Bridge. Notice in Figure 3-7 the primary PCI Express
slot, the slot designated for the video card, has direct access to the North Bridge, but other PCI
Express slots must access the processor by way of the slower South Bridge. On a motherboard,
when you see two major chips for the chipset, one is controlling the North Bridge and the
other is controlling the South Bridge (refer to Figure 3-1). Other chipset manufacturers besides
Intel also use the North Bridge and South Bridge architecture for their chipsets.
The latest Intel chipset for desktop PCs is the X58 chipset, which is used by the motherboard in Figure 3-1. You can see a close-up of part of this board in Figure 3-8. The board
comes with a fan that can be clipped to the top of the North Bridge to help keep the chipset
A+ 220-701
THE CHIPSET
1435487389_ch03_CTP.qxd
106
7/30/09
5:21 PM
CHAPTER 3
Page 106
All About Motherboards
A+
220-701
Processor
1.2
FSB
Primary
PCIe slot
for video
card
PCIe
slot
PCIe
slot
PCIe link
Memory
controller
hub
(North Bridge)
RAM
Memory bus
Drives
ATA bus
PCIe link
I/O
controller
hub
(South Bridge)
USB
Sound
PCIe link
PCI
PC I
PC I
slots
slots
slots
PCI bus
PCIe link
FireWire
PCIe
slot
Figure 3-7 The chipset’s North Bridge and South Bridge control access to the processor for all components
Courtesy: Course Technology/Cengage Learning
X58 chipset
South Bridge
Figure 3-8 The X58 chipset uses heat sinks to stay cool
Courtesy: Course Technology/Cengage Learning
cool. With previous Intel chipsets, the memory controller was part of the North Bridge, but
the Core i7 processor contains the memory controller within the processor housing. This
new architecture for the Core i7 and the X58 chipset is shown in Figure 3-9. Notice that
memory connects directly to the processor rather than to the North Bridge.
1435487389_ch03_CTP.qxd
7/30/09
5:21 PM
Page 107
Motherboard Types and Features
A+
220-701
Intel Core i7
processor
1.2
107
DDR3 memory
3
X58 North
Bridge
High-definition audio
High-speed USB ports
PCI Express x1slots
A+ 220-701
PCI Express Version
2.0 Graphics:
Support for multicard
configuration including
1 x 16, 2 x 16, 4 x 8,
and other combinations up to 36 lanes
ICH South
Bridge
Ethernet gigabit
network connection
SATA and eSATA ports
PCI
PCI
PCI
slots
slots
slots
BIOS
support
Figure 3-9 X58 chipset architecture
Courtesy: Course Technology/Cengage Learning
The X58 chipset works well for a gaming machine because it is designed to support
multiple video cards. The motherboard shown in Figure 3-8 has two PCI Express x16
slots that work with either of two technologies to install multiple video cards in the
same system. The two solutions are SLI (Scalable Link Interface) by NVIDIA and
CrossFire by ATI Technologies. You will see how to set up a dual video card gaming
PC in Chapter 7.
AMD purchased ATI Technologies, a maker of chipsets and graphics processors (called a
graphics processor unit or GPU), in 2006, which increased AMD chipset and GPU offerings.
Significant chipsets by AMD include the following:
The AMD 7-series (AMD 790FX, 790X, 790GX, 780, and 770) chipsets are designed
with the gamer, hobbyist, and multimedia enthusiast in mind. They focus on good
graphics capabilities and support overclocking.
The AMD 580X Crossfire chipset supports ATI CrossFire.
The AMD 780V chipset is designed for business needs.
The AMD 740G and 690 chipsets are designed for low-end, inexpensive systems.
NVIDIA makes graphics processors and chipsets. Because the company specializes in
graphics, its nForce series of chipsets are great at supporting high-end graphics solutions
popular with gamers. In the past, nForce chipsets were made to work only with AMD
processors, but recently the nForce 700 series has been produced to work with the AMD
Phenom processor as well as the Intel Core 2 processor. Recall that NVIDIA’s method of
1435487389_ch03_CTP.qxd
108
A+
220-701
1.2
7/30/09
5:21 PM
CHAPTER 3
Page 108
All About Motherboards
connecting multiple video cards in the same system is called SLI. If you’re planning a
gaming computer with two video cards, check out a motherboard that supports SLI and
uses the nForce chipset. In motherboard ads, look for the SLI and nForce logos, as
shown in Figure 3-10.
SLI logo
nForce logo
Figure 3-10 SLI and nForce logos both by NVIDIA
Courtesy: Course Technology/Cengage Learning
Currently, Intel dominates the chipset market for several reasons: It knows more about its
own Intel processors than other manufacturers do, and it produces the chipsets most compatible with the Intel family of processors. Intel’s investment in research and development
also led to the creation of the PCI bus, the universal serial bus (USB), the AGP bus for video
cards, and the Accelerated Hub Architecture.
Chipsets generate heat, but not as much heat as a processor generates. Some chipsets
today have a heat sink installed on top that is appropriate to keep the chipset cool.
These heat sinks are considered part of the motherboard and you should never have to
replace or install one. However, some motherboards, such as the Intel DX58SO board,
have an optional small fan that you can install on top of the North Bridge chipset to
help keep it cool.
BUSES AND EXPANSION SLOTS
As cities grow, so do their transportation systems. Small villages have only simple, twolane roads, but large cities have one-way streets, four-lane roads, and major freeways,
each with their own set of traffic laws, including minimum and maximum speeds, access
methods, and protocols. As microcomputer systems have evolved, so too have their
“transportation” systems. The earliest PC had only a single simple bus. Today’s PCs have
four or five buses, each with different speeds, access methods, and protocols. As you
have seen in previous chapters, backward compatibility dictates that older buses be
supported on a motherboard, even when faster, better buses exist. All this makes for a
maze of buses on a motherboard.
1435487389_ch03_CTP.qxd
7/30/09
5:21 PM
Page 109
Motherboard Types and Features
A+
220-701
1.2
109
Look on the bottom of the motherboard, and you see a maze of circuits that make up a
bus. These embedded wires carry four kinds of cargo:
Just as a city’s road system improves to increase the speed and number of lanes of traffic,
buses have evolved around similar issues, data path and speed. Cars on a freeway generally
travel at a continuous speed, but traffic on a computer’s processor or bus is digital (on and
off), rather than analog (continuous). The system clock keeps the beat for components. If a
component on the motherboard works by the beat, or clock cycle, then it is synchronized,
or in sync, with the processor. For example, the back-side bus of the Pentium works at half
the speed of the processor. This means that the processor does something on each clock
cycle, but the back-side bus is doing something on every other clock cycle.
Some components don’t attempt to keep in sync with the processor, even to work at one-half
or one-third of clock cycles. These components work asynchronously with the processor. They
might work at a rate determined by the system clock or by another crystal on or off the motherboard. Either way, the frequency is much slower than the processor’s and not in sync with it. If
the processor requests something from one of these devices and the device is not ready, the device
issues a wait state, which is a command to the processor to wait for slower devices to catch up.
Table 3-3 lists the various buses used on motherboards today, in order of throughput speed
from fastest to slowest. (Throughput is sometimes called bandwidth.) Looking at the second
column of Table 3-3, you can see that a bus is called an expansion bus, local bus, local I/O
bus, or local video bus. A bus that does not run in sync with the system clock is called an
expansion bus and always connects to the slow end of the chipset, the South Bridge. Most
buses today are local buses, meaning they run in sync with the system clock. If a local bus
connects to the slower I/O controller hub or South Bridge of the chipset, it is called a local
I/O bus. Because the video card needs to run at a faster rate than other expansion cards, this
one slot always connects to the faster end of the chipset, the North Bridge. This video slot
can be either an AGP slot or a PCI Express x16 slot, and the bus is called a local video bus.
The AGP buses were developed specifically for video cards, and the PCI buses are used for
many types of cards, including video cards. We’ll now look at the details of the PCI and
AGP buses and the less significant AMR and CNR slots. The FireWire and USB buses are
discussed in Chapter 7.
THE PCI BUSES
PCI (Peripheral Component Interconnect) buses have been improved several times; there are
currently three major categories and within each category, several variations of PCI. In the
following sections, we discuss each category in turn.
3
A+ 220-701
Electrical power. Chips on the motherboard require power to function. These chips
tap into a bus’s power lines and draw what they need.
Control signals. Some wires on a bus carry control signals that coordinate all the activity.
Memory addresses. Components pass memory addresses to one another, telling each
other where to access data or instructions. The number of wires that make up the
memory address lines of the bus determines how many bits can be used for a memory
address. The number of wires thus limits the amount of memory the bus can address.
Data. Data passes over a bus in a group of wires, just as memory addresses do. The
number of lines in the bus used to pass data determines how much data can be
passed in parallel at one time. The number of lines depends on the type of
processor and determines the number of bits in the data path. (Remember that a
data path is the part of the bus on which the data is placed; it can be 8, 16, 32,
64, or more bits wide.)
1435487389_ch03_CTP.qxd
7/30/09
110
5:21 PM
CHAPTER 3
Page 110
All About Motherboards
Conventional PCI
A+
220-701
The first PCI bus had a 32-bit data path, supplied 5 V of power to an expansion card,
and operated at 33 MHz. It was the first bus that allowed expansion cards to run in sync
with the CPU. PCI Version 2.x introduced the 64-bit, 3.3-V PCI slot, doubling data
throughput of the bus. Because a card can be damaged if installed in the wrong voltage
slot, a notch in a PCI slot distinguishes between a 5-V slot and a 3.3-V slot. A Universal
PCI card can use either a 3.3-V or 5-V slot and contains both notches (see Figure 3-11).
Conventional PCI now has four types of slots and six possible PCI card configurations to
use these slots (see Figure 3-12).
1.2
Bus
Bus Type
Data Path
in Bits
Address Lines
Bus Frequency
Throughput
System bus
Local
64
32 or 64
Up to 1600 MHz
Up to 3.2 GB/sec
PCI Express
Version 2
Local video
and local I/O
Serial with
up to 32 lanes
Up to 32 lanes
2.5 GHz
Up to 500 MB/sec per
lane in each direction
PCI Express
Version 1.1
Local video
and local I/O
Serial with
up to 16 lanes
Up to 16 lanes
1.25 GHz
Up to 250 MB/sec per
lane in each direction
PCI Express
Version 1
Local video
and local I/O
Serial with
up to 16 lanes
Up to 16 lanes
1.25 GHz
Up to 250 MB/sec per
lane in each direction
PCI-X
Local I/O
64
32
66, 133, 266,
or 533 MHz
Up to 8.5 GB/sec
PCI
Local I/O
32 or 64
32 or 64
33, 66 MHz
133, 266, or 532 MB/sec
AGP 1x, 2x,
3x, 4x, 8x
Local video
32
NA
66, 75,
100 MHz
266 MB/sec to
2.1 GB/sec
FireWire 400
and 800
Local I/O
or expansion
1
Serial
NA
Up to 3.2 Gbps
(gigabits per second)
USB 1.1, 2.0,
and 3.0
Expansion
1
Serial
3 MHz
12 or 480 Mbps
(megabits per second) or
5.0 Gbps (gigabits per
second)
Table 3-3
Buses listed by throughput
5-V notches
3.3-V notch
Figure 3-11 A 32-bit, 5-V PCI network card and a 32-bit, universal PCI wireless card show the difference in PCI
notches set to distinguish voltages in a PCI slot
Courtesy: Course Technology/Cengage Learning
1435487389_ch03_CTP.qxd
7/30/09
5:21 PM
Page 111
Motherboard Types and Features
111
Rear of slot
A+
220-701
1.2
3.3 V
3
3.3 V
A+ 220-701
5V
5V
32-bit PCI slots
64-bit PCI slots
Universal
3.3 V or 5 V
32-bit PCI cards
Universal
3.3 V or 5 V
3.3 V
3.3 V
5V
5V
64-bit PCI cards
Figure 3-12 With PCI Version 2.x, there are four possible types of expansion slots and six differently
configured PCI expansion cards to use these slots
Courtesy: Course Technology/Cengage Learning
PCI-X
The next evolution of PCI is PCI-X, which has had three major revisions; the latest is
PCI-X 3.0. All PCI-X revisions are backward compatible with conventional PCI cards and
slots, except 5-V PCI cards are no longer supported. PCI-X is focused on technologies
that target the server market; therefore, it’s unlikely you’ll see PCI-X slots in desktop
computers. Motherboards that use PCI-X tend to have several different PCI slots with
some 32-bit or 64-bit slots running at different speeds. For example, Figure 3-13 shows a
motherboard with three types of slots. The two long green slots are PCI-X; the three
white slots are PCI, and the one offset lime green slot is AGP. The two PCI-X slots can
use most 32-bit and 64-bit PCI or PCI-X cards. PCI-X is being replaced by PCI Express.
PCI Express
PCI Express (PCIe) uses an altogether different architectural design than conventional PCI
and PCI-X; PCIe is not backward compatible with either. PCI Express will ultimately replace
1435487389_ch03_CTP.qxd
112
7/30/09
5:21 PM
CHAPTER 3
Page 112
All About Motherboards
A+
220-701
1.2
Figure 3-13 The two long green PCI-X slots can support PCI cards
Courtesy of Super Micro Computer Inc.
both these buses as well as the AGP bus, although it is expected PCI Express will coexist
with conventional PCI for some time to come (see Figure 3-14). Whereas PCI uses a 32-bit
or 64-bit parallel bus, PCI Express uses a serial bus, which is faster than a parallel bus
because it transmits data in packets similar to how an Ethernet network, USB, and FireWire
transmit data. A PCIe expansion slot can provide one or more of these serial lanes.
PCI Express
x16 slot
PCI slots
PCI Express
x1 slots
Rear of motherboard
Figure 3-14 Three PCI Express slots and three PCI slots on a motherboard
Courtesy: Course Technology/Cengage Learning
Another difference in PCI Express is how it connects to the processor. Looking back at
the right side of Figure 3-7, you can see that all conventional PCI slots connect to the
processor by way of a single PCI bus, which connects to the I/O controller hub or South
Bridge. With PCI Express, the left side of Figure 3-7 shows each PCI Express slot for a PCIe
card has its own link or bus to the South Bridge, and one PCI Express slot has a direct link
to the faster memory controller hub or North Bridge. This last PCI Express slot is intended
to be used by a PCIe video card.
1435487389_ch03_CTP.qxd
7/30/09
5:21 PM
Page 113
Motherboard Types and Features
A+
220-701
1.2
113
Two PCIe x16 slots
PCIe x4 slot
Conventional PCI slot
Two PCIe x1 slots
Figure 3-15 Three types of PCIe slots and one conventional PCI slot
Courtesy: Course Technology/Cengage Learning
There has been one minor revision of PCIe (PCIe Version 1.1), and one major revision
(PCIe Version 2). PCIe version 1.1 allowed for more wattage to PCIe cards. The original
PCIe allowed for 150 W (75 W from pins on the expansion slot and 75 W from the 6-pin
connector from the power supply). PCIe Version 1.1 increased the wattage to 225 watts by
allowing two 6-pin connectors from the power supply to the card (75 W from the slot and
150 W from the two connectors).
PCIe Version 2 doubled the frequency of the PCIe bus, theoretically doubling the throughput. It also allows for up to 32 lanes on one slot. However, few cards are manufactured
today that take full advantage of the increased throughput, and no cards or slots are yet
made that have 32 lanes. The allowed wattage to one PCIe 2.0 card was increased to a
total of 300 watts by using a new 8-pin power supply connector that provides 150 W (see
Figure 3-16). The 300 watts to the card come from the slot (75 W), from the 8-pin connector (150 W), and an additional 75 W come from a second
Video
auxiliary connector on the motherboard. This second connecPCI Express and On-Board
tor can be a 6-pin PCIe connector, a Molex-style connector,
Wireless
or a SATA-style connector. You’ll see an example of these
connectors later in the chapter.
According to the PCIe Version 2.0 specifications, all Version 2 motherboards and cards
should be compatible with PCIe Version 1.0 and Version 1.1. However, in practice this might
not be true. The x16, x8, x4, and x1 PCIe slots look the same for all versions, but PCIe Version
2 cards might not work in Version 1.0 or 1.1 slots. However, most likely a PCIe Version 1.1 or
1.0 card should work in a Version 2 slot. If you install a PCIe card of a different version in a
3
A+ 220-701
PCI Express currently comes in four different slot sizes called PCI Express x1
(pronounced “by one”), x4, x8, and x16. Figure 3-15 shows three of these slots.
Notice in the photograph how the PCIe slots are not as tall and the pins closer together
than the conventional PCI slot. A PCI Express x1 slot contains a single lane for data,
which is actually four wires. One pair of wires is used to send data and the other pair
receives data, one bit at a time. The x16 slot contains 16 lanes, each lane timed
independently of other lanes. The more lanes you have, the more data gets transmitted in
a given time. This is similar to the way lanes of traffic on a freeway work; the more lanes
you have, the more traffic can flow. Therefore, a x16 slot is faster than a x4 slot, which is
faster than a x1 slot. A shorter PCI Express card (such as a x1 card) can be installed in a
longer PCI Express slot (such as a x4 slot).
1435487389_ch03_CTP.qxd
114
7/30/09
5:22 PM
CHAPTER 3
Page 114
All About Motherboards
A+
220-701
1.2
8-pin connector
Figure 3-16 8-pin PCIe Version 2.0 power connector
Courtesy: Course Technology/Cengage Learning
PCIe slot and it does not work, contact the manufacturer and ask for a fix to the problem they
created by not accurately following the PCIe standards. How do you know what version PCIe
card or slot you have? You can’t tell by looking at the card or slot, so you have to depend on
finding the information in the documentation, user manual, or manufacturer Web site.
To get the full potential of PCIe Version 2.0, use PCIe Version 2 cards in Version 2 slots.
If you install a PCIe Version 1.x card in a PCIe Version 2.0 slot, the slot runs at a slower
speed to accommodate the card. If you install a PCIe Version 2.0 card in a PCIe Version 1.x
slot, the card runs at the slower speed of the slot.
PCIe version 3.0 is expected to be published sometime in 2010; it will double the
throughput of Version 2. However, after a standard is published, it takes some time for
manufacturers to produce the new products. For more information on PCIe, see the PCI
Special Interest Group site at www.pcisig.com.
PCI Riser Cards Used to Extend the Slots
Recall that an NLX motherboard uses a riser card that provides expansion slots for other
cards. You can also use a riser card in other systems besides NLX to extend an expansion
slot. For example, suppose you are installing a microATX motherboard into a low-profile or
slimline case that does not give you enough room to install a PCI card standing up in an
expansion slot. In this situation, a PCI riser card can solve the problem. The riser card
installs in the slot and provides another slot that sits parallel to the motherboard. When
you install the expansion card in this riser card slot, the card also sits parallel to the
motherboard, taking up less space. These riser cards come for all types of PCI slots
including PCIe, PCI-X, and conventional PCI (see Figure 3-17).
THE AGP BUSES
Motherboard video slots and video cards used the Accelerated Graphics Port (AGP) standards for many years, but AGP has mostly been replaced by PCI Express. Even though AGP
is a dying technology, you still need to know how to support it. A motherboard will have a
PCI Express x16 slot or an AGP slot, but not both.
AGP evolved over several years, and the different AGP standards can be confusing. AGP
standards include three major releases (AGP 1.0, AGP 2.0, and AGP 3.0), one major change
in the AGP slot length standard (AGP Pro), four different speeds (1x, 2x, 4x, and 8x) yielding
four different throughputs, three different voltages (3.3 V, 1.5 V, and 0.8 V), and six different
expansion slots (AGP 3.3 V, AGP 1.5 V, AGP Universal, AGP Pro 3.3 V, APG Pro 1.5 V, and
AGP Pro Universal). To help you make sense of all this, Table 3-4 sorts it all out.
As you can see from Table 3-4, there are several different AGP slots and matching card
connectors that apply to the different standards. When matching video cards to AGP slots, be
1435487389_ch03_CTP.qxd
7/30/09
5:22 PM
Page 115
Motherboard Types and Features
A+
220-701
115
Inserts in
motherboard
slot
1.2
Figure 3-17 PCI riser card provides a 3.3-V slot or 5-V slot depending on which direction the
card is inserted in the PCI slot
Courtesy: Course Technology/Cengage Learning
Standard
Speeds (Cycles
Per Clock Beat)
Maximum
Throughput
Voltage
Slots Supported
AGP 1.0
1x
266 MB/sec
3.3 V
Slot keyed to 3.3 V
AGP 2.0
1x, 2x, or 4x
533 MB/sec or
1.06 GB/sec
3.3 V or 1.5 V
Slot keyed to 1.5 V
Slot keyed to 3.3 V
Universal slot (for
either 1.5-V or
3.3-V cards)
AGP Pro
Applies to
all speeds
NA
3.3 V or 1.5 V
AGP Pro 3.3 V keyed
AGP Pro 1.5 V keyed
AGP Pro Universal (for either
1.5-V or 3.3-V cards)
AGP 3.0
4x or 8x
2.12 GB/sec
1.5 V and 0.8 V
Universal AGP 3.0 (4x/8x) slot
Slot keyed to 1.5 V
Slot keyed to AGP Pro 1.5 V
Table 3-4
AGP standards summarized
aware of these several variations. For instance, the first two slots in Figure 3-18 are used by
cards that follow the AGP 1.0 or AGP 2.0 standards. These slots have key positions so that
you cannot put an AGP 3.3-V card in an AGP 1.5-V slot or vice versa. The third slot is a
universal slot that can accommodate 3.3-V or 1.5-V cards. All three slots are 2.9 inches wide
and have 132 pins, although some pins are not used. Figure 3-19 shows a motherboard with
an older AGP 3.3-V slot. Notice how the keyed 3.3-V break in the slot is near the back side
of the motherboard where expansion cards are bracketed to the case.
Another AGP standard, called AGP Pro, has provisions for a longer slot. This 180-pin
slot has extensions on both ends that contain an additional 20 pins on one end and
28 pins on the other end, to provide extra voltage for a high-end AGP video card that
consumes more than 25 watts of power. These wider slots might be keyed to 3.3 V or
A+ 220-701
Right-angle slot
for expansion
card
3
1435487389_ch03_CTP.qxd
116
A+
220-701
7/30/09
5:22 PM
CHAPTER 3
Page 116
All About Motherboards
Front of
motherboard
Rear of motherboard
(bracket side of slots)
1.2
AGP 3.3-V slot
AGP 1.5-V slot
AGP Universal slot
AGP Pro Universal slot
AGP Pro 3.3-V slot
AGP Pro 1.5-V slot
Figure 3-18 Six types of AGP slots
Courtesy: Course Technology/Cengage Learning
AGP slot
Rear of motherboard
(bracket side of slots)
Figure 3-19 This motherboard uses an AGP 3.3-V slot, which accommodates an AGP 1.0 video card
Courtesy: Course Technology/Cengage Learning
1.5 V or might be a Universal Pro slot that can hold either 3.3-V or 1.5-V cards. Also,
when using an AGP Pro video card, leave the PCI slot next to it empty to improve
ventilation and prevent overheating.
1435487389_ch03_CTP.qxd
7/30/09
5:22 PM
Page 117
Motherboard Types and Features
A+
220-701
1.2
117
Notes If you’re trying to buy an AGP video card to match a motherboard slot, you have to be really
careful. When reading an AGP ad, it’s hard to distinguish between AGP 3.3 V and AGP 3.0, but there’s a
big difference in these standards, and they are not interchangeable.
AMR AND CNR SLOTS
To reduce the total cost of a computer system, some older motherboards might have a small
expansion slot, about the length of a PCI Express x1 slot. This small slot can be an
audio/modem riser (AMR) slot or a communication and networking riser (CNR) slot
(see Figure 3-20). These small slots accommodate small, inexpensive expansion cards called
riser cards, such as a modem riser card, audio riser card, or network riser card. (These are
not the same riser cards used in NLX systems or riser cards used to extend an expansion
slot.) Part of a riser card’s audio, modem, or networking logic is on the card, and part is on
a controller on the motherboard. If you see an older motherboard and it has a short slot
beside a PCI or AGP slot, suspect that it’s a CNR or AMR slot. AMR and CNR slots are
rarely used today and it’s next to impossible to find the cards that fit them.
A+ Exam Tip The A+ 220-701 Essentials exam expects you to be familiar with an AMR slot, CNR
slot, and riser card, sometimes called a daughter board.
CNR slot
Figure 3-20 A CNR slot is smaller than a PCI slot but about the same height
Image copyright 2009, Slobodan Djajic. Used under license from Shutterstock.com
3
A+ 220-701
The last AGP standard, AGP 3.0, runs at 8x or 4x speeds. APG 3.0 cards can be installed in
an AGP 1.5-V slot, but signals are put on the data bus using 0.8 V. It’s best to install an AGP 3.0
card in a slot that is designed to support AGP 3.0 cards. However, if you install an AGP 3.0 card
in an older AGP 1.5-V slot, the card might or might not work, but the card will not be damaged.
An AGP video card will be keyed to 1.5 V or 3.3 V or a universal AGP video card has
both keys so that it can fit into either a 1.5-V keyed slot or a 3.3-V keyed slot. A universal
AGP video card also fits into a universal AGP slot. If an AGP video card does not make use
of the extra pins provided by the AGP Pro slot, it can still be inserted into the AGP Pro
slot if it has a registration tab that fits into the end of the Pro slot near the center of the
motherboard. In Chapter 7, you’ll learn about AGP video cards.
1435487389_ch03_CTP.qxd
118
5:22 PM
CHAPTER 3
A+
220-701
1.2
7/30/09
Page 118
All About Motherboards
Even more rare is an ACR (Advanced Communications Riser) slot. It looks like a PCI
slot, but it sits a little closer to the rear of the motherboard than does a PCI slot and the
notch in the slot is in a different position than the notch in a PCI slot. ACR cards might be
used for wireless or wired networking, FireWire, or modems.
ON-BOARD PORTS AND CONNECTORS
In addition to expansion slots, a motherboard might also have several on-board ports and
internal connectors. Ports coming directly off the motherboard are called on-board ports or
integrated components. Almost all motherboards have two or more USB ports and sound
ports. Boards might also offer a network port, modem port, FireWire (IEEE 1394) port,
video port, keyboard port, mouse port, parallel port, serial port, one or more eSATA ports
(for external SATA hard drives), and a port for a wireless antenna. Figures 3-21, 22, and 23
show ports on three motherboards. Figure 3-21 shows an older motherboard. Figure 3-22
shows a current low-end motherboard, and Figure 3-23 shows a current high-end
motherboard. We’ll discuss how to use all these ports in Chapter 7.
When you purchase a motherboard, the package includes an I/O shield, which is the plate
that you install in the computer case that provides holes for these I/O ports. The I/O shield is
FireWire port
Network port
Parallel port
S/PDIF port (for
audio coaxial cable)
Six sound ports
Wireless LAN
antenna port
PS/2 keyboard port
PS/2 mouse port
Four USB
ports
S/PDIF port (for
audio optical cable)
Figure 3-21 A motherboard provides ports for common I/O devices
Courtesy: Course Technology/Cengage Learning
Analog
video port
Four USB
ports
Network port
Serial port
PS/2 mouse
port
PS/2 keyboard
port
Figure 3-22 Ports on a value Biostar motherboard
Courtesy: Course Technology/Cengage Learning
Three sound
ports
1435487389_ch03_CTP.qxd
7/30/09
5:22 PM
Page 119
Motherboard Types and Features
A+
220-701
1.2
119
Eight USB ports
FireWire port
Network port
Two eSATA ports
Six audio ports
Figure 3-23 Intel DX58SO motherboard on-board ports
Courtesy: Course Technology/Cengage Learning
Figure 3-24 The I/O shield fits the motherboard ports to the computer case
Courtesy: Course Technology/Cengage Learning
Game port
FireWire
port
Two USB
ports
Serial port
Figure 3-25 These modules provide additional ports off the rear of a computer case
Courtesy: Course Technology/Cengage Learning
3
A+ 220-701
the size designed for the case’s form factor and the holes in the shield are positioned for the
motherboard ports (see Figure 3-24). When you first install a motherboard, you might need to
install the drivers that come on the CD bundled with the board before some of the motherboard ports will work. How to install the motherboard drivers is covered later in the chapter.
Some motherboards come with connector modules that provide additional ports off the
rear of the case. For example, Figure 3-25 shows three modules that came bundled with one
1435487389_ch03_CTP.qxd
7/30/09
120
A+
220-701
1.2
5:22 PM
CHAPTER 3
Page 120
All About Motherboards
motherboard. To use the ports on a module, you connect its cable to a connector on the motherboard and install the module in a slot on the rear of the case intended for an expansion card.
A motherboard might have several internal connectors, including parallel ATA connectors
(also called EIDE connectors), a floppy drive connector, serial ATA connectors, SCSI
connectors, or a FireWire (IEEE 1394) connector. When you purchase a motherboard, look
in the package for the motherboard manual either printed or on CD. It will show a diagram
of the board with a description of each connector. For example, the connectors for the
motherboard in Figure 3-26 are labeled as the manual describes them. If a connector is a
group of pins sticking up on the board, the connector is called a header. You will learn to
use most of these connectors in later chapters.
Six SATA
headers
S/PDIF header
Two USB
headers
High-definition
audio header
FireWire
header
Figure 3-26 Internal connectors on a motherboard for drives and ports on the front of the case
Courtesy: Course Technology/Cengage Learning
A+
220-701
1.2
2.5
5.2
HARDWARE CONFIGURATION
Settings on the motherboard are used to enable or disable a connector or port, set the
frequency of the CPU, system bus, or other buses, control security features, and control
what happens when the PC first boots. In the past, configuring these and other motherboard
settings was done in three different ways: DIP switches, jumpers, and CMOS RAM. Storing
configuration information by physically setting DIP switches or jumpers on the motherboard
or peripheral devices was extremely inconvenient, because it often required us to open the
computer case to make a change. A more convenient method is to hold configuration information in CMOS RAM, and today’s computers store almost all configuration data there. A
program in BIOS, called BIOS setup or CMOS setup, can easily make changes to the setup
values stored in CMOS RAM. Now let’s see how all three methods work.
Notes You don’t have to replace an entire motherboard if one port fails. Most ports on a
motherboard can be disabled through BIOS setup. On older motherboards, look for jumpers or DIP
switches to disable a port. For newer boards, use BIOS setup to disable the port. Then use an expansion
card for the port instead.
SETUP DATA STORED BY DIP SWITCHES
Some older motherboards and expansion cards store setup data using a dual inline package
(DIP) switch, as shown in Figure 3-27. A DIP switch has an ON position and an OFF position. ON represents binary 1 and OFF represents binary 0. If you add or remove equipment,
you can communicate that to the computer by changing a DIP switch setting. When you
change a DIP switch setting, use a pointed instrument such as a ballpoint pen to push the
switch. Don’t use a graphite pencil because graphite conducts electricity. In addition, pieces
of graphite dropped into the switch can damage it.
1435487389_ch03_CTP.qxd
7/30/09
5:22 PM
Page 121
Motherboard Types and Features
121
A+
220-701
1.2
2.5
5.2
3
A+ 220-701
Figure 3-27 DIP switches used to store setup data on older motherboards
Courtesy: Course Technology/Cengage Learning
SETUP DATA STORED BY JUMPERS
Older motherboards can also retain setup or installation information in different settings of
jumpers on the board. Jumpers are considered open or closed based on whether a jumper
cover is present on two small posts or metal pins that stick up off the motherboard (see
Figure 3-28). On these older boards, a group of jumpers might be used to tell the system at
what speed the CPU is running, or to turn a power-saving feature on or off. Look at the
jumper cover in Figure 3-29(b) that is “parked,” meaning it is hanging on a single pin for
safekeeping, but is not being used to turn a jumper setting on.
Most motherboards today allow you to set a supervisor password or user password to
control access to the system. For example, you can set two passwords in BIOS setup: one
to control access to BIOS setup (supervisor password) and the other to lock access to the
computer (user password). If both passwords are forgotten, you cannot use the computer.
Bank of jumpers
Jumper cover
Figure 3-28 Setup information about the motherboard can be stored by setting a jumper on
(closed) or off (open). A jumper is closed if the cover is in place, connecting the
two pins that make up the jumper; a jumper is open if the cover is not in place
Courtesy: Course Technology/Cengage Learning
1435487389_ch03_CTP.qxd
122
7/30/09
5:22 PM
CHAPTER 3
Page 122
All About Motherboards
a
A+
220-701
b
c
1.2
2.5
5.2
Figure 3-29 A 6-pin jumper group on a circuit board (a) has no jumpers set to on, (b) has a
cover parked on one pin, and (c) is configured with one jumper setting turned on
Courtesy: Course Technology/Cengage Learning
However, jumpers can be set to clear both passwords. Also, BIOS firmware might need
updating to solve a problem with the motherboard or to use a new motherboard feature.
If updating BIOS fails, jumpers can be set to undo the update. How to set and clear passwords, update BIOS, and undo a failed BIOS update are covered later in the chapter.
SETUP DATA STORED IN CMOS RAM
Computers today store most configuration information in CMOS RAM, also called the realtime clock/non-volatile RAM (RTC/NVRAM) chip, which retains the data even when the computer is turned off. Motherboard manuals should contain a list of all BIOS settings (also called
CMOS settings), an explanation of their meanings, and their recommended values. When you
purchase a motherboard or a computer, be sure the manual is included as a printed booklet or
on CD. If you don’t have the manual, you can sometimes go to the motherboard manufacturer’s
Web site and download the information you need to understand the specific BIOS settings of
your computer. Table 3-5 lists some BIOS settings. Several of these are discussed in future chapters. As you’re reading the table, keep in mind that the categories for BIOS settings are not universal. Each BIOS manufacturer decides which screen holds a particular setting.
Notes Even though a computer has many CMOS chips, the term “CMOS chip” has come to mean the
one chip on the motherboard that holds the configuration or setup information. If you hear someone
ask: “What does CMOS say?” or “Let’s change CMOS,” the person is talking about the configuration or
setup information stored on this one CMOS chip.
Category
Setting
Description
Standard
Date and time
Sets the system date and time (called the CMOS setup realtime clock). Windows picks up these values when it starts up.
Keyboard
Tells the system if the keyboard is installed or not; useful if
the computer is used as a print or file server and you don’t
want someone changing settings.
Hard disk type
Records the size and mapping of the drive or sets to
automatically detect the HDD (discussed in Chapter 6).
Language
Languages the BIOS setup screens use.
Table 3-5
BIOS settings and their purpose
1435487389_ch03_CTP.qxd
7/30/09
5:22 PM
Page 123
Motherboard Types and Features
A+
220-701
Category
1.2
2.5
5.2
Advanced
Chipset Setup
Table 3-5
Setting
Description
Floppy disk
type
Sets the floppy disk type; choices are usually 31⁄2-inch
and 51⁄4-inch. If you must choose a size in MB or inches,
the most likely choices are 1.44 MB (the maximum data size)
and 3.5 inch (the physical size of the disk).
System
information
Reports installed processor and speed, BIOS version,
installed RAM.
Quick boot
Enable/disable. Enable to cause POST to skip some tests
and speed up booting. Disable this feature when installing
or testing a motherboard to get a thorough POST.
Above 1 MB
memory test
Disables POST check of this memory to speed up
booting; the OS checks this memory anyway.
Memory parity
error check
For older motherboards, enables parity checking to ensure
that memory is correct.
System boot
sequence
Establishes the device the system turns to first to look for
an OS. Possible devices are the hard drive (drive C), CD drive,
DVD drive, USB device, floppy drive (drive A), or the network.
External cache
memory
Enables L2 cache. A frequent error in setup is to have cache,
but not use it, because it’s disabled here. Used on older
motherboards that have on-board cache memory.
Password
checking
option
Establishes a startup password. Use this only if you need to
prevent someone from using your PC. Sometimes there are
two passwords, each with different levels of security.
System ROM
Shadow
F000, 64 K
Enabling shadow system ROM is recommended. Shadowing
ROM is copying ROM programs into RAM. Programs are then
executed from RAM, which is faster than executing programs
from ROM.
IDE multiblock
mode or block
mode
Enables a hard drive to read or write several sectors at
a time; depends on the kind of hard drive you have.
Plug and Play
(PnP)
Enable/disable. Disable for Windows 2000/XP/Vista, which
does all the PnP configuration. Enable for Windows 9x,
which uses PnP data from BIOS.
Audio controller
Enable/disable.
Network port
Enable/disable.
Wireless network
controller
Enable/disable.
AGP capability
Switches between AGP 1x, AGP 2x, AGP 4x, and AGP 8x
versions to accommodate different AGP video cards.
AGP aperture size
Adjusts the amount of system memory AGP can address.
AGP voltage
Sets AGP operating voltage according to video card
requirements.
VGA BIOS
sequence
Determines the order in which PCI/AGP is initialized;
important mainly with dual monitors on legacy systems.
Processor serial
number
Allows processor ID# to be switched off for privacy
(Pentium III only).
BIOS settings and their purpose (continued)
3
A+ 220-701
BIOS Features
Menu
123
1435487389_ch03_CTP.qxd
124
A+
220-701
7/30/09
5:22 PM
Page 124
CHAPTER 3
All About Motherboards
Category
Setting
Description
Serial port
Sets beginning I/O address and IRQ; sometimes you can
enable/disable the port. (IRQs are discussed later in
the chapter.)
Parallel port mode
ECP or EPP (differences are discussed in Chapter 7).
Infrared
Enable/disable (sometimes enabling infrared disables the
second serial port, which uses the same resources).
USB configuration
Enable/disable and sets to high speed or legacy speed.
CPU configuration
Enable/disable Hyper Threading (covered in Chapter 4).
Sets thermal control.
PCI slots
Controls IRQ assignments to PCI slots.
Speech reporter
Startup BIOS reports messages in speech.
Overclocking
Enables/disables overclocking.
Suspend mode
Enable/disable suspending power when the system is inactive
(discussed in Chapter 11).
Power button
Controls what happens when power button is pressed.
Video off
Sets which way video to the monitor will be suspended.
HDD power down
Disables or enables the feature to shut down the hard drive
after a period of inactivity.
Wake on LAN
Allows your PC to be booted from another computer on the
same network; it requires an ATX or BTX power supply that
supports the feature.
Wake on mouse
Allows you to power up your PC by clicking the mouse.
Wake on RTC
Allows the PC to power up at a certain time of day.
Wake on keyboard
Allows you to power up your PC by pressing a certain key
combination.
IDE HDD
autodetect
Detects HDDs installed on either IDE channel; allows you to
specify Normal, Large, or LBA mode, but Autodetect is
recommended.
Serial ATA
Configure to IDE or RAID.
SMART monitoring
Monitors the HDD for failure.
Processor
operating speed
Sets the appropriate speed for your processor; used for
throttling and overclocking.
External clock
Sets the system bus speed.
I/O voltage
Sets the appropriate I/O voltage for the processor.
Core voltage
Sets the appropriate core voltage for the processor.
Boot device
priority, a.k.a.
Boot sequence
Determines the sequence of devices the BIOS looks to for
an OS to load. (Same as System boot sequence under the
BIOS Features Menu)
Boot settings
Quick boot skips tests made at startup by BIOS. (Same as
Quick boot under the BIOS Features Menu)
Enable/disable mouse support at startup.
Controls what is displayed at startup.
1.2
2.5
5.2
Power
Management
Menu
Hard Drive
Settings
Hardware
Device
Settings
Boot Settings
Enables/disables message at startup to press a certain key
to enter BIOS setup.
Table 3-5
BIOS settings and their purpose (continued)
1435487389_ch03_CTP.qxd
7/30/09
5:22 PM
Page 125
Motherboard Types and Features
A+
220-701
Category
1.2
2.5
5.2
Setting
Description
Supervisor
password
Enable/disable and set supervisor password to enter BIOS
setup and make changes.
User password
Enable/disable and set user password to access the system
or to enter and view BIOS setup. (Same as Password checking
option under the BIOS Features Menu)
Boot sector
virus
protection
Gives a warning that the boot sector of the hard drive is
being edited. When installing or upgrading an operating
system, disable this protection so the OS install process can
alter the boot sector without interruption. (How the boot
sector works is discussed in Chapter 6.)
Exit
Options are to exit and save changes, exit and discard
changes, or discard changes and not exit.
Load default
settings
Return BIOS setup to factory default settings. Use this
option if you suspect faulty changes have been made or the
system has become unstable.
Note: The titles, locations, and inclusion or exclusion of BIOS categories and settings depend on the manufacturer, BIOS
version, or both. For instance, Hardware Device Settings might be a group of settings sharing a category with other
settings in one version of BIOS, whereas Hardware Device Settings might be its own category in another BIOS version.
Table 3-5
BIOS settings and their purpose (continued)
Notes In documentation, a.k.a. stands for “also known as.”
A+ Exam Tip The A+ 220-701 Essentials exam expects you to know how the drive boot order is
set and the type of boot devices you can use.
Battery Power to CMOS RAM
A small trickle of electricity from a nearby lithium coin-cell battery enables CMOS RAM to
hold configuration data, even while the main power to the computer is off. If the CMOS
battery is disconnected or fails, setup information is lost. An indication that the battery
is getting weak is that the system date and time are incorrect after power has been
disconnected to the PC. A coin-cell battery is shown in Figure 3-30.
A+ Exam Tip The A+ 220-701 Essentials exam expects you to know about the CMOS battery.
HOW TO SELECT A MOTHERBOARD
Because the motherboard determines so many of your computer’s features, selecting the motherboard is, in most cases, your most important decision when you purchase a computer or assemble one from parts. Depending on which applications and peripheral devices you plan to use
with the computer, you can take one of three approaches to selecting a motherboard. The first
approach is to select the board that provides the most room for expansion, so you can upgrade
and exchange components and add devices easily. A second approach is to select the board that
best suits the needs of the computer’s current configuration, knowing that when you need to
3
A+ 220-701
Exit Menu
125
1435487389_ch03_CTP.qxd
126
7/30/09
5:22 PM
CHAPTER 3
Page 126
All About Motherboards
Figure 3-30 The coin-cell battery powers CMOS RAM when the system is turned off
Courtesy: Course Technology/Cengage Learning
upgrade, you will likely switch to new technology and a new motherboard. The third approach
is to select a motherboard that meets your present needs with moderate room for expansion.
Ask the following questions when selecting a motherboard:
1. What form factor does the motherboard use?
2. Does the motherboard support the number and type of processor you plan to use (for
example, Socket LGA 775 for the Intel Pentium Dual Core processor up to 3.3GHz)?
3. What are the supported frequencies of the system bus (for example, 1066/800/
533 MHz)?
4. What chipset does the board use?
5. What type of memory does the board support (DDR2 or DDR3), and how much
memory can the board hold?
6. What type and how many expansion slots are on the board (for example, PCI, PCI
Express 2.0, or AGP)?
7. What hard drive controllers and connectors are on the board (for example, IDE, serial
ATA, RAID, and SCSI)?
8. What are the embedded devices on the board, and what internal slots or connections
does the board have? (For example, the board might provide a network port, wireless
antenna port, FireWire port, two or more USB ports, mouse port, and so forth.)
9. Does the board fit the case you plan to use?
10. What are the price and the warranty on the board?
11. How extensive and user-friendly is the documentation?
12. How much support does the manufacturer supply for the board?
1435487389_ch03_CTP.qxd
7/30/09
5:22 PM
Page 127
How Startup BIOS Controls the Boot Process
127
Tip
If you have an embedded component, make sure you can disable it so you can use
another external component if needed. Components are disabled in BIOS setup.
Table 3-6 lists some manufacturers of motherboards and their Web addresses.
Manufacturer
Web Address
Abit
www.abit.com.tw
ASUS
www.asus.com
BIOSTAR Group
www.biostar.com.tw
Evga
www.evga.com
Foxconn
www.foxconn.com
Gigabyte Technology Co., Ltd.
www.giga-byte.com
Intel Corporation
www.intel.com
Micro-Star International (MSI)
www.msicomputer.com
Super Micro Computer, Inc.
www.supermicro.com
Tyan Computer Corporation
www.tyan.com
Table 3-6
Major manufacturers of motherboards
HOW STARTUP BIOS CONTROLS THE BOOT PROCESS
A+
220-701
1.2
3.4
When you first turn on a PC, startup BIOS on the motherboard is in control until
the operating system is loaded and takes over. In this part of the chapter, you’ll learn
what startup BIOS does to boot up the system, check and initialize critical hardware
components, find an OS, begin the process of loading that OS, and then turn over
control to the OS. The purpose of this part of the chapter is to help you understand
how startup BIOS controls the boot. Later in the chapter, you’ll learn how to use
this knowledge to help you troubleshoot a failed boot before the operating system
is loaded.
A+ Exam Tip The A+ 220-701 Essentials exam expects you to know how BIOS controls POST and the
beginning of the boot.
3
A+ 220-701
Sometimes a motherboard contains an on-board component more commonly offered as a
separate device. One example is support for video. The video port might be on the motherboard
or might require a video card. The cost of a motherboard with an embedded component is
usually less than the combined cost of a motherboard with no embedded component and an
expansion card. If you plan to expand, be cautious about choosing a proprietary board that has
many embedded components. Often such boards do not easily accept add-on devices from other
manufacturers. For example, if you plan to add a more powerful video card, you might not
want to choose a motherboard that contains an embedded video controller. Even though you
can often disable the proprietary video controller in BIOS setup, there is little advantage to
paying the extra money for it.
1435487389_ch03_CTP.qxd
128
A+
220-701
1.2
3.4
7/30/09
5:22 PM
CHAPTER 3
Page 128
All About Motherboards
BOOTING A COMPUTER
The term booting comes from the phrase “lifting yourself up by your bootstraps” and refers to
the computer bringing itself up to a working state without the user having to do anything but
press the on button. This boot can be a “hard boot” or a “soft boot.” A hard boot, or cold
boot, involves turning on the power with the on/off switch. A soft boot, or warm boot, involves
using the operating system to reboot. For Windows Vista, one way to soft boot is to click Start,
click the right arrow, and click Restart (see Figure 3-31). For Windows XP, one way to soft
boot is to click Start, click Turn Off Computer, and then click Restart (see Figure 3-32).
Figure 3-31 Windows Vista menu to perform a restart
Courtesy: Course Technology/Cengage Learning
Figure 3-32 Windows XP Turn off computer dialog box
Courtesy: Course Technology/Cengage Learning
CHOOSING BETWEEN A HARD BOOT AND A SOFT BOOT
A hard boot takes more time than a soft boot because in a soft boot, the initial steps of a hard
boot don’t happen. To save time in most circumstances, you should use the soft boot to
restart. A hard boot initializes the processor and clears memory. If a soft boot doesn’t work or
you want to make certain you get a fresh start, use a hard boot. If you cannot boot from the
operating system, look for power or reset buttons on the front or rear of the case. For example, one computer has three power switches: a power button and a reset button on the front of
the case and a power switch on the rear of the case (see Figure 3-33). They work like this:
The power button in front is a “soft” power button, causing a normal Windows
shutdown and restart.
The reset button initializes the CPU so that it restarts at the beginning of the BIOS
startup program. The computer behaves as though the power were turned off and
back on and then goes through the entire boot process.
1435487389_ch03_CTP.qxd
7/30/09
5:22 PM
Page 129
How Startup BIOS Controls the Boot Process
A+
220-701
1.2
3.4
129
The switch on the rear of the case simply turns off the power abruptly and is a “hard”
power button. If you use this switch, wait 30 seconds before you press the power
button on the front of the case to boot the system. This method gives you the greatest
assurance that memory will clear. However, if Windows is abruptly stopped, it might
give an error message when you reboot.
Soft power button
does a normal
Windows shutdown
Hard power switch
on rear of case
Hard power button
abruptly reboots
Figure 3-33 This computer case has two power buttons on the front and one power switch on the rear of the case
Courtesy: Course Technology/Cengage Learning
THE STARTUP BIOS CONTROLS THE BEGINNING OF THE BOOT
The startup BIOS is programming contained on the firmware chip on the motherboard that is
responsible for getting a system up and going, and finding an OS to load. A successful boot
depends on the hardware, the BIOS, and the operating system
Video
all performing without errors. If errors occur, they might stall
Beep Codes
or lock up the boot. Errors are communicated as beeps, as text
messages on-screen, or as recorded voice messages.
The functions performed during the boot can be divided into four parts, as shown in the following list. The first two items in the list are covered in detail in this section. (The last two steps
depend on the OS being used and are covered in later chapters.)
1. The startup BIOS runs the POST and assigns system resources. Recall from Chapter 2
that the POST (power-on self test) is a series of tests performed by the startup BIOS to
determine if it can communicate correctly with essential hardware components required
for a successful boot. The startup BIOS surveys hardware resources and needs, and
assigns system resources to meet those needs (see Figure 3-34). The startup BIOS begins
the startup process by reading configuration information stored primarily in CMOS
RAM, and then comparing that information to the hardware—the processor, video slot,
PCI slots, hard drive, and so on. (Recall that CMOS RAM is a small amount of memory on the motherboard that holds information about installed hardware.)
2. The startup BIOS program searches for and loads an OS. Most often the OS is loaded
from drive C: on the hard drive. The boot sequence information stored in CMOS
RAM tells startup BIOS where to look for the OS. Most BIOSs support loading the
OS from the hard drive, a floppy disk, a CD, a DVD, or a USB device. The BIOS turns
to the specified device, reads the beginning files of the OS, copies them into memory,
and then turns control over to the OS. This part of the loading process works the
same for any operating system; only the OS files being loaded change.
A+ 220-701
How the front two buttons work can be controlled in BIOS setup. Know, however, that
different cases offer different options.
3
1435487389_ch03_CTP.qxd
130
7/30/09
5:22 PM
CHAPTER 3
Page 130
All About Motherboards
System Resources
A+
220-701
1.2
3.4
USB
PCI
slots
IRQ
DMA
channel
I/O
addresses
Memory
addresses
0
1
2
.
.
.
15
0
1
2
3
5
6
7
0
1
2
3
.
.
.
3FF
A0000
A0010
.
.
.
FFFFF
I/O addresses 60–6F
and IRQ1, please!
Serial
port
Startup
BIOS
Printer
port
Keyboard
Hard
drive
Floppy
drive
I have
these
resources.
AGP
slot
Figure 3-34 Boot Step 1: The BIOS startup program surveys hardware resources and needs and
assigns system resources to satisfy those needs
Courtesy: Course Technology/Cengage Learning
3. The OS configures the system and completes its own loading. The OS checks some
of the same settings and devices that startup BIOS checked, such as available
memory and whether that memory is reliable. Then the OS loads the core components necessary to access the files and folders on the hard drive and to use memory,
the expansion buses on the motherboard, and the cards installed in these expansion
slots. The user is given a screen to log onto the system. The OS loads the software
to control installed devices, such as the mouse, the video card, the DVD drive, or
the scanner. These devices generally have device drivers stored on the hard drive.
The Windows desktop is then loaded using preferences assigned to the currently
logged in user.
4. Application software is loaded and executed. Sometimes an OS is configured to
automatically launch application software as part of the boot. After this, the user is
in control. When the user tells the OS to execute an application, the OS first must
find the application software on the hard drive, CD, or other secondary storage
device, copy the software into memory, and then turn control over to it. Finally, the
user can command the application software, which makes requests to the OS, which,
in turn, uses the system resources, system BIOS, and device drivers to interface with
and control the hardware.
Notes The four system resources on a motherboard that the OS and processor use to interact with
hardware are IRQ lines, I/O addresses, memory addresses, and DMA channels, all defined in Table 3-7.
Older systems using DOS and Windows 9x/Me required a technician to make decisions about managing
these resources when installing hardware devices, but newer systems generally manage these resources
without our involvement. For an explanation of how each resource works, see the content, “How an OS
uses system resources,” on the CD that accompanies this book.
1435487389_ch03_CTP.qxd
7/30/09
5:22 PM
Page 131
How Startup BIOS Controls the Boot Process
131
System Resource
Definition
1.2
3.4
IRQ numbers
A line of a motherboard bus that a hardware device or expansion slot can
use to signal the CPU that the device needs attention. Some lines have a
higher priority for attention than others. Each IRQ line is assigned
a number (0 to 15) to identify it.
I/O addresses
Numbers assigned to hardware devices that software uses to send a
command to a device. Each device “listens” for these numbers and
responds to the ones assigned to it. I/O addresses are communicated on
the address bus.
Memory addresses
Numbers assigned to physical memory located either in RAM or ROM chips.
Software can access this memory by using these addresses. Memory
addresses are communicated on the address bus.
DMA channels
A number designating a channel on which the device can pass data to
memory without involving the CPU. Think of a DMA channel as a shortcut
for data moving to and from the device and memory.
Table 3-7
System resources used by software and hardware
STEP 1: POST AND ASSIGNMENT OF SYSTEM RESOURCES
When you turn on the power to a PC, the processor begins the boot by initializing itself and
then turning to startup BIOS for instructions. The startup BIOS first performs POST. The
following list contains the key steps in this process:
1. When the power is first turned on, the system clock begins to generate clock pulses.
2. The processor begins working and initializes itself (resetting its internal values).
3. The processor turns to memory address FFFF0h, which is the memory address
always assigned to the first instruction in the ROM BIOS startup program.
4. This instruction directs the processor to run POST.
5. POST first checks the BIOS program operating it and then tests CMOS RAM.
6. A test determines that there has been no battery failure.
7. Hardware interrupts are disabled. (This means that pressing a key on the keyboard
or using another input device at this point does not affect anything.)
8. Tests are run on the processor, and it is initialized further.
9. A check determines if this is a cold boot. If so, the first 16 KB of RAM are tested.
10. Hardware devices installed on the computer are inventoried and compared to
configuration information.
11. The video card is tested and configured. During POST, before the processor has
checked the video system, beeps or speech communicate errors. Short and long beeps
indicate an error; the coding for the beeps depends on the BIOS. After POST checks
and verifies the video controller card (note that POST does not check to see if a
monitor is present or working), POST can use video to display its progress.
12. POST checks RAM by writing and reading data. The monitor might display a
running count of RAM during this phase.
13. Next, the keyboard is checked, and if you press and hold any keys at this point, an
error occurs with some BIOSs. Secondary storage—including floppy disk drives and
3
A+ 220-701
A+
220-701
1435487389_ch03_CTP.qxd
132
A+
220-701
1.2
3.4
7/30/09
5:22 PM
CHAPTER 3
Page 132
All About Motherboards
hard drives—ports, and other hardware devices are tested and configured. The
hardware devices that POST finds are checked against the data stored in the CMOS
chip, jumpers, and/or DIP switches to determine if they agree. IRQ, I/O addresses,
and DMA assignments are made; the OS completes this process later. Some hardware
devices have BIOSs of their own that request resources from startup BIOS, which
attempts to assign these system resources as requested.
14. Some devices are set up to go into “sleep mode” to conserve electricity.
15. The DMA and interrupt controllers are checked.
16. BIOS setup is run if requested.
17. BIOS begins its search for an OS.
STEP 2: STARTUP BIOS FINDS AND LOADS THE OS
After POST and the first pass at assignment of resources are complete, the next step is to
load an OS. The startup BIOS looks to CMOS RAM to find out which device is set to be
the boot device. Most often the OS is loaded from drive C on the hard drive. The minimum
information required on the hard drive to load an OS is shown in the following list. You
can see some of these items labeled in Figure 3-35.
Very beginning of
the hard drive
Hard drive
Drive C
Drive D
MBR program
Master Boot
Record
Partition table holds
information about
where each partition
is located
Identifies boot drive
Drive C begins here
with the OS boot record
Figure 3-35 For a successful boot, a hard drive must contain a healthy Master Boot Record (MBR) and a
healthy OS boot record
Courtesy: Course Technology/Cengage Learning
Even though a hard drive is a circular affair, it must begin somewhere. A drive is laid
out in a series of concentric circles called tracks. Each track is divided into segments
called sectors, and each sector can hold 512 bytes of data. On the outermost track,
one sector (512 bytes) is designated the “beginning” of the hard drive. This sector,
called the Master Boot Record (MBR), contains two items. The first item is the master
boot program, which is needed to locate the beginning of the OS on the drive.
(A record and a sector are both 512-byte segments of a hard drive.)
The second item in the MBR is a table, called the partition table, which contains a
map to the partitions on the hard drive. This table tells BIOS how many partitions
1435487389_ch03_CTP.qxd
7/30/09
5:22 PM
Page 133
How Startup BIOS Controls the Boot Process
A+
220-701
1.2
3.4
133
Step 1
1
Where do I
find an OS?
2
First look on drive C
and then drive E.
BIOS
RAM on CMOS
chip
Step 2
3
MBR, can you
start the OS boot?
M
progBR
ram
Hard drive
BIOS
Master Boot
Record
Drive C
starts here
OS
boot record
BootMgr
Step 3
4
Only if I
can find the OS
boot record.
MBR
5
OS
boot
record
Only if I can
find BootMgr.
6
I’m the beginning
of the OS. I’ll take
it from here!
BootMgr
Figure 3-36 Numbered steps show how BIOS searches for and begins to load an operating
system (in this example, Windows Vista is the OS)
Courtesy: Course Technology/Cengage Learning
Notes Program files can be a part of the OS or applications and have a .com, .sys, .bat, or .exe file
extension. BootMgr and Ntldr are exceptions to that rule because they have no file extension.
3
A+ 220-701
the drive has, where each partition begins and ends, and which partition is used for
booting (called the active partition). A partition is sometimes called a volume. The
first volume on the hard drive used to boot the OS is called drive C. Chapter 6 covers
partitions in more detail.
At the beginning of the boot drive (usually drive C) is the OS boot record. This
512-byte sector is physically the second sector on the hard drive right behind the
MBR. This OS boot record contains a small program that points to a larger OS
program file that is responsible for starting the OS load. (A program file contains a
list of instructions stored in a file.) For Windows Vista, the OS boot record program
points to BootMgr. For Windows XP, that program is Ntldr. Figure 3-36 shows the
steps the BIOS follows to find this first OS program.
1435487389_ch03_CTP.qxd
134
A+
220-701
1.2
3.4
7/30/09
5:22 PM
CHAPTER 3
Page 134
All About Motherboards
The first OS program (BootMgr or Ntldr) begins the process of loading the OS
into memory. For Windows XP, Ntldr is responsible for loading the OS, and is,
therefore, called the boot loader program. In Vista, BootMgr turns the job over to
Winload.exe, which loads the OS. Therefore, for Vista, Winload.exe is the boot
loader program.
Notes Future desktop and notebook systems are likely to use replacement technologies for both the
BIOS firmware on the motherboard and the MBR method of organizing a hard drive. Even now, in
Windows Vista, you can choose between two disk-partitioning systems: MBR and GPT. Using the MBR
system, you can have up to four partitions on a hard drive, although one of them can have multiple
volumes, which are called logical drives. The GPT (Globally Unique Identifier Partition Table) diskpartitioning system can support up to 128 partitions, and these partitions are more stable and can be
larger than MBR partitions. To use the GPT system for your bootable hard drive, your computer motherboard must contain an EFI or UEFI chip rather than the traditional BIOS chip. For more information on
the GPT method of organizing a hard drive, go to the www.microsoft.com site and search on GPT.
EFI (Extensible Firmware Interface) and UEFI (Unified EFI) are two standards for the interface between
firmware on the motherboard and the operating system. The standards replace the legacy BIOS standards and
improve on processes for booting, handing over the boot to the OS, and loading device drivers and applications before the OS loads. For more information on either standard, see the UEFI consortium at www.uefi.org.
Let’s now turn our attention to maintaining, installing, and configuring a motherboard.
A+ Exam Tip Content on the A+ 220-701 Essentials exam ends here and content on the A+ 220-702
Practical Application exam begins.
MAINTAINING, INSTALLING, AND CONFIGURING
A MOTHERBOARD
A+
220-702
1.1
When supporting personal computers, you need to know how to maintain a motherboard.
A motherboard is considered a field replaceable unit, so you also need to know how to
replace one when it goes bad. After the new board is installed, you’ll need to configure the
board using BIOS setup. All these skills are covered in this part of the chapter.
A+ Exam Tip The A+ 220-702 Practical Application exam expects you to know how to maintain a
motherboard by updating drivers and firmware, setting BIOS jumpers, and replacing a CMOS battery.
MAINTAINING A MOTHERBOARD
The two chores you need to know how to do to maintain a motherboard are how to update
the motherboard drivers and how to flash BIOS. You also need to know how to configure
the BIOS jumpers on a motherboard to recover from a forgotten power-on password or
failed BIOS update and how to replace a CMOS battery. All these tasks are covered next.
UPDATING MOTHERBOARD DRIVERS
A motherboard comes bundled with a CD that contains drivers for all the onboard components and documentation in PDF files. Most likely, Windows can use its own internal drivers
for these components, but if you have trouble with an onboard component or want to use a
feature that is not working, use the motherboard CD to install the manufacturer drivers into
Windows.
1435487389_ch03_CTP.qxd
7/30/09
5:22 PM
Page 135
Maintaining, Installing, and Configuring a Motherboard
A+
220-702
1.1
135
The motherboard CD might also contain useful utilities, including one that you can install
in Windows, to monitor the CPU temperature and alert you if overheating occurs. Figure 3-37
shows the main menu for one motherboard driver CD.
3
A+ 220-702
Figure 3-37 Main menu of motherboard drivers, utilities, and documentation CD
Courtesy: Course Technology/Cengage Learning
The motherboard manufacturer updates motherboard drivers from time to time. For an
unstable motherboard, you can try downloading and installing updated chipset drivers and
other drivers for onboard components. Figure 3-38 shows the download page for one Intel
motherboard where you can download BIOS and drivers.
To download the right drivers, you need to first identify your motherboard brand and
model number. Your documentation for the PC should contain that information. If you
don’t have that, open the case and look for the brand and model imprinted somewhere on
the board (see Figure 3-39).
FLASHING ROM BIOS
Recall that ROM BIOS includes the BIOS setup program, the startup BIOS that
manages the startup process, and the system BIOS that manages basic I/O functions of
the system. All these programs are considered firmware and are stored on a chip on the
motherboard, called the ROM BIOS chip or firmware chip. If a motherboard becomes
unstable (such as when the system hangs at odd times), some functions are lost (such as
a USB port stops working), or you want to incorporate some new feature or component
on the board (such as when you upgrade the processor), you might need to upgrade the
programming stored on the ROM BIOS chip. The process of upgrading or refreshing
the ROM BIOS chip is called updating the BIOS, flashing BIOS, or flashing ROM.
The BIOS updates are downloaded from the motherboard manufacturer’s Web site.
If you can’t find an upgrade on this site, try the BIOS manufacturer Web site or a
third-party site.
1435487389_ch03_CTP.qxd
136
7/30/09
5:22 PM
CHAPTER 3
Page 136
All About Motherboards
A+
220-702
1.1
Figure 3-38 Download BIOS and driver updates from the motherboard Web site
Courtesy: Course Technology/Cengage Learning
Figure 3-39 The motherboard brand and model are imprinted somewhere on the board
Courtesy: Course Technology/Cengage Learning
1435487389_ch03_CTP.qxd
7/30/09
5:22 PM
Page 137
Maintaining, Installing, and Configuring a Motherboard
A+
220-702
1.1
137
The methods of installing the BIOS updates are listed here:
Your motherboard might use one or more of these methods. To know how to update the
BIOS, read the motherboard documentation, as different motherboards use different
methods. If you can’t find the documentation, check the motherboard manufacturer’s
Web site. To find the right update, you’ll need to identify your motherboard and also
know the version of BIOS you are currently using. Do the following:
1. To identify the model of the motherboard, look on the motherboard for the brand and
model imprinted on the board.
2. To identify the BIOS version, boot the system and enter the BIOS setup utility. The
BIOS version number is displayed on the opening menu. Alternately, you can use the
Msinfo32.exe utility in Windows to display the BIOS version.
When you download the update, the downloaded compressed file will most likely include
detailed instructions. Or you might find the instructions on the Web site. Print the instructions,
read them to make sure you understand everything, and then follow them carefully. If you are
given the opportunity to save the current BIOS to another media before you perform the
update, do so because you might need to backtrack later if the update gives problems.
Notes After flashing BIOS, if the motherboard gives problems, you need to consider that the chipset
drivers might also need updating. To update the chipset drivers, go to the Web site of the motherboard
manufacturer and download the chipset driver files for the OS you are using. Then follow the manufacturer’s instructions to perform the update.
3
A+ 220-702
Express BIOS update. Some motherboards allow for an express BIOS update, which is
done from Windows. Download the update file to your hard drive. Close all open
applications. Double-click the file, which runs the update program, and follow
directions on-screen. The system will reboot to enable the update.
Update from a bootable floppy disk. Most systems let you use a floppy disk if the
update is small enough to fit on the disk and your system has a floppy drive. (Many
PCs today don’t have one.) Download the update file to your hard drive, copy it to
the disk, and double-click the file. The program creates a bootable disk. Boot from
the floppy, which will install the update. Remove the floppy and reboot the system.
Update from a bootable USB drive or bootable CD. Creating a bootable USB drive or
CD is more difficult than creating a bootable floppy disk. You first use a utility
program to make a USB drive or CD bootable. Then you download and copy the
BIOS update to the drive or CD. Make sure the boot sequence turns to the CD or USB
drive before the hard drive to load the OS. Then boot from the device, follow directions on-screen, and remove the device. Reboot the system and the update is installed.
Recovery from a failed update. If the BIOS update is interrupted or the update gives
errors, you might be able to revert to the earlier version. To do this, generally, you
download the recovery file from the Web site, and copy the file to a floppy disk, USB
drive, or CD. Then set the jumper on the motherboard to recover from a failed
update. Put the floppy disk, USB drive, or CD in the system and reboot. The BIOS
automatically reads from the device and performs the recovery. (In most cases, it is not
necessary that the floppy disk, USB drive, or CD is bootable.) After the recovery is
completed, remove the media and power down the system. Reset the jumper to the
normal setting and boot the system.
1435487389_ch03_CTP.qxd
138
A+
220-702
1.1
7/30/09
5:22 PM
CHAPTER 3
Page 138
All About Motherboards
Makers of BIOS code are likely to change BIOS frequently, because providing the upgrade
on the Internet is so easy for them. Generally, however, follow the principle that “if it’s not
broke, don’t fix it;” update your BIOS only if you’re having a problem with your motherboard or there’s a new BIOS feature you want to use. Also, don’t update the BIOS unless the
update is a later version than the one installed. One last word of caution: it’s very important
the update not be interrupted while it is in progress. A failed update can make your motherboard totally unusable. Be sure you don’t interrupt the update, and make sure there are no
power interruptions. Using a UPS while updating BIOS is a good idea.
Caution
Be very careful that you upgrade BIOS with the correct upgrade and that you
follow the manufacturer’s instructions correctly. Upgrading with the wrong file could make your system
BIOS useless. If you’re not sure that you’re using the correct upgrade, don’t guess. Check with the technical support for your BIOS before moving forward. Before you call technical support, have the information that identifies your BIOS and motherboard available.
If you can’t find an upgrade on your motherboard or BIOS manufacturer Web site, try the
drivers and BIOS Upgrades Web site by eSupport.com, Inc. at www.esupport.com. Table 3-8
lists BIOS manufacturers. A list of motherboard manufacturers is given in Table 3-6 earlier
in the chapter.
Company
URL
American Megatrends, Inc. (AMI)
www.megatrends.com or www.ami.com
Compaq and Hewlett-Packard
www.hp.com
Dell
www.dell.com
eSupport.com (drivers and BIOS upgrades)
www.esupport.com
Gateway
www.gateway.com
IBM
www.ibm.com/support
Phoenix Technologies (First BIOS,
Phoenix, and Award)
www.phoenix.com
Wim’s BIOS
www.wimsbios.com
Table 3-8
A+
220-702
1.1
4.2
BIOS manufacturers
USING THE BIOS JUMPERS ON THE MOTHERBOARD
Most motherboards today have a group of BIOS jumpers that can be used to recover
from a failed BIOS update or forgotten power-on password. For example, Figure 3-40
shows a group of three jumpers on one board. (The tan jumper cap is positioned on the
first two jumper pins on the left side of the group.) Figure 3-41 shows the motherboard
documentation on how to use these jumpers. When jumpers 1 and 2 are closed, which
they are in the figure, normal booting happens. When jumpers 2 and 3 are closed, passwords to BIOS setup can be cleared on the next boot. When no jumpers are closed, on
the next boot, the BIOS will recover itself from a failed update. Once set for normal
booting, the jumpers should be changed only if you are trying to recover when the
power-up password is lost or flashing BIOS has failed. To know how to set jumpers, see
the motherboard documentation.
1435487389_ch03_CTP.qxd
7/30/09
5:22 PM
Page 139
Maintaining, Installing, and Configuring a Motherboard
139
A+
220-702
1.1
4.2
3
Figure 3-40 This group of three jumpers controls the BIOS configuration
Courtesy: Course Technology/Cengage Learning
Jumper
Position
1
Mode
Description
Normal
(default)
The current BIOS configuration is used for booting.
Configure
After POST, the BIOS displays a menu in CMOS setup
that can be used to clear the user and supervisor
power-on passwords.
Recovery
Recovery is used to recover from a failed BIOS update.
Details can be found on the motherboard CD.
3
1
3
1
3
Figure 3-41 BIOS configuration jumper settings
Courtesy: Course Technology/Cengage Learning
A+
220-702
1.1
REPLACE THE CMOS BATTERY
The CMOS battery on the motherboard is considered a field replaceable unit. The battery is
designed to last for years and recharges when the motherboard has power. However, on rare
occasions you might need to replace one if the system loses BIOS settings when it is
unplugged. Make sure the replacement battery is an exact match to the original or is one the
motherboard manufacturer recommends for the board. Power down the system, unplug it,
press the power button to drain the power, and remove the case cover. Use your ground
bracelet to protect the system against ESD. The old battery can be removed with a little
prying using a flathead screwdriver. The new battery pops into place. For more specific
direction, see the motherboard documentation.
Now let’s turn our attention to installing or replacing a motherboard.
INSTALLING OR REPLACING A MOTHERBOARD
When you purchase a motherboard, the package comes with the board, I/O shield, documentation, drivers, and various screws, cables, and connectors (see Figure 3-42). When you replace a
motherboard, you pretty much have to disassemble an entire computer, install the new motherboard, and reassemble the system, which you learned to do in Chapter 2. The following list is
meant to be a general overview of the process and is not meant to include the details of all possible installation scenarios, which can vary according to the components and OS you are using.
A+ 220-702
BIOS
jumper
group
1435487389_ch03_CTP.qxd
140
7/30/09
5:22 PM
CHAPTER 3
Page 140
All About Motherboards
A+
220-702
Fan and mounting
bracket for North
Bridge cooling
1.1
Documentation
and drivers
Decorative cover
for North Bridge
SATA cables
I/O shield
Figure 3-42 A new motherboard package
Courtesy: Course Technology/Cengage Learning
The general process for replacing a motherboard is as follows:
A+ Exam Tip The A+ 220-702 Practical Application exam expects you to know how to install and
configure a motherboard.
1. Verify that you have selected the right motherboard to install in the system. The new
motherboard should have the same form factor as the case, support the RAM
modules and processor you want to install on it, and have other internal and
external connectors you need for your system.
2. Get familiar with the motherboard documentation, features, and settings. Especially
important are any connectors and jumpers on the motherboard. It’s a great idea to read
the motherboard manual from cover to cover. At the
least, get familiar with what it has to offer and study the
Video
diagram in it that labels all the components on the
Preparing a Motherboard for
board. Learn how each connector and jumper is used.
Installation
You can also check the manufacturer Web site for
answers to any questions you might have.
3. Remove components so you can reach the old motherboard. Use a ground bracelet.
Turn off the system and disconnect all cables and cords. Open the case cover and
remove all internal cables and cords connected to the motherboard. Remove all
expansion cards. To safely remove the old motherboard, you might have to remove
drives. If the processor cooler is heavy and bulky, you might remove it from the old
motherboard before you remove the motherboard from the case.
4. Set any jumpers on the new motherboard. This is much easier to do before you put
the board in the case. Verify the BIOS startup jumper is set for normal startup.
5. Install the motherboard. Place the motherboard into the case and, using spacers or
screws, securely fasten the board to the case. Because coolers are heavy, most processor
instructions say to install the motherboard before installing the processor and cooler to
better protect the board or processor from being damaged. On the other hand, some
motherboard manufacturers say to install the processor and cooler and then install the
motherboard. Follow the order given by the motherboard manufacturer.
1435487389_ch03_CTP.qxd
7/30/09
5:22 PM
Page 141
Maintaining, Installing, and Configuring a Motherboard
A+
220-702
1.1
141
6. Install the processor and processor cooler. The processor comes already installed on
some motherboards, in which case you just need to install the cooler. How to install
a processor and cooler is covered in Chapter 4.
8. Attach cabling that goes from the case switches to the motherboard, and from the
power supply and drives to the motherboard. Pay attention to how cables are labeled
and to any information in the documentation about where to attach them. Position and
tie cables neatly together to make sure they don’t obstruct the fans and the air flow.
9. Install the video card on the motherboard. This card should go into the AGP slot or the
primary PCI Express x16 slot. If you plan to install multiple video cards, install only
one now and check out how the system functions before installing the second one.
10. Plug the computer into a power source, and attach the monitor and keyboard. Note that
you do not attach the mouse now, for the initial setup. Although the mouse generally
does not cause problems during setup, initially install only the things you absolutely need.
11. Boot the system and enter BIOS setup. How to do this is coming up in the next
section.
12. Make sure settings are set to the default. If the motherboard comes new from the
manufacturer, it will already be at default settings. If you are salvaging a motherboard
from another system, you might need to reset settings to the default. You will need to
do the following while you are in BIOS setup:
Check the time and date.
Check the floppy drive type if you have one.
Make sure abbreviated POST is disabled. While you’re installing a motherboard,
you generally want it to do as many tests as possible. After you know the system
is working, you can choose to abbreviate POST.
Set the boot order to the hard drive, and then a CD, if you will be booting the OS
from the hard drive.
Make sure “autodetect hard disk” is set so that the system automatically looks
for drives.
Leave everything else at their defaults unless you know that particular settings
should be otherwise.
Save and exit.
13. Observe POST and verify that no errors occur.
14. Check for conflicts with system resources. If Windows is already installed on the
hard drive, boot to the Windows desktop. Use Device Manager to verify that the OS
recognizes all devices and that no conflicts are reported.
15. Install the motherboard drivers. If your motherboard comes with a CD that contains
some motherboard drivers, install them now. You will probably need Internet access,
so that the setup process can download the latest drivers from the motherboard manufacturer’s Web site. Reboot the system one more time, checking for errors.
16. Install any other expansion cards and drivers. Install each device and its drivers, one
device at a time, rebooting and checking for conflicts after each installation.
17. Verify that everything is operating properly, and make any final OS and BIOS adjustments, such as power management settings.
3
A+ 220-702
7. Install RAM into the appropriate slots on the motherboard. How to install RAM is
covered in Chapter 5.
1435487389_ch03_CTP.qxd
142
A+
220-702
1.1
7/30/09
5:22 PM
CHAPTER 3
Page 142
All About Motherboards
Notes Whenever you install or uninstall software or hardware, keep a notebook with details about
the components you are working on, configuration settings, manufacturer specifications, and other
relevant information. This helps if you need to backtrack later, and can also help you document and
troubleshoot your computer system. Keep all hardware documentation for this system together with the
notebook in an envelope in a safe place.
Here are the general steps for installing the motherboard in the case:
1. Install the I/O shield, which is a metal plate that comes with the motherboard and
fits over the ports to create a well-fitting enclosure for them. A case might come
with a standard I/O shield already in place (see Figure 3-43). But when you hold
the motherboard up to that shield, you can see the ports on the board will not fit
into the holes. Remove this I/O shield (for this particular case, you have to punch
it out). The I/O shield that comes packaged with the board can then be installed
(see Figure 3-44).
Figure 3-43 The computer case comes with an installed I/O shield but it does not match up
with ports on the motherboard
Courtesy: Course Technology/Cengage Learning
2. Some cases have standoffs, also called spacers, which are round plastic or metal pegs
that separate the motherboard from the case, so that components on the back of the
motherboard do not touch the case. Make sure the locations of the standoffs match
the screw holes on the motherboard (see Figure 3-45). If you need to remove a standoff to move it to a new slot, needle-nose pliers work well to unscrew or unplug the
standoff. The case will have more holes than you need to support several types of
1435487389_ch03_CTP.qxd
7/30/09
5:22 PM
Page 143
Maintaining, Installing, and Configuring a Motherboard
143
A+
220-702
1.1
3
A+ 220-702
Figure 3-44 Install the I/O shield in the hole at the rear of the PC case
Courtesy: Course Technology/Cengage Learning
Spacer installed
Spacer not installed
Hole in motherboard for
screw to attach board to
spacer
Figure 3-45 The spacers line up with the holes on the motherboard and keep it from touching the case
Courtesy: Course Technology/Cengage Learning
motherboards. Other cases don’t use the standoffs because the screw holes are elevated
to keep the bottom of the motherboard from touching the case. For these cases, use
screws to connect the motherboard to the case.
Caution
As with any installation, remember the importance of using a ground strap
(ground bracelet) to ground yourself when working inside a computer case to protect components
against ESD.
3. Place the motherboard inside the case (see Figure 3-46), and use screws to attach it to
the case. Figure 3-47 shows how you must align the screw holes on the motherboard
with those in the case. There should be at least six screw sets, and there might be as
many as nine. Use as many as there are holes in the motherboard. Figure 3-48 shows
one screw being put in place.
4. Connect the power cords from the power supply to the motherboard. A system will
always need the main P1 power connector and most likely will need the 4-pin
1435487389_ch03_CTP.qxd
144
7/30/09
5:22 PM
CHAPTER 3
Page 144
All About Motherboards
A+
220-702
1.1
Figure 3-46 Place the motherboard in the case
Courtesy: Course Technology/Cengage Learning
Figure 3-47 Align screw holes in the case with those on the motherboard
Courtesy: Course Technology/Cengage Learning
auxiliary connector for the processor. Other power connectors might be needed
depending on the devices you later install in the system. Here are the details:
Connect the P1 power connection from the power supply to the motherboard
(see Figure 3-49).
1435487389_ch03_CTP.qxd
7/30/09
5:23 PM
Page 145
Maintaining, Installing, and Configuring a Motherboard
145
A+
220-702
1.1
3
A+ 220-702
Figure 3-48 Use one screw in each screw hole on the motherboard
Courtesy: Course Technology/Cengage Learning
Figure 3-49 The 24-pin connector supplies power to the motherboard
Courtesy: Course Technology/Cengage Learning
Connect the 4-pin auxiliary power cord coming from the power supply to the
motherboard, as shown in Figure 3-50. This cord supplies the supplemental
power required for the processor.
A board might have a 6-pin or 8-pin PCIe power connector. You saw a photograph
of an 8-pin connector earlier in the chapter in Figure 3-16. If the board has either
connector, connect the 6-pin or 8-pin cord from the power supply to the connector.
1435487389_ch03_CTP.qxd
146
7/30/09
5:23 PM
CHAPTER 3
Page 146
All About Motherboards
A+
220-702
1.1
Figure 3-50 The auxiliary 4-pin power cord provides power to the processor
Courtesy: Course Technology/Cengage Learning
If your power supply doesn’t have this connector, recall from Chapter 2 that you can
purchase an adapter to convert two Molex connectors to a PCIe connector.
Some boards designed to support multiple PCIe video cards will have additional
power connectors on the board to power these wattage-hungry cards. For
example, Figure 3-51(a) shows a 1 x 4 Molex-style connector on one board that
provides auxiliary power to PCIe graphics cards. This same board offers a
SATA-style connector, shown in Figure 3-51(b). The motherboard documentation
says to use just one of these auxiliary power connectors to provide additional
wattage for PCIe video cards.
To power the case fan, connect the power cord from the fan to pins on the motherboard labeled Fan Header. Alternately, some case fans use a 4-pin Molex connector
that connects to a power cable coming directly from the power supply.
Later, after the CPU cooler is installed, you’ll need to connect the power cord from
that fan to the pins on the motherboard labeled CPU Fan Header.
5. Connect the wire leads from the front panel of the case to the motherboard. These are
the wires for the switches, lights, and ports on the front of the computer. Because your
SATA-style power
connector
(A)
(B)
Molex-style power connector
Figure 3-51 Auxiliary power connectors to support PCIe
Courtesy: Course Technology/Cengage Learning
1435487389_ch03_CTP.qxd
7/30/09
5:23 PM
Page 147
Maintaining, Installing, and Configuring a Motherboard
A+
220-702
1.1
147
Figure 3-52 Seven connectors from the front panel connect to the motherboard
Courtesy: Course Technology/Cengage Learning
Figure 3-53 Front panel header uses color-coded pins
Courtesy: Course Technology/Cengage Learning
The five wires on the right side of Figure 3-52 from right to left are labeled as follows:
Power SW. Controls power to the motherboard; must be connected for the PC to
power up
3
A+ 220-702
case and your motherboard might not have been made
Video
by the same manufacturer, you need to pay close attenInstalling a Motherboard
tion to the source of the wires to determine where they
connect on the motherboard. For example, Figure 3-52
shows a computer case that has seven connectors from the front panel that connect to
the motherboard. Figure 3-53 shows the corner of the motherboard that has the front
panel header for lights and switches. If you look closely at this last photo, you can see
labels on the board identifying the pins.
1435487389_ch03_CTP.qxd
148
7/30/09
5:23 PM
CHAPTER 3
Page 148
All About Motherboards
HDD LED. Controls a light on the front panel that lights up when any IDE device is
in use. (HDD stands for hard disk drive; LED stands for light-emitting diode; and an
LED is a light on the front panel.)
Power LED+. Positive LED used to indicate that power is on
Power LED-. Negative LED used to indicate that power is on
Reset SW. SwiFtch used to reboot the computer
A+
220-702
1.1
To help orient the connector on the motherboard pins, look for a small triangle embedded
on the connector that marks one of the outside wires as pin 1 (see Figure 3-54). Look for
pin 1 to be labeled on the motherboard as a small 1 embedded to either the right or the left
of the group of pins. Also, sometimes the documentation marks pin 1 as a square pin in the
diagram, rather than round like the other pins. The diagram in Figure 3-55 shows what you
can expect from motherboard documentation. Sometimes the motherboard documentation
is not clear, but guessing is okay when connecting a wire to a front panel header connection.
If it doesn’t work, no harm is done. Figure 3-56 shows all front panel wires in place and the
little speaker also connected to the front panel header pins.
6. Connect wires to ports on the front panel of the case. Depending on your motherboard
and case, there might be cables to connect audio ports or USB ports on the front of
Figure 3-54 Look for the small triangle embedded on the wire lead connectors to orient
the connector correctly to the motherboard connector pins
Courtesy: Course Technology/Cengage Learning
PWR_LED
On/Off
+ + –
9
1
+ –
SPK
Pin
1
2
3
4
5
6
7
8
Assignment
+5 V
N/A
N/A
Speaker
HDD LED (+)
HDD LED (–)
Ground
Reset control
Function
Speaker
connector
Hard drive
LED
Reset button
Pin
9
10
11
12
13
14
15
16
16
8
RST
HLED
Assignment
N/A
N/A
N/A
Power LED (+)
Power LED (+)
Power LED (–)
Power button
Ground
Figure 3-55 Documentation for front panel header connections
Courtesy: Course Technology/Cengage Learning
Function
N/A
N/A
Power LED
Power-on button
1435487389_ch03_CTP.qxd
7/30/09
5:23 PM
Page 149
Maintaining, Installing, and Configuring a Motherboard
149
A+
220-702
1.1
Speaker connected
to front panel
header
3
A+ 220-702
Figure 3-56 Front panel header with all connectors in place
Courtesy: Course Technology/Cengage Learning
the case to connectors on the motherboard. Audio and USB connectors are shown
as the two left connectors in Figure 3-52. You can see these ports for audio and USB
on the front of the case in Figure 3-57. Look in the motherboard documentation for
the location of these connectors. The audio and USB connectors are labeled for one
board in Figures 3-58(a) and (b).
Audio-out and
microphone ports
USB ports
Figure 3-57 Ports on the front of the computer case
Courtesy: Course Technology/Cengage Learning
After you install the motherboard and connect all cables and cords, next you install the video
card and plug in the keyboard and monitor. Make one last check to verify all required power
cords are connected correctly and the video card is seated solidly in its slot. You are now ready
to turn on the system and observe POST occurs with no errors. After the Windows desktop
loads, insert the CD that came bundled with the motherboard and execute any setup program
on the CD. Follow the steps on-screen to install any drivers, which might include drivers for
onboard devices and ports such as video, network, audio, USB, RAID, or the chipset.
Look back at the general list of steps to replace a motherboard at the beginning of this
section for the list of things to check and do to complete the installation, and return the
system to good working order.
1435487389_ch03_CTP.qxd
150
A+
220-702
1.1
7/30/09
5:23 PM
CHAPTER 3
Page 150
All About Motherboards
CONFIGURING THE MOTHERBOARD USING BIOS SETUP
The motherboard configuration stored in BIOS setup does not normally need to be changed
except, for example, when there is a problem with hardware, a new floppy drive is installed,
or a power-saving feature needs to be disabled or enabled. The BIOS setup can also hold
one or two power-on passwords to help secure a system. Know that these passwords are not
the same password that can be required by a Windows OS at startup. In this part of the
chapter, you’ll learn how to access and use the BIOS setup program. Earlier in the chapter,
you saw listed most BIOS settings in Table 3-5.
(A)
(B)
Three USB headers
Front audio header
Figure 3-58 Connectors for front panel ports
Courtesy: Course Technology/Cengage Learning
A+ Exam Tip The A+ 220-702 Practical Application exam expects you to know how to change
advanced BIOS settings.
ACCESSING THE BIOS SETUP PROGRAM
You access the BIOS setup program by pressing a key or combination of keys during the boot
process. The exact way to enter setup varies from one motherboard manufacturer to another.
Table 3-9 lists the keystrokes needed to access BIOS setup for some common BIOS types.
BIOS
Key to Press During POST to Access Setup
AMI BIOS
Del
Award BIOS
Del
Older Phoenix BIOS
Ctrl+Alt+Esc or Ctrl+Alt+s
Newer Phoenix BIOS
F2 or F1
Dell computers using Phoenix BIOS
Ctrl+Alt+Enter
Compaq computers such as the ProLinea,
Deskpro, Deskpro XL, Deskpro XE, or Presario
Press the F10 key while the cursor is in the
upper-right corner of the screen, which happens
just after the two beeps during booting.*
*For Compaq computers, the BIOS setup program is stored on the hard drive in a small, non-DOS partition of about
3 MB. If this partition becomes corrupted, you must run setup from a bootable CD or floppy disk that comes with the
system. If you cannot run setup by pressing F10 at startup, suspect a damaged partition or a virus taking up space
in memory.
Table 3-9
How to access BIOS setup
1435487389_ch03_CTP.qxd
7/30/09
5:23 PM
Page 151
Maintaining, Installing, and Configuring a Motherboard
A+
220-702
1.1
151
For the exact method you need to use to enter setup, see the documentation for your
motherboard. A message such as the following usually appears on the screen near the
beginning of the boot:
3
Press DEL to change Setup
Press F2 for Setup
When you press the appropriate key or keys, a setup screen appears with menus and
Help features that are often very user-friendly. Although the exact menus depend on the
maker and version of components you are working with, the sample screens that follow
will help you become familiar with the general contents of BIOS setup screens. Figure 3-59
shows a main menu for setup. On this menu, you can change the system date and time, the
keyboard language, and other system features.
Figure 3-59 BIOS Setup Main menu
Courtesy: Course Technology/Cengage Learning
The power menu in BIOS setup allows you to configure automatic power-saving features
for your system, such as suspend mode or a sleep state. Figure 3-60 shows a sample power
menu. In most situations, it is best to allow the OS to manage power rather than use BIOS
settings. You will learn more about power management in Chapter 11.
CHANGING THE BOOT SEQUENCE
Figures 3-61 and 62 show two examples of a boot menu in BIOS setup. Here, you can set
the order in which the system tries to boot from certain devices (called the boot sequence).
Most likely when you first install a hard drive or an operating system, you will want to have
the BIOS attempt to first boot from a CD and, if no CD is present, turn to the hard drive.
After the OS is installed, to prevent accidental boots from a CD or other media, change
BIOS setup to boot first from the hard drive.
A+ 220-702
or
1435487389_ch03_CTP.qxd
152
7/30/09
5:23 PM
CHAPTER 3
Page 152
All About Motherboards
A+
220-702
1.1
Figure 3-60 BIOS Setup Power menu
Courtesy: Course Technology/Cengage Learning
Figure 3-61 American Megatrends BIOS Setup Boot menu
Courtesy: Course Technology/Cengage Learning
A+
220-702
1.1
4.2
PASSWORD PROTECTION TO BIOS SETUP AND TO THE SYSTEM
Access to a computer can be controlled using a startup password, sometimes called a
user password or power-on password. If the password has been enabled and set in BIOS
setup, the startup BIOS asks for the password during the boot just before the BIOS
begins searching for an OS. If the password is entered incorrectly, the boot process
terminates. The password is stored in CMOS RAM and is changed by accessing
the setup screen. (This password is not the same as the OS password.) Many
computers also provide jumpers near the chip holding CMOS RAM; you saw
1435487389_ch03_CTP.qxd
7/30/09
5:23 PM
Page 153
Maintaining, Installing, and Configuring a Motherboard
153
A+
220-702
1.1
4.2
3
A+ 220-702
Figure 3-62 Award BIOS Setup Boot menu
Courtesy: Course Technology/Cengage Learning
how to use these jumpers earlier in the chapter. By using these jumpers, you can
disable a forgotten password.
A+
220-702
1.1
EXITING THE BIOS SETUP MENUS
When you finish, an exit screen such as the one shown in Figure 3-63 gives you various
options, such as saving or discarding changes and then exiting the program, restoring
default settings, or saving changes and remaining in the program.
Figure 3-63 BIOS Setup Exit menu
Courtesy: Course Technology/Cengage Learning
1435487389_ch03_CTP.qxd
154
A+
220-702
1.1
7/30/09
5:23 PM
CHAPTER 3
Page 154
All About Motherboards
Reboot your PC and look for the message on the first or
second display screen that tells you how to enter BIOS
setup. Press that key. What version of BIOS are you using? Explore the BIOS setup menus until
you find the boot sequence. What is the order of storage media that startup BIOS uses to find
an OS? What keystrokes do you use to change that order? Exit setup without making any
changes. The system should reboot to the Windows desktop.
APPLYING CONCEPTS
CHANGING BIOS SETUP FOR BRAND-NAME COMPUTERS
Many brand-name computer manufacturers, such as IBM, Dell, and Gateway, use their own
custom-designed setup screens. These screens differ from the ones just shown. For example,
Figure 3-64 shows the IBM BIOS Setup main menu for an IBM Thinkpad notebook
computer. Under the Config option on the screen, you can configure the network port,
serial port, parallel port, PCI bus, USB port, floppy drive, keyboard, display settings, power
settings, power alarm, and memory settings.
Figure 3-64 BIOS setup main menu for an IBM computer
Courtesy: Course Technology/Cengage Learning
Compare this BIOS setup main menu to the one shown in Figure 3-65 for a Gateway
desktop computer. For all these different brand-name computers, what you can configure is
similar, but the setup screens are likely to be organized differently.
A+ Exam Tip The A+ 220-702 Practical Application exam expects you to be able to configure a
motherboard. You need to know how and when to use BIOS setup to make appropriate changes. And to
help secure a computer, you need to know how to set startup passwords.
PROTECTING DOCUMENTATION AND CONFIGURATION SETTINGS
If the battery goes bad or is disconnected, you can lose the settings saved in CMOS RAM. If
you are using default settings, reboot with a good battery and instruct setup to restore the
default settings. Setup has to autodetect the hard drive present, and you need to set the date
1435487389_ch03_CTP.qxd
7/30/09
5:23 PM
Page 155
Chapter Summary
155
A+
220-702
1.1
3
Figure 3-65 BIOS setup main menu for a Gateway computer
Courtesy: Course Technology/Cengage Learning
and time, but you can easily recover from the problem. However, if you have customized
some BIOS settings, you need to restore them. The most reliable way to restore settings is to
keep a written record of all the changes you make to CMOS RAM. This is not that difficult
to do since you’re most likely only changing a few default settings. You can write them on a
sticker and paste it to the side of the case or record the changes in the motherboard manual.
You can’t easily make screen shots or printouts of the BIOS setup screens, but you can use a
digital camera to photograph these screens.
If you are responsible for the ongoing maintenance and care of a computer, you should consider keeping a written record of what you have done to maintain it. Use a small notebook or
similar document to record BIOS settings that are not the default settings, hardware and software installed, network settings, and similar information. Keep the documentation well labeled
in a safe place. If you have several computers to maintain, you might consider a filing system
for each computer. For example, you can put all the documentation in a large brown envelope
that is labeled to identify the PC. Another method is to carefully tape a cardboard folder to the
inside top or side of the computer case and safely tuck the hardware documentation there.
This works well if you are responsible for several computers spread over a wide area.
Regardless of the method you use, it’s important that you keep your records up to date
and stored with the hardware documentation in a safe place. Leaving it in the care of users
who might not realize its value is probably not a good idea. The notebook and documentation will be invaluable as you solve future problems with this PC.
>> CHAPTER SUMMARY
The motherboard is the most complicated of all components inside the computer. It contains
the processor and accompanying chipset, real-time clock, ROM BIOS, CMOS configuration
chip, RAM, system bus, expansion slots, jumpers, ports, and power supply connections. The
motherboard you select determines both the capabilities and limitations of your system.
1435487389_ch03_CTP.qxd
156
7/30/09
5:23 PM
CHAPTER 3
Page 156
All About Motherboards
The most popular motherboard form factors are ATX, MicroATX, FlexATX, BTX, and
NLX, in that order.
A motherboard will have one or more Intel sockets for an Intel processor or one or more
AMD sockets for an AMD processor.
Intel, AMD, NVIDIA, and SiS are the most popular chipset manufacturers. The chipset
embedded on the motherboard determines what kind of processor and memory the board
can support.
Two or more video cards installed on a motherboard use NVIDIA SLI or ATI CrossFire
technology.
Buses used on motherboards include conventional PCI, PCI-X, PCI Express, and AGP.
AGP is used solely for video cards. PCI Express has been revised three times and is
expected to replace all the other bus types.
Some components can be built in to the motherboard, in which case they are called
on-board components. Other components can be attached to the system in some other
way, such as on an expansion card.
A bus is a path on the motherboard that carries electrical power, control signals, memory
addresses, and data to different components on the board.
The most common method of configuring components on a motherboard is BIOS
setup. Some motherboards also use jumpers or DIP switches to contain configuration
settings.
Startup BIOS controls the beginning of the boot. It first checks critical hardware
components in a process called POST (power on self test). It then looks to the boot
device priority order stored in CMOS RAM to know which device will be used to
load the OS.
A hard drive has a Master Boot Record (MBR) at the beginning of the drive that
contains the partition table, which contains a map to partitions on the drive.
The next sector on the drive contains the OS boot record. The first file that the OS used
to load the OS is BootMgr for Windows Vista and Ntldr for Windows XP.
Motherboard drivers might need updating to fix a problem with a board component or to
use a new feature provided by the motherboard manufacturer.
Sometimes ROM BIOS programming stored on the firmware chip needs updating or
refreshing. This process is called updating BIOS or flashing BIOS.
When installing a motherboard, first study the motherboard and set jumpers and
DIP switches on the board. Sometimes the processor and cooler are best installed
before installing the motherboard in the case. When the cooling assembly is
heavy and bulky, it is best to install it after the motherboard is securely seated
in the case.
ROM chips contain the programming code to manage POST and the system BIOS and to
change BIOS settings. CMOS RAM holds configuration information.
The BIOS setup program is used to change the settings in CMOS RAM.
1435487389_ch03_CTP.qxd
7/30/09
5:23 PM
Page 157
Reviewing the Basics
157
>> KEY TERMS
For explanations of key terms, see the Glossary near the end of the book.
Accelerated Graphics Port (AGP)
active partition
audio/modem riser (AMR)
boot loader
boot record
booting
BootMgr
CMOS battery
cold boot
communication and networking
riser (CNR)
CrossFire
dual inline package (DIP) switch
front panel header
hard boot
I/O shield
jumper
land grid array (LGA)
Master Boot Record (MBR)
North Bridge
Ntldr
on-board ports
partition table
PCI (Peripheral Component
Interconnect)
PCI Express (PCIe)
pin grid array (PGA)
power-on password
program file
riser card
sector
SLI (Scalable Link Interface)
soft boot
South Bridge
spacers
staggered pin grid array (SPGA)
standoffs
startup password
track
user password
wait state
warm boot
zero insertion force (ZIF) sockets
>> REVIEWING THE BASICS
1. What are five main categories of form factors used for motherboards?
2. How many pins does the Intel Socket B have? What is another name for this socket?
3. How many pins does the AMD socket AM2 have?
4. Which is a better performing Intel chipset, the X58 or the P45?
5. Which part of the chipset connects directly to the processor, the North Bridge or the South
Bridge?
6. What are the names of the two technologies used to install multiple video cards in the
same system?
7. What are the two different voltages that a PCI slot can provide?
8. How does the throughput of PCI Express Version 1.1 compare to PCIe Version 1? How
does PCIe Version 2 compare to Version 1?
9. What is the maximum wattage that a PCIe Version 2.0 expansion card can draw?
10. What new type of power connector on the motherboard was introduced with PCIe
Version 1.0? How much power does this connector provide?
11. What new type of power connector was introduced with PCIe Version 2.0? How much
power does this connector provide?
12. If you are installing an expansion card into a case that does not have enough clearance
above the motherboard for the card, what device can you use to solve the problem?
13. What is the purpose of an AGP slot?
14. Which is faster, a PCI Express x16 bus or the latest AGP bus?
15. What is the purpose of a CNR slot?
16. What is the likely color of the PS/2 mouse port on the rear of a computer?
17. What is one reason to flash BIOS?
18. What is the easiest way to obtain the latest software to upgrade BIOS?
3
1435487389_ch03_CTP.qxd
158
7/30/09
5:23 PM
CHAPTER 3
Page 158
All About Motherboards
19. What can you do if the power-on password and the supervisor password to a system have
been forgotten?
20. Where is the boot priority order for devices kept?
21. What is the difference between a hard boot and a soft boot?
22. How is CMOS RAM powered when the system is unplugged?
23. Describe how you can access the BIOS setup program.
24. If a USB port on the motherboard is failing, what is one task you can do that might fix the
problem?
25. What might the purpose be for a SATA-style power connector on a motherboard?
>> THINKING CRITICALLY
1. Why does a motherboard sometimes support more than one system bus speed?
2. Why don’t all buses on a motherboard operate at the same speed?
3. When you turn off the power to a computer at night, it loses the date, and you must
reenter it each morning. What is the problem and how do you solve it?
4. Why do you think the trend is to store configuration information on a motherboard in
CMOS RAM rather than by using jumpers or switches?
5. When troubleshooting a motherboard, you discover the network port no longer works.
What is the best and least expensive solution to this problem?
a. Replace the motherboard.
b. Disable the network port and install a network card in an expansion slot.
c. Use a wireless network device in a USB port to connect to a wireless network.
d. Return the motherboard to the factory for repair.
6. A computer freezes at odd times. At first you suspect the power supply or overheating,
but you have eliminated overheating and replaced the power supply without solving the
problem. What do you do next?
a. Replace the processor.
b. Replace the motherboard.
c. Reinstall Windows.
d. Replace the memory modules.
e. Flash BIOS.
>> HANDS-ON PROJECTS
PROJECT 3-1:
Examining the Motherboard in Detail
1. Look at the back of your computer. Without opening the case, list the ports that you
believe come directly from the motherboard.
1435487389_ch03_CTP.qxd
7/30/09
5:23 PM
Page 159
Hands-On Projects
159
2. Remove the cover of the case, which you learned to do in Chapter 2. List the different
expansion cards in the expansion slots. Was your guess correct about which ports come
from the motherboard?
3. To expose the motherboard so you can identify its parts, remove all the expansion cards,
as discussed in Chapter 2.
4. Draw a diagram of the motherboard and label these parts:
Processor (Include the prominent label on the processor housing.)
RAM (each DIMM slot)
CMOS battery
Expansion slots (Identify the slots as PCI, PCIe x1, PCIe x4, PCIe x16, and AGP.)
Each port coming directly from the motherboard
Power supply connections
SATA or IDE drive connectors and floppy drive connector
5. Draw a rectangle on the diagram to represent each bank of jumpers on the board.
6. What is the brand and model of the motherboard?
7. Locate the manufacturer’s Web site. If you can find the motherboard manual on the site,
download it.
8. You can complete the following activity only if you have the documentation for the
motherboard: Locate the jumper on the board that erases CMOS and/or the startup
password, and label this jumper on your diagram. It is often found near the battery.
Some boards might have more than one, and some have none.
9. Reassemble the computer, as you learned to do in Chapter 2.
PROJECT 3-2:
Examining BIOS Settings
Access the BIOS setup program on your computer and answer the following questions:
1. What brand and version of BIOS are you using?
2. What is the frequency of your processor?
3. What is the boot sequence order of devices?
4. Do you have a floppy drive installed? If so, what type of drive?
5. Do you have a CD or DVD drive installed? What are the details of the installed drive?
6. What are the details of the installed hard drive?
7. Does the BIOS offer the option to set a supervisor or power-on password? What is the
name of the screen where these passwords are set?
8. Does the BIOS offer the option to overclock the processor? If so, list the settings that
apply to overclocking.
9. Can you disable the USB ports on the PC? If so, what is the name of the screen where
this is done?
10. List the BIOS settings that control how power is managed on the computer.
3
1435487389_ch03_CTP.qxd
160
7/30/09
5:23 PM
CHAPTER 3
PROJECT 3-3:
Page 160
All About Motherboards
Inserting and Removing Motherboards
Using old or defective expansion cards and motherboards, practice inserting and removing
expansion cards and motherboards. In a lab or classroom setting, the instructor can provide
extra cards and motherboards for exchange.
PROJECT 3-4:
Understanding Hardware Documentation
Obtain the manual for the motherboard for your PC. (If you cannot find the manual, try
downloading it from the motherboard manufacturer’s Web site.) Answer these questions:
1. What processors does the board support?
2. What type of RAM does the board support?
3. What is the maximum RAM the board can hold?
4. If the board has a PCIe slot, what version of PCIe does the board use?
5. What chipset does the board use?
PROJECT 3-5:
Using the Internet for Research
In this project, you will learn how useful the Internet can be for a PC support technician.
1. Using your own or a lab computer, pretend that the motherboard manual is not available
and you need to replace a faulty processor. Identify the manufacturer and model of the
motherboard by looking for the manufacturer name and model number stamped on the
board. Research the Web site for that manufacturer. Print the list of processors the board
can support.
2. Research the Web site for your motherboard and print the instructions for flashing BIOS.
3. Research the Abit Web site (www.abit.com.tw) and print a photograph of a motherboard
that has a riser slot. Also print the photograph of the riser card that fits this slot. What is
the function of the riser card?
PROJECT 3-6:
Exchanging the CMOS Battery
To practice the steps for exchanging a CMOS battery, do the following:
1. Locate the CMOS battery on your computer’s motherboard. What is written on top of
the battery?
2. Using the Internet, find a replacement for this battery. Print the Web page showing the
battery. How much does the new battery cost?
3. Enter BIOS setup on your computer. Write down any BIOS settings that are not default
settings. You’ll need these settings later when you reinstall the battery.
4. Turn off and unplug the PC, press the power button to drain the system of power, remove the
battery, and boot the PC. What error messages appear? What is the system date and time?
5. Power down the PC, unplug it, press the power button to drain the power, replace the
battery, and boot the PC. Return BIOS settings to the way you found them.
1435487389_ch03_CTP.qxd
7/30/09
5:23 PM
Page 161
Real Problems, Real Solutions
PROJECT 3-7:
161
Labeling the Motherboard
Figure 3-66 shows a blank diagram of an ATX motherboard. Using what you learned in this
chapter and in previous chapters, label as many components as you can. If you would like
to print the diagram, look for “Figure 3-66” on the CD that accompanies this book.
Figure 3-66 Label the motherboard
Courtesy of Intel Corporation
>> REAL PROBLEMS, REAL SOLUTIONS
REAL PROBLEM 3-1: Troubleshooting an Unstable Motherboard
Mary is responsible for all the PCs used by herself and her 10 coworkers in a small real
estate firm. When a problem gets too complicated for her, she packs up the PC and sends it
off to a local computer store for repair. For the last couple of weeks, Adriana’s computer
has been hanging at odd times. Last week, Mary reinstalled Windows XP, but the problem
has not gone away, so now Mary suspects a hardware problem. The next thing she wants to
do is reinstall the drivers for the motherboard. To practice this skill, locate the CD that
came with your motherboard and explore what’s on the CD. Then install all the drivers
stored on the CD that pertain to your system, along with any updates to these drivers
published on the motherboard manufacturer’s Web site. Answer these questions:
1. What is the brand and model of the motherboard?
2. What chipset does this board use?
3. What troubleshooting utilities are found on the CD that came bundled with the board?
4. What manuals (most likely in PDF format) are found on the CD?
3
1435487389_ch03_CTP.qxd
162
7/30/09
5:23 PM
CHAPTER 3
Page 162
All About Motherboards
5. What drivers are stored on the CD?
6. Which of these drivers did you install on your system?
7. Which updates to drivers were you able to find on the Internet and use?
Assume you can’t find the CD that came bundled with the board. Go to the Web site of the
motherboard manufacturer and locate the support pages for this board. List all the utilities,
documentation, and drivers for this board found on the Web site.
REAL PROBLEM 3-2: Selecting a Replacement Motherboard
When a motherboard fails, you can select and buy a new board to replace it. Suppose the
motherboard used in Real Problem 3-1 has failed and you want to buy a replacement and
keep your repair costs to a minimum. Try to find a replacement motherboard on the
Internet that can use the same case, power supply, processor, memory, and expansion cards
as your current system. If you cannot find a good match, what other components might
have to be replaced (for example, the processor or memory)? What is the total cost of the
replacement parts? Print Web pages showing what you need to purchase.