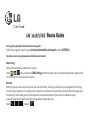
1
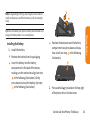
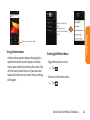
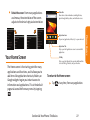
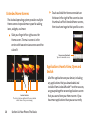
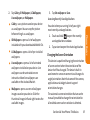
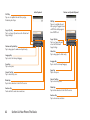
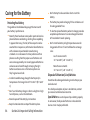
LG855
Printed in Mexico
P/N : MFL67471901(1.0) MW
Section 1
Your Phone
Your Phone: The Basics
In This Section
l FrontView of Your Phone
l Viewing the Display Screen
l Features of Your Phone
l Turning Your Phone On and Off
l Using Your Phone’s Battery and Charger
l Navigating Through Phone Menus
l Displaying Your Phone Number
l Making and Answering Calls
l Entering Text
2
Section 1A: Your Phone: The Basics
Your phone is packed with features that simplify
your life and expand your ability to stay
connected to the people and information that
are important to you.This section will guide you
through the basic functions and calling
features of your phone.
Front View of Your Phone
FrontView
1. Front-Facing Camera Lens
Phone Basics
12. Earpiece
2. Proximity Sensor
3. Status Bar
11. Touchscreen
10. Appplication Tab
4. Phone Key
9. Mobile ID Key
5. Home Key
8. Search Key
6. Menu Key
7. Back Key
Section 1A: Your Phone: The Basics
3
1. Front-Facing Camera Lens Allows you to take a
self-shot.
2. Proximity Sensors senses proximity toward
other objects (such as your head) so that
touch commands are not accidentally
activated during a call.
Note: Please be careful not to cover the sensor with a
protective film, pouch, or a protective case not authorized by
LG.
3. Status Bar provides information about your
device’s status and options, such as signal
strength, ringer setting, messaging, and
battery charge. The Status Bar displays icons
indicating that you’ve received notifications
(on the left) and icons indicating the device's
status (on the right), along with the current
time.
4
Section 1A: Your Phone: The Basics
Notification icons
Status icons
4. Phone Key displays the dialpad so you can dial
a number. It also provides additional tabs to
access Call log, Contacts, and your Favorites.
5. Home Key returns to the Home screen. If
you're already viewing one of extension
panes, it opens the central Home screen.
Touch and hold to display recently used
applications.
6. Menu Key allows you to access your device's
main functions menu from the Home screen:
Add, Wallpaper, Settings, Switch ID, Search, and
More (Manage apps and Notifications). While in
an application, tap to open a list of available
options.
7. Back Key returns to the previous screen. It also
closes pop-up display items such as menus
and dialog boxes.
8. Search Key displays the Quick Search box that
v
v
For example, entering the word “Pa”will
display any matching entries from your
device’s Contacts list, installed applications,
or will suggest search terms.
Touch and hold to launch Voice Search where
you can initiate a Google™ search by verbally
entering search terms. The device recognizes
your spoken words and initiates a Web
search.
application from where you can replace a
current ID or get a new one.
10. Applications Tab opens the Applications
screen to view installed applications.
11. Touchscreen displays all the information
needed to operate your device, such as the
applications, call status, the Contacts list, the
date and time, and the signal and battery
strength.
12. Earpiece lets you hear the caller and
automated prompts.
Section 1A: Your Phone: The Basics
5
Phone Basics
can be used to search for a key term both on
the device and online.
9. Mobile ID Key launches the Mobile ID
FrontView
1. Charger/Accessory Port
8. 3.5 mm Headset Jack
2. Power/Lock Key
3. Rear-Facing
Camera Lens
4. Flash
9. MicroSD Slot
™
7. Volume Keys
10. Quick Launch Key
5. Speaker
6. Fingertip Cutout
6
Section 1A: Your Phone: The Basics
1. Charger/Accessory Port allows you to connect
the device charger or an optional USB cable .
CAUTION! Inserting an accessory into the
incorrect port may damage the device.
hold to open the Phone options menu for the
following options: Silent mode, Airplane
mode, and Power off.
3. Rear-Facing Camera Lens lets you take pictures
and videos.
4. Flash helps take pictures and video in darker
lighting.
5. Speaker lets you hear the different ringers
and sounds. The speaker also lets you hear
the caller‘s voice in speakerphone mode.
6. Fingertip Cutout allows you to lift and remove
the device's back cover.
and media volumes or the in-call volume
during a call. When you press and hold the
down Volume Key, the phone switches to the
Sound-off mode.
8. 3.5mm Headset Jack allows you to plug in a
headset for convenient, hands-free
conversations. CAUTION! Inserting an
accessory into the incorrect jack may damage
the device.
9. microSD Slot accommodates the pre-installed
microSD™ card (expandable up to 32GB).
Note: Insert a microSD card to use the camera and other
multimedia features. Multimedia contents will be saved in
the microSD card. Your LG Marquee has a microSD™ card preinstalled.
10. Quick Launch Key gives you quick access to the
specific feature you previously allocate to this
key. Camera is allocated by default.
Section 1A: Your Phone: The Basics
7
Phone Basics
2. Power/Lock Key locks the screen. Press and
7. Volume Keys allow you to adjust the ringer
Viewing the Display Screen
The Status Bar appears at the top of the screen. It
displays icons indicating that you’ve received
notifications (on the left) and icons indicating the
device’s status (on the right), along with the current
time.
Signal Strength – Shows your current signal
strength (The more bars displayed, the
stronger the signal).
No Service – Your phone cannot find a
usable signal.
3G Connected – Indicates that 3G data
service is available.
3G In Use – Indicates that 3G data service is
in use.
Notification icons
Status icons
If you have more notifications than can fit in the
Status Bar, the icon
prompts you to open the
Status Bar to view them all. The following list
identifies the symbols you’ll see on your device's
display screen:
1x Data Connected – Indicates that 1x data
service is available.
1x Data Service In Use – Indicates that 1x
data service is in use.
Bluetooth On – Indicates that Bluetooth is
on.
Bluetooth Connected – Indicates that the
phone is connected to a Bluetooth device.
GPS On – Indicates that GPS is on.
8
Section 1A: Your Phone: The Basics
Low Battery – Indicates that the battery
charge is low.
Airplane Mode – Indicates that the device
is in Airplane Mode.
Battery Drained (40%) – Indicates that the
battery charge is partially drained.
Speakerphone On – Indicates that
Speakerphone is on.
Battery Full – Indicates that the battery is
fully charged.
No microSD – Indicates that no microSD
card is installed.
Battery Charging – Indicates that the
battery is charging.
Vibrate Mode – Indicates that the ringer
volume is set to vibrate and all sounds are
silenced.
Alarm Clock – Indicates that an alarm is set.
Ringer Silenced – Indicates that all sounds
are turned off.
Muted – Indicates that the phone's
microphone is muted.
Very Low Battery – Indicates that the
battery charge is very low.
New Gmail Message – Indicates a new
Gmail message.
New Text or Multimedia Message –
Indicates that you have received a new text
or multimedia message.
New Email – Indicates a new Email
message.
Section 1A: Your Phone: The Basics
9
Phone Basics
GPS Communicating – Indicates that the
device is receiving location data from GPS.
Problem With Text Or Multimedia Message
Delivery – Indicates a text or multimedia
message is undeliverable.
New Google Talk Message– Indicates that
you have received a new Google Talk
message.
New Voicemail – Indicates that you have
received a new voicemail message.
Upcoming Event – Alerts you to an
upcoming event.
Data Is Syncing – Application sync is active
and synchronization is in progress for
Gmail, Calendar, and Contacts.
ProblemWith Sign-In Or Sync– There has been
an issue with your connection to the Google
server or you were notproperly signed into
your account. In order to use Google
applications or sync features, you mustsetup
and sign into an active Google account.
10
Section 1A: Your Phone: The Basics
Open Wi-Fi Network Available – Indicates
that an open Wi-Fi network is available.
USB Connected – The device has detected
an active USB connection.
USB Debugging Connected – The device
has detected an active USB connection and
is in a USB Debugging mode.
More Notifications Not Displayed –
Indicates that there are more notifications
which are not displayed in the Status Bar.
Call In Progress – Indicates that a call is in
progress.
Call In Progress Using Bluetooth Headset –
Indicates that a call is in progress using the
Bluetooth headset.
Missed Call – Indicates that you have
missed calls.
Uploading Data – Indicates that your
device is uploading data.
Downloading Data – Indicates that your
device is downloading data.
Connected To VPN – Indicates that the
device is connected to a Virtual Private
Network.
Disconnected From VPN – Indicates that
the device is disconnected from the Virtual
Private Network.
Song Is Playing – Indicates that a song is
playing.
Congratulations on the purchase of your
phone. The LG Marquee is an easy-to-use,
lightweight and reliable phone that offers
many significant features and service options.
The following list previews some of those
features of the phone:
v
v
v
TTY – Indicates that your phone is
operating in TTY mode.
v
Phone Basics
Download Finished – Indicates that a
download is complete.
Features of Your Phone
Data service provides access to the wireless
Internet in digital mode.
Voicemail and text messaging provide quick
and convenient messaging capabilities.
Games, ringtones, wallpapers, and other
applications can be downloaded to make
your phone as unique as you are. Additional
charges may apply.
The Calendar offers several personal
information management features to help
you manage your busy lifestyle.
Section 1A: Your Phone: The Basics
11
v
v
v
The Location feature works in conjunction
with available location-based services.
Turning Your Phone On and Off
The on-screen keyboard lets you quickly type
messages with one keypress per letter.
Turn your device on and off and wake-up the screen by
using the Power/Lock Key
.
Direct dial shortcuts let you dial phone
numbers with one touch.
Turning Your Phone On
©
Press and hold
.
Turning Your Phone Off
1. Press and hold
for two seconds until
you see the Phone options menu.
2. Tap Power off and then tap OK to power off
the device.
12
Section 1A: Your Phone: The Basics
Making Calls
There are several convenient ways to place calls
from your device.
>
.
Note: If necessary, tap the Phone tab to access the dial pad.
2. Enter a phone number using the on-screen
dial pad and tap
.
©
If you enter a wrong number, tap
erase digits one by one.
to
©
To erase the entire number, touch and hold
.
Press the Volume Keys to adjust the call
volume.
©
Use the on-screen keys to add another call
on hold, to use the speakerphone, and for
other options, as described in In-Call
Options.
3. Tap
to end the call.
Note: To redial your last outgoing call, follow step 1 to access
the dial pad, tap the Call log tab, locate the call entry and tap
to the right of it.
You can also make calls from your Contacts list,
from the Call log, and using Voice Dialer.
Options during a call:
©
You can open other applications during a
call. The in-call icon will appear in the
Status Bar while the call is underway.
Section 1A: Your Phone: The Basics
13
Phone Basics
1. Tap
©
Adding a Contact to Your
Favorites
Favorites contains a short list of the contacts you
communicate with most often.
To add a contact to your favorites:
1. Tap
>
> Contacts.
2. Tap a contact entry to view its details.
3. Tap the star to the right of the contact's
name (The gold star indicates that the
contact has been added successfully).
To remove a contact from your favorites list:
1. Tap
>
> Favorites.
2. Tap a contact entry to view its details.
3. Tap the gold star to the right of the contact's
name. The star will turn gray, indicating that
it has been removed from your Favorites.
14
Section 1A: Your Phone: The Basics
Battery and Charger
WARNING: Use only LG-approved batteries and chargers
with your device. The failure to use a LG-approved battery
and charger may increase the risk that your phone will
overheat, catch fire, or explode, resulting in serious bodily
injury, death, or property.
Battery Capacity
Your device is equipped with a Lithium Ion (Li-Ion)
battery. It allows you to recharge your battery
before it is fully drained. The battery provides up
to 5 hours of continuous digital talk time.
When the battery reaches 5% of its capacity, the
battery icon blinks. When there are
approximately two minutes of talk time left, the
device can sound an audible alert and then turn
off.
Note: Long backlight settings, searching for service, vibrate
mode, and browser use affect the battery’s talk and standby
times.
Tip: Be sure to watch your phone’s battery level indicator and
Installing the Battery
1. Install the battery.
©
Remove the battery from its packaging.
©
Insert the battery into the battery
compartment in the back of the device,
making sure the connectors align (see step
in the following illustration). Gently
press down to secure the battery (see step
in the following illustration).
©
Phone Basics
charge the battery before it runs out of power.
Position the back cover over the battery
compartment and press down until you
hear a click (see step
in the following
illustration).
2. Press and hold
located on the top right
of the phone to turn the device on.
Section 1A: Your Phone: The Basics
15
Removing the Battery
1. Make sure the power is turned off so that
you don’t lose any unsaved items.
2. Lift the back cover using the fingertip
cutout located at the bottom of the cover
and remove it.
Charging the Battery
Keeping track of your battery’s charge is
important. If your battery level becomes too low,
your device automatically turns off, and you will
lose any information you were just working on.
Always use an LG-approved wall charger, travel
charger, or vehicle power adapter to charge your
battery.
1. Connect the wall adapter and USB cable as
3. Lift the battery using the fingertip cutout
located at the bottom of the battery
compartment and remove it from the device.
shown; the LG logo on the USB cable should
face toward you.
USB Cable
Wall Adapter
2. Plug one end of the USB cable into the
WARNING: Do not handle a damaged or leaking Li-Ion
battery as you can be burned.
16
Section 1A: Your Phone: The Basics
device's Charger/Accessory Port and the
other end into an electrical outlet. The
charge time varies depending upon the
battery level.
With the LG-approved Li-Ion battery, you can
recharge the battery before it becomes
completely discharged.
Battery Temperature Protection
Charging with USB
You can use your computer to charge your device.
To be able to charge with the USB cable, you need
to install the necessary USB drivers on your
computer first. Connect one end of the USB cable
to the Charger/Accessory Port on your device and
connect the other end to a USB port on your
computer. It is best to use the rear USB port when
connecting to a desktop computer. The USB hub
should be powered by an external power source.
You can extend your battery's life between
charges by turning off features that run in the
background. You can also monitor how
applications and system resources consume
battery power.
©
Reduce your screen's backlight time.
©
Turn Bluetooth and Wi-Fi off when not in use.
©
Deactivate the GPS when not needed. Most
applications using this function will
periodically query the GPS satellites for
your current location; each query drains
your battery.
©
Do not wait until your battery is completely
depleted before charging your device.
Repeating this process of a complete
discharge and recharge can over time
reduce the storage capacity of any battery.
Section 1A: Your Phone: The Basics
17
Phone Basics
Though extremely rare, if the battery becomes
overheated, the phone will automatically turn
off.
Extending Your Battery Life
©
Turn off Automatic application sync.
©
Use the Power Control Widget to deactivate
hardware functions, such as Bluetooth,
GPS, Synchronization, or the LCD brightness
setting.
©
©
Check the Running Services and close any
unnecessary applications.
Turn down screen brightness.
To check the battery's charge level:
Tap
>
> Settings > About phone > Status.
The battery status (charging or discharging) and
level (as a percentage of fully charged) are
displayed at the top of the screen.
To monitor and control what uses the battery:
The Battery use screen shows which applications
consume the most battery power. You can also
use it to turn off applications that you’ve
downloaded if they are consuming too much
power.
1. Tap
>
Battery use.
> Settings > About phone >
2. Tap any of the listed items for more options.
18
Section 1A: Your Phone: The Basics
Device Function Keys
Wallpaper ( ) provides the ability to
customize the current screen’s wallpaper
image. This image can be obtained from
either your pre-installed Wallpapers or
from any of the available images within the
device’s Gallery.
©
Settings ( ) provides quick access to the
device’s settings menu.
The LG Marquee comes equipped with four main
function keys that can be used on any screen to
access added functions.
Menu Key
The Menu Key (
) activates an available menu
function for the current screen or application.
When on the Home screen, the following menu
options are available:
©
The Settings menu can also be accessed by
tapping
>
> Settings.
©
Switch ID ( ) allows you to access the
downloaded Mobile ID packs, change to
another Mobile ID pack, or download new
Mobile ID packs.
©
Search ( ) displays the Quick Search box
that can be used to search for a key term
both on the device and on the Web.
Add ( ) adds one of the following
functions to a selected screen: Shortcuts,
Widgets, Folders, and Wallpapers.
Section 1A: Your Phone: The Basics
19
Phone Basics
©
For example, entering the word “Pa”, will
display any matching entries from your
device‘s Contacts list, installed
applications, or will suggest search terms.
More ( ) allows you to manage
applications and notifications.
Manage apps displays the Manage
applications screen. You can manage how
applications use memory, stop a
misbehaving application, or uninstall an
application.
Notifications allows you to expand the
Notifications Panel to provide more
detailed information about the current onscreen notification icons (See Using the
Notifications Panel).
20
Section 1A: Your Phone: The Basics
Working with Menus
There are two Android menu types: Options
menus and Context menus.
Options menus
Options menus contain tools that apply to the
activities of the current screen or application, not
to any specific item on the screen. To open the
available options menu, tap
.
©
Not all applications have Options menus; if
you tap
on a screen that has no Options
menu, nothing will happen.
Some applications have more Options menu
items than can fit in the options menu; tap More
to open the additional items.
When you touch and
hold
certain items on a
screen, a Context menu
opens.
Phone Basics
Tap to open more menu items.
Using Context menus
Context menus contain options that apply to a
specific item on the screen. To open a Context
menu, touch and hold an item on the screen. Not
all items have Context menus. If you touch and
hold an item that has no Context menu, nothing
will happen.
Backing Up Within a Menu
To go to the previous menu:
©
Tap
.
To return to the Home screen:
©
Tap
.
Section 1A: Your Phone: The Basics
21
Using the Notifications Panel
Notification icons report the arrival of new
messages, calendar events, alarms, as well as
ongoing events, such as when you are on a call.
When you receive a notification, text appears
briefly and the notification icon will be displayed
in the Status Bar.
You can open the Notifications Panel to view a list
of all recent notifications. Depending on your
settings, you may hear a notification sound and
the device may vibrate.
Applications whose activities produce
notifications, such as Gmail™ and Google Talk,
have their own settings, which you can use to
configure whether, and how, they send
notifications.
22
Section 1A: Your Phone: The Basics
To open the Notifications Panel:
©
Touch and drag the Status Bar to the
bottom of the screen.
– or –
©
Tap
>
> More > Notifications.
The Notifications Panel displays a list of your
current notifications, organized into ongoing and
event-based notifications.
To respond to a notification:
1. Open the Notifications Panel. Your current
notifications are listed in the panel, each
with a brief description.
2. Tap a notification to view it. The
Notifications Panel will close and the
application that corresponds to the
notification will open.
For example, new voicemail notifications dial
your voicemail box and new email notifications
open the Email application.
To clear all notifications:
2. Tap Clear at the top right corner of the
panel.
All event-based notifications will be cleared;
ongoing notifications will remain in the list.
To close the Notifications Panel:
©
Touch and drag the tab at the bottom of the
Notifications Panel to the top of the screen.
- or -
©
Tap
.
- or ©
Tap a notification and the Notifications
Panel will close.
The Home Key
takes you back to your main
Home screen (of the 5 total available screens).
Back Key
Phone Basics
1. Open the Notifications Panel.
Home Key
The Back Key
returns you to the previously
active screen. If the on-screen keyboard is
currently open, this key closes the keyboard.
Search Key
The Search Key
displays the Quick Search Box
that can be used to search for a key term both on
the device and on the Web. Some applications,
such as Contacts, Gmail™, and Google Maps™,
have the ability to search contents within those
specific applications. Along with being able to
search by typing in search terms, you are also
able to search by voice.
©
Tap
to launch the Quick Search Box.
Section 1A: Your Phone: The Basics
23
Basics Guide
For user guides, go to www.boostmobile.com/userguides.
To find the user guide in Spanish, please visit www.boostmobile.com/espanol and click ASISTENCIA.
To purchase accessories, go to www.boostmobile.com/accessories.
CMAS settings
Settings for the Commercial Mobile Alert System.
Touch
,
,
then scroll down to CMAS settings and touch the alerts you wish to activate/deactivate. A green check
mark indicates that the selected alert is active.
Boost 411
Boost 411 gives you access to a variety of services and information, including residential, business and government listings,
movie listings or showtimes, driving directions, restaurant reservations and major local event information. You can get up to
three pieces of information per call, and the operator can automatically connect your call at no additional charge.
A per call charge and standard airtime fee may apply depending on your plan.
Touch
and touch
.
©
Touch and hold
Search function.
to launch the Voice
Device and Web Search Using Text Entry
1. Tap
>
. When you tap
on the
Home screen or in the other applications
that support this, the Quick Search Box will
open automatically.
Voice Search
Tap to search by voice.
Recent search results
Provides one touch shortcut
to previously searched terms.
24
Section 1A: Your Phone: The Basics
©
In some applications, such as Gmail,
Contacts, Browser, and Android Market ,
the application’s own search box opens
when you tap
. This is indicated by the
application's icon on the left side of the
search box.
TM
2. Enter the text you're searching for in the
Quick Search Box.
Tap to conduct the search.
As you type, search results from your
device, previous search terms, and Web
search suggestions appear. Tap an item
to search for that term.
©
3. Tap
to search for the entered text.
– or –
If what you want to search for appears in
the suggestions list, tap that item to
conduct the search.
To search different by type:
©
Tap
> All, Web, Apps, or Contacts.
To search using voice command:
©
Touch and hold
.
Tap
from the Quick Search Box.
When you stop speaking, Google Search by Voice
analyzes your speech and displays the results of
your search.
Touchscreen Navigation
The LG Marquee is a touch-sensitive device which
allows you to not only select an on-screen option
with a single touch, but to easily scroll through
long lists. Simply slide up and down through the
display with your fingertip. Your touchscreen
provides an excellent way to interact with and
use your Android phone. With the touch of your
finger, you can access available applications,
make menu selections, and access data saved to
your device. The following terms are used for
describing the different available actions using
the touchscreen:
– or –
Section 1A: Your Phone: The Basics
25
Phone Basics
You can use the Search preferences to
configure some aspects of Google Web
search (for example, whether it makes
suggestions below the Quick Search Box as
you type), and what device features you
want to include in searches. Tap
>
Search settings.
©
Tap: A single finger tap selects items, links,
shortcuts and letters on the on-screen
keyboard.
©
Touch and hold: Touch and hold an item on
the screen by touching it and not lifting
your finger until an action occurs. For
example, to open a contact’s available
options, touch and hold the contact in the
Contacts list until the context menu opens.
©
26
©
Swipe or slide: To swipe or slide, quickly
move your finger across the surface of the
screen, without pausing when you first
touch it (so you don’t drag an item instead).
For example, you can slide the screen up or
down to scroll through a list, or browse
through the different Home screens by
swiping from left to right (and vice versa).
©
Double-tap: Double-tap to zoom on a Web
page or a map. For example, quickly doubletap a section of a Web page to adjust that
section to fit the width of the screen. You
can also double-tap to zoom in and out
when taking a picture (using the Camera),
and when using Maps.
©
Pinch-to-Zoom: Use your index finger and
thumb in a pinch or spread motion to zoom
in or out when using the Browser, Maps, or
browsing pictures.
Drag: Touch and hold an item for a moment
and then, without lifting your finger, move
your finger on the screen until you reach the
target position. You can drag items on the
Home screen to reposition them, or drag
the Notifications Panel open.
Section 1A: Your Phone: The Basics
©
Status Bar
Shows device status information, including the time,
signal strength, battery status, and notification icons.
Rotate the screen: From many applications
and menus, the orientation of the screen
adjusts to the device’s physical orientation.
Application Tab
Tap to open the Applications screen to view installed
applications.
Call Key
Tap to open the dial pad. Also provides additional tabs
to access Call log, Contacts, and your Favorites.
Your Home Screen
The Home screen is the starting point for many
applications and functions, and it allows you to
add items like application shortcuts, folders, or
Google widgets to give you instant access to
information and applications. This is the default
page and accessible from any menu by tapping
.
To return to the Home screen:
©
Tap
Section 1A: Your Phone: The Basics
at any time, from any application.
27
Phone Basics
Application Icons
Tap an icon (application, folder, etc.) to open and use it.
Extended Home Screens
The Android operating system provides multiple
Home screens to provide more space for adding
icons, widgets, and more.
©
Slide your finger left or right across the
Home screen. The main screen is in the
center with two extension screens on either
side of it.
©
Touch and hold the Home screen dots on
the lower left or right of the screen to view
thumbnails of the Extended Home screens,
then touch one to go to that specific screen.
Home screen thumbnails
Tap one for immediate access.
Applications: How to View, Open and
Switch
Location Indicator
The dots in the lower right and left corners indicate
which Home screen you are viewing.
28
Section 1A: Your Phone: The Basics
All of the applications on your device, including
any applications that you downloaded and
installed from Android Market™ or other sources,
are grouped together on one Applications screen
that you access from your Home screen. If you
have more applications than you can currently
see on the Applications screen, slide the screen
up or down to view more.
Overview
Tap an application icon
to open the application.
Slide the screen up or down
to bring more icons into view.
Tap to open the
Applications screen.
Home screen
Tap to close the
Applications screen.
Opening and Switching Applications
Multi-tasking is easy with Android™. Opened
applications can keep running in the background
when you open another application. There’s no
need to quit an application before opening
another. You can easily switch among several
open applications. Android manages each
application, pausing and starting them as
needed to ensure that unused applications don’t
waste your device's resources.
To open an application:
©
Applications screen
Simply tap its icon on the screen.
Section 1A: Your Phone: The Basics
29
Phone Basics
The Applications screen contains all of the
device's applications (though not downloaded
widgets and other downloaded material that
isn't an application),including the Clock, Browser,
Calculator, Camera, Market, YouTube, Voice
Search, and much more.
NOTE: The Applications screen closes automatically when
you tap an icon to open its Application. Dragging an icon
onto your Home screen also closes the Applications screen
automatically.
NOTE: You can customize your Home screen with shortcuts
to the applications you use most often. Applications are
located on the Applications screen, but you can add an
application shortcut to your Home screen for faster access.
No matter where the icon is, on the Applications screen or
your Home screen, just tap it to open and use it.
To open multiple applications:
1. Tap an application icon to open it.
2. Tap
.
3. Tap
– or –
Tap
to return to the current
application.
Adding Application Icons to the Home Screen
Customize your Home screen with shortcuts to
the applications you use most often.
1. Tap
>
.
and tap the icon for the other
application you want to open.
2. Touch and hold the application icon you
– or –
3. Lift your finger to place the app on your
Simply tap the icon if the application you
want is already on your Home screen.
To switch between multiple applications:
1. Touch and hold
. A small window opens
with icons of applications that you’ve used
recently.
30
2 Tap the application icon you want to open.
Section 1A: Your Phone: The Basics
want to add to your Home screen.
Home screen, or drag the icon to where you
want it on the screen, then lift your finger.
Applications
The following is a listing of the default
applications available on both the Home/
Extended screens and the Applications screen.
BoostZone – Launches the BoostZone
application that is a centralized location
for Boost related services, such as
accessing My Account,Boost News, and
help troubleshoot phone related issues.
Browser – Launches the Web browser.
Calculator – Launches the Calculator
application.
Calendar – Launches the Calendar
application that can sync to either your
Google or Outlook®Work calendar. Events
can only be synched to a managed account.
Camera – Launches the Camera.
Clock - Access the Clock application.
Contacts – Displays the Contacts that can
be synchronized with your device from
either your Google or Outlook account.
Contacts can only be synched to a
managed account.
Downloads – Launches the Downloads
application and allows you to view, reopen,
or delete what you've downloaded.
Email – Provides access your POP3, IMAP,
and Exchange Server (Outlook) email
accounts. Also provides access to your
Gmail account.
Flash Player Settings - Allows you to
manage your Flash Player settings.
Section 1A: Your Phone: The Basics
31
Phone Basics
Books – Launches the Google Books
application where you can download and
read over 3 million ebooks on the go.
Camcorder – Launches the Camcorder.
Gallery – Displays a Gallery of camera
images and video saved on your microSD™
card .
Gmail – Provides access to your Gmail
account.
Google Search – Displays the Quick Search
Box to search for a key term both on your
device and the Web.
Latitude – Lets you see your friends'
locations and share yours with them. The
application also lets you see your friends'
locations on a map or in a list.
Maps – Launches a dynamic map that
helps you find local businesses, locate
friends, view maps and get driving
directions.
Market – Browse, search for, and download
applications on the Android Market.
Messaging – Provides access to your text
and multimedia messages.
32
Section 1A: Your Phone: The Basics
Mobile ID – Accesses the Mobile ID
application.
Music – Launches the Music Player.
Navigation – Launches the GPS Navigation
feature on your phone, allowing you to get
quick turn-by-turn directions.
News & Weather – Launches the News &
Weather application, which allows you to
stay up-to-date on news and weather.
Phone – Accesses the phone keypad.
Places – Allows others to find your
business on local search results using
either Google Search or Google Maps.
Polaris Office – Launches the Polaris Viewer
application, which allows you to view,
create, and edit document files on your
device.
Settings – Accesses the device’s Settings
menu.
SmartShare – Accesses the SmartShare
application.
Talk – Launches the Google Talk
application that lets you chat with family
and friends over the Internet for free.
Voice Search – Launches your device’s builtin speech recognition software and
initiates a Google search based on the
recognized speech.
Voicemail– Launches Voicemail.
YouTube – Launches the YouTube
application.
Note: The Email application can access both Exchange
Server-based email and other Internet-based email providers
such as Yahoo! and Gmail.
You can customize your Home screen by doing
the following:
v
Creating Shortcuts
v
Adding Widgets
v
Creating Contact shortcuts
v
Creating Folders
v
Changing the Background (Wallpaper)
Phone Basics
Voice Dialer – Launches your device’s builtin automatic speech recognition (ASR)
software, called Voice Control, to dial a
phone number in our Contacts or to launch
phone functions .
Customizing Your Home Screen
Creating Shortcuts
Shortcuts are different from the Home screen
Widgets. Shortcuts can access a specific contact,
activate a feature, action, or launch an
application.
To add a shortcut from the Applications screen:
1. Tap
to access the Home screen.
Section 1A: Your Phone: The Basics
33
Table of Contents
Introduction . . . . . . . . . . . . . . . . . . . . . . . . . . . .i
Safety and Warranty Information . . . . . . . .47
Your Phone . . . . . . . . . . . . . . . . . . . . . . . . . . . .iii
Important Safety Information . . . . . . . . . . . . . .48
Your Phone: The Basics . . . . . . . . . . . . . . . . . . . . . .2
General Precautions . . . . . . . . . . . . . . . . . . . . . . . . .48
Front View of Your Phone . . . . . . . . . . . . . . . . . . . . . .3
Viewing the Display Screen . . . . . . . . . . . . . . . . . . . .8
Features of Your Phone . . . . . . . . . . . . . . . . . . . . . . .11
Turning Your Phone On and Off . . . . . . . . . . . . . . .12
Making Calls . . . . . . . . . . . . . . . . . . . . . . . . . . . . . . . .13
Adding a Contact to Your Favorites . . . . . . . . . . . .14
Battery and Charger . . . . . . . . . . . . . . . . . . . . . . . . .14
Maintaining Safe Use of and
Access to Your Phone . . . . . . . . . . . . . . . . . . . . . . . . .51
Using Your Phone With a Hearing Aid Device . . .53
Caring for the Battery . . . . . . . . . . . . . . . . . . . . . . . .54
Radiofrequency (RF) Energy . . . . . . . . . . . . . . . . . .55
Owner’s Record . . . . . . . . . . . . . . . . . . . . . . . . . . . . . .56
Manufacturer’s Warranty . . . . . . . . . . . . . . . . . .57
Device Function Keys . . . . . . . . . . . . . . . . . . . . . . . . .19
Touchscreen Navigation . . . . . . . . . . . . . . . . . . . . . .25
Your Home Screen . . . . . . . . . . . . . . . . . . . . . . . . . . .27
Displaying Your Phone Number . . . . . . . . . . . . . . .38
Creating a Google Account . . . . . . . . . . . . . . . . . . .45
Note: The user interface of Google applications (Google
Search, Google Maps, Navigation, etc.) can vary depending on
its software version.
2. Select a location for your new shortcut by
scrolling across your available screens until
you reach the desired one.
3. Tap
to reveal all your current
applications. By default, the applications
are listed in a Grid view.
4. Scroll down through the list and locate your
desired application.
5. Touch and hold the desired application icon.
This creates an immediate shortcut of the
selected icon and closes the Applications
screen. The new shortcut then appears to
hover over the Home screen.
Note: The same shortcut can be added to any of the
available screens (Home or Extended). The application you
add to the screen will still appear within the Applications
screen.
34
Section 1A: Your Phone: The Basics
6. While holding the application icon, position
it on the current screen. Once complete,
release the icon to lock the shortcut into its
new position.
To add a shortcut via the Home screen:
1. Tap
to access the Home screen.
2. Touch and hold on an empty area of the
screen.
3. From the Add to Home screen window, tap
Shortcuts.
4. Tap a selection from the list.
5. Locate the desired shortcut and tap it to
place it on the Home screen.
3. From the Add to Home screen window, tap
To delete a shortcut:
1. Tap
Widgets.
to access the Home screen.
2. Touch and hold the desired shortcut. This
3. Drag the icon over the Trash
current screen.
©
and release
it.
Adding and Removing Widgets
Widgets are self-contained applications that can
be accessed on the Home or Extended screens.
Unlike a shortcut, this Widget appears as an onscreen application.
To add a Widget:
1. Tap
to access the Home screen.
2. Touch and hold on an empty area of the
Default widgets include: Analog clock,
Calendar, Google Search, Home screen tips,
Latitude, Market, Music, News & Weather,
Picture frame, Power Control, Rate Places,
Traffic, Tutorial #1 ~#5 and YouTube.
To remove a Widget:
1. Go to the Home screen on which the widget
is located.
2. Touch and hold the widget. This unlocks it
from its location on the current screen.
3. Drag the widget over the Trash
and
release it.
screen.
©
This action does not delete the Widget, just
removes it from the current screen.
Section 1A: Your Phone: The Basics
35
Phone Basics
unlocks it from its location on the current
screen.
4. Tap an available Widget to place it on your
To place a Widget onto a different screen
3. From the Add to Home screen window, tap
Folders.
1. Touch and hold the widget you want to
4. Tap an available folder type to place it on
move.
your current screen.
2. Drag the widget to the edge of the screen
(the left side if moving to a screen located
on the left, right side if moving to a screen
located on the right).
3. After about one second, the current screen
will change. Repeat until you get to the
desired screen.
Creating and Managing Folders
Folders can be located on any of the available
screens and can contain multiple Shortcuts or
different Contact entries
To create a folder on the Home screen:
1. Tap
to access the Home screen.
2. Touch and hold on an empty area of the
screen.
36
Section 1A: Your Phone: The Basics
©
Choices include New folder, All contacts,
Contacts with phone numbers, Recent
documents or Starred contacts.
Note: Starred contacts are those Contact entries you have
tagged as very important.
Changing the Device's Wallpaper
To change the Home screen wallpaper:
1. From the Home screen, tap
>
Wallpaper.
– or –
Touch and hold an empty spot on the Home
screen, then tap Wallpapers.
2. Tap Gallery, ID Wallpapers, LG Wallpapers,
Live wallpapers, or Wallpapers.
Gallery - use a picture saved on your device
as a wallpaper. You can crop the picture
before setting it as a wallpaper.
©
ID Wallpapers - opens a list of wallpapers
included with your downloaded Mobile IDs.
©
LG Wallpapers - opens a list of pre-installed
wallpapers.
©
Live wallpapers - opens a list of animated
wallpapers installed on your device. Live
wallpapers can be animated or even
interactive. More live wallpapers are
available on the Android Market.
©
Wallpapers - opens a screen of wallpaper
images saved on your device. Slide the
thumbnail images left and right to view the
available images.
Accessing Recently-Used Applications
Your device keeps a running list of your eight
most recently used applications.
1. Touch and hold
to open the recentlyused applications window.
2. Tap an icon to open the related application.
Changing the Screen Orientation
This device is capable of changing the orientation
of screen content when the orientation of the
device itself has changed. The device’s built-in
accelerometer senses movement and changes its
angle/orientation. Note that some of the screens,
applications and widgets do not support
orientation changes.
The automatic screen orientation feature can be
manually enabled to change the orientation for
all enabled screens when rotation is detected.
Section 1A: Your Phone: The Basics
37
Phone Basics
©
3. Tap Set wallpaper or Save.
Note: An example of a screen that automatically re-orients
by moving the device is the Messaging screen. This only
requires you turn the device on its side.
To manually activate the auto-rotate feature:
1. Tap
>
> Settings > Display.
2. Tap Auto-rotate screen to enable or disable
the screen auto-rotation. A green check
mark indicates that the function is enabled.
Entering Text With the On-screen
Keyboard
The on-screen keyboard displays automatically
when you tap a text entry field. To manually
display the keyboard, simply touch a text field
where you want to enter text. There are two
types of methods that you can use: Android
keyboard and Swype.
To select the keyboard:
Displaying Your Phone Number
1. Touch and hold the text entry field and tap
Display your phone number and other
information about your phone and account.
2. Tap the method you want to use between
©
38
Tap
>
Status.
> Settings > About phone >
Section 1A: Your Phone: The Basics
Input method.
Android keyboard and Swype.
Android keyboard
Numbers and Symbols Keyboard
Letters Keyboard
Number and Symbols Key
Tap to change input to number
and symbol entry.
Settings Key
Tap to set various Android
keyboard settings.
Voice to Text Key
Tap to enter text by voice.
Space Key
Tap to enter space.
Emoticon Key
Tap to enter various emoticons.
Delete Key
Tap to delete characters to the left of the cursor.
Alt Key
Tap to enter additional symbols.
The keyboard will change to
alternate characters. Touch and
hold to lock the alternate
characters keyboard layout.
Phone Basics
Shift Key
Tap once to capitalize the next
letter you type. Double-tap for all
caps.
Letters Key
Tap to change input to letters
entry.
Settings Key
Tap to set various Android keyboard
settings.
Space Key
Tap to enter space.
Emoticon Key
Tap to enter various emoticons.
Delete Key
Tap to delete characters to the left of the cursor.
Section 1A: Your Phone: The Basics
39
1. Tap a text field where you want to enter
©
Touch to correct words tap entered words to
correct them with suggestions for other
words you may have intended.
©
Auto-capitalization allows you to
automatically capitalize the first letter of a
sentence.
©
Show settings key allows you to set whether
to display the Settings Key or always hide it.
©
Voice input allows you to set on which onscreen keyboard you want the voice-input
Microphone Key or turn voice input off.
©
Input languages allows you to select the
current text input language. The default
language depends on the language set
when you first activated the phone.
©
Quick fixes allows you to correct some
common misspellings as you type.
text.
2. Use the on-screen keyboard to enter text.
v
To enter numbers or symbols, tap
v
To enter letters again, tap
v
40
.
.
To configure Android keyboard settings, tap
.
©
Vibrate on keypress allows you to activate a
vibration sensation as you enter text using
the on-screen keyboard.
©
Sound on keypress allows you to activate a
sound as you enter text using the on-screen
keyboard.
©
Popup on keypress displays the larger image
of each key you tap.
Section 1A: Your Phone: The Basics
©
©
Auto-complete allows you to automatically
enter a suggested word, highlighted in the
strip above the keyboard, when you enter a
space or punctuation.
Rotate the screen to use the larger keyboard.
Letters Keyboard
3. When you finished typing, tap
to close
the keyboard.
Using the Swype keyboard
Swype is a text entry method that allows you to
enter a word by sliding your finger from letter to
letter, lifting your finger between words. Swype
uses error correcting algorithms and a language
model to predict the next word. Swype also
includes a predictive text system. For more
information, please refer to the Swype Tutorial
and Help on your device.
Phone Basics
v
Show suggestions shows you suggested
words in a strip above the on-screen
keyboard as you type.
Numbers and Symbols Keyboard
Note: If you do not want the screen to change orientation
automatically, uncheck the Auto-rotate screen. Tap
>
> Settings > Display and deselect Auto-rotate
screen.
Section 1A: Your Phone: The Basics
41
Shift Key
Tap once to capitalize the next letter you type.
Double-tap for all caps.
Letters Keyboard
Swype Tips Key
Tap to see Swype Tips and access the Tutorial and
Swype Settings.
Number and Symbols Key
Tap to change input to number and symbol entry.
Language Key
Tap to select the text input language.
Space Key
Tap to enter space.
Voice to Text Key
Tap to enter text by voice.
Delete Key
Tap to delete characters to the left of the cursor.
Emoticon Key
Touch and hold to enter various emoticons.
42
Section 1A: Your Phone: The Basics
Numbers and Symbols Keyboard
Shift Key
Tap once to capitalize the next
letter you type. Tap again to turn
on CAPS lock. And tap again to
turn off CAPS lock.
Swype Tips Key
Tap to see Swype Help and
access the Tutorial and
Swype Settings.
Letters Key
Tap to change input to letters entry.
Language Key
Tap to select the text input language.
Space Key
Tap to enter space.
Voice to Text Key
Tap to enter text by voice.
Delete Key
Tap to delete characters to the left of the cursor.
Emoticon Key
Tap to enter various emoticons.
Create a squiggle (like an S shape) to create
a double letter (such as “pp”in “apple”).
©
To enter a capitalized word, slide your finger
above the top row of the keyboard and then
slide back down to the next letter(s).
©
Move your finger over the apostrophe to
enter contractions. For common
punctuated suffixes, lift your finger off
between the suffix and the main part of the
word.
To configure Swype settings:
©
Language allows you to select the current
text input language. The default language
depends on the language set when you first
activated the phone.
©
Audio feedback allows you to turn on
sounds generated by the Swype
application.
©
Vibrate on keypress allows you to activate a
vibration sensation as you enter text using
the Swype keyboard.
©
Show tips allows you to turn on an onscreen flashing indicator that provides
helpful user information.
©
Word suggestion allows you to use a built-in
word database to predict words while
entering text in Swype.
1. When the Swype keyboard is displayed, tap
.
2. Tap Settings.
3. Tap any of the following settings:
Section 1A: Your Phone: The Basics
43
Phone Basics
©
Introduction
This User Guide introduces you to your wireless
service and all the features of your new phone.
It’s divided into four sections:
You’ll get the most out of your phone if you read
each section. However, if you’d like to get right
to a specific feature, simply locate that section
in the Table of Contents and go directly to that
page. Follow the instructions in that section,
and you’ll be ready to use your phone in no time.
l Section 1: Getting Started
l Section 2: Your Phone
l Section 3: Service Features
l Section 4: Safety and Warranty Information
Throughout this guide, you’ll find tips that
highlight special shortcuts and timely
reminders to help you make the most of your
new phone and service. The Table of Contents
and Index will also help you quickly locate
specific information.
i
©
Auto-spacing allows you to automatically
insert a space between words. When you
finish a word, just lift your finger and start
the next word.
©
Auto-capitalization allows you to
automatically capitalize the first letter of a
sentence.
©
©
©
44
Show complete trace allows you choose
whether or not you want the complete
Swype path to be displayed.
Speed vs. accuracy sets how quickly Swype
responds to on-screen input. Move the
slider between Fast Response (speed) or
Error Tolerance (accuracy) and tap OK.
Personal dictionary allows you to add, edit
and remove words which you have added to
your Personal Dictionary.
Section 1A: Your Phone: The Basics
©
Reset Swype's dictionary allows you to
remove all words previously added to the
Personal Dictionary.
©
Swype help displays the Swype User
Manual.
©
Tutorial provides an on-screen tutorial.
Tips for Editing Text
You can edit the text you enter in text fields and
use menu commands to cut, copy, and paste text,
within or across most applications. To cut/copy
and paste text:
1. Touch and hold the text field that contains
the text.
2. Tap Select word or Select all in the menu that
opens. The selected text is highlighted in
orange, with a tab at each end of the
selection.
3. Drag either selection tab to expand or
reduce the range of selected text.
©
To cancel the selection, simply tap
unselected text or an empty area.
5. When the Context menu opens, tap Cut or
Copy.
6. Place the cursor on the location where you
want to paste the text.
7. Touch and hold the text field.
8. When the Context menu opens, tap Paste.
The text that you pasted also remains in the
device’s memory (temporarily), so you can
paste that same text in another location.
Your Google Account
You must create and/or sign into a Google
Account to use Gmail , Google Talk , Google
Calendar , and other Google Apps. Signing into a
Google Account is also necessary to download
applications from the Android Market , to sync
your data (if applicable) with the Google servers,
and to take advantage of any other available
Google services on your device.
TM
TM
TM
TM
If you don’t have a Google Account, you will be
prompted to create one. If you have an enterprise
account through your company or other
organization, your IT department may have
special instructions on how to sign into that
account.
1. From a computer, or from your device's
Browser, navigate to www.google.com.
Section 1A: Your Phone: The Basics
45
Phone Basics
4. Tap the selected text.
Creating a Google Account
2. On the main page, select Sign in > Sign up for
a new Google Account.
3. Follow the prompts to create your free
account.
4. Log into your provided email address, locate
the email from Google, and respond to the
new email to both confirm and activate
your new account.
Signing into Your Google Account
1. Launch an application that requires a
Google account (such as Android Market or
Gmail).
2. Tap Next > Sign in.
Note: If you do not already have a Google account, tap Create
and follow the on-screen prompts to create your new
account.
46
Section 1A: Your Phone: The Basics
3. Tap the Username and Password fields and
enter your information.
4. Tap Sign in. Your device then communicates
with the Google servers to confirm your
information.
Important: Some applications, such as Calendar, work only
with the primary Google account (the first Google account
set up with your device). If you plan to use more than one
Google Account with your device, be sure to sign into the one
you want to use with such applications first. When you sign
in, your contacts, Gmail messages, Calendar events, and
other information from these applications and services on
the Web can be synchronized with your device. You will be
prompted to sign in or to create a Google Account the first
time you start an application that requires one, such as Gmail
or Android Market.
Section 2
Safety and Warranty
Information
Important Safety
Information
In This Section
l General Precautions
This phone guide contains important
operational and safety information that will help
you safely use your phone. Failure to read and
follow the information provided in this phone
guide may result in serious bodily injury,
death, or property damage.
General Precautions
l Maintaining Safe Use of and Access to Your Phone
l Using Your Phone With a Hearing Aid Device
l Caring for the Battery
There are several simple guidelines to operating your phone
properly and maintaining safe, satisfactory service.
v
Hold the phone with the antenna raised, fully extended,
and over your shoulder.
l Owner’s Record
v
Try not to hold, bend, or twist the phone’s antenna.
l Phone Guide Proprietary Notice
v
Don’t use the phone if the antenna is damaged.
v
Speak directly into the mouthpiece.
v
Avoid exposing your phone and accessories to rain or
liquid spills. If your phone does get wet, immediately
turn the power off and remove the battery.
v
Although your phone is quite sturdy, it is a complex
piece of equipment and can be broken. Avoid dropping,
hitting, bending, or sitting on it.
l Radiofrequency (RF) Energy
48
Section 2A: Important Safety Information
v
v
Do not disassemble or open crush, bend or deform,
puncture or shred.
v
Do not modify or remanufacture, attempt to insert
foreign objects into the battery, immerse or expose to
water or other liquids, expose to fire, explosion or other
hazard.
v
Only use the battery for the system for which it is
specified.
v
Only use the battery with a charging system that has
been qualified with the system per this standard. Use
of an unqualified battery or charger may present a risk
of fire, explosion, leakage, or other hazard.
v
Do not short circuit a battery or allow metallic
conductive objects to contact battery terminals.
v
Replace the battery only with another battery that has
been qualified with the system per this standard, IEEEStd-1725-200x. Use of an unqualified battery may
present a risk of fire, explosion, leakage or other hazard.
v
Promptly dispose of used batteries in accordance with
local regulations.
v
Battery usage by children should be supervised.
v
Avoid dropping the phone or battery. If the phone or
battery is dropped, especially on a hard surface, and the
user suspects damage, take it to a service center for
inspection.
v
Improper battery use may result in a fire, explosion or
other hazard.
v
For those host devices that utilize a USB port as a
charging source, the host device's user manual shall
include a statement that the phone shall only be
connected to products that bear the USB-IF logo or
have completed the USB-IF compliance program.
Note: For the best care of your phone, only authorized personnel
should service your phone and accessories. Failure to do so may be
dangerous and void your warranty.
Section 2A: Important Safety Information
49
Important Safety Information
Any changes or modifications to your phone not
expressly approved in this document could void your
warranty for this equipment and void your authority to
operate this equipment.
Part 15.19 statement
This device and its accessories comply with part15 of FCC
rules. Operation is subject to the following two conditions:
(1) This device & its accessories may not cause harmful
interference.
(2) This device & its accessories must accept any
interference received, including interference that may
cause undesired operation.
Part 15.21 statement
Change or Modifications that are not expressly approved by
the manufacturer could void the user's authority to operate
the equipment.
Part 15.105 statement
This equipment has been tested and found to comply with
the limits for a class B digital device, pursuant to Part 15 of
the FCC Rules. These limits are designed to provide
reasonable protection against harmful interference in a
residential installation. This equipment generates uses and
can radiate radio frequency energy and, if not installed and
used in accordance with the instructions, may cause
harmful interference to radio communications. However,
there is no guarantee that interference will not occur in a
particular installation. if this equipment does cause
harmful interference or television reception, which can be
50
Section 2A: Important Safety Information
determined by turning the equipment off and on, the user is
encouraged to try to correct the interference by one or more
of the following measures:
v
v
v
v
Reorient or relocate the receiving antenna.
Increase the separation between the equipment and
receiver.
Connect the equipment into an outlet on a circuit
different from that to which the receiver is connected.
Consult the dealer or an experienced radio/TV
technician for help.
Do Not Rely on Your Phone for Emergency Calls
Mobile phones operate using radio signals, which cannot
guarantee connection in all conditions. Therefore, you
should never rely solely upon any mobile phone for
essential communication (e.g., medical emergencies).
Emergency calls may not be possible on all cellular networks
or when certain network services and/or mobile phone
features are in use. Check with your local service provider for
details.
Using Your Phone While Driving
Talking on your phone while driving (or operating the phone
without a hands-free device) is prohibited in some
jurisdictions. Laws vary as to specific restrictions.
Remember that safety always comes first.
Using Your Phone Near Other Electronic Devices
Most modern electronic equipment is shielded from
radiofrequency (RF) signals. However, RF signals from
wireless phones may affect inadequately shielded
electronic equipment.
RF signals may affect improperly installed or inadequately
shielded electronic operating systems and/or
entertainment systems in motor vehicles. Check with the
manufacturer or their representative to determine if these
systems are adequately shielded from external RF signals.
Also check with the manufacturer regarding any equipment
that has been added to your vehicle.
Consult the manufacturer about any personal medical
devices, such as pacemakers and hearing aids, to determine
if they are adequately shielded from external RF signals.
Note: Always turn off the phone in health-care facilities and request
permission before using the phone near medical equipment.
Following Safety Guidelines
To operate your phone safely and efficiently, always follow
any special regulations in a given area. Turn your phone off
in areas where use is forbidden or when it may cause
interference or danger.
Section 2A: Important Safety Information
51
Important Safety Information
Maintaining Safe Use of and
Access to Your Phone
Turning Off Your Phone Before Flying
Turn off your phone before boarding any aircraft. To prevent
possible interference with aircraft systems, the U.S. Federal
Aviation Administration (FAA) regulations require you to
have permission from a crew member to use your phone
while the plane is on the ground. To prevent any risk of
interference, FCC regulations prohibit using your phone
while the plane is in the air.
v
v
Areas where the air contains chemicals or particles such
as grain, dust, or metal powders.
Any other area where you would normally be advised to
turn off your vehicle’s engine.
Note: Never transport or store flammable gas, flammable liquid, or
explosives in the compartment of your vehicle that contains your
phone or accessories.
Turning Off Your Phone in Dangerous Areas
To avoid interfering with blasting operations, turn your
phone off when in a blasting area or in other areas with
signs indicating two-way radios should be turned off.
Construction crews often use remote-control RF devices to
set off explosives.
Turn your phone off when you’re in any area that has a
potentially explosive atmosphere. Although it’s rare, your
phone and accessories could generate sparks. Sparks can
cause an explosion or fire, resulting in bodily injury or even
death. These areas are often, but not always, clearly marked.
They include:
52
v
Fueling areas such as gas stations.
v
Below deck on boats.
v
Fuel or chemical transfer or storage facilities.
Section 2A: Important Safety Information
Restricting Children’s Access to Your Phone
Your phone is not a toy. Do not allow children to play with it
as they could hurt themselves and others, damage the
phone or make calls that use your airtime balance.
A number of phones offered by your service provider have
been tested for hearing aid device compatibility. When
some wireless phones are used with certain hearing devices
(including hearing aids and cochlear implants), users may
detect a noise which can interfere with the effectiveness of
the hearing device.
Some hearing devices are more immune than others to this
interference noise, and phones also vary in the amount of
interference noise they may generate. ANSI standard
C63.19 was developed to provide a standardized means of
measuring both wireless phone and hearing devices to
determine usability rating categories for both.
Ratings have been developed for mobile phones to assist
hearing device users find phones thatmay be compatible
with their hearing device. Not all phones have been rated
for compatibility with hearing devices. Phones that have
been rated have a label located on the box. Your LG
Marquee has an M4 and a T4 rating.
These ratings are not guarantees. Results will vary
depending on the user’s hearing device and individual type
and degree of hearing loss. If a hearing device is particularly
vulnerable to interference noise; even a phone with a
higher rating may still cause unacceptable noise levels in
the hearing device. Trying out the phone with your hearing
device is the best way to evaluate it for your personal needs.
M-Ratings: Phones rated M3 or M4 meet FCC requirements
for hearing aid compatibility and are likely to generate less
interference to hearing devices than unrated phones. (M4 is
the better/higher of the two ratings.) T-Ratings: Phones
rated T3 or T4 meet FCC requirements and are likely to be
more usable with a hearing device’s telecoil (“T Switch”or
“Telephone Switch”) than unrated phones. (T4 is the
better/higher of the two ratings. Note that not all hearing
devices have telecoils in them.)
Section 2A: Important Safety Information
53
Important Safety Information
Using Your Phone With a
Hearing Aid Device
ii
Caring for the Battery
Protecting Your Battery
The guidelines listed below help you get the most out of
your battery’s performance.
v
v
v
54
Recently there have been some public reports of wireless
phone batteries overheating, catching fire or exploding.
It appears that many, if not all, of these reports involve
counterfeit or inexpensive, aftermarket-brand batteries
with unknown or questionable manufacturing
standards. LG is not aware of similar problems with LG
phones resulting from the proper use of batteries and
accessories approved by LG. Use only approved batteries
and accessories found through LG. Buying the right
batteries and accessories is the best way to ensure
they’re genuine and safe.
In order to avoid damage, charge the battery only in
temperatures that range from 32° F to 113° F (0° C to 45°
C).
Don’t use the battery charger in direct sunlight or in high
humidity areas, such as the bathroom.
v
Never dispose of the battery by incineration.
v
Keep the metal contacts on top of the battery clean.
Section 2A: Important Safety Information
v
v
v
v
Don’t attempt to disassemble or short-circuit the
battery.
The battery may need recharging if it has not been used
for a long period of time.
It’s best to replace the battery when it no longer provides
acceptable performance. It can be recharged hundreds
of times before it needs replacing.
Don’t store the battery in high temperature areas for
long periods of time. It’s best to follow these storage
rules:
Less than one month:
-4° F to 140° F (-20° C to 60° C)
More than one month:
-4° F to 113° F (-20° C to 45° C)
Disposal of Lithium Ion (Li-Ion) Batteries
Do not handle a damaged or leaking Li-Ion battery as you
can be burned.
For safe disposal options of your Li-Ion batteries, contact
your nearest authorized service center.
Special Note: Be sure to dispose of your battery properly.
In some areas, the disposal of batteries in household or
business trash may be prohibited.
Understanding How Your Phone Operates
Your phone is basically a radio transmitter and receiver.
When it’s turned on, it receives and transmits
radiofrequency (RF) signals. When you use your phone, the
system handling your call controls the power level. This
power can range from 0.006 watts to 0.2 watts in digital
mode.
Knowing Radiofrequency Safety
The design of your phone complies with updated NCRP
standards described below.
standard and the guidelines published by the National
Council of Radiation Protection and Measurements (NCRP).
Body-Worn Operation
To maintain compliance with FCC RF exposure guidelines, if
you wear a handset on your body, use the supplied or
approved carrying case, holster or other body-worn
accessory. If you do not use a body-worn accessory, ensure
the antenna is at least 7/16 inch (2.0 centimeters) from your
body when transmitting. Use of non- approved accessories
may violate FCC RF exposure guidelines.
For more information about RF exposure, visit the FCC Web
site at www.fcc.gov.
In 1991-92, the Institute of Electrical and Electronics
Engineers (IEEE) and the American National Standards
Institute (ANSI) joined in updating ANSI’s 1982 standard for
safety levels with respect to human exposure to RF signals.
More than 120 scientists, engineers and physicians from
universities, government health agencies and industries
developed this updated standard after reviewing the
available body of research. In 1993, the Federal
Communications Commission (FCC) adopted this updated
standard in a regulation. In August 1996, the FCC adopted
hybrid standard consisting of the existing ANSI/IEEE
Section 2A: Important Safety Information
55
Important Safety Information
Radiofrequency (RF) Energy
Specific Absorption Rate (SAR) for Wireless
Phones
The SAR is a value that corresponds to the relative amount
of RF energy absorbed in the head of a user of a wireless
handset.
The SAR value of a phone is the result of an extensive
testing, measuring and calculation process. It does not
represent how much RF the phone emits. All phone models
are tested at their highest value in strict laboratory settings.
But when in operation, the SAR of a phone can be
substantially less than the level reported to the FCC. This is
because of a variety of factors including its proximity to a
base station antenna, phone design and other factors. What
is important to remember is that each phone meets strict
federal guidelines. Variations in SARs do not represent a
variation in safety.
All phones must meet the federal standard, which
incorporates a substantial margin of safety. As stated above,
variations in SAR values between different model phones do
not mean variations in safety. SAR values at or below the
federal standard of 1.6 W/kg are considered safe for use by
the public.
56
Section 2A: Important Safety Information
The highest reported SAR values of the LG Marquee™ are:
Cellular CDMA mode (Part 22):
Head: 0.57 W/kg; Body-worn: 0.77 W/kg
PCS mode (Part 24):
Head: 0.69 W/kg; Body-worn: 0.71 W/kg
FCC Radiofrequency Emission
This phone meets the FCC Radiofrequency Emission
Guidelines.
FCC ID number: BEJLS855.
More information on the phone’s SAR can be found from the
following FCC Web site:
http://www.fcc.gov/oet/ea/fccid.
Owner’s Record
The model number, regulatory number and serial number
are located on a nameplate inside the battery
compartment. Record the serial number in the space
provided below. This will be helpful if you need to contact us
about your phone in the future.
Model: LG Marquee by LG®
Manufacturer’s Warranty
Manufacturer’s Warranty
In This Section
l Manufacturer’s Warranty
Your phone has been designed to provide you
with reliable, worry-free service. If for any
reason you have a problem with your
equipment, please refer to the manufacturer’s
warranty in this section.
LG offers you a limited warranty that the enclosed
subscriber unit, and its enclosed accessories, will be free
from defects in material and workmanship, according to the
following terms and conditions:
(1) The limited warranty for the unit and enclosed
accessories shall be a period of one (1) year from the date
of original purchase. The remaining warranty period for
the unit being repaired or replaced shall be determined
by presentation of the original sales receipt for the
purchase of the unit.
(2) The limited warranty extends only to the original
purchaser of the product and is not assignable or
transferable to any subsequent purchaser / end user.
(3) The limited warranty is good only to the original
purchaser of the product during the warranty period as
long as it is in the U.S., including Alaska, Hawaii, U.S.
Territories, and all Canadian Provinces.
(4) The external housing and cosmetic parts shall be free of
major defects at the time of shipment and, therefore,
shall not be covered under these limited warranty terms.
Section 4B: Manufacturer’s Warranty
57
Warranty
1. WHAT THIS WARRANTY COVERS:
(5) Upon request from LG, the consumer must provide
information satisfactory to LG to prove the date of
purchase or exchange.
(6) The customer shall bear the cost of shipping the product
to the Customer Service Department of LG. LG shall bear
the cost of shipping the product back to the consumer
after the completion of service under this limited
warranty.
2. WHAT THIS WARRANTY DOES NOT COVER:
(1) Defects or damage resulting from use of the product in
ways other than its intended manner.
(2) Defect or damage from abnormal use, abnormal
conditions, improper storage, exposure to moisture or
dampness, unauthorized modifications, unauthorized
connections, unauthorized repair, misuse, neglect,
abuse, accident, alteration, improper installation, or
other acts which are not the fault of LG, including
damage caused by shipping, blown fuses, or spills of
food or liquid.
(3) Breakage or damage to antennas unless caused directly
by defects in material or workmanship.
(4) Alleged defects or malfunctions of the product if the
Customer Service Department at LG was not notified by
58
Section 2B: Manufacturer’s Warranty
the consumer during the applicable limited warranty
period.
(5) Products which have had the serial number removed or
made illegible.
(6) This limited warranty is in lieu of all other warranties,
expressed or implied, either in fact or by operations of
law, statutory or otherwise, including, but not limited to,
any implied warranty of marketability, merchantability,
or fitness for a particular use.
(7) Damage resulting from use of non-LG approved
accessories.
(8) All plastic surfaces and all other externally exposed parts
that are scratched or damaged due to normal customer
use.
(9) Products operated outside published maximum ratings.
(10) Products used or obtained in a rental program.
(11) Consumables (such as fuses).
3. WHAT LG WILL DO:
LG will, at its sole option, either repair, replace or refund the
purchase price of any unit that does not conform to this
limited warranty. LG may choose at its option to use
functionally equivalent re-conditioned, refurbished or new
5. HOW TO GET WARRANTY SERVICE:
To obtain warranty service, please call the following
telephone number from anywhere in the continental
United States:
Warranty
units or parts or any units. In addition, LG will not re-install
or back-up any data, applications or software that you have
added to your phone. It is therefore recommended that you
back-up any such data or information prior to sending the
unit to LG to avoid the permanent loss of such information.
LG Electronics Service
4. STATE LAW RIGHTS:
No other express warranty is applicable to this product. THE
DURATION OF ANY IMPLIED WARRANTIES, INCLUDING THE
IMPLIED WARRANTY OF MARKETABILITY OR
MERCHANTABILITY, IS LIMITED TO THE DURATION OF THE
EXPRESS WARRANTY HEREIN. LG SHALL NOT BE LIABLE FOR
THE LOSS OF THE USE OF THE PRODUCT, INCONVENIENCE,
LOSS OR ANY OTHER DAMAGES, DIRECT OR
CONSEQUENTIAL, ARISING OUT OF THE USE OF, OR
INABILITY TO USE, THIS PRODUCT OR FOR ANY BREACH OF
ANY EXPRESS OR IMPLIED WARRANTY, INCLUDING THE
IMPLIED WARRANTY OF MARKETABILITY OR
MERCHANTABILITY APPLICABLE TO THIS PRODUCT.
201 James Record Road
Huntsville, AL 35824
Tel. 1-800-793-8896 Email: http://us.lgservice.com
Please call or write for the location of the LGE authorized
service center nearest you and the procedures for obtaining
warranty claims.
Some states do not allow the exclusion of limitation of
incidental or consequential damages or limitations on how
long an implied warranty lasts; so these limitations or
exclusions may not apply to you. This warranty gives you
specific legal rights and you may also have other rights,
which vary from state to state.
Section 2B: Manufacturer’s Warranty
59
A
Adding a Contact to Your
Favorites 14
G
General Precautions 48
C
Caring for the Battery 54
Creating a Google Account 45
D
Device Function Keys 19
Displaying Your Phone
Number 38
F
Features of Your Phone 11
FrontView of Your Phone 3
60
Index
Table of Contents b
Touchscreen Navigation 25
Turning Your Phone Off 12
Turning Your Phone On and Off
12
I
B
Battery
Capacity 14
Installing 15
Removing 16
Battery and Charger 14
T
Important Safety
Information 48
Introduction i
M
Maintaining Safe Use of and
Access to Your Phone 51
Making Calls 13
Manufacturer’s Warranty 57
O
Owner’s Record 56
R
Radiofrequency (RF) Energy 55
U
Using Your Phone With a
Hearing Aid Device 53
V
Viewing the Display Screen 8
Y
Your Home Screen 27
Your Phone: The Basics 2
MEMO
MEMO
Copyright ©2011 LG Electronics, Inc. All rights reserved.
LG and the LG logo are registered trademarks of LG Group and its related entities.
All other trademarks are the property of their respective owners.