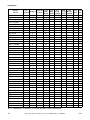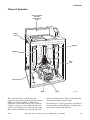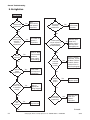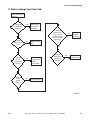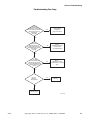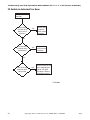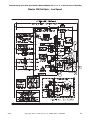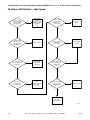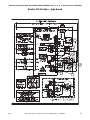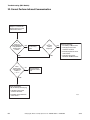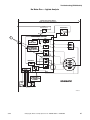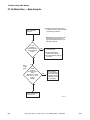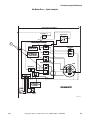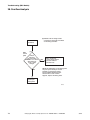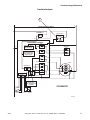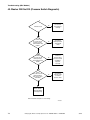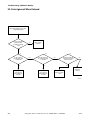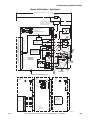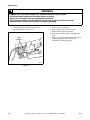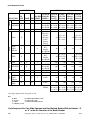
1
Troubleshooting
Commercial
Automatic
Washer
Metered and Nonmetered
Refer to Page 6 for Model Numbers
H002C
www.comlaundry.com
Part No. 39201R8
December 2009
Table of
Contents
Section 1 – Safety Information ...............................................................3
Locating an Authorized Servicer...........................................................4
Section 2 – Introduction ..........................................................................5
Customer Service...................................................................................5
Nameplate Location...............................................................................5
Model Identification ..............................................................................6
Theory of Operation ............................................................................15
Section 3 – General Troubleshooting...................................................17
1. Clicking Noise During Operation on NEWLY Installed Units ..17
2. No Hot Water ..............................................................................18
3. No Cold Water ............................................................................19
4. No Warm Water ..........................................................................20
5. Water Fill Does Not Stop At Proper Level .................................21
6. Timer Does Not Advance (Models with Timer Only)................22
7. Motor Does Not Run...................................................................23
8. No Agitation................................................................................24
9. Constant Agitation ......................................................................25
10. Washer Overheats, Cycles On Motor Thermal Protector, Switch
Actuator Kicks In and Out ..........................................................26
11. Slow Spin Or No Spin.................................................................27
12. Constant Spin ..............................................................................28
13. Washer Stops In Cycle; Quits After A Couple Loads; Is
Intermittent..................................................................................29
14. Washer Is Locked Up Or Binding...............................................30
15. Outer Tub Does Not Empty ........................................................31
16. Excessive Vibration ....................................................................32
17. Water Leaking From Outer Tub..................................................33
18. Troubleshooting Coin Drop ........................................................34
Coin Slide Operated and Non-Metered Models with the Number
“8” or “9” in the 4th Character of the Model Number ...............39
19. Error Mode..................................................................................39
20. Coin Slide Can Not Fully Insert..................................................40
21. Coin Slide Fully Inserts, Switch Does Not Activate...................41
22. Switch Is Activated Too Soon ....................................................42
23. Coin Slide Does Not Return Freely ............................................43
24. No Cycle Start When the Coin Slide is Activated ......................44
25. Washer Will Not Fill (Pressure Switch Diagnostic) ...................46
26. Washer Will Not Fill (Mixing Valve Diagnostic) ......................48
27. Washer Over Fills (Pressure Switch Open) ................................50
28. No Agitation – Low and High Speed..........................................52
29. Washer Will Not Spin – Low Speed...........................................54
30. Washer Will Not Spin – High Speed ..........................................56
EDC Models.....................................................................................59
31. EDC Error Code Listing .............................................................59
© Copyright 2009, Alliance Laundry Systems LLC
All rights reserved. No part of the contents of this book may be reproduced or transmitted in any form or by any means without
the expressed written consent of the publisher.
39201
© Copyright, Alliance Laundry Systems LLC – DO NOT COPY or TRANSMIT
1
32.
33.
34.
35.
36.
37.
38.
39.
Cannot Perform Infrared Communication ..................................60
Coins Ignored When Entered......................................................61
Electronic Control Has No Visible Display................................62
No Fill Analysis ..........................................................................64
No Motor Run — Agitate Analysis ............................................66
No Motor Run — Spin Analysis.................................................68
Overflow Analysis ......................................................................70
Audit Switch Function Analysis .................................................72
MDC Models....................................................................................73
40. MDC Error Code Listing ............................................................73
41. No Visible Display on Control....................................................74
42. Coins Ignored When Entered......................................................76
43. Washer Will Not Fill (Pressure Switch Diagnostic) ...................78
44. Washer Will Not Fill (Mixing Valve Diagnostic) ......................80
45. Washer Over Fills (Pressure Switch Open) ................................82
46. No Agitation – Low and High Speed..........................................84
47. Washer Will Not Spin – High Speed ..........................................86
48. Washer Will Not Spin – Low Speed...........................................88
NetMaster Models ...........................................................................91
49. NetMaster Error Code Listing.....................................................91
50. Microwand Does Not Communicate With Control ....................95
51. No Visible Display on Control....................................................96
52. Coins Ignored When Entered......................................................98
53. Washer Will Not Fill (Pressure Switch Diagnostic) .................100
54. Washer Will Not Fill (Mixing Valve Diagnostic) ....................102
55. Washer Over Fills .....................................................................104
56. No Agitation – Low and High Speed........................................106
57. Washer Will Not Spin – High Speed ........................................108
58. Washer Will Not Spin – Low Speed.........................................110
Section 4 – Adjustments ......................................................................113
59. Leveling Legs............................................................................113
60. Pressure Switch .........................................................................114
61. Belt (Agitate and Spin) .............................................................114
62. Cleaning Non-Electronic Coin Drop.........................................114
63. Cleaning Electronic Coin Drop.................................................116
Section 5 – Motor Test Procedure......................................................119
Section 6 – Cycle Sequence Charts.....................................................121
Timer No. 28716P and 28719 Cycle Sequence ..............................121
Timer No. 31111P, 31504P and 35368P Cycle Sequence ..............122
Timer No. 36986 Cycle Sequence ..................................................123
Timer No. 34601P, 34603P, 34604 and 36987 Cycle Sequence ....124
Timer No. 34602P Cycle Sequence ................................................125
Timer No. 200914 Cycle Sequence ................................................126
Timer No. 201066 Cycle Sequence ................................................127
Cycle Sequence For Coin Slide Operated/Non-Metered Models ...128
2
© Copyright, Alliance Laundry Systems LLC – DO NOT COPY or TRANSMIT
39201
Section 1
Safety Information
Throughout this manual and on machine decals, you will find precautionary statements (“CAUTION,”
“WARNING,” and “DANGER”) followed by specific instructions. These precautions are intended for the personal
safety of the operator, user, servicer and those maintaining the machine.
a DANGER
Danger indicates an imminently hazardous situation that, if not avoided, will cause severe personal injury or death.
a WARNING
Warning indicates a hazardous situation that, if not avoided, could cause severe personal injury or death.
a CAUTION
Caution indicates a hazardous situation that, if not avoided, may cause minor or moderate personal injury or property
damage.
Additional precautionary statements (“IMPORTANT” and “NOTE”) are followed by specific instructions.
IMPORTANT
The word “IMPORTANT” is used to inform the reader of specific procedures where minor machine damage will
occur if the procedure is not followed.
NOTE
The word “NOTE” is used to communicate installation, operation, maintenance or servicing information that is
important but not hazard related.
In the interest of safety, some general precautions relating to the operation of this machine follow.
WARNING
• Failure to install, maintain and/or operate this product according to the manufacturer’s
instructions may result in conditions which can produce serious injury, death and/or property
damage.
• Do not repair or replace any part of the product or attempt any servicing unless specifically
recommended or published in this Service Manual and unless you understand and have the
skills to carry out the servicing.
• Whenever ground wires are removed during servicing, these ground wires must be
reconnected to ensure that the product is properly grounded and to reduce the risk of fire,
electric shock, serious injury or death.
W006R2
39201
© Copyright, Alliance Laundry Systems LLC – DO NOT COPY or TRANSMIT
3
Safety Information
WARNING
To reduce the risk of electric shock, fire, explosion, serious injury or death:
• Disconnect electric power to the washer before servicing.
• Never start the washer with any guards/panels removed.
• Whenever ground wires are removed during servicing, these ground wires must be
reconnected to ensure that the washer is properly grounded.
W003
WARNING
Repairs that are made to your products by unqualified persons can result in hazards due to
improper assembly or adjustments subjecting you or the inexperienced person making such
repairs to the risk of serious injury, electrical shock or death.
W007
WARNING
If you or an unqualified person perform service on your product, you must assume the
responsibility for any personal injury or property damage which may result. The manufacturer
will not be responsible for any injury or property damage arising from improper service and/or
service procedures.
W008
NOTE: The WARNINGS and IMPORTANT INSTRUCTIONS appearing in this manual are not meant to
cover all possible conditions and situations that may occur. Common sense, caution and care must be
exercised when installing, maintaining or operating the washer.
Always contact your dealer, distributor, service agent or the manufacturer about any problems or conditions you do
not understand.
Locating an Authorized Servicer
Alliance Laundry Systems is not responsible for personal injury or property damage resulting from improper
service. Review all service information before beginning repairs.
Warranty service must be performed by an authorized technician, using authorized factory parts. If service is
required after the warranty expires, Alliance Laundry Systems also recommends contacting an authorized technician
and using authorized factory parts.
4
© Copyright, Alliance Laundry Systems LLC – DO NOT COPY or TRANSMIT
39201
Section 2
Introduction
Customer Service
If literature or replacement parts are required, contact
the source from whom the machine was purchased or
contact Alliance Laundry Systems at (920) 748-3950
for the name and address of the nearest authorized
parts distributor.
For technical assistance, call either of the numbers
listed below:
(920) 748-3121 Ripon, Wisconsin
+32 56 41 20 54 Wevelgem, Belgium
Nameplate Location
When calling or writing about your product, be sure to
mention model and serial numbers. Model and serial
numbers are located on nameplate(s) as shown.
Nameplate
W363PE3A
39201
© Copyright, Alliance Laundry Systems LLC – DO NOT COPY or TRANSMIT
5
Introduction
Model Identification
Information in this manual is applicable to these washers.
Washer
Model
BWT820*N1102
BWT920*N1102
BWTT20*N
HWLX21*N1102
HWT011*B3073
HWT020*A
HWT020*C
HWT020*M
HWT020*N
HWT021*A1102
HWT021*C1102
HWT021*M1102
HWT021*N1102
HWT110*A
HWT110*C
HWT110*M
HWT110*N
HWT111*A1102
HWT111*A3000
HWT111*B3069
HWT111*C1102
HWT111*C3000
HWT111*M1102
HWT111*M3000
HWT111*N1102
HWT120*A
HWT120*C
HWT120*M
HWT120*N
HWT121*A1102
HWT121*C1102
HWT121*C1123
HWT121*M1102
HWT121*M1123
HWT121*N1102
HWT1A0*N
HWT210*A1102
HWT210*C1102
HWT210*M1102
HWT210*N1102
Coin Coin
Coin
Card
Card
Non- Metered Electronic Slide Drop
Drop Reader Reader Motor Washmetered
Control
Speed tub
Ready Ready Installed Ready Installed
X
2
P
X
X
2
P
X
X
X
2
P
X
X
X
2
S
X
1
S
X
2
P
X
2
P
X
2
P
X
2
P
X
2
S
X
2
S
X
2
S
X
2
S
X
X
1
P
X
X
1
P
X
X
1
P
X
X
1
P
X
X
1
S
X
X
1
S
X
X
1
S
X
X
1
S
X
X
1
S
X
X
1
S
X
X
1
S
X
X
1
S
X
X
2
P
X
X
2
P
X
X
2
P
X
X
2
P
X
X
2
S
X
X
2
S
X
X
2
S
X
X
2
S
X
X
2
S
X
X
2
S
X
X
2
P
X
X
1
P
X
X
1
P
X
X
1
P
X
X
1
P
* Add Letter To Designate Color. L – Almond W – White Q – Bisque
Key: 1 = 1 Speed Motor, 2 = 2 Speed Motor, P = Porcelain Washtub, S = Stainless Steel Washtub
6
© Copyright, Alliance Laundry Systems LLC – DO NOT COPY or TRANSMIT
39201
Introduction
Washer
Model
HWT211*A3000
HWT211*B3020
HWT211*C1102
HWT211*C3000
HWT211*M3000
HWT211*M3020
HWT211*N3020
HWT220*A1102
HWT220*C1102
HWT220*M1102
HWT220*M3000
HWT220*M3020
HWT221*A1102
HWT221*C1102
HWT221*M1102
HWT221*N1102
HWT221*N1127
HWT521*A1102
HWT521*C1102
HWT621*A1102
HWT621*C1102
HWT721*A1102
HWT721*C1102
HWT820*N
HWT821*N1102
HWT910*N
HWT911*N1102
HWT911*N3020
HWT920*N
HWT921*N1102
HWT921*N1127
HWTB21*M1102
HWTB21*N1102
HWTF21*M1102
HWTF21*N1102
HWTR21*N1102
HWTT20*N
HWTT21*N1102
HWTV20*N
HWTX21*M3020
HWTX21*M3022
HWTX21*N1102
Coin Coin
Coin
Card
Card
NonElectronic
Motor WashMetered
Slide
Drop
Drop
Reader
Reader
metered
Control
Speed tub
Ready Ready Installed Ready Installed
X
X
1
S
X
X
1
S
X
X
1
S
X
X
1
S
X
X
1
S
X
X
1
S
X
X
1
S
X
X
2
P
X
X
2
P
X
X
2
P
X
X
2
P
X
X
2
P
X
X
2
S
X
X
2
S
X
X
2
S
X
X
2
S
X
X
2
S
X
X
X
2
S
X
X
X
2
S
X
X
X
2
S
X
X
X
2
S
X
X
X
2
S
X
X
X
2
S
X
2
P
X
2
S
X
X
1
P
X
X
1
S
X
X
1
S
X
X
2
P
X
X
2
S
X
X
2
S
X
X
X
2
S
X
X
X
2
S
X
X
X
2
S
X
X
X
2
S
X
X
X
2
S
X
X
X
2
P
X
X
X
2
S
X
X
2
P
X
X
X
2
S
X
X
X
2
S
X
X
X
2
S
* Add Letter To Designate Color. L – Almond W – White Q – Bisque
Key: 1 = 1 Speed Motor, 2 = 2 Speed Motor, P = Porcelain Washtub, S = Stainless Steel Washtub
39201
© Copyright, Alliance Laundry Systems LLC – DO NOT COPY or TRANSMIT
7
Introduction
Coin Coin
Coin
Card
Card
NonElectronic
Motor WashMetered
Slide
Drop
Drop
Reader
Reader
metered
Control
Speed tub
Ready Ready Installed Ready Installed
HWTX21*N3020
X
X
X
2
S
HWTX21*N3022
X
X
X
2
S
HWTY20*M
X
X
X
2
P
HWTY20*N
X
X
X
2
P
HWTY21*M1102
X
X
X
2
S
HWTY21*N1102
X
X
X
2
S
HWTZ20*M
X
X
X
2
P
HWTZ20*N
X
X
X
2
P
HWTZ21*M1102
X
X
X
2
S
HWTZ21*N1102
X
X
X
2
S
JWT110*A
X
X
1
P
JWT110*M
X
X
1
P
JWT110*N
X
X
1
P
JWT810*N3020
X
1
P
JWT810*N3050
X
1
P
JWT810*N5400
X
1
P
JWT820*N
X
2
P
JWT820*N3050
X
2
P
JWT910*N
X
X
1
P
JWT910*N3020
X
X
1
P
JWT910*N3050
X
X
1
P
JWT910*N3069
X
X
1
P
JWT920*N
X
X
2
P
JWT920*N3050
X
X
2
P
NWNBX2SP301NW22
X
X
X
2
S
NWT721*A1126
X
X
X
2
S
NWT811*N5422
X
1
S
NWT821*N3022
X
2
S
NWT911*N5422
X
X
1
S
NWT921*N3022
X
X
2
S
NWTF21*M1126
X
X
X
2
S
NWTF21*N1126
X
X
X
2
S
SWL520*N
X
X
X
2
P
SWL521*N
X
X
X
2
S
SWLB20*N
X
X
X
2
P
SWLB21*N
X
X
X
2
S
SWLF20*N
X
X
X
2
P
SWLF21*N
X
X
X
2
S
SWLT20*N
X
X
X
2
P
SWLT21*N
X
X
X
2
S
SWLY20*N
X
X
X
2
P
SWLY21*N
X
X
X
2
S
Washer
Model
* Add Letter To Designate Color. L – Almond W – White Q – Bisque
Key: 1 = 1 Speed Motor, 2 = 2 Speed Motor, P = Porcelain Washtub, S = Stainless Steel Washtub
8
© Copyright, Alliance Laundry Systems LLC – DO NOT COPY or TRANSMIT
39201
Introduction
Coin Coin
Coin
Card
Card
NonElectronic
Motor WashMetered
Slide
Drop
Drop
Reader
Reader
metered
Control
Speed tub
Ready Ready Installed Ready Installed
SWNBC2PP111TW02
X
X
X
2
P
SWNSX2PP111TW02
X
X
2
P
SWT011*A3000
X
1
S
SWT011*A3022
X
1
S
SWT011*A3028
X
1
S
SWT011*A3050
X
1
S
SWT011*A3062
X
1
S
SWT011*M3000
X
1
S
SWT011*M3022
X
1
S
SWT011*M3050
X
1
S
SWT011*N3000
X
1
S
SWT011*N3022
X
1
S
SWT011*N3028
X
1
S
SWT011*N3050
X
1
S
SWT011*N3062
X
1
S
SWT020*A
X
2
P
SWT020*M
X
2
P
SWT020*N
X
2
P
SWT021*A
X
2
S
SWT021*M
X
2
S
SWT021*N
X
2
S
SWT110*A
X
X
1
P
SWT110*M
X
X
1
P
SWT110*N
X
X
1
P
SWT111*A
X
X
1
S
SWT111*A1200
X
X
1
S
SWT111*A1300
X
X
1
S
SWT111*A3000
X
X
1
S
SWT111*A3022
X
X
1
S
SWT111*A3028
X
X
1
S
SWT111*A3050
X
X
1
S
SWT111*A5412
X
X
1
S
SWT111*B3069
X
X
1
S
SWT111*M
X
X
1
S
SWT111*M1200
X
X
1
S
SWT111*M1300
X
X
1
S
SWT111*M3000
X
X
1
S
SWT111*M3022
X
X
1
S
SWT111*M3050
X
X
1
S
SWT111*M3069
X
X
1
S
SWT111*M5412
X
X
1
S
SWT111*N
X
X
1
S
Washer
Model
* Add Letter To Designate Color. L – Almond W – White Q – Bisque
Key: 1 = 1 Speed Motor, 2 = 2 Speed Motor, P = Porcelain Washtub, S = Stainless Steel Washtub
39201
© Copyright, Alliance Laundry Systems LLC – DO NOT COPY or TRANSMIT
9
Introduction
Washer
Model
SWT111*N3000
SWT111*N3022
SWT111*N3028
SWT111*N3050
SWT111*N3069
SWT111*N5412
SWT111*N5417
SWT120*A
SWT120*M
SWT120*N
SWT121*A
SWT121*A3000
SWT121*M
SWT121*M3000
SWT121*N
SWT210*A
SWT210*A1124
SWT210*M
SWT210*M1124
SWT210*N
SWT210*N1124
SWT211*A1200
SWT211*A1300
SWT211*A3000
SWT211*A3020
SWT211*A3022
SWT211*A3062
SWT211*B3020
SWT211*M3000
SWT211*M3020
SWT211*M3022
SWT211*N3000
SWT211*N3020
SWT211*N3022
SWT211*N3050
SWT211*N3062
SWT220*A
SWT220*M
SWT220*M1124
SWT220*N
SWT220*N1124
SWT221*A
Coin Coin
Coin
Card
Card
NonElectronic
Motor WashMetered
Slide
Drop
Drop
Reader
Reader
metered
Control
Speed tub
Ready Ready Installed Ready Installed
X
X
1
S
X
X
1
S
X
X
1
S
X
X
1
S
X
X
1
S
X
X
1
S
X
X
1
S
X
X
1
P
X
X
1
P
X
X
1
P
X
X
2
S
X
X
2
S
X
X
2
S
X
X
2
S
X
X
2
S
X
X
1
P
X
X
1
P
X
X
1
P
X
X
1
P
X
X
1
P
X
X
1
P
X
X
1
S
X
X
1
S
X
X
1
S
X
X
1
S
X
X
1
S
X
X
1
S
X
X
1
S
X
X
1
S
X
X
1
S
X
X
1
S
X
X
1
S
X
X
1
S
X
X
1
S
X
X
1
S
X
X
1
S
X
X
2
P
X
X
2
P
X
X
2
P
X
X
2
P
X
X
2
P
X
X
2
S
* Add Letter To Designate Color. L – Almond W – White Q – Bisque
Key: 1 = 1 Speed Motor, 2 = 2 Speed Motor, P = Porcelain Washtub, S = Stainless Steel Washtub
10
© Copyright, Alliance Laundry Systems LLC – DO NOT COPY or TRANSMIT
39201
Introduction
Washer
Model
SWT221*M
SWT221*N
SWT2A0*N
SWT2A0*N1124
SWT2B0*N1124
SWT320*A
SWT320*M
SWT321*A
SWT321*M
SWT420*A
SWT420*D
SWT420*M
SWT421*A
SWT421*A3000
SWT421*A3022
SWT421*A3028
SWT421*A3050
SWT421*D
SWT421*M
SWT421*M3000
SWT421*M3022
SWT421*M3050
SWT520*A
SWT520*M
SWT520*N
SWT521*A
SWT521*A1119
SWT521*M
SWT521*N
SWT620*A
SWT620*C
SWT620*D
SWT620*M
SWT621*C
SWT621*D
SWT621*D1121
SWT621*M
SWT621*M1121
SWT720*A
SWT720*M
SWT721*A
SWT721*M
Coin Coin
Coin
Card
Card
NonElectronic
Motor WashMetered
Slide
Drop
Drop
Reader
Reader
metered
Control
Speed tub
Ready Ready Installed Ready Installed
X
X
2
S
X
X
2
S
X
X
2
P
X
X
2
P
X
X
1
P
X
X
2
P
X
X
2
P
X
X
2
S
X
X
2
S
X
X
X
2
P
X
X
X
2
P
X
X
X
2
P
X
X
X
2
S
X
X
X
2
S
X
X
X
2
S
X
X
X
2
S
X
X
X
2
S
X
X
X
2
S
X
X
X
2
S
X
X
X
2
S
X
X
X
2
S
X
X
X
2
S
X
X
X
2
P
X
X
X
2
P
X
X
X
2
P
X
X
X
2
S
X
X
X
2
S
X
X
X
2
S
X
X
X
2
S
X
X
X
2
P
X
X
X
2
P
X
X
X
2
P
X
X
X
2
P
X
X
X
2
S
X
X
X
2
S
X
X
X
2
S
X
X
X
2
S
X
X
X
2
S
X
X
X
2
P
X
X
X
2
P
X
X
X
2
S
X
X
X
2
S
* Add Letter To Designate Color. L – Almond W – White Q – Bisque
Key: 1 = 1 Speed Motor, 2 = 2 Speed Motor, P = Porcelain Washtub, S = Stainless Steel Washtub
39201
© Copyright, Alliance Laundry Systems LLC – DO NOT COPY or TRANSMIT
11
Introduction
Washer
Model
SWT811*N3000
SWT811*N3022
SWT811*N3050
SWT811*N3062
SWT820*N
SWT821*N
SWT910*N
SWT910*N1124
SWT910*N3050
SWT911*N
SWT911*N3000
SWT911*N3020
SWT911*N3022
SWT911*N3028
SWT911*N3050
SWT911*N3062
SWT911*N3069
SWT911*N5412
SWT920*N
SWT920*N1124
SWT921*N
SWTA21*M
SWTA21*M3022
SWTA21*M3050
SWTA21*N
SWTA21*N3050
SWTB20*M
SWTB20*N
SWTB21*M
SWTB21*N
SWTBA0*N
SWTBA1*N
SWTC20*M
SWTC20*N
SWTC21*M
SWTC21*N
SWTF20*M
SWTF20*N
SWTF21*M
SWTF21*M3050
SWTF21*N
SWTF21*N3050
Coin Coin
Coin
Card
Card
NonElectronic
Motor WashMetered
Slide
Drop
Drop
Reader
Reader
metered
Control
Speed tub
Ready Ready Installed Ready Installed
X
1
S
X
1
S
X
1
S
X
1
S
X
2
P
X
2
S
X
X
1
P
X
X
1
P
X
X
1
P
X
X
1
S
X
X
1
S
X
X
1
S
X
X
1
S
X
X
1
S
X
X
1
S
X
X
1
S
X
X
1
S
X
X
1
S
X
X
2
P
X
X
2
P
X
X
2
S
X
X
X
2
S
X
X
X
2
S
X
X
X
2
S
X
X
X
2
S
X
X
X
2
S
X
X
X
2
P
X
X
X
2
P
X
X
X
2
S
X
X
X
2
S
X
X
X
2
P
X
X
X
2
S
X
X
X
2
P
X
X
X
2
P
X
X
X
2
S
X
X
X
2
S
X
X
X
2
P
X
X
X
2
P
X
X
X
2
S
X
X
X
2
S
X
X
X
2
S
X
X
X
2
S
* Add Letter To Designate Color. L – Almond W – White Q – Bisque
Key: 1 = 1 Speed Motor, 2 = 2 Speed Motor, P = Porcelain Washtub, S = Stainless Steel Washtub
12
© Copyright, Alliance Laundry Systems LLC – DO NOT COPY or TRANSMIT
39201
Introduction
Washer
Model
SWTH20*M
SWTH20*N
SWTH21*M
SWTH21*N
SWTJ21*M
SWTJ21*N
SWTT20*M
SWTT20*N
SWTT20*N99M6
SWTT21*M
SWTT21*N
SWTV20*N
SWTW20*N
SWTW21*N
SWTX21*M
SWTX21*M3000
SWTX21*M3020
SWTX21*M3022
SWTX21*M3050
SWTX21*M3069
SWTX21*N
SWTX21*N1127
SWTX21*N3000
SWTX21*N3020
SWTX21*N3022
SWTX21*N3050
SWTX21*N3069
SWTY20*M
SWTY20*N
SWTY21*M
SWTY21*N
SWTZ20*M
SWTZ20*N
SWTZ21*M
SWTZ21*N
UWT011*A3022
UWT011*A3025
UWT011*M3022
UWT021*A
UWT021*M
UWT021*N
Coin Coin
Coin
Card
Card
NonElectronic
Motor WashMetered
Slide
Drop
Drop
Reader
Reader
metered
Control
Speed tub
Ready Ready Installed Ready Installed
X
X
X
2
P
X
X
X
2
P
X
X
X
2
S
X
X
X
2
S
X
X
X
2
S
X
X
X
2
S
X
X
X
2
P
X
X
X
2
P
X
X
X
2
P
X
X
X
2
S
X
X
X
2
S
X
X
2
P
X
X
2
P
X
X
2
S
X
X
X
2
S
X
X
X
2
S
X
X
X
2
S
X
X
X
2
S
X
X
X
2
S
X
X
X
2
S
X
X
X
2
S
X
X
X
2
S
X
X
X
2
S
X
X
X
2
S
X
X
X
2
S
X
X
X
2
S
X
X
X
2
S
X
X
X
2
P
X
X
X
2
P
X
X
X
2
S
X
X
X
2
S
X
X
X
2
P
X
X
X
2
P
X
X
X
2
S
X
X
X
2
S
X
1
S
X
1
S
X
1
S
X
2
S
X
2
S
X
2
S
* Add Letter To Designate Color. L – Almond W – White Q – Bisque
Key: 1 = 1 Speed Motor, 2 = 2 Speed Motor, P = Porcelain Washtub, S = Stainless Steel Washtub
39201
© Copyright, Alliance Laundry Systems LLC – DO NOT COPY or TRANSMIT
13
Introduction
Washer
Model
UWT821*N
UWT821*N1102
Coin Coin
Coin
Card
Card
NonElectronic
Motor WashMetered
Slide
Drop
Drop
Reader
Reader
metered
Control
Speed tub
Ready Ready Installed Ready Installed
X
2
S
X
2
S
* Add Letter To Designate Color. L – Almond W – White Q – Bisque
Key: 1 = 1 Speed Motor, 2 = 2 Speed Motor, P = Porcelain Washtub, S = Stainless Steel Washtub
14
© Copyright, Alliance Laundry Systems LLC – DO NOT COPY or TRANSMIT
39201
Introduction
Theory of Operation
Pressure Switch
(Located
inside control
hood)
Mixing
Valve
Agitator
Washtub
Outer
Tub
Transmission
Motor
The cycle begins with a wash fill. The water
temperature is determined by the temperature selected.
While water fills the washtub, a column of air is
trapped in a pressure bulb and hose. The air pressure
continues to increase as the washtub fills with water
until it is great enough to activate the pressure switch.
The pressure switch then causes the wash fill to stop
39201
Pump
W488SE3B
and wash agitation to begin. However, the lid must be
closed for the washer to agitate or spin.
The washer uses a reversing type motor, a special drive
belt and an idler assembly. The idler assembly applies
tension to the outside of the drive belt.
© Copyright, Alliance Laundry Systems LLC – DO NOT COPY or TRANSMIT
15
During agitation, the motor runs in the
counterclockwise direction. The spring tension on the
idler pulley applies the tension required to reduce the
slack on the drive belt and maintain maximum belt to
motor pulley contact. This eliminates belt slippage and
ensures an efficient wash action, even with extra large
loads.
The belt drives the transmission drive pulley in the
counterclockwise direction. The pulley drives the helix
which is splined to the input shaft of the transmission.
This causes the input shaft to turn inside of a roller
clutch which is pressed into the transmission cover.
This roller clutch acts as a bearing in the
counterclockwise direction allowing the transmission
gears to operate. The transmission’s rack and pinion
gear design produces a 210 degree agitation stroke at
the output shaft of the transmission which drives the
agitator. The brake assembly remains locked during the
agitation mode since no pressure is applied to it by the
transmission drive pulley.
After the wash agitation is completed, the timer
advances into the first spin. During spin, the motor
reverses turning in the clockwise direction to spin the
water out of the washtub. The combination of water,
washtub and load weight cause the drive belt tension on
the idler side of the belt to overtake the idler spring
pressure allowing the belt to become slack on the
opposite side. This reduces the belt to pulley contact
and allows slipping between the belt and pulley.
16
As water is removed by the pump and the momentum
of the washtub increases, the idler spring tension
gradually overcomes the belt tension removing the belt
slack. This eventually increases the belt to pulley
contact until maximum spin speed is achieved.
The drive pulley turns clockwise riding up the ramps of
the helix, exerting pressure on the brake and forcing it
to release from brake pads. The helix drives the input
shaft of the transmission, and when the input shaft turns
in the clockwise direction the roller clutch locks onto
the shaft causing the entire transmission assembly to
turn. None of the gears in the transmission are
operating at this time. The hub of the washtub is splined
to the transmission tube and rotates with the
transmission assembly. The centrifugal force created
by the spinning washtub causes water to be extracted
from the clothes.
Water is introduced during the first spin to “SPRAY”
the garments and remove suds from them. The initial
spin is followed by rinse agitation to rinse away any
detergent residue. The washer fills and then agitates
like the wash portion of the cycle. Following rinse
agitation, a final spin extracts the rinse water from the
clothes preparing them for the dryer.
© Copyright, Alliance Laundry Systems LLC – DO NOT COPY or TRANSMIT
39201
Section 3
General Troubleshooting
WARNING
To reduce the risk of electric shock, fire, explosion, serious injury or death:
• Disconnect electric power to the washer before servicing.
• Never start the washer with any guards/panels removed.
• Whenever ground wires are removed during servicing, these ground wires must be
reconnected to ensure that the washer is properly grounded.
W003
IMPORTANT: Refer to appropriate model wiring diagram for aid in testing washer components.
1. Clicking Noise During Operation on NEWLY Installed Units
If a clicking noise is heard when first starting up a new
topload washer, the noise is related to the belt taking a
temporary “set” around the idler pulley. The set causes
a slight bump in the belt which in turn causes the idler
lever to tap the motor bracket making the clicking
noise. THE BELT DOES NOT NEED TO BE
REPLACED.
39201
To correct this condition please perform the following
break-in procedure:
1.
After installing the unit start a fill cycle to
make sure the seals have been lubricated.
2.
Stop the fill cycle and place the unit into a
spin cycle.
3.
Run the cycle for several minutes until the
belt has warmed up. This will remove the
“set.”
4.
Normal use will keep the belt from
resetting.
5.
For extended periods of non-use (three to
four weeks), this procedure might need to
be repeated.
© Copyright, Alliance Laundry Systems LLC – DO NOT COPY or TRANSMIT
17
General Troubleshooting
2. No Hot Water
There is no hot water.
Is the water
supply faucet
closed?
Yes
Open faucet.
Is
timer/control
inoperative?
Yes
Test
timer/control
and replace if
inoperative.
No
No
Yes
Is the water
supply cold?
Check water heater.
Test switch (if
Yes present) and
replace if
inoperative.
Is temperature
switch (if
present)
inoperative?
No
No
Is the hot water
fill hose kinked?
Yes
Straighten or
replace hose.
No
Is pressure
switch
inoperative?
Yes
Test switch
and replace if
inoperative.
No
Is the mixing valve
screen or screen in
outer end of fill hose
nearest water supply
faucet clogged?
Disconnect hot
Yes fill hose and
clean or
replace screen.
Is pressure
hose
clogged?
Yes
Remove and
clean or
replace hose.
No
No
Is hot water
mixing valve
solenoid
inoperative?
Yes
Test solenoid
and replace if
necessary.
Is there
broken, loose
or incorrect
wiring?
No
18
Yes
Refer to
appropriate
wiring
diagram.
TLW326S
© Copyright, Alliance Laundry Systems LLC – DO NOT COPY or TRANSMIT
39201
General Troubleshooting
3. No Cold Water
There is no cold
water.
Is the water
supply faucet
closed?
Yes
Open faucet.
Is temperature
switch (if
present)
inoperative?
Yes
Test switch (if
present) and
replace if
inoperative.
No
No
Is the cold
water fill hose
kinked?
Yes
Straighten or
replace hose.
Is pressure
switch
inoperative?
Yes
Test switch
and replace if
inoperative.
No
No
Is the mixing valve
screen or screen in
outer end of fill hose
nearest water supply
faucet clogged?
Disconnect
Yes cold fill hose
and clean or
replace screen.
Is pressure
hose
clogged?
Yes
Remove and
clean or
replace hose.
No
No
Is cold water
mixing valve
solenoid
inoperative?
Yes
Test solenoid
and replace if
necessary.
Is there
broken, loose
or incorrect
wiring?
Yes
Refer to
appropriate
wiring
diagram.
No
TLW373S
Is
timer/control
inoperative?
Yes
Test
timer/control
and replace if
inoperative.
No
39201
© Copyright, Alliance Laundry Systems LLC – DO NOT COPY or TRANSMIT
19
General Troubleshooting
4. No Warm Water
There is no warm
water.
Is there no
hot water?
Yes
Refer to No Hot
Water paragraph.
No
Is there no
cold water?
Yes
Refer to No Cold
Water paragraph.
TLW362S
20
© Copyright, Alliance Laundry Systems LLC – DO NOT COPY or TRANSMIT
39201
General Troubleshooting
5. Water Fill Does Not Stop At Proper Level
Water fill does not
stop at proper level.
Is pressure
switch
inoperative?
Yes
Test switch and
replace if
inoperative.
No
Is there an
air leak in
pressure
hose?
Yes
Was there a siphoning
action started in washer
causing water to be
siphoned from washer
during cycle due to end
of drain hose being
lower than cabinet top of
washer?
Replace
hose.
Yes
Install 562P3
Siphon
Break Kit.
No
No
Does drain
hose fit tight
in standpipe
or drain?
Is mixing
valve
inoperative?
No
Yes
Test valve and
replace if
inoperative.
Yes Provide an air
gap around
drain hose and
drain receptacle.
No
Is there
water in
pressure
hose?
Yes
Blow air
through hose to
remove water.
No
Is there
broken,
loose,
shorted or
incorrect
wiring?
Yes
Refer to
appropriate
wiring diagram.
TLW329S
39201
© Copyright, Alliance Laundry Systems LLC – DO NOT COPY or TRANSMIT
21
General Troubleshooting
6. Timer Does Not Advance (Models with Timer Only)
Timer does not advance.
Is pause part
of normal
operation?
Yes
No
Yes
Is timer
inoperative?
Timer is designed to
pause during fill
periods and when
going from agitate to
spin. Allow completion
of those steps. Refer
to diagram for
information on time
required.
Test timer and
replace if
inoperative.
Has washer
drive motor
over loaded
and motor
thermal
overload
been tripped?
Timer is designed to
stop under these
conditions. Motor
thermal proctor reset
time may vary
Yes depending upon the
reason for the washer
overload, however, it
should reset within 15
minutes. Check to
ensure that washer
was not overloaded
with clothes.
No
No
Is lid
open?
Close lid. Lid
MUST be
closed any time
the washer is
set to fill,
agitate or spin.
Yes
No
Washer
will not fill?
Yes
Timer pauses
until pressure
switch is
satisfied.
No
Is timer
motor lead
wire off timer
terminal?
Is circuit
breaker to
washer
tripped,
disconnecting
power to
washer?
Yes
No
Yes
Refer to
appropriate
wiring diagram
and reattach
wire.
Washer
will not fill?
Yes
No
Is there
broken, loose
or incorrect
wiring?
Yes
Timer is designed to
pause when going
from spin into rinse
to allow the washtub
to stop spinning
before filling. Make
sure timer has
advanced into fill
portion of rinse
cycle.
Refer to
appropriate
wiring diagram.
TLW330S
No
22
Reset circuit
breaker.
© Copyright, Alliance Laundry Systems LLC – DO NOT COPY or TRANSMIT
39201
General Troubleshooting
7. Motor Does Not Run
Motor does not run.
Is electrical
power off, fuse
blown or power
cord not
plugged in?
Check laundry
room for blown or
loose fuse(s) or
Yes open circuit
breakers.
(Washer itself
does not have an
electrical fuse.)
No
Is lid open or
lid switch
inoperative?
Yes
Close lid or
test switch and
replace if
inoperative.
Is motor dead,
won't run?
Yes
No
Has motor
overload
protector
cycled?
No
Wait two or three
minutes for overload
protector to reset. If
protector cycles
Yes
repeatedly, refer to
Washer Overheats,
Cycles On Motor
Thermal Protector,
Switch Actuator Kicks
In and Out paragraph.
No
Is
timer/control
improperly
set?
Yes
Reset
timer/control
or try another
cycle.
Refer to Motor
Test Procedure
section to
check switch
and windings.
Is there a bind in
upper or lower
motor bearing?
Yes
Remove belt and
determine if
motor shaft will
spin. Replace
motor if shaft is
locked up.
No
No
Is
timer/control
inoperative?
Yes
Test
timer/control
and replace if
inoperative.
Is there
broken,
loose or
incorrect
wiring?
Yes
Refer to
appropriate
wiring diagram.
No
No
Are motor
starting
functions
inoperative; no
start or motor
hums only?
Yes
Refer to Motor
Test Procedure
section to check
start switch and
start windings.
Is power
cord
miswired?
Yes
TLW398S
No
39201
Refer to
appropriate wiring
diagram for
correct wiring.
© Copyright, Alliance Laundry Systems LLC – DO NOT COPY or TRANSMIT
23
General Troubleshooting
8. No Agitation
No agitation.
Is
timer/control
inoperative?
Yes
Test
timer/control
and replace if
inoperative.
Is transmission
assembly
inoperative?
Yes
Replace
transmission
assembly.
No
No
Is action
switch (fabric
selector), if
present,
inoperative?
Yes
Test switch and
replace if
inoperative.
Remove drive
Yes motor and
replace roll pin
and any other
damaged parts.
Is motor pulley
roll pin sheared
(through Serial
No. 001113645)?
No
Motor
won't run?
Yes
Refer to Motor
Test Procedure
section to
check switch
and windings.
No
Is pressure
switch
inoperative?
Yes
Test switch
and replace if
inoperative.
No
Is there
broken, loose
or incorrect
wiring?
Has drive
motor
overload
protector
cycled?
Yes
Refer to
appropriate
wiring diagram.
Yes
Yes
Replace pump.
No
Is lid open
or lid switch
inoperative?
Yes
Yes
Close lid or test
switch and
replace if
inoperative.
Replace belt.
TLW399S
No
24
Refer to Washer
Overheats, Cycles
On Motor Thermal
Protector, Switch
Actuator Kicks In
and Out paragraph.
No
Is there a
bind in
pump?
No
Is drive
belt
broken?
No
© Copyright, Alliance Laundry Systems LLC – DO NOT COPY or TRANSMIT
39201
General Troubleshooting
9. Constant Agitation
Constant agitation.
Is
timer/control
inoperative?
Yes
Test
timer/control
and replace if
inoperative.
No
Is there
shorted or
incorrect
wiring?
Yes
Refer to appropriate
wiring diagram.
No
Is transmission
assembly
inoperative?
Yes
Repair or
replace
transmission
assembly.
TLW333S
39201
© Copyright, Alliance Laundry Systems LLC – DO NOT COPY or TRANSMIT
25
General Troubleshooting
10. Washer Overheats, Cycles On Motor Thermal Protector, Switch Actuator
Kicks In and Out
Washer overheats, cycles on
motor thermal protector, switch
actuator kicks in and out.
Is belt tacky,
not allowing
proper slip?
Yes
Check belt and
replace if
defective.
Yes
Is there a bind
in water pump?
Replace pump.
No
No
Is belt tension
too great, not
allowing
proper slip?
Yes
Make sure idler
spring is
properly
connected.
Are brake
pads or
brake
assembly
binding?
Yes
Free binding
pads, or replace
pads and brake
assembly.
No
No
Is
timer/control
inoperative?
Yes
Test
timer/control
and replace if
inoperative.
No
Are motor
switch
functions
inoperative?
Yes
Refer to Motor
Test Procedure
section to check
switch
functions.
Check that all
these
Yes components are
able to move
freely. Correct
binding
component.
Have
bearings,
transmission
or motor
locked up and
will not turn?
No
Is voltage
incorrect?
Yes
No
Contact local
utility company,
or have a
qualified
electrician check
power supply.
TLW334S
26
© Copyright, Alliance Laundry Systems LLC – DO NOT COPY or TRANSMIT
39201
General Troubleshooting
11. Slow Spin Or No Spin
Slow spin or no spin.
Is
timer/control
inoperative?
Yes
Test
timer/control
and replace if
inoperative.
Is motor pulley
roll pin sheared
(through Serial
No. 001113645)?
Yes
Remove drive
motor and
replace roll pin
and any other
damaged parts.
No
No
Is lid open
or lid switch
inoperative?
Yes
Close lid or test
switch and
replace if
inoperative.
No
Is there a
bind in
pump?
Yes
Replace pump.
Yes
No
Yes
Replace pads
and brake
assembly.
Yes
Refer to
appropriate
wiring diagram.
Replace belt.
No
No
Motor
won't run?
Yes
No
Is there no
clearance
between
brake pads
and discs?
No
Is drive
belt
broken or
worn?
Has drive
motor
overload
protector
cycled?
Wait two or three
minutes for overload
protector to reset. If
protector cycles
repeatedly, refer to
Washer Overheats,
Cycles On Motor
Thermal Protector,
Switch Actuator Kicks
In and Out paragraph.
Yes
Refer to Motor
Test Procedure
section to
check switch
and windings.
Is there
broken, loose
or incorrect
wiring?
No
Is transmission
assembly
inoperative?
Yes
Repair or
replace
transmission
assembly.
TLW400S
39201
© Copyright, Alliance Laundry Systems LLC – DO NOT COPY or TRANSMIT
27
General Troubleshooting
12. Constant Spin
Constant spin.
Is
timer/control
inoperative?
Test
timer/control
and replace if
inoperative.
Yes
No
Washtub does
not stop spinning
within seven
seconds after lid
is opened.
Yes
Replace brake
pads and brake
assembly.
No
Is there
excessive wear
on brake pads
or missing
brake pads?
Yes
Replace brake
pads and brake
assembly.
No
Is there
shorted or
incorrect
wiring?
Yes
Refer to appropriate
wiring diagram.
TLW336S
28
© Copyright, Alliance Laundry Systems LLC – DO NOT COPY or TRANSMIT
39201
General Troubleshooting
13. Washer Stops In Cycle; Quits After A Couple Loads; Is Intermittent
Washer stops in cycle, quits
after a couple loads or is
intermittent.
Is belt tacky,
not allowing
proper slip?
Yes
Check belt and
replace if
defective.
Has motor
overload
protector
cycled?
Yes
No
No
Is belt tension
too great, not
allowing
proper slip?
Yes
Make sure idler
spring is
properly
connected.
Are motor
switch
functions
inoperative?
No
Is
timer/control
inoperative?
Yes
Test
timer/control
and replace if
inoperative.
No
Is there
broken, loose
or incorrect
wiring?
Yes
Refer to
appropriate wiring
diagram.
Yes
Wait two or three
minutes for
overload protector
to reset. If protector
cycles repeatedly,
refer to Washer
Overheats, Cycles
On Motor Thermal
Protector, Switch
Actuator Kicks In
and Out paragraph.
Refer to Motor
Test Procedure
section to check
switch
functions.
No
Has brake,
transmission
or motor
locked up and
will not turn?
Yes
Check that all
these
components
are able to
move freely.
No
TLW401S
39201
© Copyright, Alliance Laundry Systems LLC – DO NOT COPY or TRANSMIT
29
General Troubleshooting
14. Washer Is Locked Up Or Binding
Washer is locked up or binding.
Is there
excessive
belt tension?
Yes
Replace belt
and/or idler
spring.
No
Is there a bind
in upper or
lower bearing?
Are brake
pads
binding?
Yes
Yes
Free binding
pads or
replace pads.
Replace bearing.
No
No
Is there a
bind in water
pump?
Is voltage
incorrect?
Yes
Yes
Replace pump.
Contact local
utility company
or have a
qualified
electrician
check power
supply.
No
Is there a
bind in
transmission?
Yes
Repair or replace
transmission.
No
TLW338S
30
© Copyright, Alliance Laundry Systems LLC – DO NOT COPY or TRANSMIT
39201
General Troubleshooting
15. Outer Tub Does Not Empty
Outer tub does
not empty.
Is drain hose
kinked?
Yes
Straighten hose.
No
Is drain hose out
of hose retainer
clip in back of
cabinet.
Yes
Remove washer
front panel and
install drain hose
into hose retainer
clip in back of
cabinet.
No
Is water pump
inoperative?
Yes
Replace pump.
No
Is there an
obstruction
in outer tub
outlet hose?
Yes
Remove obstruction.
TLW339S
39201
© Copyright, Alliance Laundry Systems LLC – DO NOT COPY or TRANSMIT
31
General Troubleshooting
16. Excessive Vibration
Excessive vibration.
Is there an
unbalanced
load in tub?
Yes
Stop washer,
redistribute
load, then
restart washer.
No
Is there a
broken or
disconnected
module
spring(s)?
Yes
Connect or
replace module
spring(s).
Is base
damaged
(washer was
dropped)?
Yes
Replace base
assembly.
No
Is friction
ring
broken?
Yes
Replace
friction ring.
No
Is washer
unleveled?
Yes
Adjust leveling
legs.
No
Is washer
installed on
weak, "spongy",
carpeted or
built-up floor?
Relocate washer or
Yes support floor to
eliminate weak or
"spongy" condition.
No
Are cabinet
screws
incorrect or
loose?
Yes
Replace with
correct screws
or tighten.
No
TLW340S
32
© Copyright, Alliance Laundry Systems LLC – DO NOT COPY or TRANSMIT
39201
General Troubleshooting
17. Water Leaking From Outer Tub
Water leaking from
outer tub.
Is water seal
in outer tub
leaking?
Yes
Replace hub
and seal kit
assembly.
Is there an
obstruction in
drain causing
water to come
over top of outer
tub cover?
No
Is there a
hole in outer
tub?
Yes
Yes
Remove
obstruction.
Replace outer
tub.
No
No
Is pressure
hose or
accumulator
leaking?
Yes
Replace
pressure hose
and/or
accumulator.
Is tub-topump hose
leaking at
clamp?
Yes
Tighten clamp.
No
Is outer tub
cover
gasket
leaking?
Yes
Replace gasket.
No
TLW341S
39201
© Copyright, Alliance Laundry Systems LLC – DO NOT COPY or TRANSMIT
33
General Troubleshooting
18. Troubleshooting Coin Drop
a. Non-Electronic Coin Drops:
When coin is placed into coin slot, the coin should roll down drop and be heard dropping into coin vault. If coin
does not fall into coin vault or if coin drop sensor does not register that coin has been entered, follow
troubleshooting instructions on the following page. Refer to Figure 1 for path that coin follows when working
properly.
IMPORTANT: Never use oil to correct coin drop problems. Oil residue will prevent coins from rolling
properly.
IMPORTANT: Do not bend or damage mechanical parts within coin drop.
Additional coins following
path to sensor
Coin in
Coin Slot
Coin Drop
Sensor
DRY2B
Figure 1
34
© Copyright, Alliance Laundry Systems LLC – DO NOT COPY or TRANSMIT
39201
General Troubleshooting
Troubleshooting Coin Drop
Is proper
electrical power
supplied to coin drop?
(Incorrect electrical connection
may prevent coins from
registering in
coin drop.)
No
Refer to wiring
diagram for
proper connections.
Yes
Is
machine level?
(Machines that aren't
level may prevent coins from
following through required
check stages
of drop.)
No
Refer to
Installation Instructions
for instructions
on leveling machine.
Yes
Is coin drop
clean? (Residue or
lint build-up may prevent
coins from following through
required check stages
of drop.)
No
Refer to
Adjustments section
for instructions on cleaning
drop.
Yes
Do coins
fall freely
through drop?
No
Replace
coin drop.
Yes
Replace
coin drop sensor.
SWD1714S
39201
© Copyright, Alliance Laundry Systems LLC – DO NOT COPY or TRANSMIT
35
General Troubleshooting
b. Electronic Coin Drops:
If coin drop is not accepting coins, perform the
following:
(1) Clean coin drop. Refer to Paragraph 62.
(2) Test and replace tension spring using the
following instructions.
Remove Coin Drop From Machine
(3) If coin drop now operates properly, replace
tension spring using instructions on
following pages.
Replace Tension Spring
(1) Move tension spring downward until cover
catch is free. Refer to Figure 4.
(1) Disconnect electrical power to machine and
drop.
(2) Remove coin drop from machine.
Test Tension Spring
(1) Push coin return button to open and close
coin drop cover to clear possible coin jams.
Refer to Figure 2.
DRY2088N
Cover Catch
Coin Return
Button
Coin Drop
Cover
Figure 4
(2) Open cover for coin drop.
(3) Place a small flathead screwdriver under
right side of tension spring and lift up.
Refer to Figure 5.
Small Flathead
Screwdriver
MIX7B
Figure 2
(2) Manually hold down coin drop cover and
insert coin. Refer to Figure 3.
MIX2B
Left Tab
Right Side of
Tension Spring
Figure 5
MIX6B
(4) Use screwdriver to move spring
approximately 3 mm to left.
(5) Lift spring over left tab. Refer to Figure 5.
Coin Drop
Cover
Figure 3
36
© Copyright, Alliance Laundry Systems LLC – DO NOT COPY or TRANSMIT
39201
General Troubleshooting
(6) Rotate spring clockwise, 40 to 60 degrees,
until it is free from right tabs. Refer to
Figure 6.
(12) Use a small flathead screwdriver to push
spring under center tab. Refer to Figure 9.
Tabs
Center
Tab
MIX3B
Center Tab
Small Flat
Screwdriver
Figure 6
Left Tab
(7) Use screwdriver to remove spring from
center tab. Refer to Figure 6.
(8) Lift spring, with attached clip, off drop.
(9) Remove clip from spring. Refer to
Figure 7.
MIX5B
Figure 9
(13) Lift spring gently to place in position under
left tab.
(14) Push spring to right until it snaps into
position. Refer to Figure 5.
(15) Close coin drop cover.
(16) Move tension spring over cover catch.
Refer to Figure 4.
MIX4B
Clip
Reinstall Coin Drop Into Machine
Figure 7
(10) Attach clip to new tension spring, Part No.
209/00598/02.
(11) Place clip, installed on spring, in slot on
coin drop. Refer to Figure 8.
(1) Reinstall coin drop into machine.
(2) Reconnect electrical power to machine and
drop.
(3) Add a coin to drop to verify that coin drop
is operating properly and that electrical
connection is working properly.
MIX8B
Slot
Figure 8
39201
© Copyright, Alliance Laundry Systems LLC – DO NOT COPY or TRANSMIT
37
General Troubleshooting
Notes
38
© Copyright, Alliance Laundry Systems LLC – DO NOT COPY or TRANSMIT
39201
Troubleshooting
Coin Slide Operated and Non-Metered Models with the Number “8” or “9” in
the 4th Character of the Model Number
WARNING
To reduce the risk of electric shock, fire, explosion, serious injury or death:
• Disconnect electric power to the washer before servicing.
• Never start the washer with any guards/panels removed.
• Whenever ground wires are removed during servicing, these ground wires must be
reconnected to ensure that the washer is properly grounded.
W003
19. Error Mode
In Error Mode, the IN USE LED flashes to display fill and drain errors (refer to paragraphs below). Error Mode
can only be exited by powering down washer.
Fill Error
A Fill Error will occur if the tub does not fill within 62 minutes of the start of the cycle. A Fill Error is indicated
by the control repeatedly flashing the IN USE LED twice separated by a one and a half second pause until the
control is powered down. If Error Mode is turned off, the fill error will not occur and the control will continue
to wait for the fill level to be reached.
Drain Error
A Drain Error will occur if the tub is not empty after a spin cycle. A Drain Error is indicated by the control
repeatedly flashing the IN USE LED three times separated by a one and a half second pause until the control is
powered down. If Error Mode is turned off, the drain error will not occur and the machine cycle will advance
to the next cycle step as though the water had been pumped out.
39201
© Copyright, Alliance Laundry Systems LLC – DO NOT COPY or TRANSMIT
39
Troubleshooting (Coin Slide Operated/Non-Metered Models with “8” or “9” in 4th Character of Model No.)
20. Coin Slide Can Not Fully Insert
Coin slide can't be
fully inserted.
Make sure switch
activation lever is off
switch when installing
coin slide.
Are wires
and/or shield
from control
board interfering
with coin slide
movement?
Yes
Reposition wires
and/or shield.
No
Is coin slide
installed
correctly?
No
Refer toInstallation
manual. Make sure
all four mount screws
are engaged into
meter case opening.
Tighten extension rod
correctly.
TLW1836B
40
© Copyright, Alliance Laundry Systems LLC – DO NOT COPY or TRANSMIT
39201
Troubleshooting (Coin Slide Operated/Non-Metered Models with “8” or “9” in 4th Character of Model No.)
21. Coin Slide Fully Inserts, Switch Does Not Activate
Switch isn't activated when coin
slide is fully inserted.
Was the wrong
extension lever
setup used?
Yes
Make sure one or two
stars, depending on
type of coin slide,
face down. Refer to
Installation manual.
Is wiring
connected
correctly?
No
Examine wiring
and terminals
for proper
connections.
Refer to wiring
diagram.
No
Is the switch
activation lever
bent or out of
position?
Yes
Correct lever or
replace switch
mount assembly.
No
Are coin slide
extension lever
and flat washers
(shims) installed
correctly?
No
Refer to Installation
manual. Extension
lever should rotate
freely after assembly.
Extension lever
shouldn't have
excess play.
Yes
Switch activation
lever doesn't rotate
under the force of
the coin slide
extension lever?
Yes
Friction wave
washer in switch
mount assembly
is too tight.
Compress wave
washer slightly
and retest, or
replace switch
mount assembly.
No
TLW1837B
39201
© Copyright, Alliance Laundry Systems LLC – DO NOT COPY or TRANSMIT
41
Troubleshooting (Coin Slide Operated/Non-Metered Models with “8” or “9” in 4th Character of Model No.)
22. Switch Is Activated Too Soon
Switch is activated
too soon.
Is the switch
activation lever
bent or out of
position?
Yes
Correct lever
or replace
switch mount
assembly.
No
Does the switch
activation lever
rotate freely?
Yes
Replace
switch mount
assembly.
No
Was the wrong
extension lever
setup used?
Yes
Make sure one or two
stars, depending on
type of coin slide,
face down. Refer to
Installation manual.
TLW1838B
42
© Copyright, Alliance Laundry Systems LLC – DO NOT COPY or TRANSMIT
39201
Troubleshooting (Coin Slide Operated/Non-Metered Models with “8” or “9” in 4th Character of Model No.)
23. Coin Slide Does Not Return Freely
Coin slide doesn't freely return.
Consult coin slide
manufacturer
instructions, clean and
lubricate coin slide,
double check that return
springs are present.
Was the
wrong
extension
lever setup
used?
Yes
Make sure one
or two stars,
depending on
type of coin
slide, face
down. Refer to
Installation
manual.
No
Are coin slide
switch and
extension
assemblies
equipped with
updated parts?
No
Replace with
assemblies that
have
nitrocarburized
(black-coated)
brackets and
lighter spring with
open hooks.
Is there a
burr present
on extension
lever or
switch
bracket?
Yes
Remove burr,
lubricate and
retest.
Yes
Review
extension lever
for proper free
rotation.
TLW376S
39201
© Copyright, Alliance Laundry Systems LLC – DO NOT COPY or TRANSMIT
43
Troubleshooting (Coin Slide Operated/Non-Metered Models with “8” or “9” in 4th Character of Model No.)
24. No Cycle Start When the Coin Slide is Activated
Cycle won't start after the
coin slide is activated.
Yes
Is the "In Use"
light lit?
Refer to
Washer Will
Not Fill
paragraph.
No
1
Is the H8
connection
properly seated
on the control
board?
3
Is there continuity
through switch and
switch wires when
activated?
Yes Replace
control.
No
No
Properly seat
connector and
try again.
Replace control
harness.
Yes
Is coin slide
switch
activated when
slide is pushed
in?
No
Replace or
repair slide
extension
assembly.
Yes
2
Is there
continuity
through switch
when
activated?
No
Replace
switch.
TLW342S
Yes
44
© Copyright, Alliance Laundry Systems LLC – DO NOT COPY or TRANSMIT
39201
Troubleshooting (Coin Slide Operated/Non-Metered Models with “8” or “9” in 4th Character of Model No.)
No Cycle Start When the Coin Slide is Activated
1
3
2
39201
© Copyright, Alliance Laundry Systems LLC – DO NOT COPY or TRANSMIT
45
Troubleshooting (Coin Slide Operated/Non-Metered Models with “8” or “9” in 4th Character of Model No.)
25. Washer Will Not Fill (Pressure Switch Diagnostic)
Note: Assuming water is turned on.
(1)
Is the lid closed?
No
Close lid and
check switch for
continuity.
Yes
(2)
Is there 120 volts AC
between pressure
switch terminal 1 and
neutral?
No
Check wiring
between pressure
switch and lid
switch.
Yes
(3)
Is there 120 volts AC
between pressure
switch terminal 2 and
neutral?
No
Check for proper
function of
pressure switch,
pressure hose and
accumulator.
Replace if
necessary.
Yes
(4)
Is there 120 volts AC
between terminal
"H3-5" on the control
and neutral?
No
Check wiring
between control
board and
pressure switch.
Yes
Refer to Washer
will not fill (mixing
valve diagnostics).
TLW343S
46
© Copyright, Alliance Laundry Systems LLC – DO NOT COPY or TRANSMIT
39201
Troubleshooting (Coin Slide Operated/Non-Metered Models with “8” or “9” in 4th Character of Model No.)
Washer Will Not Fill (Pressure Switch Diagnostic)
1
4
2
3
39201
© Copyright, Alliance Laundry Systems LLC – DO NOT COPY or TRANSMIT
47
Troubleshooting (Coin Slide Operated/Non-Metered Models with “8” or “9” in 4th Character of Model No.)
26. Washer Will Not Fill (Mixing Valve Diagnostic)
Note: Assuming No Fill (pressure
switch diagnostics) checks out okay, and
cycle is started and "In Use" light is lit.
(1)
Is there voltage from
either "H3-4" or "H3-1" (based
on temperature selection)
to the Neutral wire?
No
Replace control.
Yes
(2)
Is there voltage
across either the hot
or cold coil to
neutral?
No
Correct wiring
between mixing
valve and control.
Yes
(3)
Is there 120 volts AC
across the coil of
either the hot or cold
valve?
Yes
Does water flow
through the mixing
valve?
No
Replace mixing
valve.
Yes
No
(4)
Is there 120 volts AC
between either the
hot or cold coil to
terminal 4 on the
motor?
Unit operates
properly.
No
Correct wiring
between motor
and neutral wire.
Yes
(5)
Is there 120 volts AC
between either the
hot or cold coil to
terminal 8 on the
motor?
No
Thermal protector
in motor open.
Replace motor.
Yes
Correct wiring
between terminal 8
of the motor and
neutral side of the
hot/cold coil.
48
© Copyright, Alliance Laundry Systems LLC – DO NOT COPY or TRANSMIT
TLW344S
39201
Troubleshooting (Coin Slide Operated/Non-Metered Models with “8” or “9” in 4th Character of Model No.)
Washer Will Not Fill (Mixing Valve Diagnostic)
1
3
2
5
4
39201
© Copyright, Alliance Laundry Systems LLC – DO NOT COPY or TRANSMIT
49
Troubleshooting (Coin Slide Operated/Non-Metered Models with “8” or “9” in 4th Character of Model No.)
27. Washer Over Fills (Pressure Switch Open)
Washer Over Fills.
With power
disconnected, does
the unit still over
flow?
Yes
Replace mixing
valve.
No
Unit works
properly.
No
Reconnect
power.
(1)
Is there voltage
on either the orange
wire of the hot valve
or gray wire of the cold
valve to neutral?
Yes
Check for
incorrect or
damaged wiring
between water
valve and L1
TLW287S
50
© Copyright, Alliance Laundry Systems LLC – DO NOT COPY or TRANSMIT
39201
Troubleshooting (Coin Slide Operated/Non-Metered Models with “8” or “9” in 4th Character of Model No.)
Washer Over Fills (Pressure Switch Open)
1
39201
© Copyright, Alliance Laundry Systems LLC – DO NOT COPY or TRANSMIT
51
Troubleshooting (Coin Slide Operated/Non-Metered Models with “8” or “9” in 4th Character of Model No.)
28. No Agitation – Low and High Speed
(1)
(2a)
Is there voltage
between "H6-1" on
control to terminal 4
on the motor?
No
Check operation of
lid switch, check
wiring to control.
Yes
Is there voltage
between "H6-5" and
terminal 4 on the
motor?
Yes
No
High speed
(2)
Low speed
Is there voltage
between "H6-6" and
terminal 4 on the
motor?
No
(3a)
Replace control
Is there voltage
across terminals 7 &
4 on the motor?
Yes
Yes
High speed
(3)
Low speed
Is there voltage
across terminals 3 &
4 on the motor?
No
No
Correct wiring
between control
and motor.
(4a)
Is there voltage
across terminals 8 &
7 on the motor?
Yes
Yes
High speed
(4)
Low speed
Is there voltage
across terminals 3 &
8 on the motor?
No
Check operation of
thermal protector
in the motor.
Replace motor if
necessary.
No
(7)
Yes
Is there voltage
between terminal 1
of the motor and
"H6-2" on the control?
(5)
Is there voltage at
"H6-4" on the control
to terminal 8 on the
motor?
No
No
Correct wiring
between motor
terminal 8 and
control.
Replace control.
Yes
(8)
Yes
(6)
Is there voltage
across terminal 1 & 8
of the motor?
No
Correct wiring
between control
and motor. Check
capacitor, replace
if necessary.
Is there voltage
between "H6-3" on
control to terminal 1
on the motor?
No
Replace control.
Yes
Yes
Replace motor.
TLW345S
52
© Copyright, Alliance Laundry Systems LLC – DO NOT COPY or TRANSMIT
39201
Troubleshooting (Coin Slide Operated/Non-Metered Models with “8” or “9” in 4th Character of Model No.)
No Agitation – Low and High Speed
1
2
3
2a
3a
7
8
6
4
4a
39201
© Copyright, Alliance Laundry Systems LLC – DO NOT COPY or TRANSMIT
5
53
29. Washer Will Not Spin – Low Speed
(5)
(1)
Is there voltage
across "H6-1" on the
control and terminal
4 on the motor?
No
Check lid switch
for proper
operation. Check
wiring from control
to lid switch to
supply.
No
Replace control.
No
Correct wiring to
the motor.
(7)
(3)
No
Correct wiring
between motor
and control.
Is there voltage from
"H6-2" on control to
terminal 6 of the
motor?
No
Yes
Yes
(8)
(4)
Yes
Is there voltage
across terminals 6 &
8 of the motor?
Yes
Yes
Is there voltage
across terminals 3 &
8 of the motor?
Replace the
control.
(6)
(2)
Is there voltage
across terminals 3 &
4 on the motor?
No
Yes
Yes
Is there voltage
across "H6-6" on the
control and terminal
4 on the motor?
Is there voltage
across "H6-3" on
control to terminal 8
of the motor?
No
Check operation of
motor
thermal protector.
Replace motor if
necessary.
Is there voltage from
"H6-4" on control to
terminal 1 of the
motor?
No
Replace control.
Yes
Unit should
operate properly.
TLW293S
54
© Copyright, Alliance Laundry Systems LLC – DO NOT COPY or TRANSMIT
39201
Troubleshooting (Coin Slide Operated/Non-Metered Models with “8” or “9” in 4th Character of Model No.)
Washer Will Not Spin – Low Speed
1
2
3
8
4
6
7
39201
© Copyright, Alliance Laundry Systems LLC – DO NOT COPY or TRANSMIT
5
55
Troubleshooting (Coin Slide Operated/Non-Metered Models with “8” or “9” in 4th Character of Model No.)
30. Washer Will Not Spin – High Speed
(5)
(1)
Is there voltage
across "H6-1" on the
control and terminal
4 on the motor?
No
Check lid switch
for proper
operation. Check
wiring from control
to lid switch to
supply.
No
Replace control.
No
Correct wiring to
the motor.
(7)
(3)
No
Correct wiring
between motor
and control.
Is there voltage from
"H6-2" on control to
terminal 6 of the
motor?
No
Yes
Yes
(8)
(4)
Yes
Is there voltage
across terminals 6 &
8 of the motor?
Yes
Yes
Is there voltage
across terminals 7 &
8 of the motor?
Replace the
control.
(6)
(2)
Is there voltage
across terminals 7 &
4 on the motor?
No
Yes
Yes
Is there voltage
across "H6-5" on the
control and terminal
4 on the motor?
Is there voltage
across "H6-3" on
control to terminal 8
of the motor?
No
Check operation of
motor
thermal protector.
Replace motor if
necessary.
Is there voltage from
"H6-4" on control to
terminal 1 of the
motor?
No
Replace control.
Yes
Unit should
operate properly.
TLW291S
56
© Copyright, Alliance Laundry Systems LLC – DO NOT COPY or TRANSMIT
39201
Troubleshooting (Coin Slide Operated/Non-Metered Models with “8” or “9” in 4th Character of Model No.)
Washer Will Not Spin – High Speed
1
2
3
8
6
4
7
39201
© Copyright, Alliance Laundry Systems LLC – DO NOT COPY or TRANSMIT
5
57
Troubleshooting (Coin Slide Operated/Non-Metered Models with “8” or “9” in 4th Character of Model No.)
Notes
58
© Copyright, Alliance Laundry Systems LLC – DO NOT COPY or TRANSMIT
39201
Troubleshooting
EDC Models
WARNING
To reduce the risk of electric shock, fire, explosion, serious injury or death:
• Disconnect electric power to the washer before servicing.
• Never start the washer with any guards/panels removed.
• Whenever ground wires are removed during servicing, these ground wires must be
reconnected to ensure that the washer is properly grounded.
W003
31. EDC Error Code Listing
E:00
E:01
General Error
Proximity Error
E:02
IR Communications
Disconnection
E:05
E:07
E:08
E:09
Invalid Value
Communication
Inoperative Control
Inoperative Control
Proximity Error
E:0A
Proximity Error
E:0B
IR Communication
Disconnection
E:0C
IR Communication
Disconnection
E:0d
Pressure Switch Error
E:0F
IR Communicator
Programmed Off
Coin Error
Err
Micro-wand IIIe is improperly aimed at infrared communicator (angle or
distance): Re-aim Micro-wand IIIe.
Micro-wand IIIe prematurely pulled away from electronic control during
infrared communication: Maintain infrared connection between Microwand IIIe and electronic control during communication.
Invalid code downloaded from Micro-wand IIIe to electronic control.
Replace electronic control.
Replace electronic control.
Micro-wand IIIe is improperly aimed at infrared communicator (angle or
distance): Re-aim Micro-wand IIIe.
Micro-wand IIIe is improperly aimed at infrared communicator (angle or
distance): Re-aim Micro-wand IIIe.
Micro-wand IIIe prematurely pulled away from electronic control during
infrared communication: Maintain infrared connection between Microwand IIIe and electronic control during communication.
Micro-wand IIIe prematurely pulled away from electronic control during
infrared communication: Maintain infrared connection between Microwand IIIe and electronic control during communication.
1. Check fill and drain hoses for improper installation and kinks.
2. Check fill electrical circuit: Replace inoperative switches or wires.
Reprogram infrared communicator on.
1. Inoperative coin sensor: Run the Coin Drop Diagnostic test.
2. Coin drop obstruction: Check coin drop area and remove any
obstructions.
3. Customer tampering: Evaluate security procedures.
NOTE: Disconnecting power to the unit may clear the error display.
NOTE: If replacing an inoperative electronic control due to burnt pin(s) on the 6-pin wire harness connector
block, it may be due to damaged terminals in the harness connector. Damaged terminals in the harness
connector will appear burnt or show signs of heat discoloration on the connector block. Replace the control
wire harness with the control to avoid repeated damage.
39201
© Copyright, Alliance Laundry Systems LLC – DO NOT COPY or TRANSMIT
59
Troubleshooting (EDC Models)
32. Cannot Perform Infrared Communication
Attempt to communicate
with the electronic control
from the Micro-wand.
Is
there any
acknowledgement
of any kind from
the electronic
control?
NO
Aim Micro-wand
closer and try
again.
Is
there any
control
response?
NO
Check the following:
– Low battery on Micro-wand.
– Is the (IR) on the control
covered or blocked?
– If needed, replace electronic
control board.
YES
YES
Does
the electronic
control display
"E:OF" or
"– C–" ?
"– C–"
– Is the (IR) cap properly
attached to the Micro-wand?
Communication
sequence checks
out.
"E:OF"
Check the following:
– (IR) disabled by manual prog.
– Is the (IR) on the control
covered or blocked?
– If needed, change electronic
control board.
60
© Copyright, Alliance Laundry Systems LLC – DO NOT COPY or TRANSMIT
W367S
39201
Troubleshooting (EDC Models)
33. Coins Ignored When Entered
NOTE: For instructions on performing tests,
refer to programming manual.
Start coin drop
diagnostic test.
Enter several coins.
Does
the electronic
control display
coin counter
increment
properly?
YES
Make sure the
control is reset
properly and
prompting for a
vend.
NOTE: In this section, bring the
control out of the diagnostic mode.
Also, make sure the control is not
in a free vend mode.
NO
NOTE: Inspect and test for continuity
the harness between the drop
and electronic control board.
Open
control
panel
Check
coin
drop
Is
connection
"H2" firmly seated
in its receptacle
on the
control?
NO
Reconnect and
run test again.
YES
Is
the 3-pin
connector plug
firmly seated in
its receptacle?
NO
Reconnect and
run test again.
YES
Are
wires exiting
the coin drop
optical sensor
cracked or
broken?
YES
Replace
coin drop.
NO
Retest again, if not successful
the following is the problem:
– Replace coin drop.
If the problem still exists:
– Replace electronic control.
W368S
39201
© Copyright, Alliance Laundry Systems LLC – DO NOT COPY or TRANSMIT
61
Troubleshooting (EDC Models)
34. Electronic Control Has No Visible Display
The electronic control has
no LED or VFD functioning
on the control board.
Is the
power cord
plugged in?
NO
Plug electronic
control unit into
electrical outlet.
YES
Open
control
panel
Is there
voltage at "FS1"
black to "FS2"
white?
YES
NO
Disconnect power and check for
broken, loose, or incorrect wiring from
the electrical outlet to the electronic
control.
NOTE: This voltage check confirms that
main power is present to the control.
Replace electronic
control.
W369S
62
© Copyright, Alliance Laundry Systems LLC – DO NOT COPY or TRANSMIT
39201
Troubleshooting (EDC Models)
Notes
39201
© Copyright, Alliance Laundry Systems LLC – DO NOT COPY or TRANSMIT
63
Troubleshooting (EDC Models)
35. No Fill Analysis
Washer is
not filling.
(#) Numbers next to voltage checks
correspond to the locations marked
on the wiring schematic.
(1)
Is
the display
on?
YES
Are
the water
lines turned
on?
NO
YES
Is the
coin counter
counting down
as coins are
entered in
the drop?
YES
NO
NO
Turn on water.
Replace inoperative
coin drop.
(4)
(3)
Check
Check
voltage at
voltage
the pressure
at control
YES
switch "2" BLU/WHT
"H3-1" to "H3-3",
and to "H3-3",
is there
is there
voltage?
When checking
voltage?
voltage to
neutral, check
between source and
NO
NO
"H3-3" since neutral
for mixing values is
through the thermal
protect on the motor.
Check
voltage at
the pressure
YES
switch "1" PNK/BLU
and to "H3-3",
is there
voltage?
NO
Replace inoperative
wiring.
Replace pressure
switch or
pressure hose.
Replace inoperative
wiring.
YES
NO
After checking for
correct wiring,
replace inoperative
lid switch.
If the problem still exists, refer to
these other troubleshooting guides:
"Electronic control has no visible display",
or "Coins ignored when entered".
(2)
Check
voltage at
the lid switch
pnk/blu "COM"
to "H3-3",
is there
voltage?
Open (5) Voltage
control
check off
panel electronic control
board hot - ORG "H5-1"
YES
to "H3-3" cold - GREY,
"H5-4" to "H3-3" warm "H5-1" and "H5-4"
to "H3-3",
Temps
is there
listed are
voltage?
determined
by what water
temps have been
selected
YES
NO
Replace electronic
control board.
On mixing valve check and replace:
– Inlet screens.
– Wiring and connections.
– Replace coils or mixing valve.
– Check thermal protect and wiring
from thermal protect to "H3-3"
64
© Copyright, Alliance Laundry Systems LLC – DO NOT COPY or TRANSMIT
W370S
39201
Troubleshooting (EDC Models)
No Fill Analysis
4
2
1
5
L1
N
120/240 VOLT 60/50 HERTZ
(Refer to machine serial plate.)
LID AND UNBALANCE SWITCH
PRESSURE SWITCH
3
1
2
H3-1
H3-1
ELECTRONIC CONTROL
N
COLD
FS-2
PRESSURE SWITCH
AND
WATER CIRCUIT
FS-1
L1
MIXING VALVE
K1
COLD
HOT
LID SWITCH SENSE.
MOTOR DIRECTION
AND CONTROL AND
TIMING CIRCUIT
H5-4
HOT
K2
H5-1
MOTOR SPEED
H3-5
K5
MOTOR START/DIRECTION
H3-4
MOTOR
LOW
3
MOTOR MASTER
HIGH
7
K3
H3-6
K4
1
START
6
H6-2
H3-2
H6-1
H2-3
H2-2
H2-1
H2-5
H2-6
H2-4
AUDIT CONTROL
CIRCUIT
AVAILABLE OUTPUT
TRANSISTOR IS
"OFF" WHEN MACHINE
IS RUNNING
SPIN
TP
4
8
H3-3
3
SCHEMATIC
SERVICE
DOOR
COIN VAULT
AGITATE
COIN DROP
SENSOR
TLW314S
39201
© Copyright, Alliance Laundry Systems LLC – DO NOT COPY or TRANSMIT
65
Troubleshooting (EDC Models)
36. No Motor Run — Agitate Analysis
The wash tub has
been filled and
there is no motor
run for agitate.
(#) Numbers next to voltage checks
correspond to the locations marked
on the wiring schematic.
NOTE: All checks in this flow chart
are based on the assumption a
high speed agitate and spin cycle
have been selected.
Is the
washer lid
closed?
NO
Close washer
lid.
YES
Open
control
panel
(1)
Check
voltage at
electronic
control board
BLU "H3-4" to "H3-2"
RED "H3-6" to BRN
"H3-2" is there
voltage?
YES
After checking
for correct wiring,
refer to Motor Test
Procedure section
or Motor Does Not
Run paragraph.
NO
Replace electronic
control board.
TLW374S
66
© Copyright, Alliance Laundry Systems LLC – DO NOT COPY or TRANSMIT
39201
Troubleshooting (EDC Models)
No Motor Run — Agitate Analysis
L1
N
120/240 VOLT 60/50 HERTZ
(Refer to machine serial plate.)
LID AND
UNBALANCE SWITCH
PRESSURE SWITCH
3
1
2
H3-1
ELECTRONIC CONTROL
1
N
COLD
FS-2
PRESSURE SWITCH
AND
WATER CIRCUIT
FS-1
L1
MIXING VALVE
K1
COLD
HOT
LID SWITCH SENSE.
MOTOR DIRECTION
AND CONTROL AND
TIMING CIRCUIT
H3-1
H5-4
K2
HOT
H5-1
MOTOR SPEED
H3-5
K5
MOTOR START/DIRECTION
H3-4
MOTOR
LOW
3
MOTOR MASTER
7
HIGH
K3
H3-6
K4
1
START
6
H6-2
H3-2
H6-1
H2-3
H2-2
H2-1
H2-5
H2-6
H2-4
AUDIT CONTROL
CIRCUIT
AGITATE
SPIN
TP
4
8
H3-3
AVAILABLE OUTPUT
TRANSISTOR IS
"OFF" WHEN MACHINE
IS RUNNING
SCHEMATIC
SERVICE
DOOR
COIN VAULT
COIN DROP
SENSOR
TLW315S
39201
© Copyright, Alliance Laundry Systems LLC – DO NOT COPY or TRANSMIT
67
Troubleshooting (EDC Models)
37. No Motor Run — Spin Analysis
(#) Numbers next to voltage checks
correspond to the locations marked
on the wiring schematic.
The washer will
not spin.
NOTE: All checks in this flow chart
are based on the assumption a
high speed agitate and spin cycle
have been selected.
Is the
"unbalance"
indicator flashing
on the electronic
control?
YES
2) Check lid/unbalance
switch correct wiring.
3) Possible thermal overload
on motor.
NO
Open
control
panel
1) Open lid and close
to reset switch.
(1)
Check
voltage at
electronic control
board
BLU "H3-4" to "H3-6"
BRN "H3-2" to "H3-6",
is there
voltage?
YES
After checking
for correct wiring,
refer to Motor Test
Procedure section
or Motor Does Not
Run paragraph.
NO
Replace electronic
control board.
TLW375S
68
© Copyright, Alliance Laundry Systems LLC – DO NOT COPY or TRANSMIT
39201
Troubleshooting (EDC Models)
No Motor Run — Spin Analysis
L1
N
120/240 VOLT 60/50 HERTZ
(Refer to machine serial plate.)
LID AND
UNBALANCE SWITCH
PRESSURE SWITCH
3
1
2
H3-1
ELECTRONIC CONTROL
1
N
COLD
FS-2
PRESSURE SWITCH
AND
WATER CIRCUIT
FS-1
L1
MIXING VALVE
K1
COLD
HOT
LID SWITCH SENSE.
MOTOR DIRECTION
AND CONTROL AND
TIMING CIRCUIT
H3-1
H5-4
K2
HOT
H5-1
MOTOR SPEED
H3-5
K5
MOTOR START/DIRECTION
H3-4
MOTOR
LOW
3
MOTOR MASTER
7
HIGH
K3
H3-6
K4
1
START
6
H6-2
H3-2
H6-1
H2-3
H2-2
H2-1
H2-5
H2-6
H2-4
AUDIT CONTROL
CIRCUIT
AGITATE
SPIN
TP
4
8
H3-3
AVAILABLE OUTPUT
TRANSISTOR IS
"OFF" WHEN MACHINE
IS RUNNING
SCHEMATIC
SERVICE
DOOR
COIN VAULT
COIN DROP
SENSOR
TLW316S
39201
© Copyright, Alliance Laundry Systems LLC – DO NOT COPY or TRANSMIT
69
Troubleshooting (EDC Models)
38. Overflow Analysis
Washer has
overflowed.
Open
control
panel
(#) Numbers next to voltage checks
correspond to the locations marked
on the wiring schematic.
(1)
Check
voltage at
pressure switch
BLU/WHT "2" to "H3-3"
when wash tub
is full, is there
voltage?
NO
YES
After checking for
correct wiring, replace
pressure switch or
pressure hose.
NOTE: The diaphragms on the mixing valve
may lock open. The way to test this
problem is to unplug the washer
and see whether the mixing valve
allows water to come in. If this
happens, replace the mixing valve.
Check for a
locked open
mixing valve.
W376S
70
© Copyright, Alliance Laundry Systems LLC – DO NOT COPY or TRANSMIT
39201
Troubleshooting (EDC Models)
Overflow Analysis
1
L1
N
120/240 VOLT 60/50 HERTZ
(Refer to machine serial plate.)
LID AND
UNBALANCE SWITCH
PRESSURE SWITCH
3
1
2
H3-1
ELECTRONIC CONTROL
N
COLD
FS-2
PRESSURE SWITCH
AND
WATER CIRCUIT
FS-1
L1
MIXING VALVE
K1
COLD
HOT
LID SWITCH SENSE.
MOTOR DIRECTION
AND CONTROL AND
TIMING CIRCUIT
H3-1
H3-4
K2
HOT
H3-1
MOTOR SPEED
H3-5
K5
MOTOR START/DIRECTION
H3-4
MOTOR
LOW
3
MOTOR MASTER
HIGH
7
K3
H3-6
K4
1
START
6
H6-2
H3-2
H6-1
H2-3
H2-2
H2-1
H2-5
H2-6
H2-4
AUDIT CONTROL
CIRCUIT
AGITATE
SPIN
TP
4
8
H3-3
AVAILABLE OUTPUT
TRANSISTOR IS
"OFF" WHEN MACHINE
IS RUNNING
SCHEMATIC
SERVICE
DOOR
COIN VAULT
COIN DROP
SENSOR
TLW317S
39201
© Copyright, Alliance Laundry Systems LLC – DO NOT COPY or TRANSMIT
71
Troubleshooting (EDC Models)
39. Audit Switch Function Analysis
NOTE: For instructions on performing tests, refer to programming manual.
NOTE: Usually review two consecutive audit reports
before sending service personnel to investigate.
Remember, the audit system may be detecting
tampering of the EC unit.
Incorrect audit counts:
Coin drop.
Service door.
Coin vault.
Cycle.
In audit report analysis, the EC computer operator
will have to determine, from the audit reports, what
the servicer should examine on the EC units.
If the servicer cannot find a particular problem,
consult the appropriate audit reports for further analysis.
Service
door
diagnostic test
"Service Door
Opening Test"
does the door
pass the
test?
Coin drop
diagnostic test
YES
"Coin Drop Input Test"
does the drop
pass the
test?
NO
Cycle
test
YES
Coin vault
diagnostic test
"Coin Vault
Opening Test"
does the vault
pass the
test?
NO
NO
Check wiring and
connections.
Replace coin drop.
YES
Run a
complete
wash cycle and
review the manual
audit or Micro-wand
"Display Counts"
does the cycle
counter
advance?
Check wiring and
connections.
Replace service
door switch.
YES
NO
Check wiring and
connections.
Replace coin
vault switch.
Replace electronic
control board.
Exit diagnostic test
Investigate
–Tampering.
– Service door and mach
cycle var reports.
The audit coin count will
not advance in the diagnostic
cycle.
Micro-wand or manual EC
control audit will have to be
accessed to determine whether
audit counters are advancing.
Is the
audit coin
counter
advancing?
Investigate
– Tampering.
– Coin vault and
collection
reports.
Investigate
– Tampering.
– Service door and
mach cycle var
reports.
NOTE: In the cycle audit test, the cycle count will not
advance on a "rapid advance" cycle. The manual
control audit or Micro-wand "show counts" will
have to be accessed to determine whether audit
counters are advancing. Also, the cycle count
does not activate until the end of the cycle.
YES
Investigate
– Tampering.
– Coin vault and
service door
opening reports.
– Machine/cycle
var reports.
NO
Check for proper wiring
and connections.
After wiring has been
confirmed correct, replace
electronic control board.
72
© Copyright, Alliance Laundry Systems LLC – DO NOT COPY or TRANSMIT
D216S
39201
Troubleshooting
MDC Models
WARNING
To reduce the risk of electric shock, fire, explosion, serious injury or death:
• Disconnect electric power to the washer before servicing.
• Never start the washer with any guards/panels removed.
• Whenever ground wires are removed during servicing, these ground wires must be
reconnected to ensure that the washer is properly grounded.
W003
40. MDC Error Code Listing
E:dr
Maximum drain time exceeded or water sensed at the end of a spin step.
E:FL
Maximum fill time exceeded.
Card Reader Machines: (In addition to the above errors)
EC:19
Indicates no card reader communication. The control and the card reader cannot communicate.
Check card reader, control and harness.
NOTE: For all other card reader errors, consult the card reader manufacturer.
39201
© Copyright, Alliance Laundry Systems LLC – DO NOT COPY or TRANSMIT
73
Troubleshooting (MDC Models)
41. No Visible Display on Control
No Visible Display on Control
Note: Assuming
the unit is
plugged into a
live outlet
(1)
Is there voltage at
the primary side of
the transformer?
No
Check wiring to
transformer.
Check supply
voltage to unit.
Yes
(2)
Is there 24 volts at
the secondary side
of the transformer?
No
Replace
transformer.
Yes
(3)
Is there 24 volts AC
across terminals
"H1-1" & "H1-3" on the
control board?
No
Check wiring
between control
and transformer.
Yes
Replace control.
TLW279S
74
© Copyright, Alliance Laundry Systems LLC – DO NOT COPY or TRANSMIT
39201
Troubleshooting (MDC Models)
No Visible Display on Control
1
120/240 VOLT 60/50 HERTZ (Refer to machine serial plate.)
2
3
39201
© Copyright, Alliance Laundry Systems LLC – DO NOT COPY or TRANSMIT
75
Troubleshooting (MDC Models)
42. Coins Ignored When Entered
Enter Production Test Cycle, Coin Drop
Test. Refer to programming manual.
Does the count on the
display increment
properly after entering
coins?
Yes
Reset control to
ready mode.
No
(1)
Is "H3" connector
properly seated on the
control board?
No
Properly seat
connection and
conduct test cycle
again.
(2)
Yes
From the coin drop, is
the 3-pin plug properly
connected?
(3)
Yes
Are the wires exiting the
coin drop optical sensor
cracked or broken?
No
Properly reseat
connection and
conduct test cycle
again.
Yes
No
Replace the
coin drop.
Replace electronic
control.
TLW300S
76
© Copyright, Alliance Laundry Systems LLC – DO NOT COPY or TRANSMIT
39201
Troubleshooting (MDC Models)
Coins Ignored When Entered
3
39201
2
1
© Copyright, Alliance Laundry Systems LLC – DO NOT COPY or TRANSMIT
77
Troubleshooting (MDC Models)
43. Washer Will Not Fill (Pressure Switch Diagnostic)
(1)
Is the lid closed?
No
Close lid and
check switch for
continuity.
Yes
(2)
Is there
120 or 240* volts AC
between pressure
switch terminal 1 and
neutral?
No
Check wiring
between pressure
switch and lid
switch.
Yes
(3)
Is there
120 or 240* volts AC
between pressure
switch terminal 2 and
neutral?
No
Check for proper
function of
pressure switch,
pressure hose and
accumulator.
Replace if
necessary.
Yes
(4)
Is there
120 or 240* volts AC
between terminal
"H4-5" on the control
and neutral?
No
Check wiring
between control
board and
pressure switch.
Yes
Refer to Washer
will not fill (mixing
valve diagnostics)
*Refer to machine serial plate for correct voltage.
TLW303S
78
© Copyright, Alliance Laundry Systems LLC – DO NOT COPY or TRANSMIT
39201
Troubleshooting (MDC Models)
Washer Will Not Fill (Pressure Switch Diagnostic)
1
120/240 VOLT 60/50 HERTZ (Refer to machine serial plate.)
4
3
2
39201
© Copyright, Alliance Laundry Systems LLC – DO NOT COPY or TRANSMIT
79
Troubleshooting (MDC Models)
44. Washer Will Not Fill (Mixing Valve Diagnostic)
(1)
Note: Assuming No Fill (pressure
switch diagnostics) checks out okay.
Is there voltage from
either "H4-4" or "H4-1"
to the Neutral wire?
No
Replace control.
Yes
(2)
Is there voltage
across either the hot
or cold coil to
neutral?
No
Correct wiring
between mixing
valve and control.
Yes
(3)
Is there
120 or 240* volts AC
across the coil of
either the hot or cold
valve?
Yes
Does water flow
through the mixing
valve?
No
Replace mixing
valve.
Yes
No
(4)
Is there
120 or 240* volts AC
between either the
hot or cold coil to
terminal 4 on the
motor?
Unit operates
properly.
No
Correct wiring
between motor
and neutral wire.
Yes
(5)
Is there
120 or 240* volts AC
between either the
hot or cold coil to
terminal 8 on the
motor?
No
Thermal protector
in motor open.
Replace motor.
Yes
Correct wiring
between terminal 8
of the motor and
neutral side of the
hot/cold coil.
*Refer to machine serial plate for correct voltage.
80
© Copyright, Alliance Laundry Systems LLC – DO NOT COPY or TRANSMIT
TLW304S
39201
Troubleshooting (MDC Models)
Washer Will Not Fill (Mixing Valve Diagnostic)
120/240 VOLT 60/50 HERTZ (Refer to machine serial plate.)
1
3
2
5
4
39201
© Copyright, Alliance Laundry Systems LLC – DO NOT COPY or TRANSMIT
81
Troubleshooting (MDC Models)
45. Washer Over Fills (Pressure Switch Open)
Washer Over Fills.
With power
disconnected, does
the unit still over
flow?
Yes
Replace mixing
valve.
No
Unit works
properly.
No
Reconnect
power.
(1)
Is there voltage
on either the orange
wire of the hot valve
or gray wire of the cold
valve to neutral?
Yes
Check for
incorrect or
damaged wiring
between water
valve and L1
TLW287S
82
© Copyright, Alliance Laundry Systems LLC – DO NOT COPY or TRANSMIT
39201
Troubleshooting (MDC Models)
Washer Over Fills (Pressure Switch Open)
120/240 VOLT 60/50 HERTZ (Refer to machine serial plate.)
1
39201
© Copyright, Alliance Laundry Systems LLC – DO NOT COPY or TRANSMIT
83
Troubleshooting (MDC Models)
46. No Agitation – Low and High Speed
(2b)
(1)
Is there voltage
between "H6-1" on
control to terminal 4
on the motor?
No
Check operation of
lid switch, check
wiring to control.
Is there voltage
between "H6-5" and
terminal 4 on the
motor?
Yes
No
Yes
High speed
(2a)
Low speed
Is there voltage
between "H6-6" and
terminal 4 on the
motor?
No
(3a)
Replace control
Is there voltage
across terminals 7 &
4 on the motor?
Yes
Yes
High speed
(3)
Low speed
Is there voltage
across terminals 3 &
4 on the motor?
No
No
Correct wiring
between control
and motor.
(4a)
Is there voltage
across terminals 8 &
7 on the motor?
Yes
Yes
High speed
(4)
Low speed
Is there voltage
across terminals 3 &
8 on the motor?
No
Check operation of
thermal protector
in the motor.
Replace motor if
necessary.
No
(7)
Yes
Is there voltage
between terminal 1
of the motor and
"H6-2" on the control?
(5)
Is there voltage at
"H6-4" on the control
to terminal 8 on the
motor?
No
No
Correct wiring
between motor
terminal 8 and
control.
Replace control.
Yes
(8)
Yes
(6)
Is there voltage
across terminal 1 & 8
of the motor?
No
Correct wiring
between control
and motor. Check
capacitor, replace
if necessary.
Is there voltage
between "H6-3" on
control to terminal 1
on the motor?
No
Replace control.
Yes
Yes
Replace motor.
TLW301S
84
© Copyright, Alliance Laundry Systems LLC – DO NOT COPY or TRANSMIT
39201
Troubleshooting (MDC Models)
No Agitation – Low and High Speed
120/240 VOLT 60/50 HERTZ (Refer to machine serial plate.)
1
2A
2B
3
8
6
3A
4A
4
5
7
39201
© Copyright, Alliance Laundry Systems LLC – DO NOT COPY or TRANSMIT
85
Troubleshooting (MDC Models)
47. Washer Will Not Spin – High Speed
(5)
(1)
Is there voltage
across "H6-1" on the
control and terminal
4 on the motor?
No
Check lid switch
for proper
operation. Check
wiring from control
to lid switch to
supply.
No
Replace control.
No
Correct wiring to
the motor.
(7)
(3)
No
Correct wiring
between motor
and control.
Is there voltage from
"H6-2" on control to
terminal 6 of the
motor?
No
Yes
Yes
(8)
(4)
Yes
Is there voltage
across terminals 6 &
8 of the motor?
Yes
Yes
Is there voltage
across terminals 7 &
8 of the motor?
Replace the
control.
(6)
(2)
Is there voltage
across terminals 7 &
4 on the motor?
No
Yes
Yes
Is there voltage
across "H6-5" on the
control and terminal
4 on the motor?
Is there voltage
across "H6-3" on
control to terminal 8
of the motor?
No
Check operation of
motor
thermal protector.
Replace motor if
necessary.
Is there voltage from
"H6-4" on control to
terminal 1 of the
motor?
No
Replace control.
Yes
Unit should
operate properly.
TLW291S
86
© Copyright, Alliance Laundry Systems LLC – DO NOT COPY or TRANSMIT
39201
Troubleshooting (MDC Models)
Washer Will Not Spin – High Speed
120/240 VOLT 60/50 HERTZ (Refer to machine serial plate.)
1
2
3
8
4
5
7
39201
6
© Copyright, Alliance Laundry Systems LLC – DO NOT COPY or TRANSMIT
87
Troubleshooting (MDC Models)
48. Washer Will Not Spin – Low Speed
(5)
(1)
Is there voltage
across "H6-1" on the
control and terminal
4 on the motor?
No
Check lid switch
for proper
operation. Check
wiring from control
to lid switch to
supply.
No
Replace control.
No
Correct wiring to
the motor.
(7)
(3)
No
Correct wiring
between motor
and control.
Is there voltage from
"H6-2" on control to
terminal 6 of the
motor?
No
Yes
Yes
(8)
(4)
Yes
Is there voltage
across terminals 6 &
8 of the motor?
Yes
Yes
Is there voltage
across terminals 3 &
8 of the motor?
Replace the
control.
(6)
(2)
Is there voltage
across terminals 3 &
4 on the motor?
No
Yes
Yes
Is there voltage
across "H6-6" on the
control and terminal
4 on the motor?
Is there voltage
across "H6-3" on
control to terminal 8
of the motor?
No
Check operation of
motor
thermal protector.
Replace motor if
necessary.
Is there voltage from
"H6-4" on control to
terminal 1 of the
motor?
No
Replace control.
Yes
Unit should
operate properly.
TLW293S
88
© Copyright, Alliance Laundry Systems LLC – DO NOT COPY or TRANSMIT
39201
Troubleshooting (MDC Models)
Washer Will Not Spin – Low Speed
120/240 VOLT 60/50 HERTZ (Refer to machine serial plate.)
1
2
3
8
4
5
7
39201
6
© Copyright, Alliance Laundry Systems LLC – DO NOT COPY or TRANSMIT
89
Notes
90
© Copyright, Alliance Laundry Systems LLC – DO NOT COPY or TRANSMIT
39201
Troubleshooting
NetMaster Models
WARNING
To reduce the risk of electric shock, fire, explosion, serious injury or death:
• Disconnect electric power to the washer before servicing.
• Never start the washer with any guards/panels removed.
• Whenever ground wires are removed during servicing, these ground wires must be
reconnected to ensure that the washer is properly grounded.
W003
49. NetMaster Error Code Listing
Errors beginning with “EI” refer to NetMaster Infrared communication errors. Errors beginning with “EC”
refer to NetMaster card reader errors. All other errors refer to electronic control errors.
Display
Description
Cause/Corrective Action
EI:00
General Communications
Error
Communication problem. Re-aim Micro-wand and try again.
EI:01
Bad Transmission
Communication problem. Re-aim Micro-wand and try again.
EI:02
Device Timeout
Communication problem. Re-aim Micro-wand and try again.
EI:03
Invalid Command Code
Wrong machine type. Before downloading, ensure data is for
current machine type.
EI:04
Expecting Upload Request
Communication problem. Re-aim Micro-wand and try again.
EI:05
Invalid or Out-of-Range
Data
Wrong machine type. Before downloading, ensure data is for
current machine type.
EI:06
Invalid Data Code
Wrong machine type. Before downloading, ensure data is for
current machine type.
EI:07
Error Writing to RTC
Control failure. Control may need to be replaced.
EI:08
Error Writing to EEPROM
Control failure. Control may need to be replaced.
EI:09
CRC-16 Error
Communication problem. Re-aim Micro-wand and try again.
EI:0A
Invalid Machine Type
Wrong machine type. Before downloading, ensure data is for
current machine type.
EI:0F
Invalid Wakeup or IR
Disabled
Communication problem or IR is disabled. Manually enable IR on
control/Re-aim Micro-wand and try again.
EC:00
General Communication
Error
Communication problem. Try card again.
EC:02
Timeout Error
Communication problem. Try card again.
39201
© Copyright, Alliance Laundry Systems LLC – DO NOT COPY or TRANSMIT
91
Troubleshooting (NetMaster Models)
Display
Description
Cause/Corrective Action
EC:03
Invalid Command Code
Wrong machine type. Before downloading, ensure data is for
current machine type.
EC:05
Invalid or Out-of-Range
Data
Wrong machine type. Before downloading, ensure data is for
current machine type.
EC:06
Invalid Data Code
Wrong machine type. Before downloading, ensure data is for
current machine type.
EC:09
Corrupted Data Error
Communication error. Try card again.
EC:0A
Invalid Machine Type
Wrong machine type. Before downloading, ensure data is for
current machine type.
EC:19
No Card Reader
Communication
Communication problem. Power down, power up and try again. If
error persists, control or reader is bad.
EC:20
Unreadable Card
Bad card/ dirty contact. Clean chip on card or card reader contacts.
Try card again. If error persists, card may be bad.
EC:21
Security ID Mismatch
Wrong card. Use card with correct security code.
EC:22
Site Code Mismatch
Wrong card. Use card with correct site code.
EC:23
Card Maximum Value
Exceeded
Value on card over max. Use a card which does not exceed
maximum value.
EC:24
Insufficient Memory on
Card
Card memory is full. Download card contents to PC and clear card
for re-use.
EC:25
Card Reader Malfunction
Bad Card Reader. Card Reader may need to be replaced.
EC:26
Card Write Error
Try card again. If error persists, card may be bad.
EC:27
Diagnostic Test Card Write
Failure
Bad Card Reader. Card Reader may need to be replaced.
EC:28
Diagnostic Test Card Read
Failure
Bad Card Reader. Card Reader may need to be replaced.
EC:29
Diagnostic Test Memory
Test Failure
Bad Card Reader. Card Reader may need to be replaced.
EC:2A
Diagnostic Test Card
Interface Failure
Bad Card Reader. Card Reader may need to be replaced.
EC:2b
Diagnostic Test Flash
Checksum Failure
Bad Card Reader. Card Reader may need to be replaced.
EC:2C
Bad Biberon or Nonbiberon Device
Bad Card Reader. Card Reader may need to be replaced.
EC:2d
Firmware Update Failed,
S/W (Software) Intact
Firmware load failed. Card Reader may need to be replaced.
92
© Copyright, Alliance Laundry Systems LLC – DO NOT COPY or TRANSMIT
39201
Troubleshooting (NetMaster Models)
Display
Description
Cause/Corrective Action
EC:2E
Firmware Update Failed, S/
W Not Intact
Bad firmware in reader. Card Reader may need to be replaced.
EC:2F
Firmware Updated, S/W
Not Intact
Bad firmware in reader. Card Reader may need to be replaced.
EC:30
Timeout Error
Card Reader may need to be replaced.
EC:31
Hotlisted Card Inserted
Into Reader
Card hotlisted. Control will destroy card.
EC:50
Loyalty Purse Read Error
Try card again. If error persists, card may be bad.
EC:56
Loyalty Purse Write Error
Try card again. If error persists, card may be bad.
Right most
DP
(decimal
point)
Lit
Network Communication
Error
Communication problem. Wait for 1.5 minutes for error to clear. If
it doesn’t, power-down and power-up the machine. If error persists,
control or Network Board may need to be replaced.
Err
Coin Error
Invalid coin pulse.
Alrm
Break-in Alarm Error
Service door or coin vault switches.
OFF
Break-in Alarm Shutdown
Error
Service door or coin vault switches.
E:FL
Fill Error
Pressure switch fails to open in 30 minutes in any fill agitate cycle.
E:dr
Drain Error
Maximum drain time exceeded or water sensed at end of spin step.
E:00
General Error
Re-aim Micro-wand and try again.
E:01
Proximity Error
Micro-wand is improperly aimed at infrared communicator (angle
or distance). Re-aim Micro-wand and try again.
E:02
IR Communication
Disconnection
Micro-wand removed before communication complete. Re-aim
micro-wand and try again.
E:05
Invalid Value
Communication
Invalid code downloaded from Micro-wand to Electronic Control.
Before downloading, ensure data is for current machine type.
E:07
Inoperative Control
Replace control.
E:08
Inoperative Control
Replace control.
E:09
Proximity Error
Micro-wand is improperly aimed at infrared communicator (angle
or distance). Re-aim Micro-wand and try again.
EI:0A
Proximity Error
Micro-wand is improperly aimed at infrared communicator (angle
or distance). Re-aim Micro-wand and try again.
39201
© Copyright, Alliance Laundry Systems LLC – DO NOT COPY or TRANSMIT
93
Troubleshooting (NetMaster Models)
Display
Description
Cause/Corrective Action
E:0B
IR Communication
Disconnection
Micro-wand removed before communication complete. Re-aim
Micro-wand and try again.
E:0C
IR Communication
Disconnection
Micro-wand removed before communication complete. Re-aim
Micro-wand and try again.
E:0d
Pressure Switch Error
Check fill and drain hoses for improper installation and kinks.
Check fill electrical circuit. Replace inoperative switches or wires.
E:0F
IR Communicator
Programmed Off
Reprogram infrared communicator on. Manually enable IR on
control/Re-aim micro-wand and try again.
Err
Coin Error
Inoperative coin sensor. Check coin drop area and remove
obstructions. Possible tampering. Evaluate security procedures.
94
© Copyright, Alliance Laundry Systems LLC – DO NOT COPY or TRANSMIT
39201
Troubleshooting (NetMaster Models)
50. Microwand Does Not Communicate With Control
Microwand Does Not Communicate With Control.
Attempt to communicate with the
electronic control from the Microwand.
Is there
acknowledgement of
any kind from the
control?
No
Aim the
Microwand closer
and try again.
Yes
Is there any control
response?
No
Yes
Does the Microwand
prompt: Control
Mismatch error
Yes
Make sure
Microwand
selection was for
the proper
machine type and
control generation
type.
Check the following:
- Microwand battery voltage
- Blockage of IR window on control
- Attachment of IR cup to
Microwand.
No
Does the electronic
control display "E:OF"
or "-C-"?
-C-
Communication
sequence checks
out properly.
E:OF
Has IR communication
been turned off?
Yes
Turn IR
communication on
(refer to
programming
manual).
No
Change electronic
control and repeat
procedure.
TLW278S
39201
© Copyright, Alliance Laundry Systems LLC – DO NOT COPY or TRANSMIT
95
Troubleshooting (NetMaster Models)
51. No Visible Display on Control
No Visible Display on Control
Note: Assuming
the unit is
plugged into a
live outlet
(1)
Is there voltage at
the primary side of
the transformer?
No
Check wiring to
transformer.
Check supply
voltage to unit.
Yes
(2)
Is there 24 volts at
the secondary side
of the transformer?
No
Replace
transformer.
Yes
(3)
Is there 24 volts AC
across terminals
"H1-1" & "H1-3" on the
control board?
No
Check wiring
between control
and transformer.
Yes
Replace control.
TLW279S
96
© Copyright, Alliance Laundry Systems LLC – DO NOT COPY or TRANSMIT
39201
Troubleshooting (NetMaster Models)
No Visible Display on Control
1
L1
N
120/240 VOLT 60/50 HERTZ (Refer to machine serial plate.)
LID
SWITCH
BLK
WHT
CONTROL TRANSFORMER
24 VAC
4N25
H5
3
4
100 OHM
1/4 WATT
2
1
4N25
100 OHM
1/4 WATT
AVAILABLE OUTPUT
OPTO OFF WHEN MACHINE RUNNING
Vmax = 28VDC Imax = 5ma
3
4
WHT/BLU
(SEE CONNECTION DIAGRAM DETAIL
FOR OPTIONAL CARD READY AND COIN
READY TRANSFORMER WIRING).
H1
2
2
3
1
3
1
START PULSE INPUT
INPUT LED ENERGIZED = START PULSE ACTIVE
I in = 9-30 ma TIME = 45 msec min.
3
24 VAC RETURN
2
RED/BLU
BLK
6
PRESSURE SWITCH
9
24 VAC
WHT
2
CONTROL
POWER
SUPPLY
3
COMM
2
SD SW
1
CV SW
5
CD1 SVDC
4
CD1
6
CD1 COMM
8
CD2 SVDC
7
CD2
9
CD2 COMM
COMM
12
COMM
HOT
PRESSURE SWITCH
AND
WATER CIRCUIT
LID SWITCH SENSE,
MOTOR DIRECTION
AND CONTROL, AND
TIMING CIRCUIT
H1
TXD
RXD
3
VUR
6
NAG
7
NRFA
12
COMM
13
COMM
10
SVDC
14
NBP
11
CRP
COLD
1
CW
7
P
GRY
MIXING VALVE
4
4
ORG
H4
K6 PUMP
2
5
HW
4
LS
1
PNK/BLU
MOTOR SPEED
L
6
MOTOR
MASTER
NETMASTER
CONTROL
ASSEMBLY
3
PNK
HIGH
7
H
5
LOW
WHT
PE
11
BLU/WHT
8
BLU
1
K5
K4
MOTOR
DIRECTION
START
6
H6
4
TP
AGITATE
SPIN
CAPACITOR
WHT/RED
10
PS
5
RED
SEE VEND APPLICATION DETAIL
(FOR NETWORK APPLICATION SEE SUPPLIMENTAL NETWORK DIAGRAM)
H7
8
4
RED
1
24VDC
2
SVDC
3
8
24VDC
2
9
SVDC
MOTOR
WHT/RED
K3
H3
BRN
SCHEMATIC
VEND APPLICATIONS DETAILS
H7
WHT/BLK
3
2
BLU/RED
MANUAL
PROGRAMMING
COIN
DROP
VEND
OPTIONS
H7
WHT/BLK
COIN VAULT
BLU/RED
2
CARD
READY
VEND
OPTION
H7
WHT/BLK
MANUAL
3
2
BLU/RED
1
WHT/ORG
1
5
GRY/YEL
5
5
PNK/YEL
4
4
WHT/RED
6
6
RED
8
WHT
7
BLK
9
9
10
10
10
11
11
11
12
12
12
4
COIN DROP
#1
(OPTIONAL)
WHT
6
8
7
C0IN DROP
#2
(OPTIONAL)
9
H1
1
PROGRAMMING
H1
2
2
4
4
2
4
H3
H3
5
BLU
5
5
4
BRN
4
4
3
PNK
3
3
6
6
6
7
7
7
12
BLK
12
12
13
BLK
13
13
10
RED
10
10
14
14
11
11
1
1
1
2
2
8
8
9
9
5
PLEASE CONSULT
CARDREADER
INSTALLATION
MANUAL FOR PROPER
INTERFACE CONNECTIONS
TO CONTROL
J1
14
11
RED
(SINGLE COIN,
DUAL COIN
COIN READY)
8
7
H1
H3
CARDREADER
3
SERVICE DOOR
WHT
SMART
CARD
VEND
OPTION
2
8
9
4
3
6
7
12
13
10
14
11
1
2
8
9
TLW318S
39201
© Copyright, Alliance Laundry Systems LLC – DO NOT COPY or TRANSMIT
97
Troubleshooting (NetMaster Models)
52. Coins Ignored When Entered
Coins Ignored When Entered.
Start Coin Drop Diagnostic Test. Refer
to programming manual.
Does the count on the
display increment
properly after entering
coins?
Yes
Reset control to
ready mode.
No
(1)
Is "H7" connector
properly seated on the
control board?
No
Properly seat
connection and
conduct diagnostic
test again.
(2)
Yes
From the coin drop, is
the 3-pin plug properly
connected?
(3)
Yes
Are the wires exiting the
coin drop optical sensor
cracked or broken?
No
No
Properly reseat
connection and
conduct diagnostic
test again.
Yes
Replace the
coin drop.
Replace electronic
control.
TLW281S
98
© Copyright, Alliance Laundry Systems LLC – DO NOT COPY or TRANSMIT
39201
Troubleshooting (NetMaster Models)
Coins Ignored When Entered
VEND APPLICATION DETAILS
GROUND TO
TOP PANEL
COIN DROP
VEND OPTIONS
3
2
1
GROUND TO
GRAPHIC PANEL
H7
1
11
WHT/RED
6
PNK/YEL
4
GRY/YEL
5
1
WHT
1
1
RED
2
3
1
H3
5
4
BLU/RED
3
COIN VAULT
SWITCH
WHT/BLK
SERVICE DOOR
6
7
WHT/ORG
12
1
2
3
1
2
3
13
10
14
11
WHT/BLK
1
2
8
(SINGLE COIN,DUAL COIN,COIN READY)
9
SMART CARD
VEND OPTION
H7
12
WHT
11
SEE VEND APPLICATION DETAIL
2
3
H7
12
8
(FOR NETWORK APPLICATION SEE SUPPLIMENTAL NETWORK DIAGRAM)
COIN DROP 2
(OPTIONAL)
2
BLK
WHT
RED
7
GROUND TO
CABINET
GRN/YEL
9 9
GROUND TO
CONTROL CHASSIS
2
9
3
GRN/YEL
4
10
BLK
GRN/YEL
H5
3
5 5
H6
5
5
BLU
6 6
4
4
RED
5 5
3
3
BRN
4 4
6
6
PNK
7 7
2
2
WHT/RED
2 2
BLU
4
5
10
9
7
3 3
1 1
2
3
1
WHT/BLU
RED/BLU
3
2
1
4
H1
H3
5
4 4
2 2
4
3
6
WHT/
BLU
RED/
BLU
PNK
MOTOR
RED
WHT
TRANSFORMER
(SEE DETAIL)
TO NETWORK
BOARD
(IF APPLICABLE)
7
12
13
1
6
3
8
4
CA
3
2
1
4
1
2
1
6
3
8
4
WHT/RED
8 8
8
7 7
RED
BRN
11
6
HOUSING
CIT
PA
OR
WHT
3
1
RED
RED
2
3
RED
MIXING VALVE
HOT COLD
BLK
BLK
2
WHT
10
1 2
1 2
14
RED NATURAL
PNK/BLU
11
1
2
6
8
4
9
H4
4
ORG
4
1
ORG
1 1
BLK
BLK
WHT
COIN DROP 1
(OPTIONAL)
12
WHT/RED
2
3
5
BLU/RED
10
MANUAL PROGRAMMING ACCESS
MANUAL PROGRAMMING PLUG MUST BE
DISCONNECTED TO ACCESS MANUAL
PROGRAMMING MODE AND RECONNECTED
FOR NORMAL OPERATION.
1
1
GRY
5
5
BLU/WHT
3
6
9
2
3
6
9
2
PRESSURE
SWITCH
9
7
CONNECTOR
8
2
WHT/BLK
3
1
H3
5
BLU
GRN
WHT
GROUND TO
REAR PANEL
7
BLK
12
RED
1
1
H6
N.O.
TRANSFORMER DETAIL
(CARD READY AND COIN READY
MODELS ONLY)
10
7 12 13 10 14 11
PNK/BLU
PNK/BLU
13
RED
6
LID
SWITCH
COM.
BLK
6
BLK
3
POWER
CORD
3
PNK
4
RIDGE OR TINNED
TERMINAL = NEUTRAL
BLK
4
BRN
5
GRY
3 3
1
2
8
9
14
11
CARDREADER
NETMASTER CONTROL
1
2
24VAC
8
TO CONTROL
9
24VAC
CARD
READY
VEND OPTION
3
2
1
4
RED
RED
RED
RED
250mA MAX
TRANSFORMER
FOR CUSTOMER
BLK
BLK
BLK
BLK
BLK
DEVICE
H7
BLK
INSTALLED VENDING
6
5
4
3
2
1
6
5
4
3
2
1
12
WHT
11
CONNECTION DIAGRAM
6
4
10
BLU
9
8
2
WHT/BLK
3
1
FAILURE TO INSTALL, MAINTAIN,
AND/OR OPERATE THIS MACHINE
ACCORDING TO MANUFACTURER'S
INSTRUCTIONS MAY RESULT IN
CONDITIONS WHICH CAN PRODUCE
BODILY INJURY AND/OR PROPERTY
DAMAGE.
BLK
7
BLU
BLU/RED
MANUAL PROGRAMMING ACCESS
MANUAL PROGRAMMING PLUG MUST BE
DISCONNECTED TO ACCESS MANUAL
PROGRAMMING MODE AND RECONNECTED
FOR NORMAL OPERATION.
BLK
5
1
H3
5
2
TO MACHINE HARNESS
4
PLEASE CONSULT
CARDREADER INSTALLATION
MANUAL FOR PROPER
INTERFACE CONNECTION
TO CONTROL
3
6
7
12
13
10
14
11
1
2
8
9
THIS MACHINE MANUFACTURED
UNDER ONE OR MORE OF THE
FOLLOWING PATENTS:
UNITED STATES NO: 3,253,874;
3,838,755; 3,845,642
CANADIAN NO: 1,008,265;
994,685
OTHER PATENTS PENDING
NOTE
POWER SUPPLY WIRING MUST
HAVE CORRECT POLARITY AND
GROUNDING FOR THE UNIT TO
OPERATE CORRECTLY.
TLW282S
39201
© Copyright, Alliance Laundry Systems LLC – DO NOT COPY or TRANSMIT
99
Troubleshooting (NetMaster Models)
53. Washer Will Not Fill (Pressure Switch Diagnostic)
(1)
Is the lid closed?
No
Close lid and
check switch for
continuity.
Yes
(2)
Is there
120 or 240* volts AC
between pressure
switch terminal 1 and
neutral?
No
Check wiring
between pressure
switch and lid
switch.
Yes
(3)
Is there
120 or 240* volts AC
between pressure
switch terminal 2 and
neutral?
No
Check for proper
function of
pressure switch,
pressure hose and
accumulator.
Replace if
necessary.
Yes
(4)
Is there
120 or 240* volts AC
between terminal
"H4-5" on the control
and neutral?
No
Check wiring
between control
board and
pressure switch.
Yes
Refer to Washer
will not fill (mixing
valve diagnostics)
*Refer to machine serial plate for correct voltage.
TLW303S
100
© Copyright, Alliance Laundry Systems LLC – DO NOT COPY or TRANSMIT
39201
Troubleshooting (NetMaster Models)
Washer Will Not Fill (Pressure Switch Diagnostic)
1
L1
N
120/240 VOLT 60/50 HERTZ (Refer to machine serial plate.)
LID
SWITCH
BLK
2
WHT
CONTROL TRANSFORMER
3
24 VAC
4N25
H5
3
4
100 OHM
1/4 WATT
2
1
4N25
100 OHM
1/4 WATT
AVAILABLE OUTPUT
OPTO OFF WHEN MACHINE RUNNING
Vmax = 28VDC Imax = 5ma
4
START PULSE INPUT
INPUT LED ENERGIZED = START PULSE ACTIVE
I in = 9-30 ma TIME = 45 msec min.
1
WHT/BLU
(SEE CONNECTION DIAGRAM DETAIL
FOR OPTIONAL CARD READY AND COIN
READY TRANSFORMER WIRING).
H1
2
4
3
1
3
3
24 VAC RETURN
2
RED/BLU
BLK
6
PRESSURE SWITCH
9
24 VAC
WHT
2
CONTROL
POWER
SUPPLY
SD SW
1
CV SW
5
CD1 SVDC
4
CD1
6
CD1 COMM
8
CD2 SVDC
7
CD2
9
CD2 COMM
10
PE
11
COMM
12
HOT
PRESSURE SWITCH
AND
WATER CIRCUIT
3
VUR
6
NAG
7
NRFA
12
COMM
13
COMM
10
SVDC
14
NBP
11
CRP
COLD
H4
LID SWITCH SENSE,
MOTOR DIRECTION
AND CONTROL, AND
TIMING CIRCUIT
H1
RXD
ORG
1
CW
7
P
GRY
MIXING VALVE
4
TXD
HW
4
K6 PUMP
2
4
BLU/WHT
8
COMM
5
PS
5
LS
1
PNK/BLU
MOTOR SPEED
L
6
MOTOR
MASTER
NETMASTER
CONTROL
ASSEMBLY
3
PNK
HIGH
7
H
5
LOW
WHT
COMM
2
BLU
1
K5
K4
MOTOR
DIRECTION
START
6
H6
4
TP
AGITATE
SPIN
CAPACITOR
WHT/RED
3
RED
SEE VEND APPLICATION DETAIL
(FOR NETWORK APPLICATION SEE SUPPLIMENTAL NETWORK DIAGRAM)
H7
8
4
RED
1
24VDC
2
SVDC
3
8
24VDC
2
9
SVDC
MOTOR
WHT/RED
K3
H3
BRN
SCHEMATIC
VEND APPLICATIONS DETAILS
H7
WHT/BLK
3
2
BLU/RED
MANUAL
PROGRAMMING
COIN
DROP
VEND
OPTIONS
H7
WHT/BLK
COIN VAULT
BLU/RED
2
CARD
READY
VEND
OPTION
H7
WHT/BLK
MANUAL
3
2
BLU/RED
1
WHT/ORG
1
5
GRY/YEL
5
5
PNK/YEL
4
4
WHT/RED
6
6
RED
8
WHT
7
BLK
9
9
10
10
10
11
11
11
4
COIN DROP
#1
(OPTIONAL)
WHT
6
8
7
C0IN DROP
#2
(OPTIONAL)
9
12
1
PROGRAMMING
12
H1
H1
2
2
4
4
H3
2
4
H3
H3
5
BLU
5
5
4
BRN
4
4
3
PNK
3
3
6
6
6
7
7
7
12
BLK
12
12
13
BLK
13
13
10
RED
10
10
14
14
11
11
1
1
1
2
2
8
8
9
9
5
PLEASE CONSULT
CARDREADER
INSTALLATION
MANUAL FOR PROPER
INTERFACE CONNECTIONS
TO CONTROL
J1
14
11
RED
(SINGLE COIN,
DUAL COIN
COIN READY)
8
7
12
H1
CARDREADER
3
SERVICE DOOR
WHT
SMART
CARD
VEND
OPTION
2
8
9
4
3
6
7
12
13
10
14
11
1
2
8
9
TLW319S
39201
© Copyright, Alliance Laundry Systems LLC – DO NOT COPY or TRANSMIT
101
Troubleshooting (NetMaster Models)
54. Washer Will Not Fill (Mixing Valve Diagnostic)
(1)
Note: Assuming No Fill (pressure
switch diagnostics) checks out okay.
Is there voltage from
either "H4-4" or "H4-1"
to the Neutral wire?
No
Replace control.
Yes
(2)
Is there voltage
across either the hot
or cold coil to
neutral?
No
Correct wiring
between mixing
valve and control.
Yes
(3)
Is there
120 or 240* volts AC
across the coil of
either the hot or cold
valve?
Yes
Does water flow
through the mixing
valve?
No
Replace mixing
valve.
Yes
No
(4)
Is there
120 or 240* volts AC
between either the
hot or cold coil to
terminal 4 on the
motor?
Unit operates
properly.
No
Correct wiring
between motor
and neutral wire.
Yes
(5)
Is there
120 or 240* volts AC
between either the
hot or cold coil to
terminal 8 on the
motor?
No
Thermal protector
in motor open.
Replace motor.
Yes
Correct wiring
between terminal 8
of the motor and
neutral side of the
hot/cold coil.
*Refer to machine serial plate for correct voltage.
102
© Copyright, Alliance Laundry Systems LLC – DO NOT COPY or TRANSMIT
TLW304S
39201
Troubleshooting (NetMaster Models)
Washer Will Not Fill (Mixing Valve Diagnostic)
N
L1
120/240 VOLT 60/50 HERTZ (Refer to machine serial plate.)
LID
SWITCH
BLK
WHT
CONTROL TRANSFORMER
24 VAC
4N25
H5
3
4
100 OHM
1/4 WATT
2
1
4N25
100 OHM
1/4 WATT
AVAILABLE OUTPUT
OPTO OFF WHEN MACHINE RUNNING
Vmax = 28VDC Imax = 5ma
4
START PULSE INPUT
INPUT LED ENERGIZED = START PULSE ACTIVE
I in = 9-30 ma TIME = 45 msec min.
1
WHT/BLU
(SEE CONNECTION DIAGRAM DETAIL
FOR OPTIONAL CARD READY AND COIN
READY TRANSFORMER WIRING).
H1
2
3
1
3
3
24 VAC RETURN
2
RED/BLU
BLK
6
COMM
2
SD SW
1
CV SW
5
CD1 SVDC
4
CD1
6
CD1 COMM
8
CD2 SVDC
7
CD2
9
CD2 COMM
12
HOT
HW
4
RXD
VUR
6
NAG
7
NRFA
12
COMM
13
COMM
10
SVDC
14
NBP
11
CRP
COLD
1
CW
7
P
GRY
MIXING VALVE
2
TXD
ORG
H4
LID SWITCH SENSE,
MOTOR DIRECTION
AND CONTROL, AND
TIMING CIRCUIT
3
BLU/WHT
4
K6 PUMP
H1
4
3
8
PRESSURE SWITCH
AND
WATER CIRCUIT
COMM
5
PS
5
LS
1
5
MOTOR SPEED
L
6
MOTOR
MASTER
NETMASTER
CONTROL
ASSEMBLY
4
PNK/BLU
3
PNK
HIGH
7
H
5
LOW
WHT
COMM
2
BLU
1
K5
K4
MOTOR
DIRECTION
START
6
H6
4
TP
AGITATE
SPIN
CAPACITOR
WHT/RED
PE
11
WHT
2
RED
SEE VEND APPLICATION DETAIL
(FOR NETWORK APPLICATION SEE SUPPLIMENTAL NETWORK DIAGRAM)
3
10
1
CONTROL
POWER
SUPPLY
H7
PRESSURE SWITCH
9
24 VAC
8
4
RED
1
24VDC
2
SVDC
3
8
24VDC
2
9
SVDC
MOTOR
WHT/RED
K3
H3
BRN
SCHEMATIC
VEND APPLICATIONS DETAILS
H7
WHT/BLK
3
2
BLU/RED
MANUAL
PROGRAMMING
COIN
DROP
VEND
OPTIONS
H7
WHT/BLK
COIN VAULT
BLU/RED
2
WHT/ORG
1
1
CARD
READY
VEND
OPTION
H7
WHT/BLK
MANUAL
3
2
BLU/RED
1
PROGRAMMING
GRY/YEL
5
5
PNK/YEL
4
4
WHT/RED
6
6
RED
8
WHT
7
BLK
9
9
10
10
10
11
11
11
5
4
COIN DROP
#1
(OPTIONAL)
WHT
6
8
7
C0IN DROP
#2
(OPTIONAL)
9
12
12
H1
H1
2
2
4
4
H3
2
4
H3
H3
5
BLU
5
5
4
BRN
4
4
3
PNK
3
3
6
6
6
7
7
7
12
BLK
12
12
13
BLK
13
13
10
RED
10
10
14
14
11
11
1
1
1
2
2
8
8
9
9
5
PLEASE CONSULT
CARDREADER
INSTALLATION
MANUAL FOR PROPER
INTERFACE CONNECTIONS
TO CONTROL
J1
14
11
RED
(SINGLE COIN,
DUAL COIN
COIN READY)
8
7
12
H1
CARDREADER
3
SERVICE DOOR
WHT
SMART
CARD
VEND
OPTION
2
8
9
4
3
6
7
12
13
10
14
11
1
2
8
9
TLW320S
39201
© Copyright, Alliance Laundry Systems LLC – DO NOT COPY or TRANSMIT
103
Troubleshooting (NetMaster Models)
55. Washer Over Fills
Washer Over Fills.
With power
disconnected, does
the unit still over
flow?
Yes
Replace mixing
valve.
No
Unit works
properly.
No
Reconnect
power.
(1)
Is there voltage
on either the orange
wire of the hot valve
or gray wire of the cold
valve to neutral?
Yes
Check for
incorrect or
damaged wiring
between water
valve and L1
TLW287S
104
© Copyright, Alliance Laundry Systems LLC – DO NOT COPY or TRANSMIT
39201
Troubleshooting (NetMaster Models)
Washer Over Fills
N
L1
120/240 VOLT 60/50 HERTZ (Refer to machine serial plate.)
LID
SWITCH
BLK
WHT
CONTROL TRANSFORMER
24 VAC
4N25
H5
3
4
100 OHM
1/4 WATT
2
1
4N25
100 OHM
1/4 WATT
AVAILABLE OUTPUT
OPTO OFF WHEN MACHINE RUNNING
Vmax = 28VDC Imax = 5ma
4
START PULSE INPUT
INPUT LED ENERGIZED = START PULSE ACTIVE
I in = 9-30 ma TIME = 45 msec min.
1
WHT/BLU
(SEE CONNECTION DIAGRAM DETAIL
FOR OPTIONAL CARD READY AND COIN
READY TRANSFORMER WIRING).
H1
2
3
1
3
3
24 VAC RETURN
2
RED/BLU
BLK
6
PRESSURE SWITCH
9
24 VAC
1
WHT
2
CONTROL
POWER
SUPPLY
SD SW
1
CV SW
5
CD1 SVDC
4
CD1
6
CD1 COMM
8
CD2 SVDC
7
CD2
9
CD2 COMM
10
PE
11
COMM
12
HOT
PRESSURE SWITCH
AND
WATER CIRCUIT
4
3
VUR
6
NAG
7
NRFA
12
COMM
13
COMM
10
SVDC
14
NBP
11
CRP
COLD
H4
LID SWITCH SENSE,
MOTOR DIRECTION
AND CONTROL, AND
TIMING CIRCUIT
RXD
ORG
1
CW
7
P
GRY
MIXING VALVE
H1
TXD
HW
4
K6 PUMP
2
4
BLU/WHT
8
COMM
5
PS
5
LS
1
PNK/BLU
MOTOR SPEED
L
6
MOTOR
MASTER
NETMASTER
CONTROL
ASSEMBLY
3
PNK
HIGH
7
H
5
LOW
WHT
COMM
2
BLU
1
K5
K4
MOTOR
DIRECTION
START
6
H6
4
TP
AGITATE
SPIN
CAPACITOR
WHT/RED
3
RED
SEE VEND APPLICATION DETAIL
(FOR NETWORK APPLICATION SEE SUPPLIMENTAL NETWORK DIAGRAM)
H7
8
4
RED
1
24VDC
2
SVDC
3
8
24VDC
2
9
SVDC
MOTOR
WHT/RED
K3
H3
BRN
SCHEMATIC
VEND APPLICATIONS DETAILS
H7
WHT/BLK
3
2
BLU/RED
MANUAL
PROGRAMMING
COIN
DROP
VEND
OPTIONS
H7
WHT/BLK
COIN VAULT
BLU/RED
2
CARD
READY
VEND
OPTION
H7
WHT/BLK
MANUAL
3
2
BLU/RED
1
WHT/ORG
1
5
GRY/YEL
5
5
PNK/YEL
4
4
WHT/RED
6
6
RED
8
WHT
7
BLK
9
9
10
10
10
11
11
11
12
12
4
COIN DROP
#1
(OPTIONAL)
WHT
6
8
7
C0IN DROP
#2
(OPTIONAL)
9
H1
1
PROGRAMMING
12
H1
2
2
4
4
2
4
H3
H3
5
BLU
5
5
4
BRN
4
4
3
PNK
3
3
6
6
6
7
7
7
12
BLK
12
12
13
BLK
13
13
10
RED
10
10
14
14
11
11
1
1
1
2
2
8
8
9
9
5
PLEASE CONSULT
CARDREADER
INSTALLATION
MANUAL FOR PROPER
INTERFACE CONNECTIONS
TO CONTROL
J1
14
11
RED
(SINGLE COIN,
DUAL COIN
COIN READY)
8
7
H1
H3
CARDREADER
3
SERVICE DOOR
WHT
SMART
CARD
VEND
OPTION
2
8
9
4
3
6
7
12
13
10
14
11
1
2
8
9
TLW321S
39201
© Copyright, Alliance Laundry Systems LLC – DO NOT COPY or TRANSMIT
105
Troubleshooting (NetMaster Models)
56. No Agitation – Low and High Speed
(2b)
(1)
Is there voltage
between "H6-1" on
control to terminal 4
on the motor?
No
Check operation of
lid switch, check
wiring to control.
Is there voltage
between "H6-5" and
terminal 4 on the
motor?
Yes
No
Yes
High speed
(2a)
Low speed
Is there voltage
between "H6-6" and
terminal 4 on the
motor?
No
(3a)
Replace control
Is there voltage
across terminals 7 &
4 on the motor?
Yes
Yes
High speed
(3)
Low speed
Is there voltage
across terminals 3 &
4 on the motor?
No
No
Correct wiring
between control
and motor.
(4a)
Is there voltage
across terminals 3 &
7 on the motor?
Yes
Yes
High speed
(4)
Low speed
Is there voltage
across terminals 3 &
8 on the motor?
No
Check operation of
thermal protector
in the motor.
Replace motor if
necessary.
No
(7)
Yes
Is there voltage
between terminal 1
of the motor and
"H6-2" on the control?
(5)
Is there voltage at
"H6-4" on the control
to terminal 8 on the
motor?
No
No
Correct wiring
between motor
terminal 8 and
control.
Replace control.
Yes
(8)
Yes
(6)
Is there voltage
across terminal 1 & 8
of the motor?
No
Correct wiring
between control
and motor. Check
capacitor, replace
if necessary.
Is there voltage
between "H6-3" on
control to terminal 1
on the motor?
No
Replace control.
Yes
Yes
Replace motor.
TLW289S
106
© Copyright, Alliance Laundry Systems LLC – DO NOT COPY or TRANSMIT
39201
Troubleshooting (NetMaster Models)
No Agitation – Low and High Speed
L1
N
120/240 VOLT 60/50 HERTZ (Refer to machine serial plate.)
LID
SWITCH
BLK
WHT
CONTROL TRANSFORMER
24 VAC
4N25
H5
3
4
100 OHM
1/4 WATT
2
1
4N25
100 OHM
1/4 WATT
4
AVAILABLE OUTPUT
OPTO OFF WHEN MACHINE RUNNING
Vmax = 28VDC Imax = 5ma
WHT/BLU
(SEE CONNECTION DIAGRAM DETAIL
FOR OPTIONAL CARD READY AND COIN
READY TRANSFORMER WIRING).
H1
2
3
1
3
1
START PULSE INPUT
INPUT LED ENERGIZED = START PULSE ACTIVE
I in = 9-30 ma TIME = 45 msec min.
3
24 VAC RETURN
2
RED/BLU
BLK
6
PRESSURE SWITCH
9
24 VAC
WHT
1
2
CONTROL
POWER
SUPPLY
3
COMM
2
SD SW
1
CV SW
5
CD1 SVDC
4
CD1
6
CD1 COMM
8
CD2 SVDC
7
CD2
9
CD2 COMM
PS
5
HOT
PRESSURE SWITCH
AND
WATER CIRCUIT
HW
4
COMM
2A
GRY
2B
P
MIXING VALVE
K6 PUMP
LS
1
PNK/BLU
LID SWITCH SENSE,
MOTOR DIRECTION
AND CONTROL, AND
TIMING CIRCUIT
H1
2
4
MOTOR SPEED
6
L
PNK
5
5
TXD
4
RXD
3
VUR
6
NAG
7
NRFA
12
COMM
13
COMM
10
SVDC
14
NBP
11
CRP
1
24VDC
2
SVDC
8
24VDC
9
SVDC
H
8
NETMASTER
CONTROL
ASSEMBLY
MOTOR
MASTER
HIGH
7
BLU
K5
1
6
K4
START
6
H6
MOTOR
DIRECTION
SPIN
CAPACITOR
8
4
RED
3
2
K3
4
TP
AGITATE
4
H3
3A
3
LOW
3
WHT
COMM
12
COLD
CW
WHT/RED
PE
11
ORG
H4
1
7
10
BLU/WHT
8
RED
SEE VEND APPLICATION DETAIL
(FOR NETWORK APPLICATION SEE SUPPLIMENTAL NETWORK DIAGRAM)
H7
4A
MOTOR
BRN
WHT/RED
5
SCHEMATIC
7
VEND APPLICATIONS DETAILS
H7
WHT/BLK
3
2
BLU/RED
MANUAL
PROGRAMMING
COIN
DROP
VEND
OPTIONS
H7
WHT/BLK
COIN VAULT
2
CARD
READY
VEND
OPTION
H7
WHT/BLK
MANUAL
1
GRY/YEL
5
5
PNK/YEL
4
4
WHT/RED
6
6
RED
8
WHT
7
COIN DROP
#1
(OPTIONAL)
8
C0IN DROP
#2
(OPTIONAL)
8
7
9
9
10
10
10
11
11
11
12
12
12
H1
H1
H1
2
2
4
4
2
4
H3
H3
H3
5
BLU
5
5
4
BRN
4
4
3
PNK
3
3
6
6
6
7
7
7
12
BLK
12
12
13
BLK
13
13
10
RED
10
10
14
14
11
11
1
1
1
2
2
8
8
9
9
5
PLEASE CONSULT
CARDREADER
INSTALLATION
MANUAL FOR PROPER
INTERFACE CONNECTIONS
TO CONTROL
J1
RED
1
PROGRAMMING
BLK
9
11
2
WHT/ORG
7
14
3
BLU/RED
5
6
WHT
BLU/RED
1
4
CARDREADER
3
SERVICE DOOR
WHT
SMART
CARD
VEND
OPTION
(SINGLE COIN,
DUAL COIN
COIN READY)
2
8
9
4
3
6
7
12
13
10
14
11
1
2
8
9
TLW322S
39201
© Copyright, Alliance Laundry Systems LLC – DO NOT COPY or TRANSMIT
107
Troubleshooting (NetMaster Models)
57. Washer Will Not Spin – High Speed
(5)
(1)
Is there voltage
across "H6-1" on the
control and terminal
4 on the motor?
No
Check lid switch
for proper
operation. Check
wiring from control
to lid switch to
supply.
No
Replace control.
No
Correct wiring to
the motor.
(7)
(3)
No
Correct wiring
between motor
and control.
Is there voltage from
"H6-2" on control to
terminal 6 of the
motor?
No
Yes
Yes
(8)
(4)
Yes
Is there voltage
across terminals 6 &
8 of the motor?
Yes
Yes
Is there voltage
across terminals 7 &
8 of the motor?
Replace the
control.
(6)
(2)
Is there voltage
across terminals 7 &
4 on the motor?
No
Yes
Yes
Is there voltage
across "H6-5" on the
control and terminal
4 on the motor?
Is there voltage
across "H6-3" on
control to terminal 8
of the motor?
No
Check operation of
motor
thermal protector.
Replace motor if
necessary.
Is there voltage from
"H6-4" on control to
terminal 1 of the
motor?
No
Replace control.
Yes
Unit should
operate properly.
TLW291S
108
© Copyright, Alliance Laundry Systems LLC – DO NOT COPY or TRANSMIT
39201
Troubleshooting (NetMaster Models)
Washer Will Not Spin – High Speed
L1
N
120/240 VOLT 60/50 HERTZ (Refer to machine serial plate.)
LID
SWITCH
BLK
WHT
CONTROL TRANSFORMER
24 VAC
4N25
H5
3
4
100 OHM
1/4 WATT
2
1
4N25
100 OHM
1/4 WATT
AVAILABLE OUTPUT
OPTO OFF WHEN MACHINE RUNNING
Vmax = 28VDC Imax = 5ma
4
START PULSE INPUT
INPUT LED ENERGIZED = START PULSE ACTIVE
I in = 9-30 ma TIME = 45 msec min.
1
WHT/BLU
(SEE CONNECTION DIAGRAM DETAIL
FOR OPTIONAL CARD READY AND COIN
READY TRANSFORMER WIRING).
H1
2
3
1
3
3
24 VAC RETURN
2
RED/BLU
BLK
6
PRESSURE SWITCH
9
24 VAC
WHT
1
2
CONTROL
POWER
SUPPLY
3
COMM
2
SD SW
1
CV SW
5
CD1 SVDC
4
CD1
6
CD1 COMM
8
CD2 SVDC
7
CD2
9
CD2 COMM
COMM
12
COMM
HOT
HW
4
COLD
H4
1
CW
7
P
MIXING VALVE
K6 PUMP
LID SWITCH SENSE,
MOTOR DIRECTION
AND CONTROL, AND
TIMING CIRCUIT
H1
4
LS
1
PNK/BLU
TXD
RXD
3
VUR
6
NAG
7
NRFA
12
COMM
13
COMM
10
SVDC
14
NBP
11
CRP
1
24VDC
2
SVDC
8
24VDC
9
SVDC
3
MOTOR SPEED
L
6
MOTOR
MASTER
NETMASTER
CONTROL
ASSEMBLY
3
PNK
5
4
GRY
2
2
5
ORG
H
LOW
HIGH
7
BLU
K5
WHT
PE
11
BLU/WHT
8
PRESSURE SWITCH
AND
WATER CIRCUIT
1
8
K4
MOTOR
DIRECTION
4
START
6
H6
4
TP
AGITATE
SPIN
CAPACITOR
WHT/RED
10
PS
5
RED
SEE VEND APPLICATION DETAIL
(FOR NETWORK APPLICATION SEE SUPPLIMENTAL NETWORK DIAGRAM)
H7
8
RED
3
4
MOTOR
BRN
2
WHT/RED
K3
H3
5
6
SCHEMATIC
7
VEND APPLICATIONS DETAILS
H7
WHT/BLK
3
2
BLU/RED
MANUAL
PROGRAMMING
COIN
DROP
VEND
OPTIONS
H7
WHT/BLK
COIN VAULT
BLU/RED
2
CARD
READY
VEND
OPTION
H7
WHT/BLK
MANUAL
3
2
BLU/RED
1
WHT/ORG
5
GRY/YEL
5
5
PNK/YEL
4
4
6
WHT/RED
6
6
8
RED
8
WHT
7
BLK
9
9
10
10
10
11
11
11
WHT
4
7
COIN DROP
#1
(OPTIONAL)
C0IN DROP
#2
(OPTIONAL)
9
12
1
1
PROGRAMMING
12
H1
H1
2
2
4
4
2
4
H3
H3
H3
5
BLU
5
5
4
BRN
4
4
3
PNK
3
3
6
6
6
7
7
7
12
BLK
12
12
13
BLK
13
13
10
RED
10
10
14
14
11
11
1
1
1
2
2
8
8
9
9
5
PLEASE CONSULT
CARDREADER
INSTALLATION
MANUAL FOR PROPER
INTERFACE CONNECTIONS
TO CONTROL
J1
14
11
RED
(SINGLE COIN,
DUAL COIN
COIN READY)
8
7
12
H1
CARDREADER
3
SERVICE DOOR
WHT
SMART
CARD
VEND
OPTION
2
8
9
4
3
6
7
12
13
10
14
11
1
2
8
9
TLW323S
39201
© Copyright, Alliance Laundry Systems LLC – DO NOT COPY or TRANSMIT
109
Troubleshooting (NetMaster Models)
58. Washer Will Not Spin – Low Speed
(5)
(1)
Is there voltage
across "H6-1" on the
control and terminal
4 on the motor?
No
Check lid switch
for proper
operation. Check
wiring from control
to lid switch to
supply.
No
Replace control.
No
Correct wiring to
the motor.
(7)
(3)
No
Correct wiring
between motor
and control.
Is there voltage from
"H6-2" on control to
terminal 6 of the
motor?
No
Yes
Yes
(8)
(4)
Yes
Is there voltage
across terminals 6 &
8 of the motor?
Yes
Yes
Is there voltage
across terminals 3 &
8 of the motor?
Replace the
control.
(6)
(2)
Is there voltage
across terminals 3 &
4 on the motor?
No
Yes
Yes
Is there voltage
across "H6-6" on the
control and terminal
4 on the motor?
Is there voltage
across "H6-3" on
control to terminal 8
of the motor?
No
Check operation of
motor
thermal protector.
Replace motor if
necessary.
Is there voltage from
"H6-4" on control to
terminal 1 of the
motor?
No
Replace control.
Yes
Unit should
operate properly.
TLW293S
110
© Copyright, Alliance Laundry Systems LLC – DO NOT COPY or TRANSMIT
39201
Troubleshooting (NetMaster Models)
Washer Will Not Spin – Low Speed
L1
N
120/240 VOLT 60/50 HERTZ (Refer to machine serial plate.)
LID
SWITC
BLK
WHT
CONTROL TRANSFORMER
24 VAC
4N25
H5
3
4
100 OHM
1/4 WATT
2
1
4N25
100 OHM
1/4 WATT
4
AVAILABLE OUTPUT
OPTO OFF WHEN MACHINE RUNNING
Vmax = 28VDC Imax = 5ma
WHT/BLU
(SEE CONNECTION DIAGRAM DETAIL
FOR OPTIONAL CARD READY AND COIN
READY TRANSFORMER WIRING).
H1
2
3
1
3
1
START PULSE INPUT
INPUT LED ENERGIZED = START PULSE ACTIVE
I in = 9-30 ma TIME = 45 msec min.
3
24 VAC RETURN
2
RED/BLU
BLK
6
PRESSURE SWITCH
9
24 VAC
WHT
1
2
CONTROL
POWER
SUPPLY
3
COMM
2
SD SW
1
CV SW
5
CD1 SVDC
4
CD1
6
CD1 COMM
8
CD2 SVDC
7
CD2
9
CD2 COMM
COMM
12
COMM
HOT
4
RXD
3
VUR
6
NAG
7
NRFA
12
COMM
13
COMM
10
SVDC
14
NBP
11
CRP
1
CW
7
P
GRY
MIXING VALVE
LID SWITCH SENSE,
MOTOR DIRECTION
AND CONTROL, AND
TIMING CIRCUIT
4
COLD
H4
K6 PUMP
H1
TXD
ORG
2
2
5
HW
4
LS
1
PNK/BLU
3
MOTOR SPEED
L
6
MOTOR
MASTER
NETMASTER
CONTROL
ASSEMBLY
PNK
HIGH
7
H
5
LOW
3
WHT
PE
11
BLU/WHT
8
PRESSURE SWITCH
AND
WATER CIRCUIT
BLU
1
K5
8
K4
MOTOR
DIRECTION
START
6
H6
4
TP
AGITATE
SPIN
CAPACITOR
WHT/RED
10
PS
5
RED
SEE VEND APPLICATION DETAIL
(FOR NETWORK APPLICATION SEE SUPPLIMENTAL NETWORK DIAGRAM)
H7
8
4
RED
1
24VDC
2
SVDC
3
8
24VDC
2
9
SVDC
4
MOTOR
WHT/RED
K3
H3
BRN
5
6
SCHEMATIC
7
VEND APPLICATIONS DETAILS
H7
WHT/BLK
3
2
BLU/RED
MANUAL
PROGRAMMING
COIN
DROP
VEND
OPTIONS
H7
WHT/BLK
COIN VAULT
BLU/RED
2
CARD
READY
VEND
OPTION
H7
WHT/BLK
MANUAL
1
5
GRY/YEL
5
5
PNK/YEL
4
4
WHT/RED
6
6
RED
8
WHT
7
BLK
9
9
10
10
10
11
11
11
12
12
12
WHT
8
7
COIN DROP
#1
(OPTIONAL)
C0IN DROP
#2
(OPTIONAL)
9
H1
H1
2
2
4
4
2
4
H3
H3
BLU
5
5
4
BRN
4
4
3
PNK
3
3
6
6
6
7
7
7
12
BLK
12
12
13
BLK
13
13
10
RED
10
10
14
14
11
11
1
1
1
2
2
8
8
9
9
5
PLEASE CONSULT
CARDREADER
INSTALLATION
MANUAL FOR PROPER
INTERFACE CONNECTIONS
TO CONTROL
J1
RED
(SINGLE COIN,
DUAL COIN
COIN READY)
8
7
H1
H3
1
PROGRAMMING
5
11
2
1
6
14
3
BLU/RED
WHT/ORG
4
CARDREADER
3
SERVICE DOOR
WHT
SMART
CARD
VEND
OPTION
2
8
9
4
3
6
7
12
13
10
14
11
1
2
8
9
TLW324S
39201
© Copyright, Alliance Laundry Systems LLC – DO NOT COPY or TRANSMIT
111
Notes
112
© Copyright, Alliance Laundry Systems LLC – DO NOT COPY or TRANSMIT
39201
Section 4
Adjustments
WARNING
To reduce the risk of electric shock, fire, explosion, serious injury or death:
• Disconnect electric power to the washer before servicing.
• Never start the washer with any guards/panels removed.
• Whenever ground wires are removed during servicing, these ground wires must be
reconnected to ensure that the washer is properly grounded.
W003
59. Leveling Legs
locknuts are not tight, washer will not remain
stationary during operation.
Refer to Figure 10.
NOTE: Install rear extension leg kit, No. 566P3,
(optional equipment at extra cost) to raise height of
washer.
a. Place rubber feet on all four leveling legs.
b. Place washer in position on a clean, dry, and
reasonably firm floor.
c. Loosen locknuts and adjust two front leveling
legs. Once adjusted, tilt washer forward on
front legs and lower back down into position
to set the rear self-leveling legs.
d. Washer must not rock. After washer is at
desired height, tighten locknuts securely
against bottom of washer base. If these
NOTE: Improper installation, installation on carpet
or flexing of a weak floor will cause excessive
vibration.
IMPORTANT: Do not slide washer across floor
once leveling legs have been extended, as legs and
base could become damaged.
Level
Washer
Base
Locknut
Leveling
Leg
Rubber
Foot
W484SE3A
Figure 10
39201
© Copyright, Alliance Laundry Systems LLC – DO NOT COPY or TRANSMIT
113
Adjustments
WARNING
To reduce the risk of electric shock, fire, explosion, serious injury or death:
• Disconnect electric power to the washer before servicing.
• Never start the washer with any guards/panels removed.
• Whenever ground wires are removed during servicing, these ground wires must be
reconnected to ensure that the washer is properly grounded.
W003
60. Pressure Switch
f. Run the washer through a cycle and observe
the water fill level.
Refer to Figure 11.
Most washers are equipped with a variable water
level pressure switch (located inside the control
hood) which allows the owner to adjust the water
fill level height in the washtub from 10, 11 or 13
inches.
Cabinet
Top
Rotating
Cam
IMPORTANT: Water fill heights less than 10
inches are not recommended. When average to
large size clothes loads are expected, damage to the
clothes and/or the washer may result.
When the washer leaves the factory, the pressure
switch is set for approximately 11 inches of
water.
To adjust the pressure switch, proceed as follows:
WARNING
Pressure
Hose
To reduce the risk of electric shock,
disconnect the electrical power to the
washer before attempting to service.
Pressure
Switch
W094
a. Remove the two control panel attaching
screws and lift the assembly up and out of the
slots in the cabinet top.
b. Lay the control panel face down (on
protective padding) on top of the washer.
c. Rotate the cam on the pressure switch
clockwise to lower the water fill height, or
counterclockwise to raise the height. Refer
to Figure 11.
IMPORTANT: The cam has three settings. The
setting on the left raises the water level to 10 inches.
Middle setting raises the water level to 11 inches.
The setting on the right raises the water level to 13
inches.
d. Carefully reinstall the control panel.
e. Reconnect the electrical power to the washer.
114
Figure 11
61. Belt (Agitate and Spin)
No belt adjustment is required.
62. Cleaning Non-Electronic Coin
Drop
a. Disconnect electrical power to machine and
drop.
b. Remove coin drop from machine.
c. If lint is preventing coins from rolling through
coin drop, blow compressed air though coin
entry and along the side of the coin drop.
Refer to Figure 12.
d. Insert a coin through the coin drop. If coin
does not roll through drop, continue with the
following.
© Copyright, Alliance Laundry Systems LLC – DO NOT COPY or TRANSMIT
39201
Adjustments
WARNING
To reduce the risk of electric shock, fire, explosion, serious injury or death:
• Disconnect electric power to the washer before servicing.
• Never start the washer with any guards/panels removed.
• Whenever ground wires are removed during servicing, these ground wires must be
reconnected to ensure that the washer is properly grounded.
W003
Cotter
Pin
h. Check coin path in coin drop for lint and
residue. If lint or light residues are present,
use a cotton swab to remove. If heavy residue
is present, it may be necessary to first scrape
off excessive residue and then use a cotton
swab dipped in water or isopropyl alcohol
(rubbing alcohol) to remove remainder of
residue. Refer to Figure 14.
Metal
Clip
Compressed
Air
DRY3B
Figure 12
e. Remove cotter pin from top of drop. Refer to
Figure 12. Save pin for reinstallation when
cleaning is complete.
f. Move metal clip closer to sensor so that it
comes off frame. Refer to Figure 12.
g. Remove coin return from coin drop frame.
Refer to Figure 13.
Cotton
Swab
DRY5B
Figure 14
i. Check coin return pendulum to verify it
swings freely. If pendulum does not swing
freely, spray pendulum pivot point with
Teflon based lubricant and move pendulum
back and forth two to three times. An
additional application of Teflon based
lubricant may be necessary to ensure that
pendulum swings freely. Refer to Figure 15.
j. Check coin drop sensor for dust or dirt on
eyes. Wipe eyes with dry cotton swab. Refer
to Figure 16.
Coin
Return
Coin
Drop
Frame
DRY4B
Figure 13
39201
© Copyright, Alliance Laundry Systems LLC – DO NOT COPY or TRANSMIT
115
Adjustments
WARNING
To reduce the risk of electric shock, fire, explosion, serious injury or death:
• Disconnect electric power to the washer before servicing.
• Never start the washer with any guards/panels removed.
• Whenever ground wires are removed during servicing, these ground wires must be
reconnected to ensure that the washer is properly grounded.
W003
Pivot
Point
Pendulum
DRY6B
Figure 15
IMPORTANT: DO NOT use isopropyl alcohol to
clean electronic sensor or eyes.
k. Reinstall coin return on to coin drop frame.
l. Reinstall metal clip and slide towards coin
insert slot. All cotter pin holes must line up.
m. Reinstall cotter pin.
n. Place drop on level surface to verify that coins
follow correct path in drop. It may be
necessary to lift drop to allow coin to follow
through sensor.
o. Reinstall coin drop into machine.
p. Reconnect electrical power to machine and
drop.
q. Add a coin to drop to verify that coin drop is
operating properly and that electrical
connection is working properly.
NOTE: If coin drop does not operate properly after
above steps have been completed, corrosion of
metal or vandalized components within coin drop
may be preventing the coin drop from functioning
correctly. Replace coin drop.
63. Cleaning Electronic Coin Drop
NOTE: The electronic coin drop should be cleaned
once a year. Clean the drop more often if it is
exposed to high levels of residue or lint build-up.
Eyes
Dry
Cotton
Swab
a. Disconnect electrical power to machine and
drop.
b. Remove coin drop from machine.
c. Move spring downward until cover catch is
free. Refer to Figure 17.
DRY7B
Figure 16
116
© Copyright, Alliance Laundry Systems LLC – DO NOT COPY or TRANSMIT
39201
Adjustments
WARNING
To reduce the risk of electric shock, fire, explosion, serious injury or death:
• Disconnect electric power to the washer before servicing.
• Never start the washer with any guards/panels removed.
• Whenever ground wires are removed during servicing, these ground wires must be
reconnected to ensure that the washer is properly grounded.
W003
NOTE: Do not lift or overbend the spring in any
direction.
e. Clean the coin path with a soft brush and wipe
exposed surfaces with an alcohol moistened
cloth. Refer to Figure 19.
Catch
DRY2090N
DRY2088N
Figure 19
Figure 17
d. Open cover for coin drop. Refer to Figure 18.
f. Clean residue from coin rail with an alcohol
moistened cloth. Refer to Figure 20.
Cover
DRY2089N
Alcohol
Moistened
Cloth
Figure 18
DRY2091N
DRY2091N
Figure 20
39201
© Copyright, Alliance Laundry Systems LLC – DO NOT COPY or TRANSMIT
117
Adjustments
WARNING
To reduce the risk of electric shock, fire, explosion, serious injury or death:
• Disconnect electric power to the washer before servicing.
• Never start the washer with any guards/panels removed.
• Whenever ground wires are removed during servicing, these ground wires must be
reconnected to ensure that the washer is properly grounded.
W003
g. Clean light sensors with a soft brush or air
spray duster. Refer to Figure 21.
Light
Sensors
h.
i.
j.
k.
Close cover for coin drop.
Move spring back over cover catch.
Reinstall coin drop into machine.
Reconnect electrical power to machine and
drop.
l. Add a coin to drop to verify that coin drop is
operating properly and that electrical
connection is working properly.
DRY2092N
DRY2092N
Figure 21
118
© Copyright, Alliance Laundry Systems LLC – DO NOT COPY or TRANSMIT
39201
Section 5
Motor Test Procedure
WARNING
To reduce the risk of electric shock, fire, explosion, serious injury or death:
• Disconnect electric power to the washer before servicing.
• Never start the washer with any guards/panels removed.
• Whenever ground wires are removed during servicing, these ground wires must be
reconnected to ensure that the washer is properly grounded.
W003
IMPORTANT: Disconnect base wire harness plug from motor.
WARNING
Disconnect electric power to washer before performing the following steps:
W188
Motor test procedures using an Ohm meter.
NOTE: Resistance readings slightly out of given ranges may be due to meter conditions. These readings DO
NOT necessarily indicate motor failure.
Meter Connections
6. Ground to Each Other Terminal
7. White to Yellow
Reading
Should Be
Open
Closed
If Not
Terminal shorted to ground.
Open thermal overload.
8. Red to Brown
2-8 Ohms
Start winding open or resistance too high or too
low.
9. Blue to White
1-2 Ohms
High speed winding (4 pole) open or resistance
too high or too low.
2.5 Ohms
(approximate)
Low winding open; High speed winding open;
or resistance too high or too low.
10. Violet to White (2-speed motor)
11. “R” to Red
Closed
Open start (auxiliary) switch.
12. “P” to Blue (2-speed motor)
Closed
Open start switch 4 pole winding
NOTE: Steps 8, 9 and 10 are with motor centrifugal mechanism in the run position.
13. “R” to Red
Open
14. “P” to Blue (2-speed motor)
3 Ohms
(approximate)
15. “P” to Violet (2-speed motor)
Closed
39201
Start auxiliary switch.
Refer to Blue to White and Violet to White.
Open low (6 pole) winding run switch.
© Copyright, Alliance Laundry Systems LLC – DO NOT COPY or TRANSMIT
119
Notes
120
© Copyright, Alliance Laundry Systems LLC – DO NOT COPY or TRANSMIT
39201
Section 6
Cycle Sequence Charts
IN USE
LIGHT
WASH
FUNCTION
WASH, FILL OR AGITATE
SPIN
PAUSE
X
CYCLE &
MOTOR
SPEED*
N = FAST
PP = FAST
D = SLOW
WATER
TEMP.
H, W, C
X
X
SPIN AND SPRAY
X
X
SPIN
X
X
SPIN AND SPRAY
X
X
SPIN
X
X
N = FAST
PP = FAST
D = SLOW
N = FAST
PP = FAST
D = SLOW
N = FAST
PP = FAST
D = SLOW
N = FAST
PP = FAST
D = SLOW
N = FAST
PP = FAST
D = SLOW
COLD
COLD
X
RINSE, AGITATE OR FILL
PAUSE
10:33
1:56
:31
:36
:07
1:07
:04
X
X
COLD
:36
X
X
COLD
:02
X
X
COLD
N = FAST
PP = FAST
D = SLOW
X
SPIN
TIME
(Min. &
Sec.)
:05
SPIN
RINSE FILL (Timer Motor
Runs)
PAUSE OR FILL
RINSE
SPIN
LIGHT
X
PAUSE
SPIN
RINSE
LIGHT
X
3:03
:06
N = FAST
PP = FAST
D = SLOW
X
TIMER MOTOR RUNS OUT
TOTAL
10:32
:42
30:00
*On single speed models, all speeds are fast.
KEY:
H = HOT
PP = PERMANENT PRESS CYCLE
W = WARM
D = DELICATE CYCLE
C = COLD
X = INDICATOR LIGHT GLOWS
N = NORMAL CYCLE
Timer No. 28716P and 28719 Cycle Sequence
39201
© Copyright, Alliance Laundry Systems LLC – DO NOT COPY or TRANSMIT
121
Cycle Sequence Charts
WASH
FUNCTION
COIN SLIDE
STARTING STROKE
17.82 º (Mallory)
16.84 º (Eaton)
AGITATE OR
VARIABLE FILL
SPIN
PAUSE
RINSE
:57
1:00
X
N = FAST
H, W, C PP = FAST
D = SLOW
7:00
7:00
:21
:21
1:25
1:25
:45
:45
1:15
1:15
:04
:04
COLD
:13
:19
COLD
:13
1:01
:13
:54
:09
:16
:14
:06
:16
:03
6:00
6:00
:04
:06
:22
20:17
:08
:03
:19
20:21
SPIN
X
SPIN AND SPRAY
X
SPIN
X
COLD
N = FAST
PP = FAST
D = SLOW
N = FAST
PP = FAST
D = SLOW
N = FAST
PP = FAST
D = SLOW
X
FILL (Timer Motor
Runs)
PAUSE OR FILL
AGITATE OR
VARIABLE FILL
X
X
X
X
X
SPIN
COLD
X
X
X
PAUSE
SPIN
X
N = FAST
H, W, C PP = FAST
D = SLOW
X
PAUSE
PAUSE
EATON
CYCLE & TIME MALLORY
IN USE RINSE SPIN WATER MOTOR (Min. & TIME (Min.
LIGHT LIGHT LIGHT TEMP. SPEED*
Sec.)
& Sec.)
N = FAST
PP = FAST
D = SLOW
X
X
X
X
X
X
N = FAST
PP = FAST
D = SLOW
OFF
TOTAL
*On single speed models, all speeds are fast.
KEY:
H = HOT
PP = PERMANENT PRESS CYCLE
W = WARM
D = DELICATE CYCLE
C = COLD
X = INDICATOR LIGHT GLOWS
N = NORMAL CYCLE
Timer No. 31111P, 31504P and 35368P Cycle Sequence
122
© Copyright, Alliance Laundry Systems LLC – DO NOT COPY or TRANSMIT
39201
Cycle Sequence Charts
IN USE
LIGHT
WASH
FUNCTION
SPIN
RINSE
WATER
TEMP.
X
H, W, C
WASH, FILL
OR AGITATE
X
H, W, C
X
X
SPIN AND SPRAY
X
SPIN
X
FILL (Timer Motor Runs)
PAUSE OR FILL
X
X
X
X
X
X
AGITATE OR
VARIABLE FILL
PAUSE
SPIN
PAUSE
EATON
TIME
(Min. &
Sec.)
:57
7:00
:21
SPIN
PAUSE
SPIN
SPIN
LIGHT
COIN SLIDE STARTING
STROKE 16.84 º
PAUSE
OFF
RINSE
LIGHT
CYCLE &
MOTOR
SPEED*
FAST
OR
SLOW
FAST
OR
SLOW
COLD
FAST
OR
SLOW
FAST
OR
SLOW
FAST
OR
SLOW
X
X
X
X
X
X
X
X
X
:45
1:15
:04
:13
:13
COLD
COLD
COLD
1:25
FAST
OR
SLOW
1:01
:09
:16
:06
FAST
6:00
:04
:10
PART OF INTENDED
COIN SLIDE START
STROKE 6.48°
:18
TOTAL
20:17
*On single speed models, all speeds are fast.
KEY:
H = HOT
W = WARM
C = COLD
X = INDICATOR LIGHT GLOWS
Timer No. 36986 Cycle Sequence
39201
© Copyright, Alliance Laundry Systems LLC – DO NOT COPY or TRANSMIT
123
Cycle Sequence Charts
WASH
FUNCTION
COIN SLIDE STARTING
STROKE
16.84 º (Eaton)
IN USE
LIGHT
AGITATE OR VARIABLE
FILL
SPIN
PAUSE
RINSE
SPIN
LIGHT
WATER
TEMP.
X
H, W, C
X
H, W, C
CYCLE &
MOTOR
SPEED*
N = FAST
PP = FAST
D = SLOW
N = FAST
PP = FAST
D = SLOW
X
SPIN
X
SPIN AND SPRAY
X
SPIN
X
FILL (Timer Motor Runs)
PAUSE OR FILL
X
X
X
PAUSE
AGITATE OR VARIABLE
FILL
PAUSE
SPIN
RINSE
LIGHT
SPIN
PAUSE
TIME
(Min. &
Sec.)
1:23
10:00
:34
COLD
N = FAST
PP = FAST
D = SLOW
N = FAST
PP = FAST
D = SLOW
N = FAST
PP = FAST
D = SLOW
COLD
COLD
X
X
COLD
X
X
X
X
X
X
X
X
X
N = FAST
PP = FAST
D = SLOW
1:32
:30
1:29
:06
:06
:20
3:19
:24
:24
:10
N = FAST
PP = FAST
D = SLOW
OFF
TOTAL
8:30
:06
:13
:32
29:39
*On single speed models, all speeds are fast.
KEY:
H = HOT
PP = PERMANENT PRESS CYCLE
W = WARM
D = DELICATE CYCLE
C = COLD
X = INDICATOR LIGHT GLOWS
N = NORMAL CYCLE
Timer No. 34601P, 34603P, 34604 and 36987 Cycle Sequence
124
© Copyright, Alliance Laundry Systems LLC – DO NOT COPY or TRANSMIT
39201
Cycle Sequence Charts
WASH
FUNCTION
COIN SLIDE
STARTING STROKE
17.82 º (Mallory)
16.84 º (Eaton)
AGITATE OR
VARIABLE FILL
SPIN
PAUSE
RINSE
1:23
1:31
X
N = FAST
H, W, C PP = FAST
D = SLOW
10:00
10:00
:34
:34
1:32
1:32
:30
:30
1:29
1:30
:06
:06
COLD
:06
:34
COLD
:20
3:19
:20
3:20
:24
:23
:24
:10
:25
:11
8:30
8:30
:06
:13
:32
29:39
:18
:05
:28
30:17
SPIN
X
SPIN AND SPRAY
X
SPIN
X
COLD
N = FAST
PP = FAST
D = SLOW
N = FAST
PP = FAST
D = SLOW
N = FAST
PP = FAST
D = SLOW
X
FILL (Timer Motor
Runs)
PAUSE OR FILL
AGITATE OR
VARIABLE FILL
X
X
X
X
X
SPIN
COLD
X
X
X
PAUSE
SPIN
X
N = FAST
H, W, C PP = FAST
D = SLOW
X
PAUSE
PAUSE
EATON
CYCLE & TIME MALLORY
IN USE RINSE SPIN WATER MOTOR (Min. & TIME (Min.
LIGHT LIGHT LIGHT TEMP. SPEED*
Sec.)
& Sec.)
N = FAST
PP = FAST
D = SLOW
X
X
X
X
X
X
N = FAST
PP = FAST
D = SLOW
OFF
TOTAL
*On single speed models, all speeds are fast.
KEY:
H = HOT
PP = PERMANENT PRESS CYCLE
W = WARM
D = DELICATE CYCLE
C = COLD
X = INDICATOR LIGHT GLOWS
N = NORMAL CYCLE
Timer No. 34602P Cycle Sequence
39201
© Copyright, Alliance Laundry Systems LLC – DO NOT COPY or TRANSMIT
125
Cycle Sequence Charts
IN USE
LIGHT
X
PAUSE
X
SPIN
WASH
FUNCTION
SPIN
X
FILL (Timer Motor Runs)
PAUSE OR FILL
X
X
X
RINSE
PAUSE
AGITATE OR
VARIABLE FILL
SPIN
LIGHT
WATER
TEMP.
H, W, C
CYCLE &
MOTOR
SPEED*
N = FAST
PP = FAST
D = SLOW
N = FAST
PP = FAST
D = SLOW
COLD
COLD
X
X
COLD
N = FAST
PP = FAST
D = SLOW
X
7:95
:40
:07
:22
:22
1:79
:15
:36
SPIN
X
RINSE, FILL
AND SPIN
X
FINAL SPIN
X
X
X
X
X
PAUSE
TIME
(Min. &
Sec.)
:35
X
PAUSE
SPIN
RINSE
LIGHT
N = FAST
PP = FAST
D = SLOW
N = FAST
PP = FAST
D = SLOW
N = FAST
PP = FAST
D = SLOW
OFF
TOTAL
:50
:50
7:24
:06
:17
:30
20:28
*On single speed models, all speeds are fast.
KEY:
H = HOT
PP = PERMANENT PRESS CYCLE
W = WARM
D = DELICATE CYCLE
C = COLD
X = INDICATOR LIGHT GLOWS
N = NORMAL CYCLE
Timer No. 200914 Cycle Sequence
126
© Copyright, Alliance Laundry Systems LLC – DO NOT COPY or TRANSMIT
39201
Cycle Sequence Charts
WASH
FUNCTION
COIN SLIDE STARTING
STROKE
16.84 º
IN USE
LIGHT
WASH FILL
OR AGITATE
SPIN
PAUSE
SPIN
LIGHT
WATER
TEMP.
X
H, W, C
X
H, W, C
SPIN
X
FILL (Timer Motor Runs)
PAUSE OR FILL
X
X
X
RINSE FILL
OR AGITATE
AGITATE OR VARIABLE
FILL
PAUSE
X
N = FAST
PP = FAST
D = SLOW
X
SPRAY AND SPIN
X
FINAL SPIN
X
X
PAUSE
1:23
10:00
X
COLD
COLD
X
COLD
X
COLD
:24
:04
:13
:13
N = FAST
PP = FAST
D = SLOW
N = FAST
PP = FAST
D = SLOW
X
SPIN
TIME
(Min. &
Sec.)
:26
2:44
:09
:26
SPIN
OFF
CYCLE &
MOTOR
SPEED*
N = FAST
PP = FAST
D = SLOW
N = FAST
PP = FAST
D = SLOW
X
PAUSE
RINSE
RINSE
LIGHT
COLD
X
N = FAST
PP = FAST
D = SLOW
N = FAST
PP = FAST
D = SLOW
FAST
PART OF INTENDED
COIN SLIDE START
STROKE 6.48°
:30
:30
8:30
:14
:20
TOTAL
24:43
*On single speed models, all speeds are fast.
KEY:
H = HOT
PP = PERMANENT PRESS CYCLE
W = WARM
D = DELICATE CYCLE
C = COLD
X = INDICATOR LIGHT GLOWS
N = NORMAL CYCLE
Timer No. 201066 Cycle Sequence
39201
© Copyright, Alliance Laundry Systems LLC – DO NOT COPY or TRANSMIT
127
Cycle Sequence Charts
TIME (Minutes and Seconds)
LONG
SHORT
CYCLE & CYCLE
LONG
CYCLE
SHORT
IN
WATER MOTOR
(Energy
CYCLE
(Energy
CYCLE
FUNCTION USE RINSE SPIN TEMP. SPEED *
Saving) (Normal) Saving) (Normal)
FILL
X
H, W, C
2:00
2:00
2:00
2:00
N = FAST N = 10:00 N = 10:00 N = 5:00 N = 5:00
AGITATE X
PP = FAST PP = 9:00 PP = 9:00 PP = 4:00 PP = 4:00
D = SLOW D = 8:00 D = 8:00 D = 3:00 D = 3:00
PAUSE
X
:10
:10
:10
:10
N = FAST
PP & D =
SLOW
N = :30
N = :30
SPIN
X
(Normal)
:34 PP = 1:00
:34 PP = 1:00
FAST
D = 1:00
D = 1:00
(Energy
Saving)
N = FAST
SPIN
PP =
AND
X
C
:00
:30
:00
:30
SLOW
SPRAY
D = SLOW
N = FAST
N = 2:30
N = 2:30
PP =
SPIN
X
:00 PP = 2:00
:00 PP = 2:00
SLOW
D = 2:00
D = 2:00
D = SLOW
FILL
X
X
C
2:00
2:00
2:00
2:00
N = FAST
AGITATE X
X
PP = FAST
5:00
5:00
2:00
2:00
D = SLOW
PAUSE
X
:10
:10
:10
:10
SPIN
X
X
FAST
:30
1:30
:30
1:30
SPIN
AND
X
X
C
FAST
:30
:00
:30
:00
SPRAY
FINAL
X
X
FAST
7:00
7:00
5:00
5:00
SPIN
N = 27:54 N = 31:20 N = 17:54 N = 21:20
TOTAL PP = 26:54 PP = 30:20 PP = 16:54 PP = 20:20
D = 25:54 D = 29:20 D = 15:54 D = 19:20
SPIN
RINSE
SPIN
WASH
LIGHTS
*On single speed models, all speeds are fast.
KEY:
H = HOT
PP = PERMANENT PRESS CYCLE
W = WARM
D = DELICATE CYCLE
C = COLD
X = INDICATOR LIGHT GLOWS
N = NORMAL CYCLE
Cycle Sequence For Coin Slide Operated and Non-Metered Models With the Number “8”
or “9” in the 4th Character of the Model Number
128
© Copyright, Alliance Laundry Systems LLC – DO NOT COPY or TRANSMIT
39201