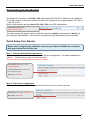
1
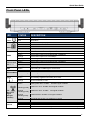
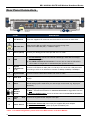
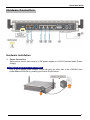
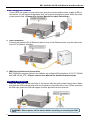
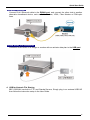
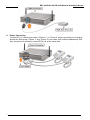
BEC 6300VNL GigaConnect® 4G/LTE VoIP Wireless Broadband Router Quick Start Guide Version 1.2 BEC 6300VNL 4G/LTE VoIP Wireless Broadband Router PLEASE READ THE QUICK START GUIDE AND FOLLOW THE STEPS CAREFULLY. THIS QUICK START GUIDE WILL HELP YOU INSTALL THE DEVICE PROPERLY AND AVOID IMPROPER USAGE. IF YOU NEED MORE INFORMATION ON THIS SOFTWARE CONFIGURATION, PLEASE REFER TO THE USER MANUAL ON CD-ROM. Package Contents BEC 6300VNL 4G/LTE VoIP Wireless Broadband Router This Quick Start Guide CD containing the user manual RJ-45 Ethernet cable Two 4G/LTE detachable antennas Power adapter Warning Attention 1 Do not use the router in high humidity or high temperatures. Do not use the same power source for the router as other equipment. Do not open or repair the case yourself. If the router is too hot, turn off the power immediately and have it repaired at a qualified service center. Avoid using this product and all accessories outdoors. Place the router on a stable surface. Only use the power adapter that comes with the package. Using a different voltage rating power adaptor may damage the router. Quick Start Guide Front Panel LEDs LED Power Battery EWAN Ethernet Port LAN 1 ~ 3 USB Wireless/WPS Phone LTE (Received Signal Strength Indicator) Internet STATUS DESCRIPTION Green System is up and ready Red Boot failure Green UPS is functional properly Orange UPS battery failure. Orange blinking UPS AC power failure and battery functional properly Off Device powered by the DC power adaptor Lit up BEC 6300VNL is successfully connected with a broadband connection device. Green Transmission speed is at Gigabit speed (1000Mbps) Orange Transmission speed is at 10/100Mbps Blinking Data being transmitted/received Green Transmission speed is at Gigabit speed (1000Mbps) Orange Transmission speed is at 10/100Mbps Blinking Data being transmitted/received Green Connecting to a USB dongle or a hard drive. Green Wireless connection established Green blinking Data being transmitted / received Orange WPS configuration is in progress Green Successfully registered and ready to be used. Orange Phone is off-hook, in-use Green RSSI greater than -69 dBm. Excellent signal condition Green Flashing quickly RSSI from -81 to -69 dBm. Good signal condition Orange Flashing quickly RSSI from -99 to -81 dBm. Orange Flashing slowly RSSI less than -99 dBm. Poor signal condition. Orange No signal and the 4G_LTE module is in service Off Green No LTE module or LTE module fails IP connected and traffic is passing thru the device. Red IP request failed. BEC 6300VNL is either in bridged mode or WAN connection not ready. Off Need to replace a new battery Fair signal condition. 2 BEC 6300VNL 4G/LTE VoIP Wireless Broadband Router Rear Panel Connectors 1 3 4 5 6 2 7 8 9 PORT 11 10 MEANING LTE Antenna Screw the supplied LTE antennas onto the antenna connectors on both sides. SIM Card Slot Insert the mini SIM card (2FF) with the gold contact facing down. Push the mini SIM card (2FF) inwards to eject it Phone (1X-2X) Connect your analog phone to this port with a RJ-11 cable. 4 USB The USB can either setup for 3G/4G LTE internet access or storage/file sharing. (1) For File Sharing: Connect an external USB dongle / hard drive for storage, network sharing, etc (2) For 3G/4G LTE Internet Connection: Connect with an external USB 3G/4G LTE modem or dongle with an activate data plan (internet access). 5 Gigabit LAN Ethernet (1~3) Connect a UTP Ethernet cable (Cat-5 or Cat-5e) to one of the four LAN ports when connecting to a PC or an office/home network of 10Mbps /100Mbps /1000Mbps 6 Gigabit EWAN Connect to Fiber/ Cable/ xDSL Modem with a RJ-45 cable 7 UPS Jack The 4-pin connectors are used to power the device with an external UPS battery backup. 8 Reset After the device is powered on, press it 6 seconds or above: to restore to factory default settings (this is used when you cannot login to the router, e.g. forgot your password) 9 WPS & Wireless On/Off 1 1 2 3 10 By controlling the pressing time, users can achieve two different effects: Power (DC) (1) WPS*1: Press &hold the button for less than 6 seconds to trigger WPS function. (2) Wireless ON/OFF button: Press & hold the button for more than 6 seconds to On/Off the wireless. Jack Connect the supplied Power Adapter to this jack. Power ON/OFF switch 11 Power Source (1) with Power Switch ON: power up by the supplied DC power adaptor (2) with Power Switch OFF: power up by the UPS battery unit * Note: 1. For WPS configuration, please refer to the WPS section in the User Manual. 3 Quick Start Guide Hardware Connection Hardware Installation 1. Power Connection Select power source from using a (1) DC power adapter or (2) UPS (Uninterruptible Power Supply) 1.1 Using the Supplied DC Power Adaptor Plug in the supplied power adapter to the wall jack, the other side to the 6300VNL then power ON the 6300VNL by pressing the Power On/Off button. 4 BEC 6300VNL 4G/LTE VoIP Wireless Broadband Router 1.2 Using a UPS Battery Unit Power OFF the power source button and plug the uninterruptible power supply (UPS) to the device; it’s an electrical apparatus that can provide emergency power when the main power source fails. <Please refer to User Manual for detail instruction.> 2. LAN Connection Connect the supplied RJ-45 Ethernet cable to one of the Ethernet ports, and the other side to the PC’s Ethernet interface. 3. WAN Link Interface and Connection BEC 6300VNL supports failover and fallback on multiple WAN interfaces, 4G LTE, EWAN and USB 3G/4G_LTE. <Please refer to User Manual for detailed Internet setup> 3.1 4G_LTE Connection Slide the SIM card into the card slot of the device with the gold contact facing down. Make sure that the SIM card has been slid into the bottom of the slot with a click. When removing the SIM card, press the SIM card again it will be ejected from the card slot. WARNING: Please power off the device before inserting or removing the SIM card. 5 Quick Start Guide 3.2 EWAN Connection Connect RJ-45 Ethernet cable to the EWAN port, and connect the other side to another alternative broadband device, such as Cable Modem, VDSL, Fiber Modem or PON optic lines. 3.3 USB 3G/4G_LTE Connection Connect a USB 3G/4G LTE dongle or modem with an activate data plan to the USB port. 4. USB for Network File Sharing BEC 6300VNL has built-in FTP and Samba Servers, Simply plug in an external USB HD then follow the instruction setup in the User Guide. 6 BEC 6300VNL 4G/LTE VoIP Wireless Broadband Router 6. Phone Connection Connect RJ-11 cable to the router’s “Phone 1” or “Phone 2” when connecting to an analog phone set. Both ports (“Phone 1” and “Phone 2”) can make VoIP calls simultaneously. But only one phone is allowed to make PSTN call at the same time. 7 Quick Start Guide Connecting to the Router The default IP of modem is 192.168.1.254 with subnet 255.255.255.0. Make sure the attached PC to this router is in the same subnet and has an IP address in the range between 192.168.1.1 ~ 192.168.1.253. Open a web browser and type http://192.168.1.254 in the URL address bar. URL Address bar: type http://192.168.1.254 The login prompt will appear. Input the default username (admin) and password (admin) for Account type, Administrator. *This username / password may vary by different Internet Service Providers. Quick Setup Your Router Use the Quick Start for fast the connection setup. Before start configuring 6300VNL, make sure you have the WAN port connected with your Internet box or fiber line. Step 1: Change administration password Setup a new password for “admin” account for device management. The default password is “admin”. Click Continue to go on to the next step. *The password may vary by different Internet Service Providers. New Password: assign a new, unique password Confirm Password: re-enter the new password again Next Step: click Next Step 2: Time Zone configuration Enable and select your Time Zone then click Continue to go on to the next step. Time Zone: select your time zone Next Step: click Next 8 BEC 6300VNL 4G/LTE VoIP Wireless Broadband Router Step 3: Setup Wireless Connection Access Point: select Activated SSID: Assign an unique name Channel: pick from 1~11 Security Type: select a mode - Disable (No security) - WPA - WPA2 (Most secure one) - WPA / WPA2 (auto detect WPA mode with wireless clients) - WEP (Less secure one) Pre-Shared Key: key for wireless authentication - WPA / WAPA2 Share Key: Assign a key between 8 ~ 63 characters. - WEP: select Open System, use default WEP Key 1 then assign 26 Hex codes Next Step: click Next Step 4: WAN / Internet Connection Setup Select the appropriate WAN protocol then fill out the information provided by your ISP in all relevant parameters. Example: WAN Interface in EWAN mode. Protocol: select one of them - Dynamic IP Address (Obtain an IP automatically) - Static IP Address (Manually assign an IP) - PPPoE - Bridge Mode Net Step: click Continue Step 5: Save Confirmation Settings Click “Next” to save and complete the Quick Setup. You should now be able to access to the Internet. Please see the relevant sections of User Manual for detailed information. 9 Quick Start Guide Troubleshooting 1. None of the LEDs are on when you turn on the router. Check the connection between the adapter and the router. If the error persists, you may have a hardware problem. In this case you should contact technical support. 2. You have forgotten your router login and/or password. Try the default login and password, please refer to User Manual. If this fails, you can restore your router to its factory settings by holding the Reset button on the back of your router for 6 seconds or more. 3. Can’t ping any PCs on the LAN. Check the Ethernet LEDs on the front panel. The LED should be on for a port that has a PC connected. If it is off, check the cables between your router and the PC. Make sure you have uninstalled any software firewall for troubleshooting. Verify that the IP address and the subnet mask are consistent between the router and the workstations. Product Support and Contact Information Most problems can be solved by referring to the Troubleshooting section in the User Manual. If you have other inquiries or need further technical support, please contact with your Internet Service Provider or visit us at www.bectechnologies.net. 10