1
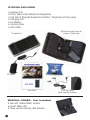
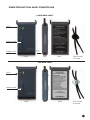
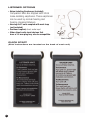
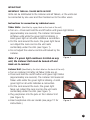
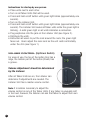
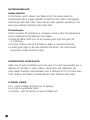
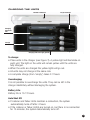
Companion Mics
E T Y M O T I C
R E S E A R C H
I N C .
™
Multi-Talker Noise Reduction System
User Guide
ABOUT THE COMPANION MICS
The Companion Mics™ project began in 1992, and has gone through five
development phases: 1) ultra low-power digital transmission; 2) low-cost
FM systems; 3) high-cost FM systems; 4) low-power digital security-alarm
systems; and 5) the present system, a 2.4 GHz spread-spectrum
(digital frequency hopping) system. None of the first four systems provided
adequate bandwidth and/or signal-to-noise ratio. The Companion Mics
system has both.
The Companion Mics system was developed to help those who have
significant difficulty understanding conversation in background noise, such
as encountered in restaurants and other noisy places. Our quality of life
depends to a great extent on our ability to communicate with family and
friends. When this ability is compromised, there is a tendency to withdraw.
With the Companion Mics system, those who have been excluded from
conversation in noisy places can enjoy social situations and fully participate
again.
BENEFITS
The Companion Mics system enables up to four talkers to speak to a
single listener. The microphones in this system give up to a ten-to-one
decrease in the relative noise level that is heard by the listener, which
makes it possible to carry on a normal conversation even in high levels of
background noise. The units use lithium polymer rechargeable batteries.
Battery life is 10-13 hours, which gives ample use time for most
applications. A complete charge takes 2-3 hours. To conserve battery
life, the system automatically times out and turns off after a period of
inactivity.
IMPORTANT PRIVACY NOTICE TO ALL USERS
It is easy to forget that you are wearing Companion Mics. If you leave the
conversation, or want to have a private conversation with someone, be
sure to disconnect from the system. The operating range of this
system can be 150 feet or more, so even if you are across a
room or away from the conversation, the Listener may be able to
hear you!
TABLE OF CONTENTS
System Includes ................................................................................2
Identification and Controls ................................................................3
Listener Options ..............................................................................4
QUICK START ....................................................................................4
Start Up ............................................................................................5
Volume Control ..................................................................................6
Connection/Disconnection Beeps ......................................................7
Temporary Disconnect ......................................................................7
Interference ......................................................................................8
Operating Distance ..........................................................................8
Other Uses ........................................................................................8
Charging the Units ............................................................................9
Overcharging
Battery Life
Auto Shutoff
How the Companion Mics System Works ........................................10
Specifications ..................................................................................11
Warranty..........................................................................................11
FCC Information ..............................................................................12
Noise Isolating Earphones................................................................13
Eartip Insertion
Eartip Removal
Proper Care
Earphone Filters
1
SYSTEM INCLUDES
• Listener Unit
• Three Talker Units (standard configuration)
• One Pair of Etymotic Research 6i Isolator™ Earphones (3.5mm plug)
• Charging Unit
• AC Adapter
• Carrying Case
• User Guide
6-Pocket Carrying Case with
Listener & Talker Units
Charging Unit
AC Adapter
User Guide
SPECIAL ORDER - Not included
• Two-unit “walkie talkie” version
• Fourth Talker Unit
• Three-pocket carrying case (shown)
2
ER-6i High fidelity,
Noise-isolating Earphones
IDENTIFICATION AND CONTROLS
LISTENER UNIT
On/Off
Volume Control
Earphone
Jack
Earphone Jack
FRONT
SIDE
BACK
Black fastener
on lanyard
TALKER UNIT
On/Off
Volume control
FRONT
SIDE
BACK
Clear fastener
on lanyard
3
LISTENER OPTIONS
• Noise-Isolating Earphones (included)
Companion Mics are shipped with ER-6i
noise-isolating earphones. These earphones
can be used by normal-hearing and
hearing-impaired listeners.
• Hearing Aid T-coils coupled with neck loop
(not included)
• Cochlear Implant; direct audio input
• Other direct audio input devices that
have a 3.5 mm plug may also be compatible.
Neck Loops
QUICK START
(Brief instructions are located on the back of each unit)
4
STARTUP
IMPORTANT: TURN ALL TALKER UNITS ON FIRST
Units can be distributed to the Listener and all Talkers, or the units can
be connected by one user and then handed out to the other users.
Instructions for connection by individual users
Talker Units: (Identified by a gray label on the back of the unit)
• Turn on—Press and hold the on/off button until green light blinks
(approximately one second). The Listener Unit seeks
all Talker units while the green light is blinking. A
solid green light on all units indicates a connection.
• Put the cord around the neck; the green light faces
out. Adjust the neck cord so the unit rests
comfortably under the chin (see Figure 1).
• Do not adjust the volume control until asked by the
Listener.
Note: If a green light continues to blink on any
unit, the Listener Unit must be turned off and
back on to connect.
Figure 1
Listener Unit: (Identified by the black label on the back of the unit).
• Turn on Listener Unit after all Talker Units are on.
• Press and hold the on/off button until green light blinks
(approximately one second). The Listener Unit seeks all
Talker units while the green light is blinking. A solid
green light on all units indicates a connection.
• Put the cord around the neck; the green light
faces out. Adjust the neck cord so the unit rests
comfortably under the chin (see Figure 1).
• Plug earphones into the jack on the Listener Unit
(see Figure 2).
Figure 2
• Insert earphones into ear canals (see page 13 for
instructions )
5
Instructions for startup by one person
• Place units next to each other.
• Turn on all Talker Units that will be used.
• Press and hold on/off button until green light blinks (approximately one
second).
• Turn on the Listener Unit.
• Press and hold on/off button until green light blinks (approximately one
second). The Listener Unit seeks all Talker units while the green light is
blinking. A solid green light on all units indicates a connection.
• Plug earphones into the jack on the Listener Unit (see Figure 2).
• Distribute the units.
• Instruction all users to put the cord around the neck; the green light
faces out. Users adjust the neck cord so the unit rests comfortably
under the chin (see Figure 1).
VOLUME CONTROL
(Up/Down Switch)
For ease of use, the top of the button (Up) has a
ridge, the bottom part of the button (Down) has
a groove.
Volume Adjustment should be determined
by the Listener.
After all Talker Units are on, the Listener can
determine if adjustments are needed. The
Listener Unit has a master volume control.
Note: It is seldom necessary to adjust the
volume control on any of the Talker Units. If any talker is unusually soft
or too loud, however, the listener can ask that talker to adjust their own
volume control.
6
Before adjusting the volume control on any unit
• Make sure all units (including the Listener Unit) are in the correct
position around the neck. The Listener Unit has a microphone to assist
monitoring the Listener’s own voice.
• The listener should be able to hear each talker clearly, as if the talkers
were speaking near the listener’s ear.
• Pressing the button raises or lowers the volume in discrete steps, and
holding the up/down button continuously increases or decreases the
volume.
-The volume control on the Listener Unit adjusts all units
up or down in 6-dB steps.
-The volume control on the Talker Units adjusts individual
units in smaller (3-dB) steps.
CONNECTION/DISCONNECTION BEEPS
The standard Companion Mics system works with one, two or three Talker
Units. If the system is pre-programmed at the factory for three Talker Units
and only one or two are in use, the Listener will hear a short beep.
The Listener hears a beep:
• At connection, if fewer than the programmed number of Talker Units
are connected; and
• When one or more Talker Units disconnect from the system.
TEMPORARY DISCONNECT
Talkers can temporarily disconnect their units by pressing the on/off
button on the Talker Unit until the green light turns off. A beep tone in the
earphone of the Listener Unit announces the disconnect. If a disconnect
occurs accidentally, the light on that Talker Unit will blink to signal the
disconnect.
To reconnect
• Turn on Talker Unit. Green light will blink.
• Turn the Listener Unit off and back on to reconnect all units.
• A solid green light on all units indicates reconnection.
7
INTERFERENCE
Unique Identifier
At the factory, each Listener and Talker Unit in the same system is
programmed with a unique identifier so that only the units in that system
will connect with each other. There can be many systems operating in the
same area without interfering with each other.
RF Interference
If there is severe RF interference, complete recovery from the interference
can be obtained by the following three steps:
• Check all Talker Units: turn on any whose green light has gone off
or is blinking.
• Turn the Listener Unit off and back on again to reconnect all units.
• A solid green light on all units indicates reconnect. The units should
reconnect in eight seconds or less.
OPERATING DISTANCE
Under line-of-sight conditions out in the open, the units may operate over a
distance of 150 feet or more. Indoors, where there are reflections, the
units should maintain communication over a distance of 15 to 20 feet even
if the Listener and Talkers occasionally turn their backs to each other.
OTHER USES
• TV—Place a Talker Unit near the TV speaker
• Air, train or automobile travel
• Lectures—Ask the lecturer to wear a Talker Unit
8
CHARGING THE UNITS
Flexible Lid Release
Lanyard Storage
Charging
Connector
Pins
Storage
Charging Indicator Light (yellow)
Figure 3
To charge:
• Place units in the charger (see Figure 3). A yellow light will illuminate on
each unit. The light on the units will remain yellow until the units are
fully charged.
• When the units are charged the yellow lights will go out.
• All units may not charge at the same rate.
• A complete charge (from “empty”) takes 2-3 hours.
Overcharging:
It is not possible to overcharge the units. They can be left in the
charger indefinitely without damaging the system.
Battery Life:
Battery life is 10-13 hours.
Auto Shut Off:
• If Listener and Talker Units maintain a connection, the system
automatically turns off after 4 hours.
• If the Listener or Talker Unit(s) are turned on, but there is no connection
for 15 minutes, the system automatically turns off.
9
HOW THE COMPANION MICS SYSTEM WORKS
The Companion Mics system establishes a direct communication
line between the Talkers’ microphones and the Listener’s receiver, which
bypasses the noise and reverberation of the local acoustic environment.
The wireless technology used in the Companion Mics system is similar
to that used by digital cordless phones and other digital users of the
2.4 GHz band.
Rather than using a single frequency, where a competing signal might
interfere, a frequency-hopping technique is used. By jumping quickly from
frequency to frequency in a pseudo-random manner among 79 frequencies, the chance of interference from microwave ovens, other Companion
Mics systems or other users of 2.4 GHz is minimized, so that 10 or more
sets can operate with little audible interference even if they are all in the
same room. When the units are first turned on, the Listener Unit starts its
repeating sequence of frequency hops while each Talker Unit waits, tuned
to one or another of those frequencies, until it receives a transmission
containing the identification code from the Listener Unit. The units then
lock together, jumping from frequency to frequency. This process is
repeated until all Talker Units lock on. Once all units are in communication
with each other, the LED lights stop blinking and the Talkers are heard by
the Listener. From then on, each Talker Unit is in constant communication
with the Listener Unit. The “lock up” sequence normally takes less than
8 seconds, but—rarely—may take 20-30 seconds if heavy interference
is present. A master volume control on the Listener Unit adjusts microphone gain on all units simultaneously. Each individual Talker Unit has an
independent volume control to fine tune an individual microphone gain to
accommodate loud or soft talkers.
10
SPECIFICATIONS
Power Consumption: 50-65 mA at nominal voltage
Battery Life: 10-13 hours
Charging Time: Typically 2-3 hours from “empty”
Environmental Performance:
Operating: -10 to +45 °C
Charging:
0 to +35 °C
Storage: -10 to +45 °C
Radio Performance: 20 meters (66 feet) min in free space
Audio Performance:
Frequency Bandwidth: 8 kHz (7 kHz for two-way system)
Acoustic Insertion Gain at Startup (preset volume): 20 dB gain
Volume Control Gain Range: 4 dB to 66 dB*
Maximum output: 119 dB SPL*
Total Harmonic Distortion: < 2%
End-to-end Delay: 22-32 msec (low-interference environments); 30-40 msec
(four microphone systems)
Earphone Minimum Output Impedance: 10 Ohms
Telecoil Minimum Output Impedance: 10 Ohms
Max Voltage Swing at Receiver Output: 1.95-2.00 Vpp
Antenna: Internal
Microphone: Noise-canceling electret condenser
*Notes:
1. Gain and output depend on the earphone that is used. These specifications apply when
the Companion Mics system is used with the supplied 6i Isolator™ earphones.
2. Maximum output is measured into a 2cc coupler with 90 dB SPL input.
3. Technical note for audiologists: When a hearing aid microphone is moved from the ear of
the listener to a position a few inches below the talker’s mouth, an increase of 16-20 dB SPL
is obtained. Insertion gain refers to the increase in ear canal SPL provided by the
Companion Mics system compared to listening directly to a talker one meter in front
of the listener.
WARRANTY
Etymotic Research, Inc. warrants this product against defects in material
or workmanship for a period of one year from the date of original
purchase from an authorized Etymotic distributor or reseller. Etymotic
will repair or replace the defective product at its option if returned within
the warranty period to our service facility. This warranty is in lieu of all
other warranties, expressed or implied, including, but not limited to, any
implied warranty of merchantability or fitness for a particular purpose.
11
FCC AND OTHER INFORMATION
6
This equipment has been tested and found to comply with the limits for a Class B
digital device, pursuant to Part 15 of the FCC Rules. Operation is subject to the
following two conditions:
1. This device may not cause harmful interference, and
2. This device must accept any interference received, including interference that may
cause undesired operation.
These limits are designed to provide reasonable protection against harmful interference
in a residential installation. Some equipment operates at frequencies that may cause
interference to nearby TVs and VCRs; to minimize or prevent such interference, the
system base should not be placed near or on top of a TV, PC monitor, or VCR; and, if
interference is experienced, moving the desk station farther away from the TV or VCR
will often reduce or eliminate the interference.
However, there is no guarantee that interference will not occur in a particular installation.
If this equipment does cause harmful interference to radio or television reception, which
can be determined by turning the system off and on, the user is encouraged to try to
correct the interference by one or more of the following measures:
1. Increase the separation between the equipment and receiver.
2. Consult the dealer or an experienced radio TV technician for help.
FCC HEALTH AND SAFETY INFORMATION
Your device is a radio transmitter and receiver. It is designed and manufactured not to
exceed the emission limits for exposure to radio frequency (RF) energy set by the Federal
Communications Commission of the U.S. Government. The FCC has established criteria for
the amount of radio frequency energy various products may produce depending on their
intended usage. This product has been evaluated and found to comply with the FCC’s
exposure criteria. For body worn operation, the FCC RF exposure guidelines were also
met when used with the accessories supplied or designed for this product. Use of other
accessories may not ensure compliance with FCC RF exposure guidelines and should be
avoided.
Caution: Any changes or modifications not expressly approved by the party responsible
for compliance could void the user’s authority to operate this device.
12
6i Isolator™ High-fidelity
Noise-Isolating Earphones
Included:
6i Isolator earphones
5 ft. cord with 3.5 mm stereo plug
Assorted flanged and foam eartips
2 replacement filters
Filter changing tool
Shirt clip
Pouch
Eartip Insertion
Flanged eartip insertion
• For best results, moisten the flanged eartip before insertion.
• Carefully insert one earphone at a time while pulling up and out on the back of the ear.
The earphone should seal deeply and comfortably in the ear canal.
Foam eartip insertion
• Use a foam eartip if a good seal cannot be obtained with a flanged eartip.
• Compress the foam at the end of the earphone by rolling
it between your thumb and forefinger before inserting it.
Hold the eartip in place for about 5 seconds while the
foam expands to create a tight seal in the ear canal.
Eartip Removal
Remove earphones slowly with a twisting motion to gradually break the seal.
Do not pull on the cords to remove earphones.
Proper Care
Cleaning the flanged eartips
1. Carefully remove the eartip from the earphone.
2. Use water and mild soap to remove dirt and earwax.
3. Rinse and completely dry the eartip.
4. With a slight twisting motion, push the eartip on the stem until it fits securely.
Foam eartips
• Replace disposable foam eartips regularly.
Earphone Filters
6i Isolator Earphones have special filters that smooth the frequency response and prevent
earwax from entering the earphones. These filters are located at the end of the earphone
and are visible when the eartip is removed. If the filters become clogged they should be
replaced. A dirty filter will reduce earphone output. The frequency with which the filters
need to be changed will vary widely among users. If one or both earphones stop working,
the volume decreases, or the sound quality declines, the filters should be changed.
Note: Once removed, the filters are not reusable.
Instructions for removing and replacing filters are included with the earphones.
For eartips and accessories: www.etymotic.com or 888-389-6684
13
ABOUT ETYMOTIC RESEARCH
Etymotic Research is an engineering driven company. Its mission, to develop products to
measure, improve and protect hearing, has not changed in over 20 years. New product
development reflects our commitment to improve the lives of those with hearing loss
and to enhance the listening experience of musicians and music lovers everywhere.
Scientists, engineers, and audiologists working together have generated more than
120 patents issued or pending. Etymotic Research has an extensive sound laboratory
that includes three anechoic chambers and a reverberation room.
Etymotic (et-im-oh-tik) means “true to the ear.”
ETYMOTIC RESEARCH INC.
61 Martin Lane • Elk Grove Village, IL 60007
www.etymotic.com • 888-389-6684 or 847-228-0006
Companion Mics and Isolator are trademarks of Etymotic Research, Inc. The Companion Mics system is covered by
U.S. patent: #5,966,639 and other patents pending.Isolator earphones are covered by the following U.S. patents: #4,677,679,
#4,763,753, #5,887,070 and other patents pending.
®
#ER083114 0306