1
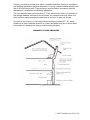
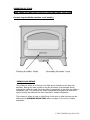
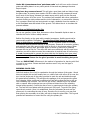
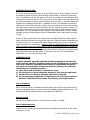
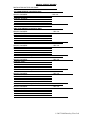
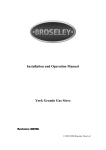
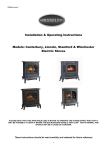
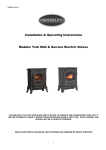
Installation and Operation Manual
Serrano 3, 5 & 7
Multi Fuel Stoves
Tested to EN 13240
TJ09B
THIS APPLIANCE MUST BE INSTALLED AND COMMISSIONED BY A FULLY QUALIFIED,
REGISTERED ENGINEER.
A “Declaration of Completion” Certificate must be obtained for the installation and retained by the
end user. Failure to comply with these requirements may void the warranty.
© 2007-2008 Broseley Fires Ltd
SERRANO MULTIFUEL STOVES
INSTALLATION AND OPERATION MANUAL
Thank You
May we take this opportunity to thank you for choosing a Serrano, cast iron
Multi-fuel stove. Please take time to read this manual and follow the guidelines on how
to install and operate your new stove, as we feel sure it will enable you to use it to its
best advantage for many years.
The term multi-fuel refers to the fact that the appliance is capable of burning both wood
and coal. Both of these fuels have very different requirements if they are to burn
correctly. The air controls on the appliance allow the chosen fuel to burn efficiently. On
an open fire, the necessary conditions to allow both wood and coal to burn is done so at
the expense of efficiency, sending more than 80% of the heat produced straight up into
the chimney. The efficiency figures for our M/F stoves are much higher as there is far
greater control over the combustion air entering and leaving the appliance.
See the sections on “Burning Wood” and “Burning Coal” for more details. After reading
this document, if there is anything you are unsure about, please contact your dealer or
our Technical Support Department on 01743 461444.
Health and safety precautions
Special care must be taken when installing the stove such that the requirements of the
Health and Safety at Work Act are met.
Handling
Adequate facilities must be available for loading, unloading and site handling.
Fire Cement
Some types of fire cement are caustic and should not be allowed to come into contact
with the skin. In case of contact wash immediately with plenty of water.
Asbestos
This stove contains no asbestos. If there is a possibility of disturbing any asbestos in the
course of installation then please seek specialist guidance and use appropriate protective
equipment.
Metal Parts
When installing or servicing this stove care should be taken to avoid the possibility of
personal injury.
© 2007-2008 Broseley Fires Ltd
INSTALLATION OF STOVE
READ THESE INSTRUCTIONS CAREFULLY BEFORE INSTALLATION
These instructions cover the basic principles to ensure the satisfactory installation of the
stove, although detail may need slight modification to suit particular local site conditions.
In all cases the installation must comply with current Building Regulations, Local
Authority Byelaws and other specifications or regulations as they affect the installation
of the stove.
It should be noted that the Building Regulations requirements may be met by adopting
the relevant recommendations given in British Standards BS 8303, BS 6461 and BS 7566
as an alternative means to achieve an equivalent level of performance to that obtained
following the guidance given in Approved Document J.
We recommend that you seek the services of an installer who is conversant with stove
installations and Building Regulations. It is most likely that the shop where you
purchased the stove will be able to help in this respect. It is our general policy to supply
specialist Fireplace shops. These shops can offer an after sales service and will be able
to offer advice when necessary.
Please note that it is a requirement under the Broseley Fires Ltd’s warranty
system that the installation of the stove is carried out under by a Competent
Person registered with a Government approved Competent Persons Scheme.
HETAS Ltd operate such a Scheme and a listing of their Registered Competent
Persons can be found on their website at www.hetas.co.uk.
Stove Performance
In the UK the stove has been approved by HETAS Ltd as an intermittent operating
appliance for burning manufactured or naturally occurring smokeless fuels and wood logs
only. It should be noted that it is an offence to burn wood logs in this stove if it is
installed within a Smoke Control Area in the UK.
The nominal heat outputs for the stove are as follows:
Heat Output
Additional Air
Serrano 3
3 kW
3 kW
Serrano 5
5 kW
5 kW
Serrano 7
7 kW
7 kW
Smokeless fuels
Wood logs
A permanent air entry opening or openings with a total free area
of at least 550mm2 per kW of appliance rated output above 5Kw.
If a flue draught stabiliser is used, extra ventilation will be
required.
© 2007-2008 Broseley Fires Ltd
Hearth
Your stove must be installed on a solid, level non-combustible hearth and with a gap of
at least 600mm from any combustible material such as beams or skirting. The hearth
protrusion in front of the stove to carpets or wooden floors must be at least 300mm. As
it is possible, that on opening the door of the stove for fuel to fall out, a fender must be
fitted if the hearth is flush with the carpet. These are just a few hearth specifications.
Please refer to Building Regulations Approved Document J (Hearths) for more specific
details.
The appliance should be sited in a properly constructed brick fireplace or recess allowing
a gap of 100mm all round, at the rear and both sides. The fireplace walls must be made
of solid non combustible material and at least 75mm thick. It is possible to reduce the all
round clearance to 75mm but this will reduce the ability of the appliance to heat the
room and could lead to over firing of the stove and structural damage to the surround.
If this reduced air gap is unavoidable it will be necessary to increase the thickness of the
surrounding wall to 200mm. If the air gap around the appliance is reduced to 75mm,
then increase the gap above to 375mm to allow the air to move into the room. The
hearth should be level and the appliance fitted at right angles to it. Fireplace walls need
to be at least 1.2m above the hearth and at least 300mm above the appliance. The
hearth has to be able to support the weight of the appliance and any flue bearing down
upon it. The clearance distances to combustible material beneath, surrounding or upon
the hearth and walls adjacent to the hearth should comply with the guidance on the
separation of combustible material given in Building Regulations Approved Document J
and also in these stove instructions.
Chimney
This appliance must not be fitted into a chimney serving another heating appliance. It is
most important that there is no obstruction in the flue or chimney. Please ensure that
any existing chimney is clear of obstruction and swept clean immediately before
installation of the stove. If the chimney has been used for an open fire it is
recommended that it be swept for a second time having been used for a month
following installation. As a closed appliance operates at a higher flue temperature, it is
possible for deposits that were previously adhered, to be dislodged, with the consequent
risk of flue blockage.
A flue draught of minimum 1.5mm (14.71 Pascal’s) to a maximum 2.5mm (24.52
Pascal’s) water gauge is required for satisfactory appliance performance. A properly built
masonry or factory constructed chimney, preferably with a height of 5 metres or more,
should ensure a consistent draught (draw) under a variety of weather conditions. The
flue draught should be checked under fire at high output and if it exceeds the
recommended maximum, a draught stabiliser must be fitted so that the rate of burning
can be controlled, and to prevent over firing (see 5 below). If you have any doubts
about the suitability of your chimney, consult your local dealer/stockist.
The outlet from the chimney should be above the roof of the building in accordance with
the provisions of Building Regulations Approved Document J.
If installation is into an existing chimney then it must be sound and have no cracks or
other faults which might allow fumes into the house. Older properties, especially, may
have chimney faults or the cross section may be too large i.e. more than 230 mm x 230
mm. Remedial action should be taken, if required, seeking expert advice, if necessary. If
it is found necessary to line the chimney then a flue liner suitable for solid fuel must be
used in accordance with Building Regulations Approved Document J.
© 2007-2008 Broseley Fires Ltd
If there is no existing chimney then either a prefabricated block chimney in accordance
with Building Regulations Approved Document J or a twin walled insulated stainless steel
flue to BS 4543 can be used. These chimneys must be fitted in accordance with the
manufacturer’s instructions and Building Regulations.
The liner diameter must not be less than 6”. If the draw on the chimney is excessive, a
flue draught stabiliser will help to slow this down. An excessive draw may cause over
firing and thus cause the internal components of the stove to wear out quicker.
Any bend in the chimney or connecting fluepipe should not exceed 45°. 90° bends
should not be used. Adequate provision e.g. easily accessible soot door or doors must
be provided for sweeping the chimney and connecting fluepipe.
SUMMARY OF FLUE PROBLEMS
© 2007-2008 Broseley Fires Ltd
Connection to Chimney Flue
A single wall metal fluepipe is suitable for connecting the stove to the chimney but is not
suitable for using for the complete chimney. It is important that the connection between
the stove spigot and the flue pipe is effectively sealed with cement and/ or glass fibre
rope to prevent harmful gases leaking into the room. The diameter of the flue spigot
(pre fibre roped) provided with the stove is 5” (125mm) and can be fitted to the rear or
the top of the stove and must be tightly fitted to the opening. Air must not be drawn in
at this point as it will affect the stoves performance. The stove may be fitted with a 6”
(150 mm) flue. This requires an adapter to be connected to the spigot. Your installer
can supply this. If you obtain this independently, make sure the adapter is compatible
with the flue pipe as not all manufacturers pipes are cross compatible. A 5” (125mm)
flue pipe is sufficient if you are only burning smokeless or low volatiles fuel but attention
must be paid to any build up of deposits in the flue and regular cleaning undertaken.
Fuels such a bituminous coal, untreated wood or compressed paper are not smokeless
or low volatiles fuel.
To get the best transfer of heat from the stove into the room there are two factors to
consider when installing into a fireplace recess.
Firstly, the flue pipe from the stove must pass through either a top or back ‘register
plate’. A top register plate is the term used for a flat plate which is installed inside
the chimney (usually out of sight) to prevent heat in the room being drawn up the
chimney to waste when using the top or rear flue outlet. A back register plate is the
term used for a flat plate which is installed over the opening of the fireplace recess
when using the rear flue outlet. This register plate must be made of a noncombustible material such as steel, asbestolux, or masterboard. It is advisable to
seal this register plate to the walls of the chimney and also around the flue pipe.
Provision of a trap door in this closure plate, or a soot door in the flue for access to
clean the chimney from time to time, is recommended. When using the rear outlet it
is advisable to infill the chimney space underneath the outlet level to prevent debris
falling into the void and being inaccessible.
Secondly, the more forward the stove can be sited on the hearth, the more heat will
be radiated into the room. To achieve this, the back flue outlet is favoured but
remember the 600mm clearance distance from combustible materials and the
300mm distance to the front of the hearth.
Combustion Air Supply
In order for the stove to perform efficiently and safely there should be an adequate air
supply into the room in which the stove is installed to provide combustion air. This is
particularly necessary in modern houses where drafts have been almost eliminated by
double glazing etc.
There must not be an extractor fan fitted in the same room as the stove as this can
cause the stove to emit fumes into the room. It is necessary to install a wall vent to
provide the necessary combustion air and to prevent the depletion of oxygen in the
room.
Assembly
The stove has four legs that are attached by bolts. These should be fitted. The main
loading door and ash door are secured by hinge pins and will lift off. Inside there are
two side fire bricks and one rear fire brick. The rear firebrick is rectangular, the smooth
surface sits towards the fire. A separate top baffle plate is supported by the left, right
and rear firebricks. There is also the fire grate that sits on the base of the stove. If these
parts are removed re-install these parts in use the instructions below to refit the
firebricks:
© 2007-2008 Broseley Fires Ltd
STEP BY STEP GUIDE FOR FITTING
NEW SERRANO FIREBRICK SETS
Please remove Grate and Ash pan before fitting fire bricks
STEP 1.
Fit Left Side Brick first with angle facing rear
of stove. Smooth side of cast facing inwards.
STEP 3.
Insert Baffle Brick with the cut outs towards
the rear of stove and the smooth side facing
downwards. Push to the top of stove with one
hand while placing right side brick into position
STEP 2.
Insert Right Side Brick same as step 1
Then lay down flat on base casting.
STEP 4.
Insert Rear Brick putting it therough
the top right hand corner first. Once
again hold up baffle with one hand and
locate Rear brick so it hooks over both
sides at the rear.
© 2007-2008 Broseley Fires Ltd
Commission/Handover
Ensure loose parts are fitted in accordance with the instructions for “Assembly” given
above.
On completion of the installation allow a suitable period of time for any fire cement and
mortar to dry out, when a small fire may be lit and checked to ensure the smoke and
fumes are taken from the stove up the chimney and emitted safely to atmosphere. Do
not run at full output for at least 24 hours.
On completion of the installation and commissioning ensure that this installation and
operation manual for the stove is left with the customer. Ensure to advise the customer
on the correct use of the appliance with the fuels likely to be used on the stove and
warn them to use only the recommended fuels for the stove.
Advise the user what to do should smoke or fumes be emitted from the stove. The
customer should be warned to use a fireguard to BS 6539 in the presence of children,
aged and/or infirm persons. Advise the user not to fit an extract fan in the same room
as the stove as this can cause the stove to emit fumes into the room.
© 2007-2008 Broseley Fires Ltd
OPERATION OF STOVE
READ THESE INSTRUCTIONS CAREFULLY BEFORE USING THE STOVE
Controls Layout (Similar function on all models)
PRIMARY AIR INTAKE
The primary air intake is in the form of a slider and is situated on the main door
assembly. Having the slider pushed to the left (As shown in the diagram above)
indicates the intake is closed. When the slider is moved fully to the right the intake is
completely open. This particular air intake is adjustable throughout the area left to
right to control the total amount of air required for suitable combustion
The primary air intake is used on initial firing of the stove or when burning coal etc.
Please see the BURNING SOLID FUEL section on page 13 for a more in depth
description.
© 2007-2008 Broseley Fires Ltd
SECONDARY AIR INTAKE
The secondary air intake is in the form of a lever and is situated under the ash lip at
the front of the stove. Having the lever to the left indicates the air intake is closed.
Having the lever fully to the right indicates the air intake is open. This particular air
intake is adjustable through 180˚ so the lever can control the total amount of air
required for suitable combustion
The secondary air intake works by opening 2 flaps located at the back of the stove.
The flaps are attached to a rod which is controlled by a small cam.
These flaps allow air to flow up tubes along the back and then across the top of the
inside of the stove. This air then becomes warm and is pushed down the back of the
glass creating the AIRWASH system – see page 11. The airwash system allows the
glass to remain soot and particle free. This particular design also allows the air to be
released on top of the grate which is ideal when burning wood products. Please see
the paragraph BURNING WOOD LOGS on page 14.
© 2007-2008 Broseley Fires Ltd
Ash Pan
The ash pan can be removed using the double end of the poker which fits under the
top lip of the ash pan. Care must be exercised when opening the ash pan door as
the handle and this part of the stove will be very hot. Use the glove provided. Do not
put hot ashes into anything other than a metal container unless you know the ashes
are cold. Ash pan removal is best done when either the contents of the ash pan have
cooled or the stove is out, as some red hot coals can be covered by the ash and may
be unseen. Take care not to drop any of the contents of the ash pan on carpet or
soft furnishings. Only a slight contact of hot ash may burn a hole. If you remove hot
ashes from the stove, use some protection for the floor covering adjacent to the
hearth, to account for accidental spillage and always use gloves.
Air Controls
The stove is fitted with a primary air control and a secondary air control (air wash)
which together control the rate at which the fuel is burned. The sections “Air-wash
system” and “Starting and maintaining the fire” give more detail of their operation
and usage.
Air-wash System
This is a system where secondary air is drawn into the stove (by combustion)
through the air control under the ash lip and deflected down the back face of the
glass, thus preventing the smoke coming into contact with the glass. It does not
mean that you will never have to clean the glass, but substantially lengthens the
periods between having to do so. The air-wash system works best when burning
dry wood at high temperature. Wet and pitchy wood will produce more deposits on
the glass. Also, deposits will form on the back of the glass when the stove is
operated on low heat for extended periods.
The ‘air wash’ is controlled via the lever situated in the centre below the ash lip of
the stove; it is this ‘air-wash’ that keeps a clean and uninterrupted view of the fire,
and good secondary combustion of the fuel. This helps to reduce emissions into the
chimney and environment. Moving the lever right opens the vent allowing more air
into the fire so making it burn faster and hotter. Closing the vent slows the
combustion rate and in this way you are able to control the rate at which the fire
burns.
The fire needs some air to burn so closing down all the air supply will make the fire
go out. Experience with the fire will show you the right balance of fuel and air to get
the best out of your stove. This stove will burn overnight using Phurnacite. This can
be achieved by closing down the secondary air and running the primary air at a
minimum, which would usually be set at about one third of the usual running
position. In the morning, open the air controls fully to re-establish the fire.
Then de-ash and refuel in the normal way adjusting the air controls accordingly.
© 2007-2008 Broseley Fires Ltd
Curing the Stove
Before lighting the stove check with the installer that the installation work and
commissioning checks described in the installation instructions have been carried out
correctly and that the chimney has been swept clean, is sound and free from any
obstructions. This curing process may have been undertaken by your installer as part
of the stoves’ commissioning and handover and the installer should have shown you
how to operate the stove correctly.
Your stove is made of a number of cast iron components and we recommended that
the first burn should be a small fire for about 30 minutes. This enables the stresses
and strains at the joints to be taken up and settle gradually. The second burn can be
a larger fire for an hour. During the curing process, the stove will give off a pungent
smell and some fumes. This is the paint curing and is quite normal. Provide
ventilation whilst this is happening since the fumes can be quite strong and may set
off smoke alarms in the room. The paint may become slightly lighter in colour when
the stove is cured, particularly in the hottest spots. Fire
Grate polish can be used to keep the stove in good condition, or stove spray paint
can be used to re-touch the stove. The correct stove spray can be obtained from
your stove stockist.
Permanent air vent
A permanent air entry opening or openings with a total free area of at least 550mm2
per Kw of appliance rated output above 5Kw. If a flue draught stabiliser is used,
extra ventilation will be required.
Recommended Fuels
This appliance has obtained approval from HETAS Ltd., for burning the
following fuels – Manufactured and natural smokeless fuels, and wood
logs only.
The HETAS Ltd. Appliance approval only covers the use of the following
fuels in this appliance, – Manufactured and natural smokeless fuels, and
wood logs not exceeding 35cms in length. Approval does not cover the use
of other fuels either alone or mixed with the suitable fuels listed above,
nor does it cover instructions for the use of other fuels.
Although approval covers the use of the smokeless fuels listed, the
claimed rated output, has been obtained burning a single representative
smokeless fuel, under standard test conditions. However, in the home, a
variety of operating conditions can occur and the performance of the
appliance may vary to some degree with these conditions and different
fuels may need to be burnt at different rates to provide the same heat
output.
The recommended fuels are Wood logs no longer than 35cms (dry, seasoned for a
minimum of one year) and solid mineral fuels (e.g. Natural smokeless fuels) The
larger briquettes are recommended as they concentrate less heat in one spot
reducing the likelihood of damage to the grate. Ask your local fuel merchant for
more details on these fuels.
Only authorised smokeless fuels may be used in smoke control areas.
© 2007-2008 Broseley Fires Ltd
Under NO circumstances burn ‘petroleum coke’ as it will burn out the internal
grate and baffle plates in a very short period of time and may damage the stove
beyond repair.
Only burn dry, seasoned wood. This will give a good heat yield and help to keep
the glass clean. A growing tree contains 50-95% water. Burning unseasoned wood
turns most of the energy released into water vapour which goes into the flue and
little heat is given off to the room. The moisture will combine with other combustion
products forming a sticky surface and the risk of obstruction, or worse still a chimney
fire, is greater. Wood logs are best stored in a stack, sheltered from the weather, in
a well ventilated area and raised off the ground. This allows the air to circulate and
prevents mildew.
Starting and Maintaining the Fire
Do not use gasoline, lighter fluid, Kerosene or other flammable liquids to start or
rekindle the fire for obvious safety reasons.
Build a fire directly on the grate with crumpled newspaper, kindling wood and/or
commercially available “firelighters”. Do not allow single pieces of paper to
float up the chimney especially alight. This is a common cause of a chimney
fire and can cause structural damage to the property. Ensure all air controls (primary
and secondary) are fully open to begin with as shown in the pictures above. When
the kindling is burning well, add larger pieces of wood or solid fuel to gradually
increase the size of the fire. The stove will work more efficiently with the main door
closed as you will be able to control the combustion air and the rate of fuel burning.
It is not recommended to operate the stove with the fuel loading door open other
than to load fuel. When alight the loading door handle and the ash pan handle will
become very hot. Please use the glove provided to avoid touching hot parts.
There are IMPORTANT differences in the method of operation for burning solid fuel
or wood in your stove. Please read both sections even if only one fuel type is
relevant to you.
BURNING SOLID FUEL
Solid fuel needs a flow of air for combustion though the bottom of the grate. Wood
does not require this and will readily burn on a bed of ash with a flow of air over the
top. Use the single end of the poker provided to push the ash and debris through
the grate before refuelling. This will allow the passage of air and prevent the grate
from clogging. Make sure there is sufficient hot fuel left to allow the fire to pick up
once refuelling has occurred. This will look like a level, shallow bed of hot embers
with no spaces. After prolonged use you will have a better idea of the refuelling
interval and procedure. Control the rate of burn by opening and closing the primary
air. The fuel will burn fastest with the primary air fully open. To get the fire going
open the air controls. Once it is established, close the secondary air and use the
primary air for controlling the rate of burn. Once the fire is running, you may find
that opening the secondary air a little, will help to keep the glass clean. This is good
practice but remember to control the fire using the primary air.
© 2007-2008 Broseley Fires Ltd
BURNING WOOD LOGS
If you are only burning wood logs, you may allow a bed of ash to build up on top of
the grate to a level of about 20mm forming a flat surface on which the wood may
burn. You will then use the “air-wash” front lever to provide the combustible air and
control the burn rate of the fire. For fully open, turn the lever to the right. By turning
the lever gradually you will be able to control the rate of burn – fully open being the
fastest burn producing most heat. To establish the fire it is acceptable to open the
primary air as well. Once the fire is bright, close the primary air control and use the
secondary air to control the rate of burn for the fire. You will not have to clean out
your stove after every firing as wood will burn better with a slight build up of ash in
the ashpan. It is not advisable to burn painted or recovered wood (such as railway
sleepers) as this contains harmful toxins or flammables which may cause the wood
to ‘spit’.
If you are burning solid fuel or a mixture with wood DO NOT allow a bed of ash to
build up above the level of the sides of the ash can. Solid fuel needs combustible air
to flow through it from underneath. When burning solid fuel, this air is needed to
keep the grate from overheating. Failure to allow a sufficient flow of air through the
grate will result in the grate burning out in a very short period of time. This will not
be covered by any warranty claim. You will get some spillage of ash to the back and
sides of the ashcan itself and you must ensure that this is cleaned out regularly and
from behind the internal baffle plate. If you do not do this, you may buckle the
baffle plate or in the extreme, burn it out.
WARNING NOTE
Properly installed, operated and maintained this appliance will not emit
fumes into the dwelling. Occasional fumes from de-ashing and re-fuelling
may occur. However persistent fume emission is potentially dangerous
and must not be tolerated. If fume emission does persist, the following
immediate actions should be taken:a) Open doors and windows to ventilate the room.
b) Let the fire out or eject and safely dispose of fuel from the appliance.
c) Check for flue or chimney blockage and clean if required.
d) Do not attempt to relight the fire until the cause of the fume emission
has been identified and corrected. If necessary seek expert advice.
Use of fireguard
When using the stove in situations where children, aged and/or infirm persons are
present a fireguard must be used to prevent accidental contact with the stove. The
fireguard should be manufactured in accordance with BS 6539.
Aerosol sprays
Do not use an aerosol spray on or near the stove when it is alight.
Use of operating tools
Always use the operating tools provided when handling parts likely to be hot when
the stove is in use.
© 2007-2008 Broseley Fires Ltd
Chimney Fires
If the chimney is thoroughly and regularly swept, chimney fires should not occur.
However, if a chimney fire does occur turn the air control setting to the minimum,
and tightly close the doors of the stove. This should cause the chimney fire to go
out in which case the control should be kept at the minimum setting until the fire in
the stove has gone out. The chimney and flueways should then be cleaned. If the
chimney fire does not go out when the above action is taken then the fire brigade
should be called immediately.
After a chimney fire the chimney should be carefully examined for any damage.
Expert advice should be sought if necessary
Cleaning the Stove and Summer Shutdown
Only clean the stove when cold. To clean the glass, either use an oven cleaning fluid
or dip a wet cloth in the wood ash (not coal ash – this will scratch the glass) and
gently rub clean.
The outside can be cleaned with a soft brush. Use a lint free cloth if necessary but
test an area first. Do not use abrasive cleaners as this will remove the paint and may
leave a chalky deposit. Under no circumstances use a yellow duster as the fibres will
stick to the rough surface of the stove and will produce a pungent odour next time
the stove is used!
If the stove has a period of non-use leave the primary and secondary air controls in
the open position to allow ventilation through the stove. The side and rear baffles
can be easily removed and are not fixed. Lift the side baffle clear of the grate with
both hands and then tilt the bottom of the plate into the stove. At the same time
lower it to the grate floor. Repeat with the other side. The rear plate will lift out. The
throat plate baffles are held in a cradle and will slide out for inspection and cleaning.
Remove them to sweep the chimney. Replace all removed parts before using the
stove.
Chimney Cleaning
The chimney should be swept at least once a year when burning only solid smokeless
fuels and twice a year when burning wood. It is important that the flue connection and
chimney are swept prior to lighting up after a prolonged shutdown period.
In situations where it is not possible to sweep through the stove the installer will
have provided alternative means, such as a soot door. After sweeping the chimney
the stove flue outlet and the flue pipe connecting the stove to the chimney must be
cleaned with a flue brush.
Where the chimney is believed to have a served an open fire installation it is possible
that the higher flue gas temperature from a closed appliance may loosen deposits
that were previously firmly adhered, with the consequent risk of flue blockage. It
is therefore recommended that the chimney be swept within a month of regular use
after installation. The baffle plate should be checked and cleaned if necessary at least
once a month during the heating season.
© 2007-2008 Broseley Fires Ltd
Trouble-Shooting
1. Smoke comes out of the stove when the loading door is opened.
•
•
The chimney cavity into which the 125mm flue pipe has been installed may
be less than the minimum requirement.
Deposits (soot) may have built up in the chimney and be restricting the flow
of waste products. This flow rate is known as the ‘draw’.
2. The Stove does not produce the expected heat into the room.
•
•
•
•
•
Has the flue pipe been sealed to the chimney to prevent heat being
drawn up the chimney to waste?
Green or wet wood is being burnt.
The chimney has excessive draw (this is unusual). Seek installer advice
with regard to installing a Flue Draught Stabiliser.
The stove has been recessed into the existing fireplace and a lot of heat
is absorbed be the surrounding fireplace walls rather than being radiated
into the room. Pull the stove forward.
For the maximum efficiency of heat transference into the room the stove
should be sited on the hearth of the fireplace rather than recessed.
3. The Stove burns too fast.
•
•
•
•
•
•
•
Use whole logs rather than split ones.
The wood being used may be generally too small.
The “air-tight” seal between the fibre rope on the doors and the casting may
have been lost, adjust door handle lock nuts to reinstate this seal.
The chimney has excessive draw (seek installers advice on this point).
The fibre rope seal between the door and the glass may be leaking. Tighten
or replace.
The glass is not sealed, gently tighten glass retaining clips. Do not over
tighten as this will stress or break the glass.
The fibre rope on doors and glass has worn out. Replace.
Spare Parts
Details of spare parts are available from your local stockist from which you
purchased this appliance or by contacting Broseley Fires.
Contact Details:
Broseley Fires
Knights Way
Battlefield Enterprise Park
Shrewsbury
Shropshire
SY1 3AB
Tel: 01743 461444
Email: [email protected]
Web: www.broseleyfires.com
© 2007-2008 Broseley Fires Ltd
ANNUAL SERVICE RECORD
INSTALLATION DATE OF APPLIANCE:
1ST YEAR SERVICE completion date:
SERVICE ENGINEER:
COMPANY NAME:
COMPANY ADDRESS:
CONTACT NUMBER
. REG. No.
.
.
POSTCODE:
2ND YEAR SERVICE completion date:
SERVICE ENGINEER:
COMPANY NAME:
COMPANY ADDRESS:
. . REG. No.
.
.
POSTCODE:
3RD YEAR SERVICE completion date:
SERVICE ENGINEER:
COMPANY NAME:
COMPANY ADDRESS:
. . REG. No.
.
.
POSTCODE:
4TH YEAR SERVICE completion date:
SERVICE ENGINEER:
COMPANY NAME:
COMPANY ADDRESS:
. . REG. No.
.
.
POSTCODE:
5TH YEAR SERVICE completion date:
SERVICE ENGINEER:
COMPANY NAME:
COMPANY ADDRESS:
. . REG. No.
.
.
POSTCODE:
6TH YEAR SERVICE completion date:
SERVICE ENGINEER:
COMPANY NAME:
COMPANY ADDRESS:
. . REG. No.
.
.
POSTCODE:
© 2007-2008 Broseley Fires Ltd
LIMITED WARRANTY
This appliance must be installed and commissioned by a fully qualified, registered engineer. A “Declaration
of completion Certificate” must be obtained for the installation and retained by the end user. Failure to
comply with these requirements may void your warranty.
You, as the end user, have a contract by law with the supplier / dealer from whom you purchased the
product. That dealer then has the same contract with the manufacturer or wholesaler and these have a
contract with their suppliers.
ALL CLAIMS MUST FOLLOW THIS PROCEDURE.
Thank you for choosing a Product from Broseley Fires Ltd. This warranty gives you specific legal rights.
The statutory rights of the consumer are not affected by the warranty, or the consumers’ rights against the
dealer arising from their sales / purchase contract.
The manufacturers’ warranty:
Your Product will be free from defective parts, material, and workmanship at the time of its original
purchase for a period of one (1) year. This Warranty will become active as of one month from the date of
delivery.
This warranty does not cover any failure of the unit due to normal wear and tear, misuse, abuse, accident,
illegal modification, illegal installation or repair, damage resulting from improper use or failure to maintain
the product. Variations in color and texture are a natural characteristic of cast iron products. Colour changes
may result from exposure to light and other elements which are a part of the aging process. These material
variations and changes are not covered by this warranty.
The consumable items within the product are not covered by the warranty, nor is the glass.
If during the warranty period, this Product fails to operate under normal use and service, due to defects in
material and / or workmanship, Broseley Fires will either repair or replace the product.The repaired or
replaced product shall be warranted for the remaining period of the original warranty + the time taken to
days from the date of repair, whichever is longer.
Repair or replacement may involve the use of functionally equivalent reconditioned units. Replaced parts or
components will become the property of Broseley Fires.
Should you wish to claim under the warranty, please contact the supplier / dealer from whom you
purchased the appliance. Do not claim directly to Broseley Fires, as they are unable to process any direct
claim from an end user.
Product design and any specifications are subject to change without notice. This is due to our continuous
product development and improvement. The buyer will not be entitled to request free upgrades to the new
design or compensation for previously purchased products or any products on order.
•
This Warranty covers all Broseley Fires costs within the Warranty period.
If the appliance remains uninstalled for a period greater than six months from date of delivery the Warranty
will become active six months from the date of original invoice to the distributor.
IN NO EVENT SHALL BROSELEY FIRES BE LIABLE FOR INCIDENTAL OR CONCEQUENTIAL DAMAGES OF ANY NATURE WHATSOEVER,
INCLUDING BUT NOT LIMITED TO LOST PROFITS OR COMMERCIAL LOSS, TO THE FULL EXTENT THOSE DAMAGES CAN BE DISCLAIMED
BY LAW. (if applicable)
NON - COVERAGE OF THE GUARANTEE
If the end-user’s claim should not be covered by this guarantee, the end-user shall be liable for costs
incurred by Broseley Fires such as callout and inspection costs for examination of the product,
transportation costs of the product as well as any other relevant costs.
If, after having been informed about the non-coverage of the guarantee, the end-user wants to have the
repairs done, the end-user shall additionally pay for any spare parts used and for the labour and
transportation costs incurred. If repairs are carried out under this guarantee, the remaining guarantee
period for the product shall be extended by the period of time that has elapsed since the complaint was
officially logged with Broseley Fires until the repairs have been completed
A COPY OF OUR FULL TERMS AND CONDITIONS IS AVAILABLE ON REQUEST.
** End-user means the natural or legal person who owns the product and who has not acquired it with a
view to reselling or installing it in the course of business
© 2007-2008 Broseley Fires Ltd