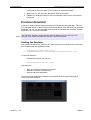
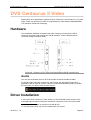
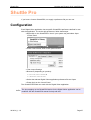
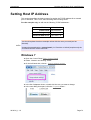
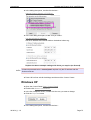
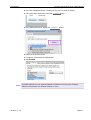
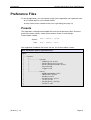
1
2014
Installation Manual
IM-2014_1-1.0
Nucoda and Phoenix 2014 Install Manual
Document Revision : IM-2014_1-1.0
Nucoda and Phoenix 2014 Install Manual
© Digital Vision 2014. All rights reserved.
This manual is provided for informational use only and is subject to change without notice. Digital Vision assumes
no responsibility or liability for any errors or inaccuracies that may appear in this manual.
Centaurus, Centaurus II, Atomix and Atomix LT are registered trademarks of DVS Digital Video Systems GmbH.
ShuttlePRO is a trademark or registered trademark of Contour Design, Inc.
NVIDIA and NVIDIA Quadro are registered trademarks or trademarks of NVIDIA Corporation in the United States
and/or other countries.
THX Cinespace is a trademark and/or registered trademark of THX.
QuickTime is a trademark and/or registered trademark of Apple Computer, Inc.
Microsoft and Windows are either registered trademarks or trademarks of Microsoft Corporation in the United
States and/or other countries.
RED ROCKET, RED and R3D are trademarks of Red.com, Inc.
All other trademarks are the property of their respective owners.
Digital Vision is an Image Systems company.
Contents
Nucoda and Phoenix 2014 Install Manual
Contents
Contents.............................................................................................................................3
Contacts.............................................................................................................................5
Resources..........................................................................................................................6
Support.....................................................................................................................6
Licensing..................................................................................................................6
User Forum..............................................................................................................6
On the Net................................................................................................................6
Before You Begin...............................................................................................................8
Upgrading.................................................................................................................8
System Requirements........................................................................................................9
Software Installation.........................................................................................................10
Install Process........................................................................................................10
Install Locations......................................................................................................11
Install Options.........................................................................................................12
Completion.............................................................................................................14
Run Application......................................................................................................15
Control Panels.................................................................................................................16
Precision.................................................................................................................16
Valhall.....................................................................................................................24
Licensing..........................................................................................................................28
System MAC Address............................................................................................28
Troubleshooting License Problems........................................................................29
ROOT Folder....................................................................................................................31
ROOT Environment................................................................................................31
User Login and Preferences............................................................................................32
First Run.................................................................................................................32
User Management..................................................................................................33
Preference Basics..................................................................................................33
Software Preferences......................................................................................................38
Overview................................................................................................................38
Folder Locations.....................................................................................................38
Colour Scaling..................................................................................................................43
Recommendations.................................................................................................43
Definitions...............................................................................................................44
Project Configuration..............................................................................................44
Scaling Modes........................................................................................................44
Colour Tools...........................................................................................................45
NVIDIA Graphics..............................................................................................................47
NVIDIA Driver.........................................................................................................47
NVIDIA Dual-DVI....................................................................................................48
NVIDIA DVI Stereo.................................................................................................51
DVS Centaurus II Video...................................................................................................52
Hardware................................................................................................................52
Driver Installation...................................................................................................52
DVS Utility Programs.............................................................................................53
VTR RS422 Control...............................................................................................54
Centaurus II Enhanced Monitoring........................................................................54
DVS SDI Stereo.....................................................................................................54
VTR Remote Mode..........................................................................................................56
Application Configuration.......................................................................................56
Shuttle Pro.......................................................................................................................57
IM-2014_1-1.0
Page 3
Contents
Nucoda and Phoenix 2014 Install Manual
Configuration..........................................................................................................57
ShuttlePRO Layout................................................................................................58
THX Cinespace................................................................................................................59
License...................................................................................................................59
Profiling and Calibration.........................................................................................59
Enabling Cinespace...............................................................................................63
References.............................................................................................................64
Red Rocket Install............................................................................................................65
Driver and Firmware...............................................................................................65
Installation..............................................................................................................66
PCI Slot Recommendation.....................................................................................67
Telecine Control...............................................................................................................68
Connections...........................................................................................................68
Configuration..........................................................................................................69
Appendices......................................................................................................................72
SMPTE / CGR Scaling...........................................................................................72
Setting Host IP Address.........................................................................................75
Preference Files.....................................................................................................79
IM-2014_1-1.0
Page 4
Contacts
Nucoda and Phoenix 2014 Install Manual
Contacts
Stockholm
London
Digital Vision
Telefonv 30
126 26 Hägersten
Sweden
Digital Vision
11 Wardour Mews
London W1F 8AN
United Kingdom
t: +46 (0)8 546 182 00
f: +46 (0)8 546 182 09
t: +44 (0)20 7734 8282
f: +44 (0)20 7292 6969
Los Angeles
Digital Vision
6464 Sunset Blvd
Suite 830
Hollywood
CA 90028
USA
t: +1 818 769 8111
f: +1 818 769 1888
IM-2014_1-1.0
Page 5
Resources
Nucoda and Phoenix 2014 Install Manual
Resources
Support
You can contact our Support Department using the telephone numbers shown on the
Contacts page. You can also email us :
[email protected]
Drivers, BIOS and system updates, technical notes and other support resources can be
downloaded from our FTP site :
ftp://dvsupport:[email protected]/
Licensing
For licensing requests or problems, please call us or email our License Department :
[email protected]
User Forum
The Digital Vision web forum is an important site for all users of our products and
contains a wealth of information. Please join :
http://forum.digitalvision.se
Registration is quick and simple and allows full access to the forums. New released
versions and important information will always be announced on the forum.
note
You can also subscribe to the forums and receive email notifications on new forum
posts. This is especially useful for the announcements forums.
On the Net
Please join us on the social networks :
Facebook
Nucoda :
http://www.facebook.com/pages/Nucoda/262219073813219
IM-2014_1-1.0
Page 6
Resources
Nucoda and Phoenix 2014 Install Manual
Phoenix :
http://www.facebook.com/pages/Phoenix/163127040447052
YouTube
Nucoda :
http://www.youtube.com/user/NucodaTV
Phoenix :
http://www.youtube.com/user/PhoenixRestoreTV
Twitter
http://twitter.com/_digitalvision_
IM-2014_1-1.0
Page 7
Before You Begin
Nucoda and Phoenix 2014 Install Manual
Before You Begin
Upgrading
Backup
If you are upgrading your software from a previous major version, make a backup copy
of important files and folders. This should include any project folders and preference
files.
alert!
Do not upgrade in the middle of a job unless you have a specific reason to do so or
are instructed to do so by the Digital Vision Support Department.
Preference Files
Preference files are stored under the ROOT folder. See the ROOT Folder chapter.
Preference files are stored per user and for all users in the Users folder under
ROOT. See the User Login and Preferences chapter.
Projects
Projects are stored in a location set in the general.prefs preference file by the
parameter projectRootDir. See the section Software Preferences on page 37.
Compatibility
A best effort is made to preserve project and note compatibility between each
consecutive major release (e.g. 2013.1 to 2013.2).
Parallel Installs
You can install a new major release in parallel with the previous without affecting your
current installation.
IM-2014_1-1.0
Page 8
System Requirements
Nucoda and Phoenix 2014 Install Manual
System Requirements
Digital Vision 2014 applications are supported on the following workstations :
· Hewlett Packard Z800 / Z820
· Dell Precision T3500 / T5500 / T7500 / T7600
For a list of supported storage units, graphics cards, video cards and operating systems
for this release, please see the application Release Notes and the Support1 area of the
Digital Vision web site.
1 http://www.digitalvision.tv/support/
IM-2014_1-1.0
Page 9
Software Installation
Nucoda and Phoenix 2014 Install Manual
Software Installation
To start the installation, double click an installer program :
install_nucoda-2014.1.nnn.exe
install_phoenix-2014.1.nnn.exe
note
We will use the Nucoda platform as our referenced application throughout this guide.
Installation and setup for the Phoenix platform is equivalent unless stated otherwise.
In most cases, simply replace the name Nucoda with the name Phoenix.
Install Process
Complete each step, pressing the Next button to continue.
Figure 1 : Installer starts
Figure 2 : Choose product
You can only choose to install a single product at a time.
note
The available options depend on the selected product e.g. the Valhall panel install
option will not be available for the Nucoda Compose product. See the Install Options
section on page 12.
Figure 3 : Choose options
IM-2014_1-1.0
Figure 4 : Review choices
Page 10
Software Installation
Nucoda and Phoenix 2014 Install Manual
Tick the required options and then press the Next button to continue and review the
choices made made.
Figure 5 : Install proceeds
Figure 6 : Install completes
The install proceeds and completes.
If additional options are installed (e.g. Quicktime, DVS drivers), these are installed as
part of the install process and may require user input.
Microsoft Visual C++ 2008
note
note
You may be prompted to Repair or Uninstall Microsoft Visual C++ 2008
Redistributable. Select to Repair :
Some options will require a system reboot.
Install Locations
Application executables and libraries are installed in folder :
C:\Program Files\Nucoda\2014_1\
and a (basic) application configuration setup is installed into folders :
C:\Nucoda\
C:\Nucoda\2014_1\
C:\Nucoda\2014_1\root\
IM-2014_1-1.0
Page 11
Software Installation
Nucoda and Phoenix 2014 Install Manual
Environment Variables
A number of environment variables are setup as part of the installation process. These
configure the location of the preference file, panel IP addresses etc.
note
For Phoenix installs, replace the string Nucoda with Phoenix (uppercase for the
environment variables).
Environment Variable
Description
NUCODA_LICENSE_DIR Set to the folder containing the product
license file e.g.
C:\Nucoda\License
NUCODA_ROOT_V2014_1 Set to the "root" folder i.e. the folder
containing the main preference file
general.prefs e.g.
C:\Nucoda\2014_1\root
NUCODA_VALHALLPANEL The IP address by the Valhall panel e.g.
192.168.64.2
NUCODA_PRECISIONPANEL The IP addresses used by the three
Precision panels (comma separated) e.g.
192.168.21.1,2,3
NUCODA_PRECISIONCOLOUR The IP address used by the Precision
Colour panel (for Nucoda Fuse use) e.g.
192.168.21.1
NUCODA_KEYBOARD Set to the selected keyboard type e.g.
US
note
The installation process will never touch your application configuration, projects or
preferences. It will only install or update program executables and libraries. The
installer can be safely re-run any time.
Install Options
The installation options are presented in a scrollable list.
Tick the checkbox to the left of the option name to schedule it for installation. Available
options will vary across products (7 below shows every possible option and may differ to
those you see).
IM-2014_1-1.0
Page 12
Software Installation
Nucoda and Phoenix 2014 Install Manual
Figure 7 : All available install options
Precision Control Panel
see Control Panel section
This option is available for Nucoda Film Master and Nucoda Fuse2. Enabling this option
will set up the correct environment for a Precision Control Panel.
Valhall Control Panel
see Control Panel section
This option is available for Nucoda Film Master, Nucoda HD, Nucoda Fuse3 and
Phoenix Finish4. Enabling this option will set up the correct environment for a Valhall
Control Panel.
DVS Atomix HDMI Driver
Select this option if you are using a DVS Atomix HDMI video board.
2 Nucoda Fuse supports the Precision Colour Panel only.
3 Nucoda Fuse supports the Valhall Colour panel only for full scene master layer grading.
4 Phoenix Finish supports the Valhall Colour panel only.
IM-2014_1-1.0
Page 13
Software Installation
Nucoda and Phoenix 2014 Install Manual
DVS Atomix LT Driver
Select this option if you are using a DVS Atomix LT video board.
DVS Centaurus II Driver
see DVS Centaurus II Video section
Select this option if you are using a DVS Centaurus2 video board.
note
The 32 bit Windows version should be use on systems running Windows Server
2003 32 bit.
Quicktime
Select this to install a version of Quicktime tested by Digital Vision.
note
Do not install the packaged version of Quicktime if you are using Windows Server
2003. Also note that Windows Server 2003 should be on service pack 2 or later.
THX CineProfiler Plug-in
Select this to install the THX CineProfiler integration support.
see THX Cinespace section
Digital Vision Wallpaper
This sets the desktop wall-paper for the current user to a Digital Vision design.
Keyboard Type
This sets the keyboard layout for the application. You can choose a UK or US layout.
Install Documentation
Documentation is included in the installer. De-selecting this option will skip installing it.
Completion
Once complete, you will have a new set of icons on your desktop :
note
IM-2014_1-1.0
The installer itself is copied to the folder :
C:\Nucoda\Releases\
Page 14
Software Installation
Nucoda and Phoenix 2014 Install Manual
Please take time to read the application release notes and any important information
provided with the install.
A web browser will open at the end of installation process and display the
documentation index page. Double-click the desktop Nucoda 2014 short-cut at any time
to access the documentation.
Run Application
To run the application, double-click its desktop short-cut icon e.g. Nucoda Film Master
2014.1.
You will be prompted to accept a license agreement on first run.
note
If you get a License Failure error, you need to request or install a Digital Vision
license. See Licensing on page 27.
System Configuration
By default, the application uses certain drives and folders (e.g. C:, D: and S:) for
configuration and preference information. If these are not present, you will get a warning
and you will not be able to proceed until your preferences have been configured for your
system.
See the Software Preferences section on page 37.
IM-2014_1-1.0
Page 15
Control Panels
Nucoda and Phoenix 2014 Install Manual
Control Panels
Precision
Precision is composed of three panels and is supported by Nucoda Film Master, Nucoda
HD and Nucoda Fuse5 :
● Precision Colour
● Precision Transport
● Precision Touch
Cabling
Each panel has :
● A separate power supply (12V, 4 pin DIN style connector)
● An ethernet network port
Figure 8 : Precision Control Panel connections and IP addresses
Power
Connect each panel to a power source using the supplied power cables. See 9 below.
5 Nucoda Fuse supports the Precision Colour panel only.
IM-2014_1-1.0
Page 16
Control Panels
Nucoda and Phoenix 2014 Install Manual
Network
Ethernet Port
Each panel has two ethernet ports. Use the top one :
Figure 9 : Precision Control Panel ethernet and power connections
Panel IP Addresses
The Precision panels have the following TCP/IP network addresses y default :
Precision Panel
note
IP Address
Colour
192.168.21.1
Transport
192.168.21.2
Touch
192.168.21.3
If you need to change the Precision panel default IP address, see page 18 below.
Environment
If you tick the Precision Control Panel option during software installation, an
environment variable is created and lists the default IP addresses of all Precision
panels, comma separated.
Variable
Value
NUCODA_PRECISIONPANEL
note
192.168.21.1,2,3
For Nucoda Fuse, this environment variable will be : NUCODA_PRECISIONCOLOUR
Host IP Address and Settings
By default, the host computer network port connected to the panels is set to :
IP address : 192.168.21.4
Subnet mask : 255.255.255.0
IM-2014_1-1.0
Page 17
Control Panels
Nucoda and Phoenix 2014 Install Manual
No other settings are required (gateway, DNS etc.).
note
If you need to change the host computer IP address, see the appendix Setting Host
IP Address on page 74. If you change this, you will also need to set the appropriate
panel IP addresses as well (see below).
Setting the Precision IP Addresses
To change the Precision panel IP addresses, enter the panel configuration menu.
1. Enter the configuration menu by holding the Tools button on the panel when
powering it up (the left Tools button on the Precision Colour panel) :
2. Once powered up, the panel configuration screen will be shown.
3. Use the left joystick to navigate the menus :
•
up /down options
•
press to select
4. Select :
IP Configuration>
The IP Configuration screen will display the current IP address settings and let
you change them.
note
IM-2014_1-1.0
The currently selected option will be highlighted in red.
Page 18
Control Panels
Nucoda and Phoenix 2014 Install Manual
5. Press the joystick button to select and enter the IP Configuration menu.
The IP Configuration menu will look similar to the following (example only) :
Current Address eth0:
192.168.21.1 (00:50:c2:xx:xx:xx)
Current Address eth1:
(00:50:c2:xx:xx:xx)
Mask:
255.255.255.0
Server Address:
192.168.21.100
Use DHCP:
NO
< Exit
Figure 10 : Joystick navigation and adjustment knobs.
6. The ethernet port used is listed at the top :
Current Address eth0 :
7. Set the eth0 address
With Current Address eth0: selected (and highlighted in red), use the four knobs
below the display (as shown in 10 above) to adjust the IP address components.
8. Set the Server Address
Now use the joystick to select the Server Address option. Then use the four
knobs below the display to set this to the IP address of the host computer system.
note
The host computer is a system on your local network, probably one running the
Digital Vision application. You only need to configure the Server Address to enable a
firmware update from the host computer with the specified IP address.
9. Once done, use the joystick to select :
Reboot
note
alert!
IM-2014_1-1.0
Remember that each panel has a separate ethernet port and TCP/IP address. Each
is configured using the same process as described above.
If you change the IP address of any of the Precision panels, you will also need to
update the environment variable e.g. NUCODA_PRECISIONPANEL or
NUCODA_PRECISIONCOLOUR (for Nucoda Fuse).
Page 19
Control Panels
Nucoda and Phoenix 2014 Install Manual
Precision Firmware Update
This section describes how to update the Precision panel firmware.
note
Firmware can add new functionality, or modify existing functionality and may be
required occasionally. Digital Vision will communicate this requirement to you.
To update the Precision firmware, you will need :
•
The new firmware files.
There may be up to 8 files called (e.g. fw1.pkg,..,fw8.pkg). Some might be 0
(zero) bytes in size and wll be skipped automatically.
•
A TFTP (Trivial FTP) server program.
The TFTP program is used to transfer (push) the firmware files to each panel.
Firmware Files
Firmware files are included in the installer and placed in folder :
C:\Nucoda\2014_1\root\Panel\Precision\Firmware
Firmware Version
Before doing the firmware update, you should note the current firmware version
installed. This will be a date and time, displayed via the configuration menu on panel
boot. Do this for each panel.
As described above, to enter the configuration menu, hold down the Tools button on
panel boot and select :
Show version >
The firmware version is displayed as the Panelapp date and time :
….
….
Panelapp: panelapp 05/10/2011 10:25:18 AM
….
Downloading TFTPD32
We will use a TFTP program tftpd32.
note
This is included in the installer and placed in folder :
C:\Nucoda\utilities\tftpd
Installing the Firmware
1. Double click tftpd32.exe to start it.
IM-2014_1-1.0
Page 20
Control Panels
Nucoda and Phoenix 2014 Install Manual
2. Set the Current Directory to the folder containing the firmware files (use the
Browse button to set this)
3. The Server Interface shown should be the IP address of the host computer
network port which is connected to the Precision panel.
note
The Server Interface address shown should match the IP address used to set the
Server Address in the Precision panel IP Configuration steps as described above.
4. Power cycle each panel in turn, while holding down the Lock button on each
(the left Lock button on Precision Colour) (see below)
The firmware files will be sent from the host computer to each panel by tftpd32.
On completion, each panel will reboot automatically.
5. On restart, check the firmware version and make sure the update was
successful.
6. Repeat this procedure for each panel in turn.
Troubleshooting the Firmware Update Process
If you have problems with the firmware update, check the following points :
1. Check that each panel has the expected IP address configuration.
2. Make sure that the host computer network port connected to the panels is
IM-2014_1-1.0
Page 21
Control Panels
Nucoda and Phoenix 2014 Install Manual
configured to be on the same TCP/IP subnet as the panel network.
3. Make sure you can ping each panel from the host computer.
4. Disable any Windows firewall on the host computer network port connected to
the panels.
Precision Emulator
A Precision Panel software emulator program is included with the application. This is a
fully emulated version of the Precision Panel and behaves in the same way as the actual
hardware. You can use the emulated panel controls and interact with a running Nucoda
application as if you had a real panel.
note
The Precision Emulator works with Nucoda Film Master and Nucoda Fuse. The
Nucoda Fuse version emulates the Precision Colour panel only.
Starting the Emulator
The emulator is started via a BATCH file. This is linked on your desktop after install and
also located under the application folder :
•
•
Desktop\Precision Emulator 2014.1
C:\Nucoda\Precision - Emulator\Precision Emulator 2014.1.bat
To start the emulator :
•
Double-click a batch (.bat) file e.g.
Desktop\Precision Emulator 2014.1
The batch file :
•
•
•
Sets up the Precision Panel environment
Starts the emulator (Precision.exe)
Starts the Nucoda application
Once the Nucoda application initialises the emulated panel, the panel displays its
welcome screens as usual :
IM-2014_1-1.0
Page 22
Control Panels
Nucoda and Phoenix 2014 Install Manual
Valhall
Valhall Control Panels consist of four user panels and a Power and Communications
Unit (PCU)6 :
● Media, Image, Colour and Scribe (tablet) panels
● PCU power/communications
Cabling
The panels connect to the PCU using special cables and the PCU connects to the host
computer via a cross-over ethernet cable. This is shown in 11 below.
Figure 11 : Valhall Control Panel connections
Ethernet Setup
Host IP Address
By default, the host computer network port is set to :
IP address : 192.168.64.1
Subnet mask : 255.255.255.0
No other settings are required (gateway, DNS etc.).
note
If you need to change the host computer IP address, see the appendix Setting Host
IP Address on page 74. If you change this, you will also need to set the appropriate
panel IP addresses as well (see below).
6 Newer Mark 2 Valhall panels use a PCU. Older Mark 1 Valhall panels have the PCU
integrated inside the Image panel.
IM-2014_1-1.0
Page 23
Control Panels
Nucoda and Phoenix 2014 Install Manual
Valhall Panel IP Addresses
By default, the Valhall panel network port is set to :
IP address : 192.168.64.2
Subnet mask : 255.255.255.0
note
If you need to change the Valhall panel default IP address, see Changing Valhall IP
Address below.
Environment
An environment variable is created during application installation (if Valhall checkbox is
ticked) and set to the default IP address of the panel.
Variable
DV_VALHALL_PANEL
Value
192.168.64.2
Changing Valhall IP Address
By default, the Valhall panel has an IP address of 192.168.64.2.
To change this press and hold the Event and Enter keys on the Image Panel when
powering it up. After the panel initialisation, instructions for changing the panel IP
address will appear in the LED display as shown in 12 below.
Figure 12 : Image Panel - Press Event + Enter keys on power-up.
Instructions will appear in the large LED panel at the top of the Image panel.
Use the four knobs below the LED display to change the IP address. Once complete,
save the new address by pressing the BookM and Enter keys.
note
The LED instructions tell you to use the Shift key. However, keys have been moved
and for the Nucoda products, the Shift key referred to is now BookM.
For 2014 application use, you will also need to :
IM-2014_1-1.0
Page 24
Control Panels
Nucoda and Phoenix 2014 Install Manual
● Edit the DV_VALHALL_PANEL environment variable via My Computer /
Properties / Advanced tab
● Modify the IP address for the host LAN port connected to the Valhall.
alert!
The panel mouse driver uses the Windows Registry to determine the panel IP
address. If you change the panel IP address from the default, you need to modify the
registry. See the section Valhall Mouse Driver below.
Valhall Mouse Driver
The Image Panel includes a trackball and buttons. This works as a mouse with the
Digital Vision Mouse Driver installed. The driver is installed automatically if you select to
install the Valhall Panel when installing the main software application.
note
The mouse driver is installed as a Windows service and can be managed in the
normal way via Control Panel / Administrative Tools / Services. The service is called
DvMouseDriver.
When running, an icon will be present in your Windows system tray :
Figure 13 : Valhall connected (top) and disconnected (bottom) system tray icons
Valhall Panel IP Change
If you change the Valhall panel IP address (see page 24), you will need to modify the
Windows Registry to ensure the panel mouse continues working :
● Start / Run : regedit
● Navigate to :
HKEY_LOCAL_MACHINE /
Software / Digital Vision / Valhall / RTC
● Right-click in the right-hand pane and select New / String Value :
IM-2014_1-1.0
Page 25
Control Panels
Nucoda and Phoenix 2014 Install Manual
● Name this string value : PanelIP
● Then double-click it and enter the new panel IP address as its value :
● Reboot the system to ensure the DvMouseDriver service picks up the registry
value for the new IP address.
IM-2014_1-1.0
Page 26
Licensing
Nucoda and Phoenix 2014 Install Manual
Licensing
A license is required to run the application. You can request this by sending an email to
the Digital Vision licensing department :
[email protected]
Include the following information :
●
System MAC address (see below)
●
Company name
●
Application to license
When received, the license string should be placed in the following file :
Product
License File
Nucoda :
C:\Nucoda\license\license.flic
Phoenix :
C:\Phoenix\license\license.flic
Each license string should be placed on a single line in the license file and you should
only have a single active license file with a .flic extension in this folder.
Environment
An environment variable is set to refer to the folder containing the license file license.flic.
By default this is set to as shown below (for each application installed) :
Variable
NUCODA_LICENSE_DIR
PHOENIX_LICENSE_DIR
Value
C:\Nucoda\license\
C:\Phoenix\license\
System MAC Address
To find your system MAC address :
● Install the software
● Open a CMD window :
Start/Run - cmd
● Change to the folder (depending on installed product) :
cd C:\Nucoda\utilities\machine_id\ or
cd C:\Phoenix\utilities\machine_id\
● Run the machine_id program by typing :
machine_id
IM-2014_1-1.0
Page 27
Licensing
Nucoda and Phoenix 2014 Install Manual
Your system identification will be printed to the CMD window e.g.
System ID: 00-1e-c9-81-cf-0b
The machine_id program has the following options :
note
--verbose
--list
--help / -h
Display all known system MAC information
Display a list of possible (and acceptable) MAC addresses
Display help
Troubleshooting License Problems
If you encounter a licensing error, follow the steps below to troubleshoot.
1. The license file is located in the directory given by the environment variable :
NUCODA_LICENSE_DIR (Nucoda) or
PHOENIX_LICENSE_DIR (Phoenix)
2. Make sure that the environment variable value has no extra spaces (at the start or
end). Inserting quotes to show the extra spurious end space e.g.
NUCODA_LICENSE_FILE “C:\Nucoda\License\license.flic “
3. The license file is called license.flic.
If you are using Windows, make sure that the file has no hidden extension
(e.g. .txt). Check via the Windows file browser menu :
Tools / Folder Options/ View tab
Disable Hide extensions for known file types
4. Make the license.flic file is the only file with a .flic extension in the folder. We
will load the first .flic file we find.
5. Make sure the date and time is correct on your computer.
alert!
It is very important that the computer clock is not reset backwards in time
(changing timezone should be safe however). Clock adjustment may cause
license failures and so prevent the application running.
6. Make sure that the MAC address in the license string (third field e.g.
003048671219) is correct for your system.
IM-2014_1-1.0
Page 28
Licensing
Nucoda and Phoenix 2014 Install Manual
See page 27 for locating your system MAC address.
7. The LAN MAC used must be on an active network interface. It must not be
disabled.
8. Make sure that the license string in the license.flic file is on one line only Do
not split license strings over more than one line.
9. Make sure that the version of software you are running matches the version in the
license (second field e.g. 2014.1)
10. Make sure you are running the correct application as per the license file.
11. The license is read from top to bottom. Make sure new and current licenses are
first in the file.
12. The date in the license string is the date the license was created. This is followed
by a duration number (in days). Make sure that the DATE and DURATION is
within the active license period.
13. Some virtualisation products (e.g VMWare) interfere with the network devices we
try and attach to. If you have such software installed, try disabling or uninstalling it.
IM-2014_1-1.0
Page 29
ROOT Folder
Nucoda and Phoenix 2014 Install Manual
ROOT Folder
Documentation and configuration files for the 2014.1 release are installed in the base
folder :
Product
Base Folder
Nucoda :
C:\Nucoda
Phoenix :
C:\Phoenix
The ROOT folder is exists inside this base folder within a version specific folder.
Product
note
Root Folder
Nucoda :
C:\Nucoda\2014_1\root
Phoenix :
C:\Phoenix\2014_1\root
This means multiple versions can co-exist side by side.
ROOT Environment
The ROOT folder location is specified by the environment variable :
Variable
Product
Value
NUCODA_ROOT_V2014_1
Nucoda
C:\Nucoda\2014_1\root\
PHOENIX_ROOT_V2014_1
Phoenix
C:\Phoenix\2014_1\root\
The ROOT folder specified as above is the primary folder location for application
configuration settings and preferences7.
note
The ROOT environment is used as the base location for locating preference files.
See the User Login and Preferences chapter.
7 Although a preference file may define folder locations on any drive or filesystem.
IM-2014_1-1.0
Page 30
User Login and Preferences
Nucoda and Phoenix 2014 Install Manual
User Login and Preferences
You can create one or more users to run the application. A user named Default is used if
no specific user is created. User accounts have the following benefits :
● Each user can have separate configuration settings specific to themselves
● Configuration settings can configured to be shared between all users
● User settings can be more easily persisted when the application is upgraded
note
alert!
The User Login function will not isolate all application settings and preferences.
Projects remain global and shared by all users.
It is always a good idea to take regular backups of any preference files you create or
modify.
First Run
When the application is run for the first time, you are prompted to choose or create a
user.
On first run, a single user Default will be visible.
To use the Default user, press the OK button (or hit the ENTER key) :
To create a new user, press the New button. A dialog will open prompting for a user
name. Type in a user name and press the OK button.
The new user added is selected in the drop-down list. Press OK to login using this user.
IM-2014_1-1.0
Page 31
User Login and Preferences
Nucoda and Phoenix 2014 Install Manual
User Management
The User Login dialog has the following functionality.
New
This creates a new user.
The new user will start fresh with some basic minimal settings defined.
alert!
User names must be unique.
Copy
This operation will copy the selected user (e.g. our user Tom) to a new user we name
(e.g. Alice).
All the preference files for the selected user will be copied to the new user.
Delete
This deletes the selected user and clears their preference files.
note
alert!
You cannot delete user Default.
Deleting a user cannot be undone. If you think this might happen accidently (or if it
does), make sure you have backups.
Preference Basics
note
Unless you need to specify preferences that have no GUI equivalent, or need finer
control over them, you will not need to view or edit the preference files themselves.
Preferences are stored within sub-folders inside the ROOT folder.
There are preference files shared between all users and separate individual preference
files per user.
All modifications made to the preferences in the application GUI will be saved to
preference files stored inside the preference folder for the logged in user.
IM-2014_1-1.0
Page 32
User Login and Preferences
Nucoda and Phoenix 2014 Install Manual
The folders created are shown below.
On a fresh install, only the Presets folder exists :
Folders Used :
ROOT/
|-- Presets
|
|
|
|-- System/
|
|-- Users/
After user "Tom" is created and we run the application :
ROOT/
|
|-- System/
|-- Users/
|
|-- AllUsers/
|-- Default/
|-- Tom/
note
For more detail of folders and preference files created, see the appendix Preference
Files.
These folders are described below.
Presets/
ROOT/
|-- Presets
|
|
|
|-- System/
|
|-- Users/
The Presets folder contains preference files shipped with the product. These files are
used as a base level configuration.
alert!
IM-2014_1-1.0
Presets settings should never be modified and are over-written as part of the
application upgrade process.
Only preferences inside the Presets folder get replaced when the application is
upgraded.
Page 33
User Login and Preferences
Nucoda and Phoenix 2014 Install Manual
Users/
Preferences for users are stored in the Users folder :
ROOT/
|
|-- System/
|-- Users/
|
|-- AllUsers/
|-- Default/
|-- Tom/
- settings inherited by all users
- settings for user Default
- settings for user Tom
● Each user created has a <User> folder created here to store their individual
preference settings (e.g. user Tom above)
● The Default user folder always exists but may be empty if this user is not used.
● The AllUsers folder contains preferences shared by all users.
A user (or their administrator) can edit (or copy) files in their own folder to affect a single
user, or edit (or copy) files in the AllUsers folder to affect all users.
note
Preference files inside the Users folder are not touched by an upgrade or install.
On first run of the application, some default preference files are copied from the
Presets\Users folder to the AllUsers and any <User> folder created (or Default if used).
Note that some preference files are created by the application on first run.
note
Any changes made by a user in the application preference GUI are saved in the
Users \ <User> preference folder.
note
A complete general.prefs file is created in the AllUsers folder. Preference files
created in the <User> folder might be empty or minimal, ready for customisation.
System
The System folder contains preferences that are not user specific.
ROOT/
|
|-- System/
|-- Users/
Files in this folder include project properties, keycode map file and various
administrative files.
A user or administrator can edit these files to configure system level settings for all users
on the system.
IM-2014_1-1.0
Page 34
User Login and Preferences
Nucoda and Phoenix 2014 Install Manual
A set of default system preference files are copied here from the Presets \ System folder
on first run.
note
Preference files inside the System folder are not touched by an upgrade or install.
note
For more detail of folders and preference files created, see the appendix Preference
Files.
Preference Load Order
Preference files are loaded in an order such that later ones (if they exist) will override
earlier ones. The load order is as follows :
For System settings :
1. Presets \ System \
2. System \
For Users settings :
1. Presets \ Users \
2. Users \ AllUsers \
3. Users \ <username> \
Presets are always loaded first, followed by any global or shared settings (e.g. AllUsers)
and then the specific preferences set, if they exist (e.g. for user "Tom"). The specific
overrides the global or shared.
This mechanism allows easier customisation while using a known base configuration.
Customisation
A user or administrator can customise application preferences in various ways.
alert!
Never modify Presets preference settings. These are installed and overwritten on a
software update.
Global System Level
To modify system (machine) level preferences, modify files in the ROOT \ System folder.
Users
To change the settings shared by all users, modify the preference files in the ROOT \
AllUsers folder.
To change the settings for a specific user, modify the preference files in their specific
user folder ROOT \ <User>.
On first run, an initial set of user preference files is placed in the <User> folder. These
are not complete preference files but fragments : a few basic minimal settings only.
IM-2014_1-1.0
Page 35
User Login and Preferences
Nucoda and Phoenix 2014 Install Manual
Using Preference Files
As stated above, on first run, an initial set of user preference files is placed in the
<User> folder but these start as fragment preference files i.e. a basic minimal set of
preferences only.
As an example, the AllUsers general.prefs file (read before a <User> general.prefs file)
is complete but the <User> general.prefs file may contain only 6 or 7 settings that
override the AllUsers settings loaded.
note
If desired, you can replace the initial <User> "fragment" general.prefs file with the full
version from AllUsers and adjust it as required.
Any preference changes made by a user in the application GUI will be saved to files in
their logged in user <User> folder.
Manual Editing
You can manually edit the <User> preference files and copy any desired preference
settings, adjusting as desired.
The general.prefs file is hierarchical and has various sections inside other sections.
This format is also shared by some other preference files.
In the general.prefs, the top-level is called general, a sub-level is panel, a sub-sub-level
brightness (within sub-level precision) containing a setting touch etc. Each level is
delimited by curly-braces "{" and "}" e.g.
general
{
..
trackballStyle "Vector"
..
precision
{
brightness
{
touch 0.780000
..
}
..
}
..
}
You should keep this hierarchy in your <User> general.prefs.
note
alert!
IM-2014_1-1.0
You can use the AllUsers \ general.prefs as a guide.
If you manually edit a <User> general.prefs file and place a setting at the wrong
level (e.g. putting "touch" inside the general section), it will be silently discarded.
Page 36
Software Preferences
Nucoda and Phoenix 2014 Install Manual
Software Preferences
The layout and organisation of the application preferences are discussed in the User
Login and Preferences chapter.
The main application preference file is called general.prefs and it is located inside the
ROOT \ Users folder as :
● AllUsers \ general.prefs
● <User> \ general.prefs
The <User> version may be a minimal number of settings while the AllUsers version
might be complete. See the User Login and Preferences chapter for a discussion.
In addition to the general.prefs preference file, there are some others that are also used
to store application settings.
note
Understand that references to the preference file general.prefs below might be to the
<User> folder specific version or that stored in the AllUsers folder.
Overview
The main areas requiring configuration are :
● Default folder for projects
● Various media folders (e.g. caches, proxies etc.)
● Rendering threads to use
● MXF media search paths
note
alert!
Any folder paths you specify in the general.prefs file can be relative or absolute (full
path). A relative path in this file will be relative to the folder containing the
general.prefs file itself (i.e. the root folder).
Any folder paths you specify in the general.prefs file must include a trailing slash
character. Use S:\CacheFolder\ and not S:\CacheFolder.
Folder Locations
Paths for important folders are set in the general.prefs file.
The following sections include some default and recommended folders to use for
application metadata (e.g. projects) and generated media (e.g. renders, captures).
IM-2014_1-1.0
Page 37
Software Preferences
Nucoda and Phoenix 2014 Install Manual
Default Volumes
Drive
Description
C:\
Operating system.
RAID 1 (mirror).
Application install but no application metadata or media.
D:\
Digital Vision data
RAID 1 (mirror, usually internal disks)
Application metadata (e.g. projects) and some media (e.g. thumbnails,
audio captures etc.). Not main renders/caches.
Example : D:\Nucoda\2014_1\projects\
Example : D:\Nucoda\media\2014_1\thumb\
S:\
Digital Vision media
RAID 5 (real-time volume, usually external RAID storage).
Renders/caches and video captures.
Example : S:\Nucoda\media\2014_1\cache\
Options
Option
projectRootDir
Description
This setting specifies the default folder
for new projects.
Location
D:\
D:\Nucoda\2014_1\projects\
notesRootDir
This setting specifies the default folder
for saving application notes.
D:\
D:\Nucoda\2009_0\notes\
CompositionNotesRootDir
This setting specifies the default folder
for saving application composition
notes.
D:\
D:\Nucoda\2009_0\compositionNotes\
cacheRootDir
This specifies the folder under which
we write cache renders. The caches
are separated automatically into
folders on a project basis.
S:\
S:\Nucoda\media\2009_0\cache\
proxyRootDir
This specifies the folder to save
generated proxy files (if defined for the
project). The proxies are separated
automatically into folders on a project
basis.
S:\
S:\Nucoda\media\2009_0\proxy\
IM-2014_1-1.0
Page 38
Software Preferences
Nucoda and Phoenix 2014 Install Manual
thumbRootDir
This specifies the folder to save
thumbnail files. The thumbnails are
separated automatically into folders on
a project basis.
D:\
D:\Nucoda\media\2009_0\thumb\
captureRootDir
This specifies the folder to save VTR
video capture sequences. The
captured sequences are separated
automatically into folders on a project
basis.
S:\
S:\Nucoda\media\2009_0\capture\
audioRootDir
This specifies the folder to save VTR
audio capture sequences. The
captured audio sequences are
separated automatically into folders on
a project basis.
D:\
D:\Nucoda\media\2009_0\audio\
For performance reasons, it is recommended to keep :
alert!
· Captured audio and video on separate drive volumes
· Thumbnails on a separate volume to caches and captured video
Thread Settings
The thread settings control the degree of parallelism used when rendering sequences
and hence the overall rendering performance.
These are set via the GUI or by editing the general.prefs file.
GUI
Main Screen / Preferences / Rendering
Figure 14 : Setting threads in the GUI Preferences screen
Preference File
name
Description
renderTileThreads How each frame is split (tiled) for
rendering in parallel.
renderFrameThreads How many frames are rendered in
parallel
IM-2014_1-1.0
Setting
1
Total number of
CPU Cores
Page 39
Software Preferences
note
Nucoda and Phoenix 2014 Install Manual
The application will set the thread settings automatically when first installed (and no
preference file exists). The optimal values for the thread settings are dependent on
many factors and these settings are a guide only. For best performance on any
particular workflow, you should undertake your own benchmarks.
MXF Section
name
Description
avidDirectory
Default :
This is the default folder list searched for MXF media
linked to AAF files.
S:\Avid MediaFiles\
The MXF media file structure needs to be placed under one of the folders specified by
the avidDirectory setting.
You can specify multiple search folders e.g.
avidDirectory "S:\Avid MediaFiles\" "H:\Avid MediaFiles\"
note
The application allows the specification of up to three folders to search through the
GUI. More can be defined via the preference file (but the GUI will show the first three
only). See the Avid Integration chapter in the User Guide.
Image Memory
The Image Memory is a pool of system memory reserved by the application and used
for storing images (both processed and unprocessed).
This includes sources, renders and intermediate results. This will be memory
unavailable to other applications or third-party libraries in use on the system.
GUI
Configure Image Memory in the Main Screen / Preferences / Rendering tab :
Figure 15 : Image Memory preference
Preference File
Name
Description
memoryImagePoolMaxMB Set size of Image Memory (MB)
IM-2014_1-1.0
Default
RAM / 2
Page 40
Software Preferences
Nucoda and Phoenix 2014 Install Manual
Recommendations
A 64 bit application can make use of a great deal of system memory and you can set
Image Memory to a high value e.g. RAM - 4096 MB. This is your total RAM minus 4
GB for OS/system reserved use.
Examples :
System RAM (GB)
IM-2014_1-1.0
Image Memory
64
60000
16
12000
8
4096
4
2048
Page 41
Colour Scaling
Nucoda and Phoenix 2014 Install Manual
Colour Scaling
Each project includes a configuration option that defines the project colour scaling.
Colour scaling modes affect :
● SDI Monitoring and whether this SDI signal is scaled or unscaled (untouched).
● Video I/O and whether the SDI signal is scaled or unscaled (untouched).
● Black and white levels to use for timeline filler, transitions, pan/scan blanking,
fade to colour
● Colour Tool behaviour and what black and white levels they pivot around
● Algorithm effectiveness for scene detection and DVO tools
alert!
The scaling behaviour can include scaling and clipping of your output display and so
it is essential to understand and test this behaviour carefully, then configure for your
own workflow requirements.
Recommendations
The following colour scaling modes are recommended. A more detailed description is
given in subsequent pages and the appendix SMPTE / CGR Scaling on page 71.
Video/Linear Work
Use : Linear (SMPTE)
Video I/O will capture and lay-off the whole 0-1023 10 bit signal with no scaling or
clipping. The signal is untouched (in/out).
SDI monitoring will be unscaled and untouched, displaying all 0-1023 values.
Generated black and white levels inside your project (e.g. blanking, filler etc.) will
be SMPTE levels 64 and 940
By default, colour tools will pivot around 1023.
Film/Log Work
Use : Film Log
As above, video IO and monitoring will be unscaled and untouched 0-1023.
Generated black and white levels inside your project (e.g. blanking, filler etc.() will
be Cineon levels 95 and 685.
By default, colour tools will pivot around1023.
note
IM-2014_1-1.0
See colourPivotPoints section in the preference file general.prefs (see the Software
Preferences chapter).
Page 42
Colour Scaling
Nucoda and Phoenix 2014 Install Manual
Definitions
We use terms SMPTE and CGR and we define these as :
SMPTE :
CGR :
Refers to the standard legal video signal 0-100%
10 bit Range : 64 - 940
Values can exist outside of the 64-940 range (super-blacks and whites)
Refers to a Computer Generated Render mode
10 bit Range : 0 - 1023
Note that this is not a legal SDI video range
Project Configuration
Select the scaling mode to use on a per-project basis on the main project screen.
Figure 16 : Project colour scaling menu
note
Note that individual colour adaptive tools allow you to set an independent scaling
mode inside the tool.
Scaling Modes
The scaling modes are Linear (SMPTE), Linear (CGR), Film Log and Video Log and
have the following behaviours.
Linear (SMPTE)
Unscaled SDI
The SDI signal is not touched (assumed SMPTE already). The full SDI range is
IM-2014_1-1.0
Page 43
Colour Scaling
Nucoda and Phoenix 2014 Install Manual
captured (0-1023) and output/monitored (0-1023) as is.
Colour tools pivot around the SMPTE values 64 and 940.
Linear (CGR)
Scaled SDI
The SDI signal is scaled on both capture and output (monitoring and I/O). On
capture, we scale the 64-940 to 0-1023 and thus lose the any super blacks and
whites. On layoff (and monitoring), we scale the 0-1023 back to 64-940.
alert!
Linear (CGR) mode will limit your output to SMPTE levels (e.g. 64-940).
Colour tools pivot around the CGR values 0 and 1023.
note
In RGB 4:4:4 mode, CGR mode will not scale the SDI video signal8
Film Log
Unscaled SDI
Logarithmic data.
Colour tools pivot around the LOG values 95 and 685
Video Log
Unscaled SDI
Logarithmic data.
Colour tools pivot around the SMPTE values 64 and 940.
note
See appendix SMPTE / CGR Scaling on page 71 for more detailed diagrams
showing the signal path for Linear (SMPTE) and Linear (CGR) modes.
Colour Tools
The colour adaptive tools have their own independent scaling mode option with the
default taken from the main project setting. The scaling mode will affect the black and
white points used and the way the tool pivots around them when adjusting parameters.
Figure 17 : Linear (CGR)
Pivot around 0.
Video level graticule.
Figure 18 : Linear (SMPTE) Figure 19 : Film Log
Pivot around 64.
Pivot around 95.
Video level graticule.
Log/Cineon level graticule.
8 Unless the general.prefs option scale444 is set to true.
IM-2014_1-1.0
Page 44
Colour Scaling
note
IM-2014_1-1.0
Nucoda and Phoenix 2014 Install Manual
You can modify the black, mid and white points of the scaling modes via the
colourPivotPoints section of the general.prefs file.
Page 45
NVIDIA Graphics
Nucoda and Phoenix 2014 Install Manual
NVIDIA Graphics
The NVIDIA graphics card acts as a display device and a Graphics Processing Unit.
note
The recommended SDI monitoring solution is via an installed DVS video board.
NVIDIA Driver
See the Digital Vision web site9 for the latest driver recommendations.
Installing/Upgrading Driver
If you need to install or upgrade an NVIDIA graphics driver, follow these instructions. For
an upgrade, it is best to completely uninstall the driver first, reboot the system and then
install the new driver.
Before installing or upgrading to a new NVIDIA driver, uninstall any current driver. See
below for instructions on how to completely uninstall the driver.
Your NVIDIA driver will be packaged as an installer you can double-click. If it is already
unpacked, you should have a setup.exe installer program to double-click :
note
Previously installed NVIDIA drivers are usually placed in a folder C:\NVIDIA.
After install, if you experience slow graphics update or issues, make sure the display
driver Hardware Acceleration is set to Full. Do this via :
alert!
Display Properties / Settings / Advanced / Troubleshoot
Driver Uninstall
Use the Control Panel and Add or Remove Programs to remove the NVIDIA
display drivers from your system :
9 http://www.digitalvision.tv/support/
IM-2014_1-1.0
Page 46
NVIDIA Graphics
alert!
Nucoda and Phoenix 2014 Install Manual
You may be prompted to choose other NVIDIA components to remove. Be
careful to only choose the display/graphics component.
Do not reboot the system at the end when prompted by pressing the Cancel
button.
Before rebooting, also uninstall the driver via the Device Manager :
My Computer / Manage
Select Device Manager :
Then select your graphics device on the right, right-click and Uninstall :
Then reboot.
NVIDIA Dual-DVI
Dual display mode using the Dual-DVI ports on the NVIDIA FX4600 graphics card allows
you to connect two displays, including projectors, LCD panels or CRT's. Each DVI-I
connector is dual-link capable.
This hardware configuration is set up in Extended Desktop DVI mode.
IM-2014_1-1.0
Page 47
NVIDIA Graphics
Nucoda and Phoenix 2014 Install Manual
Components
The NVIDIA FX graphics card :
NVIDIA FX Graphics board
PCI-Express x16 slot.
DVI and DisplayPort
Power connector.
Setup
To set up dual-display mode with a dual-DVI card :
Right-Click on your desktop and select : NVIDIA Control Panel
From the list on the left, select the option : Display / Setup multiple displays
and then on the right, we can set the mode to use.
Set Dualview :
Figure 20 : Choosing Dualview mode and display orientation and type
You can then set the orientation of your monitors and choose the primary display.
note
IM-2014_1-1.0
The primary display is the display on which your Windows task bar appears.
Page 48
NVIDIA Graphics
Nucoda and Phoenix 2014 Install Manual
Application Configuration
Start the Digital Vision 2014.1 application and on the main screen, select the
Preferences/Monitoring tab :
Figure 21 : Monitoring preferences
Then enable the Dual Display tick box :
This ensures the application is aware of both display screens and orientates itself.
note
alert!
Note that many of the Monitoring/Video IO settings require an application restart. You
can configure more than one setting at a time by pressing Cancel when prompted to
restart and proceeding to the next configuration option. Restart once all done.
Do not enable the NVIDIA SDI direct output.
We can orientate the display the application expects on each of the two outputs i.e.
which display for GUI and which for Monitor :
Figure 22 : Dual Display DVI order and Monitor Anchor
Monitor Anchor
If our displayed image size is different to the resolution of our monitor (e.g.
displaying PAL frames on an HD resolution display), then Monitor Anchor defines
how our image is re-positioned and placed inside this display.
note
This is mainly used when the second monitor resolution is different from the
primary (GUI) display resolution.
We re-position and re-fit the image using the panel buttons fit and 1:1 (keyboard
short cut keys f and g respectively).
Set the Monitor Anchor dependent on how the second display is positioned in
respect to the first on the desktop Display Properties window :
IM-2014_1-1.0
Page 49
NVIDIA Graphics
Nucoda and Phoenix 2014 Install Manual
Figure 23 : Orientation for setting
Top Left.
Figure 24 : Orientation for setting Centre.
NVIDIA DVI Stereo
The Digital Vision 2014 release includes support for Stereo Mode monitoring using the
NVIDIA DVI output.
This stereo mode treats the left and right stereo channel as a separate field which is
interlaced to a frame for display through DVI.
note
This stereo mode requires monitor support (e.g. Zalman ZM-M220W).
Enabling Stereo Mode
There are two configuration options for stereo mode. One option sets enables stereo
globally and one sets which device we use.
note
For Centaurus II SDI stereo, see page 55
Project Global Level
This turns stereo mode on for the project globally and is a tickbox on the main
project screen.
Figure 25 : Project level stereo mode enable button
IM-2014_1-1.0
Page 50
NVIDIA Graphics
Nucoda and Phoenix 2014 Install Manual
Device Level
The device level setting enables stereo output for the NVIDIA DVI output. This
setting is inside the stereo section of the main preference file general.prefs :
Option
Values
Description
interlaceDVIOutput
IM-2014_1-1.0
true | false
Send stereo output through
NVIDIA DVI connector, each
stereo channel as a separate
field.
Page 51
DVS Centaurus II Video
Nucoda and Phoenix 2014 Install Manual
DVS Centaurus II Video
Digital Vision 2014 applications support the DVS Centaurus II and Centaurus II LT video
cards. These can be used for video I/O (capture/layoff), audio ingest (embedded/AES),
VTR machine control and monitoring.
Hardware
Our workstation solutions incorporate the main Centaurus II board for the SDI A
channels, alongside a slot used for the SDI B channels10 and the RS422 remote
connector (using a breakout cable).
Figure 26 : Centaurus II PCI video board alongside the SDI B channel board.
Audio
You can use embedded audio or AES via the AES connector /breakout cable11.
To monitor audio using the Centaurus II video board, start the Digital Vision 2014.1
application and on the main screen, select the Preferences/Monitoring tab and enable
the Use Video IO card as audio monitor tick box :
Driver Installation
If you have a DVS Centaurus II video board, you should install a driver as part of the
main application install by ticking the Install DVS Centaurus II driver box (see Install
10 No electrical connection is required for the SDI B card.
11 The AES option panel may not be installed inside your system.
IM-2014_1-1.0
Page 52
DVS Centaurus II Video
Nucoda and Phoenix 2014 Install Manual
Options on page 12).
● On 32 bit Windows, install the 32 bit driver
● On 64 bit Windows, install the 64 bit driver
Centaurus Firmware
During the driver install, a CMD window will open and prompt you to update the card
firmware. If you enter Y when prompted and press the <ENTER> key, the firmware will
be flashed. You only need to do this once.
note
After driver installation, you will need to reboot.
DVS Utility Programs
We install a selection of DVS utility programs that help configure the video board,
retrieve card information and perform some basic trouble-shooting.
The programs are installed in folder :
C:\Program Files\Digital Vision\2014_1\DVS_2014_1\
dvsconf
The dvsconf program displays card information, such as driver/firmware levels and
licensed options. It also allows you to run various tests and diagnostics on the hardware.
Driver and Firmware Revisions
The firmware revision is shown after the HW label.
Licensed Options
To see a list of licensed options installed on the card, on the Card 0 tab, press the
Setup button and choose Info License (see 27 below).
Figure 27 : Centaurus installed license information.
IM-2014_1-1.0
Page 53
DVS Centaurus II Video
Nucoda and Phoenix 2014 Install Manual
VTR RS422 Control
To use the Centaurus II RS422 port (instead of the PC COM port), set the following
environment variable :
My Computer / Properties / Advanced tab / Environment Variables
Variable
USE_DVS_VTR_IF
Value
1
Centaurus II Enhanced Monitoring
Version 2014 enhances the SDI monitoring capability of the DVS Centaurus II video
board. The Centaurus II SDI output now supports the real-time display of the NVIDIA
OpenGL (GPU) output, including grading, histograms, graphs and shapes.
This is called OpenGL or GPU read-back.
Enabling Monitoring Enhancements
To enable the monitoring enhancements, enable the global option :
Preference File
In the general.prefs IOCard section :
enableReadback true
GUI
In the main Preferences/Monitoring tab, enable the OpenGL readback to Video
option :
When enabled, you will have an extra button below the Library button, indicating the
status of GPU read-back :
note
Toggle GPU read-back on/off by clicking this button.
Note, that when GPU read-back is disabled in the Preferences, you will only have
Mon and Vid icons :
IM-2014_1-1.0
Page 54
DVS Centaurus II Video
Nucoda and Phoenix 2014 Install Manual
DVS SDI Stereo
The Digital Vision 2014 release includes support for Stereo Mode monitoring using the
DVS video board.
note
You will need the Multidevice license option installed on your DVS video card. To find
installed options, use the dvsconf program (see page 53).
Enabling this mode will output video tracks 1 and 2 to the two stereo channels via SDI A
and B. Both SDI channels with be in 4:2:2 mode.
Stereo Outputs
Video Track
SDI Output
Channel
1
A
Left
2
B
Right
Enabling Stereo Mode
There are two configuration options for stereo mode :
Project Global Level
This is a tickbox on the main project screen :
Device Level
The device level setting enables stereo output for the DVS Centaurus II video card.
These settings are inside the IOCard section of the main preference file
general.prefs :
Name
dualDVSOutput
reverseStereoOutput
IM-2014_1-1.0
Description
Default
Enable or disable stereo output through false
SDI A and B channels.
Switch the left/right stereo channel
between SDI A and B.
false
Page 55
VTR Remote Mode
Nucoda and Phoenix 2014 Install Manual
VTR Remote Mode
VTR Remote Mode configures the Digital Vision application to respond as if it was a
VTR device under RS422 remote control.
We can control the Digital Vision application from a VTR device (stop, play, rewind, jog)
via the RS422 control cable.
note
VTR Remote Mode is supported with Centaurus2 video boards.
Figure 28 RS422 connection for VTR Remote mode
Note that the RS422 cable is connected in the opposite orientation compared to that
used for normal VTR control from the Digital Vision application.
Application Configuration
Enable VTR Remote Mode inside the Digital Vision application by pressing the Remote
button to the left of the play controls :
Figure 29 Remote button
Once enabled, the button turns orange :
your current timeline position.
alert!
IM-2014_1-1.0
and a locator window opens displaying
The timeline should be fully rendered for VTR Remote Mode to work correctly.
Page 56
Shuttle Pro
Nucoda and Phoenix 2014 Install Manual
Shuttle Pro
If you have a Contour ShuttlePRO, we supply a preference file you can use.
Configuration
Each Digital Vision application has a specific ShuttlePRO preference defined for use
with the application. To use the right preference, follow these steps :
· Right-click on the ShuttlePRO 2 icon in your system tray and select Open
Control Panel
· In the Control Panel, click on the Options button
· Then Import Settings.
· Browse to (depending on product) :
C:\Nucoda\ShuttlePRO or
C:\Phoenix\ShuttlePro
· Select the relevant Digital Vision application preference file and Open.
· Press Apply on the Control Panel
The ShuttlePRO should now work with the Digital Vision application.
note
IM-2014_1-1.0
The key mapping on the ShuttlePRO device for the Digital Vision application can be
modified. See the ShuttlePRO manual for help with this.
Page 57
Shuttle Pro
Nucoda and Phoenix 2014 Install Manual
ShuttlePRO Layout
The ShuttlePRO button layout is shown in 30 below.
Figure 30 : ShuttlePRO v2 Button Layout
Shuttle Wheel Positions
Position
IM-2014_1-1.0
Left Side
Right Side
1
Backward 5fps
Forward 5fps
2
Backward 10fps
Forward 10fps
3
Backward x1
Forward x1
4
Backward x2
Forward x2
5
Backward x3
Forward x3
6
Backward x5
Forward x5
7
Backward x8
Forward x8
Page 58
THX Cinespace
Nucoda and Phoenix 2014 Install Manual
THX Cinespace
Digital Vision applications support the THX cineSpace software suite. This includes
integration with the THX cineProfiler application allowing easy monitor profiling and
calibration via the Digital Vision application. The cineProfiler integration has to be
selected for installation as part of the main application installation process (see page
10).
note
You will need a Cinespace license to use these features.
To use Cinespace with Digital Vision 2014.1 :
● Install the THX cineSpace software suite (v2.9)
● If you want to integrate the Nucoda or Phoenix application with THX cineProfiler
then select THX cineProfiler Plug-in when installing Digital Vision v2014.
License
Cinespace v2.9 node-locked licenses are placed in a text file :
C:\Program Files (x86)\THX\cineSpace\licenses\license.lic
note
Note the license extension for Cinespace is .lic (not .flic)
Profiling and Calibration
The Digital Vision v2014 applications can profile and calibrate your monitor in
cooperation with the THX cineProfiler application.
note
You will need to use a recent version of THX Cinespace e.g. v2.9 or later.
How it Works
The cineProfiler application includes a Digital Vision plugin that communicates with our
application via TCP/IP (local or remote). This mechanism means that cineProfiler can
direct us to display the colour patches on our output device and still control the profiling
process.
IM-2014_1-1.0
Page 59
THX Cinespace
Nucoda and Phoenix 2014 Install Manual
Figure 31: Profiling using the Nucoda plug-in to cineProfiler
Procedure
We need to configure the Digital Vision application and cineProfiler application
separately.
Digital Vision Application
Start the software and ensure we are monitoring through the correct device. In general,
this will be via the video I/O device (e.g. DVS Atomix LT).
· On the main project screen, switch to the Preferences screen
· Then the Monitoring/Video IO tab
· Check that Enable SDI IO Card is on
Also set the desired SDI Link and format and enable :
Always use default format for monitoring
IM-2014_1-1.0
Page 60
THX Cinespace
Nucoda and Phoenix 2014 Install Manual
· Switch to the Colour tab
· Choose Linear (SMPTE) as the colour scaling mode
· Switch to the System screen
· Press the Listen to cineProfiler button
When enabled, the application prints :
Listening for cineProfiler plugin events …
note
Our application listens on a TCP/IP port for communication from the cineProfiler
application. By default, this port is 9988 but you can set this in the general.prefs file
(see page 37) CineProfilerServer section :
CineProfilerServer
{
port 9988
}
cineprofiler
Attach the calibration probe to the system.
note
The probe can be directly attached to the system running cineProfiler or on a different
system by using the THX probeServer application.
Choose the following settings :
· Viewing Device : Projector
IM-2014_1-1.0
Page 61
THX Cinespace
Nucoda and Phoenix 2014 Install Manual
· Viewing Device Controls : disable (un-tick) brightness and contrast
· Profile Type : Quick Cube or Normal Cube
note
A Quick Cube uses 1000 colour patches. A Normal Cube uses 8000 patches
(and so takes more time).
· Plugin : Nucoda
· A window opens and prompts for an IP address and port to use for the Digital
Vision application (see below).
If we are running cineProfiler on the same system as the Digital Vision
application, you can leave the IP address as the default, localhost.
Once complete, follow the usual cineProfiler instructions to perform the actual profiling.
IM-2014_1-1.0
Page 62
THX Cinespace
Nucoda and Phoenix 2014 Install Manual
Enabling Cinespace
To enable THX cineSpace for a project output format, select the THX CineFilmMaster
CMS mode on the project screen :
Figure 32 : Select THX CineFilmMaster CMS mode
You can then use the ..Select custom CMS dialog to choose your monitor and target
profiles and configure Cinespace.
Burnt in CMS
You can burn a selected CMS profile into an output format by enabling the Apply CMS
button :
Figure 33 : Enabling a burnt in CMS using Apply CMS
note
You can only burn-in a CMS to a secondary output format.
View CMS
Use the selected CMS profile as a viewing LUT only by enabling the View CMS button
inside the project.
IM-2014_1-1.0
Page 63
THX Cinespace
Nucoda and Phoenix 2014 Install Manual
Figure 34 : CMS toggle button inside project.
A viewing LUT is not rendered or burnt into the output.
References
THX CineSpace is installed with online documentation. Use your web browser and open
the following file :
C:\Program Files (x86)\THX\cineSpace\docs\cineSpace.html
IM-2014_1-1.0
Page 64
Red Rocket Install
Nucoda and Phoenix 2014 Install Manual
Red Rocket Install
The Red Rocket card is a hardware accelerator for decoding and debayering 4K R3D
files in realtime.
The hardware consists of :
alert!
•
Single slot / Full-length PCI-Express card
•
x16 physical [see below]
A x16 PCI-Express slot is required - physical and electrical. This is due to the
power requirements of the card.
The card is supported in the HP Z800 and Dell T7500/T7600 workstations only.
Driver and Firmware
Download12 the driver and firmware bundle to your local disk and unzip.
The package includes :
•
A Microsoft Windows device driver
•
Firmware update
•
Red Rocket Installation Guide (PDF)
12 See the application Release Notes for details
IM-2014_1-1.0
Page 65
Red Rocket Install
Nucoda and Phoenix 2014 Install Manual
Installation
alert!
When working inside your computer workstation with the Red Rocket card, ensure
you read and follow the safety instructions detailed in the Red Rocket Installation
Guide.
Always read the application Release Notes before installation.
If you are requested to update the Red Rocket driver and firmware and the hardware
is already installed, you should uninstall the driver before doing the update i.e.
My Computer / Manage / Device Manager - open Sound, video and game controllers,
right-click Red Rocket and select Uninstall :
note
Once the uninstall is complete, reboot. Then update driver and firmware as
described below.
1. Install Red Rocket card :
a. Shutdown your workstation, unplug power and open case
b. Install the Red Rocket card in a spare x16 PCI-Express slot
[page 67 below]
c. Close case and return cabling and power.
d. Start workstation.
2. Install Windows driver :
a. Windows will notice new hardware and open the Found New Hardware
wizard
b. Select : Install from a list or specific location
c. Navigate to the folder containing the Windows driver files and proceed to
install.
Continue through any Windows warning dialog window.
3. Reboot workstation
IM-2014_1-1.0
Page 66
Red Rocket Install
Nucoda and Phoenix 2014 Install Manual
4. Install Red Rocket firmware :
a. Navigate to folder containing Red Rocket firmware files
b. Double-click batch file : Install_Firmware.bat
c. Confirm upgrade by pressing : Y
The update process may take some time. Wait for completion.
5. Shutdown the workstation
6. Wait for one minute
7. Start workstation.
8. Validate driver and firmware install :
a.
b.
c.
d.
Right-click My Computer and select Manage
Select : Device Manager
Expand section : Sound, video and game controller
Check that the Red Rocket device is present
PCI Slot Recommendation
The slot recommendations below assume standard HP Z800 and Dell T7500
configurations.
HP Z800 - Slot 2
Second from top
IM-2014_1-1.0
Dell T7500 - Slot 2
Second from bottom
Page 67
Telecine Control
Nucoda and Phoenix 2014 Install Manual
Telecine Control
Digital Vision applications support a Spirit Classic Telecine Controller. This allows us to
interface to Spirit and Shadow telecine devices. We support both transport and picture
control (grades).
note
The Telecine Picture control (grading etc.) requires a license option.
Connections
The Telecine Controller connections are as follows :
● RS422 - to the Nucoda system
This provides the transport control (play, rewind etc.)
● Ethernet - to the Telecine unit itself (Eth0)
● Ethernet - to the Nucoda system (Eth1)
This connection is used if you have the Telecine Picture Control option licensed.
IM-2014_1-1.0
Page 68
Telecine Control
note
Nucoda and Phoenix 2014 Install Manual
An RS232/422 converter is included with the package.
Configuration
Ethernet LAN
By default, the ethernet LAN ports are configured as follows :
Port (Internal Name)
IP Address
Use
Eth0 (vrr0)
10.1.3.251
To Telecine
Do not change this 13
See note below.
Eth1 (vrr1)
192.168.25.1
To Nucoda
A dedicated link is preferred.
Changing Nucoda LAN Address
alert!
This procedure is for advanced users only!
If you need to change the default IP address Nucoda LAN port (Eth1), follow these
instructions :
● Connect a cross-over ethernet cable to Eth1
● Use an SSH client14 to connect via SSH to the Telecine unit
user astec
pass astec
port 22
● Switch to superuser :
su <enter>
pass astec
● Edit the file15 : /etc/rc.local
● Change the vrr1 line to reflect your desired IP address e.g.
ifconfig vrr1 <New IP> netmask 0xffffff00
13 The Eth0 ethernet connection does not use TCP/IP for communications to the Spirit
Classic or Shadow Telecine. As such, the IP address is not used and does not need
configuration.
14 On Windows, you can use a free SSH client such as PuTTY available from :
http://www.chiark.greenend.org.uk/~sgtatham/putty/
15 You will need to use the vi editor.
IM-2014_1-1.0
Page 69
Telecine Control
Nucoda and Phoenix 2014 Install Manual
e.g.
ifconfig vrr1 192.168.80.55 netmask 0xffffff00
● Save the file and reboot the unit.
● Test you can access the device on the new address (e.g. ping)
Preference File
Software preferences are stored in the file :
C:\Nucoda2014_1\root\general.prefs
The telecineControl section specifies the IP address assigned to Eth1 (Nucoda
LAN) e.g.
telecineControl
{
address "192.168.25.1"
port "420"
}
note
The address option is the IP address of the Eth1 port (Nucoda LAN). You should not
change this unless you also change the Telecine Controller IP address (see page
69).
Use
Telecine transport controls are available in the List Capture/VTR Capture screen.
In addition, the optional Picture Control functionality is available via the tab Telecine
Settings inside the VTR Capture window.
Figure 35 : Telecine Settings menu inside VTR Capture
window.
IM-2014_1-1.0
Page 70
Appendices
Nucoda and Phoenix 2014 Install Manual
Appendices
SMPTE / CGR Scaling
Using SMPTE video bars (64-940 or 0-100%), we will consider the SDI signal as it
passes through the system when using the two modes Linear (SMPTE) and Linear
(CGR).
Input
Scope
SMPTE video bars 0-100%
Data 64-940
These examples will use YCrCb 4:2:2 SDI signals.
note
Linear (CGR) mode does not scale RGB 4:4:4 signals unless you set the
general.prefs option :
scale444 true
IM-2014_1-1.0
Page 71
Appendices
Nucoda and Phoenix 2014 Install Manual
Capture
Linear (SMPTE) Mode
Capture video bars to disk.
Complete signal captured.
Signal unscaled and untouched.
Linear (CGR) Mode
Capture video bars to disk.
Input signal is scaled.
CGR mode takes 64-940 signal only and
scales this to 0-1023. Clipping any low and
high data values.
IM-2014_1-1.0
Page 72
Appendices
Nucoda and Phoenix 2014 Install Manual
Monitoring / Layoff
Linear (SMPTE) Mode
Output/View complete SDI signal.
Signal untouched.
Signal untouched.
Linear (CGR) Mode
Output/View scaled SDI signal.
In CGR mode signal is scaled 0-1023 to
64-940.
IM-2014_1-1.0
Signal scaled back to 64-940.
Page 73
Appendices
Nucoda and Phoenix 2014 Install Manual
Setting Host IP Address
This section describes the basic process for setting the TCP/IP address for a network
port on Windows. This is for a manual setting and not using DHCP.
For this example only, we will use the following TCP/IP addresses :
IP address : 192.168.8.100
Subnet mask : 255.255.255.0
Default gateway : 192.168.8.1
Preferred DNS server : 192.168.21.10
note
You should replace the above example values with the ones you need (and as
directed).
A network port attached to a control panel (i.e. Precision or Valhall) requires only the
IP address and the Subnet mask set.
Windows 7
● Open the Control Panel (Start / Control Panel)
● Select : Network and Sharing Center
● On the left-hand side, choose : Change adapter settings
● In the list of adapters shown, double-click the one you want to change
● In the new dialog that opens, click the Properties button :
IM-2014_1-1.0
Page 74
Appendices
Nucoda and Phoenix 2014 Install Manual
● In the dialog that opens, double-click the item :
Internet Protocol Version 4 (TCP/IPv4)
● In the new dialog that opens, make sure you select :
Use the following IP address
Set the IP address and Subnet mask to the desired values e.g.
Replace the above example settings with those you require (as directed).
note
A network port attached to a control panel requires only the IP address and the
Subnet mask set.
● Press OK until we exit all the dialogs and then exit the Control Center.
Windows XP
● Open the Control Panel (Start / Control Panel)
● Double-click Network Connections
● In the list of adapters shown, double-click the one you want to change
● Click the Properties button
● In the dialog that opens, double-click the item :
IM-2014_1-1.0
Page 75
Appendices
Nucoda and Phoenix 2014 Install Manual
Internet Protocol (TCP/IPv4)
● In the new dialog that opens, make sure you select :
Use the following IP address
Set the IP address and Subnet mask to the desired values e.g.
Replace the above settings with those you require (as directed).
note
A network port attached to a control panel requires only the IP address and the
Subnet mask set.
● Press OK until we exit all the dialogs and then exit the Control Center.
Control Panel Specific Settings
If you are setting up the network port attached to a control panel, you should also
disable any TCP/IP checksum offload feature. This setting is found in the Adapter dialog
via the Configure... button.
● Open the Control Panel (Start / Control Panel)
● Select : Network and Sharing Center
● On the left-hand side, choose : Change adapter settings
IM-2014_1-1.0
Page 76
Appendices
Nucoda and Phoenix 2014 Install Manual
● In the list of adapters shown, double-click the one you want to change
● In the new dialog that opens, click the Properties button :
● In the dialog that opens, select the Configure... button :
● Switch to the Advanced tab
● Locate the IPv4 Checksum Offload item
● Set Disabled :
note
IM-2014_1-1.0
This field depends on your ethernet hardware and driver and may have a slightly
different name and be in a different location or menu.
Page 77
Appendices
Nucoda and Phoenix 2014 Install Manual
Preference Files
To use the application, you are required to login (to the application) as a particular user.
● The default login is a user named Default
● Other users can be created via the User Login dialog (see page 31)
Presets
The application is shipped and installed with some preset preference files. Some are
global and system specific, others will be used as a base for user settings :
Preset folders created :
System :
User :
ROOT \ Presets \ System
ROOT \ Presets \ Users
After application installation but before first use, the Presets folders contain :
After Installation (before application use) :
ROOT/
|
|-- Presets
|
|
|
|---------- System/
|
|
- UIResources.prefs
|
|
- defaultEffectList.prefs
|
|
- defaultOutputFormats.prefs
|
|
- keycode.map
|
|
- logger.conf
|
|
|
|---------- Users/
|
- AAFMetadataMap.prefs
|
- CMSPresets.prefs
|
- HotKeys.prefs
|
- ParamPresets.prefs
|
- colour.prefs
|
- paramLayout.configs
|
- valhall.conf
|
IM-2014_1-1.0
Page 78
Appendices
Nucoda and Phoenix 2014 Install Manual
System and User Settings
After First Run and Create of First User (Tom)
We add the following in ROOT :
ROOT/
|
+
|
|
|-- System/
|
- minidumps/
|
- keycode.map
|
- lockfile
|
- lockfile.owner
|
- projects.properties
|
- user.config
|
|-- Users/
|
|-- AllUsers/
|
- CMSPresets.prefs
|
- Clip.prefs
|
- HotKeys.prefs
|
- colour.prefs
|
- general.prefs
|
- paramLayout.configs
|
|-- Default/
|
|-- Tom/
- Clip.prefs
- ExportFolder.prefs
- ExportLUTFolder.prefs
- exportMedia.prefs
- general.prefs
On First Run :
Users \ AllUsers folder :
● A set of default preference files are copied from Presets \ Users
● A complete general.prefs file is created
Users \ <User> folder :
● Some preference files are created here. These files may be empty or incomplete
but are ready for customisation as required.
IM-2014_1-1.0
Page 79