1
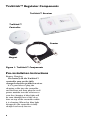
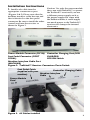
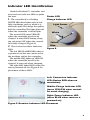
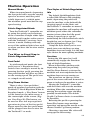
User’s Guide
Table of Contents
Page
Safety Section
TruStitch™ Regulator Components
Pre-installation Instructions
Installation Instructions
Indicator LED Identification
Activating Stitch Regulation
Machine Operation
Using the Stitch Regulator
TruStitch™ Accessories
Tips and Techniques
Register your TruStitch™
Recommended for Use with the PLATINUM™ 16 quilting machine and
TruStitch™
2
3
6
6
7
9
10
11
12
13
14
14
15
Important Information
Regulatory Information
This equipment has been tested and
found to comply with the limits for
a Class B digital device, pursuant to
part 15 of the FCC Rules.These limits
are designed to provide reasonable
protection against harmful interference in
a residential installation.This equipment
generates, uses and can radiate radio
frequency energy and, if not installed and
used in accordance with the instructions,
may cause harmful interference to
radio communications. However, there
is no guarantee that interference will
not occur in a particular installation.
If this equipment does cause harmful
interference to radio or television
reception, which can be determined
by turning the equipment off and on,
the user is encouraged to try to correct
the interference by one or more of the
following measures:
• Reorient or relocate the receiving
antenna. • Increase the separation
between the equipment and receiver.
• Connect the equipment into an outlet
on a circuit different from that to which
the receiver is connected.
• Consult the dealer or an experienced
radio/TV technician for help.
This Class B digital apparatus complies
with Part 15 of the U.S. Federal
Communications Commission (FCC)
rules, Canadian ICES-003 and RSS-210.
Operation is subject to the following
two conditions: (1) this device may not
cause interference, and (2) this device
must accept any interference received,
including interference that may cause
undesired operation.
The term “IC:” before the certification/
registration number only signifies that the
Industry Canada technical specifications
were met.
Radio Frequency Interference
This product uses the unlicensed
Industrial, Scientific and Medical (ISM)
radio band, which begins at 2.400
GHz and extends to 2.483 GHz. Many
commonly used products also share this
band, including WiFi (wireless) network
routers and cordless telephones. Correct
and consistent operation of this product
may be affected by these conflicting
devices.
RF Technical Specifications
RF Output Power: < 92 dbµV/m at 3m
Radio Band: 2.400 GHz to less than
2.483GHz.
Radio Channels: 34 channels, auto
selection.
Laser Safety Information
CLASS 1 Laser Product
The TruStitch™ controller contains an
invisible laser device that complies with
stringent safety requirements.The product
meets the U.S. DHHS and IEC 608251 laser safety standard requirements
for and is classified as a Class 1 laser
product. Under this classification, Class
1 denotes lasers whose radiation does
not pose a hazard under normal or single
fault conditions.There is no risk to eyes
including use of an optical instrument.
There is no risk to skin.
Safety Considerations
WARNING: To protect against
risk of fire, bodily injury, electrical
shock or damage to the product:
• Do not immerse any part of this product
in water or other liquid.
• Do not spray liquid on this product or
allow excess liquid to drip inside.
• Do not use this product if it has
sustained damage, such as a damaged cord
or plug.
• Clean only with a damp cloth. Use water
and a light detergent such as dishwashing
detergent if needed.
3
Environmental
Considerations
Recycling Information
We recommend that customers dispose
of their used electronic products in an
environmentally sound manner. Potential
methods include reuse of parts or whole
products and recycling of products,
components and/or materials.
Waste Electrical and Electronic
Equipment (WEEE) Directive
This marking indicates that this
product should not be disposed
with other household wastes
throughout the EU.To prevent possible
harm to the environment or human health
from uncontrolled waste disposal, recycle
it responsibly to promote the sustainable
reuse of material resources.To return your
used device, please use the return and
collection systems or contact the retailer
where the product was purchased.They
can take this product for environmental
safe recycling.
Important Battery Information
Caution – Do not attempt to replace
the battery.Your warranty is void if you
attempt to do so. Contact your local
retailer for battery replacement.
General Precautions
• Keep batteries out of the reach of
children.
• If a battery leaks, remove the battery
and recycle or dispose of it in accordance
with the local and national disposal
regulations.
Special Precautions
The precautions below are to prevent
the sudden release of electrolytes, which
these prohibited actions can cause:
• Do not install batteries incorrectly.
• Do not open, puncture, or mutilate a
battery.
• Do not heat batteries.
• Do not use a fire to dispose of batteries.
Released battery electrolyte is corrosive,
can cause damage to the eyes and skin,
and may be toxic if swallowed.
4
Battery Disposal
WARNING: Do not dispose of the
battery in a fire or with household
waste. Contact your local waste disposal
agency for the address of the nearest
battery deposit site.
The TruStitch™ controller uses a
rechargeable Lithium-ion battery for
power. Do not attempt to replace
this battery.The battery may only be
replaced at the factory or by authorized
HUSQVARNA VIKING® retailers. Contact
your local retailer should you require a
battery replacement.
Do not dispose of the product’s
battery in a fire or with household waste.
Battery cells may explode. Discard a used
battery according to the manufacturer’s
instructions or contact your local waste
disposal agency for disposal instructions.
Dispose of a spent or damaged battery
promptly.
Batteries Directive
In the European Union, this label
indicates that batteries in this
product should be collected
separately and not be disposed of
with household waste. Substances in
batteries can have a potential negative
impact on health and environment
and you have a role in recycling
waste batteries, thus contributing
to the protection, preservation, and
improvement of the quality of the
environment.You should contact your
local authority of retailer for details of the
collection and recycling options available.
Health Warning
When using this product, as with many
activities, you may experience occasional
discomfort in your hands, arms, shoulders,
neck, or other parts of your body.
However, if you experience symptoms
such as persistent or recurring discomfort,
pain, throbbing, aching, tingling,
numbness, burning sensation, or stiffness,
DO NOT IGNORE THESE WARNING
SIGNS. PROMPTLY SEE A QUALIFIED
HEALTH PROFESSIONAL, even if
symptoms occur when you are not
working with the product. Symptoms like
these can be associated with painful and
sometimes permanently disabling injuries
and disorders of the nerves, muscles,
tendons, or other parts of the body.These
musculoskeletal disorders (MSDs) include
carpal tunnel syndrome, tendonitis,
tenosynovitis, and other conditions.
Product Description
The TruStitch™ stitch regulator is
designed to turn the PLATINUM™ 16
quilting machine into a stitch-regulated
quilting machine. It uses patent-pending
technology to track your sewing motion
and thereby regulate the stitch length
as you move the fabric around the table.
The TruStitch™ controller uses highresolution, optical tracking and radio
frequency circuitry to follow your every
motion while quilting. The TruStitch™
receiver receives the motion information
from the TruStitch™ controller and
converts it to a format the PLATINUM™
16 quilting machine can use to control
the stitching speed.
The TruStitch™ controller contains a
long-life, rechargeable Lithium-ion battery
for wireless operation. A charging cable
is provided to connect the USB-B type
connector on the TruStitch™ controller
to the USB-A type connector on the
TruStitch™ receiver to recharge the
battery.The TruStitch™ controller may
still be used for quilting while charging if
care is taken to avoid piercing the charge
cable with the needle.The TruStitch™
receiver is powered with a power module.
A machine interface cable connects the
TruStitch™ receiver to the foot pedal
connector on the machine.The foot pedal
plugs into the TruStitch™ receiver and
acts to enable the stitch regulation when
in regulation mode.
CE - Authorised Representative
VSM Group AB, SVP Worldwide
Drottninggatan 2, SE-56184, Huskvarna, SWEDEN
5
TruStitch™ Regulator Components
TruStitch™ Receiver
TruStitch™
Controller
Coaster
Magnet
Figure 1. TruStitch™ Components
Pre-installation Instructions
Battery Charging
The battery on the TruStitch™
controller may not be fully
charged when the product arrives.
It is a good idea to plug the
charging cable into the controller
and receiver and then plug the wall
power module into the receiver to
start the charging. A blue light will
be seen through one of the clear
dots on top of the controller while
it is charging. When that blue light
disappears, the controller is fully
charged and ready for use.
6
Installation Instructions
1. Install each cable into the
appropriate connector or port
(Figures 2 & 3). Please note that the
machine interface cable has one end
that is identical to the foot pedal
connector. Be sure to install the other
(round) end into the receiver as
shown in Figure 3.
Caution: Use only the power module
that came with TruStitch™ to power
the TruStitch™ receiver. If you use
a different power supply, such as
the power supply that came with
the bobbin winder, it could supply
too much power to the TruStitch™
receiver and damage the internal
electronics.
Power Module Connector (DC IN) Controller Charging Port (USB
Foot Pedal Connector (FOOT
CHARGER)
PEDAL)
OFF/ON Switch
Machine Interface Cable Port
(MACHINE)
Figure 2. TruStitch™ Receiver Connectors/Ports/Switch
Foot Pedal Cable
Controller Charging Cable
(supplied with your
Machine Interface
machine)
Cable
Power Module
Cord
Figure 3. All Cables Installed
7
2. Install remaining end of controller
charging cable into the controller as
shown in Figures 4 & 5.
Figure 4. USB Mini-B style
charging port on the TruStitch™
Controller.
Figure 5. Charging cable installed.
Note flat on cable is up.
3. With the machine and TruStitch™
controller turned off, install the
machine interface cable connector to
the machine foot pedal port (Figure
6). Secure the connector by turning
the screw shafts (Figure 7).
Figure 6.
Figure 7.
4. The TruStitch™ receiver may
sit on top of the table or on the
shelf below the table. It may also be
attached to the machine using the
Velcro® strips provided, to secure it
to the side of the control or power
pod.
5. Plug the power module into a
power outlet and turn units on in the
following order:
1. Machine
2.TruStitch™ receiver
3.TruStitch™ controller
8
Indicator LED Identification
Both the TruStitch™ controller and
receiver have indicator LEDs to guide
the user.
1. The controller has a flashing
WHITE LED that flashes only in low
light conditions, such as when it is
under the quilt.This helps the quilter
find the controller.The light shuts off
when the controller is in full light.
The second LED turns YELLOW
when the controller needs to be
charged. It turns BLUE during charging and turns OFF when the controller is fully charged (Figure 8).
2. The receiver has three Indicator
LEDs.
The left LED FLASHES RED when it
is powered on, but not connected to
the machine and/or the controller.
The middle LED lights up YELLOW
when the controller needs to be
charged. It turns off when charging.
The right LED lights BLUE when the
unit is powered on. See Figure 9 for
placement of these LEDs.
Finder LED
Charge Indicator LED
Light Sensor
White
Yellow/
Blue
Figure 8.
Left: Connection Indicator
LED (flashes RED when no
connection)
Middle: Charge Indicator LED
(turns YELLOW when controller needs charging)
Right: Power Indicator LED
(turns BLUE when receiver is
powered on)
Figure 9. Receiver Indicator LED Placement
9
Activating Stitch Regulation
Display Screens Information
1. Once the machine is powered
up and the power module for the
TruStitch™ receiver is plugged in, the
machine will recognize that the Stitch
Regulator is installed and will display
a screen that looks like Figure 10.
Manual Mode
The two buttons on the left side of
the display are the Stitch Mode selectors,“Regulated” and “Manual”. Selecting “Manual” will allow the machine
to operate without stitch regulation.
In this mode, you have access to the
stitching speed Presets and other
features that are standard with the
PLATINUM™ 16 quilting machine.
Regulated Mode
Pressing the “Regulated” button
will change the display, replacing the
“Speed Adjustment” and “Preset” sections of the screen with a “StitchesPer-Inch” section and a “Idle” section
(Figure 11).
A “Play/Pause” button is also added
above the “More” button on the
center-right side of the screen to
allow machine operation without
having to press the foot pedal
(Figure 11).
0%
Manual
Stitch Mode
Manual
25 %
Regulated
Needle Stop
87 %
Up
54 %
Down
25 %
More
Figure 10. PLATINUM™ 16
quilting machine Main Screen.
Regulated
Stitch Mode
Manual
10 SPI
Regulated
Needle Stop
Up
3%
Down
More
Figure 11. Stitch-Regulation
Screen
10
Machine Operation
Manual Mode
When in manual mode, depressing
the foot pedal will cause the sewing
speed to increase, until the pedal
is fully depressed, at which point,
the machine speed matches the top
speed setting.
Stitch-Regulated Mode
Turn the TruStitch™ controller on
by using the switch on the bottom
of the controller. A bright white light
will flash until it makes radio contact
with the TruStitch™ receiver. Once
contact is made, flashing will only
occur if the ambient light is low, such
as when you have the receiver under
the fabric.
Two Ways to Start/Stop in
Stitch-Regulated Mode
Two Styles of Stitch Regulation
Idle
The default Stitch-Regulation Style
is called Idle.When in Idle stitching
mode, depressing the pedal will
start the machine at the defined Idle
(starting) speed.As the fabric and
the TruStitch™ controller are moved
together, the machine will regulate the
machine speed, when the controller
motion is faster than the Idle speed
setting. It speeds up as you do,
maintaining the Stitches-Per-Inch stitch
length that you’ve chosen (see Using
the Stitch Regulator, Page 12).
Using Idle style allows you to ease
gently into your stitching, creating
smoother starts and stops. It is the best
style choice for most quilting methods.
Precision
Setting the Idle speed to 0 will
automatically
engage the Precision
Foot Pedal
Style
of
Stitch
Regulation.
In stitch-regulated mode, the foot
When
in
Precision
stitching style,
pedal acts as a “Regulation Start”
depressing
the
pedal
(or pressing
switch. Once sewing is started by dethe
Play/Pause
Button)
activates the
pressing the foot pedal, pressing the
machine
and
starts
regulation
but the
foot pedal further will have no affect
machine
does
not
start
sewing
yet.
on the sewing speed.The pedal acts
The
status
box
on
the
top
center
as a simple on-off switch.
part of the screen will turn from red to
green to indicate the machine is active.
Play/Pause Button
Moving the TruStitch™ controller
There is also a “foot pedal-free”
with
the fabric will start the machine
mode of regulated operation with the
stitching.
When the controller stops
TruStitch™ Stitch Regulator. When in
moving,
the
machine stops stitching,
Regulated mode, a “Play/Pause” button
possibly
in
mid-stroke.
The default
can be found on the main screen at
Needle
Up/Down
choice
is overridden
the center-right of the screen (Figby
Precision.
ure 11 on Page 10).This button can
Releasing the pedal or pressing the
be used to start and stop regulated
Pause/Play
button stops machine
operation in place of the foot pedal.
operation
and
moves the needle to the
Please note that the foot pedal must
chosen
Needle
Up/Down position.
still be plugged into the receiver for
Choosing
a
non-zero
Idle value will
the TruStitch™ to work. re-engage the Idle setting.
11
Using the Stitch Regulator
The TruStitch™ controller is
designed to track the motion of the
controller across the table, not the
motion of the fabric during quilting.
For proper stitch regulation, always
keep the controller moving with the
fabric as described below.
1. Place the controller on the table
surface, under the quilt sandwich,
either to the right or left side of
the machine head during operation
(Figure 12).
Figure 12.
2. Position the controller in the area
where you would typically hold the
fabric when free-motion quilting.
3. Use your hands to hold the
quilting area taut beneath the needle
of the machine. As you move the quilt
sandwich, maintain contact with the
controller through the fabric with
the palm of the hand or directly with
fingers of the hand.
4. Keep the fabric flat between
your hands and move both hands
together while keeping them parallel
to your body. It is best to start your
experience with the Stitch Regulator
by using Idle style set to a low speed
percentage setting.
Figure 13. Move quilt north,
south, east and west.
TIP: Think of moving the fabric in
the compass directions: North, South,
East, West. Remember that your
quilting will mimic the speed and
direction of the controller, but only if
you keep your hand motions parallel
to the needle and to the table edge
(Figure 13).
Do not move the controller in a
Figure 14. Don’t rotate quilt.
circle around the needle. If you do,
the needle will make multiple stitches
in one place, as it tries to keep up
with the movement of the controller
(Figure 14).
12
TruStitch™ Accessories
Two accessories are provided with
the TruStitch™ Stitch Regulator to
give the quilter more flexibility in
quilting.
Magnet
keeping your hands close to the
controller.The controller will move
with the quilt sandwich, regulating
your stitch length.
WARNING: If the quilt sandwich
is extremely soft, you may choose to
fold the edge of the quilt sandwich to
stiffen it slightly.
1. The magnet allows you to quilt
“hands-free” without holding onto the
controller through the quilt sandwich.
Place the controller on the table,
just outside of where you wish to
place your hands. Place the magnet
on top of the controller and on the
top of the quilt sandwich (Figure 15).
Free-motion quilt as usual while
keeping your hands close to the
controller.The controller will move
with the quilt sandwich, regulating
your stitch length.
Figure 15.
WARNING: If the quilt sandwich
is extremely soft, you may not be
able to use the magnet, because the
controller won’t be able to follow
the motion of your hand if the fabric
sandwich buckles between your
hand and the controller. Most quilt
sandwiches are stiff enough to allow
you to use the magnet.
Coaster
1. The coaster allows you to quilt
close to the edge of the quilt without
losing stitch-regulation.
Attach the coaster to the edge of
the quilt sandwich using the two
clips.The clips were designed for
one-handed action. Place the coaster
on the table, press on both clips at
the same time with one hand. Use
the other hand to slide the quilt edge
into the clips, then release the clips
(Figure 16).
Free-motion quilt as usual while
Figure 16.
13
Tips and Techniques
1. Don’t twist the fabric under the
needle, as this will cause the needle
to sew faster or slower than it should
and you will not maintain regulation.
As long as the fabric remains in the
same orientation relative to your body
while quilting, the regulation will be
accurate.
2. When you have finished a section
of quilting, readjust the position of
the TruStitch™ controller to make
the next section easier to work on.
Don’t try to quilt large sections of the
quilt at one time. Work within a space
no farther out than 6”-15” from the
needle.
3. Idle speed can help you keep the
needle in motion and prevent long
stitches e.g. when doing zigzag, star
or circular patterns.
4. Adjusting your Idle speed will
give you better results. Experiment
with different percentages to find the
level you like best for each quilting
method. For example, micro-stippling
with a high stitches-per-inch count
will require a higher percentage setting than stitch-in-the-ditch.
5. When using rulers hold the controller next to the ruler and move the
ruler with both hands. As you adjust
the ruler, adjust the controller as
well. Some quilters prefer to use the
magnet when doing ruler work. Don’t
forget to release the foot pedal or
press the Pause button before moving
the controller.
6. A hoop may be used in conjunction with the controller for better
control of the fabric being sewn.You
can hold the controller just outside of
the hoop with your hand or with the
magnet.
14
7. If you are using a higher stitchesper-inch setting and the Idle speed
is set to zero, it is recommended that
you keep the controller closer to the
needle. Be careful not to let the controller hang up on the needle plate.
8. Because the controller senses
its motion across the table top, it is
important that it never be allowed to
pass over the gap in the table behind
the needle where the PLATINUM™
16 quilting machine arm is placed.
This gap will cause a break in the
information sent to the receiver and
will result in uneven stitches.
For the same reason, make sure the
controller doesn’t extend past the
edge of the table (which could happen when using the coaster).
Register your TruStitch™
For product and warranty registration,
go to the HUSQVARNA VIKING® web
site at www.husqvarnaviking.com.
Recommended for Use with the PLATINUM™ 16
quilting machine and TruStitch™
Visit your local retailer to purchase the following recommended tools and
accessories.
INSPIRA® Table Extension INSPIRA® Horizontal
Spool Pin
Expand your original PLATINUM™
16 quilting machine table with Table
Extensions. Each extension measures
18” x 30.” Purchase one or two to
provide extra support for large
projects. Adding two extensions will
expand the original table to a full six
feet in width (one extension shown
above).
An optional horizontal spool pin is
available for use with delicate threads
such metallics or holographic threads
or for specialty threads that are
wound on a spool (not a cone). Some
threads twist and break if fed from a
vertical spool.
INSPIRA® Table Overlay
The table overlay covers the entire
table with a slick surface that allows
the quilt sandwich to glide. At the
same time, it covers the gap where
the machine is set into the tabletop,
allowing the TruStitch™ controller
to operate in the area behind the
needle without interruption in stitch
regulation.
VIKING, PLATINUM, INSPIRA, KEEPING THE WORLD SEWING and Design are trademarks of KSIN Luxembourg II, S.ar.l.
HUSQVARNA and the “H” Crown Device are trademarks of Husqvarna AB. All trademarks are used under license by VSM Group AB.
©2013 KSIN Luxembourg II, S.ar.l. TRUSTITCH is a trademark of Handi Quilter, Inc.
15
www.husqvarnaviking.com
© 2013 KSIN Luxembourg II, S.ar.l. All rights reserved.