1
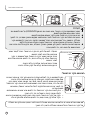
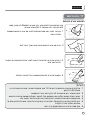
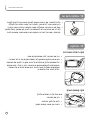
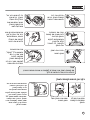
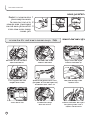
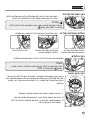
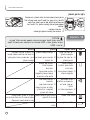
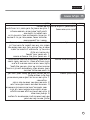
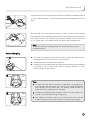
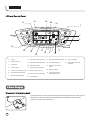
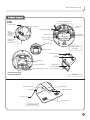
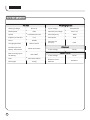
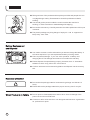
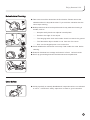
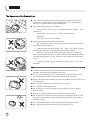
שואב אבק רובוטי מדריך למשתמש ,דגם D58 www.ecovacs.co.il תודה על שרכשתם את אחד משואבי האבק הרובוטיים של .אנו מאחלים לכם שתהנו ממנו! תודה על שבחרתם בנו! תוכן עניינים .1 .2 .3 .4 .5 .6 .7 2 3 3 3 4 5 5 6 6 6 הנחיות בטיחות ............................ מדריך למשתמש ........................... אספקת חשמל למוצר ..................... טווח השימוש במכשיר .................... הערות לפני הניקוי ......................... הנחיות בטיחות ............................. החלפת סוללה .............................. ניצול מקסימלי של הסוללה .............. כאשר המוצר אינו פועל ................... תכולת האריזה המקורית ופרמטרים טכניים 7 ....................................... שמות החלקים 9 ............................ המכשיר 9 ..................................... פאנל LCDופאנל שליטה 10 .............. טעינת הרובוט 10 ............................ הרכבת יחידת הטעינה 10 .................. טעינה 11 ........................................ הפעלה/עצירה/כיבוי 12 ..................... הפעלה 12 ...................................... עצירה 12 ........................................ כיבוי 12 .......................................... בחירת מצב 13 ................................ מצב ניקוי אוטומטי 13 ........................ מצב ניקוי פינות 14 ............................ מצב ניקוי נקודות קבועות 14 ............... מצב ניקוי יסודי 14 ............................ חזרה לעמדת הטעינה 14 ................... טעינה אוטומטית 15 ......................... .8 .9 .10 .11 .12 .13 .14 .15 .16 זמן הפעולה 15 ................................ קביעת זמן הפעולה 15 ....................... תכנות השעה 16 .............................. קביעת תדירות וביטול תזמון 17 .......... שלט רחוק 17 .................................. התקנת הסוללות 17 .......................... השימוש בשלט הרחוק 18 .................. קירות וירטואליים 18 ........................ התקנת סוללות 18 ............................ השימוש בקיר הוירטואלי 19 ............... סרט תיחום20 ................................. אחסון יומיומי 21 .............................. תחזוקה 21 ..................................... ניקוי המכשיר 21 .............................. ניקוי קופסת האבק 21 ....................... ניקוי מסנן הספוג ומיכל האבק 22 ......... החלפת מסנן הספוג 23 ..................... ניקוי המברשת הראשית 23 ................ ניקוי המברשת הצדדית 24 ................ החלפת המברשת הצדדית 24 ............ ניקוי הגלגלים 24 .............................. ניקוי חיישן הגובה 24 ........................ ניקוי חיישן האבק 25 ......................... התרעות 25 ..................................... תקלות נפוצות 26 ............................ בעיות נוספות 27 ............................. להנות מחיים חכמים יותר! .1הנחיות בטיחות אזהרה :כאשר יש ירידה בגובה המשטח המנוקה ,עקב מדרגה או שינוי גובה ,יש להפעיל את המכשיר ולוודא שהוא אכן מזהה את הפרשי הגובה מבלי ליפול .ייתכן ויהיה צורך להציב מחסום פיזי בקצה ,כדי למנוע מהמכשיר מליפול ,אבל יש לוודא שהמחסום גבוה מספיק ,כדי שאתם ובני משפחתכם לא תמעדו ממנו ותיפצעו .כמו כן ,חשוב לדאוג שחיישני האבק וחיישני המדרגות יהיו נקיים מאבק ,כיוון והדבר עלול להשפיע על היכולת של המכשיר לזהות מדרגות והפרשי גובה. ללא מחסום מגן עם מחסום מגן אזהרות ◄ אין לפתוח את המכשיר .הרכיבים שבתוך הרובוט ,כמו גם השלט רחוק והקירות הוירטואליים ,לא נועדו לתיקון על ידי המשתמש. ◄ המוצר נועד לשימוש ביתי בלבד ואינו מותאם לשימוש תעשייתי או מחוץ לבית. ◄ אין ללחוץ על ה.LCD - מדריך למשתמש אנא פעלו על פי הנחיות הבטיחות הבסיסיות שלהלן: • קראו את המדרך למשתמש בקפידה והתקינו את הרובוט בהתאם להנחיות המפורטות. • שמרו על המדריך .אם אתם מעבירים את המכשיר לאדם אחר ,אנא וודאו שאתם מצרפים אליו את המדריך. • כל הפעלה שאינה על פי ההנחיות במדריך תגרום ,קרוב לוודאי ,לנזק חמור גם למפעיל וגם למכשיר. נכון אספקת חשמל למוצר • • • • סכנת התחשמלות ניקוי במטלית הוצאת התקע • • • • • • אספקת החשמל למוצר היא מסוללה נטענת Ni-MHבתוך הרובוט, לה מותאמת במיוחד עמדת הטעינה ,לטעינה חוזרת. אנא בדקו היטב את המתח החשמלי הנדרש לעמדת הטעינה וודאות שהיא מחוברת בהתאם להנחיות. אל תשתמשו בכבל חשמלי או בתקע חשמלי פגומים .לקבלת כבל או תקע תקינים ,פנו אל היבואן. כיוון שעמדת הטעינה כבדה ,לעולם אל תגררו אותה באמצעות הכבל החשמלי. זכרו לא לסובב או לעקם את הכבל החשמלי וגם לא לחסום אותו כאשר הדלת סגורה. אין להניח עליו דברים כבדים. אין להניח לכבל החשמלי לגעת במשטחים חמים או חדים. אין להוציא את התקע באמצעות משיכה בכבל. אין לגעת בתקע ,בכבל או במכשיר בידיים רטובות. יש להוציא את התקע מהשקע כאשר אין כוונה להשתמש בעמדת הטעינה במשך זמן מה. יש להשתמש במטלית יבשה כדי לנגב את האבק מהתקע לעיתים קרובות. 3 טווח השימוש במוצר • הרובוט נועד לניקוי אבק בייתי ,כולל רצפות עץ ,רצפות גומי ,אריחים קרמיים ,לינולאום ושטיחים בעלי שיערות קצרות עד בינוניות .לא ניתן להשתמש בו בשטיחים בעלי שיער ארוך. • לא ניתן להשתמש בו ברצפות במקרים שלהלן: מים על פני המשטח )כולל נוזלים דליקים( ,כגון רצפה רטובה. בתוך השירותים ,חדרי האמבטיה או מקומות לחים אחרים. מדרגות. חדר שבו יש אח או אש.• החפצים שלהלן אסורים בתכלית האיסור: אש שלא כובתה ,בדלי סיגריות או גפרורים בוערים ,כיוון שחפציםאלה עשויים לגרום לשריפה. חפצים חדים כגון שברי זכוכית ,סיכות ,אטבי נייר ,אבנים ,גבסופיסות נייר גדולות .הם עשויים לחסום את המכשיר. מים או כל נוזל אחר ,במיוחד חומרי ניקוי ,נפט ,דלק ,צבע ,אלכוהול,בושם וכן תכשירים לניקוי רצפות או שטיחים .הם ירטיבו את חלקו הפנימי של המכשיר ויגרמו לקצר חשמלי. מיכלים של מדפסות ומכונות צילום לייזר ,עשויים להתלקח ולגרוםלפיצוץ. • • • • • • • • • • 4 יש להרחיק את המכשיר ממשטחים חמים ,כגון תנור או אח ,כיוון שהחום עשוי לעוות את הציפוי. אין להשתמש במכשיר בסביבה שבה סכנת התלקחות או פיצוץ. לדוגמה ,בתחנות דלק ,מחסני שמן ,מפעלים כימיים וכדומה. אין להשתמש במכשיר מחוץ לבית .הגשם או האבק והפסולת עשויים להיכנס לתוך המכשיר ולגרום לו לנזק. אין לתקן או לשנות את המכשיר בעצמכם. אין לזרוק או לכופף את המכשיר. אין להרטיב את המכשיר ,כיוון שהדבר יגרום לקצר חשמלי ולסכנת התלקחות או התחשמלות. טפלו במכשיר בקביעות ושמרו אותו במקום נקי. אין לחשוף את המכשיר לחום או קור קיצוניים .אין להשאיר את המכשיר במקום בו יהיה חשוף לטמפרטורה מתחת לאפס או מעל 30מעלות למשך זמן ממושך. אין להשאיר את המכשיר חשוף לנוזלים או ללחות גבוהה. אין לקרב את המכשיר לחפצים בוערים. להנות מחיים חכמים יותר! הערות לפני הניקוי • היזהרו במיוחד כאשר מפעילים את הרובוט בפעם הראשונה .אנא הסירו כל מכשול שנמצא מעבר להישג ידו של הרובוט .נסו להימנע ממצבים שבהם הרובוט מפסיק לעבוד. • נסו לפתור מראש בעיות שעשויות להקשות על הניקוי ,כגון: אחסנו חפצים שיכולים לגרום למעידה במקום בטוח. קצוות של שטיחים. וודאו שמפות שולחן ווילונות אינם נוגעים ברצפה. יש לנתק מכשירים דליקים ממקור אש. יישרו את הכבל החשמלי שעל הרצפה.• בדקו האם המברשת הראשית מותקנת כיאות במקומה בתוך הרובוט לפני הניקוי. • בדקו האם קופסת האבק נקייה וודאו שהיא מותקנת במקומה כיאות. • ראו אם חיישן הגובה וחיישן האבק נקיים. הנחיות בטיחות • המכשיר אינו מיועד לשימוש על ידי בני אדם )כולל ילדים( עם מוגבלויות פיזיות ,חושיות או מנטליות או כאלה שחסר להם הניסיון והידע ,אלא אם הם קיבלו הנחיות ומשגיחים עליהם בעל הפעלת המכשיר. 5 • טפלו היטב במכשיר והרחיקו אותו מילדים ומאנשים שאינם יכולים לזהות סכנה קרובה .יש להקפיד ולהשגיח על המכשיר בתחילת הפעולה. • יש ליידע את האנשים בחדר כאשר המכשיר פועל ,כדי להימנע מנזק ידי-אדם ,כגון מעידה. • אין להתייחס אל הרובוט כאל משחק .יש להקפיד ולשים לב כאשר יש ילדים או בעלי חיים בסביבה. • אריזת הפלסטיק עשויה להוות סכנת חנק ויש להרחיק אותה מילדים. החלפת סוללה • במקרה של צורך בהחלפת סוללות ,אנא פנו אל היבואן .אם תחליפו את הסוללות בסוללות של דגם אחר ,הדבר עשוי לגרום לפיצוץ. • אסור בתכלית האיסור להשתמש בסוללות או במטען של יצרן אחר. הנזק שייגרם מכך אינו באחריותנו. • יש למחזר סוללות שאינן פועלות עוד ,כדי למנוע פגיעה בסביבה. הגנת הסביבה • יש להשליך את האריזה לפח המיועד לה. • מומלץ למחזר את חומרי האריזה. כאשר המוצר אינו פועל 6 • אין לתקן או לפרק את המכשיר כאשר נגרם נזק לכבל החשמל או כאשר המכשיר אינו פועל. • יש ליצור קשר עם היבואן לשם תחזוקה ותיקון מקצועי. להנות מחיים חכמים יותר! .2תכולה יחידת טעינה היחידה המרכזית קיר וירטואלי סוללות לקיר וירטואלי שלט רחוק מברשת צדדית מדריך למשתמש כלי לניקוי מברשת מסתובבת סרט תיחום סוללות לשלט הרחוק כלי הוספה מגנטי 7 המכשיר מתח פעולה DC14.4V עוצמה 30W מהירות 0.25מטר/שנייה AC220-240V מתח כניסה DC17.5V מתח יציאה קיבולת קופסת האבק 0.7ליטר תדר 50Hz רעש ≤62dB עוצמה 30W תדר יציאה 0.8A משך הטעינה בערך 3שעות משך הזמן עד לטעינה מלאה של הסוללה בערך 60דקות כיסוי מקסימלי כאשר הסוללה טעונה לגמרי 120-150M2 גודל משקל נטו 8 יחידת הטעינה 100×330×330מ"מ 2.8ק"ג קיר וירטואלי DC3V מתח כניסה שלט רחוק מתח כניסה מרחק השלט הרחוק DC3V ≥ 5מטר להנות מחיים חכמים יותר! .3שמות החלקים יחידה מרכזית חיישן גובה לחצן שליטה פתח אוורור גלגל הסובב לכל הכיוונים מברשת צד מסתובבת גלגל על מתלה LCD חיישן אינפרא-אדום מברשת ראשית יעה גומי אלקטרודת חיבור למטען לוחית בלימה כפתור הפעלה/כיבוי חיישן אבק מבט על הרובוט מלמטה חיישן אבק ידית לקופסת אבק פתח יציאת אפר קופסת אבק מסנן ספוג אנטי-בקטריאלי סוגר קופסת האבק טעינה והתרעה לחצן פתיחת מכסה עליון קופסת אבק מבט-על על הרובוט חיישן פעולה משדר אינפרא-אדום אלקטרודת עגינה מאוורר צינור פליטה כבל חשמל רצועה למניעת החלקה עמדת הטעינה 9 .1 .2 .3 .4 .5 .6 .7 .8 הפעלה בחירת מצב הפעלה הפעלה/עצירה מצב עצירה מצב ניקוי נקודה קבועה חזרה לעמדת טעינה מצב ניקוי פינות מצב ניקוי יסודי .9 .10 .11 .12 .13 .14 .15 .16 מצב ניקוי אוטומטי מצב הפעלה ביטול ניקוי מתוזמן שמירה על ניקוי מתוזמן תזמון לניקוי חד-פעמי צג זמן קביעת זמן הפעלה לחצן התאמת שעה .17 .18 .19 .20 .21 מצב קביעת שעה נוכחית צג סוללה אזהרה על קופסת אבק חסרה או שיש לנקותה אזהרה על מכשיר תקוע אזהרה על הגלגל על המתלה .4טעינת הרובוט התקנת יחידת הטעינה יש להציב את יחידת הטעינה על משטח שטוח וישר ולוודא שהיא אנכית לקרקע .בו-זמנית ,יש להסתכל על המתח החשמלי המצוין ,כדי לוודא שאתם משתמשים במוצר על פי ההנחיות. 10 להנות מחיים חכמים יותר! כרכו את כבל החשמל על הוו ואל תדחפו אותו מאחורי יחידת הטעינה או מתחת לבסיס ,כדי שהרובוט לא ייתקל בו כשהוא חוזר לעמדה לטעינה. יש לוודא שאין חפצים במרחק של לפחות 1.5מטר מול יחידת הטעינה. בנוסף ,כל דבר בעל מחזיר אור חזק אינו אמור להיות מוצג מול חיישן האינפרא-אדום .לדוגמה ,זכוכית מחוסמת ,אגרטל קרמיקה חלק וכדומה. אחרת ,המכשיר לא יקלוט את עמדת הטעינה. הערה טעינת הרובוט אין להציב את יחידת הטעינה בסמוך למדרגות ,כדי להימנע מסכנת נפילה. • יש לטעון את הרובוט לפני ההפעלה הראשונה .יש להוציא ממנו את הסוללות כאשר הן טעונות במלואן ,על מנת להבטיח פעולה יעילה. • משך הטעינה ינוע סביב ה 3 -שעות. • הטעינה מורשית רק בטמפרטורות הנעות בין 0ל 45 -מעלות .חום או קור קיצוניים יאריכו את משך הטעינה ועשויים לגרום נזק לסוללה. מצב טעינה הנורית מהבהבת מצב טעינה הנורית דולקת עצות ◄ על מנת לוודא שהרובוט פועל בתנאי לחות ,אנו ממליצים להשאיר את המטען מחובר גם כאשר נורית הטעינה מראה שהסוללה טעונה במלואה .כך ,המערכת תוליך את הזרם החלש לשם טעינה מספקת. ◄ על פי המצב הקיים ,הרובוט יכול להמשיך לעבוד בערך 60דקות לאחר שהוא טעון במלואו. ◄ יכולת הסוללה ,כאשר אינה בשימוש במשך זמן רב ,תפחת במידה מסויימת ולכן משך השימוש עשוי להתקצר בהתאם. 11 .5הפעלה /עצירה /כיבוי חיבור לחשמל והפעלה • לחצו על הלחצן שבתחתית המכשיר כדי להפעילו. שביחידה המרכזית וחברו אותה לחשמל. • לחצו על לחצן ה- אמור להישמע צליל קצר ובו-זמנית ,נוריות ה LCD -יידלקו למשך 2 שניות ולאחר מכן יכבו. • לאחר מכן ,לחצו על לחצן ה- כדי להפעיל את הרובוט. עצירה • לחיצה על לחצן ה- להישאר במקומו. יכולה לעצור את פעולת הרובוט ולגרום לו עצות ◄ במצב עצירה ,ניתן לאפס את מצב הניקוי ולאחר מכן ללחוץ שוב על לחצן ה- והמכשיר יחזור לפעול. ◄ דרך נוספת לעצור היא כאשר הרובוט עובד ,ניתן ללחוץ על כל לחצן שהוא ביחידה המרכזית או להרים אותו. כיבוי • לחצו על לחצן ה- והרובוט יפסיק לעבוד. עצות ◄ אם ברצונכם לגרום לרובוט להפסיק לעבוד ,באפשרותכם ללחוץ על כאשר המכשיר במצב עצירה ולאחר מכן לכבות אותו. הלחצן ◄ החזירו את הרובוט ליחידת הטעינה לאחר שהוא מפסיק לעבוד ,כדי למנוע מקרה שבו אנשים ייתקלו בו וייפלו. 12 להנות מחיים חכמים יותר! עצות ◄ חברו את הרובוט ליחידת הטעינה והניחו לו להיטען כאשר הוא מסיים לנקות את הבית. ◄ אין להשאיר את הרובוט במצב עצירה למשך זמן ממושך ,כיוון שבמצב זה ,הסוללה יכולה להחזיק מעמד רק 20שעות .אנו ממליצים להחזיר אותו למקומו כאשר הוא אינו בפעולה. .6בחירת מצב הנחיות למצבים השונים המשמעות בה הנעשה שימוש לעיתים קרובות במדריך זה אודות שלושת מצבי הפעולה היא כלהלן: מצב פעולה :הרובוט עובד ומנקה. מצב מוכן לפעולה )סטנד-ביי(: ואל תפעילו. מקרה ראשון :לחצו על לחצן ה- או על כל לחצן שהוא ביחידה המרכזית מקרה שני :לחצו על כאשר הרובוט פועל והוא ייעצר. מקרה שלישי :הרמת הרובוט. מצב כיבוי :אין מדובר בהפעלת המכשיר או בלחיצה עליו כאשר המכשיר פועל. במצב המתנה ,המכשיר יכבה. כאשר לוחצים על לחצן ה- מצב ניקוי אוטומטי תיאור נתיב הניקוי :ראשית ,המכשיר ינוע קדימה .הוא יפנה רק כאשר ייתקל במכשול .מצב זה ייוותר על כנו עד שהרובוט יאתר שהסוללה הולכת להתרוקן ואז הוא יחזור לעמדת הטעינה. אם הרובוט מאתר שיש אבק רב בנקודת ההתחלה ,הוא יבחר בנתיב בצורת מניפה או בנתיב ספירלי. ◄ בנסיבות רגילות ,המכשיר יבחר בנתיב ספירלי כאשר הוא מאתר שיש חלקיקים גדולים רבים והוא יבחר בנתיב בצורת מניפה כאשר יש רק מעט חלקיקים קטנים. ◄ אם הוא יבחר במצב זה ,כיסוי הניקוי יהיה מקסימלי בהשוואה לאזור בגודל זהה .אנו ממליצים על מצב זה כמצב הניקוי הרגיל לבית. 13 מצב ניקוי פינות תיאור נתיב הניקוי :במצב זה ,ברגע שהרובוט מזהה חפצים ,הוא ינקה לאורכם, למשל לאורך קיר ,עד שהוא ייתקל במכשול ואז הוא ישנה את מסלולו המקורי. ◄ במצב זה ,הרובוט יעזור לנקות את פינות הבית ,השולחן ,הספה והמיטה, מקומות שמצב הניקוי האוטומטי אינו מגיע אליהם. הפעלה במצב זה אורכת כ 25 -דקות ולאחר מכן ,הרובוט חוזר לעמדת הטעינה בעצמו. מצב ניקוי נקודות קבועות תיאור הנתיב :במצב זה ,הרובוט מהמרכז כלפי חוץ בצורה ספירלית ומתמקד בנקודה מסויימת ,לניקוי חד-פעמי .כיסוי הניקוי הוא מעגל בקוטר של 1.2מטר. ◄ מצב זה נכון לאזורים מסויימים שבהם אבק רב. ◄ במצבים רגילים ,מחזור ניקוי אחד אורך לא יותר מ 6 -דקות .במהלך הפעולה ,אם הרובוט ייתקל שוב ושוב במכשור או יזהה מדרגות ,הוא ישנה את מסלולו כדי להימנע מהמכשור או מהמדרגות ,כדי לחזור לעבוד באותו המצב. ◄ הרובוט יישאר במקום שבו הוא יעצור וישמיע צליל לאחר שיסיים. מצב ניקוי יסודי תיאור הנתיב :במצב זה ,הרובוט פועל בנתיב בו הוא פועל במצב ניקוי אוטומטי. הוא יחפש את עמדת הטעינה בעצמו ,כאשר הסוללה מתרוקנת. ◄ במצב ניקיון זה ,הניקיון הוא במיטבו. ◄ אם המקום מלוכלך למדי ,אנו ממליצים להפעיל את המכשיר במצב זה. מצב חזרה לעמדת הטעינה תיאור הנתיב :הרובוט יחפש את עמדת הטעינה אוטומטית כאשר הוא מבחין שהסוללה עומדת להתרוקן .נורית ירוקה תהבהב ברגע שהמכשיר יתחבר למטען. 14 להנות מחיים חכמים יותר! .7טעינה אוטומטית • • • חדר צר • חדר צר • • כאשר הוא מסיים לנקות או כאשר הסוללה מתרוקנת ,המכשיר יחפש את המטען באותו הנתיב בו הוא פועל בניקוי אוטומטי .על מנת להקל על הרובוט למצוא את עמדת הטעינה ,עליכם להשעין את העמדה כנגד קיר ולוודא שאין מכשולים במרחק של 1.5מטר לפני מקלט האינפרא-אדום .וודאו שאין מחזיר אור בוהק מול המטען ,כגון זכוכית מחוסמת ,אגרטל קרמיקה חלק וכדומה. נדרש לרובוט זמן למצוא את המטען .זמן החזרה שונה בהתאם למצב המשטח. הרובוט יכול לחזור אל המטען אם מצב המשטח אינו מורכב .בנסיבות מורכבות, כגון בית גבוה ותצורה ממורכבת ,קרוב לוודאי שהרובוט יתקשה למצוא את המטען .במצב כזה ,עליכם לעזור לו ולהחזיר את הרובוט למקומו. דאגו אתם להטענה האוטומטית הראשונה ,אם אתם מגלים שהרובוט מסתובב באותו אזור כל הזמן ,לאחר שניסה מספר פעמים לחזור למקומו .באפשרותכם לעזור לו בכך שתשימו אותו במטען ותפקחו על הטעינה. במצב ,המברשת הראשית תפסיק לפעול והרובוט לא יוכל לנקות. הרובוט יישאר במטען כאשר הוא מסיים לטעון ויעבור למצב של זרם נמוך ,על מנת להישאר טעון עד תחילת הפעולה .אם קבעתם זמן מסויים לפעולה ,הוא ייצא מהמטען כדי לנקות כאשר יגיע זמן הפעולה. .8תזמון פעולה קביעת זמן פעולה תזמון בפעם הראשונה עצות: • היקף הבחירה :ניתן לבחור שעות בין 0ו,23 - ודקות בין 0ו.59 - • בנסיבות רגילות ,השעה המוצגת ב LCD -תהיה השעה במקום מגוריכם. .1לאחר שהמכשיר דולק ,המשיכו ללחוץ על במשך כ 3 -שניות ,עד שנורית ה -בצג ה LCD -תידלק והמספר עם קביעת הזמן יופיע ויהבהב. .2קבעו שעה ודקות באמצעות ו. - בכל פעם שתלחצו על השעה או הדקות יעלו ,בעוד שכאשר תלחצו על ,השעה או הדקות יפחתו. .3כאשר אתם מסיימים לקבוע את הזמן, ועיברו לקביעת לחצו שוב על התזמון השני. לדוגמה: כוונו את השעה הנוכחית ל.12:07 - השעה שתופיע על צג ה LCD -היא: 15 תזמון בפעם השניה עצות: • היקף הבחירה :ניתן לבחור שעות בין 0ו,23 - ודקות בין 0ו.59 - • בנסיבות רגילות ,השעה המוצגת ב LCD -תהיה השעה במקום מגוריכם. .1כעת ,ה -דולק והמספר עם קביעת הזמן מהבהב. .2קבעו את השעה והדקות באמצעות ו . -בכל פעם שתלחצו על השעה או הדקות יעלו ,בעוד שכאשר תלחצו על ,השעה או הדקות יפחתו. ועיברו לקביעת השעה .3לחצו שוב על הנוכחית. לדוגמה: כוונו את השעה הנוכחית ל.02:08 - השעה שתופיע על צג ה LCD -היא: קביעת השעה הנוכחית עצות: • היקף הבחירה :ניתן לבחור שעות בין 0ו,23 - ודקות בין 0ו.59 - • בנסיבות רגילות ,השעה המוצגת ב LCD -תהיה השעה במקום מגוריכם. .1לאחר קביעת התזמון השני ,עיברו לקביעת השעה הנוכחית .ה -ייעלם והמספר עם קביעת השעה יהבהב. .2קבעו שעה ודקות באמצעות ו. - בכל פעם שתלחצו על השעה או הדקות יעלו .לאחר מכן ,לחצו על לאישור. .3לאחר מכן ,עברו לקביעת התדירות. לדוגמה: כוונו את השעה הנוכחית ל.12:07 - השעה שתופיע על צג ה LCD -היא: עצות ◄ אם אתם מבקשים לבטל את התזמון הראשון או השני ,אנא חזרו על קביעת זמן הניקוי וקבעו את השעה ל .00:00 -לאחר מכן ,הסמל ייעלם. ◄ פרק הזמן בין שני התזמונים צריך לעלות על 4שעות. 16 להנות מחיים חכמים יותר! אזהרות ◄ כאשר המתח מנותק ,הרובוט לא יתחיל לפעול בזמנים שנקבעו לו .אם כבר קבעתם מועד לניקוי ,אנא הפעילו את הרובוט והשאירו אותו במצב המתנה ,למרות שהוא אינו פועל. נסו לגרום לו להישאר במטען וודאו שהוא מחובר. ◄ וודאו שהשקע מחובר לתקע ,אחרת הרובוט לא יוכל לפעול במועד שנקבע לו במצב המתנה, כיוון שהסוללה לא נטענה. קביעת תדירות וביטול התזמון עצות ◄ לא משנה באיזה מצב פעל הרובוט בפעם האחרונה ,כאשר המועד שנקבע מתקרב ,הרובוט יעבוד בהתאם למצב האוטומטי. ◄ אם הרובוט פועל במצב ניקוי פינות או במצב ניקוי נקודה קבועה ,כאשר המועד שנקבע מתקרב ,הרובוט לא יעבוד עד שהמועד הבא יגיע. ניתן לקבוע תדירות זמן ניקוי באמצעות לחיצה על ושחרורו. כדי לנקות במועד שנקבע באופן חד-פעמי. כדי לנקות במועד שנקבע בכל יום מעתה ואילך. כדי לבטל מועד שנקבע .הרובוט יעבוד רק כאשר יפעילו אותו ידנית. והרובוט יעבוד על פי לחצו על המצבים שלהלן: חוסר פעולה פעולה יומיומית פעולה חד-פעמית .9שלט רחוק החלפת סוללה עצות ◄ ◄ ◄ ◄ ◄ ◄ ◄ המכשיר מגיע עם שתי סוללות אלקליין ) AAAמס' (7 וודאו שאתם מכניסים אותן כיאות למקומן ,בהתאם לסימונים. החליפו את הסוללות כאשר אתם מבחינים שהסוללה מתרוקנת וודאו שאתם משתמשים באותו סוג סוללות ,כיוון שאסור להשתמש בסוגי סוללות שונים. הוציאו את הסוללות אם אינכם משתמשים בשלט הרחוק במשך זמן ממושך ,כדי למנוע נזילת אלקטרוליטים ,דבר העשוי לגרום לתקלה במכשיר. אל תניחו את השלט הרחוק במקום חם או לח מאוד. אין להכניס לשלט הרחוק כל רכיב נוסף ,במיוחד כאשר מחליפים סוללות. אסור לחשוף את משדר האותות לאור השמש או לציוד תאורה ,אחרת הוא עשוי להיפגם. 17 השימוש בשלט הרחוק לחצני הכוונה באפשרותכם לשלוט ברובוט באמצעות השלט הרחוק. • הסיעו את הרובוט לאזור אותו אתם מבקשים לנקות באמצעות שימוש בלחצן השליטה וההכוונה. • בחרו מצבי פעולה שונים ,בהתאם לבחירתכם. מצב ניקוי נקודה קבועה / מצב ניקוי פינות / מצב ניקוי אוטומטי / מצב חזרה לטעינה מצב ניקוי יסודי / לחצן עצירה :עוצר זמנית את הפעולה המתבצעת וגורם למכשיר להישאר במקום שבו הוא נמצא. לחצן הכוונה :על השלט ארבעה לחצני הכוונה -קדימה ,אחורה ,שמאלה וימינה. באפשרותכם להשתמש בשלט הרחוק בכל אזור מבוקש ,כאשר הוא במצב המתנה. • • • • • .10קיר וירטואלי החלפת סוללה באפשרותכם לשלוט במצב הניקוי ,להחזיר את המכשיר לטעינה ולכוון אותו ממרחק של חמישה מטר ,באמצעות לחצני התפקוד שעליו. אם הרובוט נמצא במצב ניקוי או שהוא חוזר לטעינה ,אנא לחצו על עצירה קודם כל ורק לאחר מכן המשיכו בהכוונה באמצעות הלחצנים. במהלך ההכוונה ,הרובוט לא יוכל לנקות. וודאו שאספקת החשמל לשלט הרחוק פועלת לפני שאתם משתמשים בו .כאשר אתם משתמשים בו ,התאימו את משדר האותות לחיישן האותות שעל המכשיר. אם הרובוט מתקרב למטען ,לקיר וירטואלי או למשדר אינפרא-אדום אחר ,האותות עשויים לבלבל אותו והוא לא יוכל לקלוט את האות מהשלט הרחוק .במצב זה ,אנא הפעילו את המכשיר ידנית. עצות ◄ ◄ ◄ ◄ ◄ ◄ ◄ 18 המכשיר מגיע עם שתי סוללות אלקליין ) AAAמס' (1 וודאו שאתם מכניסים אותן כיאות למקומן ,בהתאם לסימונים. החליפו את הסוללות כאשר אתם מבחינים שהסוללה מתרוקנת וודאו שאתם משתמשים באותו סוג סוללות ,כיוון שאסור להשתמש בסוגי סוללות שונים. הוציאו את הסוללות אם אינכם משתמשים בקיר הוירטואלי במשך זמן ממושך ,כדי למנוע נזילת אלקטרוליטים ,דבר העשוי לגרום לתקלה במכשיר. אל תניחו את הקיר הוירטואלי במקום חם או לח מאוד. אין להכניס לקיר הוירטואלי כל רכיב נוסף ,במיוחד כאשר מחליפים סוללות. אסור לחשוף את משדר האותות לאור השמש או לציוד תאורה, אחרת הוא עשוי להיפגם. להנות מחיים חכמים יותר! ◄ ◄ ◄ ◄ הערות כאשר משתמשים בקיר וירטואלי ,אנא הציבו את הסימון ,ECOVACSעל מנת לחסום את האזור אותו אתם מבקשים לחסום. הציבו את הקיר הוירטואלי מחוץ לחדר שאתם מבקשים לחסום. המערכת תבטל את הקיר הוירטואלי לאחר שהוא מוצב במקומו במשך שעתיים ,כדי לחסוך בסוללה .כתוצאה ,בכל פעם שהרובוט יתחיל במשימה חדשה ויהיה צורך להשתמש בקיר וירטואלי ,אנא בדקו שהמתג שבקיר הוירטואלי במצב הפעלה ושהנורית דולקת. אם עצרתם את המכשיר למשך זמן ממושך במהלך הפעלתו ,אנא בדקו בתדירות גבוהה אם המתג נמצא על מצב כיבוי ,כדי למנוע סכנה. מקלט אינפרא-אדום הפעלה מחוון משדר הפעלה :לחצו על לחצן זה והקיר הוירטואלי יתחיל לעבוד וימנע מהרובוט מלהיכנס לאזור החסום. נורית :אדומה כאשר הקיר הוירטואלי פועל ומסמנת כי הקיר הוירטואלי שולח קרן בלתי נראית ,כדי למנוע מהרובוט מלהיכנס לאזור החסום. משדר אינפרא-אדום :שולח קרן בלתי נראית. חיישן אינפרא-אדום :קולט את הקרן הבלתי נראית. השימוש בקיר הוירטואלי ניתן להשתמש בו כדי לשלוט בעבודת הרובוט בתוך חדר או באזור מסויים אותו אתם רוצים לנקות .הוא שולח קרן אינפרא-אדומה בלתי נראית, המייצרת פס אופטי ברוחב 2מטר ,אשר יוצר חסימה באזור פתוח ,כגון דלת של חדר ,מסדרות ומדרגות .באפשרותכם להציב את הקיר הוירטואלי כדי לעצור את הרובוט מלהתקרב לכבל של מכשיר חשמלי ,מחשב או חפצים אחרים. • ניתן להציב את הקיר הוירטואלי כדי לחסום אזור מסויים .באפשרותכם לשלב מספר קירות וירטואליים יחד ,לפי הצורך. • הקרן של הקיר הוירטואלי תיצור אזור בצורן קונוס ,שיחסום את הרובוט. • הקיר שולח קרן סביב עצמו ,כדי למנוע מהרובוט מלהתקרב אליו. אם אתם מגלים שהנורית נחלשת או שהרובוט מסוגל להיכנס לאזור חסום ,אנא בדקו את הסוללה של הקיר הוירטואלי והחליפו אותה בסוללה חדשה ,לפי הצורך. 19 .11סרט תיחום השימוש בסרט התיחום סרט התיחום נועד לתחום אזור ניקוי מסויים Deebot .לא ימשיך מעבר לפס התיחום ,דבר שיאפשר לו לנקות אזור מסויים. .1נקו את האזור שבו אתם מתכננים להציב את סרט התיחום באמצעות מטלית יבשה. .2פרסו את סרט התיחום וחתכו אותו באורך הרצוי לכם. .3הדביקו את סרט התיחום על הרצפה לאחר שהורדתם ממנו את השכבה הלבנה מצד אחד. .4שפשפו את סרט התיחום באמצעות הכלי לשיפור הגבולות. הערות .1 .2 .3 .4 .5 .6 20 אל תדביקו את סרט התיחום ברדיוס של 1.5מטר מעמדת הטעינה ,אחרת הרובוט לא יהיה מסוגל לחזור להיטען. וודאו שהאזור יבש או שהסרט לא יידבק היטב וייפרד מהמשטח. כאשר השדה המגנטי נחלש ,אנא השתמשו בכלי לשיפור הגבולות ושפשפו את סרט התיחום. אם המשטח הוא בגבהים שונים ,הדביקו תמיד את הסרט על הצד הגבוה יותר. ניתן להדביק את סרט התיחום על רצפה אריחי קרמיקה או על פרקט .אנא אל תדביקו אותו על שטיחים ,אחרת הוא ירד בקלות. אנא שמרו על סרט התיחום במקום קריר ויבש. להנות מחיים חכמים יותר! .12אחזקה ביום יום • עליכם להשאיר את הרובוט במטען למרות שהוא סיים להיטען ולנקות, כיוון שהוא יעבור לזרם נמוך ,לשמירה על טעינה מלאה של הסוללה. • טענו את הרובוט עד שהסוללה טעונה במלואה והחזירו אותה בחזרה לאריזה אם אינכם צריכים להשתמש בה לפרק זמן ממושך )מעל שלושה חודשים( .שמרו על האריזה במקום יבש והימנעו מאור שמש או לחות. .13תחזוקה ניקוי היחידה המרכזית • כבו את המכשיר לפני שאתם מנקים אותו. • הוציאו את התקע מהמטען לפני שאתם מנקים את יחידת הטעינה. • אל תשתמשו בדלק או בנוזלים על בסיס שמן כדי לנקות את המשטח. באפשרותכם להשתמש במים או בתכשיר ניקוי נייטרלי .וודאו שאתם משתמשים במטלית יבשה לניגוב ,כיוון שמים הנותרים על המכשיר יכולים לחדור אליו ולפגום בו. ניקוי קופסת האבק אנא פעלו על פי השלבים שלהלן: • כבו את המכשיר. • לחצו על לחצן הפתיחה. • הסירו את מכסה קופסת האבק. 21 החזיקו את ידית קופסת האבק ,הרימו והוציאו אותה החוצה. כדי להימנע פיזור של האבק ,הרימו את החלק כלפי מעלה כאשר אתם מוציאים את קופסת האבק. אנא פעלו לאט. חברו את התחתית לפח וסובבו את קופסת האבק בעדינות. באפשרותכם להקיש קלות על קצות הקופסה ,כדי לשחרר את האבק. אם אתם מבחינים שיש יותר מדי אבק על סנן הספוג ,באפשרותכם לפתוח את הנעילה ולהוציא את הכיסוי. הסירו את האבק מסנן הספוג. סגרו את המכסה ותשמעו צליל "קאקא", אשר מציין כי הוא במקומו .החזירו את קופסת האבק למקומה בתוך היחידה המרכזית וכסו אותה. עצה אם קופסת האבק אינה מוחזרת למקומה או שאינה מוכנסת כיאות, הרובוט יתריע ונורית אדומה תידלק. ניקוי סנן הספוג וקופסת האבק פתחו את הנעילה שבתחתית קופסת האבק. 22 שפכו את האבק שעל מסנן הספוג. אם אתם מבחינים שיש יותר מדי אבק בתוך המכשיר, לצידי קופסת האבק, באפשרותכם לשטוף את הקופסה במים זורמים ולנקות את כל האבק )לאחר מכן, יבשו אותה בשמש במשך 24 שעות( .החזירו את הקופסה ומסנן הספוג למקומם ביחידה המרכזית רק לאחר שהם יבשים לחלוטין. להנות מחיים חכמים יותר! החלפת סנן הספוג .1פתחו את מכסה הDeebot - והוציאו את קופסת האבק. .2הזיזו הצידה את הסוגר של קופסת האבק ,פתחו ונקו אותה. .3החליפו את סנן הספוג סגרו את המכסה והכניסו אותה בחזרה לתוך המכשיר. ניקוי המברשת הראשית עצה: נקו את המברשת הראשית לאחר כל 4או 5מחזורים. הוציאו את הבורג הקבוע על המברשת הראשית הוציאו את המסגרת של המברשת הראשית. הוציאו צד אחד של המברשת הראשית מהרצועה. הסירו שיערות ואבק אשר נלכדו ברצועה. הסירו שיער מהמברשת הראשית )עם המברשת הגלילית המצורפת(, כדי להסיר שיער מהמסילות. נגבו את האבק על הגליל והחזירו אותו למקומו. החזירו את המברשת הראשית ליחידה המרכזית ונקו את החיבורים של הרצועה. הכניסו את המסגרת ליחידה המרכזית. הבריגו את הבורג. 23 ניקוי המברשת הצדדית המברשת הצדדית היא חלק שמתבלה בקלות .אנו ממליצים לבדוק אותה בכל פעם שהיא מנקה .אנא החליפו אותה לפי הצורך. אזהרה היחידה המרכזית תתריע כאשר סביב המברשת הצדדית כרוך לכלוך ועל צג ה LCD -יופיע הסימן . החלפת המברשת הצדדית הבריגו החוצה את הברגים והוציאו את המברשת הצדדית. אנא החליפו את המברשת הצדדית כאשר היא מתבלה. הכניסו את המברשת הצדדית החדשה למקומה המדויק. הבריגו את הברגים. ניקוי הגלגלים השתמשו במברשת הגלילית כדי להסיר אבק ושיערות מהגלגלים. הערה הערה אם שיער או לכלוך הסתבכו סביב הגלגלים ,היחידה תתריע יופיע על צג ה.LCD - והסימן ניקוי חיישן הגובה חיישן הגובה חיישן הגובה נמצא בחזית המכשיר ,בתחתיתו .הוא יכול להבחין בהפרשי גובה של מעל 8ס"מ .אנו ממליצים שתנגבו את הלוח האופטי עם צמר גפן יבש בתום הפעולה של המכשיר ,כדי למנוע הצטברות אבק ,דבר שיפגע ביעילותו. .1כבו את המכשיר והשליכו את האבק שהצטבר בקופסה. .2הפכו את הרובוט ולאחר מכן ,הניחו אותו על משטח ישר ונקי. .3השתמשו בצמר גפן יבש כדי לנגב את שלושת החלקים של הלוח האופטי של חיישן מד-הגובה. 24 להנות מחיים חכמים יותר! ניקוי חיישן האבק חיישן האבק נמצא בחזית פתח האבק .הוא מסוגל לזהות ריכוזי אבק ,על מנת לבחור מצב פעולה יעיל. אנו ממליצים לנקות את חיישן האבק בכל פעם שאתם מנקים את קופסת האבק ,כדי לשפר את יעילותו. .1כבו את המכשיר. .2הוציאו את קופסת האבק ונקו אותה. .14התרעות אזהרה הרובוט יפסיק לעבוד בנסיבות הבאות .תושמע התראה וצליל עצה בו- זמנית .בנוסף ,בצג ה LCD -תהבהב נורית אדומה .אנא שימו לב לעצה על צג ה.LCD - סמל הנחיות פיתרון סיבת התקלה .1נקו את קופסת האבק כדי להאריך את חיי המכשיר, .1יש יותר מדי אבק הרובוט יתריע לאחר מספר מחזורי בקופסת האבק .2יש יותר מדי אבק על .2נקו את חיישן האבק או ניקוי ,גם אם אין הרבה אבק בתוך קופסת האבק. מד הגובה חיישן האבק .1הכניסו את קופסת .1קופסת האבק האבק ליחידה אינה בתוך היחידה המרכזית המרכזית .2קופסת האבק אינה .2הכניסו מחדש את קופסת האבק למקומה מותקנת כיאות ולחצו עליה בו-זמנית .1נקו את המברשת .1סביב המברשת הראשית הראשית או הגלגלים יש סבך שיער או .2נקו את המברשת לכלוך הצדדית והחזירו אותה למקומה .יש להחליף .2המברשת הצדדית אותה לפי הצורך חסומה. החזירו את הרובוט למטען פעולה זו נועדה למנוע סכנה, הגלגל תלוי באוויר במקרה שבו ילד או בעל חיים מרים והניחו לו להיטען את הרובוט כאשר הוא פועל. החזירו את הרובוט למטען הסוללה מתרוקנת ידנית 25 .15תקלות נפוצות מספר 1 2 3 4 26 פתרון בעיה הרובוט ממשיך להתקדם או לנוע כבו את המכשיר: .1בדקו אם יש אבק על חיישן הגובה ,דבר שיכול לגרום לאחור ברגע שהוא מופעל לרובוט לקבל אותות שגויים .השתמשו במטלית יבשה למחצה כדי לנקות אותו. .2החיישן נגד התנגשות אינו פועל .הניחו את הידיים שלכם בצד שמאל ,באמצע ובצד ימין כדי לראות אם המכשיר יכול להתאפס בעצמו. יכול להיות שהרובוט ייתקל בבעיה כאשר הוא פועל. הרובוט נתקל בבעיה במקרה כזה ,הוא ינסה להתגבר על הבעיה בכל דרך אפשרית ,אבל אם הוא ייכשל ,הוא יישאר במקום אחד ויתריע על כך .עליכם לעזור לו להתגבר על הבעיה. ייתכן והבעיה היא כלהלן: .1הוא הסתבך בכבל החשמל .2הוא הסתבך בוילון תלוי או בשוליים פרומים הרובוט מסוגל לזהות את מרבית המדרגות שההפרש הרובוט אינו מזהה מדרגות ביניהן הוא 8ס"מ ומעלה .יחד עם זאת ,כאשר הרצפה חלקה ,כאשר הפרשי הגובה נמוכים מ 8 -ס"מ או שהרצפה מחזירה אור בוהק ,הוא עשוי שלא לפעול כיאות .במצבים כאלה ,באפשרותכם להציב קיר וירטואלי כדי למנוע ממנו מליפול במדרגות. כבו את המכשיר והוציאו את קופסת האבק .לאחר מכן, יכולת הניקוי פוחתת פעלו על פי השלבים שלהלן: .1בדקו האם יש יותר מדי אבק או מסנן הספוג ואם כן, החליפו אותו. .2וודאו שאין אבק אשר חוסם את פתח היניקה .3הוציאו את המברשת הראשית ונקו אותה .וודאו ששני הקצוות של המברשת הראשית נקיים משיערות וסיבים .התקינו אותה במקומה כאשר היא נקייה. .4בדקו האם יש אבק או לכלות בסמיכות לגלגלים. .5נקו אבק מהחיישנים. אם הבעיה ממשיכה לאחר שביצעתם את כל השלבים שלהלן ,אנא צרו קשר עם היבואן. להנות מחיים חכמים יותר! מספר 5 פתרון בעיה כאשר הרובוט פועל הוא משמיע כבר את המכשיר והוציאו את קופסת האבק .לאחר שניקיתם אותה מלכלוך ,הפכו את הרובוט. רעש רב .1בדקו האם חלק מהמברשת הראשית חסום. .2בדקו ונקו את המברשת הראשית )בשני הקצוות(. .3בדקו ונקו את המברשת הצדדית. אם הבעיה ממשיכה לאחר שביצעתם את כל השלבים שלהלן ,אנא צרו קשר עם היבואן. .16בעיות נוספות .1 כמה זמן יכול לפעול הרובוט לפני שהוא צריך לשוב לטעינה? תשובה :משך הזמן תלוי במצב המקום אותו הוא מנקה. .2 כמה זמן יכול לפעול הרובוט כאשר הסוללה טעונה במלואה? תשובה :משך הזמן תלוי במצב המקום אותו הוא מנקה .נדרשות לו כ 60 -דקות לנקות רצפה ישרה ,כגון רצפת עץ או אריחי קרמיקה ו 20 -דקות לשטיחים בעלי שיער קצר. .3 האם מותר להפעיל את הרובוט עצמאית, מבלי השגחה? תשובה :כן .אבל ,יש להודיע לאנשים בחדר על כך שהרובוט פועל ,כדי שלא ייתקלו בו וימעדו. .4 באיזה סוג של ציוד נעשה שימוש בתוך הרובוט כדי להתמודד עם מכשולים? תשובה :הרובוט מצויד ברכיבים רגישים לאור ,אשר יכולים לאתר מדרגות בגובה של למעלה מ 8 -ס"מ ,כדי למנוע ממנו מליפול. .5 האם הרובוט מסוגל לנקות את תחתית הרהיטים? תשובה :הרובוט שטוח בעיצובו .במהלך ניקוי רגיל ,הוא יכול להיכנס מתחת לשולחן ולמקומות שגובהם למעלה מ 10 -ס"מ ,כגון מיטות ,שידות ,ספות ושולחנות תה. .6 מדוע הרובוט אינו מצליח לעבוד במצב נתון? תשובה :כאשר הסוללה שלו כמעט ריקה, הוא יחזור לעמדת הטעינה באופן אוטומטי. .7 מהו טווח הניקוי שלו כאשר הוא טעון במלואו? )במצב ניקוי אוטומטי( תשובה :בדרך כלל ,טווח הניקוי הוא -120 150מ"ר ,אבל הדבר משתנה על פי תנאי המשטח. .8 מדוע הרובוט מפסיע לעבוד כאשר הוא נתקל במכשול? תשובה :בדרך כלל ,כאשר הרובוט נתקל במכשול ,הוא יחזור או יחפש דרך אחרת. אבל ,אם הוא נשלט על ידי השלט הרחוק, הוא אינו מסוגל לשנות את הנתיב במקרה של התקלות במכשול. .9 מדוע יוצא לכלוך מהמכשיר בזמן שהרובוט פועל? תשובה :א .בדקו האם יש יותר מדי לכלוך בקופסת האבק )אם יש יותר מדי לכלוך על הרצפה ,הרובוט לא מסוגל להתריע לאחר שעבד במשך זמן מה ,למרות שיש יותר מדי לכלוך בקופסת האבק( .ב .בדקו האם המברשת הראשית לא נוקתה זמן רב והסתבכו בה שיערות ולכלוכים. 27 .10מדוע הרובוט אינו מצליח להתחיל לנקות בזמן שנקבע לו? תשובה :וודאו שהסוללה טעונה .כאשר הרובוט חוזר לטעינה לאחר ניקוי ,הוא לא ינקה בזמן שנקבע לו .ב .בדקו האם הרובוט במצב המתנה. .11מדוע הרובוט אינו טוען כאשר מחברים אותו למטען? גם נורית החיווי אינה דולקת. תשובה :א .בדקו האם הסוללה בתחתית מותקנת במקומה כיאות או אם אחד הברגים של המכסה משוחרר ויש צורך להדקו .ב. בדקו האם יש מתח חשמלי בשקע .ג .צרו קשר עם היבואן אם התקלה לא נפתרת. .12מדוע השלט הרחוק אינו פועל? תשובה :א .מרחק השליטה הוא בטווח של 5מטר .אם המרחק גדול ממנו ,המכשיר לא יגיב .ב .בדקו את הסוללות בשלט וודאו שהן מונחות במקומן כיאות .ג .וודאו שהרובוט מופעל והטעינו אותו כאשר אתם רואים שנורית החיווי ב LCD -נדלקת .ד .השתמשו במטלית נקייה כדי לנגב את המשדר בשלט ואת המקלט ברובוט .ה .אם המכשיר קרוב מדי לקיר וירטואלי או למטען ,האות מהשלט לא יתקבל. .13מדוע הקיר הוירטואלי אינו פועל? תשובה :א .וודאו שהאזור נחסם על ידי אור בלתי נראה מהקיר הוירטואלי הוא האזור שאותו אתם רוצים שהרובוט לא ינקה. ב .האות יופרע אם הקיר הוירטואלי קרוב מדי למטען .ג .בדקו האם האזור שאתם רוצים לנקות אמצע מעבר לקיר הוירטואלי ואם כן ,אנו ממליצים על רכישה של קירות וירטואליים נוספים ,לפי הצורך. .14האם הרובוט יתקשה לנקות את הפינות, אם עיצוב המקום מעוגל? תשובה :הרובוט יכול לאתר קיר בעצמו .הוא מסוגל לנקות לאורך פינות של קיר במצב ניקוי פינות אוטומטי .המברשת הצדדית שלו 28 יכולה לנקות אבק לאורך פינות של קירות ביעילות ,אך ייתכן ויישארו אזורים קטנטנים בחיבורים בין שני קירות ,אותם תאלצו לנקות ידנית. .15מדוע הרובוט מאט ממהירותו לפעמים? תשובה :כאשר הרובוט מאתר שיש יותר מדי לכלוך ואבק על הרצפה ,הוא יעבור למהירות איטית וימשיך לנקות אוטומטית. .16האם יש סכנה לרהיטים וילדים כאשר הרובוט בפעולה? תשובה :לא .סביב הרובוט יש חוצץ גומי רך. כאשר הוא יגע ברהיט או בילד ,הוא יחפש נתיב אחר. .17האם הרובוט ישפיע על חיות מחמד? תשובה :הרובוט משמיע קול נמוך בזמן שהוא פועל ,ולכן הוא אינו אמור ליצור בעיה או קול חד ,שיגרום לחיות המחמד לאי-שקט או בעיה .אם אתם מחזיקים חיית מחמד בבית ,אנו ממליצים להשגיח עליה כאשר אתם מפעילים את הרובוט בפעם הראשונה. .18למה כדאי לשים לב כאשר מנקים שטיח? תשובה :הרובוט אינו מסוגל לנקות שטיח ששערותיו באורך של למעלה מ 2 -ס"מ. יש לוודא שהשטיח פרוש במלואו לפני שמנקים אותו. .19האם כדאי לשמור על הרובוט מחובר למטען כאשר הוא אינו בשימוש? תשובה :כן .הרובוט מועבר למצב מתח נמוך ,כדי לשמור על מצב טעון .אנא הימנעו מהפעלה בטעות על ידי ילד. .20האם יש סכנה בנגיעה בטעות באלקטרודה שבין המכשיר והמטען בזמן טעינה? תשובה :לא בשתי האלקטרודות של המטען אין מתח במצב פלט )כאשר הן אינן מחוברות למקור מתח( .המתח המקסימלי שלהן הוא 24וולט ,מתח בטוח לשימוש במצב קלט )כאשר המכשיר נטען(. להנות מחיים חכמים יותר! .21כיצד למנוע מהמברשת הראשית מלהיכרך סביב חוטים? תשובה :הרובוט עשוי להסתבך בחוטים מפוזרים על הרצפה כאשר הוא פועל. במקרה כזה ,הוא ינסה לחזור לאחור כדי לצאת מהסבך וישמיע קול אזעקה במקרה של כשלון לאחר מספר ניסיונות. .22כיצד באפשרותי להפסיק את פעולתו של הרובוט בזמן הקבוע ,כיוון שלא אהיה בבית באותו זמן? תשובה :ניתן לבטל ניקיון קבוע מראש. .23כיצד באפשרותי להעביר את הרובוט ממקום למקום? תשובה :ניתן להרים את הרובוט בידיים ולהניח אותו על הרצפה במהירות .האבק והלכלוך שבקופסת האבק יתפזרו אם לא תניחו אותו בחזרה במהירות. המברשת ואת החלק הפנימי של המכשיר. להמתין עד שהמברשת מתייבשת ולהחזיר אותה למקומה .ד .להניח למכשיר להתייבש במשך 12שעות לפחות )לוודא שלוח המעגלים יבש ולאחר מכן להפעיל אותו( .אם לאחר כל הפעולות שלעיל המשיר עדיין איננו פועל ,אנא צרו קשר עם היבואן. לאחר ביצוע הפעולות שלעיל ,אם הרובוט עדין לא פועל כיאות ,אנא צרו קשר עם היבואן: רחוב נגבה ,41 רמת גן 03-6745988 .24כיצד להשתמש ברובוט ביעילות המירבית? תשובה :לשים את הרובוט ואת המטען באותו החדר ,כיוון שהדבר יקצר את זמן החיפוש ויכול להאריך את משך הפעולה. אם יש צורך שהרובוט ינקה את כל החדרים בבית ,יש לשים את המטען במרכז הבית, לשם חזרה קלה ונוחה אל המטען. .25מה לעשות אם הרובוט שאב נוזלים? תשובה :א .לכבות את המכשיר ולהוציא את קופסת האבק ,לרוקן אותה ולנגב אותה עד שתתייבש .ב .להוציא את מסנן הספוג ולנגב אותו היטב ,עד שיתייבש .ג .להוציא את המברשת הראשית ולנקות אותה ולאחר מכן ,להשתמש במטלית יבשה כדי לנגב את 29 להנות מחיים חכמים יותר! Enjoy smar ter life! D58-000IM201101 Enjoy Smarter Life! 21 . How does main brush avoid being tangled by power cord? Answer: Robot is probably get tangled by the wire scattered on the floor when it is operating. At that time, robot will try to turn back to get rid of it, and it will make alarm sound when it fails after trying several times. If the procedures above still do not make it work, please contact our after-sales service. 22 . How can I stop the robot from operating on appointment time since I will be away from home for sometime? Answer: You can cancel appointment cleaning. 23 . How can I transfer my robot? Answer: You can lift it up with both your hands and lay on the ground quickly, dust and garbage in dust box will come out if it is not place back in time. De eb ot 24 . How to use robot most effectively? Answer: Put the robot and charger in the same room, because it would shorten seeking time and it can extend the working time. If you need robot to clean every room of house, you should put the charger in the middle of house for the convenience of go back to the charging block. 25 . What should do if robot sucked liquid? Answer: a. Turn off the power and take out dust box, then empty it and wipe it dry. b. Draw out the sponge filter and wipe it dry. c. Take out main brush and clean it, then use day cloth to wipe the brush and its interior. Wait until the brush is day and place it back. d. Let the product dry by itself for at least 12hours(make sure circuit board is dry and then get power on). 29 10. Why does robot fail to start cleaning on appointment time? Answer: a.Confirm whether there is much remaining battery. Appointment timing is not applicable when robot is returning to charge after operating cleaning. b. Check if robot is under standby status. 11. Why robot is not charging as it is put in the charger? The charging indicator does not light as well. Answer: a. Examine whether the battery at the bottom is installed in place, if cover screw is loose, you need to fasten it. b. Check if there is power supply for the socket. c. Please contact our after-sales service when the failure is still there. 12. Why does not the remote control work? Answer: a. The control distance is within 5 meters. It would be insensitive if longer distance. b. Check battery in remote control and make sure it is placed correctly. c. Insure robot power supply is on, please get it charged when you notice it shows low battery on LCD. d. Use clean cloth to wipe infrared transmitter on remote control and infrared receiver on robot. e. If the host is too close to virtual wall or charger, the signal of remote control will get interfered. 13. Why does not virtual wall work? Answer: a. Insure the region blocked by invisible light from virtual wall, which is the region you do not want robot to get across. b. The signal will get interfered if virtual wall is too close to the charger. c. Check whether the region you want is beyond the virtual wall, we suggest you to purchase additional virtual wall if necessary. 14. Would it be difficult for robot to clean the corner as it is a round design? Answer: Robot can detect wall by itself. It is able to clean along the edge of wall under automatic and border cleaning mode. Its 28 side brush can remove dust along bottom edge efficiently; there would be dust beyond robot in the tiny area formed by two walls which need to be removed by hand. 15. Why does the speed of robot slow down sometimes? Answer: When robot detects there is much garbage and dust on the floor, it would turn to low speed proceeding automatically. 16. Is there any danger to furniture and child when robot is proceeding? Answer: No. There is a soft rubber buffer made of PPC in front of the host. It would try other route once it touches furniture or child. 17. Would robot affect pet? Answer: Robot makes low noise when operating, so there would be no shrill sound which may cause pet restless or even distrust. If you keep pet at home, we suggest you to notice the first time the robot operating. 18. What should be noticed when cleaning the carpet? Answer: Robot is not able to clean long hair over 2 centimeters. Fold the banding first when you start cleaning. 19. Does it matter to keep the robot at the charger when not using it? Answer: Yes. Robot will transfer to small currency to supplement charging. Please avoid wrong operation by child. 20 . Is there any danger to wrongly touch the docking electrode film between the host and charger? Answer:No.The two electrodes of charger is of no voltage under output mode(when there is no power supply); it's maximum voltage is 24V which is safe one under input mode(when it is charging) Enjoy Life Without Dust Turn off the power supply, and then take out of dust box. After removing the garbage, overturn the robot. 5 There is much noise when the robot works. 1. Check whether the suction of main brush is blocked. 2. Examine and clean the main brush(at both ends). 3. Examine and clean the side brush. If the failure is still there after operating according to the above procedure, Please contact out after-sales service. 16. Other Problems 1. How much reserve time for robot go back charging? mode? Answer: Because when there is low battery, it will do back to charging mode automatically. Answer: It differs from the ground situation, 2. How long can robot last working under full battery? 7. Answer: It differs from the ground situation, It takes around 60 minutes for even floor such as wooden floor and ceramic tile, and 20 minutes for short-haired carpet. 3. Is it allowed for the robot to work independently without taking care of? Answer: Under normal circumstance, it is around 120-150 sq, but it differs from the ground situation. 8. Answer: Yes. However, you should keep person in the room informed about robot operating to avoid tripping. 4. 5. Is robot able to clean the bottom of the furniture? Answer: It is flat design, during normal cleaning, it can go into table and bed corner whose height is over 10 centimeters, such as bed, wardrobe, sofa and tea table. 6. Why does robot fail to work under set Why does robot stop working once it meets obstacle? Answer: Under normal circumstance, robot will return or seek other route when it meets obstacle. However, if it controlled by remote control, it is not able to change route in case of obstacle. What kind of equipment inside the robot is used for dealing with failure? Answer: It is equipped with photosensitive components which can detect the stair over the height of 8 centimeters; for fear that it would fall over. What's the cleaning coverage once it is charged full?(under automatic cleaning mode) 9. Why there is garbage leaking from the machine while robot operating? Answer: a. Please check whether there is too much garbage in dust box(if there is too much dust on the floor, robot is not able to alarm after working for some time even though there is too much garbage in dust box.). That's why you need to clean dust box. b. See whether main brush is not cleaned for long time, as it is tangled with much hair and dust. 27 15. Common Failure No. Problem Solution Turn off the power. 1. Check if there is dust on up-ground height 1 Robot keeps proceeding or moving backward once power is on. sensor, which cause robot to make wrong signal. Use half dry cloth to clean it. 2. Buffer collision is out of control. Put your hand at left, middle and right in turn to see if it can rebound by itself. Robot may fall in trouble when it is working. In such case, it will try every possibility to get out of trouble, but it shall stay at a certain place 2 Robot is in trouble. when it fails and starts alarm. You should help it and get rid of the obstacle. The trouble may be as follows: 1. It is tangled by power cord. 2. It is tangled by hanging curtain or fringe. Robot is able to detect most of the stairs within 8 centimeters height difference. However, its 3 Robot fails to detect the stairs. performance will weaken when it is smooth floor with height difference or the floor with strong reflector. You can put virtual wall under this situation to prevent it from falling off. 4 26 The capacity to clean weaken. Turn off power and take out the dust box., then follow the steps as below: 1. Check whether there is too much dust on sponge filter so that it needs to change it. 2. Make sure there is no dust which blocks the suction. 3. Take out main brush and clean it. Insure the both ends of main brush is not tangled by hair or fiber. Fix it back after it is been cleaned. 4. Examine if there is dust or debris near driving wheels. 5. Clean dust sensor If the failure still there after following the steps above, please contact our after-sales. Enjoy Smarter Life! Dust sensor cleaning The dust sensor is located at the front of dust entrance. It is able to detect the concentration of dust so that it can choose efficient mode to work. We suggest you to clean dust sensor once you clean dust box to improve work efficiency. 1. Turn off power. 2. Take out dust box and clean it. 14. Alarm Function Icon Cause of failure 1. There is too much dust in dust box. 2. There is too much dust on dust sensor. 1. Dust box is not fixed into host. 2. Dust box is not fixed properly. 1. Main brush or driving wheel is tangled by hair or cloth. 2. Side brush is blocked. Note: The robot will stop working under following circumstance; there will be alarm and tip sound at the same time. What' s more, LCD will have red light flashing. Please notice the tip on LCD. Solution 1. Clean dust box. 2. Clean dust on upground height sensor. Instruction In order to extend use life, robot will alarm even though there is not much dust inside, after several cycles cleaning. 1. Put dust box back into host. 2. Re-install dust box and press it down at the same time. 1. Clean main brush 2. Clean side brush and put it back. Must change it if necessary. Driving wheel is suspended. Put the robot back on the charging block to charging. Low battery. Put the robot back manually. This function can prevent danger of child or pet lifting the robot when it is operating. 25 Side brush cleaning Side brush is a kind of easy wear part. We suggest you to check it every time it takes cleaning task. Please change it if necessary. Note: The host will alarm when the side brush tangles and it will show on LCD as . Replace sidebrush Please replace the side brush when it is destroyed. Please remove the screws, and take out the side brush. Please push the new side brush into the correct position. Tight the screws. Driving wheel cleaning Use roll brush to remove the dust or hair on driving wheel. Note: If the wheel is tangled by hair or cloth, the host will alarm and it will show on LCD as . Up-ground height sensor cleaning Up-ground height sensor Up-ground height sensor is on the front bottom of robot. It can detect the height difference within 8 centimeters. We suggest you to wipe the optical board with dry cotton cloth after it finishes task to prevent the dust piling on it which would affect its performance. 1. Turn off the power and remove the trash inside dust box. 2. Invert the robot, then put it on the even and clean platform. 3. Use dry cotton cloth to wipe three pieces of optical board of upground height sensor. 24 Enjoy Smarter Life! Sponge Filter Replacement 1. Open the cover of the Deebot, take out the dust box. 2. Push aside the lock catch of the dust box ,then open the dust box and clean it. 3. Extract the axle of the dust box’s cover. 4. Replace the sponge filter and fix the cover ,then put it back into Deebot. Main brush cleaning Tips: Clean the main brush after it has operated for 4 or 5 recycles. 1 11 Undo the screw fixed on the main brush. 2 Take off the frame of main brush. 2 3 Take out one side of main brush from the belt. 1 54 44 Remove the hair and dust which is in-between the belt. Rip off the hair on main brush (with equipped roll brush cleaning gadget to break off the hair on main crush along the groove. 7 Put the main brush back to the host and take care of the anastomosis of belt. 2 Wipe the dust on the roller and put it back. 91 8 Fix the frame into host. 6 Tie up the screw. 23 Hold the handle of 21 dust box and lift it to 31 take out. In order to avoid dust leaking, lift the suction up when you take out dust box. Please mind your speed doing this step. Match the bottom with 41 trash can and swing 51 If you notice that there is too much dust on dust box gently. You can sponge filter, you can mildly beating it along open the lock and take the edge of the can to off the cover. get the dust out. Pour out the dust on 61 sponge filter. 71 Close the cover and hear "kaca" sound which shows that it is placed. Put the dust box back into the host and cover it. Tips: If the dust box is not placed back or not properly placed, robot will alarm and show red indicator on LCD. Sponge filter and dust box cleaning If you notice that there are too much dust on inside along dust box, you can put the box under running water to get rid of the dust. (make it dry under sunshine for 24 hours)Put it Open the lock at the bottom of dust box. Pour out the dust on sponge filter. back into the host after the box and sponge filter is completely dry. 22 Enjoy Smarter Life! 12. Day-to-day Storage You should keep robot stay at charger even though it finishes charging and cleaning task, because it will change to small currency to supplement charging. Charge the robot until full battery and put it back to the package if you do not need to use it for long time(at least over three months). Keep the package in dry surroundings to avoid sunshine or humidity. 13. Maintenance The Host Cleaning Turn off the power before cleaning the host. Draw out the plug of charger before cleaning the block. mode Dust box cleaning 11 Do not use petrol or oil-like to clean the surface, while you can use water or neutral detergent to scrub. Make sure you use dry cloth to wipe, because any water is not allowed to infiltrate into the machine. Please follow belowing steps: turn off power. press "open" button. Take off the cover of dust box. open button of upper cover 21 11. Border Tape Border Tape Instruction Border Tape is used to confine the cleaning area. Deebot will not proceed beyond the border, allowing Deebot to clean a designated area. 1 Clean the area where you plan to paste the Border Tape with a dry cloth. Unroll the Border Tape and cut the length according to your needs. Paste the Border Tape on the floor after tearing off the white layer on one side. Rub the Border Tape with Border Enhancement Tool. Note: 1. Do not paste the Border Tape within a 1.5-meter radius vicinity of the Charging Station, or Deebot will not be able to return for charging. 2. Please make sure the area is dry, or the Border Tape might come off. 3. When the magnetic field deteriorates, please use Border Enhancement Tool and rub on the Border Tape. 4. If surface that have different heights, always paste the Border Tape on the higher side. 5. Border Tape can be pasted on the floor, ceramic tiles, or any hard floor. Please do not paste it on carpets, as it will come off easily. 6. Please keep the Border Tape in a dry and cool place. 20 Enjoy Smarter Life! Note: When you use virtual wall, please face marked ECOVACS to the block area you expect. Put virtual wall outside of the room you want to block to get best effect. The system would cancel virtual wall after it is set for two hours in order to save battery. As a result, every time the robot start new task and there needs to use virtual wall, please do and check whether the switch on virtual wall is on and there is indicator. If you have paused the host for long time during its operation, please examine frequently that if the switch is off to prevent from danger. Power: Press this key and virtual wall starts work which will prevent robot from entering the blocked region. Infrared receiver power Indicator: It is red when the power is on, and it shows virtual wall is ejecting invisible beam to prevent robot form entering the blocked region. Indicator transmitter Infrared transmitter: Ejecting invisible beam. Infrared receiver: Receive invisible beam. Use of virtual wall It can be used to control the robot working within room or the certain region you want it to clean. It applies invisible infrared beam to get 2 meters optical band, which forms a blocked open area, such as doorway of the room, corridor and staircase. You can apply virtual wall to stop robot getting close to the wire of domestic appliances or computer and precision object. 2m Virtual wall can be put at the entrance of block region. You are allowed to combine several walls together if necessary. The beam of virtual wall would form a conical-shaped region to block robot. The virtual wall shall have beam around itself to prevent robot from getting closer to it. If you find the indicator becomes weaker or that robot is able to enter blocked region, please examine the battery of virtual wall. Change into new battery if necessary. 19 Use of Remote Control spot edge You can control the robot via remote control. Drive robot to appointed area via using direction control button. Choose certain working mode according to different auto Automatic Cleaning Mode/ return Cleaning Mode/ intensive direction control key Border Cleaning Mode/ Intensive cleaning mode / Fixed Point Go Back Charging Mode Pause key: temporarily stop current operating and make it stay where it is. Direction control key: There are four direction control, ahead, backward, left hand and right hand. You can use remote control to drive robot to any appointed area. You can control cleaning mode, going back charging and direction within five meters through the function key on it. If the robot is under cleaning mode or going back charging, please press pause first and then can proceed direction control. During the direction control, robot is not able to operate cleaning. Make sure the power supply of remote control is on before you use it. When you use it, match the signal transmitter with signal receiver on the host. If robot is near charger, virtual wall or other infrared transmitter, it would be interfered by infrared and fails to receive the signal of remote control, under this situation, please manually operate the mode on the host. 10. Virtual Wall Tips: It applies two units of alkaline batteries (1#). Please note the positive and negative when place the battery. Battery Placement Change the battery when you notice it is in low battery and make sure you use the same kind of battery as mixture is forbidden. Take out the battery if you do not use remote control for long time to avoid electrolyte from leaking which may cause failure. Do not put the remote control in extremely hot or humid surroundings. Do not fill any other substance into remote control, especially when you change battery. Never expose the signal transmitter under sunshine or lighting equipment, or else it would cause failure. The deposal of used battery should conform with local environmental legislation. 18 Enjoy Smarter Life! Note When power is off, robot will not start work on appointment time .If you have already set appointment time cleaning, please turn on the robot and keep it on standby status, even though it is not operating. Try to make it stay at the charger and check whether it is connected. Make sure the socket is connected to power supply. Or else, robot will fail to work on appointment time under standby status because of running out of battery. Set Frequency and Cancel Timing Tips : No matter what kind of mode the robot operated in the last time, when the appointment time coming, robot will work according to the Automatic mode. If the robot is operating in Border cleaning mode, Fixed point cleaning mode, when the appointment time coming, robot will not work until the next appointment time. You can set appointment cleaning frequency via press then release. to clean on appointment time for one time. Press the key , the robot will work as belowing sequence: to clean on appointment time everyday hereafter. to cancel appointment timing, robot only works upon your manual operation. work for one time work everyday do not work 9. Remote Control Battery Placement Tips: It applies two units of alkaline batteries (7#). Please note the positive and negative when place the battery. Change the battery when you notice it is in low battery and make sure you use the same kind of battery as mixture is forbidden. Take out the battery if you do not use remote control for long time to avoid electrolyte from leaking which may cause failure. Do not put the remote control in extremely hot or humid surroundings. Do not fill any other substance into remote control, especially when you change battery. Never expose the signal transmitter under sunshine or lighting equipment, or else it would cause failure. The deposal of used battery should conform with local environmental legislation. 17 Second time setting mode 1. Now, the label high light, and the number with time setting is flashing. 2. Set hourandminute via and , each time press will increase one hour or minute. While decrease one hour and minute for . mode Tips : 3. Press again, and then go to current time setting. For example: Selection scope: hour is between 0 and 23, minute is between 0-59. Under normal circumstance, time display on LCD shows current time. Set current time as 2:08 am, time display on LCD should be: Current time setting 1. After second time setting, and then go to the current time setting. The disappeared, and the number with time setting flashing. mode 2. Set hour and minute via and , each time press will increase one hour or minute. While decrease one hour and minute for ,and then press to confirm. mode Tips : Selection scope: hour is between 0 and 23, minute is between 0-59. Under normal circumstance, time display on LCD shows current time. 3. Then go to the frequency setting. For example: Set current time as 12:07 pm, time display on LCD should be: Tips: If you need to cancel first or second timing, please repeat set cleaning time, set the time as 00:00. Then the label will disappear. The time interval between two time setting should be more than 4 hours. 16 Enjoy Smarter Life! 7 .Automatically Charging ? ● When it finishes cleaning or there is low battery, it would seek charger in same route as automatic cleaning.To make it easy for robot to search for charging block, you need to put the block back to the wall and make sure there is no obstacle within 1.5 meters ahead of the infrared receiver. Check carefully whether there is strong reflector in front of the charger, such as ground glass, smooth ceramic vase and so on. ● It takes time for robot to seek the charger. The reserve time differs from the ground situation. strait room ?? ● Robot can return to the charger if the ground situation is not too complicated. Under extreme circumstance, such as, huge house and complex layout would probably bring difficulty for robot to seek for charger. In such case, you should help to put the robot back to charger. ● Take care of the first automatic charging, if you find that the robot keeps turning in the certain area after trying several times to seek back, you can help to place it on the charger and look through the charging. strait room mode, main brush will stop working and robot cannot do the ● Under cleaning. ● Robot shall stay at the charger when it finishes charging and it transfer to small currency to charge until you start operating. If you have set appointment timing cleaning, it would go out of the charger to do cleaning when it comes to appointment time. 8. Appointment Timing Appointment Time Setting 1. After power is on, keep press for around 3 seconds then on LCD is light and the number with time setting is flashing. First time setting mode mode Tips : Selection scope: hour is between 0 and 23, minute is between 0-59. Under normal circumstance, time display on LCD shows current time. 2. Set hour and minute via and , each time press will increase one hour or minute . While decrease one hour and minute for . 3. When you finish setting time, press again, and then go to second time setting . For example: Set current time as 12:07 pm, time display on LCD should be: 15 Border Cleaning Mode Route description: under this mode, once the robot detects objects, it would run along it, like wall, to clean until it meets obstacle and change the former route. Under this status, robot helps to remove the corner of wall, table, sofa and bed where it is beyond the mode of automatic cleaning. The operation of this mode takes around 25 minutes and then robot goes back to charging block by itself. Fixed Point Cleaning Mode Route description: under this mode, robot runs from inside out shaping spiral and focuses on the certain point to clean for one time. The cleaning coverage is a round shape with diameter of 1.2 meter. This mode is applicable to certain area with plenty of dust. Under common circumstance, the cycle of one fixed point cleaning takes not more than 6 minutes. During operation, if robot continually meets obstacle or detects staircase, it would shift to avoid obstacle and staircase to turn back to work under this status. Robot shall stay where it stops and give tip music after finishing. Intensive Cleaning Mode Route description: under this mode, robot takes the same route as automatic cleaning. It would search for charging block by itself before it runs of battery. Under the same ground circumstance, the cleaning effect is the best . If the ground is quite dirty, we recommend this mode . Go Back Charging Mode Route description: robot will search for charging block automatically when it detects low battery, what's more, green light flashed once the charger is connected. 14 Enjoy Smarter Life! Tips : Put the robot on the charging block and keep it charging after finishing house cleaning. 10 Do not keep the robot on pause status for long time, because under pause, the full charged battery can only last for around 20 hours. We suggest you to turn it off when you do not want it to work. 6. Mode Selection Status instruction : The meaning of often used three status here and hence mentioned is as follows: Working status: robot is doing cleaning work mode Press mode key mode , then robot will follow the bellowing action. Standby status: Case one: press key and do not operate. Case two: press it pauses. or any other key on host when robot is running, Case three: lift the robot. auto edge spot intensive return Power off status: it is not power on, or under working status. Press key under standby mode, it is power off. Automatic Cleaning Mode Route description: first going straight ahead, it turns when it meets obstacle. This status will last until the robot detects that it shall run of battery and it would turn to back charging status. If robot detects that there is plenty of dust on the staring point, it will take the route as fan-shaped or spiral route. 0.5M Under normal circumstance, it will take spiral rout when it detects plenty of large particles, and take fan-shaped route when few of small particles. If take this mode, the cleaning coverage would reach maximum compared by the same size area. We recommend this mode as common domestic one. 13 5. Power On/Pause/Power off Get power supply and power on ● Turn on the power switch on the bottom firstly. ● Press the key on host and get power supply. There would be a short music tip and at the same time LCD lights for roughly 2 second and goes off. mode ● Then press key to start robot . mode Pause ● Press key, it can pause the operation of robot and keep it stay where it is. mode Tips: On the status of pause, you can reset the cleaning mode, then press key again, it will go back to work. Another way to pause is that, when the robot is working you can press any key on the host or lift it. Power off ● Press key, power is off and the robot stops running. Tips: mode If you want the robot to stop running, you can press under pause status, then power is off. key Put the robot back to the charging block after it stops working for fear that others would trip or step on. 12 Enjoy Smarter Life! Tangle the power cord on the pothook and do not scatter it besides the block or hold it under the base, in case that robot would get impeded when it turns back. 0. 5 0. 5 There should not be any object at least 1.5 meter in front of the charging m m block. Besides, anything with strong reflector is not supposed to stay ahead of the infrared receiver. For example, ground glass, smooth ceramic vase and 1.5 m so on. Other wise, the machine shall not detect the charging block. Note: Please do not put the charging block near to the staircase to avoid accidental cases. Robot Charging ● You need to charge the robot the first time it works. Put away the fullcharged battery for use to ensure it' s performance. ● Charging duration should be around 3 hours. ● Charging is only allowed under the temperature between 0 and 45 degree and extreme hot or cold would extend charging duration or even cause damage to the battery. charging status Indicator flashing Tips : To make sure the robot is working in saturation, we suggest you to keep charging connected even though the charging indicator lasts lighting. At the same time, the system would transfer to weak current for supplementary charging. charging status According to actual ground situation, robot can keep working for around 60 minutes after being charged full. Indicator last lighting The capacity of battery, which is not used for long time, will get certain decrease, so the use time can be shorten accordingly. 11 LCD and Control Panel 19 18 17 20 21 1 16 2 mode 3 15 4 14 9 11 13 10 7 8 12 5 6 1. Power 8. Intensive cleaning mode 15. Appointment time setting 20. Tip for trapped 2. Model selection 9. Automatic cleaning mode 16. Time adjust button 3. On/Pause 21. Tip for driving wheel suspend 10. Operation status 4. Pause status 11. Cancel timing cleaning 5. Fixed point cleaning mode 12. Keep timing cleaning 18. Battery display 6. Go back charging mode 13. One-time timing cleaning 19. Tip for lacking and cleaning dust box 7. Border cleaning mode 14. Time display 17. Current time setting status 4.Robot Charging Placement of charging dock Put the block at an even place and make the base perpendicular to the ground. Meanwhile, take a look at the marked electricity voltage to make sure the product is used under instruction. 10 Enjoy Smarter Life! 3.Name of parts host up-ground height sensor control button wind gate All-round wheel rotating side brush LCD welted induction infrared receiver suspended driving wheel main brush rubber scraper charging dock electrode on/ off switch buffer plate dust sensor bottom view of robot dust sensor dust box handle ash exit dust box charging and alarm open button of upper cover antibacterial sponge filter lock of dust box elevation of robot dust box docking electrode wind gate power indicator infrared transmitter power cord anti-skid band charging block 9 technique parameter The host Working voltage Rated power Speed Capacity of dust box Noise In-put voltage DC14.4V DC17.5V rated frequency 50Hz 0.7L rated power 30W ≤62dB rated out-put currency 0.8A 0.25meter/second About 3 hours Duration upon full battery 60 minutes About 60 minutes Max Coverage upon full battery 120-150M Net weight AC220-240V rated out-put voltage 30W Charging duration Size 8 The charging block Virtual wall In-put voltage DC3V Remote control 2 330×330×100mm 2.8Kg In-put voltage Remote control distance DC3V ≤5meters Enjoy Smarter Life! 2. C o nt e nt Host spot edge return intensive Charging block Virtual wall auto Robot Vacuum Cleaner Battery for virtual wall D58 User Guide User guide Remote control Side brush Roll brush clean-up gadget Border Tape Battery for remote control Magnetic adding tool 7 ● Take good care of the product and keep it beyond child and people who can not judge danger nearby. Extra attention should be paid when it starts working. ● You should get the person inside the room know that the machine is working, in order to avoid man-made damage like tripping. ● Do not take robot as toy. Carefully attention should be paid when child or pet is around. ● The plastic package may bring danger of asphyxia keep away from child. and is supposed to Battery Replacement and Disposal ● You need to contact our after-sales when you want to change the battery. It will cause explosion if you use replacement battery of wrong model. ● There is potential danger if you use other producer's battery and charging block. The damage cause hence is not within the warranty. ● Please dispose the spent battery properly, because there is hazardous substance which may pollute the environment. ● Conform with local environmental legislation and dispose it at the recovery site. Resource Utilization ● Do not take the package material as domestic garbage and discard it freely. ● Please deliver the package material to proper recovery site for recycle. When Product is in Failure ● Do not repair or disassemble the machine when there is damage of the power cord or failure of the host . ● Contact our after-sales service or our designate maintenance organization for professional repair. 6 Enjoy Smarter Life! Notes before Cleaning ● Take extra care of the robot when the first it works. Please remove the obstacles when it is beyond the robot. Try to avoid the situation that the robot stops working. ● Make precautions to solve the problem which may make the cleaning in trouble, such as: ---- Keep the easily knock over objects in a safe place. ---- Permian the edge of the carpet. ---- The hanging table cloth and curtain should not touch the ground. ---- The flammable object should be cut from the fire source. ---- Sort out the tangled power cord on the floor. ● Check whether the main brush is correctly fixed inside the robot before cleaning. ● Examine if the dust box is empty and insure it is fixed before it works. ● See if up-ground height sensor and dust sensor are wiped clean. Child Safety ● Child, physically or mentally disabled and inexperienced are not allowed to use it, unless their safety supervisor is there to give instruction. 5 The Spectrum of the Product Use ● This robot is applicable to domestic sweeping, including wooden floor, rubber floor, ceramic tile, linoleum and medium or short-haired carpet however, it is inapplicable to long-haired carpet. ● It can not be used for the floor as below: ---- Have water on the surface (including flammable liquids) , such as wet floor. ---- Inside toilet, shower room or other humid situation. ---- Staircase ---- The room with furnace or flame ● The following objects are definitely forbidden: ---- Not extinguished soot, burning cigarette butts or match, because these objects would cause fire. ---- Sharp objects like glass debris, pin, paper clip,stones, gypsum, and large piece of paper. These things may block the machine. ---- Water or other kind of liquid, especially detergent, kerosene, petrol, paint, alcohol, perfume, as well as carpet or floor cleaning solution. It would make the interior of the machine wet, so that may cause shortcircuit. ---- The toner of laser printer and copier which may bring fire and explosion. ● Please keep the machine away from hot source such as oven and fireplace, because the hot can distort the crust. ● Do not use the machine in the surroundings with any explosion risk. For example, at gas station, oil depot, chemical plant and so on. ● Never use the machine outdoors. As rain or solid dust may get inside it and cause damage. ● Do not repair or change any performance by yourself. ● Do not throw or bend the machine. ● Do not dampen it, or else the short-circuit would cause fire or electric shock accident. ● Take care of routine maintenance and keep it in a clean place. ● Do not expose the machine in the extreme hot or cold surroundings. This product is not allowed to long-time kept in the temperature below zero or over thirty degree. ● Do not keep the machine in the liquid or expose it to high humidity. ● Do not place the machine close to burning cigarette or fire. 4 Enjoy Smarter Life! 1.Safety Instruction War ning: Where there is a drop off in the cleaning area due to a step or stairs and they are not carpeted, you should operate the unit to see that the unit can detect the step without falling over the edge. It may become necessary to place a physical barrier at the edge to keep the unit from falling over the drop but make sure the physical barrier is high enough so that you or a family member will not trip on the barrier and cause themselves injury. NO Guardrail Set up Guardrail Note: Do not open the equipment. The components inside the robot host are beyond repair by user himself, such as remote control and virtual wall. This product is only for domestic use, not suitable for industry or outdoor surroundings. Please do not press LCD. The User Guide Please conform to the basic safety precautions as follows: ● Read the content in this user guide carefully and install the robot according to the detailed instructions. ● Safekeeping this guide. If you transfer this machine to another person, please make sure attach this booklet. ● Any inconsistent operation with this guide would probably cause serious damage to both human being and the machine itself. Power Supply for the Product ● The power supply is from a Ni-MH chargeable battery inside the host of the robot and it is specially assigned with a charging block to do recyclable charge. Correct ● Please double check the marked supply voltage on the charging block and make sure it is applied according to the instructions. ● Do not use the damaged power cord or plug, while contact our after-sales service or find our authorized supplier to maintain. Electricity leakage ● As the charging block is heavy, please never drag the block via pulling it’s power cord. ● Remember never to twist and swing or screw the power cord excessively, neither to block it when close the door. We should not put heavy things on it as well. ● Do not let power cord touch hot or sharp surfaces. Cloth cleaning ● Do not draw out the plug by pulling the cord. ● Keep wet hands away from the plug or machine. ● Pull the plug out of socket when you no longer use the charging block for some time. Draw out the plug ● Use dry cloth to wipe the dust on the plug frequently. 3 Content 1. Safety Instruction........................... 3 Set Frequency and Cancel Timing........17 User Guide............................ .. . ..... ...... 3 9. Remote Control................... .... .............17 Power Supply for the Product........ ... ...... 3 Battery Placement..............................17 The Spectrum of Product Use........ .. ...... 4 Use of Remote Control ........................18 Notes before Cleaning........ ... ............... 5 10.Virtual Wall.. ... ...... ................... .......... 18 Child Safety................... . ....... ..... ......... 5 Battery Placement. .............................18 Battery Replacement and Disposal .........6 Use of Virtual Wall ..............................19 Resource Utilization .............................6 11. Border Tape......................................20 When Product is in Failure.......... ..... ...... 6 12. Day-to-Day Storage.......................... 21 2. Content in the Original Package and Technical Parameter....... ........... ......... 7 13. Maintenance..... .... ............................ 21 3. Name of Parts ..................................... 9 The Host ............................. ..... ... . . ... ... 9 LCD and Control Panel........................10 4. Battery Charging........ ........ .............. 10 Assembly Charging Block............. ... .... 10 Charging................... ....................... .. 11 5. Power On/Pause/Power Off....... ... ..... 12 Power On.......................... .... .. ...... ... . . 12 Pause................................. ....... ........12 Power Off............................ ...... ......... 12 6. Mode Selection.......... ......... ............... 13 Automatic Cleaning Mode ...... .... ... ... . ... 13 Border Cleaning Mode.... ... ........... .... .. 14 Fixed Point Cleaning Mode........ ... ... . ... 14 Intensive Cleaning Mode...... ...... .. .... ... 14 Go Back Charging Mode......... .. .... ... .... 14 7. Automatic Charging............................15 8. Appointment Timing....... .......... .......... 15 Set Appointment Time.........................15 Set Current Time ................................16 The Host Cleaning..............................21 Dust Box Cleaning ..............................21 Cotton Filter and Filters Cleaing.......... 22 Sponge Filter Replacement .................23 Main Brush Cleaning........................ 23 Side Brush Cleaning ...........................24 Side Brush Replacement.....................24 Driving Wheel Cleaning.......................24 Up-Ground Height Sensor Cleaning.....24 Dust Sensor Cleaning.........................25 14. Alarming.......... ..... ........ ....... .... .. ....... 25 15. Common Failure.... ..... ...................... 26 16. Other Problems.......... ..... ................. 27 Thanks for purchasing patented Robot Vacuum Cleaner products. Hope you can enjoy it ! Thanks again for your choice! Robot Vacuum Cleaner D58 User Guide