1
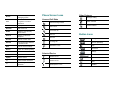
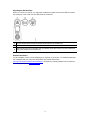
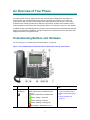
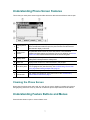
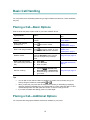
User Guide for
Cisco Unified IP Phones
7961G and 7941G
Softkey Definitions
Common Phone Tasks
View online help on
the phone
Press
Place a call
Go-off hook before or
after dialing a number.
Redial a number
Switch to the
handset during a call
Switch to the
speaker or headset
during a call
.
Press Redial. Or press
the Navigation button
while on-hook to see
your Placed Calls log.
Pick up the handset.
Press
or
, then
hang up the handset.
Mute your phone
Press
Use your call logs
Press
to
choose a call log. To
dial, highlight a listing
and go off-hook.
Edit a number
Press EditDial, << or
>>.
Hold/resume a call
Transfer a call to a
new number
Start a standard (ad
hoc) conference call
Answer
Answer a call
Back
Return to the previous Help
topic
Cancel
Cancel an action or exit a
screen without applying
changes
CFwdALL
Set up/cancel call forwarding
Clear
Delete records or settings
Close
Close the current window
ConfList
View conference participants
Confrn
Create a conference call
Delete
Remove characters to the
right of the cursor when
using EditDial
Details
Open the Details call record
for a multiparty call in the
Missed Calls and Received
Calls logs
Dial
Dial a phone number
DirTrfr
Transfer two calls to each
other
EditDial
Edit a number in a call log
EndCall
Disconnect the current call
Erase
Reset settings to their
defaults
Exit
Return to the previous
screen
.
Quick Reference Guide for
Cisco Unified IP Phones
7961G and 7941G
Press Hold or Resume.
Press Transfer and
enter a target number,
then press Transfer
again.
With 1st party on the line
press more > Confrn,
dial the participant,
then press Confrn
again.
Softkey Definitions
Phone Screen Icons
Button Icons
Common Phone Tasks
Phone Screen Icons
Other Features
iDivert
Send a call to your voice
messaging system
Join
Join several calls already on
a single line to create a
conference
more
Display additional softkeys
New Call
Make a new call
Redial
Redial the most recently
dialed number
Remove
Remove a conference
participant
Resume
Resume a call on hold
RmLstC
Drop the last party added to
a conference call
Incoming call
Services (Disabled)
Save
Save the chosen settings
Shared line in use
Help
Search
Search for a directory listing
Select
Select a menu item or call
Transfer
Transfer a call
Message waiting
Line and Call State
Call Forwarding enabled
Call on hold
Option selected
Feature enabled
Connected call
Off-hook
On-hook
Button Icons
Messages
Directories
Settings
Selected Device
Volume
Handset in use
Update
Refresh content
<<
Delete entered characters
Headset in use
>>
Move through entered
characters
Speakerphone in use
Speaker
Mute
Headset
Contents
Getting Started 1
Using this Guide 1
Safety and Performance Information 2
Connecting Your Phone 3
An Overview of Your Phone 5
Understanding Buttons and Hardware 5
Understanding Phone Screen Features 7
Cleaning the Phone Screen 7
Understanding Feature Buttons and Menus 7
Understanding the Help System on Your Phone 8
Understanding Lines vs. Calls 8
Understanding Line and Call Icons 8
Understanding Feature Availability 9
Basic Call Handling 10
Placing a Call—Basic Options 10
Placing a Call—Additional Options 10
Answering a Call 11
Ending a Call 11
Using Hold and Resume 12
Using Mute 12
Switching Between Multiple Calls 12
Viewing Multiple Calls 13
Transferring Calls 13
Forwarding All Calls to Another Number 14
Making Conference Calls 14
iv
Understanding Standard Conference Calls 14
Starting and Joining a Standard Conference 14
Using a Shared Line 16
Using a Handset, Headset, and Speakerphone 17
Using Phone Settings 18
Customizing Rings and Volume 18
Customizing the Phone Screen 18
Using Call Logs and Directories 19
Using Call Logs 19
Using Corporate Directory on Your Phone 20
Accessing the Voicemail System 21
Troubleshooting Your Phone 22
Index 23
v
Getting Started
Using this Guide
This guide provides you with an overview of the features available on your phone. You can read it
completely for a solid understanding of your phone’s capabilities, or refer to the table below for
pointers to commonly used sections.
If you want to...
Then...
Explore your phone on your own
Press
Review safety information
See Safety and Performance Information, page 2.
Connect your phone
Use your phone after it is
installed
Learn what the button lights
mean
Learn about the display
See Connecting Your Phone, page 3.
See Understanding Phone Screen Features, page 7.
Make calls
See Placing a Call—Basic Options, page 10.
Put calls on hold
See Using Hold and Resume, page 12.
Mute calls
See Using Mute, page 12.
Transfer calls
See Transferring Calls, page 13.
Make conference calls
See Making Conference Calls, page 14.
Share a line
Use your phone as a
speakerphone
Change the ring volume or tone
See Using a Shared Line, page 16.
See Using Phone Settings, page 18.
View your missed calls
See Using Call Logs and Directories, page 19.
Listen to your voice messages
See Accessing the Voicemail System, page 21.
See softkey and icon definitions
Refer to the Quick Reference Card in the front of this guide.
on the phone when you need assistance.
Start with An Overview of Your Phone, page 5.
See Understanding Buttons and Hardware, page 5.
See Using a Handset, Headset, and Speakerphone, page 17.
1
Safety and Performance Information
Read the following safety notices before installing or using your Cisco Unified IP Phone:
IMPORTANT SAFETY INSTRUCTIONS
This warning symbol means danger. You are in a situation that could cause bodily injury. Before you
work on any equipment, be aware of the hazards involved with electrical circuitry and be familiar with
standard practices for preventing accidents.
Warning: Read the installation instructions before you connect the system to its power source.
Warning: Ultimate disposal of this product should be handled according to all national laws and
regulations.
Warning: Do not work on the system or connect or disconnect cables during periods of
lightning activity.
Warning: To avoid electric shock, do not connect safety extra low voltage (SELV) circuits to
telephone network voltage (TNV) circuits. LAN ports contain SELV circuits, and WAN ports contain
TNV circuits. Some LAN and WAN ports use RJ-45 connectors. Use caution when connecting cables.
Caution: Inline power circuits provide current through the communication cable. Use the Cisco
provided cable or a minimum 24 AWG communication cable.
Power Outage
Your accessibility to emergency service through the phone is dependent on the phone being powered.
If there is an interruption in the power supply, Service and Emergency Calling Service dialing will not
function until power is restored. In the case of a power failure or disruption, you may need to reset or
reconfigure equipment before using the Service or Emergency Calling Service dialing.
2
Connecting Your Phone
IMT will likely initially connect your new Cisco Unified IP Phone to the APU IP telephony network. If
your phone needs to be moved for any reason, refer to the figure and table below to connect your
phone.
1
DC adaptor port (DC48V) – Not used
5
2
AC-to-DC power supply – Not used
6
Access port (10/100 PC) – Plug into
computer data port
Handset port
3
AC power cord – Not used
7
Headset port
4
Network port (10/100 SW) – Plug into data jack
8
Footstand button
Connecting Your Phone
Your Cisco phone is powered by and runs off of a data connection. Your phone should be plugged
into a data jack (see 4 above), NOT a phone jack. Your computer can then run off of the data
connection through the phone by plugging your computer into the phone (see 5 above).
Adjusting the Footstand
To change the angle that your phone sits on your desk, adjust the footstand while pressing the
footstand button.
3
Adjusting the Handset Rest
When you connect your phone, you might want to adjust the handset rest to ensure that the receiver
will not slip out of the cradle. See the table below for instructions.
1
Set the handset aside and pull the square plastic tab from the handset rest.
2
Rotate the tab 180 degrees.
3
Slide the tab back into the handset rest. An extension protrudes from the top of the rotated tab.
Return the handset to the handset rest.
Headset Information
To use a headset, connect it to the headset port on the back of your phone. For headset models that
are compatible with your phone and supported by IMT, please see this site:
www.apu.edu/imt/telecommunications/headsets. Requests to purchase headsets can be emailed to
the IMT Support Desk at [email protected].
4
An Overview of Your Phone
The Cisco Unified IP Phone 7961G and the 7941G are full-feature telephones that provide voice
communication over the same data network that your computer uses, allowing you to place and
receive phone calls, put calls on hold, transfer calls, make conference calls, and so on. The Cisco
Unified IP Phone 7961G provides six line buttons for phone lines, while the Cisco Unified IP Phone
7941G provides two line buttons (see Understanding Buttons and Hardware, page 5 for more details).
In addition to basic call-handling features, your phone can provide enhanced productivity features that
extend your call-handling capabilities. Your phone supports a comprehensive online help system that
displays information on the phone screen.
Understanding Buttons and Hardware
You can use Figure 1 to identify buttons and hardware on your phone.
Figure 1 Cisco Unified IP Phone 7961G (the 7941G is identical but with only 2 line buttons)
1
Item
Description
For more information,
see...
Programmable
line buttons
Programmable buttons provide access to
different phone lines or extensions (line
buttons).
The buttons illuminate to indicate status:
Green, steady—Active call
Green, flashing—Held call
Amber, flashing—Incoming call
Red, steady—Remote line in use
5
• Understanding Phone
Screen Features, page 7
• Basic Call Handling, page
10
• Using a Shared Line,
page 16
Item
Description
For more information,
see...
2
Phone screen
Shows phone features.
Understanding Phone
Screen Features, page 7
3
Footstand
button
Allows you to adjust the angle of the phone.
Adjusting the Footstand,
page 3
4
Messages
button
Auto-dials the voicemail system.
Accessing the Voicemail
System, page 21
5
Directories
button
Opens/closes the Directories menu, which
provides call logs (Missed, Received, and
Placed) and the corporate directory.
Using Call Logs, page 19
6
Help button
Activates the help menu.
Understanding the Help
System on Your Phone,
page 8
7
Settings button
Opens/closes the Settings menu. Use it to
control phone screen contrast and ring
sounds.
Using Phone Settings, page
18
8
Services
button
This button has been disabled.
9
Volume button
Controls the handset, headset, and
speakerphone volume (off-hook) and the
ringer volume (on-hook).
Using a Handset, Headset,
and Speakerphone, page 17
10
Speaker button
Toggles the speakerphone on or off.
Using a Handset, Headset,
and Speakerphone, page 17
11
Mute button
Toggles the Mute feature on or off.
Using Mute, page 12
12
Headset button
Toggles the headset on or off.
Using a Handset, Headset,
and Speakerphone, page 17
13
Navigation
button
Allows you to scroll through menus and
highlight items. When on-hook, displays
phone numbers from your placed calls log.
Using Call Logs, page 19
14
Keypad
Allows you to dial phone numbers, enter
letters, and choose menu items.
Basic Call Handling, page 10
15
Softkey
buttons
Understanding Phone
Screen Features, page 7
16
Handset
indicator light
Each button activates a softkey option
(displayed on your phone screen). Softkeys
change depending on the status of the
phone.
Blinks when the phone rings and remains lit
to indicate a new voice message.
6
Accessing the Voicemail
System, page 21
Understanding Phone Screen Features
This is what your main phone screen might look like with active calls and several feature menus open:
1
Primary phone
line
Displays the phone number (extension number) for your primary phone line.
When several feature tabs are open, the phone number and the time and
date alternate display in this area.
2
Icons for line
buttons
Programmable buttons serve as phone line buttons. Icons and labels
indicate how these buttons are configured. For an icon reference, see Phone
Screen Icons in the Quick Reference Card at the front of this guide.
3
Softkey labels
Each displays a softkey function. To activate a softkey function, press the
softkey button directly below the softkey label.
4
Status line
Displays audio mode icons, status information, and prompts.
5
Call activity area
Displays current calls per line, including caller ID, call duration, and call state
for the highlighted line (standard view). See Understanding Line and Call
Icons, page 8 and Viewing Multiple Calls, page 13.
6
Phone tab
Indicates call activity.
7
Feature tabs
Each feature tab indicates an open feature menu. See Understanding
Feature Buttons and Menus, page 7.
Cleaning the Phone Screen
Gently wipe the phone screen with a soft, dry cloth. Do not use any liquids or powders on the phone.
Using anything other than a soft, dry cloth can contaminate phone components and cause failures.
Understanding Feature Buttons and Menus
Press a feature button to open or close a feature menu.
7
If you want to...
Then...
Open or close a feature
menu
Press a feature button: Messages, Directories, Settings, Help
Scroll through a list or
menu
Press the Navigation button.
Go back one level in a
feature menu
Press Exit. Pressing Exit from the top level of a menu closes the menu.
Switch among open
feature menus
Press a feature button. Each feature menu has a corresponding tab.
The tab is visible when the feature menu is open.
Understanding the Help System on Your Phone
Your Cisco Unified IP Phone provides a comprehensive online help system. Help topics appear on the
phone screen. See the following table for details.
If you want to...
Then...
View the main menu
on your phone and wait a few seconds for the menu to display.
Press
Main menu topics include:
• About Your Cisco Unified IP Phone—Details about your phone
• How do I...?—Procedures for common phone tasks
• Calling Features—Descriptions and procedures for calling features
• Help—Tips on using and accessing Help
Learn about a button
or softkey
Press
, then quickly press a button or softkey.
Learn about a menu
item
Press Settings or Directories to display a feature menu. Highlight a menu
Get help using Help
Press
item, then press
twice quickly.
. Choose Help from the main menu.
Understanding Lines vs. Calls
To avoid confusion about lines and calls, refer to these descriptions:
Lines—Each line corresponds to a phone number (or extension) that others can use to call you. The
Cisco Unified IP Phone 7961G supports one to six lines and the Cisco Unified IP Phone 7941G
supports one to two lines, depending on configuration. To see how many lines you have, look at the
right side of your phone screen. You have as many lines as you have directory numbers and phone
line icons:
.
Calls—Each line can support multiple calls. By default, your phone supports four connected calls per
line. Only one call can be active at any time; other calls are automatically placed on hold.
Understanding Line and Call Icons
Your phone displays icons to help you determine the call and line state.
8
Icon
Call State
Description
On-hook line
No call activity on this line.
Off-hook line
You are dialing a number or an outgoing call is ringing. See Placing a
Call—Basic Options, page 10 for dialing options.
Connected
call
You are currently connected to the other party.
Ringing call
An incoming call is ringing on one of your lines. See Answering a Call,
page 11 for details.
Call on hold
A call has been placed on hold. See Using Hold and Resume, page 12
for details.
Remote-inuse
Another phone that shares a line on your phone has a connected call.
See Using a Shared Line, page 16 for details.
Understanding Feature Availability
Depending on your phone system configuration, features included in this Phone Guide might not be
available to you or might work differently on your phone. Contact the IMT Support Desk if you have
questions about feature operation or availability.
9
Basic Call Handling
You can perform basic call-handling tasks using a range of features and services. Feature availability
may vary.
Placing a Call—Basic Options
Here are some easy ways to place a call on your Cisco Unified IP Phone.
If you want to...
Then...
For more information,
see...
Place a call using the
handset
Pick up the handset and enter a
number.
An Overview of Your
Phone, page 5
Place a call using the
speakerphone
Press
and enter a number.
Using a Handset,
Headset, and
Speakerphone, page 17
Place a call using a headset
and enter a number. Or if it is
Press
lit, press New Call and enter a number.
Using a Handset,
Headset, and
Speakerphone, page 17
Redial a number
Press Redial to dial the last number, or
press the Navigation button (with the
phone on-hook) to see your Placed
Calls.
Using Call Logs, page 19
Place a call when another
call is active (using the same
line)
Dial from a call log
1.
2.
3.
Press Hold.
Press New Call.
Enter a number.
Using Hold and Resume,
page 12
1.
Choose
> Missed Calls,
Received Calls, or Placed Calls.
Select the listing or scroll to it and
go off-hook.
Using Call Logs, page 19
2.
Tips
•
•
•
You can dial on-hook without a dial tone (predial). To predial, enter a number, then go offor
.
hook by lifting the handset or pressing Dial,
When you pre-dial, your phone tries to anticipate the number you are dialing by displaying
matching numbers (if available) from your Placed Calls log. This is called Auto Dial. To call a
number displayed with Auto Dial, press the number, or scroll to it and go off-hook.
If you make a mistake while dialing, press << to erase digits.
Placing a Call—Additional Options
You can place calls using special features and services available on your phone.
10
If you want to...
For more information,
see...
Then...
1.
Place a call while another
call is active (using a
different extension)
2.
1.
Dial from a corporate
directory on the phone
2.
3.
for the new line. The
Press
call on the first line will be placed
on hold automatically.
Enter a number.
Using a Shared Line, page
16
Choose
> Corporate
Directory.
Enter a name and press Search.
Highlight a listing and go offhook.
Using Call Logs, page 19
Note: Speed dialing is not available at this time.
Answering a Call
You can answer a call by lifting the handset, or you can use other options if they are available on your
phone.
If you want to...
Then...
For more information,
see...
Answer with a headset
, if unlit. Or, if
is already
Press
lit, press Answer or the flashing line
button.
Using a Handset, Headset,
and Speakerphone, page
17
Answer with the
speakerphone
Press
, Answer, or the flashing
line button.
Using a Handset, Headset,
and Speakerphone, page
17
Switch from a connected call
to answer a new call
Press Answer, or if the call is ringing
on a different line, press the flashing
line button.
Switching Between
Multiple Calls, page 12
Answer using call waiting
Press Answer.
Send a call to your voice
messaging system
Press iDivert.
Switching Between
Multiple Calls, page 12
Accessing the Voicemail
System, page 21
Ending a Call
To end a call, hang up. See the following table for details.
If you want to...
Then...
Hang up while using the handset
Return the handset to its cradle. Or press EndCall.
Hang up while using the speakerphone
Press
Hang up while using the headset
Press
. If you want to keep headset mode activated,
press EndCall.
Press EndCall. If necessary, remove the call from hold
first.
Hang up one call but preserve another
call on the same line
or EndCall.
11
Using Hold and Resume
You can hold and resume calls. When you put a call on hold, the Hold icon
caller ID and the corresponding line button flashes green
If you want to...
appears next to the
.
Then...
Put a call on hold
1.
2.
Make sure the appropriate call is highlighted.
Press Hold.
Remove a call from
hold on the current line
1.
2.
Make sure the appropriate call is highlighted.
Press Resume.
Remove a call from
hold on a different line
1.
2.
Press the appropriate line button.
If necessary, scroll to the appropriate call and press Resume.
Tip
Engaging the Hold feature typically generates music or APU announcement.
Using Mute
With Mute enabled, you can hear other parties on a call but they cannot hear you. You can use mute in
conjunction with the handset, speakerphone, or a headset.
If you want to...
Then...
Toggle Mute on
Press
.
Toggle Mute off
Press
.
Switching Between Multiple Calls
You can switch between multiple calls on one or more lines. If the call you want to switch to is not
automatically highlighted, use the Navigation button to scroll to it.
If you want to...
Switch between calls
on one line
Then...
1.
2.
Make sure the call that you want to switch to is highlighted.
Press Resume. Any active call is placed on hold and the selected
call is resumed.
Switch between calls
on different lines
for the line that you are switching to. If a single call is holding
Press
on the line, the call automatically resumes. If multiple calls are holding,
highlight the appropriate call and press Resume.
Switch from a
connected call to
answer a ringing call
Press Answer, or if the call is ringing on a different line, press
active call is placed on hold and the selected call is resumed.
12
. Any
Viewing Multiple Calls
Understanding how multiple calls are displayed on your phone can help you organize your callhandling efforts.
In standard viewing mode, your phone displays calls as follows for the highlighted line:
• Calls with the longest duration display at the top of the list.
• Calls of a similar type are grouped together. For example, calls that you have interacted with
are grouped near the top, and calls on hold are grouped last.
You can use these additional methods to view multiple calls on multiple lines:
If you want to...
Then...
View calls on another
line
See an overview of
line activity (one call
per line)
.
1.
Press
2.
Immediately press the line button
.
for the highlighted line. The phone switches to call overview
Press
mode, displaying only one call per line. The displayed call is either the
active call or the held call with the longest duration. To return to the
standard view, press
, then immediately press the line button.
Transferring Calls
Transfer redirects a connected call. The target is the number to which you want to transfer the call.
If you want to...
Transfer a call without
talking to the transfer
recipient
Talk to the transfer
recipient before
transferring a call (consult
transfer)
Redirect an incoming call
to your voice messaging
system
Transfer two current calls
to each other without
staying on the line (direct
transfer)
Then...
1.
2.
3.
From an active call, press Transfer.
Enter the target number.
Press Transfer again to complete the transfer or EndCall to
cancel.
1.
2.
3.
4.
From an active call, press Transfer.
Enter the target number.
Wait for the transfer recipient to answer.
Press Transfer again to complete the transfer or EndCall to
cancel.
Press iDivert. The call is automatically transferred to your voice
message greeting.
1.
2.
3.
4.
Scroll to highlight any call on the line.
Press Select.
Repeat this process for the second call.
With one of the selected calls highlighted, press DirTrfr. (To
display DirTrfr, you might need to press more.) The two calls
connect to each other and drop you from the call.
Note If you want to stay on the line with the callers, use Join instead.
13
Tip
You cannot use Transfer to redirect a call on hold. Press Resume to remove the call from hold before
transferring it.
Forwarding All Calls to Another Number
You can use Call Forward All to redirect incoming calls from your phone to another number.
If you want to...
Then...
Set up call forwarding on
your primary line
Press CFwdALL and enter a target phone number.
Cancel call forwarding on
your primary line
Press CFwdALL.
Verify that call forwarding is
enabled on your primary line
Forward all calls directly to
voicemail
Look for:
.
• The call forward icon above the primary phone number:
• The call forwarding target number in the status line.
Press CFwdALL and enter extension 3620, the ext for voicemail
for Cisco phones.
Note: When call forwarding is enabled for any line other than the primary line, your phone does not
provide you with any confirmation that calls are being forwarded.
Tips
•
•
You must enter the call forward target number exactly as you would dial it from your phone.
For example, enter an access code or the area code, if necessary.
You must configure this feature per line; if a call reaches you on a line where call forwarding is
not enabled, the call will ring as usual.
Making Conference Calls
Your Cisco Unified IP Phone allows you to join up to four parties into one telephone conversation,
creating a conference call.
Understanding Standard (ad hoc) Conference Calls
You can create a standard conference in different ways, depending on your needs and the softkeys
available on your phone:
• Confrn—Use this softkey to establish a standard conference by calling each participant.
• Join—Use this softkey to establish a standard conference by joining several calls already on
one line.
Starting and Joining a Standard Conference
A standard (ad hoc) conference allows up to four people to participate in a single call.
14
If you want to...
Then...
1.
• Create a conference by
calling participants
• Add new participants to
an existing conference
2.
3.
4.
5.
From a connected call, press Confrn. (You may need to press
the more softkey to see Confrn.)
Enter the participant’s phone number.
Wait for the call to connect.
Press Confrn again to add the participant to your call.
Repeat to add additional participants.
Note Non-initiators of a conference cannot add or remove
participants.
Create a conference by
joining two or more existing
calls
1.
2.
Make sure that you have two or more calls on a single line.
Highlight a call that you want to add to the conference.
3.
4.
5.
.
Press Select. The selected call displays this icon
Repeat this process for each call that you want to add.
From one of the selected calls, press Join. (You may need to
press the more softkey to see Join.)
Note The active call is automatically selected.
Participate in a conference
View a list of conference
participants
Answer the phone when it rings.
1. Highlight an active conference.
2. Press ConfList.
Participants are listed by name or number (or unknown if the caller
was in incoming call from off campus) in the order in which they
join the conference with the most recent additions at the top.
Get an updated list of
conference participants
While viewing the conference list, press Update.
See who started the
conference
While viewing the conference list, locate the person listed at the
bottom of the list with an asterisk (*) next to the name.
Remove any conference
participant (conference
initiators only)
1.
2.
While viewing the conference list, highlight a participant’s
name or phone number.
Press Remove.
Drop the last party added to
the conference (conference
initiators only)
Press RmLstC.
End your participation in a
standard conference
Hang up or press EndCall.
Tips
•
•
Calls must be on the same line before you can add them to a conference. If calls are on
different lines, transfer them to a single line before using Confrn or Join.
If you exit a conference after creating it, the call will continue unless you remove each
participant before hanging up.
15
Using a Shared Line
You might have a shared line if you:
•
•
•
Have multiple phones and want one phone number
Share call-handling tasks with co-workers
Handle calls on behalf of a manager
Understanding Shared Lines
Remote-in-Use
The Remote-in-Use icon
appears when another phone that shares a line on your phone has a
connected call. You can place and receive calls as usual on the shared line, even when the Remotein-Use icon appears.
Sharing Call Information
Phones that share a line each display information about calls that are placed and received on the
shared line. This information might include caller ID and call duration. Phones with shared lines will
also display missed call notifications for all lines on the phone. To determine which line missed the
call, view call details in the call log for missed calls.
16
Using a Handset, Headset, and Speakerphone
You can use your phone with a handset, headset, or speakerphone.
If you want to...
Then...
Use the handset
Lift it to go off-hook; replace it to go on-hook.
Use a headset
Press
to toggle headset mode on and off. You can use the
headset in conjunction with all of the controls on your phone,
and
including
Use the speakerphone
.
Press
to toggle speakerphone mode on or off. Many of the
actions you can take to dial a number or answer a call will
automatically trigger speakerphone mode, assuming that the
handset is in its cradle and
is not lit.
Switch to the headset or
speakerphone (from the
handset) during a call
Press
Switch to the handset (from the
speakerphone or headset)
during a call
Lift the handset (without pushing any buttons).
Adjust the volume level for a
call
during a call or after invoking a dial tone. This
Press
action adjusts the volume for the handset, speakerphone, or
headset, depending on which device is in use. Press Save to
preserve the volume level for future calls.
or
, then hang up the handset.
17
Using Phone Settings
You can customize your Cisco Unified IP Phone by adjusting the ring tone, background image, and
other settings.
Customizing Rings and Volume
You can customize the ring your phone uses to indicate an incoming call and adjust the ringer volume
for your phone.
If you want to...
Then...
1.
2.
3.
4.
Change the ring sound
Choose
> User Preferences > Rings.
Select a phone line.
Choose a ring tone to play a sample of it.
Press Select and Save to set the ring tone, or press Cancel.
(Press Default to apply the default ring setting to a highlighted
phone line.)
Note to set a line on your phone to flash only (no audible ringing),
you will need to place a request with the IMT Support Desk.
Adjust the volume level
for the phone ringer
while the handset is in the cradle and the headset
Press
and speakerphone buttons are off. The new ringer volume is saved
automatically.
Customizing the Phone Screen
You can adjust some settings on your phone screen to fit your needs.
If you want to...
Then...
1.
2.
3.
Change the phone
screen contrast
> User Preferences > Contrast.
Choose
To make adjustments, press Up, Down or
Press Save. Or press Cancel.
.
Note If you accidentally save a very light or very dark contrast and cannot see
the phone screen display:
and then press 1, 3 on the keypad.
Press
Next, press
to change the contrast until you can see the phone
screen display, and then press Save.
Change the
background image
1.
2.
3.
4.
5.
Choose
> User Preferences > Background Images.
Scroll to view available images and press Select to choose an
image.
Press Preview to see a larger view of the background image.
Press Exit to return to the selection menu.
Press Save to accept the image or press Cancel.
18
Using Call Logs and Directories
This section describes how you can use call logs and directories. To access both features, use the
.
Directories button
Using Call Logs
Your phone maintains call logs. Call logs contain records of your missed, placed, and received calls.
If you want to...
Then...
View your call logs
Choose
> Missed Calls, Placed Calls, or Received Calls. Each
stores up to 100 of the most recent records.
Display details for
a single call record
Erase all call
records in all logs
1.
2.
3.
> Missed Calls, Placed Calls, or Received Calls.
Choose
Highlight a call record.
Press Details. Doing so displays information such as called number,
calling number, time of day, and call duration (for placed and received
calls only).
Press
, then press Clear.
Erase all call
records in a single
log
1.
2.
3.
Choose
> Missed Calls, Placed Calls, or Received Calls.
Highlight a call record.
Press Clear. (You may need to press the more softkey to display Clear.)
Erase a single call
record
1.
2.
3.
Choose
> Missed Calls, Placed Calls, or Received Calls.
Highlight a call record.
Press Delete.
1.
2.
3.
> Missed Calls, Placed Calls, or Received Calls.
Choose
Highlight a call record.
If you need to edit the displayed number, press EditDial followed by <<
or >>. To delete the number, press EditDial followed by Delete. (You
may need to press the more softkey to display Delete.)
Go off-hook to place the call.
Dial from a call log
(while not on
another call)
4.
1.
2.
3.
Dial from a call log
(while connected
to another call)
4.
5.
> Missed Calls, Placed Calls, or Received Calls.
Choose
Highlight a call record.
If you need to edit the displayed number, press EditDial followed by <<
or >>. To delete the number, press EditDial followed by Delete. (You
may need to press the more softkey to display Delete.)
Press Dial.
Choose a menu item to handle the original call:
• Hold—Puts the first call on hold and dials the second.
• Transfer—Transfers the first party to the second and drops you
from the call. (Press Transfer again after dialing to complete the
action.)
• Confrn—Creates a conference call with all parties, including you.
(Press Confrn again after dialing to complete the action.)
• EndCall—Disconnects the first call and dials the second.
19
Note: Phones with shared lines will display missed call notifications and missed calls in the call logs
for all lines on the phone. To determine which line missed the call, view call details in the call
log for missed calls.
Tip
To view the complete call record of a multiparty call (for example, of a call that has been forwarded or
transferred to you), highlight the call record and press Details. The Details record shows two entries
for each missed or received multiparty call. The entries are listed in reverse chronological order:
• The first logged entry is the name/number of the last completed call of a multiparty call
received on your phone.
• The second logged entry is the name/number of the first completed call of a multiparty call
received on your phone.
Using Corporate Directory on Your Phone
Your phone can provide access to a corporate directory which you can use to place calls to coworkers.
Corporate Directory is set up and maintained by IMT.
If you want to...
Dial from a
corporate
directory (while not
on another call)
Dial from a
corporate directory
(while connected to
another call)
Then...
1.
2.
3.
> Corporate Directory.
Choose
Use your keypad to enter a full or partial name and press Search.
To dial, select the listing that you want to dial, or scroll to the listing and
go off-hook.
1.
2.
3.
4.
> Corporate Directory.
Choose
Use your keypad to enter a full or partial name and press Search.
Scroll to a listing and press Dial.
Choose a menu item to handle the original call:
• Hold—Puts the first call on hold and dials the second.
• Transfer—Transfers the first party to the second and drops you
from the call. (Press Transfer again after dialing to complete the
action.)
• Conference—Creates a conference call with all parties,
including you. (Press Confrn again after dialing to complete the
action.)
• EndCall—Disconnects the first call and dials the second.
Tip
Use the numbers on your keypad to enter characters on your phone screen. Use the Navigation button
on your phone to move between input fields.
20
Accessing the Voicemail System
To access the voicemail system, use the Messages button
voicemail extension for the Cisco phones, ext 3620.
. This automatically dials the
If you want to...
Then...
Set up and personalize
your voicemail
Press
See if you have a new
voice message
Look for:
• A steady red light on your handset.
• A flashing message waiting icon and text message on your screen.
Listen to your voice
messages or access
the voicemail menu
. This auto-dials the voicemail system. Follow the
Press
instructions.
Send an incoming call
to your voicemail
Press iDivert. The iDivert feature automatically transfers an incoming call
to your voicemail. Callers will hear your voice message greeting and can
leave you a message.
and follow the voice instructions.
Tip
Instructions for the voicemail system are available at www.apu.edu/imt/telecommunications/voicemail/.
21
Troubleshooting Your Phone
This section provides troubleshooting information for your Cisco Unified IP Phone.
General Troubleshooting
This section provides information to help you troubleshoot problems with your phone. For more
information, please contact the IMT Support Desk.
Symptom
Explanation
The softkey that you
want to use does not
appear
One or more of the following factors might apply:
• You must press more to reveal additional softkeys.
• You must change the line state (for example, go off-hook or have a
connected call).
• Your phone is not configured to support the feature associated with
that softkey.
Join fails
Join requires multiple selected calls. Be sure that you have selected at
least one call in addition to the active call, which is selected automatically.
Join also requires the selected calls to be on the same line. If necessary,
transfer calls to one line before joining them.
Transfer fails
Make sure to press Transfer again after the target number is dialed.
From an active call, press Transfer, enter the target number, and press
Transfer again to complete the transfer.
A call cannot be
retrieved from hold
Make sure the appropriate call is highlighted and press Resume. You
may need to scroll up or down to highlight the desired call before pressing
Resume. If necessary, press the appropriate line button first.
Call does not hang up
Make sure that the handset is placed properly in the cradle and not stuck
on the handset rest tab.
22
Index
A
Cisco Unified IP Phone
adjusting height of, 3
answering calls, options for, 11
connecting, 3
Auto Dial, 10
description of, 5
feature configuration for, 9
C
illustration of, 5
call activity area, viewing, 7
online help for, 8
call forwarding, 14
securing handset rest, 4
call handling
conference calls, 14
advanced, 10
conference joining, 14
basic, 10
corporate directory, 20
call logs
erasing, 19
D
viewing and dialing from, 19
details softkey, viewing multiparty calls with, 20
call waiting, 11
dialing, options for, 10
calls
directories button, description of, 6
answering, 11
directory, using on phone, 20
compared to lines, 8
conference features for, 14
E
ending, 11
forwarding, 14
ending a call, options for, 11
handling multiple, 12
extension numbers, viewing, 7
holding and resuming, 12
F
icons for, 8
maximum per line, 8
feature buttons
multiple parties on, 14
directories, 6
muting, 12
help, 6
placing, 10
messages, 6
redirecting while ringing, 13
services, 6
transferring, 13
settings, 6
viewing, 7
feature menus, using, 7
viewing multiple, 13
features, availability of, 9
23
footstand
M
adjusting, 3
menus, using, 7
button, identifying, 3
messages
forwarding calls, options for, 14
indicator for, 21
listening to, 21
H
messages button, description of, 6
handset
missed calls, records of, 19
indicator light strip, 6
multiparty calls, viewing details of, 20
securing in cradle, 4
multiple calls, handling, 12
using, 17
mute button, description of, 6
hanging up, options for, 11
mute, using, 12
headset
answering calls with, 11
N
button, identifying, 6
navigation button, description of, 6
connecting, 3
hanging up with, 11
O
support and purchasing, 4
on-hook dialing, 10
using, 17
online help, using, 8
help button, description of, 6
help, using, 8
P
hold
and switching calls, 12
phone lines
and transferring, 14
buttons for, 5
using, 12
description of, 8
viewing, 7
I
phone screen
icons, for call states, 8
adjusting contrast of, 18
iDivert, 13
background image, changing, 18
installing, Cisco Unified IP Phone, 3
cleaning, 7
features of, 7
K
placed calls, records of, 19
placing calls, options for, 10
keypad, description of, 6
pre-dial, 10
programmable buttons
L
description of, 5
line buttons, identifying, 5
labels for, 7
lines
description of, 8
viewing, 7
24
button, identifying, 6
R
hanging up with, 11
received calls, records of, 19
using, 17
redial, 10
status line, viewing, 7
remote-in-use icon for shared lines, 16
switching calls, 12
resume, using, 12
ringer
T
customizing, 18
transferring, options for, 13
indicator for, 6
troubleshooting, 22
S
V
safety, warnings, 2
services button, description of, 6
voice message indicator, 21
settings button, description of, 6
voicemail service, 21
shared lines
volume
description of, 16
call, adjusting, 17
remote-in-use icon, 16
ringer, adjusting, 18
volume button, description of, 6
softkey buttons
description of, 6
W
labels for, 7
speakerphone
warnings, safety, 2
answering calls with, 11
25