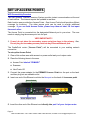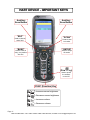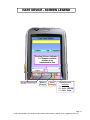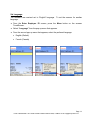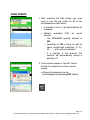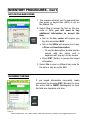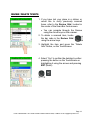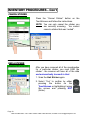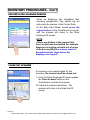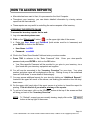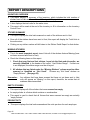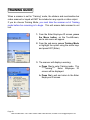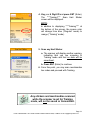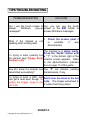
1
VERSION 01 HART ID = 233-01 SYSTEM INVENTORY MANAGER’S REFERENCE MANUAL FOR PAGE RECEIVE COMPONENTS & SUPPLIES ·················· 1 STORE PREPARATION ······································· 3 PLACING THE HART STICKERS ··························· 4 KEY STICKER RANGE ········································ 7 SET UP ACCESS POINTS ··································· 9 HART DEVICE ················································· 11 SET UP SCANNERS ········································· 13 INVENTORY PROCEDURES ······························ 15 HOW TO ACCESS REPORTS ····························· 24 REPORT DESCRIPTIONS·································· 25 CLOSE THE INVENTORY ·································· 28 DOWNLOAD INVENTORY COUNT/IMPORT FILES 30 SHIP EQUIPMENT ············································ 32 TRAINING GUIDE ············································· 33 EXHIBITS Copyright 2014 by Hart Systems, LLC RECEIVE COMPONENTS/SUPPLIES You will receive one equipment box containing all of the necessary components for Inventory. The box will be sealed with tape. Cut the tape with a knife, do not rip tape off. When opening the box, be careful. Try not to rip or damage the box. You will use the same box to return the components to Hart Systems. Inside one equipment box, you will find: ○ (5) Scanners ○ (1) Access Point labeled “PRIMARY” ○ (1) Access Point labeled “SECONDARY” ○ (2) Additional Batteries. ○ (3) Scanner chargers - Hart strongly recommends charging all of the scanners before inventory NOTE: The scanners will have 15+ hours of battery life. However, if you need to change a battery during Inventory, place the discharged battery in the plastic bag provided and return to Hart along with the equipment. DO NOT THROW THE BATTERIES OUT. Remove the Scanners from the foam insert, then remove the foam insert itself and continue with the following “layers”. You will also receive: A Customer Service Survey. Please complete the survey at the end of Inventory, and include it in the equipment boxes returned to Hart Systems. A Shipping Instructions envelope, containing labels and documents used to ship the box back to Hart Systems when the inventory is complete. The Shipping Envelope is located in the clear, plastic pouch affixed to the inside “lid” of the equipment box. To ensure the return paperwork is not misplaced, leave the envelope in the pouch until you are ready to ship back your equipment. Page 1 HAVE A QUESTION? CALL HART CLIENT CARE at 800-252-2818, or EMAIL US AT [email protected] Hart Systems also sends (1) supply packet. The supply packet arrives approximately (3) days before your Inventory. Inside the supply packet, you will find: Sticker sheets Scanner Quick Reference Guides Manager’s Reference Manual (you are reading this now) Equipment movement instructions flyer Hart Control ID Bar Code - you will need this form to set-up the scanners for your store. (1) Internet Password flyer. You will use this flyer to access Inventory reports and functions via the Hart Website. If any of the equipment or supplies are missing, contact Hart Client Care immediately at 800-252-2818. Page 2 HAVE A QUESTION? CALL HART CLIENT CARE at 800-252-2818, or EMAIL US AT [email protected] STORE PREPARATION DO WHATEVER YOU CAN TO SPEED UP THE SCANNING. Make sure that all fixtures are neat and that the merchandise is arranged in a uniform manner. Organize and clean the store to ensure that all items are clearly marked and in their proper locations. Check that all merchandise has a scannable ticket. Be sure that all displays are accounted for. Double check for merchandise in out of the way nooks and crannies - the stockroom, behind registers. Please make sure all merchandise is ready to be counted. FIXTURE CONTROL LOG When conducting an inventory, it is necessary to track where the stickers were placed. The best method to assist in tracking the stickers is the Fixture Sticker Control Log: Hart Systems provides the “Fixture Sticker Control Log (Form 001) to assist in recording the placement of the stickers. You will record the range of stickers used in each area of your store. Page 3 HAVE A QUESTION? CALL HART CLIENT CARE at 800-252-2818, or EMAIL US AT [email protected] PLACING THE HART STICKERS You will be using HART STICKERS to control the fixtures on the Floor Plan. The stickers are attached to Fixture Sticker Sheets. There are 30 removable stickers on each sheet, which means there are 30 sticker numbers on each sheet. Each sticker has a pre-printed 9-digit control number; the first 4 digits are the “series”; the next 4 digits (in parentheses) are the “Sticker Number”; the last digit is a control check-digit. For the most part, 4-digit Sticker number. you will only be concerned with the The Sticker Number is always 4 digits long. This 4-digit number is part of the control number and is always printed separately on the sticker, in the box labeled STICKER NO. The first three numbers are the “page” number and the fourth number is the sequence of the sticker on the page (0-9). There are always three “pages” (set up as columns) to a sheet of stickers. The picture below is an example of a Hart Sticker. On the sample sticker below, the 9-digit control number is 3003(956-0)1; 3003 is the series, 956-0 is the Sticker Number and 1 is the check-digit. The sticker includes a scannable bar code and boxes for recording information. After a sticker has been ended, the scanner will remind the user to write their Initials in Box 1 (“Scanned By”); DO NOT write your final count on the sticker. Page 4 HAVE A QUESTION? CALL HART CLIENT CARE at 800-252-2818, or EMAIL US AT [email protected] PLACING THE HART STICKERS - Con’t HART TRAINING STICKERS Exhibit B in this guide contains one “sheet” of Training Stickers. These stickers are only to be used for Training - never use these for Live inventory. The system can identify these stickers as Training Stickers and it will not include the inventory data scanned on them in your final results. You can identify Training Stickers in two ways. First, they are PINK in color (you will never receive pink stickers for Live inventory); Second, the series number is always 3347. When stickering your store: The stickers MUST be in place on your fixtures BEFORE scanning begins. Utilize no more than TWO (2) persons to place the stickers - the Inventory Lead who will record the sticker numbers on to the Floor Map or Fixture Log, and another key employee to place the stickers on the fixtures. DO NOT SKIP OR SEPARATE THE STICKER SHEETS. Every sticker must be accounted for. Separating the sticker sheets will create large gaps of “missing” stickers. Start with the very first sticker on the first sheet and work your way down the first column. Continue on to the top of the second column, working your way down then on to the third column of stickers. Once a sheet of stickers have been used, continue on to the very next sheet. Save the used sticker sheets. The 4-digit sticker number and 9-digit control number appear on the sheets. This will aid you when keying your sticker ranges. Never destroy or throw away any stickers. Every sticker must be accounted for. If a sticker becomes torn, use scotch tape to repair the sticker. If the bar code on the sticker is unscannable, the sticker number can be key-entered. Page 5 HAVE A QUESTION? CALL HART CLIENT CARE at 800-252-2818, or EMAIL US AT [email protected] The employees will be scanning from left to right as they move from one sticker to another. They will scan a sticker, scan all of the merchandise associated with that sticker, end the sticker, and then scan the next sticker. Place the stickers so that it will be easy to see where one sticker ends and the next sticker begins. Section Markers (“red flags”) can be used to aid with this. Some fixtures will require more than one sticker. The number of stickers is usually determined by the amount of merchandise on the fixture or the size of the fixture. In general, the more stickers that are used, the better. There should be at least one sticker for each display or fixture. As a best practice, do not have more than 50 items in a fixture. As you walk through the store, make sure that all of the merchandise to be counted has been assigned a sticker. It should be fairly easy to see what merchandise is assigned to a sticker. If you discover a fixture that does not have a sticker on it, use your leftover stickers. Be sure to use the very next sticker after the last sticker number that was used. This sticker must be recorded on the Floor Plan. SECTION MARKERS Section Markers are the pads of “red flags” that you received with your supplies. They can be used to (a) create clear section breaks and (b) identify each completed sticker. a. To create clear section breaks, place the Section Marker on the fixture where you want the section break to be. b. To identify completed stickers, place the Section Marker over the bar code on the fixture sticker when the sticker has been completed. This will not only be a visual aid in seeing what stickers have been scanned, but will prevent another employee from re-scanning stickers in error. Page 6 HAVE A QUESTION? CALL HART CLIENT CARE at 800-252-2818, or EMAIL US AT [email protected] KEY STICKER RANGE Before or during the inventory, you will need to key the range of stickers that were used in the store. This will be done via the Hart web site. 1. Log onto www.hartsystems.com. 2. Click on the “Client Login” button , on the upper right side of the screen. 3. Enter your User Name and Password (both entries must be in lowercase) and press ENTER or click on the OK button. User Name: hx23301 Password: srce0489 4. Click in the “Enter Store Number” field and enter your store number. 5. Press TAB to advance to the “Enter Password” field. password and press ENTER or click on the OK button. Enter your store-specific Your Store-specific Password will be provided to you prior to your inventory, via a flyer found with your inventory equipment and supplies. 6. You will now be connected to the “Inventory Overview” for your store. Click on Inventory Functions from the menu bar. 7. Click on “Enter Sticker Ranges”. You will key a separate sticker range for each area of your store (Backroom, Sales Floor). You can key up to 5 individual ranges per Area. 8. At the field labeled “Starting Sticker”, key the 9-digit sticker control number of the very FIRST sticker placed in the area you are keying and press the TAB key. 9. Next, at the field labeled “Ending Sticker”, key the 9-digit sticker control number of the very LAST sticker placed in the area you are keying, and click OK. Press TAB to enter the remaining range(s). 10. When finished entering the range(s), click OK. 11. A confirmation screen will be displayed to indicate that the range(s) have been accepted. Click OK. NOTE: If the range entered was not accepted, an error message will be displayed and the range should be checked and re-entered. Page 7 HAVE A QUESTION? CALL HART CLIENT CARE at 800-252-2818, or EMAIL US AT [email protected] 12. When you have completed entering the sticker range(s), click CLOSE. During the inventory, you will be able to modify the Sticker Range(s) based on additions and deletions of sticker numbers used. Each time the Sticker Range is modified, follow the instructions outlined in this section to adjust the existing range via the Hart web site. Example of a Hart Sticker: 4-Digit Sticker Number 9-Digit Sticker Control Number Page 8 HAVE A QUESTION? CALL HART CLIENT CARE at 800-252-2818, or EMAIL US AT [email protected] SET UP ACCESS POINTS WiFi Connectivity Overview The Hart Systems NexGen Inventory System provides instant communications at the end of each sticker. The Internet reports are updated in real-time. Each location was provided two Access Points. One Access Point should provide sufficient coverage for Inventory. The other access point can be used to provide additional coverage. If you use both Access Points, please keep them at least 150 feet apart from each other. The Access Point is connected into the designated Network port in your store. The user needs to simply plug the access point into the port. VERY IMPORTANT!!! 1. If used, do not place the secondary access point too close to the primary. Also, Do not plug the secondary access point into any Ethernet/Network port. The CradlePoint router (“Access Point”) will be connected to your existing network connection. To set-up the Access Point: 1. Clear a flat surface area with access to a power outlet and your Juniper router. 2. Place the following items in the area: Access Point labeled “PRIMARY” Scanners Hart Control ID 3. Connect the power adapter for the PRIMARY Access Point into the port on the back and then plug into an available outlet. 4. Insert one end of the Ethernet cord into the blue port on the back of the access point Power Switch Blue Port Power Adapter Port 5. Insert the other end of the Ethernet cord directly into port 2 of your Juniper router. Page 9 HAVE A QUESTION? CALL HART CLIENT CARE at 800-252-2818, or EMAIL US AT [email protected] 6. Once the Access Point has been connected to the power outlet and your Network port, the Power Status (green), Wireless indicator (blue), and WAN Status (blue) should be lit (see below). WAN Status Power Wireless The access point is now ready to use! The Access Point must be connected in order to transmit. Remember to connect the access point before testing communication with the scanners or scanning any live Inventory data. 7. Plug the access point labeled SECONDARY into any power outlet on the Sales Floor. Do not connect the Secondary Access Point to a Network port. 8. Place the Secondary unit in a central location on your Sales Floor. This will maximize the coverage during inventory. 9. Once the secondary unit has been plugged in and connects with the Primary access point, the Power Status (green), and Wireless indicator (green) should be lit (see below). Power Wireless Remember: The Primary access point must be connected to your Juniper router and fully operational for the Secondary access point to work. VERY IMPORTANT!!! 1. Do not place a secondary access point too close to the primary. This will not increase the range of coverage. 2. Do not connect a the Secondary access point to a Network port. If you cannot establish a connection with the Access Point, contact Hart Client Care for assistance. 800-252-2818 Page 10 HAVE A QUESTION? CALL HART CLIENT CARE at 800-252-2818, or EMAIL US AT [email protected] HART DEVICE - IMPORTANT KEYS Auxiliary Scan Button Auxiliary Scan Button “ESC” “SCAN” Used to clear an entire field. Press to scan bar codes. “BKSP” “ENTER” Used to clear an entry, one position at a time. Used to accept all entries. (Power Key) Used to power the scanner on and off. FUNC (Function) Key = Increases screen brightness. = Decreases screen brightness. = Increases volume. = Decreases volume. Page 11 HAVE A QUESTION? CALL HART CLIENT CARE at 800-252-2818, or EMAIL US AT [email protected] HART DEVICE - SCREEN LEGEND Pending Stickers Indicator P = Scanner contains stickers to be transmitted to Hart. Store# Employee Battery Strength Signal Strength Alpha/Numeric Indicator 1 = Numeric A = Alpha, UPPER a = Alpha, lower Page 12 HAVE A QUESTION? CALL HART CLIENT CARE at 800-252-2818, or EMAIL US AT [email protected] SET UP SCANNERS Now that the access points are up and running, you can start registering the scanners. Set Up Scanners: 1. Scan the Hart Control ID bar code. 2. Key your Store Number and press ENT (Enter). 3. Click Yes to continue; the scanners will register shortly after pressing Yes. 4. The “ENTER EMPLOYEE ID” screen will be displayed Registration is complete. 5. Repeat steps 1 and 2 for all scanners. 6. Verify the Scanners have Registered Successfully: After pressing “Continue”, the “P” should disappear from the bottom of the screen. If the “P” still appears, it could mean your Access Point is not connected, or the Scanners are out of range of the access point. Page 13 HAVE A QUESTION? CALL HART CLIENT CARE at 800-252-2818, or EMAIL US AT [email protected] Set Language: The scanners are received set to “English” language. To set the scanner for another language: From the Enter Employee ID screen, press the Menu button on the scanner TouchScreen. Select “Language” from the pop-up menu that appears. From the second pop-up menu that appears, select the preferred language: English (Default) French (Canada) Page 14 HAVE A QUESTION? CALL HART CLIENT CARE at 800-252-2818, or EMAIL US AT [email protected] INVENTORY PROCEDURES REMEMBER: The Access Point must be plugged in and connected BEFORE scanning begins. SET EMPLOYEE ID Key the 5 digit Employee ID and press ENT (Enter). START A STICKER After entering the Employee ID, scan the Hart Sticker. Page 15 HAVE A QUESTION? CALL HART CLIENT CARE at 800-252-2818, or EMAIL US AT [email protected] SCAN TICKETS 1. After scanning the Hart sticker, you must scan or key the bar codes for all of the merchandise on that fixture. A quantity of one (1) will automatically be accepted. Multiple entered. quantities CAN be keyed ○ The MAXIMUM quantity allowed is 999. ○ Quantities of 100 or more, as well as same, double-digit quantities (11, 22, 33, . . . ) will require verification. ○ If a quantity is not entered, the scanner will automatically accept a quantity of 1. 2. If the scanner makes a “special” sound, Follow the instructions on the scanner screen. All special messages can be acknowledged by pressing ENT (Enter). Page 16 HAVE A QUESTION? CALL HART CLIENT CARE at 800-252-2818, or EMAIL US AT [email protected] INVENTORY PROCEDURES - Con’t NOT ON FILE BAR CODES 1. The scanner will alert you if a scanned item (bar code) or keyed item (SKU) is not on the Master File. 2. Select Yes to accept the Not on File bar code or SKU; you will need to key additional information to accept the item. Not on file bar codes will require you key the associated SKU. Not on file SKUs will require you to key a Price and Item Description. ○ To key the description, double-tap the screen with the stylus and a keyboard will “pop up” on the screen. Press ENT (Enter) to accept the keyed information. 3. Select No to scan a different bar code for the item or key an on-file SKU. INCORRECT KEYING If you keyed information incorrectly, make corrections by pressing ESC (Escape) to clear the entire field or BKSP (Backspace) to clear the field one character at a time. Page 17 HAVE A QUESTION? CALL HART CLIENT CARE at 800-252-2818, or EMAIL US AT [email protected] REVIEW / DELETE TICKETS 1. If you have lost your place in a sticker, or would like to verify previously scanned items, refer to the Review Grid, located in the center of the Scan Bar Code screen. You can navigate through the Review using the Arrow keys on the scanner. 2. To delete a scanned item, locate the bar code in the Review Grid using the arrow keys. 3. Highlight the item and press the “Delete Item” button, on the TouchScreen. 4. Select “Yes” to confirm the deletion by either pressing the button on the TouchScreen or highlighting it using the arrows and pressing ENT (Enter). Page 18 HAVE A QUESTION? CALL HART CLIENT CARE at 800-252-2818, or EMAIL US AT [email protected] INVENTORY PROCEDURES - Con’t CANCEL STICKER Press the “Cancel Sticker” button on the TouchScreen and follow the instructions. NOTE: You can only cancel the sticker you are currently scanning. You cannot cancel a sticker that was “ended”. END A STICKER After you have scanned all of the merchandise for a particular sticker, you must END the sticker - the scanner will save all of the data and automatically transmit to Hart. 1. Scan the Hart Sticker again. 2. Select “Yes” to confirm by either pressing the button on the TouchScreen or highlighting it using the arrows and pressing ENT (Enter). Page 19 HAVE A QUESTION? CALL HART CLIENT CARE at 800-252-2818, or EMAIL US AT [email protected] PIECE COUNTS You will be required to conduct Piece counts on 10% of the stickers in your store. After a sticker is ended, the scanner will prompt the employee to enter a Piece count (# of units that were scanned for that sticker). They will need to manually count the items on that sticker and key the amount into the scanner. If the Piece Count is not correct, you will be given another opportunity to enter the correct Piece Count. If after the second attempt, the Piece count still does not match, the sticker will be cancelled, and must be scanned again. NOTE: For every three (3) stickers that have been cancelled due to an incorrect Piece Count, a Supervisor password must be entered into the scanner (23301). If the entry is correct, the sticker will be ended and the Write On Sticker screen will be displayed. Write the information displayed on the scanner screen on to the actual sticker and select “OK” to continue. Page 20 HAVE A QUESTION? CALL HART CLIENT CARE at 800-252-2818, or EMAIL US AT [email protected] INVENTORY PROCEDURES - Con’t DATA TRANSMISSIONS Once a sticker has been ended, the data is automatically transmitted to Hart. Once the sticker is completed, place a section marker over to sticker, to represent it is completed. Any data scanned while out of range of the access point, will be saved then automatically transmitted once you are again “in range”. PENDING TRANSMISSIONS — VERY IMPORTANT! When you have sent more than four stickers, check the indicator at the Scan Hart Sticker Screen. The “P” indicates the number of pending sticker transmissions. If you find that number is not decreasing, bring the scanner closer to an access point. If you still cannot transmit, check the access point. Page 21 HAVE A QUESTION? CALL HART CLIENT CARE at 800-252-2818, or EMAIL US AT [email protected] REVIEW PREVIOUS STICKERS SCANNED The Scan Hart Sticker screen will display the last six stickers scanned, in the Review Grid, located in the center of the screen. CREATE AN “EMPTY” STICKER If you encounter a stickered fixture for which there is no merchandise associated with it, you still need to account for the Hart Sticker. Perform “START A STICKER” and “END A STICKER”: Scan the Hart Sticker and then END it immediately, without scanning any merchandise. Follow the scanner instructions. Page 22 HAVE A QUESTION? CALL HART CLIENT CARE at 800-252-2818, or EMAIL US AT [email protected] INVENTORY PROCEDURES - Con’t END EMPLOYEE SCANNING SESSION When an Employee has completed their scanning assignments, they should log out and return the scanner to the Control Desk. At the Scan Hart Sticker screen press the Logout button on the TouchScreen to log out, and the scanner will return to the Enter Employee ID screen. NOTE: If there are stickers in the scanner that have not yet been transmitted (for example, Employee is logging out while out of range of the access point) the scanner must be brought back into range before the Employee can log out. CLOSE OUT SCANNER If a scanner is not needed again for this inventory, the scanner must be closed out. 1. From the Enter Employee ID screen, press the Close Scanner button on the TouchScreen to close the scanner. 2. Follow the scanner instructions. The scanner will return to the Scan Hart ID screen. Page 23 HAVE A QUESTION? CALL HART CLIENT CARE at 800-252-2818, or EMAIL US AT [email protected] HOW TO ACCESS REPORTS After data has been sent to Hart, it is processed on the Host Computer. Throughout your inventory, you can obtain detailed information by viewing various reports via the Hart web site. These reports are very useful in controlling the various aspects of the inventory. ACCESSING THE REPORTS ONLINE To access the inventory reports via the web: 1. Log onto www.hartsystems.com. 2. Click on the “Client Login” button , on the upper right side of the screen. 3. 3. Enter your User Name and Password (both entries must be in lowercase) and press ENTER or click on the OK button. User Name: hx23301 Password: srce0489 4. Click in the “Enter Store Number” field and enter your store number. 5. Press TAB to advance to the “Enter Password” field. Enter your store-specific password and press ENTER or click on the OK button. Your Store-specific Password will be provided to you prior to your inventory, via a flyer found with your inventory equipment and supplies. 6. You will now be connected to the “Inventory Overview” for your store. Your store number and store name will be displayed on the top. Clicking on any of the underlined items will “drill-down” to more details in that category. 7. You may access additional reports for your store by clicking on “Additional Reports”, located at the upper left corner of the screen, and making your selection from the dropdown menu. 8. On the upper right hand side of the report screen is a button to format the report for printing. Click on this link if you wish to print any of the reports. 9. To exit out of one report, click on the “CLOSE” button at the top of the screen and that will bring you back to the “Inventory Overview”. NOTE: To “Refresh” a report you are currently viewing, simply click on the button at the top right of the screen. Page 24 HAVE A QUESTION? CALL HART CLIENT CARE at 800-252-2818, or EMAIL US AT [email protected] REPORT DESCRIPTIONS INVENTORY OVERVIEW This report displays a summary of the inventory, which includes the total number of stickers sent to Hart and the number of Missing and Empty stickers. It also displays the total units for the entire store. This report will be used at the end of the inventory to fill in information on the Inventory Control Form. STICKER SUMMARY This report displays the total units scanned on each of the stickers sent to Hart. Once all of the stickers have been sent to Hart, this report will display the Total Units in the entire store. Clicking on any sticker number will drill-down to the Sticker Detail Report for that sticker. MISSING STICKERS This is the most important report, since it lists all of the stickers that are Missing (have not been scanned and Sent to Hart). Check the following items on this report: 1. Check that your first and last stickers, keyed via the Hart web site earlier, are correctly identified in the header of the report, “Hart Sticker Range”. If either one is not displayed, the sticker range must be re-keyed. 2. All stickers that are listed under the “Missing Stickers” column must be either scanned or identified as “Not Used”. Process any “Not Used” stickers as “EmptyStickers”. (See page 22). Remember: Any stickers that have been scanned but have not yet been sent to Hart may still appear as “Missing” on this report; therefore, be certain that all scanners have transmitted. EMPTY STICKERS This report displays all of the stickers that were scanned as empty. An empty sticker is a fixture which contains no merchandise. This report is used to check that all fixtures that were scanned as empty are actually “empty fixtures”. PRODUCTIVITY This report displays the total units scanned and the units per hour for each employee. Page 25 HAVE A QUESTION? CALL HART CLIENT CARE at 800-252-2818, or EMAIL US AT [email protected] STICKER DETAIL This report displays a line-by-line listing of every item on a particular sticker, in the order in which it was entered. This report can be used to ensure that each employee is following the proper scanning procedures. The Sticker Detail report may be viewed on the Hart web site by: Viewing the Sticker Summary, then clicking on the selected sticker number, OR Selecting Sticker Detail from the Reports Menu, then keying the 4-digit Sticker Number. RESCANNED STICKER This report lists all of the stickers that were rescanned (scanned more than once). The most current scanning of a sticker is always the one that is accepted. Clicking on the Date/Time a particular “version” of a sticker will drill-down to the details of that version of the sticker. NOTE: If you see that an employee is continually rescanning stickers, especially if there are multiple occurrences of the same sticker, you should follow up with that employee to see if he or she needs additional instruction. STICKERS BY EMPLOYEE ID This report displays the total units and time scanned for each sticker scanned by the selected employee. You will need to enter the Employee ID you would like to review. ITEM LOCATOR This report lists every sticker that a particular item is associated with, including the total Units and the Employee ID of the employee that scanned it. You will need to enter the SKU or UPC you wish to review. NOT ON FILE REPORT This report displays every Not On File SKU and UPC scanned and accepted during the inventory. Not On File SKUs will be displayed with the Price and Description that were keyed for the item(s). Not On File UPCs will be displayed with the valid keyed SKU that was accepted. Page 26 HAVE A QUESTION? CALL HART CLIENT CARE at 800-252-2818, or EMAIL US AT [email protected] REPORT DESCRIPTIONS - Con’t CANCELLED STICKER Displays every sticker that was Cancelled due to an incorrect piece count, including the Employee that scanned the sticker, the scanned count, the piece count entered and the difference. NOT ON SALES FLOOR REPORT This report displays all items scanned in the Stockroom but not scanned on the Sales Floor. When viewing the report via the Hart web site, clicking on the (“sort”) icon in the column heading(s) will re-sort the report based on the column selected. HIGH $ STICKER REPORT This report displays the top 25 stickers containing the highest retail value. The report displays the sticker number, area, Employee ID, units and total extended retail. CLOSE INVENTORY This report will display the status, date/time, employee name as well as the phone number of every instance the inventory was closed. Page 27 HAVE A QUESTION? CALL HART CLIENT CARE at 800-252-2818, or EMAIL US AT [email protected] CLOSE THE INVENTORY Once you have finished scanning all of the merchandise on every fixture in your store and have sent all of your data to Hart, you can prepare to close the inventory. You should review reports via the Hart web site and reconcile your inventory results. You should have NO Missing Stickers. You should have NO Stickers Outside the Range. After you are satisfied that you have accurately inventoried your store, display the Inventory Overview, via the Hart website. From this report, fill in the required information on the Inventory Control Form. This is your official documentation of this inventory. You are now ready to Close the Inventory. CLOSE THE SCANNERS As the inventory is coming to completion and you have confirmed the scanners contain no PENDING data, you may start to close the scanners. Before closing the scanners, make sure that you have: ○ Finished scanning all of the merchandise on every fixture in your store, ○ Confirmed there is no Pending data in the scanners (“P” on screen), ○ Verified there are NO Missing Stickers, ○ Verified there are NO Stickers outside the Range. Continued . . . Page 28 HAVE A QUESTION? CALL HART CLIENT CARE at 800-252-2818, or EMAIL US AT [email protected] CLOSE THE INVENTORY - Con’t CLOSE THE INVENTORY When you have verified that the inventory has been completed, you may close the inventory - via the Hart website. 1. Select Inventory Functions on the Overview screen and click on CLOSE INVENTORY. 2. Follow the instructions and prompts that are displayed. ○ If there are any Missing Stickers, or Stickers Outside the Range, a message will be displayed informing you that one or more of the above conditions exist. ○ Click the “Close” button at the top right corner and you will return to the Inventory Overview. You must resolve these issues before you may close the inventory. Contact Hart Client Care for assistance. 3. Once the close inventory process has been completed, click the refresh button on the Inventory Overview and the inventory status will be displayed as Finished and your Inventory Close Confirmation Number for the inventory will be available. 4. Write the Inventory Close Confirmation Number on the Inventory Control Form. Page 29 HAVE A QUESTION? CALL HART CLIENT CARE at 800-252-2818, or EMAIL US AT [email protected] DOWNLOAD INVENTORY COUNT/IMPORT FILES Once the inventory has been closed, the inventory data must be downloaded from the Hart website, then imported into the store’s SOS system to apply the results. DOWNLOAD INVENTORY COUNTS 1. Follow the instructions for accessing the Hart website and on-demand reporting, as outlined on page 18 of this manual. 2. From the Inventory Overview, click on Download Inventory Counts and a “pop-up” window (“Save As”) will open. 3. Select Save To Disk, and a directory of your computer will open in a “pop-up” box. NOTE: You will not actually use a disk. The file will be saved to a folder on your in-store computer (c:\Windows\SUA\usr\lib\sos). 4. In the “File Name” field, type in the following (type EXACTLY as shown below): c:\Windows\SUA\usr\lib\sos\count.dat 5. Click Save. Continued . . . Page 30 HAVE A QUESTION? CALL HART CLIENT CARE at 800-252-2818, or EMAIL US AT [email protected] DOWNLOAD INVENTORY COUNT/IMPORT FILES - Con’t LOADING AND APPLYING THE COUNTS ON THE STORE SYSTEM 1. In the SOS inventory program, select Option 3 - Apply Scanned Inventory Counts. Select Option #3 to view or apply the uploaded counts. 2. This will convert the file for use by the program and list it as “count.000”. The file can now be viewed or applied to the counting deck. 3. Once the counts have been applied, you can verify them by selection Option 4 Enter Deck Counts Data, or by selection Option 7 - Print Preliminary Tilt List Report. 4. Complete the line listings as per a normal inventory, lock the files, create a transmit file and send it to Barrie (Option 9). NOTE: Don’t forget to print off the final summary after transmitting as this step will update the on hand quantities in your store’s local stock file. Page 31 HAVE A QUESTION? CALL HART CLIENT CARE at 800-252-2818, or EMAIL US AT [email protected] SHIP EQUIPMENT Do NOT write on any of the original Hart boxes. Before packing the boxes, remove and read the shipping instructions. The Shipping Instructions are in a clear envelope, affixed to the inside flap of Box U. All of the equipment will be shipped in the original boxes. Apply the shipping labels to the covers of the two boxes, as specified in the Shipping Instructions. First, place the Access Point(s) and cables back in the foam. Second, place the removable scanner foam insert into the box. Third, place the scanners into the foam cavities. Fourth, place any paperwork in the box. Finally, remember to include all batteries, whether used (“discarded”) or unused and chargers. Place the batteries in the plastic bag(s) provided and place with the equipment. Tape up the boxes. Refer to your shipping instructions for more information. It is very important that the equipment is shipped or carried to the next store or shipped back to Hart Systems, according to the agreed upon shipping schedule. If you have any questions regarding the shipping of the equipment, please contact Hart Client Care at (800) 252-2818 or (631) 439-8200. Be sure to retain your copies of the shipping receipts OR record your tracking numbers, before the equipment has been shipped back to Hart. You may need to refer to them at a later time to provide proof of shipment. Page 32 HAVE A QUESTION? CALL HART CLIENT CARE at 800-252-2818, or EMAIL US AT [email protected] TRAINING GUIDE When a scanner is set for “Training” mode, the stickers and merchandise bar codes scanned or keyed will NOT be included on any reports or other output. If you do choose Training Mode, you must take the scanner out of Training mode before live scanning is to begin. This will ensure data scanned is not lost. 1. From the Enter Employee ID screen, press the Menu button, on the TouchScreen, and a sub-menu will appear. 2. From the sub-menu, press Training Mode or highlight the option using the arrow keys and press ENT (Enter). 3. The scanner will display a warning: a. Press Yes to enter Training mode. The “***Training***” Enter Employee ID screen will be displayed. b. Press No to exit and return to the Enter Employee ID screen. Page 33 HAVE A QUESTION? CALL HART CLIENT CARE at 800-252-2818, or EMAIL US AT [email protected] 4. Key your 6 Digit ID and press ENT (Enter). The “***Training***” Scan Hart Sticker screen will be displayed. NOTE: In addition to displaying “***Training***” at the bottom of the screen, the screen color will change from blue (“Regular” mode) to orange (“Training” mode). 5. Scan any Hart Sticker. a. The scanner will display another warning, indicating that you are scanning in Training mode and that no data will be saved/sent. b. Press ENT (Enter) to continue. 6. From this point, you may scan merchandise bar codes and proceed with Training. Any stickers and merchandise scanned while the scanner is set for Training mode, will not be saved or transmitted. Page 34 HAVE A QUESTION? CALL HART CLIENT CARE at 800-252-2818, or EMAIL US AT [email protected] TRAINING GUIDE - Con’t 7. End the sticker and the ***Training*** write on sticker screen will be displayed. 8. Press the OK button on the TouchScreen and the scanner will return to the ***Training*** Scan Sticker screen. TO EXIT TRAINING MODE: 1. Press to bring up the menu. 2. From the ***Training*** Scan Hart Sticker screen, press the Menu button and a submenu will appear. 3. From the sub-menu, press Training Mode. 4. The scanner will return to a Scan Hart Sticker screen, in Regular mode. Page 35 HAVE A QUESTION? CALL HART CLIENT CARE at 800-252-2818, or EMAIL US AT [email protected] Store managers should schedule a pre-inventory meeting to review Physical Inventory procedures with the employees who will be scanning. BEFORE TRAINING: Make sure that all of the scanners have been set up. Become very familiar with the scanner and its functions. Place the Hart Fixture Stickers on all of the fixtures to be counted. TRAINING: Assemble all of the scanning employees together and give the following materials to each of them: Copy of the Employee Quick Reference Guide Scanner A few sheets of red flags Pen THE TRAINING SESSION SHOULD TAKE ABOUT 15-20 MINUTES. DISCUSSION POINTS: The Hart Fixture Stickers placed throughout the store, represent individual fixtures, or sections of merchandise to be counted. Explain how the stickers were placed on the fixtures throughout the store. use specific examples and show the differences between how the stickers were placed on the shelves, racks, and other areas. When beginning a new section (an aisle, for instance), begin at the far left and work from top to bottom, left to right. The Hart Fixture Stickers are consecutively numbered and, if scanned in order, the scanner will inform you if you have skipped one sticker while scanning (if you skip more than one, there will be no message). When scanning a sticker, it is important to know where the sticker begins and ends (that is, which merchandise associated with that sticker). The sticker is placed as close to the first piece of merchandise as possible and it ends at the next Hart Fixture Sticker. You should take a step back before scanning the sticker to identify where the sticker begins and where it ends. Page 36 HAVE A QUESTION? CALL HART CLIENT CARE at 800-252-2818, or EMAIL US AT [email protected] TRAINING GUIDE - Con’t The SCANNING PROCEDURE is as follows: 1. Scan the Hart Fixture Sticker. 2. Scan the bar code on the merchandise ticket (the number may also be keyed if the bar code can’t be scanned). 3. Scan all the merchandise on the fixture. 4. End the sticker by scanning it again. 5. When directed, manually count the merchandise on the fixture, and key the total “Piece Count” into the scanner. 6. Write the information displayed on the screen onto the Hart Fixture Sticker (the scanner will display this information). 7. Place a red flag on the sticker, covering the bar code, to show that it has been counted. 8. Move on to the next sticker. The scanner normally makes a simple “beep” when you scan a bar code or key-enter information. If you hear any sound other than a simple “beep”, it means “Look at the scanner screen and follow the instructions”. There are several different messages that you may see, and they should all be clear and easy to understand. You may scan each item individually without pressing the “Enter” key after each entry. The scanner will inform you if the Battery is Low. If you receive a Low Battery message, finish the sticker you are working on and then bring the scanner to a supervisor. The data will then be sent to Hart, and the battery will be changed. A re-scanned sticker will completely replace the original scanned version of that sticker. The date and time is set into every scanner. When a sticker is rescanned, the first scanning of the sticker will be ignored by the system and the second scanning will be used. If a sticker is ended and then you realize that you made an error, simply rescan the sticker and all of the merchandise. When you re-scan a sticker, you may use any scanner. The goal of the inventory is to count all of the merchandise in the store. If you see an area of merchandise that does not have a sticker placed on it, let the Supervisor know. Page 37 HAVE A QUESTION? CALL HART CLIENT CARE at 800-252-2818, or EMAIL US AT [email protected] If a bar code cannot be scanned (the scanner will not read the bar code or the bar code is rejected as “Not Valid”), try to manually key-enter the SKU or UPC using the scanner keypad. If an item still cannot be scanned OR keyed in to the scanner, (no ticket, invalid number, etc.), it should be placed on the side. After the current sticker is ENDED, bring the merchandise on the side to the Research Area (explain where this area is ) to be investigated later. Do not stop scanning to research these items. Does Anyone have any questions? The training session has been completed. It’s now time to give the employees their scanning assignments. Remember, if you have any questions at any time, please do not hesitate to contact Hart Client Care. They are available 24 hours a day, 7 days a week, and are standing by to assist you in any way they can. Call us at: (800) 252-2818 Or E-mail us at: [email protected] Page 38 HAVE A QUESTION? CALL HART CLIENT CARE at 800-252-2818, or EMAIL US AT [email protected] SYSTEM FOR EXHIBITS TIPS/TROUBLESHOOTING TRAINING STICKERS INVENTORY SPECIFICATIONS CONTACTING HART CLIENT CARE TIPS/TROUBLESHOOTING PROBLEM/QUESTION SOLUTION Can I use the touch screen to Yes, you can use the touch answer Window’s pop-up screen or the ENT button to messages? answer Window’s messages. What if the Internet is not updating after sending data. 1. Check the access point, it is possible it was disconnected. The scanner is in alpha mode. Press the “Alpha” button until I’m trying to enter quantity, but a “1” in the bottom right of the the scanner says “Please Enter scanner screen appears. Refer Numbers only.” to the Alpha-Numeric indicator box on page 11 of this guide. How do I know if a scanner has The “P” will indicate pending transmitted successfully? transmissions, if any. I’m trying to scan a UPC, and Don’t scan too close to the bar cant get a read even though I’m code. The Imager works best 4putting the imager close to the 6 inches from the product. bar code. EXHIBIT A Copyright 2014 by Hart Systems, LLC TRAINING STICKERS Copyright 2014 by Hart Systems, LLC INVENTORY SPECIFICATIONS BAR CODES UPC A – Can be scanned or keyed and must be 12 digits in length. EAN 13 – Can be scanned or keyed and must be 13 digits in length. Multiple quantities are allowed for ALL merchandise in your store. The maximum quantity allowed is 999. QUANTITY NOT ON FILE PIECE COUNTS Quantities of 100 or more, as well as any same, double-digit quantities (11, 22, 33, 144) will require a re-key with 2 successive matches in order to be accepted. Not on File bar codes will not be accepted. If a scanned bar code is not on file, the scanner will display a message indicating it is “Not On Master File” and instruct the employee to move it to the Research Area. You will be required to conduct Piece Counts on 10% of the stickers in your store. The system will randomly select the stickers that are to be Piece Counted and will alert you when the Hart Sticker has been scanned to end the sticker. After an incorrect Piece Count has been entered for 3 stickers within a “session”, a password will be required. The password is 23301. REVIEW STICKERS SCANNED At any time during the inventory, you can check to see what fixtures have been scanned in each scanner. At a blank “SCAN HART STICKER” screen, all stickers scanned by the employee will display in the “grid” on the screen. This form is the official documentation of this inventory. INVENTORY Make sure that it is completed with the most current Follow the CONTROL FORM information at the END of the inventory. instructions printed on the form. EXHIBIT C Copyright 2014 by Hart Systems, LLC CONTACTING HART CLIENT CARE IF YOU HAVE ANY QUESTIONS, CONTACT THE HART SYSTEMS CLIENT CARE. (800) 252-2818 OR (631) 439-8200 Our Client Care Staff may be reached by calling the above numbers. If your call is answered by our Receptionist, please ask for “Hart Client Care”. If your call is answered by our Automated System, please Enter “1” for “Hart Client Care”. You may also contact Hart Client Care via e-mail: [email protected] When sending an email, please remember to include your: Company Name Store Location # Personal Name Phone Number, and A Brief Message, describing your question or issue. Hart Client Care will respond to your email within 10 minutes. AUXILIARY HART CLIENT CARE NUMBER If for any reason our primary Hart Client Care Number is not working, please use our Cellular Phone number to reach Hart Client Care. This number is 516-639-3103. EXHIBIT D Copyright 2014 by Hart Systems, LLC