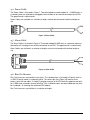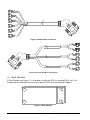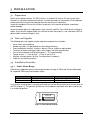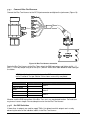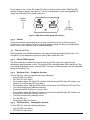
1
Installation and Operation
User Guide
"
1.1
1.2
1.3
1.4
Purpose and Intended User of this Manual ........................................................................ 1
Scope ................................................................................................................................ 1
Glossary of Abbreviations.................................................................................................. 1
Reference Documents ....................................................................................................... 1
2.1
2.2
2.3
Radio Frequency Radiation Hazard ................................................................................... 2
High Current Hazard.......................................................................................................... 2
Electrostatic Discharge (ESD) ........................................................................................... 2
3.1
3.2
Dual Band Systems ........................................................................................................... 3
Single Band System .......................................................................................................... 5
4.1
4.2
4.3
4.4
4.5
4.6
4.7
General.............................................................................................................................. 7
Front Panel........................................................................................................................ 7
Rear Panel ........................................................................................................................ 8
Power Cable ...................................................................................................................... 9
Alarm Cable....................................................................................................................... 9
Bias Tee Harness .............................................................................................................. 9
Rack Extender ................................................................................................................. 10
!!
5.1
5.2
5.3
5.4
Preparation...................................................................................................................... 11
Tools and Supplies .......................................................................................................... 11
Installation Procedure ...................................................................................................... 11
Functional Test ................................................................................................................ 15
6.1
6.2
6.3
6.4
6.5
6.6
6.7
Start-Up ........................................................................................................................... 17
Voltage Regulation .......................................................................................................... 17
Current Monitoring........................................................................................................... 17
Short Circuit Protection.................................................................................................... 17
Alarm Indications ............................................................................................................. 17
Resetting Alarms ............................................................................................................. 18
Shut-Down....................................................................................................................... 18
7.1
7.2
7.3
Instruments...................................................................................................................... 19
Check Lists...................................................................................................................... 19
Technical Support............................................................................................................ 20
A.1
A.2
A.3
A.4
A.5
Functional Detail.............................................................................................................. 21
Current Monitoring and Alarm.......................................................................................... 21
Alarm Interface ................................................................................................................ 22
Connector Pin-Out........................................................................................................... 22
Mechanical Detail ............................................................................................................ 23
B.1
B.2
B.3
Identification .................................................................................................................... 24
Part Number List.............................................................................................................. 24
Model Numbers ............................................................................................................... 25
C.1
C.2
C.3
Description ...................................................................................................................... 26
Alarm Range Selector Setting.......................................................................................... 26
Operation......................................................................................................................... 26
#!
' (
$
%
$
!
'#(
' (
Bulletin II-102051-EN • Revision B
&
#
)
#
"
November-2007
iii
*++
$+
!"
,-
#
#"
$%
&"
!
!" # $
%
! &' '
(
&
'
&$
&) +)$
%
(
%
$
'
1
$
iv
,'
-''
$
) '( $
) $
'
*
"
*
$ %
%
'
(
'
#$$
./
$ 0
'
)$
%
$
'
#$
$ ,'
)$ ,'
%
-' '
#$$
'
'
&
$ ,'
' $
'
#$ $
$ ' # (
$ # *
November-2007
%
,'
'-
'
,'
Bulletin II-102051-EN • Revision B
This manual provides a complete description of the Multimode Power Distribution Unit (PDU) along
with installation and operating instructions for its use in general purpose applications.
The intended user of this manual is an engineer or technician with adequate and specific experience
in installing base transceiver station (BTS) and antenna line equipment such as base station
antennas and tower mounted amplifiers (TMAs).
The manual covers the PDU and associated accessories, including Power Cable, Alarm Cable, Bias
Tee Harness, and Rack Extender. See Appendix B for a complete parts list.
The user is encouraged to read the important information in the Safety section.
The System Information section covers a selection of TMA system configurations. The information
is intended to familiarize the user with the application of the PDU together with other TMA system
components.
In the Product Description section, the user is acquainted with the external features of the PDU
and its accessories as they are identified and their functions described.
The Installation section provides all necessary information to correctly install and set up the PDU,
and perform a functional test.
The Operation section is organized by the different functions and operating states. It provides the
user with a general understanding of what the PDU does and how to perform various operations.
Should any problems occur with installation or operation, the user may find helpful information in the
Troubleshooting section.
For the interested reader, more in-depth information about the design of the PDU has been placed in
Appendix A.
Supplementary details on special purpose modes MODE A and MODE B are found in Appendix C.
This information is not applicable to the general purpose use of the PDU that is the exclusive topic of
the manual.
BTS
EAI
OMC
PDU
TMA
Base Transceiver Station
External Alarm Interface
Operations and Maintenance Center
Power Distribution Unit
Tower Mounted Amplifier
!
PA-102050-EN
"
Product Specifications: Multimode Power Distribution Unit
Bulletin II-102051-EN • Revision B
November-2007
1
All operations relating to the installation of the PDU must be executed in accordance with industry
approved safety standards and practices. The installer shall also follow the safety practices
recommended by the BTS provider to insure that the BTS operation is not compromised.
# $
%&
The BTS, antenna line equipment, and the
antennas generate high frequency electric and
magnetic fields when in operation. The high
density energy can damage the eyes and
certain tissues of the human body in persons
exposed to radiation near the antenna.
RADIO FREQUENCY
ENERGY CAN CAUSE
INJURY OR BURNS.
Turn off transmitters before
servicing antenna line equipment.
Shut down transmitters when work is
performed on the transmitter antenna and
antenna line equipment. Avoid remaining in the immediate vicinity of the antenna when the
transmitter is in operation.
%' (
%&
The BTS equipment contains circuits that
generate high available short circuit currents.
Unintentional short circuits can cause
dangerous heating, fire, or equipment
damage.
HIGH CURRENT HAZARD.
Short circuit currents can cause
burns or fire.
Use only fuse of appropriate
Turn off circuit breakers or remove fuses
voltage and amperage rating.
when work is performed on the power supply
circuits. Install or replace fuses with
appropriate voltage and amperage rating. Do not bypass or defeat overcurrent protection devices.
Do not remove equipment covers.
)
!
'*
) !+
ESD can damage the BTS equipment or the
PDU during installation if proper precautions
are not taken. The damage may cause an
immediate failure of the device, or remain
latent and lead to a failure some time in the
future.
ELECTROSTATIC SENSITIVE
DEVICES.
Use proper grounding techniques
to prevent equipment damage.
Discharge static build-up by touching the metal
enclosure before making connections. Do not
remove equipment covers.
2
November-2007
Bulletin II-102051-EN • Revision B
A typical TMA system consists of TMAs, Bias Tees, and PDU with accessories. For its function, the
system also depends on the proper configuration of other antenna line equipment, including feeders
and jumpers, surge arrestors, antennas, etc.
This section provides single sector illustrations of several RF path configuration examples. While
frequency bands vary and variations can occur, the examples provide guidance for many common
situations.
Contact your Andrew Corporation Sales Representative for recommendations on applicable system
components.
!
,
*
"
+
+
. /0
Figure 1 shows a dual-band TMA system using shared feeders. Diplexers (crossband couplers)
combine the bands at the BTS level. At the tower top, the TMA incorporates a diplexer at its BTS
port.
Figure 1: Conventional diplexed TMA system
Bulletin II-102051-EN • Revision B
November-2007
3
Bias Tees are installed on the antenna ports of one of the base stations. The diplexers must pass
DC through that branch. DC blocks must be present in the other branch, either integral to the
diplexers or in external devices as shown.
#
1
+
. /0
In Figure 2, dual-band, diplexed Andrew OneBase™ TMAs are used with shared feeders and
shared antennas. OneBase™ diplexers at the BTS level incorporate DC redundancy circuitry,
automatically routing the DC to the feeder and blocking the opposite branch.
Figure 2: OneBase™ diplexed TMA system
4
November-2007
Bulletin II-102051-EN • Revision B
#
1
2 +
. /0
Figure 3 shows a TMA system with Andrew OneBase™ TMAs and separate feeders for each band.
The OneBase™ dual-band TMAs incorporate DC redundancy circuitry that allows DC supply for
both bands to be provided to either BTS/Node-B port.
Figure 3: OneBase™ non-diplexed dual-band TMA system
' ,
"
A detailed connection diagram for a typical single-band TMA system is shown in Figure 4. The PDU
receives DC input power from the BTS and outputs a summary alarm signal to the BTS. The Bias
Tee Harness is connected from the PDU to up to six Bias Tees to provide +12 VDC power to the
TMAs via the feeder cables. Embossed or engraved markings or labels are used to identify the ports
of the Bias Tees and TMAs. All equipment should be properly grounded.
3+ + 4 #
0
Twin TMAs include two identical RF paths (main and diversity). Conventional twin TMAs require DC
supply to both BTS ports, similar to two single TMAs. Andrew OneBase™ Twin TMAs incorporate
DC redundancy circuitry. DC supply for both RF paths can be provided to either BTS/Node-B port.
Bulletin II-102051-EN • Revision B
November-2007
5
To Antenna
To Antenna
ANT
TMA
GND
To BTS
RX/TX
Bias Tee
GND
GND
Feeder
To BTS
RX/TX
GND
Bias Tee Harness
Black: 1
Tower
Base Station
Gray or Yellow: 2
White: 3
To Sector 2
Red: 4
Green: 5
To Sector 3
Blue: 6
PDU
GND
2
1
Alarm Cable
Blue: NO
White: COM
To EAI
Brown: NC
Power Cable
White or 2: neg (-)
To DC supply: ±20 to ±60 VDC
Red or 1: pos (+)
Figure 4: Single-band TMA system connection diagram
6
November-2007
Bulletin II-102051-EN • Revision B
The PDU provides DC power conversion, regulation, and distribution to power TMAs at a cell site.
Each PDU can power up to six TMAs via six Bias Tees. Two different output current ranges are
supported for compatibility with a variety of TMA types. A shunting block on the rear panel allows
selection of the desired output current range.
The PDU monitors itself as well as each of the TMAs. The status of the PDU and each TMA output
is displayed by a set of LED indicators on the front panel. Alarm conditions are indicated by the
LEDs and also sent to the BTS EAI via the Alarm Interface.
The PDU is housed in a 1 rack unit tall, 19” rack mountable enclosure, designed for indoor
installation. All connections are located on the front panel.
Supply power for the PDU is provided by the BTS. Positive or negative voltage in the range 20 – 60
VDC is accepted.
#
The front panel connections and controls are illustrated in Figure 5.
Ground Stud
Power Input Connector
LED Indicators
DIP Switches
Figure 5: Front panel
%, 5 0 50
A ground cable can be attached here and routed to the equipment ground point. The cable should
be fitted with a 6mm (1/4”) diameter ring terminal. A 10 mm wrench is used to tighten the connection
securely.
3 , .5
6 ,
The Power Cable is connected here and routed to a supply point in the BTS providing 20 – 60 VDC,
positive or negative supply. The supply voltage is connected to Pin 1 (at left) and pin 4 (at right),
observing the polarity as marked on the panel. Pins 2 and 3 are not used. The Power Input is
floating (insulated from ground) and reverse polarity protected.
7
3+68
Controls the main power to the PDU. When power is turned off, delay timers and latched alarm
indications are reset, and the Alarm Interface defaults to the ALARM state.
Bulletin II-102051-EN • Revision B
November-2007
7
.5
9!
GREEN light indicates supply voltage is within specified range. DARK otherwise.
9!
GREEN light indicates internal voltage is within specified range. A DARK LED may indicate PDU
malfunction or short circuits present at more than two outputs.
"
,: !
GREEN light indicates voltage and current is within normal range for each output.
RED light indicates a fault condition, i.e., current is outside normal range (including when the output
is disabled). The RED light is latched and the indication will persist until reset by the user.
A DARK LED indicates current monitoring is DISABLED.
,:
, 6
6 ,
The Alarm Cable is connected here and routed to the BTS EAI. A summary ALARM state is indicated
if the PDU or any output is in a fault condition. The indication is automatically reset upon clearing the
fault condition. With no supply power to the PDU, the default indication is the ALARM state. An
insulated relay is used as the Alarm Interface.
;
,:
3+68
Flip down to ENABLE current monitoring for each output. Flip up to DISABLE. When DISABLED, the
associated LED is DARK, a latched RED light is reset, and the Alarm Interface ignores the output.
&
5 .5
3+68
Flip up to ENABLE and turn on voltage for each output. Flip down to DISABLE. When DISABLED, no
voltage is present on the output. If current monitoring is ENABLED, the LED and Alarm Interface
indicate a fault condition.
<
5 .5
6 ,
The Bias Tee Harness is connected here and routed to up to six bias tees. Each of the six outputs is
individually monitored and protected. Nominal voltage is +12 VDC.
LO CURRENT
HI CURRENT
The rear panel control is illustrated in Figure 6.
ALARM RANGE
SELECTOR
LO CURRENT MODE
HI CURRENT MODE
Figure 6: Rear panel
,:
4
6 ,
With power switched off, a shunting block is positioned as shown to select LO CURRENT or HI
CURRENT mode according to the type of TMA used. The factory default setting is LO CURRENT mode.
8
November-2007
Bulletin II-102051-EN • Revision B
- (
The Power Cable is illustrated in Figure 7. Two color-coded or number-coded 18 – 24 AWG wires in
a common jacket are attached to a pluggable terminal block on one end for connection to the PDU.
The opposite end is unterminated.
Power Cables are available in a selection of lengths and can be trimmed to the desired length on
site.
Figure 7: Power Cable
.
"(
The Alarm Cable is illustrated in Figure 8. Three color-coded 24 AWG wires in a common jacket are
attached to a D-sub plug on one end for connection to the PDU. The opposite end is unterminated.
Alarm Cables are available in a selection of lengths and can be trimmed to the desired length on
site.
Figure 8: Alarm Cable
/,
0 %
Bias Tee Harnesses are available in two styles. The standard style is illustrated in Figure 9 and has
six RG174 coaxial cables in a common jacket. The sector-split style (Figure 10) features three
jackets, each with two cables. A single D-sub plug connects to the PDU while the opposite end splits
to six SMA-male connectors to mate with Bias Tees. Individual cables are color-coded and may also
be numbered 1-6, matching the numbered PDU outputs:
Bias Tee Harnesses are available in a selection of lengths.
Bulletin II-102051-EN • Revision B
November-2007
9
Figure 9: Standard Bias Tee Harness
Figure 10: Sector-split Bias Tee Harness
1
2)3
A Rack Extender (see Figure 11) is used when installing the PDU in a standard EIA 23” rack. The
extender plate is attached to the left or right side of the PDU using the enclosed hardware.
Figure 11: Rack Extender
10
November-2007
Bulletin II-102051-EN • Revision B
!!
.
Select the installation location. The PDU installs in a standard 19” rack (or 23” rack using a Rack
Extender) in a climate controlled environment. It can be mounted in any orientation. Ensure optimum
airflow around the instrument for cool operation and maximum life expectancy.
Inspect the equipment. Ensure that all items are present, of the correct description, and without
evident damage.
Locate connection points for supply power, alarm interface, and Bias Tees. Determine the routing of
cables. Verify that the supplied cables are sufficient to reach these points. If not, relocate the PDU or
obtain cables of alternate length or style.
.
0
The following tools and supplies may be required to complete the installation:
•
•
•
•
•
•
•
•
Rack screws and screwdriver
Needle-nose pliers (if repositioning the Alarm Range Selector)
Ground cable with terminals, fasteners, wrench (10 mm), and other required tools
Terminals for Power and Alarm Cables, wire stripper, and other required tools
Fuse or circuit breaker for BTS power panel (1 – 5 A recommended)
Torque wrench, 7 – 10 in-lbs (0.8 – 1.1 Nm), 8 mm or 5/16”
Weather-sealing materials (for Bias Tee connections if outdoors)
Cable ties and marking materials
.
6
,:
4
Determine the applicable alarm current range based on the type of TMA used. See the table below
for supported TMA current consumption ranges.
' (
& '
8 '
) *
2 3 ./4
.4 3 2 .
&
+ *
5.
5.
&
6.74
62 2
LO CURRENT
HI CURRENT
Verify that the shunting block is correctly positioned in the Alarm Range Selector on the rear panel of
the PDU (Figure 12). To reposition, pull out the shunting block using needle-nose pliers and reinsert
it in the desired position.
ALARM RANGE
SELECTOR
LO CURRENT MODE
HI CURRENT MODE
Figure 12: Alarm Range Selector
Bulletin II-102051-EN • Revision B
November-2007
11
68
6= /
0 ,> . +
?
If installing the PDU in a 23” rack, first attach the Rack Extender to either side of the PDU using the
included hardware. Tighten the fasteners securely.
Mount the PDU in the rack using four suitable rack screws (not included). Tighten securely.
68%, 5 0
The addition of a ground cable is recommended but may not be necessary in some installations.
Using insulated copper wire in the AWG 5 – 10 (5 – 16 mm2) range, crimp a 6 mm (1/4”) ring
terminal to one end and attach to the PDU Ground stud (Figure 13). Tighten the nut to 6 Nm (4.5 ftlbs) torque using a 10 mm wrench. Avoiding sharp bends, route the ground cable to the common
frame or ground bar. Trim, and attach with suitable terminal and hardware.
Figure 13: Ground cable attachment
6
3 ,
Make sure that the On/Off switch on the PDU is in the OFF position. Connect the Power Cable to the
Power Input connector, pushing the connector firmly until it snaps in place. See Figure 14.
2
1
Figure 14: Power Cable connection
Route the Power Cable to the BTS power panel, trim, and attach with suitable terminals and
hardware. Observe the color or number markings on the two wires as shown in the table below to
determine correct polarity.
12
November-2007
Bulletin II-102051-EN • Revision B
%
) *,
.
%
"
= '
>$
9
:
'
"-"
.
:7 ;! <
%
= '
%
&-"
'
9
?
.
?7 ;! <
Use a dedicated circuit for the PDU if the BTS power panel is so equipped. Install a fuse or circuit
breaker with a rating in the 1-5 A range.
"
6
,:
Connect the Alarm Cable to the Alarm Interface connector and tighten the jackscrews (Figure 15).
Figure 15: Alarm Cable connection
Choose which relay terminals to use. Using the NO relay terminal is recommended because an
alarm indication will be obtained also in case the Alarm Cable becomes disconnected. The BTS
External Alarm Interface (EAI) should then be programmed to expect a closed circuit and to indicate
alarm when an open circuit occurs. Connection to the EAI is made with the NO and COM wires of
the Alarm Cable.
If the EAI expects an open circuit, use instead the NC and COM wires. The circuit will then close in
the ALARM condition. Refer to the table below for the color coding of the Alarm Cable.
%
>$
#
'
.
*
) +
*
+
&
'
'
&
&
&
&
*
&
Route the Alarm Cable to the EAI, trim, and attach with suitable terminals and hardware. Insulate
and tie off the unused wire.
Bulletin II-102051-EN • Revision B
November-2007
13
6 #+
$ ,
Connect the Bias Tee Harness to the DC Output connector and tighten the jackscrews (Figure 16).
Figure 16: Bias Tee Harness connection
Route the Bias Tee Harness to the Bias Tees, attach the SMA connectors and tighten to 0.8 – 1.1
Nm (7 – 10 in-lbs) torque using an 8 mm (5/16”) wrench. Refer to the table below for color coding of
the cables.
If TMA installation is not complete, leave the SMA connectors unattached
until a Functional Test per Section 5.4 has been successfully completed.
%
#%/
.
1
=
>$
=
'
@
#
2
A
/
7
0
0
. 1
""
.
2
Weather-seal the SMA connections if the Bias Tees are in an unprotected location. Coil and stow
any excess harness length. Do not attempt to cut or trim the Bias Tee Harness.
;
3+68
If fewer than six outputs are used to supply TMAs, first determine which outputs are in use by
observing the colors of the individual cables in the Bias Tee Harness.
14
November-2007
Bulletin II-102051-EN • Revision B
For all outputs in use, set the DC Output DIP switches to ENABLE (up) and the TMA Alarm DIP
switches to ENABLE (down). See Figure 17. For any unused outputs, set the corresponding DC
Output and TMA Alarm DIP switches to DISABLE.
Enable
Alarm
Enable
DC Output
Figure 17: TMA Alarm and DC Output DIP switches
&
+ +8
Check all connections and settings to ensure they are correct and secure. After passing the
Functional Test (see Section 5.4), dress and tie the cables making sure they are not exposed to
excess strain, crush, abrasion, heat, or accidental damage.
.
#
0
After completing the installation procedure, verify the installation by performing these tests. The
Functional Test can be done also prior to installing TMAs and/or Bias Tees.
8 6=
-
:
The PDU will be fully functional only once all parts of the TMA system are installed and all
connections made (complete system). To check the PDU installation before TMAs and/or Bias Tees
are installed (incomplete system), ensure the Bias Tee Harness SMA connectors are left unattached
during the Functional Test.
, ,:
@
:.
-
:
Turn the PDU ON. Verify the following front panel indications:
•
•
•
•
•
•
•
•
•
•
Input OK LED stays GREEN
DC2 OK LED stays GREEN
For all outputs where DC Output DIP switches are ENABLED and TMA Alarm DIP switches are
ENABLED, the TMA Alarm LED stays GREEN.
For all outputs where TMA Alarm DIP switches are DISABLED, the TMA Alarm LED stays DARK.
The Alarm Interface relay indicates NO ALARM.
Disconnect the Bias Tee Harness from the PDU.
For all outputs where DC Output DIP switches are ENABLED and TMA Alarm DIP switches are
ENABLED, the TMA Alarm LED turns RED in 5 s.
The Alarm Interface relay indicates ALARM.
Turn the PDU OFF.
Reconnect the Bias Tee Harness.
, ,:
@
6 :.
-
:
Turn the PDU ON. Verify the following indications:
•
•
Input OK LED stays GREEN
DC2 OK LED stays GREEN
Bulletin II-102051-EN • Revision B
November-2007
15
•
•
•
•
•
•
•
•
For all outputs where DC Output DIP switches are ENABLED and TMA Alarm DIP switches are
ENABLED, the TMA Alarm LED is initially GREEN and turns RED in 5 s.
For all outputs where TMA Alarm DIP switches are DISABLED, the TMA Alarm LED stays DARK.
Ensure at least one TMA Alarm DIP switch is ENABLED and a TMA Alarm LED is lit RED.
The Alarm Interface relay indicates ALARM.
Flip all TMA Alarm DIP switches up to DISABLE.
The Alarm Interface relay indicates NO ALARM.
Restore all TMA Alarm DIP switches to their designated positions.
Turn the PDU OFF.
* 5
If the Functional Test was passed, proceed to finish the installation per Section 5.3.9. If any
problems were encountered, troubleshoot (see Section 7), and then redo the test.
16
November-2007
Bulletin II-102051-EN • Revision B
"
Before operating, ensure all parts of the TMA system are installed and all connections completed.
Also refer to instructions provided with other equipment.
/
4
Turn the PDU ON. Verify that all front panel LEDs stay GREEN. Only LEDs for outputs with TMA
Alarm DISABLED shall be DARK. Observe the indications for 60 s to ensure they remain unchanged.
The TMA system is now operating. No further action is needed.
If short circuit conditions are present on outputs, the PDU may fail to start up. This is more likely to
occur with supply voltage in the lower part of the 20 – 60 VDC range. When failing, the PDU will
repeat the start-up sequence indefinitely, visible as the front panel LEDs keep flashing on and off.
Troubleshoot and correct the short circuit conditions per Section 7.
/
5
'
'
The PDU provides six independent regulated-voltage outputs. The nominal output voltage is +12
VDC with minimal variation across the operating temperature range and output currents up to 400
mA per output (2.2 A total maximum, all outputs).
/
(
'
Output current is individually monitored for each output. Normal current is any current within the
range determined by the setting of the Alarm Range Selector. Current below or above this range is
considered a fault and will result in alarm indication.
/
(
Each TMA output is individually protected from over-current and short circuit conditions. Current in
excess of 400 mA on any output will cause the output to go into SHORT CIRCUIT PROTECTION state.
The output voltage is then turned off, the TMA Alarm LED turns RED, and the Alarm Interface goes
into the ALARM state. After a brief interval, the PDU will attempt to re-apply the output voltage.
Periodic attempts will continue until the over-current condition is cleared. At that time, the output
automatically resumes operation and the Alarm Interface goes into the NO ALARM state. The TMA
Alarm LED remains RED until reset by the user.
Up to two outputs can be in the SHORT CIRCUIT PROTECTION state while remaining outputs continue
operating. If more than two outputs experience simultaneous over-current conditions, DC/DC
converter protection may be activated, affecting the operation of all outputs.
/.
"
"
5..-A
4
The supply voltage is internally monitored. Voltage outside the acceptable range will result in the
Input OK LED turning DARK and the Alarm Interface going into the ALARM state. The indications will
clear once the problem is corrected.
"
7
*, ,
The operation of the internal DC/DC converter is monitored. Malfunction, overload, or other problem
will result in the DC2 OK LED turning DARK and the Alarm Interface going into the ALARM state. The
Bulletin II-102051-EN • Revision B
November-2007
17
indications will clear once the problem is corrected.
"
5 .5
5,,
Each output is individually monitored. With associated TMA Alarm DIP switch ENABLED, current
consumption outside the selected range is considered a fault condition. Once a persistent fault
condition has existed on the same output for 5 s, the associated TMA Alarm LED turns RED and the
Alarm Interface goes into the ALARM state. The Alarm Interface will return to the NO ALARM state
after 1 s once the problem is corrected. As a means to facilitate troubleshooting of intermittent
problems, the TMA Alarm LED will be latched and remain RED until reset by the user.
An output with its DC Output DIP switch DISABLED will supply no current. With the associated TMA
Alarm DIP switch ENABLED, this is a fault condition resulting in alarm indication.
While the Alarm Interface is in the ALARM state, any additional fault conditions will be immediately
indicated by the LEDs without a 5 s delay.
"
,:
, 6
The Alarm Interface relay has two states. In the NO ALARM state, the relay is energized and indicates
trouble-free operation. The ALARM state (de-energized relay) is entered to indicate the presence of
any fault condition. A fault condition on a TMA output is ignored when the associated TMA Alarm
DIP switch is set to DISABLE. When the PDU is turned off, the Alarm Interface defaults to the ALARM
state.
//
""
'
5 .5
"
,:
To reset a TMA output alarm indicated by a RED TMA Alarm LED, flip the associated TMA Alarm
DIP switch up to DISABLE. The LED will turn DARK. Flip the switch down to re-ENABLE current
monitoring. If a fault is present, the LED will again turn RED.
""
,:
Turn the PDU OFF to reset all alarms. After turning back ON, any present or recurring fault will reactivate alarm indications.
/1
4! -
Turn the PDU OFF. All alarms and delays are reset. The Alarm Interface defaults to the ALARM state.
18
November-2007
Bulletin II-102051-EN • Revision B
#!
$
%
Because the PDU supplies and monitors the entire TMA system, all system components should be
considered when troubleshooting. The TMA system can include TMA, Bias Tee, surge arrestor,
diplexer (crossband coupler), and other devices in addition to RF and DC cables and connectors as
well as the PDU itself.
1
"
5 +
:
,
A digital instrument is preferred, capable of measuring DC voltage, current, and resistance. When
measuring current, use an unfused high-current input if a short circuit is suspected. For more
accurate current consumption measurement, use a low-current input and suitable measuring range.
3
.,
A frequency-sweep instrument incorporating detector and tracking generator should be able to
display return loss or VSWR at the operating frequencies of the TMA system. Always calibrate
before measuring for best accuracy. Use Distance-to-Fault (DTF) measurement judiciously as
results can be difficult to interpret due to the bandwidth limitation of the TMA.
1
(
26
Problems occurring the first time the TMA system is operated are often due to installation errors and
oversights. Be sure to check all RF and DC connections, switch and shunting block settings. The
check lists in this section may be helpful.
•
•
•
•
•
•
•
•
Check labeled or embossed port designators to ensure the BTS/Node-B port is connected to the
feeder and the ANT port to the antenna.
Some TMAs with more than one BTS/Node-B port accept DC supply on specific port(s) only.
Tower-top jumpers may be mislabeled or cross-connected.
Verify operating bands of TMA and antenna if high VSWR appears.
Uplink band VSWR may be degraded if the TMA is measured without DC supply.
The TMA, when detecting a malfunction in its circuitry, will raise or lower its current consumption
to a value outside the PDU normal current range in order to report the TMA fault. This will lead to
an alarm indication from the PDU.
A TMA equipped with VSWR detector will report a fault when the measured VSWR exceeds the
programmed limit. The VSWR detector requires TX power for its operation. Therefore, this type
of fault indication will clear if all transmitters in that RF path are turned off.
RF and DC operation of the TMA can be verified on the ground using a short jumper and known
good termination load as needed.
#+
•
•
•
•
•
The Bias Tee ANT port must be connected in the direction of the tower feeder, not the base
station. Connector genders vary by model.
Ensure the Bias Tee is installed on the same feeder as the TMA.
Verify that any Surge Arrestor in the path between the Bias Tee and TMA is only of the DC
passing type.
Ensure there are no other devices in the path that inject, block, or shunt DC voltage.
Verify the Bias Tee operating band if high VSWR appears.
Bulletin II-102051-EN • Revision B
November-2007
19
+
. /,
If DC passes through a diplexer (crossband coupler) at the base or tower top:
•
•
•
•
•
•
•
•
•
•
•
•
1
Ensure the device is designed to pass DC through the intended branch and in the intended
direction.
Ensure that (external or internal) DC blocking is present in the other branch(es).
Do not attempt to supply DC from multiple sources to the same feeder.
Verify operating bands of each branch if VSWR problems are encountered.
Remember to reset alarms after changing any connections.
Ensure all connectors are firmly engaged and secured.
Check DIP switch settings. Cycle the switches to make sure they are fully positioned in the
desired direction. Ensure no debris is obstructing travel of the levers.
Review marking and color coding of the Bias Tee Harness, especially where not all outputs are
used.
Review color coding of the Alarm Cable and the logic of the Alarm Interface and EAI.
Ensure the Alarm Range Selector is correctly set for the type of TMA used.
DISABLE all outputs and alarms. Turn the PDU ON, then ENABLE one output/alarm at a time to
locate offending outputs.
If all front panel LEDs keep flashing on and off as the PDU is turned ON, this indicates failure to
start up due to multiple short circuits on outputs. DISABLE all outputs to allow the PDU to start up
normally and then proceed with steps above.
0
Technical support is available 24 hours a day, five days a week through the Andrew Customer
Technical Support center (CTS). Between the hours of 11 pm Friday and 8 am Monday, immediate
support is available for any critical issue causing a service outage while other support requests will
be scheduled for the next business day.
Support Engineers provide guidance for installation and operation issues as well as interactive help
with troubleshooting. They can also assist with returning and replacing defective equipment. Contact
CTS by phone at the following numbers:
)
+*
2
20
November-2007
Bulletin II-102051-EN • Revision B
'
#
(
$
!
!
A functional block diagram of the PDU is shown in Figure A-1.
Input OK
Power
DC2 OK
TMA Alarm x 6
DC Output
On/Off
DC+
GND
GND
DC-
Input
Pwr
Monitor
DC/DC
Conv
Voltage
Reg
Current Mon
and
Protection
TMA 1
Voltage
Reg
Current Mon
and
Protection
TMA 2
Voltage
Reg
Current Mon
and
Protection
TMA 3
Voltage
Reg
Current Mon
and
Protection
TMA 4
Voltage
Reg
Current Mon
and
Protection
TMA 5
Voltage
Reg
Current Mon
and
Protection
TMA 6
Alarm
Interface
NC
Common
NO
TMA Alarm
Enable/Disable
6 outputs
Summary
Alarm
Ctrl
High/Low Current
Mode Select
6 inputs
DC Output
Enable/Disable
Microprocessor
6 inputs
6 inputs
Figure A-1: PDU Block Diagram
The input DC voltage (20 – 60 VDC) is converted to an intermediate voltage level by the DC/DC
converter. The intermediate voltage bus is then split into 6 output channels. Each channel is
individually regulated down to +12 VDC. A current monitoring circuit at the output of each voltage
regulator provides TMA alarm monitoring and short circuit protection. Each output can be individually
enabled or disabled.
The TMA alarm lines are OR-ed together to form a summary alarm signal which is presented for
monitoring by the BTS.
High/Low current alarm range can be selected by a shunting block to match the current consumption
of the TMA.
All inputs and outputs are protected from surges and electrostatic discharge.
(
'
"
The PDU measures the current delivered from each output and compares it to a programmed
normal range of current consumption which depends on the selected mode. The Multimode PDU
supports multiple modes selectable by the Alarm Range Selector.
Current consumption below or above the normal range will result in alarm if alarming is enabled.
Bulletin II-102051-EN • Revision B
November-2007
21
Andrew TMAs are equipped with internal fault monitoring and will raise or lower their current
consumption as a means to signal a fault condition to the PDU. Abnormal current consumption can
also result from other problems in the DC path from PDU to TMA.
The table below summarizes the behavior of the PDU in the LO CURRENT and HI CURRENT modes:
/
%
! (
#
(
$
%
%
%
'
3/ %
' ( *+
12%
' ( *+
5.
2 ? ./4
6.74
6A
5.
.4 ? 2 .
62 2
6A
+ *
34#
#%
/
&
&
&
&
"2
=
+
2
*
$
1
Applies when the TMA Alarm DIP switch is ENABLED.
If an alarm has previously occurred, the TMA Alarm LED will be latched RED until reset by the user.
3
SHORT CIRCUIT PROTECTION state (see below).
2
Beginning with revision 02, the PDU also supports special purpose modes MODE A and MODE B.
Refer to Appendix C for further information.
When in the SHORT CIRCUIT PROTECTION state, the DC Output is turned off. At intervals of 200 ms,
the output is turned on in attempts to recover. If the short circuit condition persists, the output is
immediately turned off again. Output duty cycle in the SHORT CIRCUIT PROTECTION state is 10%. In
the event the short circuit condition clears, the output will stay on following the next recovery
attempt.
"
The Alarm Interface is a form C, insulated dry contact relay. It is energized in the NO ALARM state
and therefore defaults to the ALARM state in the event the PDU loses supply voltage. Figure A-2
shows the relay connections and terminal designators.
Maximum current rating is 1 A at 24 VDC or 0.5 A at 120 VAC.
COM
NO
NC
COM
NO
NC
No Alarm
Alarm
Figure A-2: Alarm Interface relay
(
47
Pin-out for the Alarm Interface and DC Output connectors are shown in Figure A-3 and table below.
Figure A-3: Connector pin-out
22
November-2007
Bulletin II-102051-EN • Revision B
5
.
2
A
/
7
4
B
.
+ *2
&
$
#%/
) .:
)
:
) 2:
) A:
) /:
) 7:
=!
=!
3
&
3
3
3
3
3
3
!
PDU dimensions are shown in Figure A-4. The weight of the PDU without accessories is 1.1 kg.
Figure A-4: Mechanical dimensions, in (mm)
Bulletin II-102051-EN • Revision B
November-2007
23
' #(
#
,
The PDU and its accessories are each identified by a part number and revision code, typically found
on a label affixed to the item and/or its individual packaging. A label as in Figure B-1 is affixed to the
PDU.
Revision code
Part number
Serial number
Date of manufacture
Week/Year
Figure B-1: Part number label
The part number and revision code should be verified to ensure the applicable Installation and
Operation User Guide is used and should also be referenced when contacting Andrew Customer
Technical Support.
,
8"
6
The following part numbers are included in the scope of this Installation and Operation User Guide:
#
5 )!/A= ."4
!/A= ."4
!"
? .
+ *
& '
& '
&"
C8 '
C8 '
(
C
#
3 ,
5 )7. ."2
7. ."24
#
3 &
/
./
!"
3 &
,:
5 )7. ."2.
7. ."2
24
!"
./
November-2007
Bulletin II-102051-EN • Revision B
#
#+
$ ,
5 )7. ." .
7. ."2
7. ."24
7. ."A/
#
!"
6= /
"
.,
5
,
3 & +
//
./
.
B/
3 & 6
/
/
/
/
0,
5 ).B?4 2 ?.
#
.
!"
#"
.BD
2D
.8
,
)E
?..
!"
#"
$' %
1
%
8"
Model numbers provide a convenient way to order the PDU as a kit, including a defined set of
accessories. The model number is found on a label affixed to the packaging of the kit and should be
referenced when placing an order with Andrew Customer Care.
The table below lists model numbers currently issued and their configurations. Additional model
numbers may be issued based on demand and customer requests.
' ( )-
5#7
!-
!/A= ."42
"!27 2?! 7
"!27 2?! "
58
%,
7. ."2
7. ."2
7. ."2
+ *
%,
7. ."2.
7. ."2.
7. ."2.
6 "
1
""
7. ." .
7. ." .
7. ."A/
9
4:
3
3
3
(
Availability for ordering of a particular model number varies in different regions of the world.
Bulletin II-102051-EN • Revision B
November-2007
25
' (
(
)
#
!
Beginning with revision 02, the Multimode PDU supports special purpose modes MODE A and MODE
B in addition to the LO CURRENT and HI CURRENT modes, which are supported by all revisions.
MODE A and MODE B are intended for use in specific site configurations not described herein. The
user will need additional information if using MODE A and MODE B in these intended configurations.
Included here is a full description of Mode A and Mode B operation as it applies to the Multimode
PDU.
(
"
'
'
LO CURRENT
HI CURRENT
LO CURRENT
HI CURRENT
To select MODE A, position two shunting blocks as shown in Figure C-1. Only one shunting block is
included with the PDU. A second block can be obtained from another PDU operating in MODE B, or
ordered separately. To select MODE B, remove shunting blocks from the Alarm Range Selector.
Mode A
Mode B
Figure C-1: Shunting block positioning
(
7
The specific characteristics of MODE A and MODE B operation are summarized in the table below. All
other characteristics remain as described above for the LO CURRENT and HI CURRENT modes.
/
%
*+
! (
# %
%
(
%
$
'
!
9<
5,,
' ( +
' ( 6
' ( 6
5.2
.2/ ? .4
6.B
6A /
7
5.2
.2/ ? .4
6.B
6A /
7
5.
.4 ? 2 .
62 2
6A /
7
+ ,+ 4
The normal and short circuit current ranges apply as shown in the table. In MODE B, different normal
current ranges apply to outputs 1-3 and to outputs 4-6.
,:
-
A fault condition must persist for 60 s before the associated TMA Alarm LED turns RED and the
Alarm Interface goes into the ALARM state.
26
November-2007
Bulletin II-102051-EN • Revision B
)/ 2%4
)$
#
$'
-
*
&$ # +,
(
7
-
7
$% +,
,'
,'
,'
-*
'$
( ,'
,'
(
$
'
'
! "# " $$" %&'
- !. "&&'"%/$" $
#
/6
,
'
6
$
#
'
(
#
)
-
(
$ $$
.%%$' &#
(
(
0
8
"
&
$ "12 )
7
0 3 4 &5
6
9
$% +,