1
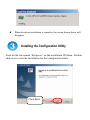
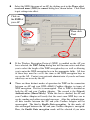
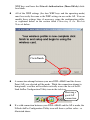
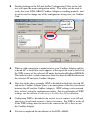
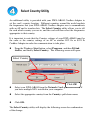
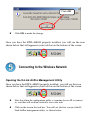
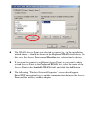
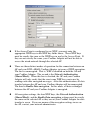
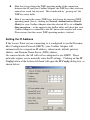
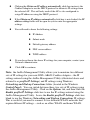
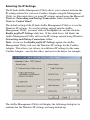
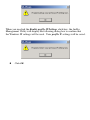
802.1a/b WLAN PC Card
802.11a and 802.11b Multimode WLAN Cardbus Adapter
Note: The installation screenshots were taken in Windows 2000. For other Windows Operating
Systems, the installation procedure will be nearly the same but the screens will differ in appearance
somewhat.
Package Contents:
D-Link AirPro DWL-AB650 Wireless Cardbus Adapter
Printed Quick Installation Guide
CD with Manual and Drivers
If any of the contents are missing, please contact your reseller.
System Requirements
A laptop computer with an available 32-bit Cardbus slot
At least a 300 MHz processor and 32 MB of memory
Cardbus Controller properly installed and working
An 802.11a or an 802.11b Access Point (for Infrastructure Mode) or
another computer with an 802.11a or an 802.11b wireless adapter
installed (for Ad-Hoc mode).
Installing the DWL-AB650
Turn on the computer.
Insert the D-Link
AirPro DWL-AB650
Wireless Cardbus
Adapter into an
available 32-bit
Cardbus slot.
Installing the Driver
Installing the software for your new DWL-AB650 Cardbus Adapter
involves two steps. The first is to install the driver for the Cardbus Adapter,
and the second is to install the Configuration Utility.
When the Cardbus Adapter is inserted in a Cardbus slot, Windows will
recognize the card and the following screen will appear:
Insert the Driver CD into your CD-ROM drive, if you have not done so
already. If the Driver CD is not in the CD-ROM drive, a prompt such as
the one below will appear. Click OK.
The installation will continue. The following screen appears to let you
know that the driver installation is continuing.
When the driver installation is complete, the screen shown above will
disappear.
Installing the Configuration Utility
Look for the file named “Setup.exe” on the installation CD-Rom. Doubleclick on it to start the installation for the configuration utility.
Click Next.
To install to the folder C:\Program Files\D-Link\AirPro Utility. Click
Next. Otherwise click on Browse to choose an alternate location.
Or Click
Browse
Click Next
Click Next.
Click Next
The Setup Status screen will appear and display the progress of the
installation.
A screen alerting you that all backup files have been removed will appear.
This is the next to the last screen to appear in the installation.
After AirPro Utility has been successfully installed, the
InstallShield Wizard will prompt you to restart your computer.
Select Yes, I want to restart my computer now, and click Finish.
After your computer has restarted, the following screen will appear.
Click Next.
Click Next
Select the SSID (the name of an AP) by clicking on it in the Please select
a network name (SSID) to connect dialog box, shown below. Click Next
to put settings into effect.
Click on
the SSID of
your AP
Then click
Next
If the Wireless Encryption Protocol (WEP) is enabled on the AP you
have selected, the WEP Setting dialog box will become active and allow
you to select the length of the WEP encryption keys as well as allowing
you to enter the WEP encryption keys in the appropriate fields. All four
of these keys must be exactly the same as the WEP encryption keys in
use on the AP. Contact your network administrator if you do not know
what keys are in use by the AP.
There are three distinct modes of operation for WEP on the connection
between an AP and your DWL-AB650 Cardbus Adapter, in terms of
WEP encryption. The first is unencrypted. That is, WEP is disabled on
both the AP and your Cardbus Adapter. The second is the Network
Authentication (Shared Mode). When this box is checked, the AP and
your Cardbus Adapter will verify that the exact same WEP keys are in
use by sending each other encrypted messages. After this authentication,
all data transfer between the AP and your Cardbus Adapter will be
unencrypted. The third is Enable Data encryption. In this mode, all
data exchanged between the AP and your Cardbus Adapter is encrypted.
Here, the Enable Data encryption mode will be selected if you enter
WEP keys and leave the Network Authentication (Shared Mode) clickbox blank.
All of the WEP settings (the four WEP keys and the operating mode)
must be exactly the same as the WEP settings in use on the AP. You can
modify these settings later, if necessary, using the configuration utility,
as explained below in the section titled Connecting to the Wireless
Network below.
Click Finish
A connection attempt between your new DWL-AB650 and the Access
Point (AP) you selected will be made. While the connection attempt is
being made, a red bar will oscillate vertically across the face of the DLink AirPro Configuration Utility icon in the task tray.
Showing a
good AP
connection
If a valid connection between your DWL-AB650 and the AP is made, the
D-Link AirPro Configuration Utility icon will show a yellow color − as
illustrated above.
Double-clicking on the D-Link AirPro Configuration Utility in the task
tray will open the main configuation utility. This utility can be used to
verify that your DWL-AB650 Cardbus Adapter is working properly, and
it can be used to change any of the configuation settings for you Cardbus
Card.
Showing a
good AP
connection
When a valid connection is made between your Cardbus Adapter and the
selected AP, a small blue circle appears at the top of the icon to the left of
the SSID (name) of the selected AP under the heading Preferred WLANs.
This indicates that a valid connection (link) has been established between
the selected AP and your Cardbus Adapter.
Note that in the above example, WEP is disabled on both the selected AP
and on the Cardbus Adapter (there is no encryption of the data transferred
between the AP and the Cardbus Adapter). WEP settings can be entered
here, or later, using the configuration utility. For an explanation of WEP
settings, see the section, Connecting to the Wireless Network below.
Configuring WEP as disabled is the easiest way to connect to an AP and
gain access to network resources, but is not secure. For WEP to work, all
of the WEP settings must be exactly the same on the AP as they are on
the Cardbus Adapter.
You have completed the installation of the DWL-AB650.
Select Country Utility
An additional utility is provided with your DWL-AB650 Cardbus Adapter to
set the card’s country location. Different countries around the world regulate
the frequencies that your DWL-AB650 Cardbus Adapter uses to communicate
with an AP and to transfer data. The Select Country utility allows you to tell
the card which country you are in, and the card will then select the frequencies
appropriate to that country.
It is important to note that the Country settings of your DWL-AB650 must be
the same as the country settings of an AP or another 802.11a or 802.11b
Cardbus Adapter in order for communication to take place.
From the Windows Start button, select Programs, and then D-Link
AirPro, and finally Select Country. The following screen will open:
Select Country
Click OK
Select your DWL-AB650 from the Network Card: pull-down menu, if
you have multiple NICs installed in your computer.
Select the appropriate country from the Country: pull-down menu.
Click OK.
The Select Country utiltiy will display the following screen for confirmation
of the change:
Click OK
Click OK to make the change.
Once you have the DWL-AB650 properly installed, you will see the icon
shown below that will appear in your task bar on the bottom of the screen.
Connecting to the Wireless Network
Opening the D-Link AirPro Management Utility
Once you have the DWL-AB650 properly installed, you will see the icon
shown below that will appear in your task bar on the bottom of the screen.
Note that when the configuation utility is scanning for an AP to connect
to, a red bar will oscillate vertically across the icon.
Click on the icon in the task bar. You will see the first screen of the DLink AirPro management utility, as shown below:
The WLAN Access Point you selected to connect to − in the installation
wizard above − should be shown in the Preferred WLANs field above. In
this case, the Access Point named HereOne was selected and is shown.
If you want to connect to a different Access Point, or you want to add a
second Access Point to the Preferred WLANs list, select the name of the
Access Point in the Available WLANs field, and click the Add button.
The following “Wireless Network Properties” screen should appear.
Enter WEP encryption keys to enable communication between the Access
Point and the wireless cardbus adapter.
Configuring the Wireless Encryption Protocol (WEP) Keys
Adding an AP to the Preferred WLANs list, or selecting any AP from the
Preferred WLANs list, and then clicking on the Properties button will open
the Wireless Network Properties dialog box, as shown below:
If the Access Point is configured to use the Wireless Encryption Protocol,
the Enable Data encryption check-box will be checked, and the WEP
enctryption key fields will be open for you to enter the appropriate WEP
keys, as shown below:
If the Access Point is configured to use WEP, you must enter the
appropriate WEP keys in the WEP key fields above. These WEP keys
must be exactly the same as the WEP keys in use by the Access Point. If
they are not exactly the same, your Cardbus Adapter will not be able to
access the wired network through the selected AP.
There are three distinct modes of operation for the connection between an
AP and your DWL-AB650 Cardbus Adapter, in terms of WEP encryption.
The first is unencrypted. That is, WEP is disabled on both the AP and
your Cardbus Adapter. The second is the Network Authentication
(Shared Mode). When this box is checked, the AP and your Cardbus
Adapter will only verify that the exact same WEP keys are in use by
sending each other encrypted messages. After this authentication, all data
transfer between the AP and your Cardbus Adapter will be unencrypted.
The third is Enable Data encryption. In this mode, all data exchanged
between the AP and your Cardbus Adapter is encrypted.
All encryption settings, the four WEP keys, the Network Authentication
(Shared Mode), and the Enable Data encryption settings must be exactly
the same on the selected AP as they are on your Cardbus Adapter for data
transfer to occur. If you are unsure of the encryption settings in use on
the AP, contact your network administrator.
Note that if you change the WEP operating mode of the connection
between the AP and your Cardbus Adapter, the WEP keys that you have
entered are saved, but not used. This is indicated by “greying out” the
WEP key entry fields.
Note if you enter the correct WEP keys, but choose the incorrect WEP
operating mode (that is, clicking the Network Authentication (Shared
Mode) for your Cardbus Adapter when the selected AP is set to Enable
Data encryption − or the opposite) the AirPro utility will show that your
Cardbus Adapter is connected to the AP, but no data transfer will occur.
Please ensure that the correct WEP operating mode is selected.
Setting the IP Address
If the Access Point you are connecting to is configured to use the Dynamic
Host Configuration Protocol (DHCP), your Cardbus Adapter will
automatically be assigned an IP address, subnet mask, default gateway
address, and Domain Name Server (DNS) address.
On some networks, the AP will not be configured to use DHCP. These
networks require you to manually enter the IP settings. Clicking on the IP
Config button at the bottom left-hand will open the IP Config dialog box, as
shown below:
Clicking the Obtain an IP address automatically click-box instructs the
Cardbus Adapter to use the DHCP protocol to obtain its IP settings from
the selected AP. This will only work if the AP is also configured to
assign IP addresses using the DHCP protocol.
If the Obtain an IP address automatically click-box is not clicked, the IP
address setting fields will be open for you to enter the appropriate
settings.
You will need to know the following settings:
IP Address
Subnet mask
Default gateway address
DNS server address
WINS address
If you do not know the above IP settings for your computer, contact your
Network Administrator.
Click OK to continue.
Note: the AirPro Management Utility allows you to maintain two different
sets of IP settings for your new DWL-AB650 Cardbus Adapter − the IP
settings entered using the AirPro Management Utility (illustrated above and
referred to as profile IP Settings) and IP settings using Windows
Networking and Dial-up Connections folder (located in the Windows
Control Panel). You can switch between these two sets of IP settings using
the AirPro Management Utility. Click on the Options tab, and then click the
Enable profile IP Settings click-box to use the IP settings entered using the
AirPro Management Utility. Leave the Enable profile IP Settings click-box
blank to use the Windows Networking and Dial-up Connections IP settings.
This is useful if you need to connect to two different WLAN networks that
require different IP settings − such as an office WLAN and home WLAN.
Selecting the IP Settings
The D-Link AirPro Management Utility allows you to choose between the
IP settings entered for your new Cardbus Adapter using the Management
Utility (as illustrated above) or using IP settings entered using the Microsoft
Windows Networking and Dial-up Connections folder (located in the
Windows Control Panel)
The default setting of the D-Link AirPro Management Utility is to use the
Windows IP settings. To use the settings entered into the AirPro
Management Utility, you must click on the Option tab, and the click the
Enable profile IP Settings click-box. If this click-box is left blank, the
AirPro Management Utility will use the IP settings entered using Windows
Networking and Dial-up Connections folder.
Note: if you use the Enable profile IP Settings option, the AirPro
Management Utility will save the Windows IP settings for the Cardbus
Adapter. This allows you to have two different IP settings for the same
Cardbus Adapter − one for the office, and one for the home, for example.
The AirPro Management Utility will display the following dialog box to
confirm that the Windows IP settings are being backed-up:
When you un-click the Enable profile IP Settings click-box, the AirPro
Management Utility will display the following dialog box to confirm that
the Windows IP settings will be used. Your profile IP settings will be saved.
Click OK.
Technical Support
The most recent software and documentation are available on the D-Link website.
D-Link provides free technical support for customers within the United States
during the warranty period on this product.
U.S. customers can contact D-Link Technical Support through our web site, or by
phone.
D-Link Technical Support over Telephone:
(877) 453-5465
24 hours a day, seven days a week.
D-Link Technical Support over the Internet:
http://support.dlink.com
Building Networks for People