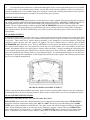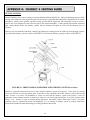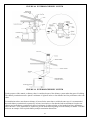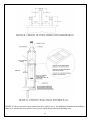
1
INSTALLATION OPERATION
& MAINTENANCE MANUAL
FOR
FREESTANDING MODELS: BBF
INSERT MODELS: BBF
RETAIN THESE INSTRUCTIONS
Version 7.2
WARNING:
COUNTRY FLAME RECOMMENDS A CERTIFIED PROFESSIONAL INSTALL AND
SERVICE WOOD BURNING STOVES. IMPROPER INSTALLATION OR SERVICE WILL
VOID THE COUNTRY FLAME WARRANTY. IMPROPER INSTALLATION CAN ALSO
RESTRICT, LIMIT, OR VOID A HOMEOWNER’S INSURANCE POLICY. READ THIS
ENTIRE MANUAL BEFORE UNDERTAKING THE INSTALLATION PROCESS. IMPROPER
INSTALLATION IS THE LEADING CAUSE OF WOOD STOVE PROPERTY DAMAGE. A
HOUSE FIRE, BODILY INJURY OR EVEN DEATH CAN OCCUR DUE TO IMPROPER
STOVE INSTALLATION. CHECK WITH LOCAL BUILDING OR FIRE INSPECTORS
ABOUT LOCAL CODE RESTRICTIONS AFFECTING INSTALLATION.
1
Country Flame Technologies grants no warranty, implied or written, for the installation or maintenance of any catalytic stove.
As such, Country Flame assumes no responsibility for any consequential damage resulting from the improper installation or improper
care of any specific catalytic stove.
2
Please fill out and return the warranty card within 30 days of purchase of a specific model catalytic stove.
3
ALWAYS consult local building authorities to determine if a permit is required for installation of any stove covered by this
manual.
4
ALWAYS consult local codes before installation to obtain information on local restrictions or additional local code
requirements.
5
ALWAYS maintain minimum clearances from all combustible surfaces and materials including clothing, drapes, furniture,
carpets, walls, wood, paper, etc. Do not store firewood within clearances established for a catalytic stove.
6
This stove requires a non-combustible fireplace hearth. Refer to the floor protection section in this manual.
o
7
ALWAYS connect any stove covered in this manual to a (a) listed UL103 or USC S629 rated type HT (2100 F) chimney or
(b) code-approved masonry chimney with an appropriate flue liner. The chimney size should not be less than the stove flue collar size
or more than three times greater than the cross-sectional area of the flue collar.
8
NEVER OVER FIRE ANY FIREPLACE. If any part of a catalytic stove or chimney glows red it has been over fired.
Over firing causes a catalytic stove to operate at temperatures outside its designed capability. Over firing immediately voids the
catalytic stove warranty.
9
NEVER attempt to repair any part of a catalytic stove. Only qualified service personnel should make installations and
repairs. Any parts removed for servicing must be replaced prior to operation.
10
NEVER leave a catalytic stove unattended and burning on high. Uncontrolled and unattended high burn fires will lead to
over firing.
11
NEVER connect a stove described in this manual to a chimney flue already connected to another appliance.
12
NEVER install any Country Flame catalytic stove in a sleeping room.
13
NEVER CONNECT ANY PART TO AN EXISTING HOME AIR DUCT DISTRIBUTION SYSTEM.
14
NEVER use gasoline, lantern fuel, kerosene, charcoal lighter fluid, or similar combustible liquids to start or freshen up a fire.
Vapors from these liquids are highly explosive. Keep them a safe distance from stove.
15
ALWAYS use only solid wood fuel. Country Flame catalytic stoves have been approved for burning only dry seasoned
natural wood.
16
NEVER BURN GARBAGE, FLAMMABLE FLUIDS, OR TREATED WOOD.
17
NEVER allow creosote to build up in the chimney system. Inspect the chimney system at least twice monthly during use and
clean as required. Using green or improperly seasoned wood can greatly increase the production of creosote. Use wood with less than
25% moisture content in order to minimize creosote buildup.
18
ALWAYS wait until the unit is completely cool to perform any maintenance or cleaning procedures.
19
THIS STOVE IS HOT WHILE IN OPERATION. KEEP CHILDREN, CLOTHING, AND FURNITURE AWAY.
CONTACT MAY CAUSE SKIN BURNS.
20
SUPERVISE children when they are in the same room with an operating fireplace.
21
ALWAYS follow the lighting instructions in this manual; short cuts of any kind can be dangerous.
22
ALWAYS check local building codes and consult with your insurance company before installing your unit.
23
ALWAYS dispose of ash accumulations from your unit, using a metal container with a tight fitting lid. Place the closed ash
container on a non-combustible surface well away from all combustible materials, pending final disposal. Retain all ashes in the
closed container until they have thoroughly cooled.
24
INSTALL any safety screen; guard, or doors removed for maintenance prior to operation.
25
NEVER block free airflow through open vents connected to the fireplace units.
26
INSTALL a smoke detector within the proximity of a catalytic stove.
27
ALWAYS observe the unit closely during operation. If any part of the catalytic stove starts to glow red or white, it is in an
over fire condition. Close the air controls completely until the glowing material has returned to a normal dark color.
2
28
NEVER burn wet or green wood. Firewood should be stored in a dry location away from the elements.
29
Check your chimney system carefully before installation. If in doubt about a chimney’s condition, contact a certified
professional.
30
ALWAYS comply with all minimum clearances to combustibles as they appear in this manual.
31
See the listing label located on the back of the catalytic stove for additional safety information.
32
ALWAYS start a fire with paper and kindling. Adding of wood fuel should be moderate as the fire progresses. Do not burn
large quantities of paper or foreign materials that create an extremely hot, quick fire that can lead to over fire conditions.
33
NEVER burn a catalytic stove with the damper open, except when reloading a stove.
34
ALWAYS build fires directly on the refractory brick floor. DO NOT use andirons or grates or elevate the fire in any other
manner.
35
For further information on using your catalytic wood stove, obtain a copy of the National Fire Protection Association’s
“Using Coal and Wood Stoves Safely”, NFPA No. NS-10-1978. The address of the NFPA is 470 Atlantic Avenue, Boston,
Massachusetts 02210.
36
INSTALLATION of a catalytic stove shall be in accordance with the Manufactured Home and Safety Standard (HUD), CFR
3280, Part 24.
37
Never allow the combustion or blower air intake to be blocked. Once a stove is installed as an insert do not allow a raised
hearth to create a blockage.
38
CAUTION: Do not turn a room air blower on until the fire has been burning for 30 minutes or longer. (This is not
applicable to units without the blower option.)
39
Never slam the door, strike the glass, or over tighten the glass screws.
40
ALWAYS operate a Country Flame catalytic stove with the door closed, except during refueling operation.
41
Do not burn coal in your stove
42
Keep the door of the unit closed except during the fueling process.
43
44
Check the door and glass seal frequently and keep them in good condition.
SAVE THESE INSTRUCTIONS
3
SAFETY NOTES................................................................................................................................................................2-3
4
BBF SAFETY LABEL (FREESTANDING OR INSERT APPROVED).........................................................................4
TABLE OF CONTENTS .....................................................................................................................................................5
EPA CERTIFIED......................................................................................................................................................7
LISTING/TESTING AGENCY..................................................................................................................................7
MANUAL USAGE....................................................................................................................................................7
FORWARD – WHY A CATALYTIC STOVE?.................................................................................................................8
EARLY HISTORY...................................................................................................................................................8
HISTORICAL RESULTS ........................................................................................................................................8
REFERRAL…………………………………………………………………………………………………………9
THEORY OF OPERATION ..............................................................................................................................................10
LIMITED LIFETIME WARRANTY................................................................................................................................11
FREESTANDING INSTALLATION PROCEDURES ...................................................................................................14
MINIMUM CLEARANCES ...................................................................................................................................14
ALTERNATE MINIMUM CLEARANCES............................................................................................................14
ALCOVE CLEARANCES.......................................................................................................................................16
FLOOR PROTECTION REQUIREMENTS............................................................................................................17
CHIMNEY REQUIREMENTS ...............................................................................................................................18
FREESTANDING LEG REQUIREMENTS............................................................................................................19
STOVE INSTALLATION PREPARATION ..........................................................................................................20
INSERT INSTALLATION PROCEDURES ....................................................................................................................21
FACTORY BUILT FIREPLACES...........................................................................................................................21
MASONRY BUILT FIREPLACES ........................................................................................................................21
DRAFT .....................................................................................................................................................................22
MINIMUM CLEARANCES ...................................................................................................................................22
FLOOR PROTECTION REQUIREMENTS............................................................................................................22
SHROUD AND TRIM INSTALLATION................................................................................................................24
MOBILE HOME INSTALLATION..................................................................................................................................25
STOVE TERMINOLOGY .................................................................................................................................................25
STOVE COMPONENTS..........................................................................................................................................25
MANUAL DRAFT CONTROLS.............................................................................................................................25
CATALYTIC COMBUSTORS................................................................................................................................26
CATALYTIC BYPASS ROD...................................................................................................................................26
BLOWER UNITS.....................................................................................................................................................26
8” PROBE THERMOMETER..................................................................................................................................26
WOOD FUEL REQUIREMENTS ..........................................................................................................................27
CHIMNEY................................................................................................................................................................27
CHIMNEY CONNECTOR ......................................................................................................................................27
FLUE TRANSITION ...............................................................................................................................................27
WALL THIMBLE ...................................................................................................................................................27
MODEL BBF (FREESTANDING/INSERT) ....................................................................................................................30
MODEL BBF SPECIFICATIONS (FREESTANDING/INSERT) .................................................................................32
APPENDIX A: REPLACEMENT PARTS DESCRIPTION...........................................................................................33
CATALYST PARTS ...............................................................................................................................................33
5
DOORS.....................................................................................................................................................................33
ELECTRICAL..........................................................................................................................................................33
REFRACTORY BRICK.......................................................................................................................................33
GLASS......................................................................................................................................................................33
HANDLES & KNOBS ............................................................................................................................................33
HARDWARE ..........................................................................................................................................................34
INSULATION .........................................................................................................................................................33
MOTORS..................................................................................................................................................................34
OWNER'S MANUAL .............................................................................................................................................34
TRIM & GRILLS.....................................................................................................................................................35
GASKETS ...............................................................................................................................................................35
APPENDIX B: OPERATION & MAINTENANCE GUIDE...........................................................................................36
FIRST FIRE, STEP 1................................................................................................................................................36
FIRST FIRE, STEP 2................................................................................................................................................36
FIRST FIRE, STEP 3................................................................................................................................................36
FIRST FIRE, STEP 4................................................................................................................................................36
FIRST FIRE, IGNITION .........................................................................................................................................36
DRAFT PROBLEMS ...............................................................................................................................................37
FIRST LARGE FIRE................................................................................................................................................38
CARE OF STOVE GLASS: ....................................................................................................................................39
GLASS REPLACEMENT........................................................................................................................................39
GLASS-CERAMIC SPECIFICATIONS..................................................................................................................39
GLASS-CERAMIC CLEANING.............................................................................................................................40
DECORATIVE DOORS ..........................................................................................................................................40
ROOM AIR BLOWER MAINTENANCE...............................................................................................................41
ROOM AIR BLOWER TESTING ..........................................................................................................................41
BLOWER MALFUNCTION....................................................................................................................................42
NO ELECTRICITY..................................................................................................................................................42
CREOSOTE BUILDUP............................................................................................................................................42
FIREBOX TIPS AND TECHNIQUES.....................................................................................................................42
APPENDIX C: CATALYTIC SYSTEM ...........................................................................................................................43
THE CATALYTIC COMBUSTOR ..................................................................................................................................43
CATALYTIC COMBUSTOR CLEANING......................................................................................................................43
REPLACING THE COMBUSTOR...................................................................................................................................44
WARRANTY ....................................................................................................................................................................45
HOME INSURANCE........................................................................................................................................................45
FEDERAL LAW ...............................................................................................................................................................45
COMBUSTOR PROBLEMS ............................................................................................................................................45
MODEL BBF CATALYST INSPECTION & REPLACEMENT..................................................................46
CLEANING INSPECTION...............................................................................................................................................46
REPLACEMENT INSPECTION......................................................................................................................................46
REPLACEMENT ..............................................................................................................................................................46
APPENDIX D: BLOWER SYSTEMS, ELECTRICAL ..................................................................................................47
BLOWER THEORY OF OPERATION ...........................................................................................................................47
MODEL BBF ....................................................................................................................................................................47
6
APPENDIX E: WARNING LABELS................................................................................................................................49
APPENDIX F: TROUBLESHOOTING GUIDE..............................................................................................................52
APPENDIX G: CHIMNEY & VENTING GUIDE ..........................................................................................................54
VENTING SYSTEMS.......................................................................................................................................................54
THIMBLE INSTALLATION............................................................................................................................................55
OUTSIDE AIR COMBUSTION ......................................................................................................................................58
CHIMNEY INSTALLATION...........................................................................................................................................58
PREFABRICATED CHIMNEY SYSTEM INSTALLATION ........................................................................................61
EPA CERTIFIED
All Country Flame catalytic stoves have passed rigorous emission standard testing. All Country Flame catalytic stoves
have been certified by the United States Environmental Protection Agency.
LISTING/TESTING AGENCY
All Country Flame catalytic stoves have been tested to UL listing standards UL1482, ULC-S627 for installation into
residential dwellings, including standard construction units, mobile home, or modular home units. All catalytic stoves
tested to UL standards by Intertek Testing Services, NA, Inc., 8431
MANUAL USAGE
Please read, understand, and carefully follow all instructions, installation procedures, and proper care and maintenance
advice found in this manual. Please observe the safety instruction contained in this manual. If there are any questions,
please contact Country Flame or one of its authorized dealers.
7
Why consider a Country Flame Technologies catalytic stove for your home?
EARLY HISTORY
During the 1970’s Americans became obsessed with both indoor and outdoor air quality. By the early 1980’s America’s
obsession turned into governmental regulatory controls as the screams for improved air quality reached fever pitch.
Someone coined the phrase “fugitive emissions” and government agencies sprang into action to define, document, and
control fugitive emissions being released into the atmosphere from just about any source imaginable.
Of course, government involvement meant that dozens of laboratories sprang into action to begin the study of fugitive
emissions. Soon government laboratories had full-fledged programs studying the wood burning fireplace and stove
industry. The objective: to define the atmospheric (fugitive) emissions that was resulting from the use of every fireplace
or stove. At this historic point in time, the fireplace manufacturing industry changed from “art form to science” and
spelled the doom of literally thousands of small “mom and pop” manufacturers.
The fireplace industry had long understood the correlation between the three parts of a fire: a) fuel, b) oxygen, and c) heat
but the exacting theory of mixing these basic items and the resultants (emissions) eluded even the most sophisticated pre1970 fireplace manufacturer. Not the government laboratories! Quantification (defining numbers) was a government
specialty and thousands of papers were written on non-airtight and airtight fireplace combustion. These learned papers
defined and quantified every aspect of wood burning particulate emissions.
HISTORICAL RESULTS
The laboratory findings were conclusive. In 1970, wood stoves did emit large amounts of what has come to be known as
polycyclic organic matter, or POM’s. Many of these POM emissions were known to be carcinogens (meaning cancer
causing.) Armed with new documented science and an overabundance of evidence caused the Regulator Agencies to
spring into action. Soon draft government (federal and state) regulations were proposed that would establish limits on the
emissions of just about every fuel-burning device, including wood burning products. Once these government regulations
were rumored to be just a vote away, fireplace manufacturers sprang into action to design product that would meet the
new evolving emissions criteria.
Country Flame Technologies was part of that late 1970’s push to produce cleaner burning fireplace and stoves. Like all
fireplace manufacturers, Country Flame asked the question, HOW CAN EMISSIONS BE CONTROLLED? The answer
was as simple as the question, ENSURE FIREPLACES BURN 100% EFFICIENT. 100% BURN EFFICIENCY
ENSURES ALL UNACCEPTABLE EMISSIONS ARE ELIMINATED. It is always easier to state the problem and an
answer than it is to put it into practice. Country Flame engineers remained undaunted. In the early 1980’s Country Flame
Technologies began work on a full line of catalytic wood burning freestanding or insert stoves. Country Flame’s catalytic
stoves have evolved into an efficient and clean wood-burning product line.
Most likely, if you have read this far, you are strongly thinking about or have purchased a Country Flame catalytic stove.
After almost three decades of continuously developing this line of products, all of us at Country Flame are very proud of
this American born, American tested, and American produced product. With a sense of pride and dedication, our
employees wish you and your family a lifetime of happiness and warmth with a Country Flame catalytic stove. On behalf
of Country Flame, THANK YOU.
8
American Energy Systems, Inc.
150 Michigan St SE
Hutchinson, MN 55350
1-800-495-3195 320-587-8872 (fax)
REFER a FRIEND, NEIGHBOR or FAMILY MEMBER . . .
American Energy Systems believes that our success is fueled by your
satisfaction of owning a quality MagnuM or Country Flame product.
Over the past 37 years, we have been very fortunate to have satisfied,
loyal homeowners that have helped to grow our business. We’ve
created the MagnuM Referral Program as an added incentive to
continue this trend.
Participating is easy – just refer a friend, neighbor or family member
and once they purchase a MagnuM or Country Flame quality product to
keep their family warm, we’ll send you a check for $50.00
to show our appreciation!
Now that’s an easy way to a FREE renewable energy home heating
MagnuM product!
To refer a homeowner, provide the information on our quick referral program on-line at:
http://www.americanenergysystems.com/customer-referral.cfm
1-800-495-3196
or call us at
or write us at
American Energy Systems, Inc.
150 Michigan St SE
Hutchinson, MN 55350
Please provide Homeowner’s: Name, Address, City, State, Zip Code,
Telephone and/or Email Address
and we’ll take it from there.
We appreciate your participation!
Program Conditions:
A valid referral must be a homeowner that American Energy Systems has not had contact regarding our
products. There is no limit to the number of MagnuM or Country Flame referral payments that can be earned.
A referral payment may be split when multiple parties refer the homeowner. There is no limit between the
time of the referral and the time the purchase is made. American Energy Systems reserves the right to amend
or cancel the referral program at any time.
9
The purchase of a Country Flame Technologies catalytic stove is usually made based on its looks, its heating capacity, and
because of reduced emissions (clean and efficient burn.) Once the catalytic unit has been properly installed in a home,
usually the next question asked by the homeowner is how can a catalytic stove’s favorable operational characteristics be
maintained over the life of the product?
In 2004, the study of woodstove emissions and woodstove efficiency remains a strongly debated issue. “Experts” use
significantly different methodologies to arrive at often-conflicting conclusions. One thing is for certain, these same
experts unanimously agree on one aspect of a stove’s pollution and creosote production process: All stove studies
conclude that a homeowner’s operating procedure dramatically impacts the production of POM’s (fugitive emission) more
than any other single factor that has been examined over the past 20 years! BOTTOM LINE: a homeowner must
understand and operate a catalytic stove correctly to maintain its cleanliness and efficiency!
Catalytic stove theory is quite simple. The catalytic combustor begins oxidizing carbon monoxide and other flue gases
O
around 600 F. With the bypass flue open, the stove operates as a non-catalytic stove and fugitive emissions escape up the
O
chimney unrestricted. As the stove reaches 700 F degrees, close the bypass flue. All emissions are then forced to travel
through the combustor on their way to the chimney. As the stove’s temperature continues to rise, the combustor ignites
more particulates effectively burning these emissions. This secondary combustion, as it is called, occurs traditionally at
O
O
temperatures 300 F to 600 F degrees lower than in non-catalytic stoves. Once “light-off” of the catalytic combustor
occurs, the overall efficiency and cleanliness of burn is dramatically improved in a catalytic stove.
The catalytic combustor creates a secondary burn process that “scrubs” the exhaust emissions producing a cleaner exhaust
gas. When operated properly, the Country Flame catalytic stove benefits are a) improved efficiency, b) longer burn times,
c) reduced chimney fire potential, and d) reduced operating costs. In order to maintain the Country Flame warranty, the
catalytic combustor must be properly engaged at all times during operation. Removing the combustor is dangerous and
can lead to uncontrolled or over firing. Operation of the stove with the combustor removed instantly voids Country
Flame’s warranty. Further, operating a woodstove in any manner that is restricted by Country Flame can cause a
homeowner’s insurance policy to be negatively affected. REMEMBER: Federal Law requires all catalytic woodstoves
to be maintained and operated with combustors in place over the life of the stove.
The catalytic combustor is a honeycomb ceramic and noble metal device. The catalytic combustor initiates combustion of
secondary gases at lower temperatures than would be possible without the combustor installed while not destroying itself.
Most modern catalytic combustors are designed to survive over 12,000 hours of continuous use. Operator use, firing
practices, and the type of fuel used can all negatively affect the life expectancy of the combustor. Signs of combustor
problems include increased smoke from the chimney, creosote accumulation, poor performance of the unit, continued
firebox smoking, and an increase in fuel consumption. Here are five ways to produce cleaner air when operating a
catalytic woodstove:
1
2
3
4
5
Use the largest diameter log that is practical in a particular model.
Build as small a fire as practical.
Keep the firebox hot and attempt to maintain a constant stove temperature.
Do not dramatically change draft settings. Gradual draft changes improve performance.
Avoid excessively dry or wet fuel. 20 to 25% moisture content in wood is good.
NEVER FORGET: Correct operation of a catalytic woodstove is key to its efficiency and life expectancy!
10
AMERICAN ENERGY SYSTEMS INC. LIMITED PRODUCT WARRANTY
This warranty is in effect on all products sold after 01/01/2009 and supersedes any and all warranties currently in existence.
Please keep a copy of this warranty for your personal records or in the event of a claim
American Energy Systems Inc., hereinafter referred to as (AES), warrants to you, the original consumer purchaser, that this product is
free from defects in material and workmanship for a period of five (5) years from the original purchase date minus any time past one
(1) year from manufacturing date, and that the product’s electrical parts and steel firepot, are free from defects in material and
workmanship for a period of one (1) year from the original consumer purchase date minus any time past one (1) year from
manufacturing date, and that the cast iron firepot models carry a lifetime warranty against defect in material or workmanship
(excluding war page or deterioration), and that door glass carries a lifetime replacement warranty against heat breakage (does not
cover accidental breakage) . There is expressly no warranty on installation of product, any venting, grates, gaskets, door latches,
insulation, ceramic or brick boards/logs/backing, paint, plated surfaces/doors/trims, baffles, bushings, bearings, auger flightings, war
page or discoloration of steel or plated parts or any other normal wearing part. In the event the product fails to conform to this
warranty, AES, through the place where you purchased the product or if purchased on the AES E-Com store directly through AES,
will provide the parts and components necessary to remedy such nonconformity. AES will not be responsible for any labor, mileage
or freight cost to the factory under this warranty. This warranty is not transferable.
In order to obtain performance under this warranty, you must (1) have registered this warranty within 30 days of purchase by
completing and returning the warranty registration card or filling in the on-line warranty registration form at www.magnumheat.com,
and (2) promptly report the claimed nonconformity to your place of purchase, also providing your name, address, phone number,
proof of purchase, date of purchase, the model and serial number of the stove, digital pictures of installation and venting inside and
outside of the home, pictures of the claimed nonconformity part and the claimed nonconformity. All claims must be submitted in
writing to your place of purchase.
AES shall have no warranty obligations if this product; (1) was not purchased from an authorized AES dealer; (2) was not installed by
a AES dealer or other qualified installer; does not have outside combustion air hooked directly to the unit; (3) was not operated and
maintained in strict accordance with the manufacturer’s instructions, local or national codes or (4) was subject to abuse, misuse,
negligence or accident. AES shall have no warranty obligation for damage caused by improper handling, freight damage (must be
reported to freight provider), over-firing, unapproved fuel, variance in feed rates, variances in BTU output or the unauthorized
disassembly or modification of the product. AES shall have no warranty obligation if this warranty is not timely registered, for claims
which are not submitted through the selling AES dealer, or for claims submitted verbally or without the required information and
documentation.
Before exercising this warranty, an AES representative (the place where the product was purchased or AES approved person) must
inspect the part/unit to determine if the part/unit is defective. If a local AES representative is not available the original purchaser of
the product must submit digital pictures of the part/unit, installation of the unit to AES at [email protected] If the
inspection reveals that the failure is due to defective material or workmanship and the part is covered by the conditions of this
warranty, AES will, at its option, repair the defective part/unit. The sole duty of AES and liability under this warranty is limited to the
repair of the covered defective part/unit. The purchaser shall assume all costs related to shipping the replacement parts or return of the
unit to the factory for repairs. If it is determined that the defect was caused by AES, AES will cover the costs of shipping the repaired
part/unit to an AES approved shipping point. AES will not cover additional freight or delivery services such as residence delivery
charges, special handling, etc.
INSTALLATION, VENTING, REMOVAL OR REINSTALLATION COSTS ARE NOT COVERED BY THIS WARRANTY.
THE WARRANTY PRINTED ABOVE IS THE ONLY WARRANTY APPLICABLE TO THE PRODUCT. ALL
OTHER WARRANTIES, EXPRESSED OR IMPLIED, INCLUDING, WITHOUT LIMITATION, THE IMPLIED
WARRANTIES OF MERCHANTABILITY AND FITNESS FOR A PARTICULAR PURPOSE, ARE DISCLAIMED.
IT IS UNDERSTOOD AND AGREED THAT AES’S LIABILITY UNDER THIS WARRANTY SHALL BE LIMITED
TO THE PROVISION OF REPLACEMENT PARTS AND SHALL NOT INCLUDE LIABILITY FOR SPECIAL,
INCIDENTAL OR CONSEQUENTIAL DAMAGES. ANY ACTION BROUGHT UNDER THIS WARRANTY MUST
BE BROUGHT WITHIN ONE YEAR OF THE ACCRUAL OF THE CAUSE OF ACTION AND MAY ONLY BE
BROUGHT IN THE CIRCUIT COURT OF MCCLOUD COUNTY, MINNESOTA.
Some states do not allow limitations on how long an implied warranty lasts or the exclusion or limitation of incidental or consequential damage, so
the above limitations may not apply to you. This warranty gives you specific legal rights, and you may also have other rights which vary from state
to state.
ALL WARRANTY CLAIMS MUST BE SUBMITTED IN WRITING THROUGH THE PLACE WHERE THE PRODUCT WAS
PURCHASED. In the event where the place of purchase has ceased business or if you feel that there is a legitimate reason that you
11
cannot submit your claim to the place where the product was purchased you may make a written request to the factory by emailing
your request along with all of the required information to [email protected] . NOTE: Verbal requests will not be
recognized. If it is determined that warranty could have been performed by the place of purchase, the factory will deny the
claim.
Included with the claim must be the following information: (if this information is not complete, the claim will be denied)
Name, address, telephone number, email address, of place of business where product was purchased & also purchaser contact
info.
Date of purchase, model and serial number of product, digital pictures of product (front, sides, back, venting inside and
outside)
(If there is ductwork, there must be digital pictures of entire ductwork installation, static pressures, air flow measurements,
and contact information of licensed/factory certified contractor that installed unit)
Nature of defect, what has been serviced (service record), who installed product along with contact information.
12
American Energy Systems, Inc
150 Michigan Street SE
Hutchinson, MN 55350
-----------------------------------------------------------------
WARRANTY INFORMATION
Name ___________________________________________________________
Address ________________________________ City ____________________
State: __________
Zip _____________
Phone Number
_____________
Authorized Dealer __________________________________________________
Dealer Telephone #: __________________________________________________
Date Purchased:
__________________________________________________
Model No#
___________________
Serial No# __________________
Installed By:
__________________________________________________
Trained By:
__________________________________________________
NOTE: FILL OUT THE ABOVE WARRANTY INFORMATION AND KEEP THIS
COPY FOR YOUR PERSONAL RECORDS. REGISTRATION OF THIS
WARRANTY CONSTITUTES YOUR ACCEPTANCE OF ALL TERMS
CONTAINED THEREIN.
13
MINIMUM CLEARANCES
1. FIGURE 1 shows how to measure freestanding clearances for Country Flame catalytic models covered by this
manual. Table 1 provides minimum clearances for specific models that must be maintained in FIGURE 1. The
installer should familiarize themselves with FIGURE 1 and TABLE 1, understand MINIMUM CLEARANCE
requirements, incorporate, and maintain these clearances during installation.
Official wall clearances to combustibles are located on each Safety Testing Label that is located on the
back of each Country Flame catalytic stove. REMEMBER that all minimum clearances must be
measured and maintained from that part of the stove that is nearest to the combustible material. If there
is any doubt or confusion about clearance requirements, refer to both national and local codes. Failure
to properly install a stove and maintain proper clearances voids the warranty and can lead to a house
fire.
FIGURE 1: MINIMUM FREESTANDING CLEARANCE DIAGRAMS
Chimney
Pipe
Single*
BBF
21
20
18
20
20
18
Model
A
B
C
D
E
F
*S – Single wall chimney pipe
TABLE 1: MINIMUM CLEARANCES,
IN INCHES, REFER TO FIGURE 1
1. Contact the local building code department in your area to obtain necessary information about the installation of
the particular stove being installed in your home.
14
3. Questions to ask the local code department include but are not limited to:
a.
Are there any local codes that impact installation and how do they differ from national codes?
b.
What are the applicable local codes and any differences that will guide the installation of a stove covered
in this manual?
c.
Country Flame stoves are approved for mobile home installation. What are the local codes governing
mobile home installation?
d.
What electrical code must the stove power outlet meet? Country Flame’s woodstove requires a grounded
three-prong electrical outlet rated at 120VAC, 60Hz, and 15A.
e.
What, if any, local code amendments are there concerning woodstove installation?
f.
Does a permit need to be obtained before the stove is installed?
g.
What is the cost of a permit, if it is required?
h.
What is the local code concerning rooms where a woodstove cannot be installed?
i.
Are smoke detectors required by local code? How many and where are they to be located? Country
Flame strongly recommends the use of smoke and carbon monoxide detectors in the home.
ALTERNATE MINIMUM CLEARANCES
1.
Alternate minimum clearances can be obtained by following what is known as the 12 RULE.
2.
Essentially, the 12 RULE states that no clearance can ever be less than twelve inches (12” or 300mm) from a
catalytic stove to any COMBUSTIBLE WALL regardless of the additional type of protection provided for a specific
combustible wall. Refer to FIGURE 2 for 12 RULE examples.
FIGURE 2: *12 RULE CLEARANCE SYSTEMS
3.
heat.
If the 12 RULE is used, additional wall protection must be provided to protect combustible walls from radiated
4.
Clearance reductions apply only to the clearances found in TABLE 1 of this manual for single wall stovepipe.
Reduced clearances CANNOT be applied to the already reduced clearances of a double wall insulated pipe with an added
15
heat shield.
EXAMPLE: The rear clearance defined for a Model B (FIGURE 1 and TABLE) measurement B, is listed as twenty
inches (20”, 500mm.) This rear clearance, for a Model B may be reduced up to 66% but never less than twelve inches
(12”, 300mm) by using either of the wall protection procedures listed in ITEM 5 and ITEM 6.
5.
Tested and Listed Wall Protectors: Clearances to combustibles may be reduced if a tested and listed wall
protector is installed over a combustible surface when the following conditions exist:
a.
A dead air space of 1” must separate the tested and listed wall protector from the combustible wall
surface.
b.
The tested and listed wall protector must extend from floor to ceiling with a full 1” clearance for air
circulation. This air circulation must be between the combustible walls and the tested and listed wall protector all the way
from the floor to the ceiling.
c.
Spacers (preferably 1”ceramic rather than metal) must be located at the corners on the tested and listed
wall protector rather than behind the heater or the chimney connector.
6. Untested and Unlisted Wall Protectors: Untested and Unlisted Wall Protectors may be constructed of masonry,
24-gauge metal or thicker sheet metal, or non-combustible half-inch (0.5”, 12.5mm) thick insulation board. If
untested and unlisted protectors are used, then Item 5a, 5b, and 5c above must be modified to read one and a half
inches (1.5”, 37.5mm) instead of the 1” separation.
NOTE: If the installer plans to use a reduced clearance by using double wall chimney connectors as shown in
TABLE 1, then the stove clearances may not be further reduced by utilizing any of the methods listed in ITEM 5
or ITEM 6.
ALCOVE CLEARANCES
O
1
Alcove clearances require the use of listed UL 103 or listed ULC S629 Type HT (2100 F) double wall chimney
pipe to establish clearances according to FIGURE 3 as listed in TABLE 3.
FIGURE 3: ALCOVE CLEARANCES
16
TABLE 2: ALCOVE CLEARANCES, IN INCHES, REFER TO FIGURE 3
FLOOR PROTECTION REQUIREMENTS
1. All Country Flame freestanding catalytic woodstoves require a listed floor protector that is noncombustible.
Country Flame catalytic stoves were tested with a listed floor protection that had a thermal conductivity of K =
0.85 BTU-inch per hour per square foot per degree Fahrenheit and that was 3/8” thick (9.5mm) non-asbestos
millboard. Refer to FIGURE 4 and TABLE 4 for floor protector information.
FIGURE 4: FLOOR PROTECTOR DIMENSIONS
NOTE: Chimney connectors must have 2 inches of floor protection from all sides in all direction.
MODEL
G
H
I
BBF
8
18
8
B
8
18
8
R
8
16
3
TABLE 3: FLOOR PROTECTOR, IN INCHES, REFERS TO FIGURE 4
2. If a floor protector, different from the tested floor protector, is to be used, it must meet or exceed the requirements of
the listed R-value of the tested floor protector. To convert alternate floor protectors to their respective R value use the
following procedures:
a. Convert floor material specification to R-value.
i.
R-value is given – no conversion is required.
ii.
k-factor is given with required thickness (T) in inches: R = (1/k) x T.
iii.
C-factor given: R = 1/C.
b.
Determine the R-value of the proposed alternate floor protector.
i.
Use the formulas provided in STEP 2 to convert values not expressed as “R.”
ii.
For multiple layers of material, add each R-value of each layer to determine the materials overall R-
Value.
17
c. If the overall R-value of the alternate material is greater than the tested material defined in STEP 1, then the
alternate floor protection is acceptable.
d. EXAMPLE:
i.
The tested material was 3/8 inch thick with a k-factor of 0.85.
ii.
The R-value of the tested material was R = (1/0.85) x 3/8 = 0.44.
iii.
Suppose the tested material is to be replaced by 4-inch brick material with a C of 1.25.
iv.
The R-value of the alternate brick material is R = (1/1.25) = 0.80. Since the R-value of the alternate brick
material [R = 0.80] is greater than the tested material’s R-value [R = 0.44] then the alternate material is acceptable for use
in the specific application.
3.
Listed Floor Protector Definitions:
2
O
2
O
a. Thermal Conductance = C = Btu/(hr)(ft )( F) = W/(m )( K)
2
O
O
O
b. Thermal Conductivity = k = (Btu)(inch)/(hr)(ft )( F) = W/(m)( K) = Btu/(hr)(ft)( F)
2
O
2
O
c. Thermal Resistance = R = (ft )(hr)( F)/Btu = (m )( K)/W
d. HEARTH EXTENSIONS must total an R-value equivalent to or greater than 2.0 to ensure proper floor
protection for combustible materials.
4. WARNING: A catalytic stove must always be placed on a listed floor protector if the existing floor where the stove
is to be placed is made of any combustible material. IF THE AREA WHERE THE STOVE IS TO BE PLACED IS
CARPETED, THE CARPET MUST BE REMOVED. A LISTED FLOOR PROTECTOR IS NEVER TO BE
PLACED ON CARPET. CHECK LOCAL CODES FOR ADDITIONAL CARPET RESTRICTIONS AND FLOOR
PROTECTION REQUIREMENTS.
CHIMNEY REQUIREMENTS
The installer must be prepared to deal with one of two different types of chimneys that will be encountered during the
installation of a freestanding catalytic stove. The chimney systems are defined as follows:
1
FACTORY BUILT CHIMNEY: Stainless steel pipe with interlocking sections that can be double walled or
triple wall air-cooled or double wall-insulated stovepipe. In the event that a factory built chimney already exists, a
certified chimney professional should inspect the chimney system for mechanical or structural weakness, broken, leaky,
corroded or warped joints or any other signs that would indicate the need for replacement. All sections of chimney that
pass through the floors, ceilings, or attics should be inspected for proper installation, adherence to code, and correct
installation to protect from overheating.
2
MASONRY BUILT CHIMNEY: Masonry chimneys are built with several different types of brick material.
The outer brick is for appearance and the inner brick (called tile) are designed to withstand high temperature exhaust gases
being emitted from the fire. A good masonry chimney system should not have cracks, loose mortar, missing sections of
tile, other signs of deterioration or blockage of the flue. A qualified mason should perform construction or repairs to a
masonry chimney. Inspection of a chimney should be completed by a certified chimney sweep and before a new stove is
attached, the chimney sweep should certify the chimney has no obstruction and is clean of creosote and debris.
3
OVERSIZED CHIMNEY: Regardless of the type of chimney used, over sizing a chimney will result in reduced
performance of the catalytic stove. A chimney’s flue size should be no more than three (3) times the cross sectional area
of the flue size of the catalytic stove’s flue collar. EXAMPLE: Assume the stove’s flue collar has an inside diameter of 6”.
This means the stove’s flue area is approximately 28 square inches, which means the chimney’s cross sectional area
cannot exceed 84 square inches. This means the chimney flue pipe or clay liner diameter must be less than 10” in
diameter. The installer should ensure a chimney is of proper size over the full length of the chimney. If not, install a
properly sized liner to ensure optimal performance of the catalytic stove that is being installed.
4
DRAFT REQUIREMENTS: The Country Flame catalytic stove is just one part of the heating system being
installed in a home. There are two airflow elements associated with each stove system. There is the (a) room air system
and the (b) combustion air system. Combustion airflow is extremely important to the proper operation of a catalytic stove.
Proper amounts of combustion air are required to achieve complete combustion in the firebox. Complete combustion
18
ensures that as much of the unwanted combustion byproducts (efficiency) are removed before entering the chimney. The
installer should use a draft gauge to ensure proper draft is achieved in a newly installed stove system.
5
AIR TIGHT HOMES: Newer homes have become more airtight with constantly improving insulation packages.
These improvements are great for energy efficiency but they can create draft problems for wood burning stoves. In fact,
these insulation packages can lead to what is called negative pressure (absence of air) in new homes. This means a
reverse draft will occur which pulls smoke and exhaust fumes into the home. Sometimes, if combustion air venting
systems are not installed, a homeowner may be required to crack a window on the windward side of the house when the
stove is in operation in order for it to operate properly. It is much safer and more cost effective for the homeowner to
ensure proper draft is accounted for and achieved during the installation process of the stove.
6
COMBUSTION AIR REQUIREMENTS: The room or area must be capable of delivering the proper volume
of combustion air required of a stove for proper burning of wood fuel. The installer and homeowner must recognize that
other appliances compete for fresh air, such as the clothes dryer, exhaust fans, hot water heater, other fireplaces, or other
fuel burning appliances. If the combustion air demand of a catalytic stove is not met or if a catalytic stove must compete
for a limited supply of combustion air, problems will occur. These problems can lead to poor draft of the catalytic stove,
improper combustion, smoke in the home, and a dirty chimney that could lead to a chimney fire. ENSURING PROPER
COMBUSTION VENTILATION IS IMPORTANT TO THE PROPER OPERATION OF A CATALYTIC STOVE.
FREESTANDING STOVE LEG REQUIREMENTS
All Country Flame freestanding catalytic stoves have a Queen Ann leg system available for purchase. This leg kit includes
four Queen Anne legs that are available in a number of optional finishes and all mounting hardware required by the
installer. Please contact Country Flame or a local authorized dealer to discuss optional finishes and to order a Queen
Anne leg kit.
1.
Refer to FIGURE 5 for a diagram and refer to this paragraph’s instructions on how to mount the Queen Anne leg
kit to a Model R catalytic stove. If the installer is working with a different model catalytic stove, the instructions and
mounting procedures are the same as the Model R.
a. Locate the eight (8) bolts that are included with the four Queen Anne Legs.
b.
Bolt and tighten each leg to the stove using two bolts. DO NOT OVER TIGHTEN THE BOLTS AS
DAMAGE MAY OCCUR. Ensure each leg is positioned properly so the leg is facing towards the front of the stove.
c.
Position the stove on a level surface. Adjust the leveling bolts in the legs in order to level the stove to the
floor, as necessary. Ensure that clearances to combustibles are maintained once the stove has been set in its final position.
TO CHIMNEY
FIGURE 5: QUEEN ANNE LEG INSTALLATION
19
STOVE INSTALLATION PREPARATION
1
Prepare the stove for installation by removing it from its shipping container. Discard all packaging material in an
appropriate waste container. WARNING: Do not throw away any stove parts that are included with the stove.
2
The installer and homeowner should familiarize themselves with the stove and adhere to ALL warning labels.
Protect the gold trim from any physical damage.
3
Ensure that a code approved electrical power outlet has been installed for later use with the stove’s blower system.
4
The installer or homeowner should IMMEDIATELY inspect the stove for any physical damage that may have
occurred during shipment. The fact that the package was NOT DAMAGED does not mean that the stove was not
damaged in shipping. Report all damage immediately to the shipper, the dealer, and Country Flame.
5
Check all stove controls for movement. In the event the stove was dropped during shipment, a jammed control
can be costly to fix. The stove controls should move freely before the stove is installed. Report all damage to the shipper,
dealer, and Country Flame.
6
TABLE 4 and TABLE 5 serve as a guide on equipment that is available with each stove.
TABLE 4: FREE STANDING MODELS
FREESTANDING
MODEL BBF
TEMP
PROBE
STANDARD
CATALYST
BLOWER
QUEEN
ANN
LEGS
FLUE
COLLAR
RECTANGULAR
STANDARD
OPTION
OPTIONAL
TABLE 5: INSERT MODELS
INSERTS
TEMP
PROBE
MODEL BBF
STANDARD
CATALYST
BLOWER
FLUE
ADAPTOR
TRANSITION
SHROUD
TRIM
RECTANGULAR
STANDARD
OPTION
OPTION
NOTES:
1
SHROUDS ARE SOMETIMES REFERRED TO AS PANELS OR TRIM.
2
OTHER OPTIONAL ITEMS MAY BE AVAILABLE FOR THE CATALYTIC STOVES, CHECK WITH A
DEALER OR COUNTRY FLAME.
3
CHECK THE OWNERS MANUAL FOR SPECIFIC ITEMS PROVIDED WITH A CATALYTIC STOVE OR
CONSULT A DEALER OR COUNTRY FLAME.
20
FACTORY BUILT FIREPLACES
Country Flame catalytic stoves are approved for installation in factory built wood burning fireplaces. Any fireplace used
to install a Country Flame catalytic stove should be listed to UL 127 or ULC S610 standards. Further, Country Flame
stoves have been specifically tested and approved for installation in the following manufacturer’s fireplaces: Heatilator,
Superior, Preway, Marco, Majestic, Martin. The approval to install one of Country Flames stoves in one of these
manufacturers’ fireplaces extends to all models if it meets one condition. A minimum clearance (air space) of 1” (25mm)
is to be maintained from the sides, back and top between the zero clearance fireboxes and the Country Flame catalytic
stove once installation has been completed. Only two modifications may be made to any zero clearance fireplaces before
installing a Country Flame catalytic stove:
1
The damper may be removed from the existing fireplace. If the damper is not removable, it must be permanently
wired into the open position before the catalytic stove is installed and,
2
The ember catcher, located in the base of the fireplace flue, may be permanently removed before the catalytic
stove is installed.
NOTE: Any parts removed from an existing fireplace should be properly stored. In the event the catalytic stove is
removed, these fireplace parts would need to be reinstalled. Failure to reinstall a removed part will create a dangerous
situation during fireplace operation.
MASONRY BUILT FIREPLACES
Country Flame catalytic stoves are approved for installation in masonry built fireplaces constructed in accordance with the
requirements of the Standard for Chimneys, Fireplaces, Vents, and Solid Fuel Burning Appliances in accordance with
NFPA Number 211, UBC 37 standards, or any applicable local code requirements. Carefully plan the installation in order
to avoid costly mistakes. First, be sure to understand clearance requirements and ensure the Country Flame catalytic stove
model selected for the home will fit into an existing masonry built fireplace. An installation in masonry built fireplaces
requires that the damper be secured into the open position. Although Country Flame catalytic stoves have been approved
for “face seal” installation only, Country Flame STRONGLY recommends the use of one of the following techniques
when deciding on a chimney connection:
a) GOOD – Minimum of 12” (300mm) starter pipe installed into fireplace flue.
b) BETTER – Direct connection of a chimney liner past the first clay flue tile in
accordance with NFPA 211 or any applicable local code.
c) BEST - Install a complete relining of the masonry chimney system with an 8”
(200mm) diameter standard steel chimney connector.
Kits are available to assist in the connection of a catalytic stove to a masonry fireplace chimney. Look for a listed kit,
which means it has agency approval. The stove to fireplace kit is to be installed in place of the fireplace damper. In most
cases, the existing fireplace damper will be removed to allow for installation of the kit adaptor. The critical points are that:
(1) The stove connector pipe (either 6” [150mm] or 8” [200mm]) must extend up the masonry chimney past the first clay
flue tile and (2) The adaptor and chimney connector must fit tightly and be sealed with high temperature furnace cement.
The adaptor kit’s instructions must be followed over any information provided in this manual.
DO NOT REMOVE BRICK OR MORTAR FROM THE FIREPLACE IN ORDER TO INSTALL ANY STOVE
OR ADAPTOR KIT. FIREPLACE INSERT FLOOR PROTECTORS MUST EXTEND AT LEAST 8” (200MM)
TO EACH SIDE AND 18” (450MM) IN FRONT.
Have the masonry fireplace inspected by a certified installer or chimney sweep. Inspect for loose mortar, cracks, broken
clay liners, deterioration, blockage of the flue, etc. The existing masonry chimney system should be certified for use with
a catalytic stove. If the masonry chimney has an oversized flue, it will contribute to poor draft, creosote build up and
other problems. A chimney’s flue size should be no less than the existing diameter of a stove’s flue collar and no more
than three (3) times the cross sectional area of the flue size of the catalytic stove’s flue collar. EXAMPLE: Assume the
21
stove’s flue collar has an inside diameter of 6”. This means the stove’s flue area is approximately 28 square inches, which
means the chimney’s cross sectional flue area cannot exceed 84 square inches. Thus, if the clay tile inside the chimney has
a dimension larger than 8” (200mm) by 8” (200mm) a full liner would need to be installed in the chimney flue to ensure
proper stove draft. The installer should ensure that the proper size chimney tile is installed over the full length of the
chimney. If not, install a properly sized liner to ensure optimal performance.
DRAFT
A good draft is necessary for the proper operation of any stove. Draft is the force created as warm flue gases move up the
chimney and pull fresh air into the stove. Any restriction either at the exhaust or intake ends of the chimney will affect
draft. The amount of draft in the chimney system depends on the length of the chimney, the local geography, nearby
obstructions, prevailing winds, etc. A draft gauge should measure somewhere between 0.05 to 0.07 inches of water
column (W.C.) for the stove to operate efficiently.
MINIMUM CLEARANCES
When installing a catalytic stove into an existing fireplace, ensure that all minimum clearances shown in FIGURE 7 and
defined in TABLE 6 are maintained during installation. Failure to maintain these minimum clearances can create
overheating of the fireplace, the stove, or surrounding combustible materials. Do not seal over the face of any chimney or
air-cooling system of the existing fireplace system. Failure to maintain the proper clearances during installation voids the
Country Flame warranty. Always refer to the Safety Label on the rear of the specific Country Flame stove being
installed for the latest clearance and installation instructions.
FIGURE 7: INSERT MINIMUM CLEARANCE REQUIREMENTS
TABLE 6: INSERT MINIMUM CLEARANCES, IN INCHES
MODEL
BBF
A
B
C
D
E
18"
8"
21"
10"
26"
FLOOR PROTECTION REQUIREMENTS
1. All Country Flame freestanding catalytic wood stoves require a listed floor protector that is noncombustible.
Country Flame catalytic stoves were tested with a listed floor protection that had a thermal conductivity of K =
0.85 BTU-inch per hour per square foot per degree Fahrenheit and that was 3/8” thick (9.5mm) non-asbestos
millboard. Refer to FIGURE 8 and TABLE 7 for floor protector information.
22
FIGURE 8: FLOOR PROTECTOR DIMENSIONS
MODEL
G
H
I
BBF
B
R
8
18
8
8
18
8
8
16
3
TABLE 7: MINIMUM DIMENSIONS OF FLOOR PROTECTOR (in inches)
2. If a floor protector, different from the tested floor protector, is to be used, it must meet or exceed the requirements of
the listed R-value of the tested floor protector. To convert alternate floor protectors to their respective R value use the
following procedures:
a. Convert floor material specification to R-value.
i. R-value is given – no conversion is required.
ii.
k-factor is given with required thickness (T) in inches: R = (1/k) x T.
iii.
C-factor given: R = 1/C.
b. Determine the R-value of the proposed alternate floor protector.
i. Use the formulas provided in STEP 2 to convert values not expressed as “R.”
ii.
For multiple layers of material, add each R-value of each layer to determine the materials overall RValue.
c. If the overall R-value of the alternate material is greater than the tested material defined in STEP 1, then the
alternate floor protection is acceptable.
d. EXAMPLE:
i. The tested material was 3/8 inch thick with a k-factor of 0.85.
ii.
The R-value of the tested material was R = (1/0.85) x 3/8 = 0.44.
iii.
Suppose the tested material is to be replaced by 4-inch brick material with a C of 1.25.
iv.
The R-value of the alternate brick material is R = (1/1.25) = 0.80. Since the R-value of the alternate brick
material [R = 0.80] is greater than the tested material’s R-value [R = 0.44] then the alternate material is acceptable
for use in the specific application.
3. Listed Floor Protector Definitions:
2
O
2
O
b.
Thermal Conductance = C = Btu/(hr)(ft )( F) = W/(m )( K)
c.
Thermal Conductivity = k = (Btu)(inch)/(hr)(ft )( F) = W/(m)( K) = Btu/(hr)(ft)( F)
2
2
O
O
2
O
O
O
d. Thermal Resistance = R = (ft )(hr)( F)/Btu = (m )( K)/W
e. HEARTH EXTENSIONS must have an R-value greater than to ensure proper combustible floor protection.
23
4. WARNING: A catalytic stove must always be placed on a listed floor protector if the existing floor where the stove
is to be placed is made of any combustible material. IF THE AREA WHERE THE STOVE IS TO BE PLACED IS
CARPETED, THE CARPET MUST BE REMOVED. A LISTED FLOOR PROTECTOR IS NEVER TO BE
PLACED ON CARPET. CHECK LOCAL CODES FOR ADDITIONAL CARPET RESTRICTIONS AND FLOOR
PROTECTION REQUIREMENTS.
SHROUD AND TRIM INSTALLATION
Each Country Flame insert can be installed with an optional shroud and trim package. There are three shroud and trim
packages available for each catalytic stove depending on the installation requirements. There is the (a) standard shroud kit,
(b) the oversized shroud kit, and (c) the custom shroud kit. The size of the fireplace opening and the surrounding fireplace
facing will determine which one of these kits will be selected by the installer or homeowner. In the event there is any
confusion, about which one to select, the local Country Flame Dealer or Country Flame will be able to assist in the
selection of the appropriate shroud kit.
Once the stove is properly located in the opening, leveled on the floor, and installed in its finished position, the installer
would pull the stove out from the fireplace in order to install a shroud kit on the catalytic stove. FIGURE 9 shows a
shroud kit on a generic stove; however, each Country Flame shroud kit comes with detailed instructions for use in
installing the kit on a specific model stove. Refer to these instructions and in the event of any confusion, contact Country
Flame or its local dealer to assist with clarification.
FIGURE 9: SHROUD AND TRIM INSTALLATION
24
MOBILE HOME RULES
1
Install only a HUD-approved laboratory tested stove in a mobile home. If the metal tag permanently affixed to a
stove does not specifically state; “mobile home approved to HUD Standard UM-84,” do not install it in a mobile home.
COUNTRY FLAME’S MODEL BBF IS NOT APPROVED FOR MOBILE HOME INSTALL.
STOVE COMPONENTS
Before installing and operating a catalytic stove, locate and identify all the controls and ensure a complete understanding
of each. This manual has been organized to assist the installer during installation. This manual has been organized to
assist the homeowner in operating and maintaining the catalytic stove at peak performance. Keep this manual and refer to
it often.
MANUAL DRAFT CONTROLS
1
A manual draft control is provided on each catalytic stove to assist in controlling the solid wood fuel burn rate.
The manual draft control limits the fuel burn rate by metering the amount of combustion air entering the firebox.
2
All Country Flame catalytic stoves have manual draft controls. Refer to a specific model for the different
locations of these controls.
3.
Manual draft controls have nothing to do with the room air being heated and returned to the room. Manual draft
controls are used to control the amount of combustion air available to the firebox.
a.
Model BBF Manual Draft Control Slides: Refer to FIGURE 13 for the location of the two manual
draft control slides on these models.
i. Slide each manual draft control slide toward the center of the stove. When slid all the way to the center,
the slides allow maximum combustion air to be drawn into the firebox.
ii.
Slide each manual draft control toward the outside of the stove. When slid all the way out, the
slides allow minimal combustion air to be drawn into the firebox.
iii.
CAUTION: Do not allow the manual draft control slides to remain fully open and the stove
unattended for more than 30 minutes. In this state, the stove can overheat due to OVER FIRING. Over
firing can cause a chimney fire or even worse, a house fire.
FIGURE 13: MODEL BBF MANUAL DRAFT CONTROL
25
CATALYTIC COMBUSTORS
Catalytic stoves contain catalytic combustors. Approximately 70% to 95% of the chemical energy contained in wood logs turns into
heat as they are burned in a conventional stove (assuming optimal operation.) If smoke (flue gas) does escape up the chimney without
being burnt, about 30% of the chemical energy is lost. This lost energy pollutes the chimney system and the atmosphere. The
catalytic combustor was designed to make use of this wasted chemical energy. The combustor makes uses of more of the chemical
energy by ensuring flue gases ignite at lower burn temperatures; therefore, the catalytic stove has the potential to: a) reduce chimney
creosote buildup, b) reduce air pollution, and c) reduce operating costs when compared to a conventional stove.
The catalytic combustor consists of a durable temperature resistant ceramic composition, which is extruded into a honeycomb shape.
This ceramic material is then fired and covered with a noble-metal catalyst. As smoke from the fire contacts the combustor, it ignites
O
O
at temperatures as low as 500 F. Flue gases normally ignite at 1,000 F. Country Flame recommends waiting until the probe
thermometer reaches 700°F before engaging the catalytic combustor. (Catalytic operation, called “light off,” will not occur until the
stove and catalyst exceeds 500°F to 700°F.) The Catalytic Bypass Rod must be disengaged to allow flue gases to bypass the catalytic
combustors until the stove’s firebox reaches approximately 700°F, the temperature necessary to sustain combustor light off.”
CATALYTIC BYPASS ROD
The catalytic bypass rod determines whether exhaust emissions travel up the chimney unimpeded or pass through the catalytic
combustor to be cleaned on the way to the chimney. On Country Flame models, the catalytic combustor should be disengaged (pulled
out on some models and pushed in on some models) when the fire is started. This allows combustion gases to bypass the catalytic
combustors. As the stove reaches approximately 700°F the catalytic bypass rod should be engaged (pulled out on some models and
pushed in on some models) thus closing off the flue and forcing all combustion gas to pass through the combustor. The catalytic
bypass rod should always be disengaged when loading or reloading the stove with additional wood fuel.
BLOWER UNITS
Blowers circulate room air through and around the catalytic stove to provide additional heating capability to the home. Refer to
TABLE 5 and TABLE 6 to determine whether a blower is standard or optional on the unit purchased. The blower is designed to pull
cool room air into and through the hot stove and back out into the room to provide additional heating value from the stove. Refer to
blower specifications on a specific model for specific types and operation of each blower. A stove’s firebox should reach proper
operating temperature in order to minimize emissions and improve operating efficiency; therefore, a room air blower system should
not be operated for at least 30 minutes after starting a fire. (This information is not applicable to catalytic stoves that do not include an
optional blower system.)
8” PROBE THERMOMETER
A probe thermometer is provided with each catalytic stove. This probe thermometer is used to measure the temperature at the
catalytic combustor. Replacement probe thermometers are available from Country Flame or a local authorized dealer. The probe
thermometer is installed directly above the hood and slightly to the left of the air bypass damper on the top left face of the stove.
Refer to FIGURE 15 for the proper location of the probe on the face of the stove.
FIGURE 15: PROBE THERMOMETER
26
1
The probe thermometer is used to determine when to close the catalytic bypass rod.
2
The probe thermometer displays the temperature measured above the front combustion exhaust and over the
catalyst combustor inside the firebox.
3
NOTE: A PROBE THERMOMETER IS NOT AFFECTED WHEN A BLOWER (OPTIONAL ON SOME
MODELS) IS ENGAGED.
4
Any blower that is operating on a specific model will NOT influence temperatures in the firebox or catalyst
regardless of the impact on the probe thermometer.
WOOD FUEL REQUIREMENTS
1
2
3
Country Flame’s catalytic stove models have been approved for use only with natural dry forest cut
wood. Burning unapproved materials will damage or destroy the catalytic combustor and invalidates
the Country Flame warranty.
Do not burn pressed logs or particleboard or any other construction material, as the bonding agents or
kiln-dried wood can damage the catalytic combustor.
Uncured or green wood will cause creosote buildup in the chimney, plug the catalyst, and provide
little in the way of heat.
4
Well-seasoned wood will improve the heat output of the stove. Fresh cut wood can contain over 80%
moisture and this moisture content should be reduced to less than 20% moisture before the cut wood
is considered “fuel.”
5
“Seasoning” wood is the most appropriate and lowest cost method of reducing moisture content in cut
wood. Ideally, cut wood’s moisture content should be somewhere between 11 to 20%. Moisture
meters are available for checking cut wood moisture content but other methods can be used to
determine or ensure appropriate wood moisture content.
6
Softwoods should be seasoned from six to eighteen months. Hardwoods should be seasoned from 12
to 24 months. Logs that are 5” or greater in diameter need to be split in half, logs that are 8” or
greater in diameter need to be split in thirds, and logs that are 12” or greater in diameter need to be
split in fourths. Even trees that are found in forests and have been felled or broke off for several years
will still require splitting and seasoning before they are used.
7
Store wood in uniformly stacked rows with walking space between each row. Store the wood
elevated off the ground. All of this allows for good air circulation around the stack. Do not stack cut
wood against a building or against any wall.
REMEMBER: Wood is one critical element of a complete stove heating system. Failure to select a proper grade of wood
fuel, failure to store wood fuel properly, or failure to maintain wood fuel in a dry state will lead to reduced stove
efficiency and increased maintenance and operational costs
CHIMNEY
Chimneys come in two basic varieties:
a) Masonry, as shown in FIGURE 16.
b) Factory Built, as shown in FIGURE 17
NOTE: Refer to the Chimney appendix for detailed information on chimney construction and venting techniques.
Whether masonry or factory built, chimneys are used to ensure proper venting in order to remove combustion exhaust
gases from the stove to the air outside the home. A chimney uses the fact that hot gases are light and therefore rise up
through the chimney thereby creating a DRAFT. Chimney draft is dependent on many factors. Three important factors
are: a) the height of the chimney, b) the quality of the chimney construction (no leaks), and c) a properly dimensioned
chimney when compared to the stove being connected to the chimney.
27
The performance of a stove, as a heating system, is heavily dependent on the quality of the chimney system. Chimney
systems have to meet stringent requirements in both the United States and Canada. For a model BBF, use chimney
connectors with an outside diameter of 8” (200mm). Country Flame requires the use of a properly designed chimney that
is approved or listed with regulatory agencies.
Prefabricated chimney pipe must be UL 103 listed and be HT 2100 rated. Chimney components, such as the chimney
base, chimney fire stop (as required), chimney attic insulation shield, chimney-insulated tee, etc. are all required to be
listed components and purchased from the same manufacturer where the chimney connector was purchased. These listed
ancillary items are necessary to guarantee a proper, safe, and complete chimney system installation. CAUTION: Do not
mix and match different manufacturer’s chimney components. Once a single chimney component is selected, stay with
that specific manufacturer and follow all the chimney manufacturer’s installation requirements. ALWAYS follow a
specific chimney manufacturer’s installation instructions to exacting detail regardless of information provided from other
sources. If there is any discrepancy that requires clarification, please contact Country Flame or a local dealer for
assistance. Country Flame’s warranty requires a properly installed and listed chimney system.
CHIMNEY CONNECTOR
Chimney connectors are also commonly referred to as chimney pipe. Follow the specific chimney manufacturer’s
installation instructions for proper installation. It is important to ensure a good tight seal and proper installation of the
chimney pipe in order to obtain proper chimney draft once the chimney is completed and the stove is operational. The
chimney pipe should have an 8” (200mm) outside diameter for all other Country Flame catalytic models. The chimney
connector should be constructed of a minimum of 24 MSG black or 25 MSG blue steel. The use of high temperature RTV
sealant and self-tapping screws will be required to attach different sections of chimney connectors together and ultimately
to the stove.
FLUE TRANSITION
Many catalytic stove inserts have chimney connections that do not align with an existing chimney system. In order to
make the installer’s job easier, Country Flame provides standard flue transitions (offsets) that make the installation of a
stove simpler. The use of high temperature RTV sealant and self-tapping screws will be needed to secure and seal the flue
transition properly to the stove and chimney system. Contact Country Flame or one of its locale authorized dealers to
obtain more information about flue transitions.
WALL THIMBLE
A wall thimble is a manufactured or site-constructed device installed in combustible walls and ceilings through which the
chimney pipe passes as it is routed through the house. The wall thimble is designed to ensure that combustible wall
material does not self-ignite due to continuous, radiated and sometime excessive heat generated through the chimney. The
wall thimble is a safety device that prevents wall or house fires.
28
29
The Model BBF catalytic stove is the largest and heaviest catalytic combustor stove that Country Flame produces. This
stove can handle 29-inch cut wood. The stove’s firebox is made from 5/16-inch thick steel. Some of the stove’s
combustion components are made from ½-inch thick steel. This stove weighs close to 600 pounds. The Model BBF’s
mass is one of its advantages (except to the installer) because as the stove reaches operating temperatures, its thermal
mass maintains a uniform burn rate. In addition, the large stove door allows for full viewing of a beautiful wood fire. All
of these features give the Model BBF catalytic stove a heating capability that will warm an entire house. Truly, the Model
BBF is a top of the line catalytic heating machine.
A Model BBF can be installed as a freestanding or the Model BBF can be inserted into an existing masonry fireplace. Do
not remove any bricks or mortar from a masonry fireplace to accommodate a BBF insert. Whichever way the homeowner
chooses to purchase and install the BBF, it comes standard with a blower system capable of moving room air at 600 cubic
feet per minute. This blower system is housed in a convenient blower tray that slides into the lower front of the Model
BBF. The blower system is used to warm and circulate room air. NOTE: The Model BBF catalytic stove is not approved
for installation into a zero clearance fireplace. Refer to the MODEL BBF (Freestanding/Insert) section for the Model
BBF stove specifications. Please contact Country Flame or one of its local authorized dealers to resolve any installation
issue, request further assistance, or obtain the latest recommended procedures.
Freestanding BBF catalytic stove applications should follow FIGURE 1 and TABLE 1 in order for the installer to
conform to minimum clearance requirements. The Model BBF freestanding stove requires a minimum of: a) a 21-inch
clearance from sidewalls, b) a 20-inch clearance from back walls, and c) a 20-inch clearance from any adjacent walls with
a 45-degree angle to the adjacent walls. The installer should consult national and locale codes for additional information.
Always refer to the Safety Label on the rear of the stove for the latest clearance and installation instructions before
installing the Model BBF.
Freestanding floor protection requirements are shown in FIGURE 4 and TABLE 3. A listed floor protector must have a
minimum total “R” value of 2.0. Floor protection must extend a) a minimum of 8 inches from the stove opening to each
side of the unit and b) a minimum of 18 inches from the face of the BBF stove.
Insert a BBF catalytic stove into an existing masonry fireplace and maintain proper minimum clearances. Refer to
FIGURE 7 and TABLE 6 for minimum clearance requirements. The BBF stove requires minimum clearances of: a) 2
inches from side and back walls in the zero clearance fireplace, b) 26 inches from the top of the BBF to the bottom of a
combustible mantel, c) 10 inches from the BBF firebox opening to any combustible wall face material, d) and 21 inches
from the BBF firebox opening to any combustible sidewalls. The use of a listed floor protector requires a minimum of a)
8 inches from each side of the BBF firebox opening and b) 18 inches of depth from the face of the BBF stove. Failure to
maintain clearances can create overheating of combustible materials and lead to a house fire. Failure to maintain the
proper clearances will void the Country Flame warranty. A hearth extension that was part of the previous masonry
fireplace installation must be used in the BBF insert installation; however, minimum clearances to combustibles are still
required. Use a listed floor protector with a minimum thermal conductivity of K = 0.85 Btu – inches per square foot per
hour per degree Fahrenheit and equivalent to 3/8” (9.4mm) non-asbestos millboard.
Refer to APPENDIX G for information on venting and chimney requirements.
30
MODEL BBF CATALYTIC
STOVE (GOLD PACKAGE SHOWN)
The Model BBF blower tray comes will automatically turn on as the stove heats up and automatically turns off when the
stove cools down. The by-pass switch allows the homeowner to test the blower system by bypassing the snap disk only
when the stove is cool.
31
INSERT HEIGHT
23.5”/ 597 mm
INSERT DEPTH
23.5”/ 597 mm
WIDTH AT FRONT
35.75”/ 908 mm
WIDTH AT FIREPLACE
OPENING
22” / 539 mm
WIDTH AT REAR
28” / 711 mm
HANDLE DEPTH
7.5” / 184 mm
HEARTH EXTENSION
Adjustable
FLUE SIZE, I.D.
8” / 203 mm
DEPTH TO FLUE CRT
(From back of stove)
15” / 381 mm
WEIGHT WITH BRICK
590 pounds / 268 kg
LEG FRAME HEIGHT
6.125”/ 156 mm
SHROUD WIDTH
48” / 1219 mm
SHROUD HEIGHT
30.375” / 772 mm
EPA EFFICIENCY
72%
EPA BTU RANGE
10,500 to 51,400
COMBUSTION AIR CONTROL
Manual
EMISSION RATE (grams/hour)
3.0
LOG LENGTH, MAXIMUM
29” / 737 mm
FIREBOX VOLUME
3.9 cubic feet
BLOWER ASSEMBLY
600 cubic feet per minute
WARNOCK HERSEY TEST REPORT 632-019601
NOTE: ALL SPECIFICATIONS ARE APPROXIMATE AND SUBJECT TO CHANGE WITHOUT NOTICE.
32
CATALYST PARTS
CF-105
B, BBF, E1
Catalyst Stainless Steel Deflector Shield
PP-422
B, BBF, E1, R
Catalyst Holder 7x11 - New - 1 bolt
PP-517
B, BBF, E1, R
Catalyst 7x11 1990-present
CF-199
Damper Activation Handle
PP-31
All Catalytic Stoves
Thermometer Probe
DOORS
CF-2400
BBF
SD-2 (PP-42) Cast Door Assembly
CF-2410
BBF
SD-2 (PP-42G) Gold Door Assembly
CF-2420
BBF
SD-2 (PP-42N) Nickel Door Assembly
MF3537
PP-988
BBF
Wood/Pellet
Heat Sensor 110
Power cord
58-0022-00
BBF
Switch - Toggle switch
PP-1013
All Stoves
Wire: Black 18 gauge wire (ft)
58-0103-00
BBF
Switch - Toggle switch SPDT
BBF-P43
BBF
BBF firebrick - takes 6 (ea)
BBF-P44
BBF
BBF firebrick - takes 2 (ea)
BBF-P45
BBF
BBF firebrick - takes 2 (ea)
PP-868
BBF
BBF firebrick - takes 4 (ea)
GLASS
PP-51
B, BBF, E1
20 7/8 x 11 5/8 plain - SD2
PP-52
B, BBF, E1
20 7/8 x 11 5/8 etched - SD2
PP-53
BBF
3 7/16 x 11 1/2 plain - side glass
PP-54
BBF
3 7/16 x 11 etched - right hand side
PP-65
BBF
3 7/16 x 11 etched - left hand side
All Inserts, FPD
Insulation stove kit - shroud
ELECTRICAL
REFRACTORY
BRICK
INSULATION
PP-220
33
HARDWARE
CF-175
Door Handle
CF-177
Cam Lever for Door
PP-1270
8/32-3/8 flat head machine screw 12 ea
PP-38
Hinge pin cap 5/16” x ½” black 2 ea
PP-33
Hinge pin cap 5/16” x ½” Gold 2 ea
PP-34
P003087
Hinge pin cap 5/16” x ½” Nickel 2 ea
Flat washer plain ½” 2 ea
P7544
½-13 Jam nut plain 2 ea
PP-412
Glass clips 12 ea
PP-414-Black
1 ½” Spring Black
PP-414
1 ½” Spring Brass
PP-350
Rheostat w/ knob
PP-835
PP-820
5/16-18 Brass Nut 4 req’d
5/16” Fender washer 4 req’d
PP-819
Set screw 5/16-18 x 1.00 CP SS 4 req’d
PP-101
PP-103
Flat washer 3/8”
3/8-16 Hex nut
PP-104
3/8-16 x 1 ¼ CGB Carriage Bolt
PP-120
#8-32 Hex Kep nut
PP-143
Lock washer 5/16
PP-36
Brass Logo
PP-440
Screw Black 8/32 X 1 for Trim
PP-439
Screw Black 8/32 X 3/4 for Trim
PP-163
Screw Brass 8/32 X 1 for Trim
PP-162
Screw Brass 8/32 X 3/4 for Trim
MOTORS
PP-574 BBF, B, E1
AC motor 600 cfm with attached blade
OWNER'S MANUAL
PP-400 B, BBF, O2, E1, E2, R, SBF
Owner's Manual, Catalytic
34
TRIM & GRILLS
GTK-SLIDE
BTK-SLIDE
Gold Air Slides Assembly Kit
Black Air Slides Assembly Kit
BW-TK-B
Bay Window - Trim Kit, Black
BW-TK-G
Bay Window - Trim Kit, Gold
PP-538G
PP-538C
Gold Frame-Bay Window
Black Frame-Bay Window
BBF-9200B
Standard Shroud BBF w/ Black trim
BBF-9200G
Standard Shroud BBF w/ gold trim
BBF-9210B
Oversized Shroud BBF w/ Black trim
BBF-9210G
BBF-P100B
BBF-P100G
BBF-P101B
BBF-P101G
BBF-P102G
BBF-P100B
BBF23-9200-L
BBF23-9200-R
BBF23-9200-T
BBF-P103B
BBF-P103G
BBF-P104B
BBF-P104G
BBF-P105G
BBF-P105B
BBF23-9210-L
BBF23-9210-R
BBF23-9210-T
Oversized Shroud BBF w/ gold trim
RH Std Shroud trim black
RH Std Shroud trim gold
LH Std Shroud trim black
LH Std Shroud trim gold
TOP Std Shroud trim black
TOP Std Shroud trim gold
Std Shroud LH
Std Shroud RH
Std Shroud TOP
RH Oversized Shroud trim black
RH Oversized Shroud trim gold
LH Oversized Shroud trim black
LH Oversized Shroud trim gold
TOP Oversized Shroud trim black
TOP Oversized Shroud trim gold
Oversized Shroud LH
Oversized Shroud RH
Oversized Shroud TOP
GASKETS
PP-87
P1234
Door seal
Door gasket
¾” rope gasket 6’ req’d
1/8 x ¾” window gasket 5 ft req’d.
PP-226
Catalyst holder gasket
1/16 x 1/2 glass tape 4 ft req’d
35
FIRST FIRE, STEP 1
Please read and understand this manual before installing, operating, or attempting to maintain a Country Flame Catalytic
Stove. Failure to follow instructions, warnings, or understand safety issues may result in property damage, bodily injury
or even loss of life.
FIRST FIRE, STEP 2
All Country Flame catalytic stoves are approved to burn natural untreated properly seasoned wood fuel. Any other fuel,
such as coal, synthetic logs, plywood, paint, particleboard, chemical lighters, or chemically treated fuel may produce
poison gas and will ruin the catalyst combustor inside the Country Flame stove. The catalyst is designed for burning dry
O
seasoned wood. When operated properly, the catalyst will ignite gases whose temperatures can approach 2,000 F and the
catalyst will turn cherry red with heat. If any parts of the steel stove or chimney system turn red, immediate action is
required in order to slow down the burn rate and prevent over firing. As temperatures drop, the catalyst will continue to
function properly long after the red glow is gone.
FIRST FIRE, STEP 3
Before a fire is started in the stove, become knowledgeable with all stove controls associated with a specific catalytic
model. Different catalytic models operate differently. On some stoves, pushing in on the catalyst rod may disable the
catalyst while on other models pulling out on the catalyst rod may disable the catalyst. Whether you have experience with
a catalytic stove or this is a new experience, it is imperative that the operator know how to control the stove in all
situations and be prepared to react to any situation.
KNOWING WHERE THE STOVE CONTROLS ARE, WHAT THEY DO, AND HOW TO OPERATE THESE
CONTROLS IS CRITICAL TO SAFE AND PROPER STOVE OPERATION. REFER TO THE SPECIFIC
STOVE SECTIONS AND ENSURE THOROUGH KNOWLEDGE OF EACH CONTROL BEFORE
CONTINUING TO START THE FIRST FIRE.
FIRST FIRE, STEP 4
In preparing for the first fire, ensure that the controls are set as follows:
1
Set the combustion air controls wide open. This allows for maximum airflow into the firebox to create maximum
draft as a fire starts.
2
Ensure that the catalyst bypass rod is set such that the catalyst is bypassed during fire startup. Once the stove has
O
O
reached around 500 F to 700 F, the catalyst will be engaged to ensure a cleaner, hotter, and more efficient burn occurs in
the stove. Ensure that the 8” probe thermometer has been installed and is visible on the front of the stove. This
thermometer provides critical information during stove operation.
3
Once a fire is started, the stove will warm quickly and controls may become warm if not hot to the touch. It is
important to have a hot pad or insulated gloves available at all times so that controls can be adjusted regardless of their
temperature.
FIRST FIRE, IGNITION
1
Open the front door of the unit and build a small fire as defined in the following steps. It is important to keep the
first couple fires small (less than ½ hour in duration) so that the stove and chimney system can be tested for any leaks,
proper operation, and proper draft.
2
Place several pieces of wadded up newspaper between small pieces of seasoned kindling. Add a couple more
36
pieces of wadded up newspaper and then add some small diameter wood, small dry kindling, or even rolled up newspaper.
AGAIN, be cautious, as the amount of fuel put in will determine how long the fire burns. The first fire could just be some
wadded up paper and kindling to determine how well the stove drafts and to determine if there are any “leaks” in the
system.
3
Light an edge of the newspaper and close the stove door. The fire should spread quickly as the combustion air
control is wide open allowing for an unlimited fuel-air mixture. As the stove warms up, the temperature of the probe
O
O
thermometer should start to climb but should not exceed much over 400 F to 500 F due to the limited fuel and the fire
should quickly burn out (unless a really large amount of fuel was put into the firebox.) Any smoke should be seen moving
to the back-center-top part of the firebox as the exhaust gases rise up the chimney. NOTE: If the smoke builds up in the
firebox or any smoke is seen coming out of the combustion air controls, ensure a window close to the stove is opened
slightly to improve the stove draft. AGAIN, a chimney, in order to properly draft must be warm (hot air rises) so a flow
of fresh air must be available to the stove. Ensure other house fans or other devices consuming air are not causing limited
or negative pressure to the catalytic stove. As the stove temperature rises, the chimney system should become more
efficient in removing unwanted exhaust gases as draft improves.
1
The stove should be completely cool before attempting to correct any problems discovered during the first fire or
before repeating the first fire process.
2
The homeowner should be confident of both the understanding of the stove controls and a properly operating
stove and chimney system before creating a large fire in the system.
DRAFT PROBLEMS
1.
Stove system draft problems may exist if any of the following systems are observed during the first few small
fires:
a.
Smoke enters the living area after the chimney has warmed up and a window, close to the
stove, has been opened slightly.
b.
The small fire’s burn rate was slow or the fire extinguished itself before burning up all
material.
c.
The chimney system may not have the proper clearances to obstructions with in the
vicinity outside the home.
d.
The geographical location of the house and chimney system causes a consistent
downdraft.
e.
The chimney system was pre-existing and has not been properly cleaned or has
obstructions.
f.
The chimney system, whether old or new, was not been properly sealed along the full
length of the liner. Leaks will reduce the amount of chimney draft.
2. After several attempts with small fires, if the homeowner suspects any of the problems above or even if they are not
sure what the problem is, it may be necessary to call a certified chimney sweep and have them bring in equipment to
measure the chimney draft. At a minimum, a chimney should draft between 0.05 to 0.07 inches of water column.
3. High tech stoves of all types are more sensitive to drafting problems. If a stove is 100% efficient, that means
100% of the heat is going into the home and no heat goes up the chimney. However, for a chimney system to work
properly, the air entering the chimney must be heated so that it will rise and thus create a draft behind it. Some of these
suggestions may help to remedy drafting problems.
a.
Open the catalytic bypass rod to open the flue damper before opening the stove door.
b.
Open the flue damper and combustion air slides anywhere from 30 seconds to 1 minute before opening the
stove door. This will increase draft by heating the chimney thus keeping smoke or smoke smell from entering
the house as more fuel is added to the fire.
c.
Turn off all vents or exhaust fans. Keep stove doors closed during normal operation. Only open the doors to
refuel the stove. Verify that no other draft-robbing appliances are in operation. Slightly crack a door or
window near your stove/insert to promote a good draft.
d.
In severe cases with inserts, a positive connection to the fireplace damper or to the top of the chimney may be
necessary to correct leaks caused by broken or cracked tiles.
37
FIRST LARGE FIRE
1
Repeat the small fire building process, ensuring that the stove controls are in the proper position to start a fire. As
the firebox is filled with wood fuel, build on the size of wood that is put on top of the pile of kindling. The firebox can be
filled with any amount and size of logs that the stove will handle.
2
Once the firebox has been filled, the newspaper can be lit and the stove door closed.
3
It is important to monitor the fire as it grows in size. If the stove is left unattended with the combustion air wide
open and the catalyst bypassed, the stove can rapidly overheat, as there is nothing to control the rate of fuel burn with the
controls set in the “startup” position. DO NOT LEAVE THE STOVE UNATTENDED DURING FIRE STARTUP.
4
Depending on the type of seasoned fuel, the amount of fresh air, and the chimney system, the stove should rapidly
O
O
O
approach 500 F to 700 F. Country Flame recommends the catalyst bypass rod be closed around 700 F. By closing the
catalyst bypass rod, the flue gases will now be forced to pass through the catalytic combustor thus increasing the
temperature and slowing the burn rate. It is normal for the fire to diminish slightly as the catalyst will add a restriction to
the amount of gases going up the flue. If it looks like the fire is going to go out, it may be necessary to bypass the catalyst
and allow the stove gases to exhaust directly up the flue that again, should increase the size and rate of burn of the fire.
Once the fire has been re-established and the temperature is at 700ºF, the open flue should be closed through use of the
catalyst bypass rod.
5
Should the fire diminish to the point of going out, the operator will need to consult the Troubleshooting Guide,
contact the installer, or dealer for assistance if the problems persist.
6
Once a burn has been established and the catalyst is operating properly, the probe thermometer temperature can
O
O
rise anywhere from 900 F to 2,000 F. The temperature will be determined by the quality of draft, the amount of
combustion air available, the quality and volume of wood fuel available to the fire, and the setting of the controls.
7
After several large fires, the homeowner should feel comfortable in operating and monitoring the performance of
a specific catalytic stove. By monitoring the stove’s temperature and adjusting combustion air slides, the homeowner
should be able to achieve the burn time and heat output acceptable to them. The preceding statement assumes that all
other factors affecting the stove’s operation are correct. NOTE: The catalyst is unaffected by the room air blower’s
operation (optional on some units).
8
Surface thermometers are not accurate for monitoring interior stove temperatures. The probe thermometer is the
only temperature that is accurate for making decisions on stove operation. Maintain the probe thermometer in good
working condition to remove any stove operational guesswork. The outside portion of the slide (the last section to be
covered as the slide closes) is called the Air Wash. It channels preheated combustion air into the firebox through long
slots just inside the door opening on the top and sides.
9
Performance of a catalytic stove will vary according to many factors but draft is an important element. The
homeowner may want to experiment as to when to close the flue and engage the catalyst to determine the best settings for
desired performance. Country Flame recommends the homeowner experiment by engaging the catalyst at different
O
temperatures and at different combustion air control settings. The homeowner may determine that 1,000 F is the
optimum setting to close the combustion air control in their system. Bottom line: Do not be afraid to experiment but
monitor results closely and DO NOT OVER FIRE the stove. If over firing occurs, immediately close all combustion air
controls to reduce the air supply to the fire. Also, if not already operating, turn on the room air blower to pull heat away
from the stove and surrounding area.
10
During stove operation, hot air sweeps over the front door glass. This airflow is designed to help maintain clean
glass but continuous operation will result in regular glass cleaning issues. REMEMBER: Long slow burns will generate
some creosote formation. A hot fire will assist in keeping the glass clean. Sometimes a chemical cleaner or a razor blade
is necessary to remove the creosote from the glass. It the fire is hot before limiting the combustion air, the stove glass will
remain much cleaner than if it is a cool fire. The hotter the fire, the cleaner the glass.
11
An ash bed is helpful in maintaining a hot fire in a catalytic stove. For maximum efficiency, allow an ash build
up of 1 to 2 inches in the stove. CAUTION: Never remove ash from a stove with the room air blower operating. The
airflow from the room air blower could scatter hot ash or hot embers across the room sparking a house fire!
12
Country Flame catalytic stoves are not equipped with automated thermostatic controls. This means the
homeowner must gain the knowledge, confidence, and experience to adjust the combustion air slides on a specific stove in
order to maintain a comfortable home temperature range. If the combustion air slides are opened fully, significant
amounts of heat will be generated with increased fueling requirements and the stove will burn hotter and cleaner. If the
combustion air slides are operated fully closed, a stove will generate very low amounts of heat with very long periods
between refueling. This means the home will have lower average temperatures and the chimney system will build up
creosote at a much faster rate.
38
13
It is important for the homeowner to understand what happens in the event enough combustion air is not available
to a catalytic stove. Poor combustion, dirty chimney systems, and overall reduced performance will occur if an adequate
volume of combustion air is not available during stove operation. Consult with a certified professional to ensure a specific
home has both balanced and positive amounts of air present during stove operation.
CARE OF STOVE GLASS
All Country Flame stoves use high temperature ceramic glass that is rated to 1400°F. If the glass should crack or break for
any reason, it must be replaced with an equal or better grade ceramic glass. NOTE: THE MOST COMMON CAUSE OF
GLASS DAMAGE IS DUE TO OVER TIGHTENING THE GLASS CLIPS THAT HOLD THE GLASS IN THE
DOOR. The use of tempered glass or ordinary glass IS NOT AUTHORIZED for use in any Country Flame stove and is
hazardous if used. All Country Flame stove replacement glass can be purchased from the Country Flame or through a
local authorized dealer. DO NOT OPERATE any stove with a cracked or broken door glass or with a stove door in the
open position.
GLASS REPLACEMENT
If a door glass should crack or break for any reason, it must be replaced with an equal or better grade ceramic glass. Refer
to FIGURE 18, remove the glass clips with a common household screwdriver, and store both the screws and glass clips in
a safe place. These items will be required during reassembly so any damaged or worn items should be ordered and
replaced to ensure the glass and door properly fit together. The use of tempered glass or ordinary glass IS NOT
AUTHORIZED and is hazardous to use. Refer to APPENDIX A for the specific part number and a specific size of glass
for a specific model catalytic stove. Be prepared to provide the stove model number, stove serial number, the glass part
number, and whether etched or non-etched glass is required when reordering. Cutting or trimming the replacement glass
is not required. Replacement glass should fit into a specific catalytic stove door without any modification. Replacement
glass can be purchased from Country Flame or a local authorized dealer. It is important that when glass or any other stove
component is replaced that reinstallation of said component(s) include the proper gaskets and clearances provided when
the stove was originally manufactured.
If there is any question about installation procedures, proper clearances, required gasket material, or the latest techniques
in maintaining a stove in perfect operating condition, please contact Country Flame or one of its local authorized dealers.
GLASS-CERAMIC SPECIFICATIONS
Manufacturer: Euro Kera Window Type: Glass-Ceramic, Kera Lite®
KERA LITE® glass-ceramic has a thermal endurance far exceeding that of normal tempered glass. KERA LITE® is
0
0
designed to operate at temperatures ranging from -400 F to +1400 F. Despite its superior thermal properties, KERA
LITE® stove windows should be treated with care. This glass-ceramic can still be scratched or broken by mechanical
abuse. When cleaning the window, use only non-caustic, nonabrasive cleaners. Country Flame uses KERA LITE®
glass-ceramic that is 0.197 inches thick +/- 0.008 inches. The KERA LITE® glass is custom cut to fit Country Flame
stoves. If problems occur with stove glass, contact Country Flame or an authorized local Country Flame dealer for
39
assistance.
GLASS-CERAMIC CLEANING
NEVER ATTEMPT TO CLEAN HOT STOVE GLASS. Applying cleaner to hot glass may cause burns, emit hot
noxious fumes, and will increase the chances the glass will stain. Creosote and soot that attaches to the glass, caused by
burning wood fuel, may be removed with Speedy White Hearth and Stove Cleaner or Cook Top Cleaning Crème available
at appliance centers or call 1-800-872-8855 to obtain the proper cleaning material. BE CAREFUL, the cleaning solution
can stain surrounding material, especially after the creosote has dissolved and runs or drips off the glass. Hint: put down a
generous amount of newspaper in the surrounding area. After using any cleaner always remove all residue by washing the
glass with water or conventional window cleaner spray. Any remaining residue will stain the glass when it is heated. The
glass door on a Country Flame stove provides the enjoyment and beauty of viewing the fire while retaining the efficiency
of your stove. Although the brand of glass used in the Country Flame door has well established and recognized heat
resistant and strength characteristics, it can be broken through improper use. To achieve the maximum utility and safety
of your glass door, Country Flame advises the homeowner to observe the following use and safety tips:
1 Inspect the glass regularly for cracks or breaks. If you detect a crack or break, extinguish the fire immediately.
Contact Country Flame or an authorized local Country Flame Dealer for glass replacement. CAUTION: DO NOT
OVER TIGHTEN GLASS CLIPS OR GLASS BREAKAGE WILL OCCUR.
2. Do not slam the stove door or otherwise impact the glass. When closing the door, make sure that no logs or
other objects protrude to impact against the glass.
3.
Glass will require cleaning but several techniques are advised to reduce creosote buildup.
a.
b.
4.
Pull your fire forward to intensify the heat near the glass.
Each Country Flame stove is equipped with a glass air wash system. Opening the combustion air
slides slightly ensures enough air is entering the glass air wash system to be more effective.
c.
Very long, slow fires starve the glass air wash system and hasten creosote buildup.
d.
Trim the gasket around the glass if it has curled and is interfering with the flow of air over the
inside of the glass.
Do not clean the glass with materials, which may scratch it (such as steel wool) or otherwise damage the
glass.
5
The Glass-Ceramic, KERA LITE® used in Country Flame stoves is built to exacting standards and is
expensive. Replacement costs are high so be careful, properly clean and care for this ceramic glass thus enjoying years of
beautiful fire viewing.
DECORATIVE DOORS
Optional doors are available from Country Flame for all catalytic stoves. The purchase of optionally decorated or plated
doors in no way impacts the overall operation or efficiency of a stove. Optional doors are strictly decorative and provided
to allow customers to meet a variety of home décor options. Today’s plating technology is almost completely done
outside the United States. This makes plated doors an expensive option. Damage of any kind to plated doors results in
costly repairs that no one wants to pay for.
It is strongly recommended by Country Flame that homeowners follow the care and maintenance procedures for plated
doors provided in this manual. Any damage that has been caused by misuse or improper cleaning techniques will not be
the responsibility of Country Flame.
Gold or plated door should be wiped down regularly to ensure the luster and beauty of the door system lasts the life of the
stove. Always use an approved glass cleaner (i.e. Windex, Glass Plus) and a lint free soft cloth to polish the doorframe.
DO NOT use any abrasives, like steel wool, brass polish, cleaners, like comet, or other household cleaners. If these
products are used on the plating, the door will be permanently scratched and the finish ruined. If damage does occur to
the doors from improper cleaning, the solution will be expensive to return the doors to their original luster. The doors
would have to be returned to Country Flame for refinishing. Country Flame can accomplish the repair of any door but it
is expensive. Use proper care in cleaning plated and other plated surfaces and a lifetime of enjoyment will be yours. Cast
doors require little or no care as long as abrasives are not used.
40
ROOM AIR BLOWER MAINTENANCE
All Country Flame catalytic stoves come equipped with a room air blower or have an optional capability to install a room
air blower. Before any room air blower is operated, some basic electrical safety precautions should be taken. The room
air blower is like any other home appliance; it operates off standard household electrical voltages and currents. This
means that if improperly installed, the blower will create conditions that can cause electrical shock or even death. Ensure
that a certified electrician has reviewed or inspected the installation of the wiring system before operating the blower
system.
WARNING: ROUTE POWER SUPPLY CORD AWAY FROM THE STOVE. FAILURE TO OBSERVE
THIS WARNING CAN LEAD TO A MELTED POWER CORD AND A SHOCK HAZARD.
WARNING: NEVER COVER CIRCULATING AIR INLETS TO THE STOVE BLOWER.
WARNING: MODIFYING THE BLOWER SYSTEM OR IMPROPERLY INSTALLING THE BLOWER
SYSTEM WILL IMMEDIATELY VOID THE COUNTRY FLAME WARRANTY.
NOTE: STOVE BLOWER SYSTEMS HAVE MOVING PARTS THAT REQUIRE ROUTINE ATTENTION.
Maintenance schedules will be affected by the use of the stove. Frequent to daily use will shorten the interval between
maintenance intervals. Inspect the fan for routine cleaning and oiling to keep the blower system performing at optimal
efficiency. At least once a year, the fan should be removed for cleaning. During cleaning it should be determined if
lubrication of the electrical motor is required. High temperature blower motor systems are lubricated at the factory. These
motors should require no further lubrication; however, at higher inlet temperatures, increased bearing life can be achieved
by annually re-lubricating the motors with 10 to 20 drops of Anderol Number 465 high temperature synthetic lubricant.
DO NOT USE petroleum-based oil, as premature bearing failure will result.
ROOM AIR BLOWER TESTING
Several steps are required to verify the correct operation of a blower system associated with Country Flame catalytic
stoves. Several additional components have been provided in the blower system to assist the homeowner in testing a
catalytic stove blower system. The following general information is provided as steps to be followed in testing a blower
system. Refer to the schematics provided with this manual for more detailed information. If problems occur, contact a
local Country Flame dealer, Country Flame, or a certified electrician to determine the cause of the problem.
1
Check the automatic fan switch thermal snap disc. Ensure this switch has not been broken during shipment. Check
its electrical connections for any loose connections or shorts.
2
Use a hair dryer to heat the thermal snap disk to approximately 110ºF. When a click is heard, that means the snap
disk has closed and the blower system should begin to operate. WARNING: 120 Volts AC is available at the snap disk
terminals. Caution should be used and if unfamiliar or unqualified to deal with household voltages and currents contact a
qualified electrician.
3
If the blower system fails to operate after completing step 2, remove the power cord from the wall and then
bypass the automatic snap disk (fan switch). This can be done by providing a jumper to the wires on each side of the snap
disk. Again, if unqualified, contact an electrician. Ensure that the fan switch is not in the off position. Reinstall the
power cord in the wall outlet and if the blower system begins to operate, replace the defective automatic fan switch and
wire it correctly.
4
If the blower system still does not operate, unplug the power cord and bypass the 3-speed fan switch. Once
bypassed, reinstall the power cord into the wall socket. If the blower system begins to operate when power is restored,
replace the 3-speed switch and restore the connection to the automatic fan switch described in Step 3.
5
If the blower system is still not operative, contact a local Country Flame dealer, Country Flame or a qualified
electrician.
6
The model BBF is equipped with a standard blower tray that is located below the ash lip of the stove.
41
BLOWER MALFUNCTION
In the event of any malfunction in the electrical system of your insert/stove, please refer to previous section, electrical
system checklist, and blower schematics for wiring details.
NO ELECTRICITY
In the event of a power failure, the catalytic stove will continue to generate heat into the home. This is because the
catalytic stove will pull cold air into the bottom of the stove and heat it up. As the air is heated, it rises and pulls itself
through the stove and into the room. This is called gravity airflow or convection heat. The homeowner can enhance the
amount of heat coming from the stove by performing the following (BBF and B only):
1. Unplug the stove’s power cord from the wall receptacle.
2. Remove the blower tray assembly by loosening the two screws beneath the ash fender.
3. Removal of the blower tray assembly allows more air to be pulled into the bottom of these stoves thus creating
more heat for the room.
4. When electrical power has been restored, reinstall the blower tray assembly and plug the blower system power
cord back into the wall receptacle to resume normal operation.
5. In the event of a power failure, Country Flame recommends that the blower tray be removed part way to enhance
gravity flow. Choosing to ignore this recommendation will not cause any damage to the blower motor or blower
system.
CREOSOTE BUILDUP
When wood burns slowly, it produces tar and other organic vapors, which combine with expelled moisture to form
creosote. These creosote vapors condense in the relatively cool chimney flue of a newly started fire or from a slow
burning fire. As a result, creosote residue accumulates on the flue lining and tends to build up from the top of the
chimney or chimney liner towards the bottom of the chimney. If ignited, creosote or creosote tar can make an extremely
hot fire, which may damage the chimney or even destroy the house.
The chimney system should be inspected at least twice monthly during the heating season to ensure no creosote buildup is
occurring. If creosote has accumulated, it should be removed to reduce the risk of a chimney fire. Inspection should start
at the stove connection and work towards the top of the chimney. Again, cooler surfaces tend to build up creosote deposits
quicker, so it is important to check the chimney from the top as well as from the bottom. Creosote can be removed with a
proper chimney brush. A certified chimney sweep can perform this service at a very reasonable cost. Country Flame
strongly recommends that a certified chimney sweep inspect the chimney system at least once before each heating season.
Cleaning and repair should be completed as required.
FIREBOX TIPS AND TECHNIQUES
Refer to the WOOD FUEL REQUIREMENTS section in this manual. Below are some tips that Country Flame
recommends a homeowner review if heating with wood:
1. Maintaining a home at a comfortable heat for extended periods is a learned talent that requires time and
experience. The exact technique will vary with the layout of the home, the location of the stove, the airflow
throughout the home, the chimney system, and the wood fuel used.
2. The timing of when wood is added to a fire greatly influences how long a fire will last. A full charge of wood
added to a good set of embers will burn several hours and produce heat that is ideal for overnight burns. The
same charge of wood when added to a very hot fire produces more intense heat for a shorter period.
3. Adding a large charge of wood to a fire will immediately cool the fire. Naturally, the stove’s heat output will be
drastically reduced for some period. Adding smaller charges of wood will produce faster starting and more even
heating.
4. Ashes in a Country Flame stove insulates the hot coals and makes them last longer. Remember that failure to
clean a stove regularly will allow too much ash to build up. This buildup of ash effectively reduces the size of the
firebox and lowers the overall heat output. ASH IS AN INSULATOR!
5. Ashes must be removed and stored in a fireproof metal container with a tight fitting lid. The container should be
kept on a noncombustible floor or on the ground, well away from all combustible materials, until all cinders have
thoroughly cooled. An accumulation of too much ash restricts airflow and reduces the available burning area. A
layer of an inch or two of ash in the bottom of the stove should be maintained to assist in the fire burn to support
combustion and insulate the bottom of the firebox.
42
THE CATALYTIC COMBUSTOR
Catalytic combustors are designed to withstand 12,000 hours of continuous use or approximately five to six years of
operation; however, the life expectancy of any combustor is affected by many variables that can diminish this life
expectancy. There are many signs that the combustor is becoming a problem, these include:
a) Increased smoke from the chimney
b) Creosote buildup
c) Sluggish performance
d) Excessive smoking
e) Increased fuel consumption
f) Decreased burn times.
Proper and regular maintenance will not only increase the effectiveness of the combustor, it will also ensure problems are
spotted before expensive replacement of the combustor is required. Keeping the combustor cells clear increases the
amount of surface area available to promote the catalytic reaction. This will prevent sluggish operation and improved heat
output. A combustor may become clogged three ways: a) with fly ash, or b) from creosote, or c) from soot.
a) Fly ash is the normal accumulation of light grey ash. This ash comes from normal combustion and from
combustion particles being blown about by normal chimney draft. Gently brushing the combustor with a
clean soft brush or lightly vacuuming the combustor will remove fly ash. DO NOT use high-pressure air
to clean the fly ash as this air can damage the combustor cells. Using cotton swabs to clean ash out of a
specific cell is permissible. Care should be taken not to damage the cell.
b) Creosote is a brown tar-like substance that is a byproduct of incomplete combustion. The more creosote,
the more this is an indication that the stove is not burning efficiently and is burning at too low a
temperature. Creosote must be burned off the combustor. To burn the combustor clean, reinstall it back in
the stove and operate the stove at a higher temperature burn for about 30 minutes with the combustor
engaged. Repeat this step as necessary until the combustor is clean. REMEMBER: if the combustor is
covered in creosote, it is likely the chimney and associated pipe are also covered in creosote. Be sure to
have the chimney system cleaned. FAILURE to clean the chimney can lead to a chimney fire. Ensure the
combustor has completely cooled before attempting to remove it.
c) Soot is the dark granular material that can result from burning off the creosote or from burning foreign
material in the stove. Clean soot out of the system the same way that fly ash is cleaned from the
combustor.
d) A combustor has active elements on the honeycomb material. Without this material, the combustor
becomes inactive and the combustor will allow an ever-increasing percentage of particulates to escape up
the chimney. An inactive combustor will reduce a catalytic stove’s heat output and cause the chimney
system to build up creosote. If any large portion of the combustor becomes inactive, the entire combustor
should be replaced. Do not operate the stove when it is observed that a large portion of the combustor has
become inactive. If the homeowner is not sure about the quality of the combustor, contact Country Flame
or one of its local dealers to have the combustor inspected. It is illegal to operate a catalytic stove without
a properly functioning combustor.
CATALYTIC COMBUSTOR CLEANING
Refer to the section on removal of the catalytic combustor and then follow the following instructions.
a. Enough distilled water will be required to cover the entire catalytic combustor to a depth of ½” over its
total thickness at least three separate times. Do not use tap water as it contains minerals that may
adversely effect the designed operation of the combustor. Expect to use at least 3 gallons of distilled
water
b. White vinegar will also be required, as it will be mixed with the water to form a 50/50 solution that the
combustor will be soaked in. Expect to use at least 3 quarts of white vinegar.
c. Both the distilled water and white vinegar will be required to be heated so ensure that an old pot is
43
available to heat the solution.
d. A large metal wash pan will be required to soak the combustor in after the solution is heated. This wash
pan must be large enough to allow the combustor to be completely submerged in the distilled
water/vinegar solution.
e. A plastic coated wire or heavy cord will be required.
f. A number of common hand tools will also be required, such as, soft bristle brush, screwdriver, pliers, and
any other tools required to remove the combustor from the stove.
g. A home vacuum cleaner with a standard size hose.
Using a clean unused paintbrush and the vacuum cleaner remove any fly ash and loose soot from the combustor. If any
combustor cells are totally blocked, use cotton swabs or pipe cleaners to open up the clogged cells. Be careful as too much
pressure can damage the wall thereby rendering that combustor cell useless.
Bring the solution to boil. Reduce the heat and slowly dip the combustor into the boiling solution using the cord or coated
wire as a handle. Be careful, as any splash can burn. There is no need to keep the solution boiling once the combustor is
in place. Do not bang the combustor against the walls or bottom of the pot. Now slowly raise and lower the combustor in
the solution to assist in the cleaning process. The combustor should be soaked in the hot cleaning solution for a minimum
of 45 minutes.
Once the hot wash is complete, dry the combustor with a soft cotton clean rag. Empty the pot of hot solution in an
appropriate drain. Now refill the pot with distilled water and bring it to boil in order to rinse the combustor. Once
boiling, use the cord or coated wire to lower the combustor into the hot clean rinse. Reduce heat to a simmer and soak the
combustor for about 20 minutes. This rinse cycle should be repeated two to three times with clean distilled water each
time.
Ensure that the combustor cells are void of water and ensure complete dryness. Once drying is complete, reinstall the
combustor back into the Country Flame stove by reversing the removal instructions. Ensure any warn parts are replaced
during this process.
The homeowner should be confident that the combustor is completely dry before reigniting the stove. Any steam that is
generated from the combustor will cause damage to the catalytic material. To ensure complete dryness of the combustor,
it can be placed in the family oven for one to two hours at 350ºF. Allow the combustor to cool before reinstalling it in the
wood stove.
REPLACING THE COMBUSTOR
Any time a firebox is worked on, the combustor should be inspected to determine if cleaning is required or damage
demands replacement. Inspect the combustor for deterioration. If damage is found, replace the entire combustor and any
worn parts used for installation. Common damage that might be encountered in a combustor is:
PEELING
Peeling occurs when the beige metal coating or catalyst material is peeling off the ceramic base. If large areas peel, this
can render the combustor useless, so be prepared to replace it if necessary.
CRACKING
If random lines of cracking are observed in the ceramic base, replace it, especially if large pieces are missing or falling
out.
CRUMBLING
This is different from cracking as crumbling is caused by thermal shock. Crumbling occurs if the stainless steel shield
deteriorates and the flames make direct contact the combustor. Overheating and then cooling the combustor too quickly
will also cause the substrate to crumble.
MECHANICAL CRACKING
If the combustor receives a hard bump or is dropped, then mechanical cracking or fracture will occur. Mechanical cracks
usually follow a structural line in the ceramic wall. The breakage will not be as random as thermal cracking. Mechanical
cracking does not affect the combustor performance as long as all parts of the combustor are in place.
Always replace a catalytic combustor with the same combustor as recommend by Country Flame.
44
If a different
combustor is used, performance of the stove could be adversely affected.
WARRANTY
Catalytic stoves are designed to operate at high temperatures only with the combustor engaged. Removing the combustor
will allow uncontrolled fires that will eventually damage the stove. Removing the combustor and operating a catalytic
stove voids the warranty.
HOME INSURANCE
Improper operation of a woodstove can affect homeowner insurance coverage. Always follow manufacturers
recommended instructions when operating any woodstove.
FEDERAL LAW
Federal and many state laws require that all catalytic woodstoves be maintained and operated with combustors to reduce
pollution over the entire life of the stove.
COMBUSTOR PROBLEMS
The following questions are provided to help determine if the catalytic combustor is working. If the answer to these
questions is YES, then the combustor is usually working as it was designed:
1
Is the stove producing the same amount of heat for the same wood consumption?
2
Does the catalyst glow red for a short amount of time during the burning of the wood load? By looking inside the
stove, directly over the damper rod, the combustor can be seen.
3
Is creosote buildup in the chimney the same as when the combustor was new?
4
Is white smoke seen exiting the chimney?
5
Does a visual inspection of the catalyst show it to be clean of any fly ash, creosote or soot?
6
Is there a color variation in the honeycomb material signifying inactive portions of the combustor?
If the answer to any of the above questions is NO, then look to the Trouble Shooting Guide to determine if the catalyst
must be replaced.
NOTE: KEEP AND REFER TO THE CATALYTIC COMBUSTOR INSTRUCTIONS AND WARRANTY
INFORMATION. IN THE EVENT INFORMATION IS REQUIRED ABOUT THE CATALYTIC COMBUSTORS
THAT COUNTRY FLAME INSTALLS IN ITS STOVES, CONTACT WWW.APPLIEDCERAMICS.COM FOR
ADDITIONAL INFORMATION ON A SPECIFIC CATALYST.
45
MODEL BBF CATALYST INSPECTION & REPLACEMENT
CAUTION: Be certain that there is no fire in your Country Flame stove and that the unit has had sufficient time to cool.
CLEANING INSPECTION
To inspect the catalyst, look up inside the stove and locate the catalytic combustor stainless steel plate. Remove the four
bolts that allow the stainless steel plate to be removed. Inspect for a dirty or plugged combustor. If dirty, refer to the
cleaning information provided earlier in this section. Proceed to remove the combustor for cleaning. Once the catalyst is
cleaned, replace the cleaned catalytic system back into the stove.
REPLACEMENT INSPECTION
Visually inspect the catalytic combustor at least 3 times during the heating season to determine if physical deterioration
has occurred. Only replace the combustor if it has become damaged. Cleaning can improve catalytic combustor
performance so before throwing it away, always attempt to clean it before disposing of a non-functioning combustor.
Refer to the cleaning process defined earlier in this section or refer to FIGURE 19 for an assembly diagram to be used in
the replacement process. Replace the catalytic combustor with a complete kit from Country Flame.
REPLACEMENT
Make sure your kit is complete and all parts are available for installation. To replace the catalyst, remove the retainer
plate by removing the four bolts on the plate. Loosen and remove carriage bolt on left side of the catalyst holder. Slide
entire holder system to the right. Caution: As it is slid to the right, the holder, gaskets, and catalyst will drop down. Be
prepared to handle the weight and ensure no damage occurs to the catalyst from mechanical shock.
Now reverse the process and install the new catalyst system into the holder. Push the holder securely against
the top cast clips and align the slots and wedges. Once aligned, slide the holder to the left and into its final
location. Ensure the gasket between the unit’s top and catalyst holder has fixed an airtight seal. Failure to create
an airtight seal will allow gases to bypass the catalyst thus causing accelerated burn rates with reduced heat
output. Position the carriage bolt, washer, and nut into the proper locations. Tighten the bolt and nut but do not
over tighten. Replace the stainless steel plate and bolt it into place with its four bolts.
FIGURE 19: RECTANGULAR CATALYST FOR MODEL BBF
46
BLOWER THEORY OF OPERATION
All Country Flame catalytic stoves come standard or have optional room air blower systems available. These room air
blower systems are designed to pull cool air from the living space into, through, and across the hot catalytic stove body
thereby returning the exchanged air to the home at an elevated temperature (heated). These blower systems add to the
overall heating efficiency by ensuring that a stove does not rely solely on heat convection to provide warmth to a home. It
is important to note that in the event of a power outage, all Country Flame catalytic stoves will continue to operate
properly and no damage should occur to the blower system from over heating.
All Country Flame blower systems are designed to turn on and off automatically as the temperatures rise and fall inside
the firebox. The blower systems are automated with a thermal 110° F snap disk installed in the blower’s electrical system.
This thermally activated switch automatically turns the blower on and off. The blower is turned on as the air surrounding
the snap disk reaches approximately 110° F. As the air temperature rises, the thermal snap disk closes, completing the
electrical circuit thus allowing the fan motor to be activated. Household air is pulled into the stove, heated, and then
returned back to the home. In the event the home air temperature drops below approximately 90° F, the switch
deactivates, turning off the stove blowers.
The following information and schematics are provided for informational purposes only. A qualified electrician should
perform all repairs or installation of the electrical power required for Country Flame stoves.
WARNING: Lethal electrical power is present in home electrical circuits. All Country Flame stoves require standard
household power at 120 volts, 60 Hz, and 15 amperes. This standard household power should be provided through a
National Electric Code approved 3-wire power outlet that is properly grounded. Installing house wiring incorrectly,
failing to maintain proper polarity in either the plug or receptacle, or removing the grounding pin can lead to potentially
fatal shock hazards. Country Flame strongly recommends the use of a qualified electrician to install, maintain, or service
any part of a stove’s electrical system.
The schematics provided on the next several pages are for informational purposes. Changes do occur from time to time
on stove wiring systems and Country Flame reserves the right to update and change the schematic at its discretion. In the
event of any discrepancy between the information provided and the actual wiring of a stove, please contact Country Flame
or one of its local dealers.
MODEL BBF
The Model BBF catalytic stoves come standard with a blower system that can move 600 cubic feet per minute (CFM).
The blower system is located in a convenient blower tray that provides for easy cleaning. The blower tray access is
achieved by removing the grill below the front ash lip. The blower tray can then be slid forward and removed. NOTE: A
standoff bolt keeps the blower tray from rattling during operation. This bolt will need to be loosened and lowered for tray
removal.
The blower system operates when the temperature of the 110º F thermal snap disk, located in the blower tray, completes
the electrical circuit. When the thermal snap disk cools to somewhere around 90º F, the electrical circuit is broken and the
blower system will shut down. A bypass switch is provided on the front of the blower tray so that the thermal snap disk
can be bypassed. FIGURE 21 shows the blower tray electrical schematic. This allows for testing the operation of the
blower system without requiring the system to be hot. The front label is provided for clarification when operating the
blower system.
47
BLOWER CARE: At lease once a season (light use) and every six months (heavy use), the blower tray should be
removed for cleaning. The motor required no maintenance and no oiling. DO NOT attempt to oil the electric motor;
however, the fan blades will require cleaning. All household dust and lint should be removed from the blower tray.
Allowing large amounts of dust to build up in the blower tray housing can generate odors or even become a fire hazard.
FIGURE 21: MODEL BBF BLOWER SYSTEM ELECTRICAL SYSTEM
48
FIGURE 24: GOLD DOOR WARNING LABEL
FIGURE 25: EPA STOVE STICKER
49
50
51
PROBLEM
FIREPLACE/STOVE/CHIMNEY
SMOKES
CAUSE
SOLUTION
Chimney cap restricted
Clean the chimney cap and remove any debris
that may have accumulated in the screen.
Damper not set correct.
Open damper until 700OF achieved, then close
damper to activate catalytic combustor.
Downdraft
Obstruction
Atmospheric conditions
Chimney obstruction
Too many flues to a
chimney
House too tight
Paint curing
Leaky chimney
GLASS GETS DIRTY
Wet wood
Normal buildup
Position of fire
HEAT OUTPUT POOR
Wet wood
Load Fire Differently or
Increase Amount of Wood
Too high a speed on
blower
HEAT OUTPUT POOR (Continued)
Severely cold weather
Overdraft
Draft controls not adjusted
Bad wood
52
Add a chimney cap designed to prevent
downdrafts.
Remove any obstruction at least 10 feet from top
of chimney or increase chimney height.
Atmospheric conditions may cause smoke if the
chimney pipe is not straight, has too many
elbows, or is leaking. Consult with professional.
Check the flue system for obstructions and clean
as needed.
Consult Certified Chimney Expert.
Crack window by stove, close upper floor
windows or provide combustion air to stove.
Country Flame cures all new stoves at plant so
this should not last more than 10 to 15 minutes.
Chimney joint leaks or mortar leaks cause
chimney draft to be weak. Consult with
professional.
Dry wood produces much less creosote than wet
wood.
A damp cloth dipped in wood ashes used to wipe
glass clean. Household glass cleaners are not
effective in cleaning glass. DO NOT USE
abrasives, as permanent glass damage will occur.
Use fireplace glass cleaners, like Stove Bright.
Hot fires help keep glass clean. Burning logs,
close to the glass, will tend to dirty the glass.
Dry wood can produces at least twice the BTU’s.
Use properly seasoned hardwoods.
Wood loaded front to back may improve
performance versus loaded side to side.
Alternatively, increase the load of wood but when
starting a fire allow it to burn rapidly for several
minutes to establish good burn. A well-built fire
is much more efficient and heats better than a few
sticks.
Always adjust the speed of the blower to the size
of the fire. If air moves to quickly across small
fire, little heat will be transferred.
Depending on house insulation package, ceiling
height, stove insulation (leaking insert) or air
infiltration, fuel consumption may increase.
Control with stove combustion air damper or
chimney damper to reduce excessive draft.
Consult with professional.
Combustion is restricted when the air is restricted.
Adjust combustion air properly for fire size and
burn rate.
Hardwood has higher Btu rating than softwood.
Dry rotted wood has low Btu and lots of ash.
PROBLEM
BLOWER DOES NOT WORK
CAUSE
SOLUTION
Thermal Snap Disk
Wiring
Electric Motor
House Power Outlet
LARGE AMOUNTS OF CREOSOTE
Poor Quality Fuel
Combustion Air
Flue size
Geography
Humidifier
GOLD/NICKEL DOOR DAMAGE
Cleaning
Abrasives
WALLS GETTING TOO HOT
Clearances
Improper Installation
Defective Stove
CREOSOTE/FIRE ODOR
Creosote
Chimney
Catalytic Combustor
ANNUAL MAINTENANCE
Inspection
53
Blower system cannot operate until snap disk
closes electrical circuit. Consult with
professional.
Loose connection or damaged (pinched or cut)
wire. Carefully check wiring upon removal and
reinstallation. Consult with professional.
Motor may be worn out or bearings froze up from
years of use. If oil is required, make sure it is
done annually. Consult with professional.
Consult with professional. DO NOT use
extension cord to operate stove. Ensure power
outlet has proper polarities for all prongs.
Unseasoned or poor quality wood fuel.
Too little combustion air will choke fire and
cause poor burn. Hotter fires produce less
creosote.
The larger the flue, the harder to heat, the cooler
it operates, creating more creosote.
Outside flues, north side of house, normal wind
currents cooling chimney thus poor draft. Design
and location of chimney is critical to operation.
Heavy moisture in combustion air will cool
exhaust gases and cause more creosote. If
humidifier is used, measure home humidity.
Plated doors should be cleaned BEFORE FIRST
FIRE to ensure no permanent damage occurs.
Do not use abrasives, chemicals, or unknown
compounds or plated doors. Permanent damage
will occur. Refer to cleaning instructions this
manual.
Freestanding and insert stoves must maintain
minimum clearances. Consult with professional
but if walls get hot --- DO NOT BURN FIRE as
combustibles may self ignite into house fire.
If proper clearances are maintained walls should
not get hot. If they are, assume improper
installation, leaky chimney, or some other
problem. Consult with professional.
If stove firebox does not remain sealed, hot gases
can escape and overheat surrounding area. Inspect
monthly during heavy use and annually by
professional.
Firebox is dirty. Creosote will give off odor.
Make sure firebox stays clean through “hot safe
fire.”
If stove is not operating, chimney may be prone
to downdraft bringing in odor. Close all air
controls to minimize downdraft.
Wore out or nearing end of life causing stove to
burn dirty. Consider new catalyst.
Have Country Flame local dealer or certified
chimney sweeps annually inspect and approve
stove system. If there are warranty issues, contact
Country Flame with Model & Serial Number.
VENTING SYSTEMS
National Building Codes require venting of systems that burn solid and liquid fuels. Approval and listing agencies define
venting as the means for removing the flue gases from a facility’s equipment that burns solid or liquid fuels to the outside
atmosphere. Further, these agencies state that venting systems shall be engineered and constructed in order to ensure a
positive flow of air adequate to remove the flue gases to the outside atmosphere. Venting and the requirements associated
with venting thereby define the chimney systems that are ultimately designed for each solid fuel-burning stove or
fireplace.
There are only two methods (with many variations) to build proper venting systems for solid fuel (wood burning) systems:
a) prefabricated chimney systems as shown in FIGURE 27 or b) masonry chimney systems as shown in FIGURE 28.
FIGURE 29: FREESTANDING PREFABRICATED CHIMNEY SYSTEM (no chase)
Whichever system the homeowner chooses to have installed, chimney systems are expensive. These parts of a heating
system are effective at removing exhaust gases for decades or they repeatedly fail at their function, cause problems, and
create expense. Cut corners on installation or scrimp on costs and the chimney system will become a source of
nightmares. In the chimney business, no matter how expensive it is to do it right the first time, it is far less expensive than
doing it over. Almost 30 years of manufacturing experiences has taught Country Flame that if there is one-place
customers must be vigilant and become knowledgeable, it is in ensuring a chimney system is properly engineered,
designed and installed to match the heating stove being installed in their home.
54
If there is any doubt, hire a third party inspector to verify the installer’s work when complete. To avoid, costly mistakes or
repairs, ask questions and verify the installation work. If there is still any doubt, contact Country Flame or a local
authorized dealer to obtain the name of “industry experts” who can provide the correct answer.
When modifying, fixing, or installing a brand new chimney system, it is important to obtain knowledgeable help from a
certified professional. The homeowner should select an experienced professional. This is necessary because each home,
each location, each chimney system has unique requirements and variables. The more experience a chimney professional
has, the more likely the results will please the homeowner for years to come.
THIMBLE INSTALLATION
Catalytic stove installations that require a connection from the stove through a combustible wall to a masonry or
prefabricated chimney require either a UL Listed thimble (wall penetration assemblies) or the methods outlined in the
National Fire Association Standard 211, which is outlined below. It is important that the homeowner or installer be well
versed in these variations and understands which one is best suited for their application. The following diagrams provide
examples and explanations of chimney connector systems and clearances from combustible walls for residential heating
appliances. During any installation, it is important to consult with the local code authority or an installation professional to
ensure your installation is properly done. The following additional requirements will apply to FIGURE 31 through
FIGURE 34:
1
Insulation material used as part of a thimble wall pass-through system shall be constructed of noncombustible
2 0
2 0
material and shall have a thermal conductivity of 1.0 Btu-in/hr-ft - F (4.88 kg cal/hr-m - C) or less.
2
All clearances and thicknesses are minimums; larger clearances and thicknesses shall be permitted.
55
3
Any material used to close up an opening for the connector shall be of noncombustible material.
4
A connector to a masonry chimney, except for the installation shown in FIGURE 31, shall extend in one
continuous piece through the wall pass-through system and the chimney wall to the inner face of the flue liner, but not
beyond.
FIGURE 31: MASONRY CHIMNEY TO COMBUSTIBLE WALL
A minimum of three and one-half inch thick brick masonry chimney framed into a combustible wall with a minimum of
twelve-inch brick separation from the clay liner to combustibles is permissible. The clay liner (stove) shall run from the
outer surface of the brick wall, but not beyond the inner surface of chimney flue liner. The clay liner should be firmly
located and firmly cemented in its proper location.
0
FIGURE 32: TYPE HT 2100 FACTORY-BUILT CHIMNEY
0
Type HT 2100 factory-built chimney length that has the same inside diameter as the chimney connector. The factory-built
chimney must also have one inch or more insulation with a minimum of nine inches of airspace between the outer wall of
the chimney length and any combustibles.
56
FIGURE 33: SHEET STEEL CHIMNEY CONNECTOR, VENTILATED THIMBLE
Sheet steel chimney connectors must be made from material that is a minimum of 24 gauge in thickness and is separated
by two, one-inch air channels. The outside of the air channel must be separated from combustible materials by a
minimum of six inches of glass fiber insulation. The wall opening shall be covered and the thimble will be supported with
sheet steel supports that are made from material at least 24 gauge in thickness.
FIGURE 34: TYPE HT 2100ºFACTORY-BUILT CHIMNEY
Installations that use type HT 2100º listed factory-built chimney require an inside diameter two inches larger than the
chimney connector. This listed chimney must have at least one inch or more insulation that serves as a pass-through for a
single-wall sheet steel chimney connector that is a minimum 24-gauge thick and with a minimum two-inch air space
between the outer wall of chimney section and any combustibles. The minimum length of the chimney section must be
twelve inches and that chimney section will be spaced one inch away from the connector using sheet steel support plates
at both ends of chimney section. Cover the opening and support the chimney section on both sides with sheet steel
brackets that are a minimum of 24-gauge thickness. Securely fasten these brackets to the wall surfaces. Any fasteners
used to secure the chimney section shall not penetrate any portion of the chimney flue liner. A minimum of three screws
per chimney connector must be used.
57
A chimney connector shall not pass through an attic, roof space, closet, floor, ceiling, or similar concealed space. Where
passage through a wall or partition of combustible construction is desired or necessary, the installation shall conform to
NFPA 211 or CAN/CSA-B365 requirements.
Whatever brand of chimney system is purchased for your Ovation installation, you must ensure that all chimney
manufacturer’s installation instructions are followed and that all national and local codes have been met.
OUTSIDE AIR COMBUSTION
It is imperative that the installer or homeowner ensures that a minimum of at least eight square inches (fifty square
centimeters) of outside air be admitted to the hearth room or directly to the stove. If installation allows, a four-inch
diameter pipe can be brought in through an exterior wall and connected, using the optional fresh air adapter, directly to a
catalytic stove.
Provision for outside combustion air may be necessary to ensure that fuel-burning appliances do not discharge products of
combustion into the house. Guidelines to determine the need for additional combustion air may not be adequate for every
situation. If in doubt, it is advisable to provide outside air.
Outside combustion air may be required if:
1
A catalytic stove does not draw steadily, smoke rollout occurs; fuel burns poorly, or back-drafts occur whether or
not combustion is present, or
2
Existing fuel-fired equipment in the house, such as fireplaces or other heating appliances smell, do not operate
properly, suffer smoke rollout when opened, or back-draft occurs whether or not combustion is present, or
3
The home is equipped with a well-sealed vapor barrier and tight fitting windows or has any powered devices that
exhaust house air, or
4
There is excessive condensation on home windows in the winter, or
5
A ventilation system is installed in the house.
If any of these or other indicators suggests that infiltration air is inadequate to sustain proper combustion in a catalytic
stove, additional combustion air should be provided from the outdoors. Outside combustion air can be provided to the
appliance by the following means:
Direct connection: appliances can only use direct connection of outside combustion air if they are certified for this type
installation. Follow the Ovation instructions for direct connection of outside combustion air.
Indirect connection: for appliances not certified for direct connection of outside combustion air, outside air can be
ducted to within twelve inches of the appliance.
Mechanical ventilation: if the house has a ventilation system (air change or heat recovery):
A ventilation system may be able to provide sufficient combustion make-up air for a catalytic stove but the homeowner
should be informed that the ventilation system might need to be re-balanced by a ventilation technician after installation
of a catalytic stove.
CHIMNEY INSTALLATION
Install an approved chimney system in an interior chase of a home. A chase is defined as an enclosure (combustible or
noncombustible) that is built to cover the chimney system. Interior chimney systems, with a properly constructed
chase, provide better overall stove performance. Performance is enhanced because the chase maintains heat around the
chimney thereby ensuring improved draft that improves venting (removal of spent exhaust gases.) In areas where
temperatures hover or remain below freezing, the use of an exterior chimney will only increase the likelihood of
problems. Some of these problems will be difficult starts, weak draft, high rates of creosoting, and increased maintenance
of the system. Exterior chimneys are also prone to down drafting and flow reversal. Installations, which are located on
lower floors in the house, such as in a basement, in combination with an exterior chimney are especially prone to flow
reversal.
Always follow the Chimney Manufacturer’s installation procedures over any recommendations this manual provides on
chimney systems. Installing the chimney must be in compliance with local codes, chimney manufacturer’s recommended
procedures, and the chimney must connect to the Country Flame stove in accordance with instructions provided.
58
CAUTION: DO NOT FILL REQUIRED CLEARANCES AROUND THE CHIMNEY AND SURROUNDING
COMBUSTIBLE MATERIAL WITH INSULATION!
1
The Country Flame catalytic stoves covered in this manual use either listed six-inch diameter or listed eight-inch
diameter chimney system. Use the correct chimney connectors in the installation of a catalytic stove.
2
IMPORTANT: All Country Flame catalytic stove’s flue collars have been engineered, tested, and approved for a
specific stove that takes into account the minimum and maximum burn rates. These flue collars have the correct inside
diameter to accept listed standard chimney connectors from a variety of manufacturers. Ensure the chimney connector is
properly interfaced, properly sealed, and properly secured according to local and national codes. FIGURE 35 shows the
correct and incorrect installation of a chimney connector into a Country Flame catalytic stove. Installed correctly, the first
section of chimney connector will support the entire chimney, ensuring no leakage of creosote or fumes.
FIGURE 35: CATALYTIC STOVE TO CHIMNEY CONNECTOR INTERFACE
3
MINIMUM CHIMNEY HEIGHT: A chimney must be a minimum of 8’ above the top of a catalytic stove. The
chimney must extend a minimum of three feet above the highest point where it passes through the roof. National building
codes require that all chimneys shall extend at least 3 feet above the point where it passes through the roof. In addition,
the chimney must extend at least 2 feet higher than any portion of the building that is within 10 feet of the chimney.
FIGURE 36 shows chimney connector roof height requirements.
59
4
MAXIMUM CHIMNEY HEIGHT: A chimney can be no taller than 50’ high as measured from the top of the
catalytic stove flue collar. Chimney height is affected by many factors, consult both national and locale codes to ensure
proper installation for a specific application.
5
ELBOWS USED IN CHIMNEY CONSTRUCTION: A maximum of four thirty-degree elbows can be used in
chimney construction as long as they are used in two sets offset from each other. Maximum offset between the sets of
elbows is 4’. If two thirty-degree elbows are used, the chimney must be a minimum of 12’ high. When four thirty-degree
elbows are used, the chimney must be a minimum of 25’ high. Follow all chimney manufacturers’ clearance
recommendations for distances from combustible material and the location of support bracket requirements.
6
A chimney venting a catalytic stove shall not be used to vent any other appliance.
WARNING: In cold areas, an air-cooled chimney may generate a large amount of water due to condensation. This
water will accumulate on top of the catalytic stove and may cause corrosion. Country Flame Technologies does not
warrant any damage nor are they held responsible for condensation/corrosion problems. In cold climates, Country
Flame recommends the use of double wall insulated chimney connectors that are UL103 listed and rated to HT
2100°.
7
A rain cap must be installed on top of the chimney. Failure to install a rain cap will cause corrosion of the
chimney system and degrade its expected life and warranty.
8
FOLLOW THE CHIMNEY MANUFACTURER’S INSTALLATION PROCEDURES FOR PROPER
CLEARANCES BETWEEN THE CHIMNEY AND ANY COMBUSTIBLE MATERIALS. Do not fill this space
with insulation or any other combustible material.
9
Any portion of the chimney system that extends through a living (accessible) space must be enclosed to avoid
contact with combustible materials, damage the chimney, or to prevent occupants from coming in contact with the
chimney system.
60
PREFABRICATED CHIMNEY SYSTEM INSTALLATION
Cut and frame the required holes in the floors, ceilings, and roof where the chimney will pass through.
REFER TO THE CHIMNEY MANUFACTURER’S INSTRUCTIONS FOR PROPER CLEARANCES
REQUIRED BETWEEN CHIMNEY AND COMBUSTIBLES, REQUIRED SUPPORT BRACKETS, AND THE
PROPER FRAMING REQUIRED AROUND THE CHIMNEY SYSTEM COMPONENTS.
Install chimney sections, fire stops, attic insulation shields, and any other chimney parts per the manufacturer’s
installation instructions. Install the flashing, storm collar and the chimney cap following the chimney manufacturer’s
instructions. Refer to the chimney manufacturer’s requirements concerning supports, bracing, anchors, and other required
material.
FIGURE 37, FIGURE 38, FIGURE 39, Figure 40, FIGURE 41, and FIGURE 42 are provided as examples for different
types of chimney system installations. Please consult and utilize a professional installer and follow all chimney
manufacturers’ instructions during installation of a chimney system.
61
FIGURE 40: EXTERIOR CHIMNEY SYSTEM
FIGURE 41: EXTERIOR CHIMNEY SYSTEM
For the purpose of this manual, a chimney chase is considered a part of the chimney system rather than part of a building.
The chimney termination must be placed a minimum of eighteen inches or four hundred and sixty millimeters above the
chase.
For installations where more than one chimney is located in the same chase or within the same area, it is recommended
that each chimney termination be separated by at least sixteen inches or four hundred and ten millimeters from the next
chimney and each chimney termination be placed a minimum of eighteen inches or four hundred and sixty millimeters
above the chase. These separations are required to prevent smoke from migrating from one chimney to another. FIGURE
40 shows an example of the required chimney multiple termination dimensions.
62
FIGURE 43 shows an exterior chase construction for a catalytic stove. For additional information on building a
chase or for construction of an interior chase, please consult national and local building codes.
63