1
MP3 Player
With
Network Interface
By
Michael Somersmith
School of Information Technology and Electrical Engineering,
University of Queensland.
Submitted for the
Bachelor of Engineering Degree
Computer Systems Engineering
October 2002
Abstract
Compressing raw audio with the MP3 standard can reduce the storage space required by
approximately one twelfth. [17] This has made it possible to play audio from devices
with limited storage space, for example mobile phones, PDA’s and flash based MP3
players. Their small size also makes them more convenient and flexible to use than
using traditional audio CDs. It is now possible to buy MP3 players that can play MP3s
from a CD containing ten or more albums or from a hard drive containing hundreds of
albums.
Another advantage of their small size is that they are very suitable for transferring
between devices, whether it be through USB, cable based networks or wireless
networks. This allows for the MP3s to be played in a remote location from where they
are stored. For a long time now people have been doing this on computers to play MP3s
that are stored on other computers connected via a LAN or the internet. Up until now
this has been limited to computers. The aim of this thesis is to produce a MP3 player
that can play MP3s that are stored on computers connected to it through a LAN or
internet connection. This enables the user to be able to play MP3s that are stored on
computers without being in the same environment as the computer.
The project was broken into two parts: development of an embedded MP3 decoder with
a network interface, and a server program on a PC to communicate to the player and
Windows. The networking on the player was performed using an Ethernut development
board. The Ethernut is an open source hardware and software project. The hardware
uses an Amel ATmega103 processor with a Realtek 8019 network controller and the
software is the Nut OS, which is a real-time operating system and Nut Net, which
provides networking APIs and a fully featured TCP/IP stack. The software developed
on the player streams the MP3 data from the server program on the PC through a TCP
connection. The server program determines which MP3 to stream by reading a standard
Winamp play list file. From this file it also determines the song title and sends it to the
player which receives the song name and displays it on an LCD. On the player the MP3
stream is received and stored in a buffer which in turn is sent to the MP3 decoder, the
VS1001k. Whenever the decoder needs more data it raises an interrupt and the program
feeds it data through a serial interface. A user is able to control how the music is played
ii
through standard track controls: play/pause, stop, next and previous track. The player
decodes these and sends them as commands to the server which will either modify the
data stream accordingly (i.e. Stop or pause) or go back to the Winamp play list and open
a new file to stream (next and previous).
The final implementation of the player operates as you would hope it to. It can play
MP3s that are stored anywhere on the network, whether the data be on the computers
hard drives or on a CD in their CDROM drives. All sample rates are supported and all
bit rates can be played up to 250kbbs, including variable bit rates. The user can navigate
through the play list using the controls on the player and the song name selected is
displayed on the LCD. The audio that is produced is of CD clear quality at a line out
level ready to be connected to the line in of a stereo.
iii
Acknowledgements
Rebecca Somersmith for her love and support.
Peter Sutton for allowing me to take on a thesis topic that I enjoyed, and providing the
direction and organisation that I sometimes required.
To all the musicians that make the music. Without them there would be no need for
MP3 players
iv
Table of Contents
Chapter 1 – Introduction ............................................................................................... 2
1.1 Motivation............................................................................................................... 2
1.2 Solution................................................................................................................... 3
1.3 Thesis overview ...................................................................................................... 4
Chapter 2 – Background ................................................................................................ 6
2.1 What are MP3s?...................................................................................................... 6
2.2 The TCP/IP protocol............................................................................................... 7
2.3 Current MP3 players with a network interface....................................................... 8
Chapter 3 – Specifications............................................................................................ 11
Chapter 4 – The development platform...................................................................... 13
4.1 Platform requirements........................................................................................... 13
4.2 The Hardware ....................................................................................................... 14
4.2.1 Network Hardware......................................................................................... 14
4.2.2 The microcontroller ....................................................................................... 14
4.2.3 Embedded networking solutions.................................................................... 15
4.2.4 Does the Ethernut fulfil the requirements? .................................................... 16
4.2.5 Embedded MP3 decoding technology ........................................................... 18
Chapter 5 - Implementation of software..................................................................... 20
5.1 TCP/IP development environment........................................................................ 20
5.2 The Ethernut Software .......................................................................................... 21
5.3 Software development .......................................................................................... 22
5.3.1 Accessing Windows file system from a remote embedded environment ...... 22
5.3.1.1 The server message block (SMB)........................................................... 23
5.3.1.2 The Server program ................................................................................ 23
5.3.2 Sending data from the PC to the Ethernut. .................................................... 25
5.3.3 Sending files from the PC to the Ethernut ..................................................... 27
5.3.3.1 Sending files through a TCP connection ................................................ 27
5.3.3.2 Sending files over TCP with the Ethernut .............................................. 28
5.3.4 Storing data in a temporary buffer................................................................. 28
5.3.4.1 The buffer system ................................................................................... 29
5.3.4.2 The local buffer....................................................................................... 29
5.3.5 Interfacing the MP3 decoder.......................................................................... 31
v
5.3.6 Playing MP3 data........................................................................................... 35
5.3.7 Making the music sound as the artist intended .............................................. 38
5.3.7.1 Speeding up the network transfer ........................................................... 40
5.3.7.2 Removing clicks from the playback ....................................................... 41
5.3.8 Playing more than one song........................................................................... 42
5.3.7 Adding user controls...................................................................................... 44
5.3.7.1 Play/Pause Button. .................................................................................. 45
5.3.7.2 Stop Button. ............................................................................................ 47
5.3.7.3 Next and previous Buttons...................................................................... 51
5.3.8 Displaying the song name.............................................................................. 52
5.3.8.1 Integrating the LCD ................................................................................ 52
5.3.8.2 Extracting the song name........................................................................ 56
5.3.9 The Graphical user interface (GUI). .............................................................. 57
5.3.9.1 Where should the GUI be?...................................................................... 57
5.3.9.2 The web page based GUI........................................................................ 57
5.3.9.3 A stand alone program as the GUI.......................................................... 58
5.3.9.4 Winamp as the GUI ................................................................................ 59
Chapter 6 - Design evaluation...................................................................................... 61
6.1 Fulfilling the basic requirements .......................................................................... 61
6.2 Fulfilling the subtle requirements ......................................................................... 64
6.3 Personal reflection ................................................................................................ 64
Chapter 7 - Future Improvements .............................................................................. 66
7.1 Improvements to the Current Design.................................................................... 66
7.2 Extensions to the Current Design. ........................................................................ 67
Chapter 8 - Conclusion................................................................................................. 68
References...................................................................................................................... 70
Appendices..................................................................................................................... 72
Appendix A – The Player Source code....................................................................... 72
Appendix B – Server Source code.............................................................................. 80
Appendix C – LCD interface source code .................................................................. 89
Appendix D – Decoder interface Source code............................................................ 94
vi
List of figures
Figure 1 The network layers [1] ....................................................................................... 7
Figure 2 The AudioTron [3] ............................................................................................. 8
Figure 3 Functional diagram of the AudioTron [3] .......................................................... 9
Figure 4 Motorola SimpleFi [4.]....................................................................................... 9
Figure 5 Overall design layout........................................................................................ 12
Figure 6 Ethernut development kit [9]............................................................................ 16
Figure 7 The MP3 decoder board [19]............................................................................ 19
Figure 8 Early overall design.......................................................................................... 22
Figure 9 Overall design revision two.............................................................................. 25
Figure 10 TCP file transfer ............................................................................................. 27
Figure 11 TCP file transfer with Ethernut ...................................................................... 28
Figure 12 The player interaction with the whole network.............................................. 29
Figure 13 The ring buffer................................................................................................ 30
Figure 14 TCP file transfer through the Ethernut with a ring buffer .............................. 31
Figure 15 Writing data to the decoder command register .............................................. 33
Figure 16 Writing data to the decoder data register........................................................ 33
Figure 17 Interrupt service routine to transfer data to the decoder................................. 35
Figure 18 First program to play MP3 data...................................................................... 37
Figure 19 Program to play MP3 data that refills buffer if buffer empties ...................... 39
Figure 20 The openMP3 function................................................................................... 43
Figure 21 Play/pause implementation............................................................................. 46
Figure 22 Buffer control delays ...................................................................................... 48
Figure 23 Buttons with GAP message for buffer control ............................................... 50
Figure 24 Writing to the LCD command register........................................................... 53
Figure 25 The initialisation of the LCD [23].................................................................. 54
Figure 26 The print screen function................................................................................ 55
Figure 27 Song name extraction ..................................................................................... 56
Figure 28 A web page as the GUI................................................................................... 58
Figure 29 Winamp screen shot ....................................................................................... 60
List of tables
Table 1 The AudioTron versus SimpleFi ....................................................................... 10
Table 2 The ideal player specifications .......................................................................... 11
Table 3 The connections between the Ethernut and the VLSI piggy back board........... 32
Table 4 The LCD connections to the Ethernut ............................................................... 52
Table 5 Final player specifications ................................................................................. 61
vii
Chapter 1 – Introduction
1.1 Motivation
MP3s are quickly becoming a very popular format for audio storage. As a result, the
number of MP3 players available on the market is increasing rapidly. Most of these
players require the data to be stored locally on the player and the data is usually
transferred onto the player from a computer. Though there are many players now
available on the market most people still listen to MP3s played through their computer.
This is probably because the software to play MP3s on a computer is free and the user’s
MP3s can be stored in one place. The problem appears when the user wishes to play the
MP3s stored on their computer in an environment away from the computer. The options
for the user up until now have been to convert the MP3s to traditional CD audio or
download them onto a portable player.
After reading a review of the AudioTron by Turtle Beach on Tom’s Hardware [2], it
became apparent that it would be very useful to be able to use MP3s that are stored on a
computer and play them remotely into a normal stereo. The AudioTron, as described in
chapter 2 section 2.3, is an MP3 player with a network interface that has no local
storage. It retrieves all the MP3 data through a network connection from computers on
the local area network (LAN) or internet. The idea of being able to have a stand alone
device that can play MP3s through a network connection opens up a new possibility.
Having the ability to store all the MP3s on a computer where it is easy to manipulate
and manage them and still be able to play them in an environment remote from the
computer.
The problem with current MP3 players (or even other forms of audio storage) is that the
data has to be accessible locally to the player. This means that the data has to be
transferred (or copied) to the player before it can be played. This is probably the reason
why MP3s are very useful in the player market because they can reduce the storage
requirements by a factor of ten. [17] Their small size also renders them more suitable
for transmission between devices, across wireless or wired mediums. This makes them
2
ideal for playback as a stream of data remote from where they are stored. This is not a
new idea; it is commonly done on a PC, where people can play MP3s that are store on
other computers on a network, but has been unavailable for playback away from
computers. Finding a solution to this spatial problem was the intention of the current
thesis, i.e. to build a stand alone audio device capable of playing MP3 data that is stored
on and retrieved from network computers.
1.2 Solution
To build this player a mix of hardware and software solutions were required. An Atmel
based embedded networking solution was chosen as a development platform. This
platform, known as the Ethernut [9], uses an Atmel ATmega103 processor based
development board with a Realtek network interface and 32Kbytes of SRAM. The
Ethernut was chosen because it is the result of an open source hardware and software
project, which allows for greater flexibility and reduced cost.
The software developed for the Ethernut is a real time operating system with thread
support and a fully functional TCP stack. This provides a networking software
development environment similar to other operating systems, where APIs are provided
to implement connections, sending and receiving via sockets. All of the protocol and
stack management are handled by the operating system. Software was developed on this
platform to communicate with a server program that was developed on a Windows PC.
The server program interacts with a play list file that is created by Winamp [18] to
select the required file. The server then reads this file into a buffer and sends it to the
player over a TCP connection. The player takes this data and stores it into a buffer
where the MP3 decoder can read it. The MP3 decoding is provided in hardware by a
decoder called the VS1001k by VLSI [13]. For development purposes, the decoder was
purchased on a development board from YAMPP [19] and was connected to the
Ethernut board. The decoder was integrated with the Ethernut to receive MP3 data from
a buffer, which was filled from the network connection, to successfully play MP3
songs. Controls were added to give the user the ability to play/pause, stop and go to the
next and previous tracks, and an LCD was integrated to display the current song number
and song name.
3
By the completion of the thesis, the player was operating as you would hope it to. It can
play MP3s that are stored anywhere on the network, whether the data be on the
computers’ hard drives or on a CD in their CDROM drives. All sample rates are
supported and all bit rates can be played up to 250kbbs, including variable bit rates. The
user can navigate through the play list using the controls on the player regardless of
whether it is currently playing. If the user navigates through the play list while the
player is playing a song the player will automatically begin playing the newly selected
song when the user has finished navigating. The song of the song selected and the
current song number are displayed on the LCD. The audio that is produced is of CD
quality at a Line Out level and is ready to be connected to the Line In of a stereo.
The player can be placed any where there is a network connection to a local area
network. Ideally, this would be near a stereo so the line out of the player can be
connected to the line in of the stereo. The player can then be connected to the network
with a network cable and the user runs the server program on a PC that is connected to
the player through a local area network connection. A play list can be created in the
usual manner using the program called Winamp. Songs can be selected anywhere on the
network or internet and the play list is saved in the same directory as the server
program. The user can then operate the controls on the player to play/pause or stop the
file currently selected from the play list or use the next and previous controls to navigate
through the play list. The selected song name and song number get displayed on the
LCD and will be updated every time a new song is selected.
1.3 Thesis overview
This chapter introduces the idea of an alternate method for MP3 play back; a stand
alone MP3 player that can play MP3s through a network connection. The chapters that
follow outline how this was developed and well it was implemented.
Chapter 2 provides a background into what an MP3 is and how network communication
works. It also provides an outline to other MP3 players with network interfaces.
Chapter 3 presents the desired specifications for the MP3 player to be developed.
4
Chapter 4 explains how the development platform was chosen for the project. The
development platform for this project was a microcontroller based solution with
networking and MP3 decoding capabilities.
Chapter 5 outlines how the software was developed on the development platform and a
Windows PC. The development flows through from selecting the operating system with
TCP extensions to a fully functional MP3 player.
Chapter 6 reviews the implementation and decides how good it is and whether design
process used was successful.
Chapter 7 takes a look at extending the design features past what was implemented. It
also outlines methods for modifying the final design to meet the initially outline
specifications
Chapter 8 summarises the thesis and provides a conclusion.
5
Chapter 2 – Background
2.1 What are MP3s?
MP3 stands for MPEG Audio Layer 3. MPEG is the name of a working group
established
under
the
joint
direction
of
the
International
Standards
Organisation/International Electrotechnical Commission (ISO/IEC), whose goal is to
create standards for the compression of digital video audio. More precisely, MPEG
defines the syntax of audio and video format needing low data rates, as well as
operations to be undertaken by decoders. [16]
Layer 3 is one of three coding schemes (Layer 1, Layer 2 and Layer 3) for the
compression of audio signals. Layer 3 uses perceptual audio coding and psychoacoustic
compression to remove all superfluous information from the audio signal. It removes
the data from the audio signal which represents the physical sound components the
human ear cannot here. [17]
The result in real terms is Layer 3 shrinks the original sound data from a CD (with a bit
rate of 1411.2 kilobits per one second of stereo music) by a factor of 12 (down to 112128kbps) without sacrificing sound quality. [17] Bit rate denotes the average number of
bits that one second of audio data will consume.
With this reduction of size and the increase in the use of the internet, MP3s have
become very popular. Ideally, they have made it now possible to purchase
downloadable music online and download the music in relatively little time.
Consequently, music stores will eventually become redundant and music groups will
perhaps discard their record producers. At the moment there are very few options for
purchasing music online therefore MP3 distribution has largely been done illegally. Use
of MP3s does not have to be illegal though. If one purchases the music on CD and
decides that using CDs is cumbersome, it is legal to convert the CD into MP3 data for
your own personal use.
6
2.2 The TCP/IP protocol.
TCP/IP stands for Transmission Control Protocol/Internet Protocol. It is frequently
referred to as a “stack” because of the relation to the layers through which all the data
must pass at both client and server ends of a data exchange. These layers refer to the
different protocol implementation at different layers in the design as shown in figure 1.
Figure 1 The network layers [1]
On the left is the OSI model that was developed to standardise the layer implementation
of network communication. Each layer has its own function that works abstractly from
the next layer. Currently the OSI model is not used very much because the TCP/IP
model has become much more popular. In the TCP model the data link and physical
layers are combined to form the network layer. This layer looks after the physical bit
switching of the hardware and reliability issues, such as error checking and framing of
data. The network layer is called the IP layer or the internet protocol layer. This layer
handles the routing of packets; getting the IP packet from its source to the requested IP
address across the network. The transportation layer can be either TCP or UDP and
refers to the control of how messages are sent between the senders and receivers. TCP
allows for the message to be split into packets and then sent separately across the
network and manage the packets so that they are put back together in the correct order.
TCP is connection based so that before packets are sent over the network it is
established whether the receiver is ready and a virtual link is made between the two.
The application layer is the program that the user develops on top of the TCP layer. The
program passes messages to the TCP layer which inturn sends it the IP layer and then
the network layer. The data is then sent over the network and the receiver performs the
same operation in reverse.
7
2.3 Current MP3 players with a network
interface.
As mentioned in the introduction the inspiration for the topic predominantly came from
the AudioTron [3] from Turtle Beach a PC sound card processor manufacturer. This
was the first non-PC based MP3 player that could play MP3’s being stored remotely
from the player. There are many MP3 players available at the moment, but they all
require the data to be stored locally on many different media formats; on hard disks with
the Creative Nomad and Apple iPod, while others use CD’s or Flash cards.
The review of current solutions will focused on MP3 players that can play the data
through a network interface. The AudioTron, shown in figure 2, is a device that outputs
analogue audio to a stereo from MP3 data it has retrieved from a LAN connection.
Figure 2 The AudioTron [3]
Internally, it runs Windows CE and has a Cirrus Logic Maverick EP7312 ARM720T
processor with a Turtle Beach audio chip decoding the audio.
To demonstrate the use of the Audiotron its’ webpage provides the diagram shown in
figure 3 to illustrate the functionality of the AudioTron
8
Figure 3 Functional diagram of the AudioTron [3]
To operate the AudioTron the user must install software to enable interaction with the
Windows file system and internet. The same software is used to compile the song play
list. The user can navigate through the songs on the player using remote control or
controls on the player and the song information is shown on a display on the front panel.
After the release of the AudioTron, Motorola released a similar device called SimpleFi
[4]. This is basically a better looking version of the AudioTron with a wireless
connection.
Figure 4 Motorola SimpleFi [4.]
The setup of the SimpleFi is fairly similar to the AudioTron except that a wireless
network is required to be setup on the PC; therefore, the extra cost of the SimpleFi can
be attributed to installing the USB wireless network device on the computer.
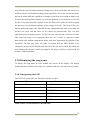
At the moment these are the only two players available commercially that can play
MP3’s through a network connection. Table 1 displays their contrasting features. The
AudioTrons good features are its ability to play so many different formats and that it is
cheaper than the SimpleFi. They both require the user to have a computer nearby to run
9
the PC software for it to operate, reduce the autonomy of the device. The SimpleFi’s
main advantage is that it can transmit the data wirelessly.
Specification
Supported Formats
AudioTron
Motorola SimpleFi
All MP3 bit rates and sample
All MP3 bit rates and
frequencies.
sample frequencies.
WMA (Windows media audio)
Most bit rates and sample
frequencies.
PCW WAV (uncompressed)
Internet Formats
Shoutcast and Windows Media
Streaming MP3
Network interface
Ethernet 10BaseT (10 Mb/s
Wireless (USB)
Ethernet) or 10/100BaseT
Proprietary Motorola
running TCP/IP. Note: Not
standard called HomeRF.
compatible with networks
Up to 150 ft
which support only Fast
Ethernet 100BaseTX (100
Mb/s)
Audio outputs
Stereo RCA jack output
Stereo RCA jack output
connectors on rear panel
connectors
Stereo ¼" jack output
connector on front panel
S/PDIF (Digital Output)
User controls
Remote control and buttons on
Remote control and
the player. Can control song
buttons on the player.
selection and playback as well
Can control song selection
as sound effects such as bass
and playback.
and volume.
Song selection
Play list created with PC based
Play list created with PC
software. Supports PLS & M3U based software.
play list standards
Cost
About $700 AUD
About $850 AUD
Table 1 The AudioTron versus SimpleFi
10
Chapter 3 – Specifications
The main requirement for the player to be implemented is the ability to able provide
similar functionality to the AudioTron but at a fraction of the cost. Both the AudioTron
and Motorola SimpleFi provide good solutions to the problem described but their cost is
far too high. They are even more expensive than most of the MP3 players available that
use large hard drive as local storage. The reason for there high cost appears to be the
complexity of the internal design of the products. To solve the networking problem they
are basically running a smaller version of a PC in the player. With most users of MP3s
very sensitive to cost it would be a much better solution to make the player a much
greater cost with similar functionality. To do this the cost of the internal hardware and
software needs to be kept at a minimum.
The ideal specifications of the player for this project are shown in table 2.
Specification
Supported Formats
The Player
All MP3 bit rates and sample frequencies. MP3s are the main
focus of interest, other formats such as WMA may be
considered in future products.
Internet Formats
Internet radio streamed as MP3
Network interface
Ethernet 10BaseT (10 Mb/s Ethernet) or 10/100BaseT running
TCP/IP.
Audio outputs
Either RCA or headphone stereo.
User controls
Buttons on the player.
Song selection
Create a song play list on the player itself using the buttons
and display on an LCD screen.
Cost
Below $400 AUD (much lower if in mass production)
Table 2 The ideal player specifications
11
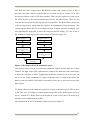
To achieve the above specifications the product was broken up into the components
shown in figure 5.
Graphical user
interface
Central
Processing
Line out level
CD quality audio
MP3
decoding
Play List
Management
File transferring
TCP/IP
capabilities
Interaction with
windows file
system
Buffer
Management
User controls
Figure 5 Overall design layout
An embedded solution needs to be achieved that has TCP/IP capabilities and can
interact with the Windows file system through the TCP. The TCP system must be able
to transfer at least 30Kbytes/sec. This was determined by playing a 192Kbbs MP3 file
remotely on the computer using Winamp and monitoring the network traffic through the
Windows XP task manager. A central processor must be able to run this TCP software
as well as manage the play list formation, file transferring and local buffers of data. It
was decided that approximately 2 seconds of audio buffer would be all that is needed to
allow for network speed deviations. This equates to about 25Kbytes of RAM. The
device will need to be able to take the data received from Windows and decode the data
into CD quality audio at a line out level. A user interface must be present to display the
song that is being played and enable the user to construct a play list. Ideally, all of this
user interface will be implemented on the device itself making it possible for
autonomous operation. The user will be provided with buttons to control all the required
actions of the player.
12
Chapter 4 – The development platform
When planning how to implement this device it quickly became apparent that it would
require far too much time (beyond the time available for thesis) to design and construct
it from raw components. So the first stage of the implementation was to investigate
which components had already been developed and which components requiring
development.
From the beginning of this thesis the main area of focus was on the software
development either in an embedded environment or on a PC; therefore, a suitable
embedded system platform had to be found to develop the software.
4.1 Platform requirements
The project can be broken into the following functional units. The main component is a
microcontroller that runs an operating system and a TCP/IP stack. It interfaces with a
hardware network interface and MP3 decoder and has enough memory to manage the
buffer requirements of the network interface and MP3 decoder.
When searching for this platform hardware a few basic requirements were considered
important. It must be able to decode MP3 data in hardware. A decision was made that
this is to be done on an integrated circuit that is separate from the microcontroller.
Separation of these components allows reduction in cost and processing power, as the
processor does not have to decode the data into audio. The microcontroller has to be
capable of interfacing with a network physical layer and the MP3 decoder. It has to be
fast enough to transfer data through the network to the MP3 decoder and have enough
power left to process controls and a display. There must be enough storage space to
make a sufficient MP3 buffer. It was decided that approximately 2 seconds of audio
buffer would be all that is needed, equating to about 25Kbytes of RAM. Most players
normally buffer larger amounts than this because they are dealing with shock and
movement related issues. This player is not aimed as a portable player and nor will it
have any moving parts. The buffer that was used was to allow for variations in network
traffic and processing capabilities of the microcontroller. The selection of the network
13
physical layer was primarily based on one that is compatible with the microcontroller.
Important factors when deciding on a microcontroller and an operating system was for
their combination to provide enough power but also a flexible environment to develop
in. The selection of the microcontroller and the operating system it uses greatly affected
the overall cost of the system, so it was important to choose a solution that fulfilled the
requirements at the lowest cost.
4.2 The Hardware
A study of available technology was conducted on the internet to determine which
hardware solutions were available. Preference was taken to solutions that could
combine requirements, for example, a microcontroller with a network chip on the same
circuit board.
4.2.1 Network Hardware
Many varieties of physical layer integrated circuits are available from companies like
Rabbit semiconductors, Realtek and Crystal. The chips they produce can run at either
10Mbit or 100Mbit and act as the interface between the microcontroller and the
network. They all have a similar interface to the processor; therefore, their selection was
based on the microcontroller environment chosen and which one was commonly used to
interface with the controller.
4.2.2 The microcontroller
To decide on the microcontroller used it was important to consider how it interface with
a network physical layer controller and operate TCP/IP with its stack. It would be
possible to develop a TCP/IP stack, but due to time limitations it was decided that this
would only be required if a suitable version available at a suitable cost could not be
found. This TCP package would have to provide stack management functions and the
ability to control the network protocol layers. Then there is the possibility of running the
TCP environment built into a real time operating system. This would allow the ideal
development environment; development can focus on the MP3 player application layer
14
without worrying about handling the threads related to handling the network protocol.
The operating system would then handle the stack management and the protocol layers.
Keeping this in mind research was conducted looking for existing embedded solutions
with network interfaces and in turn the appropriate microcontroller would be chosen.
4.2.3 Embedded networking solutions
The results of the search focused on solutions that could provide a hardware
development platform with a TCP package included and possibly an operating system.
The search also attempted to find products that were available at a reasonable cost due
to the purchase limitations of the thesis. It also had to consider the legal ramifications of
the package since the long term aim of the product is to have something that can be
manufacture in large numbers and sold. The ideal solution was to find a hardware
product that could be legally manufactured or at least a design that could easily be
modified to the custom requirements of the project.
Ethernut [9] is an open source Atmel microcontroller based project. This project is open
source with respect to hardware and software. The hardware provides both the
microcontroller and network interface. All the schematics and PCB’s of the
development board are provided for use with their software. The designs are available
for free and it is legal to use and reproduce them without charge.
Atmel[11] themselves provide a development package called @WebTM TCP/IP. It
works on their 8051 line of processors and they provide the TCP/IP stack libraries. No
operating system is required or provided. The network physical layer and PCB design is
not provided therefore this would have to be implemented.
Rabbit semiconductors [5] also provide a development board with their own microcontroller, physical layer and software. The development environment provided is for
Dynamic C. The development boards are purchase out of the United States, and the
design is not freely available.
JKmicrosystems[12] combine an embedded x86 processor with DOS and they provide
TCP/IP libraries. Development kits are available but at a cost.
There are many more different types of solutions available but they are not available at
a reasonable cost when considering the cost limitations of the product. All the retail
15
development boards combined with TCP/IP development kits exceed US$500. And this
is only for the networking side of the project. The obvious alternative is the Ethernut
project.
Figure 6 Ethernut development kit [9]
With a free OS, TCP/IP environment and hardware design for a development kit, it
provides the most attractive solution. It is possible to manufacture the hardware from
the design they freely supply and they manufacture the kits for sale. It is important to
consider the long term development of the product. At this stage of development it is
more suitable to buy a working tested version but in long term production it would be
far cheaper to manufacture all the components and this can easily done with the
Ethernut. The bare PCB can be purchased for $US15 or the whole thing constructed,
tested and delivered to Australia for AUD$295. The low cost and my familiarity in
working with Atmels were two important factors in the choice of the Ethernut.
However, the main reason for choosing this solution was not for its hardware
implementation but for the software environment that surrounds it. Software will be
outlined in Chapter 5.
4.2.4 Does the Ethernut fulfil the requirements?
The fact that the Ethernut is very low cost and provides an easy development
environment can not only make it suitable for this project, it must also be able to meet
the technical specifications.
16
The hardware features of the Ethernut kit are as follow:
Atmel ATmega 103 processor running at 3.6864 Mhz
Realtek IEEE 802.3 compliant Ethernet controller (10Mbit)
RS-232 serial port
128 Kbyte of programmable flash ROM
32 Kbyte SRAM
22 input/output lines
Two 8-bit and one 16-bit timer
The RAM space provides 32Kbytes and it was decided that this amount was adequate.
The Ethernut documentation [9] suggests that most typical applications running TCP
use between 5Kbytes and 10Kbytes of RAM. This leaves between 22Kbytes and
27Kbyted, which is what the project requires.
An example of integrating this Atmel processor with these types of MP3 decoders is the
YAMPP project [19]. It is another open source project. It is a MP3 player that retrieves
its data from a hard disk interface with FAT32 installed. This is a freely available
recourse project from the web, which can use either the MAS chip or the VLSI chip.
This demonstrates that the Atmel processors are capable of delivering the data fast
enough to these decoders.
To determine whether the Ethernut can transfer data fast enough across the network to
play MP3s the network capabilities of the Ethernut were investigated. For a 192Kbbs
MP3 file Winamp puts data into its buffer at a rate of about 30Kbytes/s (from tests
mention in Chapter 3). However, a data transfer speed of up to 50Kbytes/s has been
assured by the designer, Harald Kipp. [20] This will be ample to assure that a buffer
underrun will not occur. The bandwidth from the Atmel to the decoder was
demonstrated in the YAMPP project. It also showed that Atmel was able to supply
enough bandwidth to the MP3 decoder and at the same time was fast enough to take
data from the hard drive interface.
17
4.2.5 Embedded MP3 decoding technology
The available MP3 decoder technology seems rather simple compared to the networking
solutions. Most of the chips available take data serially or through parallel and output
the analogue audio. Some suitable chips for this project are as follows:
MICRONAS [14] make the MAS 3587F MP3 decoder chip. MP3 data is provided to it
through a serial or parallel interface to a micro-controller and then it decodes it into
digital audio signals. The signals are then converted to analogue audio with its own
digital to analogue converter. It comes in a package with a lot of pins allocated to its
ability to interface with many external devices like flash cards and its 8 bit parallel
interface. Unfortunately its 64 pin package makes it difficult for development.
VLSI [13] make the VS1001k audio decoder chip which has the same basic
functionality as the MICRONAS, but it comes in a larger package with less pins. It also
only has a serial interface and can only interface with a microcontroller and no interface
to flash card or other devices is provided greatly reducing its package size.
Atmel [11] make the AT8xC51SND1A which is an Atmel 8015 microcontroller with a
MP3 decoder on the same package. It comes with more RAM than the normal 8015 and
is in an 80 pin package. It’s a very new product from atmel with very little development
support available at the moment but in coming weeks a development environment is to
be released.
It is important to consider which decoder is best used with the microcontroller (Atmel
ATmega103) chosen. Both the MAC and the VSLI have been shown to work in the
YAMPP [19], but the makers of this YAMMP provide the design and PCB layout for
the VLSI. They also sell what they call the “piggy back board”, which is a small PCB
with the VLSI and its required supporting hardware already constructed. To use this
board it only has to be connected via a bus to the microcontroller. The VLSI contains all
the analogue audio processing (filtering and amplifying) required to get Line Out level
audio. As far as the maker of the YAMMP is concerned, both decoders produce similar
audio quality. It is capable of decoding all possible MP3 bit rates (including variable bit
rate) and sample frequencies. It also uses a simple and familiar SPI interface. The fully
construct piggy back board is shown in figure 7 which was used in the project.
18
Figure 7 The MP3 decoder board [19]
19
Chapter 5 - Implementation of software
Before a decision had been reached about the Ethernut an investigation was carried out
for other embedded TCP/IP software development environments. Investigation
examined the possibility of combining different solutions, for example the possibility of
combining a hardware solution with a separate software solution.
5.1 TCP/IP development environment
As mentioned in the hardware section, Rabbit semiconductors [5] provide a
development environment in Dynamic C and a TCP/IP toolkit to be used on the rabbit
micro-controllers.
Microdigital Inc[6] make an operating system called SMX that requires x86, PowerPC,
ColdFire, ARM, or SH3/4 embedded processors. It comes with an extension for TCP/IP
and requires about 65-70 KB of ROM. Available commercially.
CMX Micronet[7], provide TCP/IP development kits for almost all 8 and 16 bit
processors available and can be used with or without an operating system. They also
provide all the source code available commercially.
Dunkels uIP[8] is a free open source TCP/IP stack that has been written for x86,
H8S/2148, z80 and 6502 CPUs but can be ported to many others. It has been written for
the Atmel 8015 processors but has never been tested. This has the advantage that it is
free but its development has been limited.
Ethernut [9], as mentioned, is an open source real time operating system and TCP/IP
package that has been developed for the Atmel AVR line of processors. All of the
source code and manuals are available free off the internet. The stack features include:
ARP, IP, UDP, ICMP and TCP protocol over Ethernet.
Automatic configuration via DHCP.
HTTP API with file system access and CGI functions.
TCP and UDP Socket API for other protocols.
Kadak[10] provide a real time operating system for called AMX and TCP/IP libraries.
They configure it for customised embedded solutions and is available commercially.
20
It appears that most of the TCP/IP software discussed on the internet seemed to use
TCP/IP with an operating system due to ease of development and allows for more
elegant solutions. The decision that resulted from this search was to use the Ethernut
solution. This was because of the hardware features described in the hardware chapter
and also the features the software provided.
5.2 The Ethernut Software
The software provided on the Ethernut platform is split into two functional components,
the Nut OS and the Nut Net [9]. The Nut OS is a simple real time operating system that
provides multithread capabilities, event queues, memory management and a device
driver interface with stream I/O functions. Thread management provides the ability to
customise each threads stack and priority. Event queues allow interrupt events to be
handled by the operating system, which stores them in a que and services the requests in
orders of priority. The memory management allows for the control of how memory
resources are shared between the threads, the operating system and a stack. The device
driver interface allows the user to create an abstraction layer from the physical device.
For example the serial port is used as a device (a Nut Device); to initialise the port the
driver is installed and to use the port the user writes to the device driver interface.
The Nut Net is a programming interface to a TCP/IP stack that provides the following
features:
ARP, IP, UDP, ICMP and TCP protocols over Ethernet
Automatic configuration via DHCP
A web server with file system access to the flash ROM space and CGI functions
A TCP and UDP Socket API providing standard functions such as connect,
accept, send and receive.
The applications developed with the Nut OS and Nut Net is compiled using the AVRGCC compiler, a free open source compiler available from AVRFreaks [15].
21
5.3 Software development
5.3.1 Accessing Windows file system from a remote embedded
environment
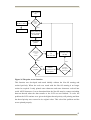
When this project was started it was comprehensible how to interface the
microcontroller to the MP3 decoder and how to manage the buffering of data, but it was
difficult to conceptualise how to interact with the Windows file system from the MP3
player. Not knowing how to transfer files, navigate or find the files, and then how to
open them, all from the remote device.
The original plan for the design is shown in figure 8.
The player
MP3 decoder
Graphical
User interface
Buffer
Microsoft
Windows
Networking
Figure 8 Early overall design
The plan was to have the MP3 player communicate with Windows to navigate through
the file system and gather information about the directory, network and file structure
and then send this information to be displayed on the graphical user interface (GUI).
The user could then use the GUI to view the available files and make file selections to
compile a play list. At this stage it was undecided where the GUI should be located but
in order for it to be portable it was decided that the player should be in between
Windows and the GUI with respect to communication. Therefore, for development
purposes, the GUI could be implemented on the PC and still be easily moved onto the
player in future revisions because the only communication it makes is with the player.
The main difficulty at this stage was considering how to interact with the Windows file
system from the player. After researching how this could be done, it was found that
22
Windows provide an application protocol above TCP/IP called Server Message Block
(SMB) or common internet file sharing protocol (CIFS), as it is called now.
5.3.1.1 The server message block (SMB)
Server message block is a protocol that allows other operating systems to interact with
the Windows file system. It incorporates the same multi-user read-and-write operations,
locking, and file-sharing semantics that are used as if you were operating with the files
from the local machine.
This seemed like a very good solution. It meant that it was possible for the MP3 player
to directly talk to Windows. The main problem was that the Ethernut operating system
did not have this support built in. Consequently, it would have to be integrated into the
operating system as an application layer above TCP. Two options were available: either
develop the layer or find a suitable implementation and port the code to operate with the
Ethernut. A freely available implementation of an embedded version of SMB was found
from CodeFx [21]. It is free to develop with but if it was used in a product that was to
be sold licensing fees would apply. At a glance, it did appear that it was possible to use
this solution but there were two problems. Is the Ethernut fast enough and does it have
enough memory to operate this extra load. At this design stage it was estimated that
there would be about 25Kbytes for MP3 buffering and 40Kbytes per second network
speed might be possible once the MP3 decoder is integrated as well. It was decided at
this stage that a large amount of time could be spent developing this layer but there was
good chance that the resources required were not available on the hardware. An
alternative had to be found.
5.3.1.2 The Server program
After investigating how other embedded networking systems interacted with Windows,
it was found that they most commonly ran a server program on one of the computers on
the network to handle file operations. If the player could not handle these functions
themselves then the processing would have to be done on something with which they
can communicate. A server program was required to convert communication with the
player into the required Windows file operations.
23
The design question then turned from how to implement SMB on the player to how to
implement it on the PC. How does one write a Windows program that can open files
from its own local storage or remote location and in turn transfer the data into a buffer?
Very little was known about Windows programming and obviously a lot had to be
learnt.
After reading MSDN [22] about how to use SMB in Windows programming, it was
found that making direct calls to the SMB layer is not needed. If the programmer wants
to open local files they can open them directly and if they want to open a file from a
remote location the system redirector takes the command. Once the redirector sees that
the user wants a remote file it converts the information into SMB packets and performs
the operation. In most cases this redirector is the Client for Microsoft Networks Service
so this has to be installed in the computers networks settings for it to work. To access
these services a request for a file must be made in the universal naming convention. A
request for a file from a remote location must be made with the following syntax:
\\Servername\Sharename\Directory\Filename.
For a request to a file stored on the local file system it can be made as above but can
also be made as follows:
DriveLetter:\Directory\Filename.
For the Windows file handling APIs to be understand this structure where ever a ‘\’
occurs there needs to be two of them. This is so they are not confused for string
commands. The users can then very easily create, open, read or write files anywhere on
the computers local or remote file system. This was obviously a much simpler solution
then implementing SMB on the player it self.
The idea of having the interface directly to Windows implemented on the Ethernut was
good because it would make it autonomous. Ideally it would be more convenient to
allow the user to simply plug into any network without installing software on computers
and it would work. This sounded ideal but at this stage there was a physical problem,
the Ethernut didn’t seem to have enough resources to handle these extra functions and
there was not enough time to develop the protocol to find out if it did have enough
resources. The alternate solution the server was used.
The over design has then change to the operation shown in figure 9.
24
The player
Computer
MP3 decoder
Server program
Graphical
User interface
Buffer
Networking
Microsoft
Windows
Figure 9 Overall design revision two
The player makes the request to the server for the file system information. The server
retrieves the required information from Windows and sends it back to the player which
in turn sends the information to the GUI. The user then use the GUI to navigate the file
system and the nut sends this to the server. This continues until the play list is
composed. When the user wants to play a file the server opens the file and sends the
data to the MP3nut which then transmits it out of a buffer to the MP3 decoder.
5.3.2 Sending data from the PC to the Ethernut.
This was the first stage of testing with the Ethernut board and its operating system. To
become familiar with the Nut OS and the AVR-GCC compiler initially the test code
examples provided in the Nut OS were compiled and programmed onto the Atmel.
From these a TCP server was setup that could be Telnet into, and hence test that the
board was functioning as described. After determining that all parts of the Ethernut
board were working the first stage of code development began.
The first stage was just to setup a simple TCP server program on the Ethernut that
echoed what it received through TCP stream to the serial port to be displayed on
HyperTerminal. A client program was then set up on the PC to connect to the Ethernut
and then send text at regular intervals.
It was at this stage it was discovered that there were two ways to handle the TCP
packets on the Ethernut. The receiving and sending of TCP packets can be handled
directly through the functions NutTCPSend and NutTCPRecieve which are very similar
to the equivalent functions in Windows and UNIX. They are blocking functions, so that
25
if they are called the thread will stop and will only continue once they are complete. The
second way is to create what the Nut OS calls a SoStream (Socket Stream) which is a
type of Nut Device (as described in section 5.2 of this Chapter). This creates a
programming model similar to what is found in UNIX. In UNIX each device is
considered a file and you simply read and write to the file and the operating system will
handle the communication to the device. So by creating a SoStream from a TCP socket,
the Nut OS creates threads to handle the TCP receives and sends.
To use the device, the user simply writes or reads to the SoStream which puts or takes
the data in or out of a buffer which the Nut OS then uses for the underlying TCP
functions. To create this SoStream a socket is created as normal and then a TCP
connection is established between the connecting devices. Then a Nut Device is created
(which is basically a file handler with standard inputs and outputs) of type SoStream
and then was bound to the socket that was created.
When deciding between using the SoStream or handling the packets with sends and
receives it was decided to use the SoStream method, because all the examples provided
in the Nut OS used this method and it seemed much more convenient. When reading
and writing to the SoStream the function calls are no longer blocking, the Nut OS can
keep receiving TCP data into the buffer until it becomes full and then waits for it to start
to empty by reading from the SoStream.
The first implementation using the SoStream was a simple server–client program. The
Nut OS received all the TCP messages sent from the client program on the PC and put
them into a buffer. To get these messages the program simply read from the SoStream
device a set number of bytes (or less, but not greater) or a line at a time, and then sent
the data to hyper terminal via the serial port. The results from this were that the system
worked as planned; a string was sent through the TCP connection and this appeared on
HyperTerminal.
26
5.3.3 Sending files from the PC to the Ethernut
To test whether the Ethernut can transfer files successfully, the server program on the
PC first has to open files in Windows, read from the file into a buffer and then transmit
the buffer via TCP.
5.3.3.1 Sending files through a TCP connection
The ReadFile function in Windows programming reads the requested length or less if it
reaches the end of the file. The next time the ReadFile function is called it reads from
the end of the last read performed on that file handler. Therefore it is not required to
store where in the file the reading is up to.
After working out how to open files, the next part tested was the possibility of packet
transmission through a TCP connection and the possibility of post transmission
reconstruction back into the original file form. This was done by creating two programs
in Windows; one that reads a packet of data out of a file and then sends that packet via
TCP, the other program was to receive the TCP packets and then write them into a file.
This TCP file transfer is show in figure 10
Process 1
Process 2
Open file
Create file
Read file data
Write data to
file
Send packet
Receive
packet
Figure 10 TCP file transfer
This test was successful, it could send any type of file and it would come out from
process 2 the same it went into process 1. Next it was time to see if the data remained
intact if it went through the Ethernut.
27
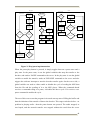
5.3.3.2 Sending files over TCP with the Ethernut
To test whether the same could happen through the Ethernut, the Ethernut was added
into the loop. The server program on the PC now sent the packet of file data to the
Ethenut first and the Ethernut inturn sent the data to the other program on the PC that
reconstructed the file. This process is shown in figure 8.
Process 1
Open file
Ethernut
Process 2
Write data to
sostream
Create file
Write data to
file
Read file data
Send packet
Read data from
sostream
Receive
packet
Figure 11 TCP file transfer with Ethernut
The Ethernut was setup having two SoStream devices. The program read a certain
amount from one SoStream that was connected to process 1 and then wrote that same
data to another SoStream that was connected process 2. The data was not put into a
cumulative buffer it was simply passed on, i.e. the data was only ever placed into a
buffer the size of the packet and then directly sent back out of the same buffer. There
was no buffer to work asynchronously between the two actions. The result of this test
was that it successfully transferred the file.
5.3.4 Storing data in a temporary buffer.
To be able to play MP3’s at least a small local buffer is going to be required. The length
of music that is produced by each byte of MP3 data is not consistent and it would be
erroneous to assume that data can be sent through a network at the same speed
constantly.
28
5.3.4.1 The buffer system
A 20 Kbyte ring buffer was implemented on the Ethernut. This translates to about 1-2
seconds worth of audio. It doesn’t sound like much but not very long is required.
Although the network speed will vary, it will not vary much in the local area network. A
problem may arise when the data comes from the internet, because the reliability of the
connection speed is greatly decreased. In this case, only having 20Kbytes of buffer
would be a problem; therefore, another advantage of the server process running on a
computer connected on the network is that it can act as a buffer between the internet
connection and the LAN connection. The server program can have a buffer with a much
larger size. Therefore, all streams to the Ethernut must first go through the computer
with the server running, as shown in figure 12.
The player
Computer
MP3 decoder
Read file
Buffer
Buffer
Network
Other
computers
The internet
TCP Receive
TCP send
Figure 12 The player interaction with the whole network
Send all the network traffic to the player through the single server does provide some
limitations in that there must be a computer somewhere on the LAN running this
process, but it does make it much easier to deal with network delays.
5.3.4.2 The local buffer
The 20Kbytes local buffer acts to allow for some fluctuations in the LAN connection
and in the data density of the MP3. The buffer is implemented by firstly allocating this
linear space in memory to be used for the buffer. This is achieved by the function
NutHeapAlloc which blocks a linear memory address space from any of operating
system functions and predefined variables. The only way to access this space is through
the use of pointers as shown in figure 13.
29
Receive
pointer
*
Transmit
pointer
*
End Address
of the buffer
Memory
addresses
Starting Address
of the buffer
Figure 13 The ring buffer
The buffer works by using two pointers a transmit pointer and a receive pointer. The
receive pointer is passed to the function that reads the TCP data and stores the data from
this pointer forward. When the read is finished, it is determined how many bytes were
put into the buffer and the pointer is moved to this next position, ready to receive more
data. If the pointer goes past the end of the memory space allocated it is reset back to
the start of the memory space, hence the name ring buffer. The transmit pointer is used
by the MP3 function, which was yet to be implemented, to determine from where in the
buffer it was to read data. This pointer wraps back to the beginning of the buffer the
same as the receive pointer.
The buffer management algorithm starts by calculating the amount of data that is in the
buffer by counting how far the receive pointer is in front of the transmit pointer. If the
buffer becomes full, meaning the receive buffer catches up to the transmit buffer, the
program waits until the buffer starts to become empty before reading more TCP data.
This situation is ideal; it indicates when the data is coming in faster than the data is
going out. At this point a test of how the Nut OS regulated the TCP stream from the
server when the buffer became full was done. The hope was that it would simply stop
the stream when its own buffer became full and wait for data to be taken out. It was
tested by using the same TCP file transfer model as above, but this time the Ethernut
took all the data from the server and put it into the buffer as shown in figure 14.
30
Ethernut
Process 2
Open file
Write data to
sostream
Create file
Read file data
Ring buffer
Write data to
file
Send packet
Read data from
sostream
Receive
packet
Process 1
Figure 14 TCP file transfer through the Ethernut with a ring buffer
The Ethernut does not transfer the data to process 2 until the buffer gets full. At this
stage it also stops reading data from process 1 until the buffer becomes empty again.
Testing this showed that the file came out the other side intact and that the Nut OS
could regulate the TCP streams so that data was not lost; an expected outcome but one
worthy of testing nonetheless. Since it was found that data could be stored in the buffer,
the next step was to see if the MP3 decoder could use it to play MP3s.
5.3.5 Interfacing the MP3 decoder
To play MP3 data the VLSI had to be connected to the Ethernut and the software
interface had to be developed. The first stage was to wire up the bus between the piggy
back board and the Ethernut board. On the home page of the manufactures of the piggy
back board [19] YAMPP provide the interface code required to operate the decoder,
which provides the user with code to initialise the decoder, send it MP3 data, software
reset and a sine wave test data set. This code was written for an Atmel 90S8515
processor so it would have to be modified to operate on the Atmel ATmega103 with the
Nut OS. When searching through the Nut OS [9] examples of how to use its SPI
functions, it was found that they had already modified the test code to work with the
Nut OS and the Atmel mega103. At the time of deciding which hardware and operating
system to use for the project the interface to the MP3 decoder was not included in the
Nut OS, but shortly after the Ethernut board was delivered they included it in an
updated version. The code they provide is a modification of the YAMPP code that
comes with the MP3 piggy back board.
31
Before running the code, the piggy back board was connected to the Ethernut. The 12
connection are outlined in table 3.
Piggy back
Function
Connection on Ethernut
connection
OUTR
Audio right channel out.
NC
OUTL
Audio left channel out
NC
DCLK
Clock for the data line
PORTB PIN 1
DREQ
This goes high when the decoder is
PORTE PIN 6
running out of data.
BSYNC
This line is used to synchronize
PORTB PIN 5
between bytes transferred.
CS
This selects whether the decoder
PORTB PIN 4
reads data from the data line or the
command line.
RESET
Resets the decoder.
PORTB PIN 7
SCK
Clock for the command line
PORTB PIN 1
SO
Data line out from the decoder.
PORTB PIN 3
SI
Data line into the decoder
PORTB PIN 2
VCCIN
Voltage rail in. 5 volts.
VCC
GND
Ground rail.
GND
Table 3 The connections between the Ethernut and the VLSI piggy back board.
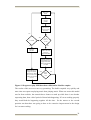
From the table you can see that the interface to the decoder is to two data lines, one to
pass commands and configuration data and the other to send the actual MP3 data.
To operate the decoder the user must be able to write to the configuration registers as
well as the data register of the decoder. The operations required to command register are
shown figure 15.
32
Select the
command
register
Select the
data register
Disable the
Atmel SPI
module
Enable the
Atmel SPI
module
Write each bit
to the data
line and toggle
the clock
Figure 15 Writing data to the decoder command register
To write to the configuration register, the hardware SPI module of the Atmel
ATmega103 cannot be used because the configuration of the data is not a standard 8-bit
packet. The data consists of 4-bits for an op-code (used to tell the decoder if the user is
writing or reading data), 4-bits for the command register required (there is more than
one command register) and then 16-bits for the data. The sending of this packet is done
by masking out each bit and placing it on the data line (SI pin) of the decoder then
raising the clock for a few clock cycles and lowering it again. This process is repeated
for all the 24bits and then the SPI module is enabled again and the data register is
selected ready to receive data.
Lower the
byte sync line
Wait for SPI
to finish
Place data into
the SPI register
Raise the byte
sync line
Wait 6 clock
cycles
Figure 16 Writing data to the decoder data register
Figure 16 displays the operations required to send data to the decoder’s data register.
The data register is selected already selected so is not required; the write begins by
raising the byte sync line which is used to tell the decoder that data is being sent. The
data is then placed into the Atmel’s SPI shift register which handles the sending of the
data. After a few clock cycles the byte sync line is then lowered and the function waits
until the SPI transfer is finished and the exits.
33
To test the connections of the bus and the functionality of the decoder board, the
decoder was sent the test sine wave. To do this the decoder had to first be initialized by
calling the initialisation function, setting up the required pins as outputs or inputs and
then enables the SPI function of the Atmel mega103. The decoder is then reset by
calling the software reset function, which writes hex 4 to the control register telling the
chip to reset then the clock speed of the crystal attached to the decoder is written to the
register. If this is not done, the MP3 data will still play but at the wrong speeds. In this
case, hex 9800 is written to the register to indicate that a 12.288Mhz crystal is attached
and that the clock doubler should be enabled so that the internal clock is at 24.576Mhz.
In initial tests, this part was left out and the MP3’s would play at half speed. Next, the
reset function clears the buffer on the decoder by writing 1024 0’s to the data register.
To create the test sine wave the test code loads a set data set into the decoder that
produces the sine wave. With this function, the frequency and length of the tone can be
modified by passing it different values. Tests with this function showed that the MP3
decoder was operating and connected properly. It also showed that the sound was clear
and at a good level.
34
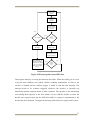
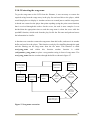
5.3.6 Playing MP3 data
To play the MP3 data that is stored in the buffer through the MP3 decoder, the transfer
needs to be at one byte at a time. The data transfer function provided with the Nut OS
was modified to take data from the buffer that was created. The following is a flow
chart of how this function works.
Data
request ISR
No
Is the
transfer
enabled
Return
Yes
Select the
decoder data
register
Buffer
emtpy
Yes
Return
No
Yes
Decoder
full
Send 32 more
bytes to the
decoder
Return
No
Send data to
the decoder
Increment
transmit
pointer
Reset pointer if
it is past the end
of the buffer
Figure 17 Interrupt service routine to transfer data to the decoder
35
This function is the interrupt service routine that is called when the DREQ line of the
VLSI goes high. This pin goes high whenever the buffer in the decoder is getting low.
The pin that this DREQ line is connected to is an interrupt on edge pin on the Atmel
that is configured to interrupt of the rising signal edge. To operate interrupts in the Nut
OS, the code must register the interrupt, first by identifying what the interrupt is, and
then when the Interrupt Service Routine (ISR) is called. When an interrupt happens the
OS actually has its own ISR that in turn calls the ISR that was registered. When this ISR
finishes, control is given back to the operating system ISR that clears the flags and
returns.
The ISR for the DREQ function starts by checking whether output to the decoder is
allowed at that moment. This allows the data transfer to be disabled when needed and is
a global variable that can be modified anywhere. It then sets the CS line to select the
data register and goes into a loop that keeps sending data to the decoder until the buffer
becomes empty or the decoder becomes full (when the DREQ line goes low again). To
send each byte it needs to set the BSYNC line before sending the byte and then clear it
after sending the byte. The data that is sent is the data at the current transmit pointer of
the ring buffer. After that byte is sent, the pointer is incremented to the next point. Just
like the receive pointer, if it exceeds the memory space allocated to the buffer it wraps
back to the beginning of the buffer. If the buffer becomes empty when the transmit
pointer equals the receive pointer, the function sets a global variable indicating that the
buffer is empty. If the decoder buffer is full when it lowers the DREQ line, the function
exits this loop and goes into another loop to input 32 more bytes of data. This is because
when the decoder indicates it is full it actually still has 32 more bytes of space available.
The first program to test if the buffer data can be used to produce music works as shown
in figure 18.
36
Receive MP3
data from
server
Increment the
receive
pointer
Reset the
pointer if it is
past the buffer
boundary
No
Yes
Is t he
buffer set
t o refill
Is it full
Yes
No
Calculate the
buffer size
Start the
decoder
If buffer is empty
send indiactor to
HyperTerminal
Send indicator to
HyperTerminal
and wait for there
to be room in the
buffer for another
receive.
Yes
No
Is the
buffer
full
Figure 18 First program to play MP3 data
The program starts by receiving the data into the buffer. When the buffer gets to a size
of greater than 10Kbytes the global variable enabling transmission of data to the
encoder is enabled and the software trigger is called to start the first interrupt. The
interrupt needs to be software triggered whenever the decoder is currently not
transferring and the program wants to start a transfer. The decoder is not transferring
(not making data requests) in the first instance of use with the decoder or when the
decoder has requested data but the MP3 data buffer is empty or transmission to the
decoder has been disabled. To trigger the interrupt with software a signal can be sent to
37
the OS indicating which interrupt you want to trigger. Once the interrupt has been
triggered, the transmission of data to the decoder will start. If the buffer becomes empty
or full the test program outputs this through the serial port to indicate the buffer status.
The results of this were that the buffer initially got to the 10Kbytes and then audio
started to play. This means that the decoder was working and it understood the data in
the buffer. There were still some complications though the buffer very quickly became
empty and the audio stopped. The buffer was not filling fast enough from the network
connection to meet the demand of the decoder.
5.3.7 Making the music sound as the artist intended
The major problem was that the data was not coming through the network connection
fast enough to maintain the buffer. There were two questions of interest: how close was
it to being fast enough and as a result, how dramatic a change to the design is going be
to needed to fix the problem? To test how close it was to being fast enough the program
was modified so that when the buffer was emptied by the decoder it sets a flag for the
main thread to see. When the main thread sees this flag set it keeps filing the MP3
buffer from the TCP stream and when the buffer gets to be greater than 10k again it retriggers software interrupt to start the decoder. The program was also modified to
display the size of the buffer at every main loop. The program implementing this is
shown in figure 19.
38
Receive MP3
data from
server
Increment the
receive
pointer
Reset the
pointer if it is
past the buffer
boundary
No
Yes
Is the
buffer set
to refill
Is it full
Yes
Start the
decoder
No
Calculate the
buffer size and
send it to
HyperTerminal
If buffer is empty
send indiactor to
HyperTerminal
and set the buffer
to refill
Send indicator to
HyperTerminal
and wait for there
to be room in the
buffer for another
receive.
Yes
Is the
buffer
full
No
Figure 19 Program to play MP3 data that refills buffer if buffer empties
The results of this test were not very promising. The buffer emptied very quickly and
more time was spent not playing music then playing music. What was worse this model
was far from realistic, the network has a chance to catch up while there is no decoder
requesting data, then a brief period of them both happening. If it was working properly
they would both be happening together all the time. So the answer to the second
question was that there was going to have to be a massive improvement in the design
for it to start working.
39
5.3.7.1 Speeding up the network transfer
Small changes to try to optimize the code were made while monitoring the buffer size
that was being output to HyperTerminal. Changing the TCP packet size and shortening
the delays in the decoder interface made next to no difference to the speed; the buffer
emptied. After spending time making minor design changes, it was decided that a major
change was required. To solve the problem outside help contacted (Harald Kipp [20] the
person who designed the Ethernut OS and TCP stack). After contact via e-mail and
discussion of the design he noted that the problem could be that the TCP data was being
read through a SoStream device. Early in the design phase, it had been decided to use
the SoStream device because it was convenient. Harald Kipp advised that using the
SoStream requires much more processor time allocated to the operating system and is
hence much slower. The alternative is to simply use the NutTCPReceive function,
which performs a blocking receive on the socket. The program was modified to use
NutTCPReceive instead of reading from the SoStream nut device. The NutTCPRecieve
function is passed the current position of the receive pointer in the buffer. When the
receive function is finished it returns the number of bytes received and the pointer to the
buffer is incremented by this amount. The tests of this were an instant success. The
player filled the buffer and triggered the first interrupt and it then began to play music
without the buffer emptying. The change was dramatic. Instead of empting as soon as
the music started, the buffer only dipped in size when the music started and then stayed
about full through the song.
There was still one problem though: the sound was constantly being played but was
being played at half speed and there were loud clicks periodically. The half speed
playback had to be a problem with the configuration of the decoder, because the
function supplying the MP3 decoder did not signal that it ran out of buffer. After a little
research into how to configure the decoder, it was found that the configuration register
was set to use a 24.576Mhz crystal when is was actually connected to a 12.288Mhz,
explaining why it was playing at half speed. After setting the configuration register to
use the internal clock doubler, the audio now played at normal speed. This created
another problem: now that it was playing faster than before, it was using the buffer up
faster and the buffer started empting again. The buffer emptied quite slowly and then
40
recovered nearly immediately so it was close to being fast enough. At this stage it was
decided to change from using a 128kbbs test file to a larger 192kbbs test file. This was
so that if development time was being spent trying to get the network speed right then it
has to be fast enough to play all bit rates. In experimenting to try to find a little bit more
speed, it was found that changing the TCP packet size now had quite an effect on the
speed of transfer. It was found that the optimal packet size was 1.5Kbytes. Any smaller
or larger and the speed began to drop off. This was determined using the network
monitor in Windows XP, and at the 1.5K packet size the network utilization of the
10mbit connection got up to 3% or about 40kbytes/sec. At this point, the 192kbbs MP3
was now playing without emptying the buffer.
5.3.7.2 Removing clicks from the playback
It was now able to play while keeping the buffer from empting, but it still had persistent
clicks every now and then. The obvious reason was that the MP3 decoder was being
given data that was not a part of the original MP3, and the obvious place for this was at
the loop of the ring buffer. To test, every time the buffer was looped back to the start an
indicator was sent to HyperTerminal. When the indicator appears the click appeared
very shortly after. Remember from earlier that the buffer was filled by the TCP receive
function. This function was passed the current receive pointer and placed data on from
this point. When the receive function was finished the pointer was incremented the
number of bytes received. A check was then done to see if this pointer went past the
address space allocated to the buffer and if so, it was reset to the start of the buffer. The
transmit buffer would do the same, except one byte at a time would be sent to the
decoder and after each byte it would be determined if the pointer is past the end. This
creates two problems: the first is that the receive pointer can go well past the end of the
allocated space before it gets reset because it gets incremented by the number of bytes
received, whereas the transmit pointer will get reset as soon as it reaches the end
because it gets incremented one at a time. This means that the transmit pointer will
never get to the data that the TCP receive function puts after the allocated space. The
solution to this was to create a variable that stored the memory address the receive
pointer reached before it was reset: the flip pointer. The transmit pointer could now use
this value to determine when it should be reset and therefore, reach the end of the
receive data. The result of this was that the audio still had clicks but they were not as
41
long or intense, indicating that the clicks were definitely something to do with the
pointers at the end of the allocated space.
The second problem with the TCP receive function and the buffer was that the buffer
should not be able to store data outside the space allocated to it. That space could be
assigned to other variables or data, therefore the buffer could cause errors with other
parts of the program or the program could corrupt the buffer. The solution to this was to
consider that the most the TCP receive could receive could be 1.5Kbytes of data as this
is what the function was passed as a limit to the packet size. Therefore, after a receive
has happened and the pointer is incremented by the number of byte actually received, it
is determined whether the pointer is within 1.5Kbytes of the end of the allocated space
for the buffer. If it is within this space, the pointer is reset to the beginning of the
allocated space and the address before it was reset is recorded as before. The transmit
pointer then uses this same variable as before to determine when it should be reset to the
beginning of the buffer. The tests of this implementation were very successful. For the
first time, the MP3 player was able to play an MP3 from beginning to end without any
anomalies.
5.3.8 Playing more than one song.
An MP3 player that only plays one song is not very useful. Next the device had to be
given some features, so the first was to enable it to play more than one song. To do this
no change required on the MP3 player. All the code changes were made on the server
program.
The first stage was to be able to detect when the current file being read is finished. This
was achieved by looking at the value the ReadFile function returns showing how many
bytes were read. If it equalled zero the program was at the end of the file. This was
tested by printing an indicator to the screen when this condition was true. The next step
was letting the server know the name and path of the other files are to open and send.
The design decisions for this are mostly discussed in the GUI section (section 5.3.9 in
this chapter) but some are relevant to this section. The decision was to use a play list file
to contain all the information required to open the required file. Initially this play list
42
was just a text file that listed each file to be open on separate lines with their path in
front of the filename. For example:
C:\mp3\The Whitlams\Eternal Nightcap\05 - Melbourne.mp3
C:\mp3\The Whitlams\Eternal Nightcap\06 - Where's the Enemy.mp3
The server program keeps a count of what song number it is up to and this song number
is passed to a function called openMp3 that was created to search through the play list
and retrieves the information required as shown in figure 20.
Open play list
and read into a
buffer
Set a pointer to
the first position
in the buffer
Set character
return (CRT)
counter to 1
Return song number
greater than songs in
play list
Yes
Increment
pointer
Pointer
= NULL
No
CRT count
= song
number
No
No
Pointer
= CRT
Yes
Increment
CRT count
Yes
Copy the next line of
buffer into a string
and add two '/'
symbols whenever
one is read
Use this string to
open the new MP3
Figure 20 The openMP3 function
43
It reads this play list file counting the number of character returns. When the number of
character returns is one less than the song number, it reads the next line in the play list
as the song and its respective path. In this process, the string is also converted to the
UNC. When it sees a ‘\’ the program adds another one in the next string position. This
string is then passed to the create file function which opens the required file. The file
handler that was created to read the file into the buffer now points to the new file. When
the file being read reaches the end, the program increments the song counter and calls
the openMP3 function which opens the new song. The main loop continues as normal,
reading the file into a buffer and then sending to the player. When it gets to the end of
the MP3 file the next time the main loop comes around to read the data into the buffer
again it is actually the new file. As far as the MP3 player is concerned, this is presented
as a constant data stream.
The tests of this implementation went very smoothly. A play list was created by simply
typing it into the text file and the player successfully played file after file. The only
problem was that after the player played the last song the server crashed. This was
because it was stuck in a loop looking for a file on the last line of the play list, which
was just a character return. The solution to this was to put in a catch for a line with
nothing on it, which is considered to be the end of the play list. At this point it was
determined that two modes could be used, either stop playing at this point or loop back
to the beginning of the play list. If it is set in loop mode it re-calls the openMP3
function with song number set back to 1. If not it just returns to a loop waiting for
commands from the MP3 player.
5.3.7 Adding user controls.
The user is provided with four buttons to use: ‘play/pause’, ‘stop’, ‘next’ and
‘previous’. These buttons all trigger separate interrupts in the player software. To stop
the buttons triggering many interrupts with each button press, another tread was created
to handle de-bounce. This was done by turning off the respective button interrupt in the
interrupt routine and setting a global variable to indicate that a button had been pressed.
The de-bounce thread then sees this variable and turns the button interrupt back on after
200ms. The de-bounce was tested by simply having the interrupt service routine for
each button do as described plus send an indicator to HyperTerminal showing when the
44
button was pressed. The tests showed that de-bounce and the interrupts worked but the
buffer for the MP3 data kept emptying. This was surprising, because there was very
little extra that appeared to be happening then before when it worked. Even without
pressing the buttons the buffer kept emptying, but if the de-bounce thread was removed
the player now played without a problem. It was discovered that when a thread is
created, it is given a default priority of 64. What was happening was that the main
thread and the de-bounce thread had the same priority and hence were sharing a similar
CPU time. By giving the main thread a higher priority (60), the player started to operate
successfully with the de-bounce thread operating.
5.3.7.1 Play/Pause Button.
Next the Play/Pause button was given a function. Using the global variable to turn
access on and off for the decoders interface it was possible to either stop the MP3
decoder from reading any more data. The first stage was to see if it was possible to
pause the audio stream, essentially stopping the decoder from being able to read data
and also sending a command to the server to stop sending data. If the server was not
stopped, eventually the buffer would become full and the send command would
continue attempting to send but the Ethernut will not be receiving. Eventually the send
will fail and exit. Therefore, a method of passing commands from the MP3 player to the
server program was required. The design for this was to open a separate TCP
connection just for passing commands to the server. On the server a new thread was
created that simply waited for commands to be received and then responded to them. To
test the pause function the design in figure 21 was implemented.
45
Server
The player
Main thread
Main thread
Play/Pause
button ISR
Receive MP3
data from
server
No
Is send
enabled
Play
No
If play
Yes
Yes
Send
UNPAUSE to
the server
Pause
Is the
buffer set
to refill
Is it full
Read file into
buffer
Toggle between
play and pause
states
Reset the
pointer if it is
past the buffer
boundary
If at end of file
call openMP3 to
open the next
song
Decode the
message
If
UNPAUSE
Enable transfer
to the decoder
Send PAUSE
to the server
Software
trigger the
decoder ISR
Yes
Enable
send
No
Send MP3 data
Disable
transfer to the
decoder
No
Start the
decoder
Receive command
from player
Yes
Disable button
interrupt
Increment the
receive
pointer
Thread 2
Yes
If PAUSE
Disaable
send
No
Calculate the
buffer size
If buffer is empty
set the buffer to
refill
Wait for there to be
room in the buffer
for another receive.
Yes
Is the
buffer
full
No
Figure 21 Play/pause implementation
When the pause/play button is pressed, it simply toggles between a pause state and a
play state. In the pause state, it sets the global variables that stop the transfer to the
decoder, and sends a PAUSE command to the server. In the play state is sets the global
variable to enable the transfer, sends an UNPAUSE command to the server and also
triggers the software interrupt to start the decoder transfer again. On the server side, a
global variable was used to either enable or disable the cycle of reading the MP3 data
from the file and the sending of it to the MP3 player. When the command thread
receives a command telling it to pause, it disables the above cycle. If it receives a unpause command it enables the cycle.
The test of this was to start the program in its usual start up state of filling the buffer and
then the initiation of the transfer of data to the decoder. This stage worked as before - no
problem in playing audio - then the pause button was pressed. The audio stopped, as
was hoped, and the network transfer was stopped without the send from the server
46
failing. The pause button was then pressed again to undo pause and the player stated
producing music from the point it left off.
The first test proved to be more successful then those that followed. The problems was
that the buffer would sometimes empty after play was resumed. This would cause a gap
in the music and a blip could be heard most times when the play was resumed.
The initial reason suspected for this was the transfer was stopped at an undetermined
buffer size on the player. Sometimes the buffer could be close to empty when pause is
activated. When play is resumed the player starts playing immediately from that state.
This means that as soon as the software triggers the interrupt to feed the decoder the
buffer can quickly be reduced before there is any immediate increase in data from the
network. To prevent this, when play is activated again the decoder interrupt is no longer
software triggers straight away. Instead, the program is set back to the state of refilling
the buffer. It will then receive the MP3 data from the network into the buffer and when
the buffer gets full again the interrupt to feed the decoder is triggered in software. This
has the effect of stopping the audio immediately but only restarting the audio when the
buffer becomes full again. The testing of this was much better; the buffer didn’t empty
and there were negligible delays as a result of the buffer topping up after the play button
was pressed. The ‘blip’ sound still persisted but it was not due to the buffer because it
never emptied. At this stage it was becoming difficult to see what was causing the blip.
It seemed that there was data corruption somewhere but there was difficulty analysing
where. The test data was generally music and it was hard to hear if any significant data
was being lost.
5.3.7.2 Stop Button.
A change in the design approach was required. Implementation switched to the stop
function, because this would place the song back to the start, making it easier to tell
what was happening. The stop button was implemented the same as the PAUSE button
but it sent the STOP command to the server and reset the buffer pointers (transmit and
receive) back to the beginning, clearing the buffer of the current data that was no longer
needed. On the server side, when it received the stop command it disabled the sending
cycle as before, but this time it also called the openMP3 function with the same song
47
number as previously. This resets the file handler back to the start of the file, ready to
play from the start when play is pressed.
The results of this test were very puzzling. Stop did indeed stop the music but when
play was pressed the music began playing, from where it was stopped for about one
second then the song would start from the beginning again. This meant that old data
from before stop was pressed was still being stored somewhere. This could have been
somewhere in the TCP system (either on the sender or receiver) or something to do with
the buffer management. It was decided that there was a delay between when the decoder
was stopped from receiving data and when the server actually stops sending data.
Button pressed
Transfer
stopped buffer
stops filling
Decoder transfer
stopped
immediately buffer
stops empting
Stop message
sent to server
Main loop has to
finish current send
before checking if
sending is enabled
Main loop told to
disable sending
Delay
Stop message
received by server
Figure 22 Buffer control delays
The delay in controlling the buffer means data will keep going into the buffer after the
button is pressed. Hence, when play is resumed and the new file is received it gets
added after the old data that has not been played yet. It was decided to prevent the delay
by also disabling the TCP receive at the same time the decoder is disabled. The testing
of this actually did not change anything; somehow the old data was still being received
or stored somewhere. Therefore the disabling of the TCP receive was removed.
It was decided that it had to be somewhere in the TCP system because the buffer
management was rather simple. The buffer management reset the pointers back to the
beginning of the buffer space when stop was pressed; therefore, what ever came in
through the network after this would be written over the old data. To investigate further,
a program was written to display the number of bytes each TCP receive actually
received. In these tests, it was found that the TCP receive function never received data
48
to the upper limit that was passed to the function. It returned before the full 1.5Kbyte
packet was received, normally at 536 bytes. This was while the player was actually
playing a song. If the player was stopped and the play was pressed again, the first
packet, and often the second packet would be 1.5Kbytes and the following packet would
be closer to 536bytes. It would then receive 536 bytes from that point on. This
suggested that the TCP receive function that was being called on the player was not
directly responding to the TCP send on the server. The Nut OS must have been handling
the direct receives from the send, placing the data into a buffer and then the TCP receive
function must have been reading out of this buffer. To test whether the function worked
synchronously, the limit of the TCP receive was set to a value of 3Kbytes. If this
function synchronously received data from the TCP send then it would not receive more
than 1.5Kbytes, because this is the size of the packet the server sends.
The test showed that indeed it did exceed the 1.5Kbytes and even sometime received the
full 3k after play was resumed. This meant that when the program disabled access to the
TCP receive, and expected it to stop receiving, the operating system kept receiving data.
Then when the receive was re-enabled it received this old data out of the buffer. This is
apptopriate for the pause function, but not for stop, next or previous, which all need to
play fresh data from the beginning of the song.
A lot of research was done into this underlying Nut OS buffer. It was definitely there
but the Ethernut documentation provided little information about it or how to
manipulate it. It was expected that a function might have been provided to flush the
buffer when required, but it was implemented somewhere in the Nut OS and little could
be found about it. The alternative was to look at the problem on a functional level. The
solution was to have the server program place a song gap identifier at the start of the
new MP3 song when a stop, next, or previous command was received. This was
implemented by simply sending “GAP” across the MP3 stream just before the first
packet of new MP3 data was sent, as shown in figure 23.
49
Server
The player
Main thread
Main thread
Receive MP3
data from
server
Stop button
ISR
Yes
If set to
discard
No
Is GAP
in buffer
No
Increment the
receive
pointer
Yes
Disable discard and
set pointers to the
data after GAP
Disable button
interrupt
No
Is send
enabled
Thread 2
Receive command
from player
Yes
If GAP send has
been selected
send the GAP
Decode the
message
Disable transfer
to the decoder
Read file into
buffer
Set buffer to
discard
Yes
If
UNPAUSE
Enable
send
No
Reset the
pointer if it is
past the buffer
boundary
Send STOP
command to
the server
If at end of file
call openMP3 to
open the next
song
Yes
If PAUSE
No
Disable
send
No
Is it full
Yes
Is the
buffer set
to refill
Send MP3 data
Yes
No
If STOP
Yes
Calculate the
buffer size
Start the
decoder
If buffer is empty
set the buffer to
refill
Wait for there to be
room in the buffer
for another receive.
Yes
Disable
send
No
Call
openMP3
ro reopen
current file
Set variable
to send
GAP
Is the
buffer
full
No
Figure 23 Buttons with GAP message for buffer control
If the stop, next, or previous button were pressed on the player they enabled a global
variable called ‘discard’. When this variable was set and play was re-enabled, the
receive buffer was not incremented until it receives the string “GAP”. At this point it
would turn off discard and set the transmit buffer to the position after the P in GAP and
the receive pointer would be moved to the end of the packet just received. The program
is then free to start filling the buffer with the new data. When the buffer gets full, the
software interrupt triggers the decoder to start receiving. The result of testing was that
the amount of old data that was being played was greatly reduced but there was still a
very small amount of old data still being played. The reason for this became very
confusing. It did not seem possible that the GAP was some how getting in the middle of
the old data. This was simply not possible in the TCP system because TCP guarantees
order of delivery. Therefore, it seemed it was something to do with the buffer
50
management. How was it possible that the GAP can be put into the middle of old data in
the buffer? It did not make sense, for a long time the Nut OS was again suspected.
5.3.7.3 Next and previous Buttons.
The design focus then changed as too much time was being spent on this problem, so
next and previous buttons were implemented. They acted the same as stop, but on the
server side the program opened song number plus one for next, and minus one for
previous. Testing showed that this worked the same as stop, except the next or previous
song was played instead of the same one, and the slight slice of the old data was still
being played.
This implementation means that if the player is in play mode and the button is pressed,
the player will stop the decoder immediately and the server will start streaming the next
or previous file. When the buffer gets full it then starts the decoder. This effectively
means that the player will continue playing but with the new song. If the player is in
stop mode and previous or next is pressed, then the player stops the decoder and tells
the server to open the new file, but the transfer of MP3 data is not started until play is
pressed again.
This all worked except for the blip of old data. It could successfully change to a new
song while in play mode, without to many problems if the songs were the same bit rate.
But during testing it was note that when the player went from a 128kbbs to a 192kbbs
song, when next or previous was pressed while in play mode, the buffer would very
quickly empty and the song would stutter for a while, constantly re-emptying the buffer
when it refilled and then eventually start. This was repeated when going from 192kbbs
to 128kbbs. The player had no problem doing this when the song was stopped, before
going to the next song, then pressing play. It was decided that the decoder might not
handle having its own buffer partially filled with one bit rate and the rest filled with a
different rate. It seemed unlikely that the decoder couldn’t handle this change, but it was
not described anywhere in the data sheets [13].
To test if it was something to do with the implemented stopping and starting algorithms
or the decoder, the player was simply allowed to play a 192kbbs song after a 128kbbs
51
song from the play list without buttons being pressed. This would allow the buffer to be
unaffected by the GAP and discarding of data algorithms. The result was that the player
had just as much difficulty regardless of whether it went from low to high or high to low
bit rates; the buffer quickly emptied. To solve this problem, it was necessary to reset the
decoder every time the buffer emptied. It was decided to do it when the buffer emptied
because this is the functional outcome of the change in bit rate. The result of this was
that the buffer did empty once when the bit rate changed but only once, so not after the
decoder was reset, and the effect on the sound was unnoticeable. This was then
implemented for the button presses. The decoder was reset after the GAP was received.
This ended up being a very important discovery. As a result, it could now switch
between bit rates without emptying the buffer, and more importantly the problem of the
mysterious old data play back was gone. It seemed that the MP3 decoder never
completely emptied its local buffer until the end of the file was reached. By calling the
reset function, the decoder’s buffer got emptied. The player itself now worked with full
controls, without problems.
5.3.8 Displaying the song name.
To display the song name an LCD module was chosen as the display. The display
module that was available at the time was a module with two rows and sixteen columns.
5.3.8.1 Integrating the LCD
The LCD was connected to the Ethernut as shown in table 4.
LCD connections
Ethernut Connections
Data lines 4 – 7
PORTE PINS 0 - 3
Write/Read
GND
Enable
PORTE PIN 4
Register select
PORTE PIN 7
VCC
VCC
GND
GND
Table 4 The LCD connections to the Ethernut
52
The LCD has three control lines, Read/Write, enable and register select. It has a
processor on board with two registers that are accessed via its bus. In this case a 4-bit
bus was used due to a lack of I/O pins available. There are two registers to write too on
the LCD; the first is the control register the second is the data register. These use the
same bus but are selected by the register select control line. The Read/Write control line
is always kept low to signify that the registers are continuously being written to. The
control register allows the user to configure the type of cursor and style of display. It is
also important for being able to move the cursor around the display. To write to the 8bits of data to control register the actions taken are shown in figure 24.
Register Select = 0
Register Select = 1
Enable = 1
Enable = 0
Write the high 4 bits of
the data to the data
lines
Delay to let data settle
Delay to let data settle
Write the low 4 bits of
the data to the data
lines
Toggle the enable low
then high
Figure 24 Writing to the LCD command register
The register select is set to 0 to select the command register and the data line is then
enabled. The high 4 bits of the command are written to the data lines and a short delay
is allows the data lines to settle. Toggling the enable line initiates a new write cycle and
the low 4 bits of the command are written to the data lines. A small delay allows the
data to settle and enable is set back to zero and the select line is set to one to select the
data register.
To display characters, the character needs to be written to the data register. This is done
in the same way as writing to control register except that at the start Register select is
set to 1 instead of 0. Before data can be displayed on the screen. the LCD needs to go
through a strict initialisation procedure.
The initialisation of the LCD module is done as shown in figure 25.
53
Figure 25 The initialisation of the LCD [23]
The values at (1), (2), (3), (4), and (5) are the configuration data written to the LCD
module using the control function described above. At (1), the LCD is set in 4-bit bus
mode, 2 lines of display and the characters are in 5x7 dot format. At (2), the memory
mode is set to increment mode. This means that when a character is printed the cursor is
moved across one position. At (3), the display is turned on and a cursor is shown. At
(4), the display is cleared, and (5), the memory address is set to the first cursor position.
These are the main basic function used to operate a LCD module. For this project, a
print screen function was developed. This function was designed to display the song
name on the screen while at the same time removing all the previous characters. To
make it faster in each screen write, each character position is only written too once. This
means the screen is not cleared before writing the song name but clearing as required
during the printing of the name. The function will not split words onto two lines. It
determines if the word will fit on the space remaining and if not, it prints it on the next
line. The implementation of the print screen function shown in figure 26.
54
Goto position
0,0
Clear the rest of
the line or lines
Yes
String
pointer =
NULL
No
Exit
Print pointer at
cursor position
on the LCD
Increment
pointer
Yes Goto position
1,0
The next line
Position of
next character
> LCD
columns
No
Yes
Yes
Pointer
= space
Clear the rest of
the line
Calculate the
number
characters to the
next space
If greater
than space
left on line
No
No
Figure 26 The print screen function
This function was developed and tested initially without the Nut OS running and
worked perfectly. When the code was tested with the Nut OS running it no longer
worked as required. It only printed some characters and some characters evolved into
weird ASCII characters. It was determined that the Nut OS must be context switching
between threads when the data transfer to the LCD was not finished. To solve the
problem the LCD routines were given the highest thread priority will printing and then
the thread priority was restored to its original value. This solved the problem and the
screen printed properly.
55
5.3.8.2 Extracting the song name
To get the song name to the LCD from the filename, it was necessary to extract the
required string from the songs entry in the play list and send this to the player, which
would simply have to display it. Another socket was created just to send the song name.
A thread was created on the player that prints anything (using the print screen function)
that is received through this socket. On the server, the task is more complex. It was
decided that the appropriate time to send the song name is when the server calls the
openMP3 function, which reads from the play list file the file name and path and stores
the information in a buffer.
A function was created to extract the song name from this buffer, and store it in another
buffer and send it to the player. This function works by first shuffling through the path
and the filtering out the song name from the file name. This function is called
send_song_name
and
within
this
function
another
function
is
called
(add_number_song_name) to place a song number string in front of song name. The
send_song_name function searches through the buffer as shown in figure 27.
Rest the position
in the song buffer
to the start
Increment the
position in the
path buffer
Increment 3
positions in the
path buffer
Yes
Add song
number to the
start of the
song buffer
Add current
item from path
buffer to song
buffer
Increment the
position in both
buffers
Next item
in path
buffer '\'
Yes
Next 3
items in the
path buffer
'-'
No
No
Next 4
items in the
path buffer
'.mp3'
No
NULL terminate the
song buffer and
send to the player
Yes
Figure 27 Song name extraction
56
There are two buffers represented in the flow chart. The path buffer is the buffer the
openMP3 function creates to store the path and filename in and the song buffer is the
buffer the function stores the song name in. It starts by adding the song number to the
start of the buffer and then copying each character from the beginning of the path into
the song buffer one character at a time. If it reads a ‘\’ in the path buffer it moves the
pointer to the current position in the song name buffer back to the beginning and reinserts the song number. The same is done if a space is read that is followed by ‘–‘ and
another space, representing a separator in MP3 naming standards. As a result the song
name that is stored is the song buffer after all the back slashes and dash separators. The
string copying stops when it gets to a ‘.’ followed by ‘m’ ‘p’ ‘3’. The string that remains
is the song name that is sent to the player. The player then successfully prints this to the
LCD.
5.3.9 The Graphical user interface (GUI).
The main function of the GUI is to enable a search through the computers on the
network and then select files to go on the song play list. This play list should also be
able to be modified while the music is playing.
5.3.9.1 Where should the GUI be?
This question came up at various design stages of the project. GUI means the interface
the users operates to navigate through the Windows computers on the network selecting
files to be put into the play list. This can also be extended to an interface that allows the
user to navigate through the play list while in a playback mode. Initially the goal was to
place all of this on the player itself. An LCD would provide the required display and
buttons would provide the controls needed. Due to development time limitations, it was
decided to develop the GUI on a PC connect to the player through the network.
5.3.9.2 The web page based GUI
Many possibilities were opened up by this decision, not only which development
environment would be used, but how the communication with Windows and the MP3
player could be arranged.
57
Initial tests with the Ethernut showed that the web server functions that it provided were
very useful. Commands could easily be passed to the web server through CGI scripts
and the interface was easily developed via HTML.
The Ethernut
The PC
Web page
Web server
Web browser
CGI functions
Windows file
system
Figure 28 A web page as the GUI
Figure 28 demonstrates the idea was that the web page would be stored on the ROM on
the Ethernut and the user could pass function to the player from a web browser, located
on a computer on the network. The Ethernut would then communicate with Windows to
get the requested file information (for example, the directories and MP3’s contained in
it) and this would modify the web page and be displayed on the user’s web browser. It
sounded good solution but running the web server from the Ethernut used up most of its
resources. The web interface still seemed possible though, because the user had to use
the GUI from a computer, it was possible to run a web server on one of the computers
on the network.
After investigating possible web servers for Windows (IIS and Apache), it would be
possible to implement the web page by storing the web page on the computer and using
the proxy function of the web server to pass required request to the Ethernut though the
web server. Though this was technically possible, it was decided that this should not be
developed because configuring the web servers was too complicated and an important
quality of the product is for it to be user friendly to install and operate.
5.3.9.3 A stand alone program as the GUI
The development then switched to developing an interface with Visual C++. Initially,
consideration was given to having this program communicate with the Ethernut, which
58
would in turn talk to Windows to get the required information about files and then pass
this on to the GUI. At the same time it was decided that the Ethernut should not
communicate with Windows directly but instead, through a server. This meant that it
would make more sense for the GUI to interact with Windows directly to form the play
lists and then communicate with the server. Consequently, all the song selection and
organization would be passed onto the server, reducing the overhead from the player.
All the player had to do then is request the current, previous or next song, and the server
could talk to the GUI and start the transfer. It was decided that the look and
functionality of the GUI should be similar to Winamp, with the ability to drop and drag
files onto the play list or enter through a dialog box. After developing a simple interface
in Visual C++, the next step was decided to investigate how the GUI and the server
program would in fact communicate. Attempts at integrating the server into the GUI
code were unsuccessful and so the decision was made to use an intermediary file to
store the play list. The GUI would write all the songs into a file and the server could
read this file to choose the song and its location.
It was at this stage that development on the GUI slowed and the server and player
development took priority. As mentioned earlier, most of the development of the server
was done by manually entering the song locations into a text file and then the server
opened files from this play list depending on what line the file was on. Once this was
successful, development switched back to the GUI, with the main aim of creating the
same file that was used before. A simple drag and drop utility was developed in which
files could be added to a dialog box but developing with the entire flexibility of
Winamp was going to be difficult.
5.3.9.4 Winamp as the GUI
It seemed like it would be far better if Winamp could instead be used. To determine
whether it could be used it had to be determined if the play list file it constructs was
usable. The structure looks as follows.
#EXTM3U
#EXTINF:342,Jeff Buckley - Mojo Pin
C:\mp3\Jeff Buckley\Grace\01 - Mojo Pin.mp3
59
#EXTINF:322,Jeff Buckley - Grace
C:\mp3\Jeff Buckley\Grace\02 - Grace.mp3
#EXTINF:275,Jeff Buckley - Last Goodbye
C:\mp3\Jeff Buckley\Grace\03 - Last Goodbye.mp3
It is the same structure as the file that was developed except that before each song the
song ID tag information is put on the line preceding. If all the lines that are hashed
defined were removed, then it is indeed the same. The server program was modified to
ignore lines that begin with ‘#’. As a result any Winamp play list file worked perfectly.
Winamp also provides the ideal interface for use with play lists, it is well known with
MP3 users and has many features like name sorting algorithms on many criteria that
would take a great deal of time to implement. Therefore, it was decided to use Winamp
(shown in figure 29) as the GUI.
Figure 29 Winamp screen shot
60
Chapter 6 - Design evaluation
The evaluation of the design for this player is unfortunately quite a subjective one. How
does one assess whether they like a stereo, for example? Most of the evaluation is done
on how the stereo sounds and operates. The same can be said for this player. To be able
to judge the product for these qualities, the product must first be able to fulfil the basic
requirements of a player. That is, can it play the media it is supposed to and can the user
perform the basic tasks required?
6.1 Fulfilling the basic requirements
The basic requirements of the player were outlined in Chapter 3. Table 5 compares
those requirements with what the project fulfilled.
Specification
Supported Formats
The Player design
The Player implementation
All MP3 bit rates and sample
All MP3 bit rates up to
frequencies. MP3s are the
250kbbs and all sample
main focus of interest; other
frequencies are supported.
formats such as WMA may be
considered in future products.
Internet Formats
Internet radio streamed as MP3 Not tested
Network interface
Ethernet 10BaseT (10 Mb/s
Ethernet 10BaseT (10 Mb/s
Ethernet) or 10/100BaseT
Ethernet)
running TCP/IP.
Audio outputs
User controls
Either RCA or headphone
Either RCA or headphone
stereo.
stereo.
Buttons on the player.
Buttons for play/pause, stop,
next and previous tracks
Song selection
Create a song play list on the
player itself using the buttons
and display on an LCD screen.
Cost
Below $400 AUD
Song list created through
Winamp and read from a
server program running on
the PC. This then interfaces
with the player.
AUD $295.00 for Ethernut
AUD $119.00 for VLSI
AUD $25.00 for the LCD
Table 5 Final player specifications
61
The player can successfully play MP3s, up to and including 250kbbs, data rates with
perfect audio quality. The test for this specification was to create MP3 data from a song
multiple times and each time slightly increasing the bit rate. A play list was then created
from the multiple copies of this same song in increasing bit rates and then the player
was controlled to play each song. It was found that at 250kbbs the player worked was
expected but any higher than that and the buffer began emptying, so the song would
stop and start. The test was repeated with different songs and the same result was found.
Unfortunately, at the time of writing this report, streaming an MP3 from the internet
was unable to be attempted. At this stage it is possible to say that there is no reason why
it shouldn’t work, however it has not been tested. The reason why it was not tested was
that there was no internet connection available where MP3 streaming was possible. All
tests of streaming from many computers connected via a LAN were successful up to
and including 250kbbs. This shows that the design decision to use the Ethernut
development environment allowed the player to be able to transfer data fast enough and
the memory space was large enough to buffer the traffic fluctuations of the network.
The implementation of the user controls was limited to controlling the playback of the
MP3; no controls were provided for play list editing. The controls allow for the user to
play or continue playing, pause or stop the selected song and change the current song to
the next or previous song in the play list. All of these functions work without any
problems. The stop and pause buttons stop the sound as soon as they are pressed and,
when the play button is pressed, there is a slight delay of less than one second to allow
for the buffer to refill. The next and previous buttons can work in two ways. Firstly, if
the player is currently in play back mode and previous or next is pressed, the newly
selected song will begin playing without the play button being pressed. Secondly, if the
player is stopped, the new song will simply be selected but playback will not begin until
play is pressed. Whenever a new song is selected, whether it is during playback or not,
or if it is simply because a song has ended and a new song is starting, the LCD module
is always updated with the new song and its position in the play list. At this stage, no
‘seek’ function is available to allow the user to play through the song quickly. If the
user continually holds down the next or previous button, which is the usual way to
invoke a seek mode, the player will simply continue going through the play list,
selecting a new song every 300ms. This is in fact a useful feature; it enables the user to
62
quickly navigate the play list while the player is in playback mode. Playback does not
resume until the user finally takes their finger off the button, otherwise the user will
only hear about one tenth of a second of each song they are passing, which is more
annoying than useful. This does not happen if the user toggles the button up and down.
There is a repeat and a non-repeat function for the player. In the repeat mode, if the
player attempts to open a file past the end of the play list, it will wrap the current song
selected back to the start of the play list. In non-repeat mode the player will simply keep
the last song of the play list open.
Unfortunately, the play list editor was not implemented on the player itself but through
Winamp on the PC. Therefore, to set up or even modify the play list the user has to go
back to the computer before changing the play list. To be able to do all of this from the
Ethernut would have been ideal, but for an alternative solution using Winamp as a GUI
is a very good one. Of all the environments to edit a play list, Winamp is the most
desirable. It is very familiar to nearly all MP3 file users and provides an incredible
amount of flexibility. The user can either drag and drop files to be played or use the
provided dialog boxes. It provides sorting algorithms and an easy interface to modify
the song order. Implementing all of this on the player would have been difficult. The
play list can be modified and the player will respond to the updated changes after it is
finished playing the current song, or if the stop, previous or next buttons are pressed.
The final cost of the player which included the Ethernut, the Decoder board and the
LCD came to AUD $ 439.00. The cost of the player was considered to be one of the
most important outcomes of the project, to provide a solution similar to existing
solutions but at a fraction of the cost. The player developed is a lot cheaper than the
alternatives but the goal was to have it below $400. This is actually what has been
achieved. When you consider that the components used in the $439, the Ethernut and
the Decoder, were purchased on pre constructed development boards from overseas and
delivered to Australia for the above prices, it can be produced a lot cheaper than $400.
There is no software fees involved and the PCB designs of the boards used are provided
on the internet for free. As a result, the next step of producing and constructing the
hardware locally done very easily and a lot cheaper.
63
6.2 Fulfilling the subtle requirements
The finer details of an audio device are also worth mentioning. The user controls on the
player are very easy to use. This might seem easy to accomplish, but it is often difficult
to implement controls the human user enjoys. In so many MP3 players, there are often
quite long delays before the action expected is actually performed. This is most
commonly involved with the next and previous functions. With the design implemented,
priority is given to responding to button presses and then displaying the response (the
song name on the screen) as soon as possible. The user can very quickly move through
the play list and select the required song, either holding down the next or previous
buttons or simply toggling them. Test data is not available to demonstrate the delay
inherent in other players, but subjectively this player is much quicker.
The most important thing to consider with an audio device is its sound quality. This
again is a very difficult thing to measure. The player produces no audio defects and
there is no noise added to the song other than what was recorded. When comparing the
audio quality of the player with Winamp, using the same song, it was very difficult to
tell the difference. The line out level that the player produces is suitable for all the input
lines of the devices tested.
6.3 Personal reflection
The most difficult task for this thesis was to make decisions about the design and
implementation that could greatly effect whether the task can be completed in the time
available, from a point in time well before completion. Initially, a topic had to be
thought of that was possible to complete over the thesis time period even though it was
unclear what the requirements of some of the components would be. Then taking this
idea and carrying it through to completion, making decisions after researching the
possibilities, and attempting to foresee any long term problems were the other big
challenges.
Overall, the design process was quite successful, resulting in a fully functioning MP3
player. The bulk of the product implementation was completed on schedule, allowing
for time to make minor changes to remove smalls bugs in the software. There are a few
64
decisions that were significant for finishing the product on schedule. The decision to
implement a server program on a PC, instead of implementing an SMB layer on the
Ethernut, was very important for time management. It also made the development a lot
easier. However, it was disappointing overall, because it meant that the player would no
longer be as flexible due to the proximity to a PC that the user would need to be. The
actions of the player were easily controlled from the server and having all the play list
decoding interfacing with the windows file system, were much easier to decode from
the server program. Also, having all the song name and file path decoding being
performed on the server greatly sped up the performance; if the player had to do these
tasks it would have to retrieve the data first across the network. After testing the player,
and finding that it cannot play files greater that 250kbbs, it is apparent that the Ethernut
would not have had the resources to be able to handle the extra load, as the range of bit
rates available to play would decrease.
The greatest challenge of the project was to design within the limited confinements of
the Ethernut. The main difficulty came with the lack of CPU speed and the overhead
caused by switching between threads. The big advantage of the Ethernut is that it now
allows for very cheap production of the product - the main objective of the thesis - to
provide the functionality of existing solutions but at a fraction of the cost.
65
Chapter 7 - Future Improvements
The previous chapters have outline how the idea for the thesis came about and how the
idea was developed in to fully functional MP3 player. Not all aspects of the MP3 player
were implemented in way that fulfilled the ideal specifications that were outlined in
Chapter 3. Chapter 7 deals with the features that were not yet implemented and also the
extra features that could be added to the design.
7.1 Improvements to the Current Design.
When looking at the ideal specifications, the implemented design does not allow the
user to create and edit the play list from the device itself. To be able to do this in future
revisions are larger display and keypad with more buttons is required. The graphical
user interface will then need to be developed on this platform. To get the information
required for the interface the player will need to be able to navigate through the
computers on the network and browse their directory structures. MP3 files would be
selected and stored on the player. To get this information the player can either use the
existing server program and expand its features, or interact with Windows itself.
Interacting with Windows itself is the ideal implementation as no PC software is
required, making the player autonomous. To achieve all of the features on top of the
existing design a more powerful platform will be require. Implementing the MP3
players own interface to the Windows file system will require more resources than the
current Ethernut will provide. The solution is to use the latest hardware revision of the
Ethernut. It uses an 11Mhz processor and provides 64Kbytes of RAM. The current MP3
player software that was developed can simply be installed on this newer Ethernut and it
will work. Development can then continue on top of the existing solution to provide the
extra features.
66
7.2 Extensions to the Current Design.
After developing the user interface on the player itself there are a wide range of extra
features that could be added. A remote control could be used to control all the features
of the player including track control and play list functions. An infrared received would
be developed on the player and the remote control could either be designed and
constructed or a third party product could be used.
Extra sound effects would be useful. Even though the player is designed to go into a
traditional stereo that should provide the user with the required effects it would still be a
benefit to be able to do this from the player. The effects could include bass, treble and
volume controls. The integration of this into the existing design would not be difficult.
The existing MP3 decoder provides the functionality to modify these characteristics of
the sound across the serial interface with the microcontroller.
The implementation of a seek function could be done to allow the user to fast forward
or rewind through the song. The current MP3 decoder also provides this as a function.
The main difficulty with doing this in the current solution is that the Ethernut cannot
transfer the data across the network fast enough. If the faster Ethernut product was used
the seek function could be implemented. The speed of the seek function can easily be
controlled on the MP3 decoder; therefore; the functional speed of the seek function
would be governed by how fast the new Ethernut can transfer.
It would be possible to display extra information about the song while it is playing. By
reading from the ID tag of the MP3 it is possible to read extra information. Not all MP3
files have the ID tag information, but if it is there the player could display the artist who
performed the song, the album it was from and its name. On top of this the player could
display a time indicator. Indicating either how long the song has been playing for or
how much of the song is left.
Not everyone agrees with network cables being viewable or putting holes in the wall to
install a network socket. Therefore, a long term improvement would be to allow the
player to connect to a wireless network.
67
Chapter 8 - Conclusion
The outcome of this thesis was to produce an MP3 player that solved the problem with
the current MP3 player solutions. The problem was that current MP3 player requires the
user to up load the MP3 data from a computer to the player before the player could be
used. Current MP3 players use the small size of MP3 files to be able to store as many as
possible on the local storage of the player. A better method would be to play the MP3s
that are stored on the computer using a remote device. The ability to stream MP3s and
play them in real time through a network connection is an obvious advantage of their
small size.
Currently, there are two devices already available commercially that can play MP3s that
are stored remotely on computers connected via a local area network or the internet. The
players provide a full list of features but are very expensive. For this alternate type of
MP3 player to be successful it must be considerably cheaper than other MP3 players
that provide local storage for MP3s. The product that was to be developed from this
thesis must provide similar functionality to current solutions but at a fraction of the cost.
The Ethernut was selected as the embedded development platform for the project. The
Ethernut was selected because it provide a networking solution fast enough for the
project and it provided an operating system with a TCP package that allowed for
flexible development of the MP3 player software. The VS1001k was selected as the
hardware MP3 decoder to integrate with the Ethernut board. An LCD and buttons were
added to the Ethernut board to allow the user to control the track play back and to be
able to view the name of the current song.
Software was developed on the hardware platform to produce a useable MP3 player.
Software was written on the Ethernut to communicate with a server program on
Windows over a TCP connection. The Ethernut software buffered the MP3 data from
the server program and in turn sent the data onto the MP3 decoder to produce the audio.
The server program was developed to read a play list created by Winamp. From the play
list the server program could open selected files either store locally or remotely across
the network, and send them to the Ethernut to convert into audio. The server program
68
also extracts the song name of the file selected to play and sends it the Ethernut which
displays it on the LCD. The buttons connected to the Ethernut result in the sending of
messages to the server program. The messages can invoke the actions of play, pause,
stop, previous or next, allowing control of the current track or selection of new tracks.
Concluding the thesis, the final product that was produced was a fully functional MP3
player. It can play MP3 files of any bit rate up to and including 250kbbs and any sample
rate. The quality of the sound that is produced is of CD quality and no extra noise on top
of what was recorded is added by the player. The use of Winamp as the method for
creating the play list provides a familiar and very flexible method and the buttons on the
player allow for responsive control of the track play back and track selection. The
implementation of the LCD allows for clear identification of tracks and song names
from the play list. Overall, the player is very enjoyable to use.
69
References
1. Sutton, P. ‘COMS3200, Lecture 2’, University of Queensland,
URL:http://www.itee.uq.edu.au/~coms3200/, (Sept, 2002)
2. ‘Music across Your Home Network? – AudioTron’, Tom’s hardware Guide,
URL: http://www4.tomshardware.com/network/01q4/011220/index.html,
(Sept, 2002)
3. AudioTron product page,
URL:http://www.audiotron.net/audiotron/producthome.asp, (Sept, 2002)
4. SimpleFi Devices Home Page,
URL:http://www.simpledevices.com/simplefi.shtml, (Sept, 2002)
5. Rabbit Semiconductor Home Page,
URL:http://www.rabbitsemiconductor.com, (Sept, 2002)
6. Micro Digital Inc. Home Page, URL: http://www.smxinfo.com/, (Sept, 2002)
7. CMX Systems Home Page, URL: http://www.cmx.com/micronet.htm, (Sept,
2002)
8. ‘A Free Small TCP/IP Implementation for 8- and 16-bit Microcontrollers’,
uIP Home Page, URL: http://www.dunkels.com/adam/uip/, (Sept, 2002)
9. Ethernut Home Page, URL: http://www.ethernut.de/en/news.htm, (Sept, 2002)
10. Kadak Products Ltd. Home Page, URL: http://www.kadak.com, (Sept, 2002)
11. Atmel Corporation Home Page, URL: http://www.atmel.com, (Sept, 2002)
12. JKMicrosystems Inc. Home Page, URL: http://www.jkmicro.com/, (Sept,
2002)
13. ‘VLSI Solution Oy’, VLSI, URL: http://www.vlsi.fi/welcome.htm, (Sept,
2002)
14. ‘MAS3587F MPEG-1/2 Layer-3 Encoder/Decoder (PLQFP64, PMQFP64, or
PQFN64 package)’, Micronas,
URL:http://www.micronas.com/products/documentation/communication/mas3
587f/index.php, (Sept, 2002)
15. AVRFreaks, URL: http://www.avrfreaks.net, (Sept, 2002)
16. ‘Overview of the MPEG committee’, MP3’ Tech, URL:http://www.mp3tech.org/layer3.html, (Sept, 2002)
70
17. ‘MP3’, (1999), Webopedia,
URL:http://www.webopedia.com/TERM/M/MP3.html, (Sept, 2002)
18. Nullsoft Winamp Home Page, http://www.winamp.com/, (Sept, 2002)
19. YAMPP Home Page,URL:www.yampp.com, (Sept, 2002)
20. E-mail correspondence from Harald Kipp, egnite Software GmbH.
21. ‘Software solutions for applications and appliances’, CodeFX Home Page,
http://www.codefx.com/, (Sept, 2002)
22. ‘Windows Networking API/Redirector Overview’, msdn,
URL:http://msdn.microsoft.com/library/default.asp?url=/library/enus/wceoak40/htm/cooriwindowsnetworkingapiredirectoroverview.asp, (Sept,
2002)
23. ‘Seiko LCD Character Module - Operating Instructions’, in COMP4300
Assignment 2, http://www.itee.uq.edu.au/~comp4300/_netphone/lcd_oi.pdf,
(Sept, 2002)
71
Appendices
Appendix A – The Player Source code
/*
* MP3 player with network interface.
* The Ethernut code
* Engineering Thesis 2002
* by Michael Somersmith
*/
/* The MAC address of the realtek controler - dont loose */
#define MY_MAC
{0x00,0x06,0x98,0x01,0x00,0x61}
/* Buffer size all buffer management is based around this */
#define BUFFER_SIZE 16000
#include <dev/irqreg.h>
#include <string.h>
#include <dev/nicrtl.h>
#include <sys/heap.h>
#include <sys/thread.h>
#include <sys/timer.h>
#include <sys/print.h>
#include <netinet/sostream.h>
#include <netinet/tcp.h>
#include <arpa/inet.h>
#include "vs1001k.c"
#define NO_COL (16) // number of columns on the LCD
#define lcddelay (5) //delay for data settling on LCD
void initialise_lcd(void);
void gotoxy(unsigned char x, unsigned char y);
void putch(char data);
void control(unsigned char data);
void print(char *text);
void clrscn(void);
void print_screen(char *text);
void printInt(unsigned int data, char length);
void printIntxy(unsigned char x, unsigned char y, unsigned int value, char digits);
void printxy(unsigned char x, unsigned char y, char *text);
#include "lcd.c"
static u_char mac[] = MY_MAC;
TCPSOCKET *command_sock;
TCPSOCKET *playlist_sock;
char play = 0;
char pause = 1;
u_char discard = 0;
static HANDLE q_pause = 0;
72
static HANDLE q_stop = 0;
static HANDLE q_next = 0;
static HANDLE q_previous = 0;
char button = 0;
char first = 1;
/*
* Pause button ISR
*/
static void PauseButton(void *arg)
{
/*Diable the button interrupt*/
EIMSK = EIMSK & ~(0x01);
/* Toggle the button state */
if(play){
pause = 0;
} else {
pause = 1;
}
if (pause){
/* change mode to play */
play = 1;
/* Send command to the server */
NutTcpSend(command_sock, "UNPAUSE\n", 12);
} else {
/* Send command to the server */
NutTcpSend(command_sock, "PAUSE\n", 12);
/* Disable the encoder access to the buffer */
tx_act = 0;
/* change mode to pause */
play = 0;
/* This will discard all transfer until it recieves GAP */
discard = 1;
}
/* Signal to debounce that a button has been pressed */
button = 1;
/* Return the handler - signals the interrupt is finished */
NutEventPostAsync(&q_pause);
}
/*
* Stop button ISR
*/
static void StopButton(void *arg)
{
/*Diable the button interrupt*/
EIMSK = EIMSK & ~(0x04);
/* Disable the encoder access to the buffer */
tx_act = 0;
/* Send command to the server */
NutTcpSend(command_sock, "STOP\n", 12);
73
/* Signal to debounce that a button has been pressed */
button = 1;
/* change mode to stop */
play = 0;
/* This will discard all transfer until it recieves GAP */
discard = 1;
/* Return the handler - signals the interrupt is finished */
NutEventPostAsync(&q_stop);
}
/*
* Next button ISR
*/
static void NextButton(void *arg)
{
/*Diable the button interrupt*/
EIMSK = EIMSK & ~(0x08);
/* Disable the encoder access to the buffer */
tx_act = 0;
/* Send command to the server */
NutTcpSend(command_sock, "NEXT\n", 12);
/* This will discard all transfer until it recieves GAP */
discard = 1;
/* Signal to debounce that a button has been pressed */
button = 1;
/* Return the handler - signals the interrupt is finished */
NutEventPostAsync(&q_next);
}
/*
* Previous button ISR
*/
static void PreviousButton(void *arg)
{
/*Diable the button interrupt*/
EIMSK = EIMSK & ~(0x02);
/* Disable the encoder access to the buffer */
tx_act = 0;
/* Send command to the server */
NutTcpSend(command_sock, "PREV\n", 12);
/* This will discard all transfer until it recieves GAP */
discard = 1;
/* Signal to debounce that a button has been pressed */
button = 1;
/* Return the handler - signals the interrupt is finished */
NutEventPostAsync(&q_previous);
}
74
/*
* debounce thread
*/
THREAD(debounce, arg)
{
while(1){
/* Wait for button press */
NutSleep(100);
if (button){
/* Re - enable buttons after 200ms */
NutSleep(200);
EIMSK = EIMSK | 0x0F;
button = 0;
}
}
}
/*
* Command recieving thread
*/
THREAD(Command, arg)
{
char playlist_buff[50];
char size;
/* Change thread priority to the lowest */
NutThreadSetPriority(200);
while(1){
/* Recieve the song name from the server */
size = NutTcpReceive(playlist_sock, &playlist_buff[0], 50);
/* Null terminate */
playlist_buff[size] = NULL;
/* Change thread priority to the highest */
NutThreadSetPriority(10);
/* Print the song name on the LCD */
print_screen(&playlist_buff[0]);
/* Change thread priority back to the lowest */
NutThreadSetPriority(200);
}
}
/*
* Main Thread.
*
75
* Nut/OS automatically calls this entry after initialization.
*/
THREAD(NutMain, arg)
{
TCPSOCKET *sock;
int bytes;
int buffer_in = 0;
int buffer_shuffle;
int buffer_count;
/*
* Allocate the space required for the buffer
* Prevents the OS and the compiler writing to it
* Set the transmit and recieve pointer to the start of the space
*/
mem_start = NutHeapAlloc (BUFFER_SIZE) ;
mem_end = mem_start + BUFFER_SIZE;
tx_ptr = mem_start;
wr_ptr = mem_start;
mem_flip = mem_end;
/* Intialise the decoder and software reset it */
VsInit(4);
VsReset(0);
/* Configuration for the buttons*/
PORTD = 0xFF;
DDRD = 0x00;
/* Enable interrupts for the buttons */
EICR = 0x30;
EIMSK = 0x4F;
/* Register the decoder interupt with the OS */
NutRegisterInterrupt(IRQ_INT6, VsDataRequest, 0);
/* Register the button interupts with the OS */
NutRegisterInterrupt(IRQ_INT0, PauseButton, 0);
NutRegisterInterrupt(IRQ_INT1, PreviousButton, 0);
NutRegisterInterrupt(IRQ_INT2, StopButton, 0);
NutRegisterInterrupt(IRQ_INT3, NextButton, 0);
/* enable global interrupts */
sei();
/* intialise the LCD */
initialise_lcd();
/* Start the debounce thread with stack of 100 */
NutThreadCreate("debounce", debounce, NULL, 100);
/* Enable the decoder access to the buffer */
tx_act = 1;
/*
* Register Realtek controller at address 8300 hex
* and interrupt 5.
76
*/
NutRegisterDevice(&devEth0, 0x8300, 5);
/*
* Configure lan interface.
*
*/
NutNetIfConfig("eth0", mac, inet_addr("192.168.0.100"), inet_addr("255.255.255.0"));
for(;;) {
/*
* Create the three sockets.
*/
sock = NutTcpCreateSocket();
command_sock = NutTcpCreateSocket();
playlist_sock = NutTcpCreateSocket();
/*
* Listen for connections on ports
* 12345, 12222, 11111. If we return,
* we got the server.
*/
print_screen("Waiting for Server");
NutTcpAccept(sock, 12345);
NutTcpAccept(command_sock, 12222);
NutTcpAccept(playlist_sock, 11111);
/* Start the command thread with stack of 200 */
NutThreadCreate("command", Command, NULL, 200);
print_screen("Server Ready");
/*
* Change this main thread priority to be slightly less
* the default. The default is 60.
*/
NutThreadSetPriority(60);
/* main loop */
while(1){
/* Receive the MP3 data from the server */
bytes = NutTcpReceive(sock, wr_ptr, 1500);
/*
* When discard is set whatever is recieved from the
* server will be discarded until "GAP" is recieved
*
*/
if (discard){
buffer_count = bytes;
buffer_shuffle = 0;
while(buffer_count > 0){
if(*(wr_ptr + buffer_shuffle) == 'G'){
if(*(wr_ptr + buffer_shuffle + 1) == 'A'){
if(*(wr_ptr + buffer_shuffle + 2) == 'P'){
77
/* Reset the decoder */
VsReset(0);
discard = 0;
/*
* Place the transmit pointer to
* the byte after GAP
*/
tx_ptr = wr_ptr + buffer_shuffle + 4;
/*
* Place the recieve pointer to
* the end of the data recieved
*/
wr_ptr = wr_ptr + bytes;
mem_flip = mem_end;
/* Tell it to refill the buffer */
first = 1;
empty = 0;
break;
}
}
}
buffer_count--;
buffer_shuffle++;
}
/* If no GAP recieved clear the buffer */
if(buffer_count == 0){
tx_ptr = mem_start;
wr_ptr = mem_start;
mem_flip = mem_end;
}
} else {
/*
* If discard is not set move
* the receive pointer to the
* end of the data received
*/
wr_ptr += bytes;
}
/* Chech to see if at the end of the buffer space */
if(wr_ptr > (mem_end - 1500)){
/* Set the flip possition to be used by the tx pointer */
mem_flip = (wr_ptr - 1);
/* set the recieve pointer back to the beginning */
wr_ptr = mem_start;
}
/* Calculate the buffer size */
if (wr_ptr >= tx_ptr){
buffer_in = wr_ptr-tx_ptr;
} else {
buffer_in = (wr_ptr-mem_start)+(mem_flip-tx_ptr);
}
78
/* If set the buffer is set to refill */
if(first){
/* If the buffer is full again */
if(buffer_in > (BUFFER_SIZE - 3000)){
/* Start the decoder receiving data again */
tx_act = 1;
SIG_INTERRUPT6();
first = 0;
}
}
/* The buffer has emptied */
if(empty){
empty = 0;
tx_act = 0;
/* Signal to refill buffer */
first = 1;
/* Reset the decoder */
VsReset(0);
}
/*
* Recieve buffer full wait for VSLI to take data
*/
while((BUFFER_SIZE - buffer_in) < 2000 ){
/* Calculate the buffer size */
if (wr_ptr >= tx_ptr){
buffer_in = wr_ptr-tx_ptr;
} else {
buffer_in = (wr_ptr-mem_start)+(mem_flip-tx_ptr);
}
/*
* exit if discard has be set
* means a button has been pressed
*/
if (discard){
tx_ptr = mem_start;
wr_ptr = mem_start;
mem_flip = mem_end;
break;
}
}
}
/*
* Close socket.
*/
NutTcpCloseSocket(sock);
}
}
79
Appendix B – Server Source code
/*
* MP3 player with network interface.
* Server software
* Engineering Thesis 2002
* by Michael Somersmith
*/
#include <winsock2.h>
#include <windows.h>
#include <stdio.h>
#include <stdlib.h>
#include <string.h>
#include <conio.h>
#define DEFAULT_PORT
12345
#define C_PORT
12222
#define S_PORT
11111
#define DEFAULT_BUFFER 2048
int iPort
int cPort
int sPort
= DEFAULT_PORT; // Port on server to connect to
= C_PORT;
// Port on server to connect to
= S_PORT;
// Port on server to connect to
char play = 0;
char stop = 1;
int song_no = 1;
HANDLE FileHandle;
char reopen = 0;
char repeat = 1;
SOCKET
song_Server;
char go = 0;
/*
* Adds the number passed to it to the string
*/
char add_number_song_name(unsigned int number, char * string ){
char length;
char space;
char tmp;
unsigned int power;
unsigned int data;
/* convert the number to base 10 */
data = number;
length = 1;
if(number > 9){
length = 2;
}
if(number > 99){
length = 3;
}
if(number > 999){
length = 4;
}
space = length + 1;
80
/* place the number in the string */
while(length>0){
tmp = length - 1;
power = 1;
while( tmp > 0 ){
power *= 10;
tmp--;
}
*string = data/power + '0';
string++;
length--;
data -= (data/power)*power;
}
*string = '.';
/* return the number of places taken in the string */
return space;
}
/* Sends the song name to the ethernut */
void send_song_name (unsigned int song_count, char * song_path){
TCHAR song_name_to_send[50];
TCHAR *song_to_send_ptr;
char dummy;
int pointer_pos = 0;
song_to_send_ptr = &song_name_to_send[0];
/* Add the song number to the start of the song name */
song_to_send_ptr += add_number_song_name(song_count, &song_name_to_send[0]);
dummy = 1;
/* loop until get to '.mp3' */
while(dummy == 1){
/* put the character in the buffer */
*song_to_send_ptr = song_path[pointer_pos];
song_to_send_ptr++;
/* if the character is a back slash */
if(song_path[pointer_pos] == 0x5C){
/* reset the pointer */
song_to_send_ptr = &song_name_to_send[0];
/* Add the song number to the start of the song name */
song_to_send_ptr += add_number_song_name(song_count,
&song_name_to_send[0]);
/* if there is a MP3 separator ' - ' */
} else if((song_path[pointer_pos] == '-') &&
(song_path[pointer_pos - 1] == ' ') && (song_path[pointer_pos + 1] == ' ')){
pointer_pos++;
/* reset the pointer */
song_to_send_ptr = &song_name_to_send[0];
81
/* Add the song number to the start of the song name */
song_to_send_ptr += add_number_song_name(song_count,
&song_name_to_send[0]);;
}
pointer_pos++;
/* if at the end of the buffer set variable to exit */
if((song_path[pointer_pos] == '.') && (song_path[pointer_pos + 1] == 'm')
&& (song_path[pointer_pos + 2] == 'p') && (song_path[pointer_pos + 3] == '3')){
dummy = 0;
}
}
/* NULL terminate */
*song_to_send_ptr = ' ';
song_to_send_ptr++;
*song_to_send_ptr = NULL;
song_to_send_ptr++;
*song_to_send_ptr = '\n';
/* Send the song name to the ethernut */
printf("sending song name\n");
send(song_Server, &song_name_to_send[0], strlen(&song_name_to_send[0]), 0);
printf("%s\n", &song_path[0]);
}
/* opens the mp3 file passed to it as a song number */
void open_MP3 (int song){
HANDLE PlayList;
TCHAR songs[100000];
TCHAR *songs_ptr;
unsigned long bytes;
TCHAR song_name[1000];
TCHAR *song_name_ptr;
int crt_num = 1;
char net_address;
printf("opening song name\n");
/* open the playlist */
if ((PlayList = CreateFile("C:\\mp3\\playlist\\new.m3u",
GENERIC_READ, FILE_SHARE_READ | FILE_SHARE_WRITE | FILE_SHARE_DELETE,
NULL, OPEN_EXISTING, 0, 0))
== INVALID_HANDLE_VALUE)
{
printf("Playlist failed with error %d\n", GetLastError());
}
/* set up the pointer to the buffer of the play list from
82
* and to write to
*/
song_name_ptr = &song_name[0];
songs_ptr = &songs[0];
ReadFile (PlayList, &songs[0], 100000, &bytes, NULL) ;
songs[bytes] = NULL;
/* extract the path and file name */
if(*songs_ptr == '#') crt_num--; //for winamp playlists
/* loop til the end of the buffer */
while(*songs_ptr != NULL){
/* if the CRT count is one less than song number */
if(crt_num == song){
if(*songs_ptr == 0x5C){
net_address = 1;
} else {
net_address = 0;
}
/* Read the path out on the next line of the buffer */
while(*songs_ptr != 0x0D){
*song_name_ptr = *songs_ptr;
if((*songs_ptr == 0x5C) && (net_address == 0)){
song_name_ptr++;
*song_name_ptr = *songs_ptr;
}
songs_ptr++;
song_name_ptr++;
}
*song_name_ptr = NULL;
break;
} else {
/* If character equals character return increment count */
if(*songs_ptr == 0x0D){
crt_num++;
songs_ptr++;
if(*(songs_ptr + 1) == '#') crt_num--;
}
songs_ptr++;
}
}
CloseHandle(PlayList);
/* The song number is past play list boundaries */
if (*songs_ptr == NULL){
printf("End of list\n");
/* in repeat mode go back to start */
if(repeat){
song_no = 1;
open_MP3 (song_no);
/* else stay at current file */
} else {
song_no = song - 1;
open_MP3 (song_no);
}
83
} else {
/* close old MP3 file */
CloseHandle(FileHandle);
/* send the new song name to the ethernut */
send_song_name(song_no, &song_name[0]);
/* open the new MP3 */
if ((FileHandle = CreateFile( &song_name[0],
GENERIC_READ, FILE_SHARE_READ, NULL, OPEN_EXISTING, 0, 0))
== INVALID_HANDLE_VALUE)
{
printf("MP3 open failed with error %d\n", GetLastError());
}
}
}
/* The message handler for commands from the ethernut */
DWORD WINAPI CommandThread(LPVOID lpParam)
{
SOCKET
sock=(SOCKET)lpParam;
char
Buff[100];
while(1){
recv(sock, &Buff[0], 20 , 0);
printf("%s", &Buff[0]);
/* Pause stops the current transfer loop */
if ( strncmp("PAUSE", &Buff[0], 4) == 0){
play = 0;
Sleep(100);
reopen = 1;
/*
* UNPAUSE restarts the transfer
* reopens the file if stopped resets the buffer
*/
} else if ( strncmp("UNPAUSE", &Buff[0], 5) == 0){
if(stop){
open_MP3(song_no);
printf("open\n");
stop = 0;
}
play = 1;
/* STOP stops the current transfer loop */
} else if ( strncmp("STOP", &Buff[0], 3) == 0){
play = 0;
stop = 1;
Sleep(100);
reopen = 1;
/* NEXT increments the song count and opens the new file */
} else if ( strncmp("NEXT", &Buff[0], 3) == 0){
play = 0;
84
song_no++;
open_MP3(song_no);
reopen = 1;
if(stop == 0){
go = 1;
}
/* NEXT decrements the song count and opens the new file */
} else if ( strncmp("PREV", &Buff[0], 3) == 0){
play = 0;
if(song_no != 1){
song_no--;
}
open_MP3(song_no);
reopen = 1;
if(stop == 0){
go = 1;
}
}
}
return 0;
}
/* The Main loop of the program */
int main(int argc, char **argv)
{
WSADATA
wsd;
SOCKET
Server;
SOCKET
command_Server;
int
bytes_sent;
HANDLE
Thread;
DWORD
ThreadId;
char buffer[3000];
unsigned long bytes_read = 1;
struct sockaddr_in server;
struct sockaddr_in command_server;
struct sockaddr_in song_server;
struct hostent *host = NULL;
/* Open the Winsock library */
if (WSAStartup(MAKEWORD(2,2), &wsd) != 0)
{
printf("Failed to load Winsock library!\n");
return 1;
}
85
/* Set up the network information structures */
server.sin_family = AF_INET;
server.sin_port = htons(iPort);
server.sin_addr.s_addr = inet_addr("192.168.0.100");
command_server.sin_family = AF_INET;
command_server.sin_port = htons(cPort);
command_server.sin_addr.s_addr = inet_addr("192.168.0.100");
song_server.sin_family = AF_INET;
song_server.sin_port = htons(sPort);
song_server.sin_addr.s_addr = inet_addr("192.168.0.100");
/* Create the socket for the MP3 stream */
Server = socket(AF_INET, SOCK_STREAM, 0);
if (Server == INVALID_SOCKET)
{
printf("socket() failed: %d\n", WSAGetLastError());
return 1;
}
/* connect this socket to the ethernut */
printf("connecting\n");
if (connect(Server, (struct sockaddr *)&server,
sizeof(server)) == SOCKET_ERROR)
{
printf("connect() failed: %d\n", WSAGetLastError());
return 1;
}
printf("connected\n");
/* Create the socket for the command passing */
command_Server = socket(AF_INET, SOCK_STREAM, 0);
if (command_Server == INVALID_SOCKET)
{
printf("socket() failed: %d\n", WSAGetLastError());
return 1;
}
/* connect this socket to the ethernut */
printf("connecting\n");
if (connect(command_Server, (struct sockaddr *)&command_server,
sizeof(command_server)) == SOCKET_ERROR)
{
printf("connect() failed: %d\n", WSAGetLastError());
return 1;
}
printf("connected\n");
/* Create the socket for the song name */
song_Server = socket(AF_INET, SOCK_STREAM, 0);
if (song_Server == INVALID_SOCKET)
{
printf("socket() failed: %d\n", WSAGetLastError());
return 1;
}
/* connect this socket to the ethernut */
86
printf("connecting\n");
if (connect(song_Server, (struct sockaddr *)&song_server,
sizeof(song_server)) == SOCKET_ERROR)
{
printf("connect() failed: %d\n", WSAGetLastError());
return 1;
}
printf("connected\n");
/* Create the thread to receive the commands */
Thread = CreateThread(NULL, 0, CommandThread,
(LPVOID)command_Server, 0, &ThreadId);
if (Thread == NULL)
{
printf("CreateThread() failed: %d\n", GetLastError());
}
/* stay in main loop until a key is hit */
while(!kbhit())
{
/* delay for fast file skiping */
if(go){
go = 0;
Sleep(400);
if(go == 0){
play = 1;
}
}
/* if the transmision of data is allowed */
if(play){
/* The gap is to be sent send it here */
if (reopen){
printf("sending GAP\n");
bytes_sent = send(Server, "GAP", 5, 0);
if (bytes_sent == SOCKET_ERROR)
{
printf("send() GAP failed:\n");
break;
}
reopen = 0;
Sleep(50);
/* read the file into a buffer and send it to the ethernut */
} else {
/* Read the file */
ReadFile (FileHandle, &buffer[0], 1500, &bytes_read, NULL) ;
/* if at the end of the file open the next one in the playlist */
if(bytes_read == 0){
CloseHandle(FileHandle);
song_no++;
open_MP3(song_no);
ReadFile (FileHandle, &buffer[0], 1500, &bytes_read, NULL) ;
87
printf("Done\r\n");
}
/* Send the MP3 data to the ethernut */
bytes_sent = send(Server, &buffer[0], bytes_read, 0);
Sleep(50);
if (bytes_sent == SOCKET_ERROR)
{
printf("send() data failed:\n");// %d\n");//, WSAGetLastError());
break;
}
}
/* Send disabled */
} else {
Sleep(1);
}
}
/* close everything and exit */
CloseHandle(Thread);
CloseHandle(FileHandle);
closesocket(Server);
closesocket(command_Server);
closesocket(song_Server);
WSACleanup();
printf("Key pressed.. Exiting\n");
return 0;
}
88
Appendix C – LCD interface source code
/*
* MP3 player with network interface.
* The Ethernut LCD code
* Engineering Thesis 2002
* by Michael Somersmith
*/
/*
* Print screen
* prints the passed "text"
* prints character to every position on the LCD
*/
void print_screen(char *text)
{
char counter = 0;
char space_counter = 0;
char *temp;
char line = 0;
gotoxy(0,0);
/* loop until at the end of the string */
while ( *text != '\0'){
/* print the character to the LCD */
putch(*text);
text++;
counter++;
/* if past the end of the LCD goto next line */
if ((counter >= NO_COL) && (line == 0)){
line++;
counter = 0;
gotoxy(1,0);
/* if at a space check to see if word will fit on the line */
} else if (*text == ' ') {
space_counter = counter;
temp = text;
temp++;
while((*temp != ' ') && (*temp != '\0')){
space_counter++;
temp++;
}
/* if doesn't fit clear the rest of the line and goto the next */
if ((space_counter >= NO_COL) && (line == 0)){
while(counter < NO_COL){
counter++;
putch(' ');
}
line++;
counter = 0;
gotoxy(1,0);
text++;
}
}
89
}
/* clear the rest of line 1 and line 2 */
if(line == 0){
while(counter < NO_COL){
counter++;
putch(' ');
}
gotoxy(1,0);
counter = 0;
while(counter < NO_COL){
counter++;
putch(' ');
}
} else {
counter = counter - NO_COL;
while(counter < NO_COL){
counter++;
putch(' ');
}
}
}
/* prints the text at the co-ordinates x,y */
void printxy(unsigned char x, unsigned char y, char *text)
{
gotoxy(x,y);
print(text);
}
/* usec delay */
void delay2(int clks)
{
clks = clks * 4;
while ( clks )
{
clks--;
}
}
/* The initialise function of the LCD */
void initialise_lcd(void)
{
/* setup the port */
PORTE = 0x40;
DDRE = 0x9F;
control (0x03);
NutDelay(5);
control (0x03);
delay2 (100);
control (0x03);
delay2 (40);
control(0x02);
//intitialise
//intitialise
//intitialise
// 4 bit
90
delay2 (40);
control(0x02);
control(0x08);
delay2 (40);
// 4 bit
// 2 lines
control(0x00);
control(0x06);
delay2 (40);
//display on, cursor off, blink off
control(0x00); //clear display
control(0x0C);
delay2 (40);
control(0x00);
control(0x01);
NutDelay(2);
//entry = increment + shift
control(0x08);
control(0x00);
delay2 (40);
}
/*
* goto the x y position on the LCD
* 0,0 represents top left
*/
void gotoxy(unsigned char x, unsigned char y)
{
x = x * 0x04;
NutDelay(5);
control(0x08 + x);
control(y);
NutDelay(5);
}
/* Control for the enable line */
void LCD_E(char state){
if (state)
PORTE |= 0x80;
else
PORTE &= 0x7F;
}
/* Control for the register select line */
void LCD_RS(char state){
if (state)
PORTE |= 0x10;
else
PORTE &= 0xEF;
}
/*
* PUTCH
* writes character "data" to the LCD
*/
void putch(char data)
{
unsigned char count;
91
char temp;
u_char priority;
/* Set the thread priority to the highest */
priority = NutThreadSetPriority(10);
LCD_RS(1); // select the data register
LCD_E(1);
/* Select the high 4 bits of the data */
temp = (PORTE & 0xF0)+((data & 0xF0)>>4);
PORTE = temp; //load nibble
for ( count = lcddelay; --count;)
;
LCD_E(0); // strobe
for ( count = lcddelay; --count;)
;
LCD_E(1);
data = (PORTE & 0xF0)+(data & 0x0F); //low nibble
PORTE = data; //load nibble
for ( count = lcddelay; --count;)
;
LCD_E(0); // strobe
NutThreadSetPriority(priority);
}
/*
* CONTROL
* write the passed data to the LCD control register
*
*/
void control(unsigned char data)
{
unsigned char count;
LCD_RS(0);
// select the control register
data &= 0x0F;
// clear the high 4-bits
LCD_E(1);
count = PORTE & 0xF0; //keep high 4 bits of port
data += count;
PORTE = data; //load data
for ( count = lcddelay; --count;)
;
LCD_E(0); //strobe data to LCD
LCD_RS(1); // select the data register
}
//clears the screen
void clrscn(void)
{
92
printxy(0,0,"
printxy(1,0,"
}
");
");
93
Appendix D – Decoder interface Source code
/*
* Copyright (C) 2001-2002 by egnite Software GmbH. All rights reserved.
*
* Redistribution and use in source and binary forms, with or without
* modification, are permitted provided that the following conditions
* are met:
*
* 1. Redistributions of source code must retain the above copyright
* notice, this list of conditions and the following disclaimer.
* 2. Redistributions in binary form must reproduce the above copyright
* notice, this list of conditions and the following disclaimer in the
* documentation and/or other materials provided with the distribution.
* 3. All advertising materials mentioning features or use of this
* software must display the following acknowledgement:
*
* This product includes software developed by egnite Software GmbH
* and its contributors.
*
* THIS SOFTWARE IS PROVIDED BY EGNITE SOFTWARE GMBH AND CONTRIBUTORS
* ``AS IS'' AND ANY EXPRESS OR IMPLIED WARRANTIES, INCLUDING, BUT NOT
* LIMITED TO, THE IMPLIED WARRANTIES OF MERCHANTABILITY AND FITNESS
* FOR A PARTICULAR PURPOSE ARE DISCLAIMED. IN NO EVENT SHALL EGNITE
* SOFTWARE GMBH OR CONTRIBUTORS BE LIABLE FOR ANY DIRECT, INDIRECT,
* INCIDENTAL, SPECIAL, EXEMPLARY, OR CONSEQUENTIAL DAMAGES (INCLUDING,
* BUT NOT LIMITED TO, PROCUREMENT OF SUBSTITUTE GOODS OR SERVICES; LOSS
* OF USE, DATA, OR PROFITS; OR BUSINESS INTERRUPTION) HOWEVER CAUSED
* AND ON ANY THEORY OF LIABILITY, WHETHER IN CONTRACT, STRICT LIABILITY,
* OR TORT (INCLUDING NEGLIGENCE OR OTHERWISE) ARISING IN ANY WAY OUT OF
* THE USE OF THIS SOFTWARE, EVEN IF ADVISED OF THE POSSIBILITY OF
* SUCH DAMAGE.
*
* For additional information see http://www.ethernut.de/
*
** Portions Copyright (C) 2001 Jesper Hansen <[email protected]>.
*
* This file is part of the yampp system.
*
* This program is free software; you can redistribute it and/or
* modify it under the terms of the GNU General Public License
* as published by the Free Software Foundation; either version 2
* of the License, or (at your option) any later version.
*
* This program is distributed in the hope that it will be useful,
* but WITHOUT ANY WARRANTY; without even the implied warranty of
* MERCHANTABILITY or FITNESS FOR A PARTICULAR PURPOSE. See the
* GNU General Public License for more details.
*
* You should have received a copy of the GNU General Public License
* along with this program; if not, write to the Free Software Foundation,
* Inc., 59 Temple Place - Suite 330, Boston, MA 02111-1307, USA.
*/
/*
* $Log: vs1001k.c,v $
* Revision 1.3 2002/06/26 17:29:08 harald
94
* First pre-release with 2.4 stack
*
*/
/*
* MP3 player with network interface.
* The Ethernut code
* Engineering Thesis 2002
* Modified by Michael Somersmith
* Added different buffer controls
*/
#include <interrupt.h>
#include <sys/event.h>
#include "vs1001k.h"
static u_char writeDelay = 0;
u_char * volatile tx_ptr;
u_char * volatile wr_ptr;
static volatile u_char tx_act;
static u_char *mem_start;
static u_char *mem_end;
static u_char *mem_flip;
static u_short empty = 0;
static HANDLE q_dreq = 0;
/*!
* Data request interrupt service.
*/
static void VsDataRequest(void *arg)
{
u_char yd;
if(tx_act) {
sbi(VS_XCS_PORT, VS_XCS_BIT);
/*
* Write MP3 data until either no more
* data is available or the chip clears
* the DREQ line.
*/
for(;;) {
sbi(VS_BSYNC_PORT, VS_BSYNC_BIT);
outp(*tx_ptr, SPDR);
asm volatile("nop\n\tnop\n\tnop");
cbi(VS_BSYNC_PORT, VS_BSYNC_BIT);
if(++tx_ptr > mem_flip)
tx_ptr = mem_start;
loop_until_bit_is_set(SPSR, SPIF);
/*
* Stop transfer if our data buffer is empty.
95
*/
if(tx_ptr == wr_ptr) {
empty = 1;
tx_act = 0;
break;
}
/*
* Stop transfer if the chip is filled up.
*/
if(bit_is_clear(VS_DREQ_PIN, VS_DREQ_BIT)) {
break;
}
}
/*
* If the transfer stopped because the decoder
* clears the DREQ signal, it still has room
* for 32 bytes.
*/
if(tx_act) {
for(yd = 32; yd; yd--) {
sbi(VS_BSYNC_PORT, VS_BSYNC_BIT);
outp(*tx_ptr, SPDR);
asm volatile("nop\n\tnop\n\tnop");
cbi(VS_BSYNC_PORT, VS_BSYNC_BIT);
if(++tx_ptr > mem_flip)
tx_ptr = mem_start;
loop_until_bit_is_set(SPSR, SPIF);
/*
* Stop transfer if our data buffer is empty.
*/
if(tx_ptr == wr_ptr) {
tx_act = 0;
break;
}
}
}
}
NutEventPostAsync(&q_dreq);
}
/*!
* \brief Write a byte to the serial control interface.
*/
static inline void VsSciPutByte(u_char data)
{
u_char mask = 0x80;
/*
* Loop until all 8 bits are processed.
*/
while(mask) {
/*
96
* Set data line.
*/
if(data & mask)
sbi(VS_SI_PORT, VS_SI_BIT);
else
cbi(VS_SI_PORT, VS_SI_BIT);
/*
* Toggle clock and shift mask.
*/
sbi(VS_SCK_PORT, VS_SCK_BIT);
mask >>= 1;
cbi(VS_SCK_PORT, VS_SCK_BIT);
}
}
/*
* Write a word to the VS1001 command interface.
*/
static void VsWriteReg(u_char reg, u_short data)
{
/*
* Disable interrupts and select chip.
*/
cli();
//asm volatile("cli");
cbi(VS_XCS_PORT, VS_XCS_BIT);
cbi(SPCR, SPE);
//outp(BV(MSTR) | BV(SPE), SPCR);
VsSciPutByte(VS_OPCODE_WRITE);
VsSciPutByte(reg);
VsSciPutByte((u_char)(data >> 8));
VsSciPutByte((u_char)data);
/*
* Added on Jesper's recommendation.
*/
if(writeDelay)
NutDelay(writeDelay);
/*
* Re-enable SPI. Changed due to a hint by Jesper.
*/
outp(BV(MSTR) | BV(SPE), SPCR);
outp(inp(SPSR), SPSR);
/*
* Deselect chip and enable interrupts.
*/
sbi(VS_XCS_PORT, VS_XCS_BIT);
// asm volatile("sei");
sei();
}
/*
* Write a byte to the VS1001 data interface.
*/
static inline void VsSend(u_char b)
97
{
/*
* Set BSYNC high.
*/
sbi(VS_BSYNC_PORT, VS_BSYNC_BIT);
outp(b, SPDR);
asm volatile("nop\n\tnop\n\tnop\n\tnop\n\tnop\n\tnop");
/*
* Set BSYNC back to low.
*/
cbi(VS_BSYNC_PORT, VS_BSYNC_BIT);
loop_until_bit_is_set(SPSR, SPIF);
}
/*
* VS1001 software reset.
*/
void VsReset(u_short mode)
{
int i;
/*
* Software reset.
*/
VsWriteReg(VS_MODE_REG, VS_SM_RESET);
NutDelay(2);
/*
* Wait for DREQ.
*/
loop_until_bit_is_set(VS_DREQ_PIN, VS_DREQ_BIT);
//NutDelay(200);
VsWriteReg(VS_CLOCKF_REG, 0x9800);
for(i = 0; i < 1024; i++)
VsSend(0);
/*
* Set configured modes
*/
VsWriteReg(VS_MODE_REG, mode);
}
/*
* Set volume.
*/
void VsSetVolume(u_char left, u_char right)
{
VsWriteReg(VS_VOL_REG, (((u_short)left) << 8) | (u_short)right);
}
/*
* Sine wave beep.
*/
void VsBeep(u_char fsin, u_char ms)
{
u_char i;
98
u_char on[] = { 0x53, 0xEF, 0x6E, 56 };
u_char off[] = { 0x45, 0x78, 0x69, 0x74 };
on[3] += (fsin & 7) * 9;
for(i = 0; i < sizeof(on); i++)
VsSend(on[i]);
for(i = 0; i < 8; i++)
VsSend(0);
NutDelay(ms);
for(i = 0; i < sizeof(off); i++)
VsSend(off[i]);
for(i = 0; i < 8; i++)
VsSend(0);
}
/*
* Initialize the VS1001 hardware interface.
*/
void VsInit(u_char wDelay)
{
writeDelay = wDelay;
/*
* Toggle MP3 hardware reset output.
*/
cbi(VS_RESET_PORT, VS_RESET_BIT);
sbi(VS_RESET_DDR, VS_RESET_BIT);
NutDelay(3);
sbi(VS_RESET_PORT, VS_RESET_BIT);
/*
* Set BSYNC output low.
*/
cbi(VS_BSYNC_PORT, VS_BSYNC_BIT);
sbi(VS_BSYNC_DDR, VS_BSYNC_BIT);
/*
* Set MP3 chip select output low.
*/
sbi(VS_XCS_PORT, VS_XCS_BIT);
sbi(VS_XCS_DDR, VS_XCS_BIT);
/*
* Set DREQ input with pullup.
*/
cbi(VS_DREQ_DDR, VS_DREQ_BIT);
sbi(VS_DREQ_PORT, VS_DREQ_BIT);
// setup serial data interface :
// clock = f/4
// select clock phase positive going in middle of data
// master mode
// enable SPI
// setup serial data I/O pins
/*
* Set MOSI output.
* FIXME: hi/lo?
99
*/
sbi(VS_SI_DDR, VS_SI_BIT);
/*
* Set SS to output for SPI master mode.
*/
sbi(VS_SS_DDR, VS_SS_BIT);
/*
* Set MISO to input.
*/
cbi(VS_SO_DDR, VS_SO_BIT);
/*
* Set SCK output low.
*/
sbi(VS_SCK_DDR, VS_SCK_BIT);
cbi(VS_SCK_PORT, VS_SCK_BIT);
outp(BV(MSTR) | BV(SPE), SPCR);
inp(SPSR); // clear status
}
100