1
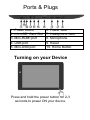
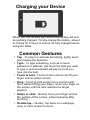
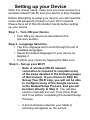
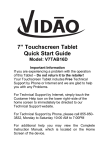
9” Touchscreen Tablet Quick Start Guide Model: V9TAB16D Important Information If you are experiencing a problem with the operation of this Tablet – Do not return it to the retailer! Your Touchscreen Tablet includes Free Technical Support by Phone or Internet and we are glad to help you with any Problems. For Technical Support by Internet, simply touch the Customer Help icon on the lower right–side of the home screen to immediately be directed to our Technical Support website. For Technical Support by Phone, please call 855-8503832, Monday to Saturday 10:00 AM to 7:00PM For additional help you may view the Complete Instruction Manual, which is located on the Home Screen of the device. Ports & Plugs 1. Power button 6. Power Jack ® 2. microSD Card Slot 7. Headphone Jack 3. Mini-HDMI port 8. Microphone 4. USB port 5. Mini-USB port 9. Reset 10. Home Button Turning on your Device Press and hold the power button for 2-3 seconds to power ON your device. Charging your Device When you first receive your device the battery will only be partially charged. To fully charge the battery, allow it to charge for 5 hours to ensure it’s fully charged before using the tablet. Common Gestures • Tap - To select or activate something, lightly touch and release the selection. • Type - To type something, such as a name, password or address, just touch the field you want to type in and a keyboard will pop up to let you type into the field. • Touch & hold - Touch an item and do not lift your finger until an action occurs. • Drag - Touch & hold an item for a moment and then, without lifting your finger, move your finger on the screen until the item reaches the target position. • Swipe or slide - Quickly move your finger across the surface of the screen, without pausing after touching • Double-tap – Quickly Tap twice on a webpage, map, or other screen to zoom. Setting up your Device Note: For proper setup, make sure you have access to a wireless network (Wi-Fi) and your device is fully charged. Before attempting to setup your device, you will need the name and password (if used) of your Wi-Fi network. Please have all of this information handy before setting up your device. Step 1 – Turn ON your Device • Turn ON your device as described in the previous section. Step 2 - Language Selection • Tap the Language list to scroll through the list of available languages. • Select the default language for your device by tapping it. • Confirm your choice by tapping the Start icon. Step 3 – Set-up your WI-FI o Note: A wireless (WI-FI) network connection is required to complete many of the steps detailed in the following pages of this manual. If you choose to Skip the Set-up Your WI-FI step, you will not be able to configure many of the Google services in the Guided Setup Process, and you will be taken directly to Step 9. You will also need to manually set your Time Zone, Date, and Time before completing the Guided Setup Process. o A list of wireless networks your tablet is receiving will appear on the screen. o Select the name of your WI-FI network from the list by tapping it. o If your WI-FI network is password protected, you will need to enter a password and a dialog box will appear for you to enter your password. o Tap the password line to make the tablet keyboard appear. § Check the “Show Password” box if you want to view your password instead of seeing, ****** § Passwords are case-sensitive and must be typed exactly as they were created. o After you type your password, tap the “Connect” icon § Wait for the network to connect as this may take 15-20 seconds. When the device has successfully connected to your WI-FI, the device automatically moves to the next step. If you are having problems connecting to your WI-FI network, contact our Customer Support Team. Step 4 – Got Google? A Google Account lets you organize and access your personal information from any computer or mobile device: • Never lose your contacts again. When you sign in to your device with a Google account, all the contacts you associate with that account in the People app are automatically backed up. As a result, they're always accessible through your Gmail account from any computer. • Synchronize and back up everything. Whether you draft an email, add a contact's phone number, add an event to your calendar, work gets backed up continuously by Google and synchronized with any computer where you use the same Google Account. • Access from anywhere. Check your latest calendar, email, text messages, or social stream, wherever you are, no matter what computer or mobile device you're using. • Use other Google services. Your Google Account also lets you take full advantage of any other Google apps and services that you may want to use, such as Gmail, Google Maps, Navigation, Google Play, YouTube, Google Talk, Messaging, and many more. Note: If you currently have an existing Gmail account, then you already have a Google Account. Your full Gmail email address and password will be used as the Sign In information for your Google Account. If you do not already have a free Google account, it is strongly recommended you set-up a free Google account when using the Setup wizard on this device in order to get the optimum use from this tablet. • Your device is designed to work with Google Mail (Gmail). If you don’t have a free Google account it is recommended you sign up for one. • If you already have a Google account tap the “Yes” icon and you will be taken to Step 6 – Setup your Wi-Fi • If you do not have a Google account tap the “No” icon and you will be taken to the Make it Google screen. Step 5 - Make it Google • To create a free Google account, tap the “Get an Account” icon. • On the next screen you will create a Username for your Google account. • Your Google account Username can also be used as a new email address, which will be (YourUsername)@gmail.com Note: If you don’t want to use Google Mail (Gmail) as your email provider, you can use a different email account from almost any provider with this tablet. This is explained fully in the E-mail section of the full manual found on the tablet. • If you don’t want to create a Gmail account, tap the “Not Now” icon. • After you made your selection you will be taken to the Wi-Fi setup. Step 6 – Sign in • Type in your Gmail address and your password • Tap the “NEXT” icon • Note: a dialog box will appear asking you to agree to the Google User License Agreement (ULA). • Tap “Yes” to agree • Tap “Cancel” to not agree and you will not be able to access the Google email system, or other related Google Apps. Step 7 – Entertainment You can quickly, easily, and securely purchase items from the Google Play store by safely storing your credit card information with 128-bit encryption in the Google Wallet System. • Tap the “Setup Credit Card” icon to securely & safely enter your credit card information. • Please review Google’s Privacy Information by tapping the icon before entering your personal information. • Tap the “Not Now” icon if you do not wish to use the Google Wallet feature, and move on to the next screen. Note: If you do not use Google Wallet you will need to enter your complete credit card information every time you wish to make a purchase from the Google Play Store. Step 8 – Backup and restore You can easily and automatically backup your apps, settings, music, photos, videos, books, website bookmarks, and other data to your Google account. • Check the options you would like to use. You can change them in your Settings at anytime. • When finished tap the “Right” arrow at the right hand bottom of the screen to continue. Step 9 – Use Google location You can use the Google location services to use the location data from your Wi-Fi network to help apps determine your approximate location when it’s available. This location data is used to: provide driving directions, find the nearest shops, restaurants, movie theaters, & more. • Check the options you would like to use. You can change them in your Settings at anytime. • When finished tap the “Next” icon at the right hand bottom of the screen to continue. o If you skipped Step 3 (Set-up your WI-FI), you will arrive at a screen where you will need to enter your Time & Date settings. Tap the Time Zone, Date, and Time fields to choose the correct settings. When finished tap the “Right” arrow at the bottom of the screen to continue. Step 10 – Setup Complete Your tablet is now setup and ready to use. • Tap the “Back” arrow to make additional changes. • Tap the “Finish” arrow to start using your tablet. For Additional Help: For additional help you may view the Full version of the Instruction Manual, which is located on the Home Screen of the device. Important Information If you are experiencing a problem with the operation of this Tablet – Do not return it to the retailer! Your Touchscreen Tablet includes Free Technical Support by Phone or Internet and we are glad to help you with any Problems. Technical Support For Technical Support by Internet, simply touch the Customer Help icon on the lower right–side of the home screen to immediately be directed to our Technical Support website. For Technical Support by Phone, please call 855-850-3832, Monday to Saturday 10:00 AM to 7:00PM. LIMITED ONE-YEAR WARRANTY We warrant this product to be free from defects in material and workmanship under normal use for a one-year period from the original date of purchase from an authorized VIDAO dealer. We will repair or replace the unit free of charge should it become defective under this warranty, providing you, the original purchaser, have your original dated sales receipt. To obtain warranty service or replacement within the one-year warranty period, please return the product with all parts and accessories along with your original dated store receipt to the original place of purchase and the unit will be exchanged at no charge. It is not necessary to contact the manufacturer for warranty replacement. Our Customer Support Center is available Monday - Saturday (10:00AM to 7:00PM EST) for technical assistance or troubleshooting. To contact us, please call 1-855-850-3832. This warranty applies only under conditions of normal use. This warranty does not cover any product which has been subject to damage due to an act of nature, misuse, neglect, accident, abuse, commercial use, or modification of, or to, any part of the product, including rooting the operating system and other software. Damage to any external media such as SD, microSD, USB devices, and/or other memory devices, or loss of data are not covered nor is the cost incurred in shipping the unit for warranty repair or exchange. Under no circumstances shall VIDAO be liable for any loss (direct, indirect, incidental, foreseen, unforeseen, special or consequential) or for any damage arising out of, or in connection with, the use of this product. VIDAO makes no guarantee, express or implied, as to the capability, performance, or quality of any third-party software or equipment used with this product. UNDER NO CIRCUMSTANCES WILL VIDAO BE LIABLE FOR ANY INCIDENTAL OR CONSEQUENTIAL DAMAGES. This warranty does not cover re-manufactured, refurbished, or repaired units, or any products sold 'As Is'. This warranty is valid only to the original purchaser of the Product in the United States and Canada and grants specific legal rights. © Schoenfeld International Inc. PN V9TAB16D Version 1.0 August 2013