1
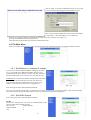
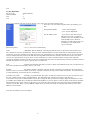
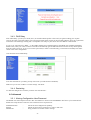
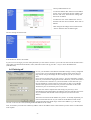
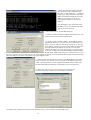
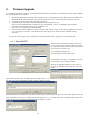
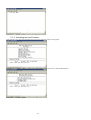
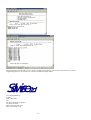
Solwise Ltd.
Quick setup instructions for
Asus AAM6000EV
ADSL Router
(read these notes whilst also referring to the manual supplied with the product)
-1-
-2-
Quick setup instructions for
Asus AAM6000EV ADSL Router
(read these notes whilst also referring to the manual supplied with the product)
Passwords. ..............................................................................................................................................................................4
Connecting to your network and line .....................................................................................................................................4
Basic Configuration................................................................................................................................................................4
3.1. Installing TCP protocol on your PC ...............................................................................................................................4
3.2. Checking your TCP/IP settings ......................................................................................................................................5
3.3. Running your Browser ...................................................................................................................................................5
3.4. The Main Menu ..............................................................................................................................................................6
3.4.1.
Set Ethernet i.e. configure IP settings.....................................................................................................................6
3.4.2.
Set ADSL Channel .................................................................................................................................................6
3.4.3.
DNS Relay..............................................................................................................................................................8
3.4.4.
Restarting................................................................................................................................................................8
3.5. Advanced........................................................................................................................................................................8
3.5.1.
Altering Configuration User/Password...................................................................................................................8
3.6. Finishing off ...................................................................................................................................................................9
4. Testing..................................................................................................................................................................................10
5. Firmware Upgrade................................................................................................................................................................12
5.1.1.
Setup BOOTP.......................................................................................................................................................12
5.1.2.
Setup TFTP...........................................................................................................................................................13
5.1.3.
Booting the Router ...............................................................................................................................................14
5.1.4.
Activating the new Firmware ...............................................................................................................................16
1.
2.
3.
-3-
1. Passwords.
Some levels of access in the firmware are password protected. Below shows the default password for the current firmware
version:
name
password
: adsl
: adsl1234
2. Connecting to your network and line
Referring to the product manual check the small switch on back of unit. For the purposes of initial router setup, we would
advise that you connect the LAN card of your computer and the router to a hub with no other clients connected: This is to
stop any problems that you might experience with IP clashes from other computers. Connect the LAN cable from the
socket marked ‘10/100 Base T’ on the router to a ‘normal’ port on your hub (i.e. not an uplink or cross-over port). After
you have gone through initial setup of the router (see below) you can then reconnect any other devices to your hub (taking
care with possible IP clashes). If you want to connect the router directly to the LAN card of your PC then you will need to
use a LAN crossover cable.
Then refer to the product manual and connect to the ADSL line using RJ11/RJ11 cable as supplied by your provider (if
you don’t have a cable then we can supply one for you) from the socket marked ‘Line’ on the back of the router.
3. Basic Configuration
The easiest way to configure the router is using a standard web browser (e.g. Explorer). You first of all need to check the
TCP/IP settings of your PC. Please note that the author is assuming you are using MS Windows (Win9x); please make
appropriate allowances if using another operating system or platform such as Apple or Linux. Please note that if there is
some reason why you cannot do configuration via a web browser then you will have to use console management via the
WAN port of the router connected to the serial port of your PC and then run a terminal application. To do this you will
require a 9 pin serial lead. Details on how to do configuration via the console port are given in the product manual. If you
are using console management then the following sections concerning TCP setup can be skipped and you can go direct to
the section concerning configuration from the Main Menu.
3.1. Installing TCP protocol on your PC
If you already use TCP/IP on your PC for LAN use then this section can be skipped.
Goto Start/Settings/Control Panel/Network....
If you already see a line showing TCP/IP protocol such as the
example shown left then you can skip this section.
Otherwise click on Add, then select Protocol and then click on
Add.. again. Then on the Select Network Protocol screen select
Microsoft/TCP/IP...
Click on OK and Windows will then add the protocol to your
network setup. You now need to check the settings of the TCP/IP protocol to ensure they are compatible with the router
setup. Details on how to do this are shown in the next section.
-4-
3.2. Checking your TCP/IP settings
The default IP address of the EV router is 192.168.1.1 on subnet mask 255.255.255.0. In simple terms this means that, in
order for your PC to talk to the router, the IP address of your PC’s should be in the range from 192.168.1.2 to
192.168.1.254. If you already use TCP as your default network protocol and you don’t use IP settings in the required range
then you will have to either permanently alter the settings of your computers to suite or change the default address of the
router. If you wish to alter the settings of all your PC’s to suite then it is probably best to ask the person in charge of your
network setup to do this for you. If you want to alter the router then you will have to temporarily change the settings for
your PC.
Goto network settings (Start/Settings/Control Panel/Network).
Scroll down the list of network settings until you find the entry
showing TCP/IP. There may be several such entries (see example);
the one you need is the entry associated with your network card.
Select it and then click on Properties:
Click on ‘Specify an IP address’ and, on the first screen (IP Address) enter a suitable address (e.g. as above) and the
subnet mask.
Now click on OK and, from the main Network screen click on OK.
Windows will now install the revised network settings; please note that your original Windows installation CD might be
required. You should then reboot your PC.
3.3. Running your Browser
After checking your connections and TCP settings (see above) you
are ready to run your browser in order to configure the router.
Any browser can be used on any operating system: The
configuration screens are the same. If you are using Explorer then
click on your Explorer icon to start your browser.
When your browser starts up first check that it’s using your LAN
for internet access. To do this in Explorer goto Tools/Internet
Options/Connections.
Then check that the setting ‘Never dial a connection’ is selected.
No other changes need to be made. If you’re using Netscape then
no configuration is required for your browser to automatically use
your LAN.
Now enter the address of the router on the Address/URL line of
your browser. The browser should then load the startup page from
the router:
-5-
Click in ‘Enter’ to goto the configuration logon (or if you wait
a few seconds this should happen automatically anyway).
(Don’t worry that the example above shows the router address
as 192.168.0.9 – this is the address we’ve used on our
network. If you left the addresses as default in the router then yours will show as 192.168.1.1).
Now enter the default user name and password.
Click OK and you should then goto the main configuration menu.
3.4. The Main Menu
After successfully entering the user name and password the main configuration menu will be shown similar to below:
3.4.1. Set Ethernet i.e. configure IP settings
If you want to alter the default IP address settings of the router
(e.g. if you already use a different IP address range for your
LAN) then below shows the basic outlines to do this. Note that
this is the address that your router uses for your internal LAN.
WARNING If you alter the IP address settings of the router then
remember that the TCP settings of your PC may have to be
altered to suite (this will especially be true if you are using
Telnet or web interface to do the router configuration).
Click on the quick Setup Wizard and then Ethernet:
Enter your new settings and then click on submit. If you change the settings then you will now have to alter the TCP settings
on your PC and also change the address that you enter on your browser to go into configuration.
3.4.2. Set ADSL Channel
Click on the quick Setup Wizard and then Channel:
For BT
The first four settings below will, as far as I understand this, be the
same for ANY ISP on the BT network.
Service Type
: PPPoA Routed.
Channel number
:1
VPI
:0
-6-
VCI
: 38
For KC RapidTime
Service Type
Channel number
VPI
VCI
: PPPoA Routed.
:1
:1
: 50
Then click on Submit. The next screen is then for you to setup your user name and password:
Now enter your user name and password as provided by your
ISP.
PPP starting status
Encapsulation Mode
: ‘Auto’ when using BT
: ‘LLC’ for KC Rapidtime.
Get IP Address from
: if you have a static IP from your
ISP then enter select ‘Customize’
and then enter your IP address in the
Wan IP Address box. However
normally your ISP will provide your
IP address so you should select
‘Service Provider’
: ‘UP’ i.e. start service automatically
DoD
: ‘DISABLE’ Dial on Demand – basically this tells the router to disconnect from the ISP if you
don’t use the service for a specified time. Then the router will automatically reconnect when there is an demand for internet
access from you LAN. Normally you would want the service permanently up i.e. DoD disabled BUT if you are worried about
security and unsolicited access from the ISP then selecting DoD means that the connection will break if you are away from
your PC for a period of time or if your don’t use the connection for a while. The Idle Timeout value specifies when the
connection should be dropped. Once the connection is dropped then the router will automatically reconnect if it detects internet
demand. Reconnection is very quick; typically just a second or two.
NAT
: normally this should be selected. If you have a block of IP addresses from your provider then you
may want to disable NAT and fully ‘expose’ your LAN.
IP Filter
: this feature enables or disables to IP filter firewall. Normally you would have this NOT ticked.
However if you run non-NAT mode, with a fully ‘exposed’ LAN then you may wish to enable this feature. You will then need
to setup IP filtering; see Network Service, IP Filtering.
Auto Discovery DNS...
: Normally you should enable this option. In order for internet access to work correctly from your
PC your computer needs to know the DNS address. The DNS allows the computer to translate a site name (e.g.
www.solwise.co.uk) into a valid IP address. If you have a single PC dial up connection using a single connection device such
as a USB or PCI modem then your ISP will send the DNS address to your PC when it connects. However this doesn’t normally
happen when using a router connection. However if you select this option then the router will record the given DNS when it
connects to your ISP. Then, if you use DHCP or DNS relay (see below) the router can automatically inform your PC what
address to use for DNS.
Now click on Submit to store the changes.
-7-
3.4.3. DNS Relay
With ‘DNS Relay’ you tell your clients (PC’s) to send their DNS requests to the router (as against sending your requests
through the router to the ISP’s DNS). The router then forwards those requests to the true DNS and then passes any replies back
to the client. The advantage of doing this is it simplifies TCP setup on your clients: One less address to find and set.
If you’ve set ‘Auto Discovery DNS....’ in the ADSL channel setup (as detailed above) then DNS relay should be enabled by
default. Then, when your router connects to the ISP it automatically gets the ISP DNS and can use this for any DNS requests
from the clients. However, if you’ve not set this option then, in order to use DNS relay you will need to manually enter these
values in the router configuration.
Goto Network Service/DNS Relay:
Now enter the DNS for your ISP (you may need to ask your ISP for this information).
Make sure you click on ‘Enable’ to set the settings. Jobs done!
3.4.4. Restarting
To make the changes have an effect you must now select Restart...
3.5. Advanced
3.5.1. Altering Configuration User/Password
The default user name and password are ‘adsl’ and ‘adsl1234’. However the AAM6000EV does allow you to both alter the
default user setup and also create new users with three levels of permission:
MAINTENANCE
SETUP
MONITOR
-
Full access and configuration capability
Similar to above but no permission to create or edit users
Only permission to read or monitor settings
-8-
Goto Sys-Maintenance/User:
To alter the default ‘adsl’ main user select EDIT
for the ‘Action’ then enter the user number (1 for
the first ‘adsl’ user). Then alter the settings and
then click on Submit.
To add a new user select ADD for the ‘Action’
and then enter the new user details. Then click on
Submit.
After doing all the changes select SAVE for the
‘Action’ and then click on Submit again.
The new settings are then stored:
You should now ‘Reset’ the modem.
If you ever loose or forget your user name/passwords you will need to connect to your router user the Console interface with a
serial cable (see full manual for details). Then, when the router boots up press the ‘?’ key to restore the default user
(adsl/adsl1234).
3.6. Finishing off
So now you should have the ethernet and ADSL settings correctly configured
on your router. If you altered the IP address settings of the router then you
may need to now go and change the TCP settings of your PC (or LAN) to
suite.
If you want to use the router via your LAN (i.e. not just connected to a single
PC) then you should now unplug the network cable from your PC and connect
it to a normal LAN connection on your network hub. At the same time you
must set the hub/pc switch on the rear of the router to ‘hub’. If you did this
with the router power still on then now press the reset button on the router.
Alternatively now reconnect the power to the router.
You will now need to complete the TCP settings of your PC(s). Goto
Start/Settings/Control Panel/Network and then select the TCP/IP protocol line
for your network card and then click on Properties (see above for more
details).
The first screen shows the IP Address for your PC. As already explained, you
need to ensure that each PC on your LAN has an IP address which is both
unique and within the subnet range of the routers address e.g. in the range
192.168.1.2 to 192.168.1.254 (assuming default IP address for the router).
Next, for each PC you must enter a Gateway address. This is the address of the router and tells your PC where to send internet
TCP requests:
-9-
Finally you must setup DNS Configuration on each PC:
Each PC MUST have the address for DNS entered in it’s TCP setting. If your
PC doesn’t have a DNS setting then it will not be able to find any internet
sites so it’s important that you have this set correctly!
On the DNS Configuration screen you must Enable DNS and then enter a
Host name; this can be anything you like – just a made up name will do!
If you’ve followed the instructions given above then your router will
automatically be doing a feature called ‘DNS relay’. With DNS relay you tell
your clients (PC’s) to send their DNS requests to the router (as against sending
your requests through the router to the ISP’s DNS). The router then forwards
those requests to the true DNS and then passes any replies back to the client.
Therefore, you need to ‘add’ the address of the router to the DNS list.
Finally click on OK and then OK from the main Network menu.
Windows will now install the revised network settings; please note that your
original Windows installation CD might be required. You should then reboot
your PC.
That’s all there is to the basic setup. The next section covers basic testing.
4. Testing
After doing a restart on the router the following things should happen.
1. Power, Status, Line and PC lights go on and then go out.
2. Then the PC light goes on and the Status LED should start to flicker; this indicates there is a line negotiation taking place.
3. If the Status does not come on or stays flickering all the time then there might be something wrong with the line.
4. After line synchronisation the Status light stays on and then the router verifies the user name and password. It is possible to
have a connection (Status light on) but no internet because of failure to logon.
5. Reconnect using your web browser (as shown above).
6. From the login screen enter your user name and password.
7. Then go ADSL Line Status.
If it says MODEM ACTIVATING then it’s not finding the line
or failing to synchronise. This could be because your ADSL
phone cable is not plugged in or maybe even faulty. Check and
retry.
- 10 -
8. Now drop into DOS (DON’T PANIC!
Just do start/run enter ‘command’ and
then click on OK) and at the ‘>’ command
prompt type ‘ping’ followed by the router
address (remember the DEFAULT router
address is 192.168.1.1 but if you’ve
changed this remember to use the new
address):
You should get a reply if not then check
the addresses of your computer match the
gateway (as shown below)....
9. Next, from your PC go Start/Run/winipcfg.
10. Make sure that the Ethernet Adapter Information is for your
actual network card (see the example below).
11. Check you have sensible numbers for IP address, Subnet,
and Default Gateway. If you just have 0.0.0.0 then either you
haven’t correctly setup you IP settings on your PC or, if trying
to use DHCP, you haven’t correctly setup DHCP on the router.
Also check that the IP address for your PC is on the same
subnet as the address given for the gateway e.g. if the gateway
is 192.168.1.1 then your computers should be addresses where
the first three numbers match e.g. PC’s could be 192.168.1.2 or
192.168.1.3 or 192.168.1.4 or 192.168.1.xx etc.. If the address of your PC does not match the subnet range of the gateway then
either the address of your PC or the gateway must be changed to suite.
12. Click on More Info and check you have a valid DNS address, if not then
check you have it set correctly in your IP settings or the DHCP setup on the
router... Remember that if you are using the DNS Relay feature of the router
then the DNS address should be the same address as the router/gateway.
13. Then start your browser. If using IE then goto Tools/Internet
Options/Connections. Check it says ‘Never dial a connection’
18. Finally enter a valid web site name on the ‘Address’ line e.g. www.solwise.co.uk! It should work!!
- 11 -
5.
Firmware Upgrade
To accomplish a firmware upgrade you will need the following software elements (it is assumed that you are using a standard
PC running Windows 9x or similar):
1.
2.
3.
4.
5.
The latest firmware file for upload. Contact Solwise direct or your dealer for this file. DO NOT GO TO THE ASUS
SITE FOR THIS. Solwise have their own, special firmware for UK use. You cannot get this from the Asus site.
A terminal programme such as Windows HyperTerminal.
A BOOTP server programme such as Weird Solutions’ BOOTP Server95: see
http://www.freedownloadscenter.com/Network_and_Internet/Misc__Server_Tools/BOOTP_Server95.html
A TFTP server programme such as Cisco TFTP Server: see
http://www.cisco.com/pcgi-bin/tablebuild.pl/tftp
You must have TCP/IP installed on your PC and ensure that your PC is setup on the same IP segment as your router.
e.g. if your router is 192.168.1.1 with mask 255.255.255.0 then your PC must also have an address starting
192.168.1.......
You will also need a 9-pin to 9-pin serial lead. Your dealer should be able to supply you with a suitable cable.
5.1.1. Setup BOOTP
With the router switched off connect it to the com
port of your PC and run HyperTerminal (or similar)
as per the instructions given in the full user guide but
don’t switch your router on yet.
Next run BOOTP and goto the
Service/Properties/Clients setup screen:
On this setup screen select <no template> then click
on New to enter a new hardware address:
Enter the 12 digit MAC address of your router as
given on the underside of the router case. The click
on OK.
Then select Boot file on the ‘Available options’ list and click on ‘>>’ to transfer this to the ‘Configured options’ then click on
the ‘Boot file’ entry to highlight it and then on Edit to change it’s Value:
Enter the name of your firmware file e.g. uk-solwise.hex. Don’t include any drive or directory in the name. Then click on OK.
Then select IP Boot file on the ‘Available options’ list and click on ‘>>’ to transfer this to the ‘Configured options’ then click
on the ‘IP file’ entry to highlight it and then on Edit to change it’s Value:
- 12 -
Enter the IP address of your router; the default address of the AAM6000EV is normally 192.168.1.1. (NOT as shown in the
example above!!). Then click on OK.
Finally click on close to return to the main BOOTP screen:
5.1.2. Setup TFTP
Run the Cisco TFTP server programme and goto View/Options:
Click on Browse and enter the directory which contains your firmware file. e.g. if your firmware file is called ‘C:\ADSL\UKSOLWISE.HEX’ then c:\adsl is the server directory (and uk-solwise.hex is the ‘Boot file’ name as required with the BOOTP
programme).
The select OK:
- 13 -
5.1.3. Booting the Router
Now that you have the various software programmes (Terminal/BOOTP/TFTP) setup you are ready to boot the router and auto
load the firmware file.
With HyperTerminal showing, hold down the ‘*’ key (Shift/8) and at the same time press the reset button on the rear of the
router. The following screen should then show on HyperTerminal:
Press E to boot from Ethernet.
The terminal screen should then show boot messages and start to down load the firmware file. At the same time the BOOTP
screen should show the router connecting:
- 14 -
and the TFTP screen should show the file downloading....
When the file download is finished the TFTP shows:
and HyperTerminal clears to the logon prompt:
- 15 -
5.1.4. Activating the new Firmware
After entering your user name and password (see above) the main setup screen appears:
You now need to tell the router to activate the new firmware. To do this select 6. System Maintenance:
Now select 3. Firmware Update.....
- 16 -
When finished you are advised to reset to Factory Configuration (option 2.) however this will remove any custom
programming/setup so you will have to re-enter your ISP and routing details.
Solwise Ltd.
13/15 Springfield Way
Anlaby
Hull HU10 6RJ
UK
Tel 0845 458 4558 (local rate)
Fax 0845 458 4559
Email [email protected]
Http www.solwise.co.uk
- 17 -