1
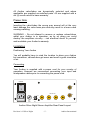
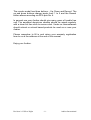
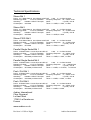
Silver Night
Power Amplifiers
User Manual
Models Covered
Stereo 300B - 7 Watt Mk1 & 2
Stereo Integrated 300B - 7 Watt Mk1 & 2
Stereo PX25 Mk2 – 8 Watt
Stereo Integrated PX25 - 8 Watt Mk2
Parallel Single Ended 300B Mk1 & 2
Push Pull 300B Mk1
Revision 1.02 Silver Night
-1-
Audion International
Introduction
Congratulations on your purchase of the World acclaimed “Silver
Night” triode amplifier from Audion.
Your Audion Amplifier is the result of nearly 20 years’ exhaustive
research and development culminating in our current world class
product. The chassis is made of anodised aluminium designed to
minimise magnetic interference and reduce internal noise to an
absolute minimum. All our amplifiers are hand built using only the
finest components available our Mark 2 range is entirely hard
wired offering even better quality.
Our new look corporate colouring Blue, Red and now Black are
available for both our Mark 1 and 2 ranges and represent our
guarantee to you of quality.
Warranty
All of our products carry a 2 (two) year worldwide parts and labour
warranty (less delivery charges). All valves/tubes are guaranteed
for a period of 6 (six) months. This does not affect your statutory
rights.
Revision 1.02 Silver Night
-2-
Audion International
Getting Started
Upon opening your box you will find:
1.
2.
3.
4.
5.
6.
Audion Amplifier
Power cord
This User Manual
Product Registration and Warranty form
Authenticity Certificate (Mark 2 versions only)
Valves/tubes
Please keep all packaging and store in a dry and safe place.
Carefully remove your Audion Amplifier from its packaging and
store both the box and the foam in a safe place, should, in the
unlikely event that you ever need to return your Audion to us for
maintenance, upgrading or servicing. The packaging has been
specifically designed to protect your amplifier.
Before attempting to connect your Audion please read carefully
and understand thoroughly the contents of this manual. Keep this
manual near you when installing your Audion so it is handy for
reference.
This manual is designed to assist both novice and experienced
persons in achieving satisfaction from your Audion. It describes the
features and operation.
Please Note.
As with any electrical product extreme caution should be
exercised. Do not place your Audion in direct sunlight. There are
no user serviceable parts inside. The valves/tubes run HOT in
normal operation, under no circumstance during operation should
they be touched. If it becomes necessary to replace a valve/tube
please allow at least 20 minutes from switching off for the unit to
cool down.
Revision 1.02 Silver Night
-3-
Audion International
Valves/Tubes
You will now need to place the valves/tubes into your Audion. The
Silver Night Mark 1 uses a 6922 in the left hand side front and a
5687 on the right hand side front. The Silver Night Mark 2 Stereo
and Push/Pull uses 6922’s in both the left and right hand sides.
The Silver Night P.S.E. uses a CVX100 in the left hand side and a
CVX120 in the right hand side. All Models use either 300B or PX25
valve/tubes in the rear sockets depending on the model ordered.
Revision 1.02 Silver Night
-4-
Audion International
All Audion valve/tubes are dynamically selected and where
applicable are supplied as matched pairs. All are supplied with a
six (6) month return to base warranty.
Please Note
Inserting the valve/tubes the wrong way around will at the very
least damage the valve base pins and may result in a loose valve
causing crackling.
WARNING – Do not attempt to remove or replace valves/tubes
whilst your Audion is in operation, as by so doing you could
destroy the amplifiers circuitry – risk electrical shock to yourself
and invalidate your Audion’s warranty.
Installation
Positioning Your Audion
You will probably have in mind the location to place your Audion
but remember, valves/tubes get warm and need a good circulation
of air.
Connecting
Your Audion is supplied with a power cord for your country of
operation. However we recommend connecting your input and
loudspeaker cables prior to connecting the power cord.
POWER
0
L
1
OUTPUTS
R
OFF
ON
H.T.
fuse
Ground
lift
GND
RIGHT
LEFT
GND
Audion Silver Night Stereo Amplifier Rear Panel Layout
Revision 1.02 Silver Night
-5-
Audion International
POWER
5
TAPE
INPUTS
3
4
2
1
0
L
1
R
OUTPUTS
OFF
ON
H.T.
fuse
Ground
lift
GND
RIGHT
LEFT
GND
Audion Silver Night Integrated / Remote Amplifier Rear Panel
POWER
0
INPUT
1
OUTPUTS
Off
On
H.T.
fuse
Ground
lift
1
2
3
4
Audion Silver Night Mono-block Amplifier Rear Panel
First connect audio input leads to the input RCA connectors. In the
case of the integrated / remote models , connect all audio input
leads. The top white sockets are for the Left input(s) the bottom
red sockets are for the Right channel(s).
Next, connect the loudspeaker cables to your Audion. For all
Stereo models the left and right channels are marked by red/black
colouring and also ground & channel name; ie left, right etc. Your
loudspeaker cables should be of a suitable quality and connect to
the corresponding red/black binding posts of the loudspeaker. To
achieve the best from your Audion we recommend that your
loudspeakers have an efficiency of 89 db or higher.
Unless ordered specifically all the above models come with an 8
ohm output. The Mono-block Amplifiers come with 2 x 8 ohm
outputs marked 2 x black & 2 x red. These are designed for “Biamping”.
Revision 1.02 Silver Night
-6-
Audion International
The ground lift switch is used to effectively reduce a ground
feedback loop and hence noise from some installations.
Finally connect the power cord to a mains electricity supply.
Before proceeding – Are all the connections fitted correctly and
securely tightened?
Finally Check again – make sure everything is correct.
Using your Audion
Congratulations you are now ready to switch your Audion on. But
first we recommend turning the volume control on the front panel
anti-clockwise to zero. On the rear panel locate the on/off button.
Push the button downwards to position 1, this has now turned your
Audion on. You will notice if everything has been installed correctly
that your valves/tubes are starting to glow, your Audion is now
“Warming up”. We recommend that an initial few minutes is
allowed for the warm up process to take place. A valve/tube will
change its audio characteristics slightly once it has reached its
nominal operating temperature.
Select your sound source, CD, record, etc. and play. Once your
source has started playing adjust the volume control to your
required level.
On the Integrated model, the five switches correspond to the five
inputs on the rear and can be switched in and out accordingly.
1
2
3
4
5
MUTE
Audion Silver Night Integrated Amplifier Front Panel
Revision 1.02 Silver Night
-7-
Audion International
The remote model has three buttons – Up, Down and Record. The
up and down buttons change inputs from 1 to 5 and the Record
button allows recording via RCA pair No. 6.
In general use your Audion should give many years of trouble free
use. The anodised aluminium chassis should be wiped regularly
with a clean lint free cloth to remove dust. Under no circumstances
should solvent or solvent based products be used on or near your
Audion.
Please remember to fill in and return your warranty registration
form to us at the address at the end of this manual.
Enjoy your Audion.
Revision 1.02 Silver Night
-8-
Audion International
Technical Specifications
Stereo Mk 1
Power: 2 x 7 Watts Class A into 8 Ohms at 240V AC
Load: 4 – 16 Ohm Nominal
Distortion @ 1Watt:
<0.1% No Feedback
Frequency Response: 20 – 24KHz ±3 db
Sensitivity:
Variable >150mV Full output
Noise:
< (CCIR) – 90 db
Consumption: 145 Watts
Tubes: 2 x 300B, 1 x 5687, 1 x 6922
Stereo Mk 2
Power: 2 x 7 Watts Class A into 8 Ohms at 240V AC
Load: 4 – 16 Ohm Nominal
Distortion @ 1Watt:
<0.1% No Feedback
Frequency Response: 10 – 35 KHz ±3 db
Sensitivity:
Variable >150mV Full output
Noise:
< (CCIR) – 90 db
Consumption: 152 Watts
Tubes: 2 x 300B, 2 x 6922
Stereo PX25 Mk 2
Power: 2 x 8 Watts Class A into 8 Ohms at 240V AC
Load: 4 – 16 Ohm Nominal
Distortion @ 1Watt:
<0.1% No Feedback
Frequency Response: 15 – 33 KHz ±3 db
Sensitivity:
Variable >150mV Full output
Noise:
< (CCIR) – 90 db
Consumption: 157 Watts
Tubes: 2 x PX25, 2 x 6922
Parallel Single Ended Mk 1
Power: 18 Watts Class A into 8 Ohms at 240V AC
Load: 4 – 16 Ohm Nominal
Distortion @ 1Watt:
<0.1% No Feedback
Frequency Response: 10 – 35KHz ±3 db
Sensitivity:
Variable >150mV Full output
Noise:
< (CCIR) – 90 db
Consumption: 165 Watts per Mono-block
Tubes: 2 x 300B, 1 x 5687, 1 x 6922
Parallel Single Ended Mk 2
Power: 18 Watts Class A into 8 Ohms at 240V AC
Load: 4 – 16 Ohm Nominal
Distortion @ 1Watt:
<0.1% No Feedback
Frequency Response: <10 – >40KHz±3 db
Sensitivity:
Variable >150mV Full output
Noise:
< (CCIR) – 90 db
Consumption: 167 Watts per Mono-block
Tubes: 2 x 300B, 1 x CVX100, 1 x CVX120
Push / Pull Mk 1
Power: 24 Watts Class A into 8 Ohms at 240V AC
Load: 4 – 16 Ohm Nominal
Distortion @ 1Watt:
<0.1% No Feedback
Frequency Response: 11 – 30KHz ±3 db
Sensitivity:
Variable >150mV Full output
Noise:
< (CCIR) – 90 db
Consumption: 140 Watts per Mono-block
Tubes: 2 x 300B, 1 x 5687, 1 x 6922
Push / Pull Mk 2
Power: 25 Watts Class A into 8 Ohms at 240V AC
Load: 4 – 16 Ohm Nominal
Distortion @ 1Watt:
<0.1% No Feedback
Frequency Response: 20 – 35KHz ±3 db
Sensitivity:
Variable >150mV Full output
Noise:
< (CCIR) – 90 db
Consumption: 165 Watts per Mono-block
Tubes: 2 x 300B, 2 x 6922
Audion International
Chez Reynaud
Le Haut Mont
17360, La Genetouze
France
www.audion.co.uk
Revision 1.02 Silver Night
-9-
Audion International