1
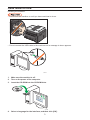
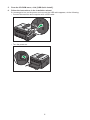
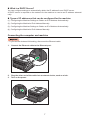
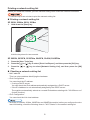
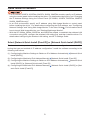
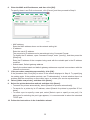
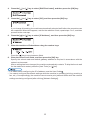
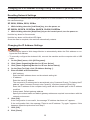
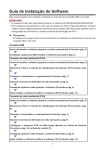
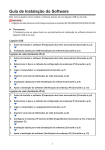
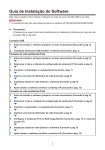
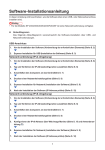
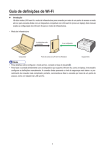
Software Installation Guide This manual explains how to install the software over a USB or network connection. • Network connection is not available for models SP 200/200S/203S/203SF/204SF. • To manually configure the wireless LAN setting via Smart Organizing Monitor, first install Smart Organizing Monitor via a USB connection. For details about configuring the wireless LAN setting, see Wi-Fi Settings Guide. Flowchart The following flowchart illustrates the software installation procedures over USB and network connections. USB Connection Before Installing the Software (Preparing the Necessary Items) (See p.2) Quick Install for USB (Installing the Software) (See p.3) Network Connection (IPv4 Environment) Before Installing the Software (Preparing the Necessary Items) (See p.6) Selecting the Type and Method of IP Address Configuration (See p.6) Connecting the Computer and Machine (See p.7) Printing a Network Setting List (See p.8) Quick Install for Network (Installing the Software) (See p.9) After Installing the Software (Checking the IP Address) (See p.13) Network Connection (IPv6 Environment) Before Installing the Software (Preparing the Necessary Items) (See p.6) Selecting the Type and Method of IP Address Configuration (See p.6) Connecting the Computer and Machine (See p.7) Printing a Network Setting List (See p.8) Configuring the IPv6 Address via Web Image Monitor or Control Panel (See p.16 and the User Guide ) Quick Install for Network (Installing the Software) (See p.9) After Installing the Software (Checking the IP Address) (See p.13) 1 1. Connecting the Computer and Installing the Software (USB Connection) Connect the machine and computer with the USB cable, and then click [USB Quick Install] to install the software. CTT177 1. USB Quick Install • SP 200, 200N, 200Nw, 201N, 201Nw tor. • SP 200S, 202SN, 203S, 204SN ganizing Monitor. Install the printer driver and Smart Organizing Moni- Install the printer driver, TWAIN/WIA driver, and Smart Or- • SP 203SF, 203SFN, 203SFNw, 204SF, 204SFN, 204SFNw WIA driver, PC FAX driver, and Smart Organizing Monitor. Install the printer driver, TWAIN/ Before Installing the Software To install the software over a USB connection, a USB cable and the supplied CD-ROM are required. 2 Quick Install for USB Installing the software. • Do not turn the machine on until you have read how to do so. CTT136 • Do not connect the USB cable to the machine until a message to do so appears. CXP122 1. Make sure the machine is off. 2. Turn on the power of the computer. 3. Insert the CD-ROM into the CD-ROM drive. 4. Select a language for the interface, and then click [OK]. CXP066 3 5. From the CD-ROM menu, click [USB Quick Install]. 6. Follow the instructions in the installation wizard. If a message to turn on the power and connect the USB cable appears, do the following: • Connect the machine and computer with a USB cable. CTT137 • Turn the power on. CTT061 4 2. Connecting the Computer and Installing the Software (Network Connection) • Network connection is not available for models SP 200/200S/203S/203SF/204SF. • Ethernet and wireless LAN settings cannot be enabled at the same time. Connect the machine and computer with the Ethernet cable, and then click [Network Quick Install (DHCP)] or [Network Quick Install (Fixed IP)] to install the software. CTT178 1. Network Quick Install (DHCP) 2. Network Quick Install (Fixed IP) • SP 200N, 200Nw, 201N, 201Nw • SP 202SN, 204SN tor. Install the printer driver and Smart Organizing Monitor. Install the printer driver, TWAIN/WIA driver, and Smart Organizing Moni- • SP 203SFN, 203SFNw, 204SFN, 204SFNw FAX driver, and Smart Organizing Monitor. Install the printer driver, TWAIN/WIA driver, PC 5 Before Installing the Software To install the software over a network connection, a Ethernet cable and the supplied CD-ROM are required. To automatically obtain the IP address, a router with a built-in DHCP server is required. Selecting the type and method of IP address configuration What is an IP Address? The IP address is an identification number allocated to computers and other devices connected to an IP network. An IP address is an address for use on a network. There are two types of IP address: IPv4 and IPv6. • IPv4 address The IPv4 address consists of four fields, such as "192.168.0.113". The first three fields (192.168.0) are fixed, and the last one (113) is variable. 192.168.0. 113 1 2 CTT179 1. Fixed part 2. Variable part To manage the network, only the variable part needs to be changed. 1 192.168.0.111 2 3 192.168.0.112 4 192.168.0.113 192.168.0.115 CTT180 1. Router 2. Another computer 3. Machine 4. Your computer • IPv6 address Because IPv4 addresses are running out as a result of the widespread use of the Internet, IPv6 has been developed as a next generation Internet protocol. 6 What is a DHCP Server? You can configure settings to automatically obtain the IP address from a DHCP server. A DHCP server is required on the network for the machine to receive an IP address automatically. Types of IP addresses that can be configured for the machine (1) Configuring the Machine Settings to Obtain an IPv4 Address Automatically (2) Configuring the Machine's IPv4 Address Manually (3) Configuring the Machine Settings to Obtain an IPv6 Address Automatically (4) Configuring the Machine's IPv6 Address Manually Connecting the computer and machine • If you use the wireless LAN setting, disconnect the Ethernet cable. 1. Connect the Ethernet cable to the Ethernet port. 2. Plug the other end of the cable into a network device, such as a hub. 3. Turn on the power. CTT138 CTT061 7 Printing a network setting list Before you install the software, print the network setting list to check the network information. • It can take up to two minutes to print the network setting list. Printing a network setting list SP 200N, 200Nw, 201N, 201Nw 1. Hold down the [Start] key. CTT175 Hold the key down for two seconds. SP 202SN, 203SFN, 203SFNw, 204SFN, 204SN, 204SFNw 1. Press the [User Tools] key. 2. Press the [ ] or [ 3. Press the [ key. ] or [ ] key to select [Print List/Report], and then press the [OK] key. ] key to select [Network Setting List], and then press the [OK] Checking a network setting list • MAC address This is a unique address identifying the hardware. • IPv4 Configuration You can check the IP address. • If using a DHCP server: You can check the IPv4 address automatically assigned by a DHCP server. • If the IPv4 address is not automatically assigned by the DHCP server: The machine automatically selects an unused IPv4 address starting with "169.254.xxx.xxx" (AutoIP function). • IPv6 Configuration You can check the Link-local address. • With the SP 200Nw, 201Nw, 203SFNw, and 204SFNw models, before you configure the wireless LAN setting, check the following items in "Wi-Fi Status" in the network setting list. 8 Quick Install for Network • For SP 202SN, 203SFN, 203SFNw, 204SFN, 204SN, 204SFNw models, specify an IP address using the control panel before installing the driver. For details about doing this, see "Changing the IP Address Settings Using the Control Panel (SP 202SN, 203SFN, 203SFNw, 204SFN, 204SN, 204SFNw only)". • In an IPv6 environment, specify an IP address using Web Image Monitor or control panel before installing the driver. For details about configuring the IPv6 address, see "Configuring Network Settings" and "Using Web Image Monitor" in the User Guide . For information about how to launch Web Image Monitor, see "Starting Web Image Monitor". • With the SP 200Nw, 201Nw, 203SFNw, and 204SFNw models, to establish the wireless LAN connection using WPS, configure the wireless LAN setting first, and then install the driver. For details about configuring the wireless LAN setting, see Wi-Fi Settings Guide. Select [Network Quick Install (Fixed IP)] or [Network Quick Install (DHCP)] The item to select depends on the type and method of IP address configuration selected in "Selecting the type and method of IP address configuration". Install the software according to the following instructions. (1) Configuring the Machine Settings to Obtain an IPv4 Address Automatically Install (DHCP)] (2) Configuring the Machine's IPv4 Address Manually [Network Quick Install (Fixed IP)] (3) Configuring the Machine Settings to Obtain an IPv6 Address Automatically Install (DHCP)] or [Network Quick Install (Fixed IP)] (4) Configuring the Machine's IPv6 Address Manually work Quick Install (Fixed IP)] 9 [Network Quick [Network Quick [Network Quick Install (DHCP)] or [Net- Selecting [Network Quick Install (DHCP)] 1. Turn on the power of the computer. Quit all applications currently running. 2. Insert the CD-ROM into the CD-ROM drive. CXP066 3. Select a language for the interface, and then click [OK]. 4. From the CD-ROM menu, click [Network Quick Install (DHCP)]. CTT193 5. Read the entire license agreement carefully. If you accept its terms, click [I accept the agreement.], and then click [Next >]. 6. Select [Add a new printer], and then click [Next>]. 7. Select the printer detection method, and then click [Next>]. • To search for printers automatically, select [Search for printers automatically]. • To search for a printer by its IP address, select [Search for printers by specified IP Address]. • To select a port or specify a new port, select [Select a port or specify a new port]. If a dialog box for selecting the port type appears, it is recommended to select the standard TCP/IP port. 8. Follow the instructions in the installation wizard. 10 Selecting [Network Quick Install (Fixed IP)] 1. Turn on the power of the computer. Quit all applications currently running. 2. Insert the CD-ROM into the CD-ROM drive. CXP066 3. Select a language for the interface, and then click [OK]. 4. From the CD-ROM menu, click [Network Quick Install (Fixed IP)]. CTT190 5. Read the entire license agreement carefully. If you accept its terms, click [I accept the agreement.], and then click [Next >]. 11 6. Enter the MAC and IP addresses, and then click [OK]. To specify these in an IPv6 environment, click [Cancel], and then proceed to Step 8. CTT191 • MAC address Enter the MAC address shown on the network setting list. • IP address Enter the user's IP address. The computer's IP address can be ascertained using Command Prompt. To display the IP address, open Command Prompt, enter "ipconfig", and then press the [Enter] key. Enter the IP address of the computer being used with the variable part in the IP address modified. • Subnet mask, Default gateway address Specify the subnet mask and default gateway address as required in accordance with the network environment. 7. If the procedure completes successfully, click [OK]. If the procedure fails, click [OK] to return to the window displayed in Step 6. Try specifying the setting again. If the problem persists, see "Troubleshooting" to check whether there is a problem with the connection or some other issue, or contact your service representative. 8. Select [Add a new printer], and then click [Next>]. 9. Select the printer detection method, and then click [Next>]. • To search for printers automatically, select [Search for printers automatically]. • To search for a printer by its IP address, select [Search for printers by specified IP Address]. • To select a port or specify a new port, select [Select a port or specify a new port]. If a dialog box for selecting the port type appears, it is recommended to select the standard TCP/IP port. 10. Follow the instructions in the installation wizard. 12 After Installing the Software Checking a network setting list Check the network setting list to see whether the configured IP address setting has been applied. For details about printing the network setting list, see "Printing a network setting list". 13 3. Changing the IP Address Settings Changing the IP Address Settings Using the Control Panel (SP 202SN, 203SFN, 203SFNw, 204SFN, 204SN, 204SFNw only) • With the SP 203SFNw and 204SFNw models, select [Wireless LAN] in [LAN Type] to establish the wireless LAN connection or select [Ethernet] in [LAN Type] to establish the wired LAN connection. Configuring the Machine Settings to Obtain an IPv4 Address Automatically 1. Press the [User Tools] key. 2. Press the [ ] or [ ] key to select [Network Settings], and then press the [OK] key. With the SP 203SFNw and 204SFNw models, to establish the wireless LAN connection, select [Wi-Fi Settings] in [Network Settings]. 3. Press the [ key. ] or [ 4. Press the [ ] or [ 5. Make sure [DHCP Activated] is set to [On]. ] key to select [Machine IPv4 Address], and then press the [OK] ] key to select [DHCP Activated], and then press the [OK] key. After a setting has been changed, the machine automatically restarts. To skip the time to wait for the machine to restart, press the [User Tools] or [ ] key. Configuring the Machine's IPv4 Address Manually 1. Press the [User Tools] key. 2. Press the [ ] or [ ] key to select [Network Settings], and then press the [OK] key. With the SP 203SFNw and 204SFNw models, to establish the wireless LAN connection, select [Wi-Fi Settings] in [Network Settings]. 3. Press the [ key. ] or [ ] key to select [Machine IPv4 Address], and then press the [OK] 14 4. Press the [ ] or [ ] key to select [DHCP Activated], and then press the [OK] key. 5. Press the [ ] or [ ] key to select [Off], and then press the [OK] key. If you change this setting, the machine automatically reboots itself before the procedure can be completed. When this happens, wait for the reboot to finish, repeat steps 1 to 3, and then proceed to the next step. 6. Press the [ 7. Enter the machine’s IPv4 address using the number keys. Press the [ 8. ] or [ ] key to select [IP Address] , and then press the [OK] key. ] key to move between fields. Enter the values in all fields, and then press the [OK] key. Specify the subnet mask and default gateway address as required in accordance with the network environment. After a setting has been changed, the machine automatically restarts. To skip the time to wait for the machine to restart, press the [User Tools] or [ ] key. • For details about configuring the IPv6 address, see the User Guide . • You cannot configure the network settings while the machine is operating (printing, receiving a fax, etc.). Correspondingly, the machine cannot receive print jobs and faxes while the network settings are being configured (after clicking [Network Settings]). 15 Changing the IP Address Settings Using the Web Image Monitor • With the SP 200Nw and 201Nw models, select [Wireless LAN] in [LAN Type] to establish the wireless LAN connection or select [Ethernet] in [LAN Type] to establish the wired LAN connection. Starting Web Image Monitor 1. Launch the Web browser. 2. In the address bar, enter "http://(machine's IP address)/". • IPv4 Address Enter the IP address shown on the network setting list. Use a computer using the IP address shown on the network setting list with its variable part modified. • IPv6 Address Enter the IP address shown in "Link-local Address" in the network setting list. Enclose the IP address in square brackets, thus: "http:/[fe80:226:73ff:fe47:62e]/". 3. Click [Log in]. 4. Enter the administrator password, and then click [Log in]. If you are logging in for the first time, enter "admin133" as the password. Configuring the Machine Settings to Obtain an IPv4 Address Automatically Check that [DHCP] is set to [Enable] in [IPv4] in Web Image Monitor. If [DHCP] is set to [Enable], the machine can automatically obtain the IP address. CTT163 16 Configuring the machine's IPv4 address manually 1. Launch Web Image Monitor and log in. 2. Click [IPv4]. 3. Set [DHCP] to [Disable]. CTT167 4. Specify the IP address in [IPv4 Address]. Specify the subnet mask and default gateway address as required in accordance with the network environment. 5. Specify other settings if necessary. 6. Click [OK]. • For details about configuring the IPv6 address, see the User Guide . 17 Changing the IPv4 Address Settings Using the Smart Organizing Monitor Resetting Network Settings To change the IP address after moving the machine or in other situations, it is necessary to reset the network settings. SP 200N, 200Nw, 201N, 201Nw 1. While holding down the [Job Reset] key, turn the power on. SP 202SN, 203SFN, 203SFNw, 204SFN, 204SN, 204SFNw 1. While holding down the [Stop/Clear] key on the control panel, turn the power on. Hold the key down for five seconds. Hold the key down until the Alert LED lights. Once the reset is complete, the machine automatically restarts. Changing the IP Address Settings • Use the control panel or Web Image Monitor to automatically obtain the IPv4 address or configure the IPv6 address. • To manually configure the wireless LAN, connect the machine and the computer with a USB cable. 1. On the [Start] menu, click [All Programs]. 2. Click [Smart Organizing Monitor for SP xxx Series]. 3. Click [Smart Organizing Monitor for SP xxx Series Status]. 4. On the [User Tool] tab, click [IP Address Setting...]. 5. Enter the MAC and IP addresses. • MAC address Enter the MAC address shown on the network setting list. • IP address Enter the user's IP address. The computer's IP address can be ascertained using Command Prompt. To display the IP address, open Command Prompt, enter "ipconfig", and then press the [Enter] key. Enter the IP address of the computer being used with the variable part in the IP address modified. • Subnet mask, Default gateway address Specify the subnet mask and default gateway address as required in accordance with the network environment. 6. Click [OK]. If the configuration is successful, the message "IP address has been set." appears. If the configuration fails, the message "Failed to set IP address. Try again." appears. If this happens, repeat the procedure from Step 5. 7. Click [OK]. 8. Click [Close]. 18 4. Troubleshooting USB Connection The USB cable may not be connected properly. Check that the USB cable is connected properly and is undamaged. The CD-ROM may not be inserted properly. Check that the CD-ROM is inserted properly. Check also that it is not damaged and the CDROM drive is working properly. Other applications are not closed. When installing software, quit all other applications. Installation may be disrupted if other applications are open. Also, quit any anti-virus applications that are running. The machine is turned on before installation. Turn the machine off and then on, and then try "USB Quick Install" again. Network Connection The Ethernet cable may not be connected properly. Check that the Ethernet cable is connected properly and is undamaged. The CD-ROM may not be inserted properly. Check that the CD-ROM is inserted properly. Check also that it is not damaged and the CDROM drive is working properly. The machine's IP address has not been configured, or the machine and computer are not on the same network. If the machine does not appear on the network, its IP address has not been configured or it is on a different network from the computer. In the event of such a problem, check the machine's IP address and network configuration. The machine is unable to automatically obtain the IP address. Check whether the DHCP server is working. Network settings have not been reset. To change the IP address via Smart Organizing Monitor, it is necessary to reset network settings. For details, see "Resetting Network Settings". 19 EN GB 20 EN US EN AU © 2013 M143-8635