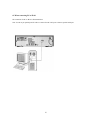
1
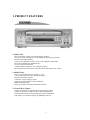
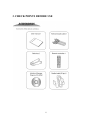
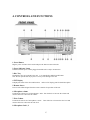
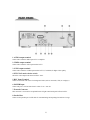
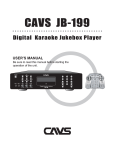
2
3
4
Digital Jukebox CAVS JB-99
CAVS JB-99 Player is a versatile music machine designed to meet the demands of professional DJs and KJs. It
is a three-in-one machine, combining the functions of a multi-disc player (plays audio CD, CD+G, video CD), a
disc changer (holds up to 20,000 CD and CD+G songs), and a jukebox (accesses any song instantly). Yet
CAVS JB-99 is a unit that is as small as a home CD player. This marvel is achieved by using the latest digital
technology, MP3 + Graphics.
Contents
1. Product Features
2. Safety/Precautions
3. Check Points Before Use
4. Controls And Functions
5. Using Remote Controllers
6. How To Connect
7. How To Operate
Jukebox Play
Disc Play
CDG Capture
System Setup
Sound Control
8. How To Use DataCD
9. How To Upgrade JB-99
10. Optional Features
11. Trouble Shooting
12. Specification
6
7
13
15
23
25
30
31
34
37
47
49
50
51
52
53
56
5
1. PRODUCT FEATURES
1. Jukebox Play
Play CD and CD+G songs from internal memory of JB-99.
Store up to 20,000 CD and CD+G songs (additional song capacity optional).
Built-in 4 band audio equalizer.
Tempo control, Digital key control, Voice cancel (multiplex) and Fanfare.
Reservation, Random play and Repeat play.
On-screen song selection menu.
Songlist manager program for easy editing and printing.
BGV (background video) picture from both internal and external video sources.
2. Multi-CD Play
Play CD, CD+G and video CD (version 1.1, 2.0).
3-disc carousel that allows disc changes during play.
Built-in 4 band audio equalizer.
Continuous / Single song play option.
Digital key control and Voice cancel (multiplex).
Random and Repeat play.
PBC play, Resume, Time, Intro and Search functions.
3. CD and CD+G Capture
Capture CD and CD+G songs directly from CD and CD+G discs.
Capture CD and CD+G songs from WAV, MP3, RW, BIN files.
Download CD and CD+G songs from Internet and CAVS DataCD.
Edit, update, save and print song lists by JBManager software.
6
2. SAFETY/PRECAUTIONS
Place the unit on even-level.
Tilted position may cause damage
to the unit and the disc.
Do not place heavy equipment
such as TV on top of the unit
Do not place the unit in areas with
vibration
high humidity
limited or no ventilation
under direct sunrays
high or low temperature.
7
Moving the unit from one place to
another with extreme temperature
difference may cause water dew on
the laser pickup of the unit and result
in malfunctioning of the unit. If so,
turn off the unit and wait for one or
two hours before starting again.
To avoid the magnetic interference,
place the unit away from speakers.
Do not open the tray by force.
8
Be sure to read the user manual before
operating the unit
Place the unit in an area well
ventilated and with no heat.
Never open the top cover. It is very
dangerous to touch the inside of the
unit due to possible electric shock.
When not in use for long duration, be sure to pull out the power cord from the electric outlet.
Also do not use the unit when the power cord is damaged as it may cause electric shock.
9
The unit and its power cord should be arranged safely
at all times and never be handled with wet hands due to
a danger of electric shock.
Check the supply voltage before turning on the unit.
The unit uses 110 - 220V AC.
10
11
12
3. CHECK POINTS BEFORE USE
13
14
4. CONTROLS AND FUNCTIONS
1. Power Button
Plug the power cord into electric outlet and press the button to turn on the unit.
2. Power Indicator Lamp
It indicates that the power cord is plugged in and the unit is ready to be turned on.
3. Disc Tray
It holds three discs to be played by the unit. It is controlled by OPEN/CLOSE button.
Note: Do not open the disc tray by force as it may cause damage to the unit.
4. FLT Display
It displays the status of the discs and functions.
Refer to FLT display panel for detail description.
5. Remote Sensor
It receives the infrared signal from the remote controller for operation of the unit.
6. Microphone volume
It controls the volume level of microphones 1 and 2. Turn clockwise to increase the volume and
counter-clockwise to decrease the volume.
7. Echo Volume
It controls the echo level of microphones 1 and 2.
counter-clockwise to decrease the echo level.
Turn clockwise to increase the echo level and
8. Microphone Jack 1, 2
15
Plug in the microphones 1 and 2.
9. KEY buttons
Use the KEY buttons to lower/reset/raise the key (pitch) of a song by a half note.
10. TEMPO buttons
Use , buttons to decrease / increase the tempo.
11. DISC CHANGE button
Press D/C button to select the disc in the sequence of disc1 - disc2 - disc3.
12. PLAY/SELECT button
Press to play a selected song or to select your choice of menu.
13. PAUSE button
Press to pause a play and press again to continue.
14. STOP/RETURN button
Press to stop playing or to go back to previous menu.
15. OPEN/CLOSE button
Press to open the disc tray or to close the disc tray.
16. Numeric buttons (1 - 0, +10)
Press the buttons to input a song number, track number, or menu selection number.
+10: Use the button to input numbers over 10.
Example: 13: push +10 once and 3
20: push +10 twice and 0
17. PROGRAM button
Press to reserve a song for play. First select a song using the JB/CD button and numeric buttons.
PROGRAM button to reserve. For more details, see 7. HOW TO OPERATE.
Then press
18. CANCEL button
Press to cancel a reserved song. Select a song in reserve using JB/CD button and numeric buttons.
CANCEL to delete the song from reservation. For more details, see 7.HOW TO OPERATE.
Then press
19. MENU button
Press to display main menu.
20. JB/CD button
Press to select the Jukebox (hard drive) or CD (discs) as the source of songs for play or program.
21. DISC SELECT 1, 2, 3 buttons
Press to choose Disc1 / Disc2 / Disc3 as the source of songs for play or program.
to Jukebox.
Press JB/CD button to return
22. VOCAL button
Press to choose from Left / Right / Stereo channels for play. Generally in CD+G, the left channel will contain a
singer’s voice that can be canceled by choosing the right channel.
16
23. Skip (,), PREV/NEXT buttons
Press to display the song list on TV screen and then press to move to the next or previous page of the song list.
In Disc Play mode, press to go to the next or previous track in the disc.
24. TIME button (Video-CD)
Press to select a specific time (track, minute, second) and press again to begin playing.
25. SEARCH (,) buttons
Press to display the song list on TV screen and then press to move to the next or previous song in the song list.
In Disc Play mode, press to move forward or backward by several second in play.
26. PBC button (Video-CD ver 2.0 with Play Back Control)
Press to turn on/off the Play Back Control.
17
1. AUDIO output terminal
Connect the terminal to audio input of TV or amplifier.
2. VIDEO output terminal
Connect the terminal to video input terminal of TV.
3. S-VHS output terminal
Connect the terminal to S-VHS input terminal of TV (if available) for higher video quality.
4. NTSC/PAL mode selection switch
Select the video output mode between NTSC / PAL.
5. BGV Input Terminal
Connect to external video source for background video (such as camcorder, VHS, or LD player).
6. POWER Input
Connect the power cord to home electric outlet of 110 – 220 volt.
7. External Connector
This connector is reserved for an optional feature of light control and special effects in KTV.
8. Parallel Port
Connect to PC parallel port via FX cable for communicating and capturing CD and CD+G songs.
18
1. PBC (Play back control)
Display when Video-CD with Play Back Control is inserted.
2. INTRO
Display when INTRO button is pressed.
3. PLAY indicator
Display when a song is in play.
4. PAUSE indicator
Display when a song is in pause.
5. DISC
Indicate the disc tray number.
6. TRACK
Display the total number of tracks in a disc in play.
7. TOTAL
Indicate when the displayed time is the total playing time of a disc.
8. EACH
Indicate when the displayed time is the remaining time of a track.
9. SCENE
Indicate the section of Video CD while in PBC mode.
10. SELECT/TIME display panel
Display the song number / time.
19
11. RANDOM
Indicate the random mode selection.
12. Types of disc
Indicate the type of disc Video-CD / CDDA / CD+G in play.
13. REPEAT
Indicate the repeat mode in play.
14. ONE / ALL
Display the Repeat One / All mode in play specifying that the unit will play one song repeatly or play all songs
sequentially.
15. Music contents
Display the numbers of tracks contained in a disc.
16. OVER indicator
Indicate when the total number of tracks is over 21.
17. TRAY status
Indicate the disc positions in the tray. The top position indicates the disc in play or ready for play. The other
two indicate the discs in standby or ready for change.
20
21
1. MUTE button
Press to suppress the audio output.
Press again to resume normal audio output.
2. INTRO button
Press to play the beginning 10 seconds of each track on the disc.
3. RESUME button (Video-CD)
Press to begin playing from where it was stopped or turned off.
4. SLOW button (Video-CD)
Press to select slow motion play.
5. PBC button (Video-CD)
Press to enter PBC mode.
6. JB/CD button
Press to select from Jukebox / Discs as the source of a song for play or program.
7. SETUP button
Press to enter System Setup mode.
8. MENU button
Press to enter Menu mode.
9. RANDOM button
Press to select a song at random.
10. REPEAT button
Press to select from Repeat One / All / Off mode.
sequentially, or play normally.
The choices are to play one song continuously, play all songs
11. SORT/FAN button
Press to select from Fanfare 1 / Fanfare 2 / Fanfare 3 and then press the Play button to begin playing the fanfare
mursic.
12. JB MODE button
Press to return to the initial screen of the Jukebox Play mode.
13. DISC MODE button
Press to select the Disc Play mode.
14. CAPT MODE button
Press to select the CDG Capture mode.
22
5. USING REMOTE CONTROLLER
23
24
6. HOW TO CONNECT
6.1 When connecting video/audio outputs to TV
The connection for operating JB-99 with TV is illustrated below.
Note: If your TV does not have video/audio inputs, use an adopter (such as R/F modulator) for the connection
with JB-99.
25
6.2 When connecting video output to TV and audio output to amplifier
The connection for operating JB-99 with TV and amplifier is illustrated below.
Note: For better vocal sound, try connecting the microphones directly to karaoke (mixer) amplifier.
26
6.3 When connecting S-VHS output to TV and audio output to amplifier
The connection for operating JB-99 through S-VHS output to TV and audio output to amplifier is illustrated
below.
Note: S-VHS output is of better video quality than composite video output. When using S-VHS output, external
video input is disabled.
Warning: When using S-VHS output, be sure to use the FR Core on the S-VHS cable.
27
6.4 When connecting external background video to JB-99
The connection for external video source (such as a camcorder) to JB-99 is illustrated below.
Note: Connect the video output of the external video source to the video input terminal of JB-99.
28
6.5 When connecting PC to JB-99
The connection for PC to JB-99 is illustrated below.
Note: Use the 25 pin parallel port FX cable to connect from PC LPT1 port to JB-99’s parallel cable port.
29
7. HOW TO OPERATE
1. Power on
Plug in the power cord and press the POWER button when the standby light is lit. The JB-99 will boot up to the
initial screen of the Jukebox Play mode.
2. Menu screen
From the Jukebox Play mode, press the Menu button to go to the Menu screen.
From this Menu screen, you may select a mode from the following choices:
1. Jukebox Play Mode: To play songs from Jukebox or discs.
2. Disc Play Mode: To play songs from discs only.
3. CDG Capture Mode: To capture songs from discs.
4. System Setup: To manage System Setup.
5. Sound Control: To manage Sound Control.
Note: The disc tray will not operate until you have selected a mode.
3. Jukebox Play Mode
To return to the initial screen of the Jukebox Play mode, press 1 button on JB-99 or on the remote controller.
30
1. Select Jukebox Play Mode
When powered on, JB-99 will automatically enter into the initial screen of Jukebox Play mode.
the Menu screen, press 1 to enter the Jukebox Play mode.
If starting from
2. Select a song for play
2.1 Press a SKIP ( / ) or SEARCH ( / ) button to display the song list on the screen. You can then
move forward or backward by a page using the SKIP ( / ) buttons.
2.2 After finding your page, use the SEARCH ( / ) buttons to move up or down by a line. Then press
PLAY/SELECT button to enter the category you wish. Repeat the steps using the SKIP ( / ) and SEARCH
( / ) buttons to search for a song and press PLAY/SELCT button to begin playing.
2.3 Alternatively search for a song and its code using a songbook. Input the song code using the numeric
buttons and press PLAY/SELECT to begin playing.
3. Select a song for play from a disc
3.1 To select a song from a disc, press a DISC1 / DISC2 / DISC3 button to select the disc tray in which the disc
is loaded. Press the track number of the song using the numeric button. Press the PLAY/START to begin
playing.
3.2 If the disc is not in the tray, load the disc and proceed as above.
3.3 To return to selecting a song from Jukebox, press the JB/CD button.
Warning: To select a song in a Video CD (ver2.0) while the unit is in Jukebox Play mode, you must input the
actual track number of the song which may be different from the song number written in the CD cover or insert.
To find the correct track number, set the unit into Disc Play mode and examine the disc with PBC mode turned
off.
4. Reserve a song for play
4.1 Input a song number using the numeric buttons and press the PROGRAM button to reserve the song.
4.2 To reserve a song from a disc, press a DISC1 / DISC2 / DISC3 button to select the disc and press the track
number using the numeric buttons. Press the PROGRAM button to reserve the song.
4.3 If the disc tray is empty, insert the disc and proceed as in Item 4.2.
4.4 To return to reserving a song from Jukebox, press the JB/CD button and proceed as in Item 4.1.
4.5 Up to 99 songs can be reserved in the queue.
4.6 If you wish to reserve a song with priority, select the song as above and then press TIME button. The song
will then be queued right after the song currently in play.
Note: If the JB-99 is in Continuous mode (optional in System Setup), the reserved songs will play continuously.
If the JB-99 is in Single Play mode (optional in System Setup), the reserved songs will play one at a time waiting
31
for a press of PLAY/SELECT button for the next.
Note: If you wish to select a group of songs and play them repeatedly, you can do so by reserving the group of
songs and then setting REPEAT function to All.
5. Cancel a reserved song
5.1 Press the song number of the reserved song you wish to cancel. Press the CANCEL button to delete the
song from the queue.
5.2 For a reserved song from a disc, press the DISC1 / DISC2 / DISC3 buttons to select the disc and enter the
track number of the song. Press the CANCEL button to delete the song from the queue.
5.3 If a specific song number is not inputted, pressing the CANCEL button will delete the last song in the
reservation queue.
6. RANDOM play
Press the RANDOM button followed by the PLAY/SELECT button to play a song at random.
RADOM button again to disable the RANDOM play.
Press the
Note: When both the RANDOM and REPEAT All function are turned on, the unit will continue to play the songs
at random.
7. REPEAT play
Press the REPEAT button to select from One / All / Off repeat play mode:
One:
Play the current song continuously.
All:
Play all songs (Jukebox, disc, or reservation queue) sequentially.
Off:
Play in normal mode.
Note: If the JB-99 is in Continuous mode (optional in System Setup), the REPEAT function will play the songs
continuously. If the JB-99 is in Single Play mode (optional in System Setup), the REPEAT function will play
the songs one at a time waiting for a press of PLAY/SELECT button for the next.
8. Voice Cancel
With a song in play, press the VOCAL button to select from Left / Right / Stereo channels. Vocal recordings in
karaoke music would generally be recorded in the left channel and so choosing the right channel would cancel
the singer’s voice.
9. Changing Tempo of a song
With a song in play, press the TEMPO: / buttons to increase or decrease the tempo of the song.
10. Changing Key of a song
With a song in play, press the KEY CONTROL buttons to lower/reset/raise the key (pitch) of the song.
11. Fanfare play
Press the SORT/FAN button to select from Fanfare1 / Fanfare2 / Fanfare3 and press the PLAY/SELECT to begin
playing the fanfare music to show your appreciation of a singer’s performance.
32
12. Pause the play
Press the PAUSE button to pause a song in play.
to resume.
Press the PAUSE button again or press PLAY/START button
13. Stop the play
Press the STOP/RETURN button to stop a song in play. The screen will return to the initial screen of the
Jukebox play mode, ready for a next selection.
14. BGV (Background Video) mode
Press the BGV button to turn on / off the background video. The source of the background video can be
internal (disc1/disc2/disc3) or external depending on the BGV setting in the System Setup.
Note: Background video will not be available while playing a CD+G disc.
33
1. Select Disc Play mode
From the MENU screen, press 2 to enter into the Disc Play mode in which the JB-99 will perform as a multi-CD
player of audio CD, CD+G, and video CD (ver 1.0, 2.0).
2. Select a disc
Use the DISC CHANGE (disc1/disc2/disc3) button to select the disc you wish to play. The FLT screen will
display the chosen disc and the TV screen will display the track information. If the disc tray is empty, insert the
disc and proceed as above.
3. Select a track and play
Select a track using the numeric buttons and press the PLAY/SELECT button to start playing. If a track number
is not selected, the unit will begin playing from track 1.
Note: If the JB-99 is in Continuous mode (optional in System Setup), the tracks will be played continuously. If
the JB-99 is in Single Play mode (optional in System Setup), the tracks will be played one at a time waiting for a
press of the PLAY/SELECT button for the next.
4. RANDOM play
Press the RANDOM button to play a song at random.
play.
Press the RADOM button again to disable RANDOM
Note: The randomly selected songs will play continuously if the Continuous mode is selected in the System
Setup. The songs will play one at a time waiting for a press of the PLAY/SELECT button for the next if the
Single Play mode is selected in the System Setup.
5. REPEAT play
Press the REPEAT button to select from One / All / Off repeat play mode:
One:
Play the current song continuously.
All:
Play all songs in the disc sequentially
Off:
Play in normal mode.
Note: If the JB-99 is in Continuous mode (optional in System Setup), the REPEAT function will play the songs
continuously. If the JB-99 is in Single Play mode (optional in System Setup), the REPEAT function will play
the songs one at a time waiting for a press of PLAY/SELECT button for the next.
34
6. Voice Cancel
With a song in play, press the VOCAL button to select from Left / Right / Stereo channels. Vocal recordings in
karaoke music would generally be recorded in the left channel and so choosing the right channel would cancel
the singer’s voice.
7. Changing the Key of a song
With a song in play, press the KEY CONTROL buttons to lower / reset / raise the key (pitch) of the song.
8. Fanfare play
Press the SORT/FAN button to select from Fanfare1 / Fanfare2 / Fanfare3 and press the PLAY/SELECT button
to play the fanfare music to show your appreciation of a singer’s performance.
9. SEARCH play
Press and hold the SEARCH button to jump forward or backward in play.
return to normal play.
Release the SEARCH button to
10. SLOW play (Video CD)
Press the SLOW button to slow down the playing speed (1/2, 1/4, 1/8).
PLAY/START button.
To return to normal speed, press the
Note: During SLOW play, audio is muted.
11. INTRO play
Press the INTRO button to play 10 seconds of beginning of each track on a disc.
12. TIME play
Press the TIME button and enter the track number, minute and second using the numeric buttons and the
PREV/NEXT buttons. Press the PLAY/START button to begin playing from the entered time.
13. RESUME play
With a song in play interrupted by the STOP/RETURN button or the POWER (off) button, you may resume the
play by pressing the RESUME button or the POWER (on) button followed by the RESUME button.
Note: If the OPEN/CLOSE or the DISC CHANGE button is pressed, the RESUME information will be cleared.
The RESUME function is also not available in PBC mode.
14. Pause the play
Press the PAUSE button to pause a song in play.
button to resume.
Press the PAUSE button again or press the PLAY/SELECT
15. Stop the play
Press the STOP/RETURN button to stop a song in play. The screen will return to the Disc Play mode ready for a
next selection.
16. PBC mode (Video CD ver2.0)
When a Video CD (ver 2.0) is selected, the unit will automatically switch on the PBC mode and display the PBC
sign on the FLT screen. If you wish to play the disc in the normal mode (according to tracks), press the PBC
button to turn off the PBC mode.
While the PBC mode is on:
16.1 Press the START/SELECT button to begin playing.
35
16.2 Press the PREV () button to move to the previous menu.
16.3 Press the NEXT() button to move to the next menu.
16.4 Press the STOP/RETURN button to return to the parent (root) menu.
16.5 To make a selection in menu, press a number using the numeric buttons.
36
1. Connect JB-99 to PC
Power off the JB-99 and your PC. Using the 25 pins parallel port FX cable (included in accessory), connect the
JB-99 to the PC. Power on the JB-99 and the PC.
Note: To download CD or CD+G songs into JB-99 without a PC, please refer to Chapter 8. How To Use
DataCD.
2. Install the CAVS Jukebox Manager program in PC
Insert the CAVS Jukebox Manager program disc (included in accessory) into your PC. Go to My Computer and
then double click on the CD-ROM drive. You will see two folders, one for Windows 95, 98, ME, and the other
for Windows 2000, NT, XP. Open the folder for the Windows version of your PC and double click on
Setup.exe to begin the installation. For Windows 2000, NT, XP only, also double click on Port95NT.exe to
install a new LPT1 driver. After the installation is complete, click on Start – Programs – CAVS – JBManager
to begin the program.
NOTE: To install the latest version of Jukebox Manager program, visit our website
http://www.cavsusa.com/jb-99.htm and go to the Upgrade Software.
3. Select CDG CAPTURE mode in JB-99
From the MENU screen of JB-99, select 3 to enter into CDG CAPTURE mode.
Note: When without a TV, turn on the power of JB-99 and press the MENU button for the “Menu” sign in the
FLT panel. Press 3 and “SEL3” sign will appear on the FLT panel to indicate that JB-99 is in CDG Capture
mode.
4. Start the CAVS Jukebox Manager program in PC
From your PC, start the CAVS Jukebox Manager program. Click on the Conn/Refresh button to check the
connection between the PC and the JB-99. If you receive a message "JB-99 connection error", then check the
cable connections between the JB-99 and the PC before trying again.
37
5. If you have a recordable CD-ROM* drive in PC
If you have a recordable CD-ROM* drive in PC, go to Item 7 for capturing a song. If you have a standard
CD-ROM drive installed in PC (and do not have a recordable CD-ROM drive), go to Item 6 for capturing a song.
*For the list of compatible recordable CD-ROM drive, see Chapter 12. SPECIFICATION.
6. Capturing CD/CD+G songs
There are three parts to capturing a song from a disc. First is to capture the graphic data (of lyrics display),
which is relevant only to CD+G songs. Second is to capture the audio data (of music) which applies to both CD
and CD+G songs . Third is to transfer the captured graphic and audio data to JB-99 database.
Note: If you have a recordable CD-ROM* drive installed in PC, you can capture both the graphic and audio data
of CD+G songs at the same time. See Item 7 for the instructions.
Note: If you are capturing a CD+G song from a BIN or RW MP3+G files, go to Item 8 for the instructions
Step 1: Capturing graphic data of a CD+G song
6.1.1 Insert the disc you wish to capture a song from into the disc tray of the JB-99.
Close the disc tray.
6.1.2 From the Jukebox Manager program in PC, click on the Step 1 button to display the window of Step 1:
Graphic File Capture.
38
6.1.3 Select the SOURCE directory from Jukebox Disc1/ Jukebox Disc2/ Jukebox Disc3 for the inserted disc.
The track information of the disc will be shown in the display window. Select the DESTIN directory into which
the captured files will be saved.
Note: If a DESTIN directory is not designated, the captured files will be saved in the directory of the C:\program
files\cavs\JBManager\work by default.
6.1.4 Click to place check marks on each of the songs you wish to capture and enter the song titles.
6.1.5 Click Send button to begin capturing.
The captured data will be saved in files with extension *.cdg.
Step 2: Capturing audio data of a CD or CD+G song
6.2.1 Insert the disc from which you wish to capture a song into the CD-ROM drive in PC.
6.2.2 From the Jukebox Manager program, click on the Step 2 button to display the window of Step2: Audio File
Capture.
39
6.2.3 Select the CD-ROM drive as the SOURCE directory. The track information of the disc will be shown in
the display window. Also select the DESTIN directory into which the captured files will be saved.
Note: If the DESTIN directory is not designated, all files will be saved in the directory of C:\program
files\cavs\JBManager\work by default.
6.2.4 Click to place check marks on each of the songs you wish to capture and enter the song titles.
Note: If you have captured the graphic data in Step 1 , it is recommended that the same song title be used for the
audio data.
6.2.5 Click on Option button to select the MP3 bit rate and CD-ROM drive speed. The quality of MP3 music
will improve with a higher bit rate and/or a slower CD-ROM drive speed. MP3 data file size however will also
increase with a higher bit rate. The default settings are 128 kbps and 16x speed.
6.2.6 Set the Sync using the up down arrows. The Sync, indicating the amount of time by which the lyric will
scroll ahead or behind the music, can be changed in steps of 1/75 of a second. The default setting is zero.
6.2.7 Click Send button to begin capturing the audio data into PC.
Step 3: Send the captured graphic and audio data to the JB-99
6.3.1 From the Jukebox Manager program, click Step 3 button to open the window of Step3: Captured Data
Transfer.
40
6.3.2 Select the SOURCE directory as the one in which you have saved the graphic (cdg) and audio (mp3) files.
All files in the directory will be displayed. The DESTIN directory will automatically show the song files
already stored in the JB-99.
6.3.3 Click on the files that you wish to send to the JB-99. There is a limit of 100 songs that can be transferred
at any one time. Also change or confirm the song number, title, and artist of the files you wish to send. For
each song, be sure to give the same song number for the graphic and audio files.
Note: You may use the Edit button to change the song number, title, and artist of a song after sending the files to
the JB-99 (For more details, see Item 9. Editing and Printing Songlist).
Note: The title and artist names will be shown in the on–screen song list as entered above.
6.3.4 Click the Send button to start transferring the files to JB-99.
7. Capturing a CD or CD+G song with a recordable CD-ROM* drive
*For the list of compatible recordable CD-ROM drive, see Chapter 12. SPECIFICATION.
When using a recordable CD-ROM drive, there are only two parts (Step 2 and Step 3) to the capturing of songs
from a CD or CD+G disc.
Step 2: Capturing graphic and audio data using a recordable CD-ROM drive
7.2.1 Insert the disc into the recordable CD-ROM drive in PC.
7.2.2 From the Jukebox Manager program, click on the Step 2 button to display the window of Step 2: Audio File
Capture.
41
7.2.3 Select the recordable CD-ROM drive as the SOURCE directory. The track information of the disc inside
the recordable CD-ROM drive will be displayed. Select the DESTIN directory into which the captured files will
be saved.
Note: If DESTIN directory is not designated, all files will be saved in the directory of C:\program
files\cavs\JBManager\work by default.
7.2.4 Click to place check marks on each of the songs you wish to capture and enter the song titles.
7.2.5 Click to place a check mark on Send Graphic Files located in the center of Step 2 window.
7.2.6 Click on the Option button to select the MP3 bit rate and CD-ROM drive speed. The quality of MP3
music will improve with a higher bit rate and/or a slower CD-ROM drive speed. MP3 data file size however
will also increase with a higher bit rate. The default settings are 128 kbps and 16x speed.
7.2.7 Set the Sync using the up down arrows. The Sync, indicating the amount of time by which the lyric will
scroll ahead or behind the music, can be changed in steps of 1/75 of a second. The default setting is zero.
7.2.8 Click the Send button to begin capturing the graphic and audio data.
Step 3: Send the captured graphic and audio data to JB-99
7.3.1 From the Jukebox Manager program, click Step 3 button to open the window of Step3: Captured Data
Transfer.
42
7.3.2 Select the SOURCE directory as the one in which you have saved the graphic (cdg) and audio (mp3) files.
All files in the directory will be displayed. The DESTIN directory will automatically show the songs files in the
JB-99.
7.3.3 Click on the files that you wish to send to JB-99. There is a limit of 100 songs that can be transferred at
any one time. Also change or confirm the song number, title, and artist of the files you wish to send. For each
song, be sure to give the same song number for the graphic and audio files.
Note: You may use the Edit button to change the song number, title, and artist after sending the files to the JB-99
database (For more details, see Item 9. Editing and Printing Songlist).
Note: The title and artist names will be shown in the on–screen song list as entered above.
7.3.4 Click Send button to start sending the files to JB-99.
8. Capturing a CD+G song from a BIN or RW file
You can capture a CD+G song from a BIN or RW file as follows.
Step 2: Converting BIN or RW files into graphic (cdg) and audio (mp3) files of JB-99
8.2.1 From the Jukebox Manager program, click on the Step 2 button to display the window of Step 2: Audio File
Capture.
43
8.2.3 Select the directory in which the BIN or RW files are stored as the SOURCE directory.
DESTIN directory into which the converted files will be saved.
Select the
Note: RW file of a CD+G song contains only the graphic data and when converted will become a graphic (cdg)
file. A matching audio file (*.mp3) is assumed to be prepared using a standard MP3 encoder.
8.2.4 Click to place check mark on the BIN or RW file you wish to convert and enter the the song titles.
8.2.5 Click to place a check mark on Send Graphic Files located on the center of the Step 2 window.
8.2.6 Click on the Option button to select the MP3 bit rate. The quality of MP3 music will improve with a
higher bit rate. MP3 data file size however will also increase with a higher bit rate. The default setting is 128
kbps.
Note: The Option for CD-ROM drive speed will be ignored.
8.2.7 Set the Sync using the up down arrows. The Sync, indicating the amount of time by which the lyric will
scroll ahead or behind the music, can be changed in steps of 1/75 of a second. The default setting is zero.
8.2.8 Click the Send button to begin converting the BIN or RW files.
Step 3: Send the converted graphic and audio data to JB-99
8.3.1 From the Jukebox Manager program, click Step 3 button to open the window of Step3: Captured Data
Transfer.
44
8.3.2 Select the SOURCE directory as the one in which you have saved the graphic (cdg) and audio (mp3) files.
All files in the directory will be displayed. The DESTIN directory will automatically show the songs files in
JB-99.
8.3.3 Click on the files that you wish to send to JB-99. There is a limit of 100 songs that can be transferred at
any one time. Also change or confirm the song number, title, and artist of the files you wish to send. For each
song, be sure to give the same song number for the graphic and audio files.
Note: You may use the Edit button to change the song number, title, and artist after sending the files to the JB-99
database (For more details, see Item 9. Editing and Printing Songlist).
Note: The title and artist names will be shown in the on–screen song list as entered above.
8.3.4 Click Send button to start transferring files to JB-99.
9. Editing and printing the song list
9.1 Making a song list for JB-99
9.1.1 From the main menu of the Jukebox Manager program, Click the Juke button to open the song list of JB-99.
9.1.2 Select any song and click Edit button to change the contents (song number, title, artist ).
9.1.3 Click Save button to save the changed song list into a directory of your choice in PC.
9.1.4 The song list may be sorted according to song number, title, artist name by clicking the Number / Title /
Artist buttons on the top of the song list.
9.1.5 Click Preview and Print buttons to preview and print the song list.
Note: The original song list of JB-99 can not be changed by the Edit / Save functions in the main menu. If you
wish to make permanent changes in the song list of JB-99, go to Step3: Captured Data Transfer of the Jukebox
45
Manager program and use the Edit function.
Note: For extensive editing of the song list, you are recommended to save the songlists of JB-99 in a text file
format into your PC and use any professional editing programs such as Microsoft Word or Excel for the
appearances and printouts you wish to achieve.
9.2 Making a songlist for a disc
9.2.1 From the main menu of the Jukebox Manager program, Click one of Disc1 / Disc2 / Disc3 / CD-R buttons
to select the disc for which you wish to make a songlist. The track information for the disc will appear on the
display screen.
9.2.2 Select any track and click Edit button to input the contents (song number, title, artist).
9.2.3 Click Save button to save the edited songlist into a directory of your choice in your PC.
9.2.4 The songlist may be sorted according to song number, title, artist name by clicking the catergory buttons on
the top of the songlist.
9.2.5 Click Preview and Print buttons to preview and print the songlist.
Note: For extensive editing of the song list, you are recommended to save the song list of JB-99 in a text file
format in PC and use an editing program such as Microsoft Word or Excel.
46
1. Select System Setup mode
From the MENU screen of JB-99, press 4 for System Setup mode.
2. Download songs from DATA CD-ROM (DataCD)
2.1 Press 1 to select Download from CD-ROM.
Following window will appear on the screen.
<<<DOWNLOAD>>>
Insert the ‘SONG DATA CD-ROM’
into Tray 1. Then Close the Tray
and press ‘PLAY’
See also: OPEN,CLOSE,DISC,D/C
2.2 Insert the CAVS Data CD-ROM (DataCD) into Disc1 slot of the disc tray.
PLAY/SELECT button. Following menu will appear on the screen:
Close the tray and press the
<<<DOWNLOAD>>>
1. To begin download, press Play.
Starting song number XXXXX
2. To change the setting, press #2.
2.3 If the starting song number XXXXX is correct, and you wish to download all the songs in the DataCD, press
the Play button to begin downloading. If you wish to change the starting song number or any other settings,
press 2 and the following screen will appear:
1.
2.
3.
<CHANGE SETTING>
Overwrite existing data: No
Download from CD-ROM: All
Starting song number: XXXXX
To download, press ‘PLAY’.
Total CD-ROM data: XXX song(s)
2.4 Press 1 to change the Overwrite existing data to Yes, if you wish to overwrite existing song files.
47
Warning: When the Overwrite existing data is set as Yes, downloading new song files will replace the existing
song files with same song numbers.
2.5 Press 2 to choose the songs in the DataCD to be downloaded. Press the song number of each song you wish
followed by a press of the PROG button. When the selection is complete, press Stop. Press 2 again if you
wish to change the selection to All songs in the DataCD.
Note: To select more than one song for download, each song number must be followed by a press of the PROG
button.
2.6 Press 3 to enter a new starting song number for download.
button.
2.7 Press the PLAY/SELECT button to begin downloading.
return to:
Input the starting number and press the Stop
After the download is completed, the screen will
<<<DOWNLOAD>>>
Insert the ‘SONG DATA CD-ROM’
into Tray 1. Then Close the Tray
and press ‘PLAY’
See also: OPEN,CLOSE,DISC,D/C
Press Stop, Stop and 1 to get back to the initial screen of the Jukebox Play mode.
2.8 To cancel or return to the System Setup mode during downloading, press the STOP/RETURN button.
Note: When the downloading is canceled, the song file in process will be deleted.
3. Set Disc Play mode (Continuous Play / Single Play)
In the System Setup, press 2 to change the setting between the Continuous Play mode and Single Play mode. In
the continuous play mode, songs in reservation or repeat will play continuously without stops. In a single play
mode, songs in reservation or repeat will play one at a time and stop for a press of the PLAY/SELCT button for
the next.
4. Set BACKGROUND VIDEO (BGV) Play mode
4.1 In System Setup, press 3 to change between the Internal and External BGV modes.
4.2 When Internal, press 4, 5, and 6 to set the disc types of disc1, disc2 and disc3 slots.
Example: If you will be using a Video CD in the disc1 slot as the source of internal BGV, set the type
of disc1 as VCD. The JB-99 will then search for the internal BGV source from the disc1 slot.
Otherwise, set the type of disc1 as OFF.
4.3 When External, connect the external video source to JB-99 as shown in the Section 6.4 of the Chapter 6.
HOW TO CONNECT.
Warning: When the BGV Play mode is set as External, the external video source must be connected and powered
on before starting JB-99.
48
From the MENU screen of JB-99, press 5 for the Sound Control Mode.
1. Jukebox Volume
Press 1 to select the Volume control for Jukebox play.
the volume level.
Press the Search (,) buttons to increase or decrease
2. Disc Play Volume
Press 2 to select the Volume control for disc play.
volume level.
Press the Search (,) buttons to increase or decrease the
3. Base Band
Press 3 to select the Low Band control for the equalizer.
decrease the Low Band level.
Press the Search (,) buttons to increase or
4. MID Low Band
Press 4 to select the MID Low Band control for the equalizer.
decrease the MID Low Band level.
Press the Search (,) buttons to increase or
5. MID High Band
Press 5 to select the MID High Band control for the equalizer.
decrease the MID High Band level.
Press the Search (,) buttons to increase or
6. High Band
Press 6 to select the High Band control for the equalizer.
decrease the High Band level.
Press the Search (,) buttons to increase or
7. Default settings
Press 7 to reset the all audio settings back to the default values.
49
8. HOW TO USE DATACD
An alternate method of loading CD or CD+G songs into JB-99 is by DataCD. This method is particularly
useful when JB-99 is located in a remote area where connecting with a PC is not possible. We describe below
the instruction on how to make a DataCD and how to download the songs from DataCD to JB-99.
8.1 Making DataCD
8.1.1 Using JBManager program, capture the CD or CD+G songs from discs to prepare the graphic and audio
files (*.cdg and *.mp3) in PC.
8.1.2 Make the file names of the graphic and audio files as
00001.cdg
00001.mp3
00002.cdg
00002.mp3
...
8.1.3 Using a Notepad or Wordpad editor, make a text file named Juke.txt of the song list in the following form:
00001Unbreak My Heart
00002After The Loving
....
Braxton/Tony
Humperdink/Englebe
Note 1: The song number (which matches the graphic and audio file names) must begin from Column 1 and end
at Column 5.
Note 2: Title of the song must begin at Column 6 and end before or at Column 44.
Note 3: Artist name must begin at Column 45 and end before or at Column 64.
Note 4: When completed, Juke.txt must be saved as a text file.
8.1.4 Using any CD writer program (e.g. Easy CD Writer), write a CD-ROM disc with the song files (00001.cdg,
00001.mp3, 00002.cdg, 00002.mp3, ...) and Juke.txt file. The format of the disc layout must be set to ISO 9660
and Mod 2:CDROM XA. Also be sure to select Close Disc option and to write the disc at no more than 2x speed.
Note: Reliability of the DataCD will depend on the quality of the CD-ROM disc used and the speed at which the
disc is written.
8.1.5 You have completed making DATA CD.
8.2 Downloading songs from DataCD to JB-99
There are two ways to download the songs of DataCD into JB-99. One is to use the internal disc tray of JB-99
and the other is to use an external CD-ROM drive (See Chapter 10. Optional Features) attached to JB-99. For
both ways, the instruction to download the songs is the same and is given above in the Section SYSTEM
SETUP in the Chapter 7. HOW TO OPERATE. Note that an external CD-ROM drive can provide a faster
and more reliable downloading of songs. For instruction on how to attach an external CD-ROM drive, please
visit our website at http://www.cavsusa.com/jb-99.htm and go to the External Drive.
50
9. HOW TO UPGRADE JB-99
The Jukebox Manager (JBManager) program and the operating system software (firmware) for JB-99 will be
upgraded periodically and made available in our website http://www.cavsusa.com/jb-99.htm. This chapter
provides the instructions on how to install the new JBManager program in PC and the new firmware in JB-99.
9.1 Installing New JBManager program
9.1.1 Download the new upgrade program jb99-xxxx-xxxx.exe from our website
http://www.cavsusa.com/jb-99.htm into a directory of your choice in PC. Be sure to select a correct version of
the upgrade program for your Windows version (Windows 95, 98, ME or 2000, NT, XP) in PC.
9.1.2 The file jb99-xxxx-xxxx.exe is a self-extracting file. Double click on the file and it will unzip among other
files, Readme.txt, Juke.exe, and Setup.exe into the directory.
9.1.3 Read the Readme.txt for the changes in the latest upgrade programs.
9.1.4 Double click on Setup.exe to begin installing the new JBManager program. Follow the menu to complete
the installation.
9.1.5 For Windows 2000, NT, XP, double click on Port95NT.exe to install the LPT1 driver.
9.2 Installing New Firmware For JB-99
9.2.1 Connect the PC with JB-99 unit via FX cable and start the new JBManager program in your PC. Also turn
on your JB-99 unit and select 3. Capture CDG mode from the main menu.
9.2.2 Using the Step 3. Data Transfer in JBManager program, transfer the new downloaded Juke.exe from PC
into your JB-99. When asked to input a song number for the file Juke.exe, insert any number that is not used
before. This number will have no significance afterward.
9.2.3 When the transfer of Juke.exe is completed, power off the JB-99 and after 10 seconds, power on the
JB-99. While the unit is booting up, you should be a display of the new software version, for example, 00.xx, on
the TV screen that confirms a successful upgrade of the firmware Juke.exe.
51
10. OPTIONAL FEATURES
This chapter introduces many optional features that can be added or performed on JB-99.
optional features, please visit our website http://www.cavsusa.com/jb-99.htm .
For the latest list of
10.1 IDE Transfer
IDE Transfer offers a direct (hard drive to hard drive) way of transferring the song files between JB-99 and PC.
It is the fastest way of transferring the song files with no limit to the number of song that can be transferred at
any one time. If you are planning to transfer thousands of songs between JB-99 and PC, the IDE Transfer is the
correct choice of method. For the instruction on the how to do the IDE transfer, please visit our website at
http://www.cavsusa.com/jb-99.htm and go to the IDE Transfer.
10.2 External Drive
External Drive attached to JB-99 can hold an extra capacity hard drive for additional 20,000 songs or a high
speed (52X) CD-ROM drive for fast song loading. Instruction for installing the External Drive can be found at
our website http://www.cavsusa.com/jb-99.htm.
Additional Capacity: External Drive with a hard drive inside can store up to 20,000 additional songs in
JB-99. With a clip-on connector, the External Drive can also be easily removed from JB-99 and connect to a PC
for IDE transfer (See 10.1 IDE Transfer) of song files.
Fast Song Loading: External Drive with a high speed CD-ROM drive inside provides a faster and more reliable
way of downloading the song files from DataCD (See 8. How To Use DataCD) into JB-99. It is particularly
convenient for the JB-99 units in remote locations without easy means to connect to PC. Also with a clip-on
connector, External Drive can be shared among multiple JB-99 units making it economical as well as portable.
10.3 Xtra Large Remote Control
Xtra Large (XL) Remote Control serves those who use the JB-99 in less than perfect environment. With large
florescent buttons, XL Remote Control is visible and usable in the pitch-dark surroundings.
With the rubber
membrane coating inside, it is resistant to the liquid spills. And with the hard casing outside, it is also drop
resistant. For more detail information on XL Remote Control, please go to our website
http://www.cavsusa.com/jb-99.htm.
10.4 Bill Acceptor
Bill Acceptor can turn your JB-99 into a money making karaoke jukebox. This Bill Acceptor comes with a
4-way reader accepting $1, $5, $10, and $20 bills in all directions and a bill stacker of 600-bill capacity. The
unit is programmable to be set at any price and set on or off by the control from JB-99. For the instruction on
installation, please go to http://www.cavsusa.com/jb-99.htm.
52
11. TROUBLE SHOOTING
There may be various reasons for the abnormal operation of JB-99. Please refer to the trouble-shooting guide
below. For continuing problems with JB-99, contact your local dealer or CAVS USA Inc for a repair service.
Symptoms
Reasons
Remedies
No power to the unit even after
POWER button is pressed.
Power plug is not properly
connected
Check that the power plug is well
plugged in.
Front panel buttons and remote
controller buttons are not working
Power is not connected properly.
Pull out the power plug and after a few
seconds plug in again.
Disc is loaded but FLT screen
does not display any information
Disc is loaded upside down
Reload the disc in correct position
Disc is un-clean or scratched
Clean the disc before loading or
use an alternate disc
Audio output terminal is not
tightly connected.
Check the connections of audio output
terminal.
Amplifier is not working.
Check the power and volume level of
amplifier
The unit is in mute mode.
Press the MUTE button to release the
audio output
Audio output terminal is connected
to record terminal of amplifier
Connect the audio output terminal to
disc or AUX terminal of amplifier.
One audio output terminal is not
correctly connected to the amplifier.
Check the terminal to amplifier
Scratched or unclean disc.
Clean the disc or use an alternate disc
Dirty audio output terminal or audio input
terminal of amplifier.
Clean the terminals before reconnecting
Howling noise while playing
Noise from microphone input
Place the microphone away from
Speakers
No video picture on TV
The disc is not a Video-CD
Use a Video CD
Video output terminal is not connected
to the input terminal of TV
Connect the video output terminal to
video input terminal of TV
Incompatible RF modulator
(for TV with only coaxial video
input).
Use an alternate RF modulator to
connect the video output terminal
into coaxial video input.
External video source is
set on.
Go to Menu and then 4. System Setup
to change the video source from
external to internal.
Incorrect video mode.
Turn off the unit and then correct the
No sound from speakers
Abnormal sounds from
speakers
Screen distortion when
JB-99 is turned on
53
video mode (NTSC/PAL) using a
switch on the back of JB-99.
JBManager program will not start
in PC
Incorrect installation
Reinstall JBManager program from the
program disc. Be sure to have the latest
version of the program.
Incorrect JBManager version
Be sure to have the correct version of
JBManager program (Windows 95, 98, ME
or Windows 2000, NT, XP).
“DLPortIO.dll was not found.”
message from JBManager.
Incorrect JBManager version
Be sure to install a correct version of JBManager
program for your Windows. This message is
likely to appear when JBManager for Win 9x, ME
is installed in a PC with Windows 2000, NT, XP.
“CD-ROM drive not found” or
"Cannot find driver. Looking for .
system aspi” message from
JBManager program.
Incorrect winaspi32.dll driver.
For Windows 2000, NT, XP, go to
C:\Windows\System32 directory and check
for winaspi32.dll file. If the file exists, then go to
C:\Program Files\Cavs\JBManager
and delete the file with the same name
wnaspi32.dll. If the file "wnaspi32.dll" does not
exist in C:\Windows\System32, then download
COMPELASPI.EXE from our website
www.cavsusa.com into your PC and double click on
it to install. After the installation is complete, go
to C:\Program Files\Cavs\JBManager directory and
delete the file wnaspi32.dll. Having installed
COMPELASPI.EXE, if the program JBManager
still gives out the error messages, then go
www.goldenhawk.com/download_body.htm or
www.adaptec.com for the latest WINASPI driver.
“JB-99 connection error” or
“Time our error” message from
JBManager program.
Wrong cable.
Check that the cable is 25 pin parallel port
FX cable.
Bad connections.
Check the connections to JB-99 and PC.
Parallel port occupied by other
programs.
Close other programs in PC which
may occupy the parallel port.
JB-99 not ready.
Be sure to have JB-99 turned on and in
3. Capture CDG mode from the main menu.
Incorrect parallel port setting.
Check the parallel port setting of PC to
be Normal or Bi-directional (not
uni-directional) in the PC CMOS setup.
“Disc is engaged by other programs”
message from JBManager program.
Can not access the disc in CD-ROM
drive.
The disc is engaged by other Windows
programs such as Media Player. Close
all other programs which may use
the CD-ROM drive.
Interrupted data transfer between PC
and JB-99.
Dirty or scratched disc.
In transferring graphic data from JB-99
to PC, a dirty or scratched disc may
cause interruption of data transfer. Clean
the disc or use an alternate disc.
Windows is using the parallel port for
other tasks such as checking for a
Especially common among PCs
connected to laser printers, the
54
Very slow capturing of a CD or
CD+G song in PC.
printer status or printing job.
parallel port is regularly used
to patrol for the printer status, thus interrupting the
communication between PC and JB-99. While
transferring data, divert the printer settings of each
printer located in the printer folder (in Control
Panel) to ports other than LPT1.
PC is being occupied by other
programs.
Close other programs running in PC
Access to disc is being shared
with other programs.
Be sure to close any generic
CD player programs which may.
have started automatically with
the insertion of a disc into CD-ROM
drive.
JBManager program does not
recognize a recordable CD-ROM
drive as CD+G compatible (In.
Step 2 of JBManager program,
the square box for Send Graphic
Files is grayed out).
Unknown type or brand of
CD-ROM drive.
See 12.SPECIFICATION for a list
of compatible recordable CD-ROM
drive.
Incorrect installation of JBManager
program or CD-ROM drive.
Uninstall completely and then reinstall
the JBManager program and the
CD-ROM drive.
"C++ Error" or other error
messages when transferring
files from PC to JB-99.
Limit over in number of
song files selected for
transfer.
Select only 100 or less
songs for transfer to
JB-99 at any one time.
“NO DISC” message when
trying to download songs from
DataCD.
Incorrect format of DataCD.
Check the disc format to be ISO9660
and Mod 2:CDROM XA. Also
check that the song files and Juke.txt
file are correctly named and prepared.
Limit over in number of
song files written for
donwload.
Write only 100 or less songs for
download per DataCD.
55
12. SPECIFICATION
SECTION
DESCRIPTION
System
Digital Jukebox player
Disc playable
Audio CD
CD+G
Video CD (ver 1.1, ver 2.0)
Hard Disk
8 Gigbyte – 20 Gigbyte
5,400 – 7,200 RPM
Input Terminal
Microphone input
External Background Video
Parallel port
1.2mV(600 ohm), 2 each
1 Vp-p (75 ohm)
25 pins
Output Terminal
Composite Video Output
Audio Output
1 Vp-p (75 ohm)
2.0 Vrms(max)
Power
Rated Voltage
Power Consumption
AC 110 –220V, 50/60Hz
30 Watt
Dimension
420 (W) x 118 (H) x 360 (D) mm
Weight
6.9Kg(net)
PC Requirement
IBM compatible
Pentium or equivalent
Windows 95, 98, ME
CD-ROM Drive
Recordable CD-ROM
Drive
All Sony models except the CRX0811 and CRX1611.
All Yamaha models except the 2100 and 2200 (the 2100/2200 record CD+G, but does
not read CD+G with our software).
All Plextor models.
All Hewlett Packard models except drives with a model number that ends with 50 or
90 (NOTE: If our software sees the drive and there is a "b", "c" or "f" at the end of the
model number, then it will not do CD+G. Newer HP drives starting from the 9700
through the 24RI are also incapable of doing CD+G with our software).
Panasonic CW-7501
Plasmon CDR4240
TDK 8/4/32 veloCD
Note: Technical specifications are subject to change without notice.
56