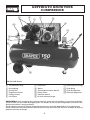
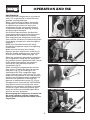
1
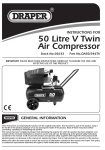
100, 150 & 200 LITRE
COMPRESSORS
■ STOCK Nos.77709
77897
77711
■ PART Nos.DA100/300B
DA150/300B
DA200/300B
• INSTRUCTIONS •
IMPORTANT: PLEASE READ THESE INSTRUCTIONS CAREFULLY TO ENSURE THE
SAFE AND EFFECTIVE USE OF THIS TOOL.
01/2005
GENERAL INFORMATION
This manual has been compiled by Draper Tools and is an integrated part of the product with which it is enclosed
and should be kept with it for future references.
This manual describes the purpose for which the product has been designed and contains all the necessary
information to ensure its correct and safe use. We recommend that this manual is read before any operation or,
before performing any kind of adjustment to the product and prior to any maintenance tasks. By following all the
general safety instructions contained in this manual, it will ensure both product and operator safety, together with
longer life of the tool itself.
All photographs and drawings in this manual are supplied by Draper Tools to help illustrate the operation of the
product.
Whilst every effort has been made to ensure accuracy of information contained in this manual, the Draper Tools
policy of continuous improvement determines the right to make modifications without prior warning.
100, 150 & 200 LITRE
COMPRESSORS
■ STOCK Nos.77709
77897
77711
■ PART Nos.DA100/300B
DA150/300B
DA200/300B
CONTENTS:
Contents/Declaration
Specification/Guarantee
Power Supply
General Safety Instructions
Getting to Know Your Compressor
Assembly
Operation and Use
Maintenance
Trouble Shooting
1
2
3
4
5
6
6-8
8 - 10
11
DECLARATION OF CONFORMITY
We
Draper Tools Ltd. Hursley Road, Chandler’s Ford, Eastleigh, Hampshire.
SO53 1YF. England.
Declare under our sole responsibility that the product:
Stock No:- 77709, 77897, 77711.
Part No:- DA100/300B, DA150/300B, DA200/300B.
Description:- Air Compressors.
To which this declaration relates is in conformity with the following directive(s)
98/37/EC, 97/23/EC, 2000/14/EC, 73/23/EEC, 89/336/EEC, 87/404/EEC
JOHN DRAPER
Managing Director
16/07/2004
-1-
SPECIFICATION
The Draper Tools policy of continuous improvement determines the right to change specification
without notice.
Stock No.
Part No.
Voltage
Motor
77709
77897
DA100/300B
DA150/300B
230V/50Hz
230V/50Hz
3HP (2.2kW)
3HP (2.2kW)
77711
DA200/300B
230V/50Hz
3HP (2.2kW)
1450
1450
145PSI (10bar)
145PSI (10bar)
Air displacement
10.4cfm (295L/min)
10.4cfm (295L/min)
10.4cfm (295L/min)
Free air delivery
7.2cfm (204L/min)
7.2cfm (204L/min)
7.2cfm (204L/min)
70kg
75kg
Sound pressure level
73dB(A)
73dB(A)
73dB(A)
Sound power level
86dB(A)
86dB(A)
86dB(A)
RPM
Max. pressure
Weight
1450
145PSI (10bar)
88kg
ALWAYS WEAR EYE PROTECTION
GUARANTEE
Draper Tools have been carefully tested and inspected before shipment and are
guaranteed to be free from defective materials and workmanship for a period of 12
months from the date of purchase except where tools are hired out when the guarantee
period is ninety days from the date of purchase.
Should the machine develop any fault, please return the complete tool to your nearest
authorized warranty repair agent or contact Draper Tools Limited, Chandler's Ford,
Eastleigh, Hampshire, SO53 1YF. England. Telephone: (023) 8026 6355.
If upon inspection it is found that the fault occurring is due to defective materials or
workmanship, repairs will be carried out free of charge. This guarantee does not apply
to normal wear and tear, nor does it cover any damage caused by misuse, careless or
unsafe handling, alterations, accident, or repairs attempted or made by any personnel
other than the authorised Draper warranty repair agent.
This guarantee applies in lieu of any other guarantee expressed or implied and
variations of its terms are not authorised.
Your Draper guarantee is not effective unless you can produce upon request a dated
receipt or invoice to verify your proof of purchase within the 12 month period.
Please note that this guarantee is an additional benefit and does not affect your statutory
rights.
Draper Tools Limited.
-2-
POWER SUPPLY
CONNECTING YOUR MACHINE TO THE POWER SUPPLY
The machine should be connected to a 16amp power supply either using the
appropriate blue 16amp plug or directly into the fused mains supply. Both of these
operations should be carried out by a qualified electrician.
*WARNING
A plug with bare flexible wires exposed is hazardous if engaged in a live power socket
outlet.
WARNING THIS APPLIANCE MUST BE EARTHED. (230V ONLY)
The mains lead is coloured Green and Yellow - Earth, Blue - Neutral & Brown - Live. As
these colours may be correspond with the coloured markings identifying the terminals
in you 16amp plug, proceed as follows. The wire which is coloured Green and Yellow
must be connected to the terminal in your plug marked with the letter 'E' or by the earth
symbol
or coloured green or green and Yellow. The wire which is coloured blue must
be connected to the terminal which is marked with the letter 'N' or coloured black or
blue. The wire which is coloured brown must be connected to the terminal which is
marked with the letter 'L' or coloured red or brown.
-3-
GENERAL SAFETY INSTRUCTIONS
FOR COMPRESSORS
WARNING:
Please read the following instructions carefully, failure to do so could lead to serious personal injury. Read all these instructions
before operating this product and save these instructions.
IMPORTANT:
Draper Tools Limited recommends that this machine should not be modified or used for any application other than that for which it
was designed. If you are unsure of its relative applications do not hesitate to contact us in writing and we will advise you.
1. KNOW YOUR COMPRESSOR
Before operating this compressor, read and fully
understand the starting, operating and stopping
sections in this manual. Read all labels affixed to
the compressor. Learn its applications and
limitations.
2. SERVICING AND MAINTENANCE
Do not service or maintain this compressor until
you have read and understood the maintenance
section of this manual.
3. CHECK DAMAGED PARTS
Before further use of this compressor, a guard or
any other part that is damaged should be
carefully checked to ensure that it will operate
correctly and perform its intended function.
Check for alignment of moving parts, breakage
of parts and any other conditions that may effect
its operation. A guard or other part that is
damaged should be properly repaired or
replaced.
4. DISCONNECT FROM POWER SUPPLY
Before servicing, maintaining or replacing
damaged parts ALWAYS disconnect the
compressor from the power supply.
5. EARTH
This compressor is equipped with an approved
3-core power cable. The green and yellow
conductor in the core is the earth wire. NEVER
connect the yellow and green wire to a live
terminal.
6. AVOID DANGEROUS ENVIRONMENTS
Do not use the compressor in damp or wet
locations or expose it to rain. Keep the work area
well lit. Provide adequate surrounding work
space.
*Not suitable for building sites.
7. KEEP GUARDS IN PLACE
8. AVOID ACCIDENTAL STARTING
Make sure the power supply switch is off before
connecting to the power supply.
9. KEEP CHILDREN AWAY AND MAKE
WORKSHOP CHILDPROOF
All visitors should be kept a safe distance from
the work area. The power tools and workshop
should be made childproof with padlocks,
master switches or by removing starter keys.
10. NEVER LEAVE THE COMPRESSOR
RUNNING UNATTENDED
Turn the power supply off. Do not leave the
compressor until it comes to a complete stop.
11. DO NOT OVERLOAD THE COMPRESSOR
Before operating any air tool, check that the free
air delivery (FAD) from the air compressor is
equal or greater than that of the air tool to be
used. NOTE: The compressor should not start
more than nine times in one hour.
12. AIR PRESSURE
Always check the air supply pressure is equal to
or less than the air tool manufacturers maximum
operating pressure.
13. USE SAFETY GOGGLES/MASK
Wear safety goggles (which comply to a
recognised standard) at all times. Normal
spectacles only have impact resistant lenses.
They are NOT safety glasses. Also use a face
mask if a cutting operation is dusty or if
spraying paint or other toxic substances.
14. USE RECOMMENDED ACCESSORIES
For a complete range of recommended
accessories please refer to page 10 of this
manual.
IMPORTANT NOTE:
Residual Risk. Although the safety instructions and operating manuals for our tools contain extensive instructions on safe working
with power tools, every power tool involves a certain residual risk which can not be completely excluded by safety mechanisms.
Power tools must therefore always be operated with caution!
-4-
GETTING TO KNOW YOUR
COMPRESSOR
(6)
(5)
(7)
(9)
(4)
(8)
(16)
(11)
(12)
(3)
(10)
(2)
(13)
(15)
(1)
(14)
DA150/300B Shown
(1)
(2)
(3)
(4)
(5)
(6)
Air Receiver Tank
Sump Bung
Pump Unit
Dipstick/Oil Inlet
Pulley Guard
Air Filters
(7) Drive Belt
(8) Motor
(9) Overload Protection Switch
(10) Safety Valve
(11) Pressure Switch
(12) In-Line Pressure Gauge
(13) Tank Pressure Gauge
(14) Tank Bung
(15) Tank Rating Plate
(16) Pressure Regulator
UNPACKING: After removing the packing material, make sure the product is in perfect condition
and that there are no visible damaged parts. If in doubt, do not use the compressor and contact the
dealer from whom it was purchased.
The packaging materials (plastic bags, polystyrene etc), must be disposed of in an appropriate
refuse collection container. These materials must not be left within the reach of children as they are
potential sources of danger.
-5-
OPERATION AND USE
POSITIONING:
Do not stand the compressor on any surface
with a 15° or greater tilt as this will lead to
possible running problems.
Allow a minimum gap of 50cm around the
compressor to aid connection and airflow.
In addition to pneumatic air tools, your
compressor may be connected to several
accessories suitable for blowing, washing
and spraying for example.
For technical specifications and detailed
instructions, please refer to the instructions
provided with the individual accessory.
After unpacking the compressor for the first
time it will be necessary to remove the plastic
transit bung and replace it with the dipstick
supplied.
NOTE: It is advisable to store this bung,
should the compressor require transporting
in the future.
Make sure that the level of oil ranges
between the max. and the min. mark (Fig.1).
After the first 50 working hours, replace the
oil with one of those listed (see page 10).
When the installation procedure is complete,
the compressor is ready for use. Make sure
the pressure switch is positioned 'OFF'. Switch
on the power then position the pressure
switch to the 'ON' position to start the
compressor (Fig.2).
When starting the compressor for the first
time, leave it running for about 10 minutes
with the air tap (A) or the bung on the
underside of the tank completely open
(Fig.3). After this time, close air tap (A) and
make sure that pressure in the tank is correct
and that the compressor stops automatically
when the max. pressure is reached. The
pressure is monitored on gauge (B) (Fig.4).
The operation is automatically controlled by
the pressure switch which stops the motor
when the max. pressure allowed is achieved,
and starts it again when the pressure goes
below the minimum threshold (about 2 bar
less than the max. pressure).
Never unplug the compressor or switch off
the main switch to stop the compressor.
Always position the pressure switch to the
off position.
Fig.1.
Fig.2.
Fig.3.
(A)
Fig.4.
(B)
-6-
OPERATION AND USE
ADJUSTING THE PRESSURE SWITCH
(Fig.5):
Note: This is the only operation where it is
acceptable to switch the compressor off
without using the pressure switch.
To decrease the pressure switch, run the
compressor up to the desired capacity for the
pressure switch to be set. At this point, turn
the mains power off and do not operate the
red button on the pressure switch as this will
release the pressure. Disconnect the machine
from the power source before loosening
screw (D) to remove the cover. With this
removed, the adjustment bolt (C) will be
visible. Adjust this anti-clockwise gently until
the switch is heard to release the pressure.
Replace the cover and tighten the screw. The
switch will now be set to the new pressure.
To increase the pressure switch, remove the
switch cover (having disconnected the
machine from the power supply) and turn the
adjustment bolt clockwise 3 turns and
replace the switch cover. Run the compressor
up to the desired capacity for the pressure
switch to be set (do not let the compressor
run past its maximum pressure). At this point
turn the mains power off and disconnect from
the supply. Remove the cover and adjust the
bolt anti-clockwise gently until the switch is
heard to release the pressure. Replace the
cover and tighten the screw. The switch will
now be set to the new pressure.
(C)
Fig.5.
(D)
HOW TO ADJUST WORKING PRESSURE
(Fig.6):
See in the instruction manual for the rated
pressure value of the accessory you are going
to use.
By means of the pressure reducer (E) you
can adjust delivery air pressure. Just turn the
knob clockwise to increase the pressure or
anti-clockwise to decrease the pressure.
Check the operating pressure value on
pressure gauge (F).
After having used your compressor, set
pressure to zero by turning knob (E) so as to
avoid damaging the pressure reducer.
Fig.6.
(E)
(F)
-7-
OPERATION AND USE
OVERLOAD CUT-OUT (Fig.7):
The compressor is equipped with an overload
cut-out (G) which operates as a safety device
to protect the motor. The device will activate in
case of motor overload or overheating due to
operation troubles. In this case, the safety
device will automatically activate,
disconnecting the compressor and avoiding
possible motor damages.
To restart the compressor, proceed as follows:
- Allow three minutes.
- Position the pressure switch to"0" OFF.
- Manually reset the thermal cut-out.
- Position the pressure switch to "1" ON.
If you restart the compressor and the overload
cut-out releases again, turn the main switch to
position "0" OFF, unplug the equipment and
contact the Authorized Service Centre.
If disconnection is required from the air tap
assembly, ensure the tap is fully closed to stop
air loss from the tank.
NOTE: After reconnection is complete,
ensure that the tap is opened again.
It is essential to connect air line, air filter
separator and lubricator to ensure a good,
clean air supply is provided for the tool.
(NOTE: If the intended tool for use is a spray
gun, use only a filter separator as
lubrication will cause contamination of the
material being sprayed).
Draper Stock No.51857 - Air Filter,
Regulator & Lubricator.
Draper Stock No.51858 - Air Filter &
Regulator.
To ensure an optimum air supply, please
refer and carry out the following procedures
as recommended
Fig.7.
(G)
MAINTENANCE
Some of the operations listed in this section will require the compressor to be returned to an
Authorized Service Agent.
Before carrying out any service or routine operation to your compressor, ensure the power
has been disconnected and all pressure has been released from the tank, so as to prevent
any sudden unexpected restart. After any maintenance operation, make sure all components
have been fitted correctly.
-8-
MAINTENANCE
In order to keep your compressor in good
working conditions, we recommend you to
perform periodical servicing operations.
Before performing any maintenance
operation, switch off the compressor and
ensure all air in the tank is released.
Fig.8.
OPERATIONS TO BE CARRIED OUT
AFTER THE FIRST 50 WORKING HOURS:
Check that all screws are properly tight,
paying special care to the head and crank
case. Replace the lubricant with one of the
recommended oil listed in the table
(page10).
Never mix different oils together. Do not
use non-detergent oils or low quality oils
as they have very poor lubricating
properties.
Do not pour out oil in the environment.
Always contact your local body in charge
of the collection.
(H)
Fig.9.
WEEKLY OPERATIONS:
Check the oil level and if necessary top up.
Do not exceed the mark corresponding to the
max. level. Make sure the oil does not drop
below the minimum so as to avoid any
damage or seizure.
Drain condensation, while the tank is
pressurised by opening the valve (H) located
under the tank. Open the valve by turning it
anti-clockwise (Fig.8) with a container under
the valve. Keep the compressor in a position
to allow all condensation to flow out
completely.
(I)
Fig.10.
MONTHLY OPERATIONS (OR MORE
FREQUENTLY IF THE COMPRESSOR
OPERATES IN VERY DUSTY AREAS) (Fig.9):
Remove the suction filler (I) and replace or
clean the filtering component. Do not operate
the compressor without the suction filter
fitted, as foreign bodies or dust could
seriously damage the inside components.
(J)
OPERATIONS TO BE CARRIED OUT
EVERY 6 MONTHS (Fig.10):
Pull out the oil dipstick and loosen the screw
(J) to change the oil. Collect the oil into a
suitable container.
You should perform this operation when the
compressor is hot so as to allow the oil to
drain rapidly and completely. Tighten the
screw (J) in its housing and pour in the new
oil up to the max. level and no higher.
-9-
MAINTENANCE
It is advisable to clean all the finned parts of
your compressor, so as to keep the cooling
system efficient and to ensure a long work
life to your machine. Check belt tension.
Hang a weight of about 3kg at the midpoint of
the belt. The belt should flex about 10mm.
(Fig.11).
If necessary, tension up the belt taking care
not to disturb the pulley-to-flywheel
alignment (Fig.12).
Fig.11.
OPERATIONS TO BE CARRIED OUT
EVERY 2 YEARS:
Check the non-return valve and if necessary
replace the seal.
Check intake and delivery valves on valve
plates.
Recommended Oils:
Recommended oils with ISO 100 viscosity for
compressors, in accordance with DIN51506VDL 100-E Standards and ISO6521:L-DAC
Specifications (suitable for room temperature
ranging from +6°C and +25°C).
AGIP
API
BP
CASTROL
ESSO
IP
MOBIL
FINA
SHELL
TOTAL
DICREA100
CM-8X
ENERGOL CS100
AIRCOL PD100
EXX OLUB H150
CALATIA OIL ISO 100
RARUS 427
EOLAN AC 100
COREMA OIL H100
CORTUSA 100
Fig.12.
Use oils with an ISO 46/68 viscosity for a
room temperature ranging from 0°C to + 5°C
Use oils with an ISO 150 viscosity for a room
temperature ranging from + 26°C to + 45°C.
- 10 -
TROUBLE SHOOTING
USE ONLY ORIGINAL SPARE PARTS, AVAILABLE AT ALL AUTHORIZED SERVICE CENTRES.
FAULT
POSSIBLE CAUSE
REMEDY
Pressure drop in tank
Air leaks at connections
Allow the compressor to reach max.
pressure allowed. Switch it of and brush
a soapy water solution onto all air
connections. Look carefully for air bubbles
flowing out. Tighten those connections
where leaks are present.
If the problem is still present, contact the
After Sales Service.
The pressure switch
valve leaks when the
compressor is idle
Non-return valve seal defective
Contact your Local Service Centre
The compressor
stopped and does not
start
Overload cut-out tripped
See Page 8
The compressor does
not stop even though
the max. pressure
allowed has been
reached; the safety
valve operates
Incorrect Setting
Contact your Local Service Centre
The compressor does
not get to the set
pressure and
overheats
Compressor head gasket broken
or valve faulty
Contact your Local Service Centre
The compressor is
noisy with metallic
clangs
Bearing or connecting rod
seizure
Contact your Local Service Centre
The compressor does
not hold regular speed
Belt is slipping
Contact your Local Service Centre
- 11 -
NOTES
- 12 -
NOTES
- 13 -
NOTES
- 14 -
DRAPER TOOLS LIMITED,
Hursley Road, Chandler's Ford, Eastleigh, Hants. SO53 1YF. U.K.
Helpline: (023) 8049 4344.
Sales Desk: (023) 8049 4333.
General Enquiries: (023) 8026 6355.
Fax: (023) 8026 0784.
http://www.draper.co.uk
e-mail: [email protected]
YOUR DRAPER STOCKIST
©Published by Draper Tools Ltd.
No part of this publication may be reproduced,
stored in a retrieval system or transmitted in
any form or by any means, electronic, mechanical
photocopying, recording or otherwise without prior
permission in writing from Draper Tools Ltd.