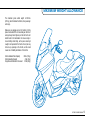
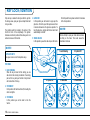
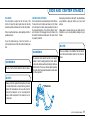
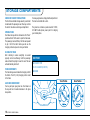
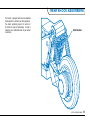
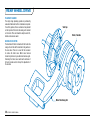
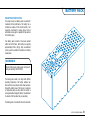
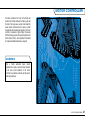
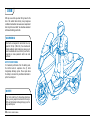
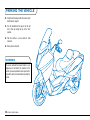
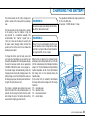
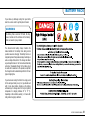
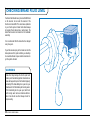
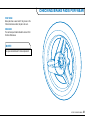
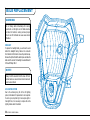
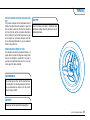
1
WELCOME!
Thank you and congratulations
for purchasing the Vectrix Maxi Scooter! You are helping the environment and your daily commute as well! We hope that you enjoy the experience! If you need any
repairs to your Vectrix or just want some friendly advice, please see your local dealer service center. This manual is provided to help you get to know your Vectrix.
Enjoy Your Vectrix
Maxi Scooter
VECTRIX ZEV OWNER’S MANUAL
TABLE OF CONTENTS
General Warranty
Symbols Contained in This Manual
Safe Riding
Maximum Weight Allowance
Vehicle Identification Number (Vin)
3
3
3
4
5
6
CONTROLS Instrument Cluster
Key Lock/ignition
Left Handlebar Switches
RIGHT Handlebar Switches/THROTTLE
7
8
12
13
14
Main Components 16
Side and Center Stand
17
Storage Compartments
18
Rear Shock Absorbers
19
Rear Wheel Drive
20
Battery Pack
21
Motor Controller 23
Use 24
Pre-Ride Checks
25
Interlocks
25
Braking
26
Parking the Vehicle
28
Charging the Battery
29
VECTRIX ZEV OWNER’S MANUAL
Maintenance Battery Pack
Checking Brake Fluid Levels
Checking Brake Pads for Wear
Bulb Replacement
Beam Setting
Fuses
Tires
Cleaning
Storing
Transporting
Troubleshooting
30
31
32
33
34
35
36
37
39
40
41
42
Technical Data Specifications
Range Performance Data
44
44
45
47
USA Information Safety Defects
Label Locations
48
48
49
SWITZERLAND INFORMATION
Power cut off information
48
48
Routine Maintenance Record
51
GENERAL
WarRANTY
Your Vectrix is warranted for twenty-four months.
To maintain the warranty you must comply with
the servicing requirements called out in the Vectrix
Warranty Book.
SYMBOLS CONTAINED IN THIS MANUAL:
WARNING!
When this symbol is shown, it means that you
must read this section. Failure to read this section
could result in injury or death!
NOTE!
When this symbol is shown, it means that there is
some important information that will help you enjoy
your Vectrix even more!
VECTRIX ZEV OWNER’S MANUAL
SAFE RIDING
In order to operate your Vectrix properly, you must
familiarize yourself with the bike’s controls and
movements.
parking to prevent it from tipping over. It is
recommended that you put down the side stand
before you dismount your Vectrix to park.
n ALWAYS ride with your license and insurance
n ALWAYS avoid parking on sand, gravel or soft
certificate in your possession.
n ALWAYS wear a safety helmet.
n ALWAYS hold both ends of the handlebar/
handgrips.
n ALWAYS remain seated while riding the Vectrix.
Do not stand while riding.
n ALWAYS obey state- and local traffic laws.
n In the event of bad weather, adjust your speed to
reflect the type of weather while obeying speed
limits.
surfaces.
n Become familiar with the handling of the Vectrix
before carrying a passenger. You should instruct
your passenger about safety on a Vectrix.
A passenger should have his hands on the
passenger grab rail or wrapped around the driver
of the Vectrix at all times that the Vectrix is in
motion.
Always use turn signals to alert other drivers of
your intentions. Use caution in bad weather when
roads become wet and slippery. Sudden braking can
cause the Vectrix to become unstable and cause an
accident.
n Never permit an inexperienced rider to ride on or
DO NOT DRINK ALCOHOL OR TAKE MIND-ALTERING
DRUGS AND RIDE
drive your Vectrix. You are responsible for telling
them about Vectrix safety and safe handling.
n ALWAYS use your turn signals to identify your
intent to change lanes or turn.
n Wear appropriate clothing to ride. A helmet,
proper eye protection, boots and gloves are a
must.
n Park in an area that is visible to others, and
always have either your center or side stand
down when parked. Do not leave the key in your
ignition unattended.
n ALWAYS maintain control of your Vectrix when
VECTRIX ZEV OWNER’S MANUAL
SAFE RIDING
These safety tips are useful and may save your life
in case of a potential accident. Please read and
understand these tips before riding your Vectrix.
Defensive driving is more important on a Vectrix
versus in a car. Always wear protective gear, but
understand that protective gear cannot totally protect
you in the event of an accident.
SAFETY RULES AND REGULATIONS
Traffic rules and regulations vary from jurisdiction
to jurisdiction. Please become aware of those rules
and regulations that apply to you before riding your
Vectrix.
PROTECTIVE APPAREL
When riding, Vectrix suggests that you always wear
a safety helmet. Studies have shown that there is
a direct correlation between head injury and a lack
of helmet use (NHTSA Traffic Safety Facts, October,
2007). It is recommended that you wear aboveankle boots and that you wear eye goggles when not
wearing a full helmet. Without eye protection wind
and debris could get into your eyes and cause an
accident.
This vehicle is not intended for off-road use.
MAXIMUM WEIGHT ALLOWANCE
The maximum gross vehicle weight is 938 lbs.
(425 kg), which includes the Vectrix, rider, passenger
and cargo.
Make sure any luggage put on the Vectrix is firmly
placed and secured. Do not overload your Vectrix or
arrange heavy items higher up on the Vectrix. Do not
attach items to the handlebars. Do not wear long or
loose clothing while riding, as the pieces could get
caught in components of the Vectrix. Do not jam any
items in any openings on the Vectrix, as this could
cause loss of stability and failure of the Vectrix.
Vectrix Underseat Trunk Capacity
26 lbs. (12 kg)
Vectrix Glove Box Capacity 4 lbs. (2 kg)
Cargo Box and Contents not to exceed
20 lbs (9 kg)
VECTRIX ZEV OWNER’S MANUAL
VEHICLE IDENTIFICATION NUMBER (VIN)
The VIN is located on the back of the frame in the
right bottom corner. It is stamped into the metal.
The Manufacturer’s Data Plate is located adjacent
to the VIN stamping on the bottom right rear
frame. This label displays the VIN (upper section),
Manufacturer’s name, type approval mark, the VIN
printed again (lower section) and the Static Sound
Level.
The VIN is a 17-digit alphanumeric code which
uniquely identifies your bike. The VIN meets NHTSA
(US) and ISO (EU) requirements. The VIN number
should be used when ordering parts so that Vectrix
can access its database to ensure that the correct
and appropriate parts are provided.
The DOT certification label is located on the front of
the bike behind the front wheel well. (USA only)
VIN #: 0XXXX00000X000000
EXAMPLE:
VECTRIX SP Z.O.O.
e00*0000*00*0000*
OXXXX00000X000000
* dB (A) – * 1/min
VECTRIX ZEV OWNER’S MANUAL
DOT
Certification
Label
CONTROLS
WARNING!
In order to properly run your vehicle, you must
read and understand this section of the manual. It
will help you get more familiar with your Vectrix.
Instrument Cluster
Left Handlebar
Regen Throttle
Ignition Switch
VECTRIX ZEV OWNER’S MANUAL
INSTRUMENT CLUSTER
15
16
17
Fig 1.0
18
20
19
21
22
23
24
Telltales
25
10
14
11
13
7
8
5
26
9
6
4
2
3
12
1
Left Status LCD
27
Speedometer / Odometer
VECTRIX ZEV OWNER’S MANUAL
Fuel Level LCD
INSTRUMENT CLUSTER
Fig 1.0 illustrates where items
1–30 are located
6.RF RANGE INDICATOR
RF signal strength for future enhancements.
1. TRIP A-B OR ODOMETER INDICATOR
Indicates mileage reading is currently displayed.
Use the select button (labeled ‘S’) to select
between Trip A, Trip B or the odometer.
7.READY INDICATOR
This is displayed when the system is ready to be
enabled.
2. TRIP ODOMETER INDICATOR
Can be displayed in either miles or kilometers by
selecting the button marked ‘K/M’.
3. ODOMETER OR TRIP A-B READING
Displays the mileage of the currently selected trip
or odometer. Use the button label “E/M” to switch
between km and MILES. If the wrench icon is
illuminated this will display an abbreviated fault
code. During charging this will display the highest
battery module temperature in C°.
4.ESTIMATED RANGE READING
Displays the estimated range available (km or
miles) based on your recent driving profile. Hard
accelerations and high speeds will decrease this
value. Soft accelerations and slower speeds will
increase this value. During charging this will
display the battery voltage.
5. BLUETOOTH INDICATOR
This indicator is installed
enhancements.
for
future
8. GO INDICATOR
The GO Indicator will light up when the system is
enabled to accelerate.
9. BATTERY CHARGE/CHARGING INDICATOR
When the system is being charged by an external
power source, the Battery Charging Indicator will
illuminate.
10.CLOCK READING
Displays the time of day in either 12 or 24 hour
format. This will display the total charge time
while charging or the remaining cool down time
during the transition mode.
11.SPEEDOMETER (KM/H – mph)
The speedometer displays your current speed
in both km/H and mph.During charging this
indicates the charge current times 10. For
example, if dial indicates 110, charge current is
11 amps.
12.ODOMETER READING
The odometer reading lets you see how many
total miles or kilometers you have traveled on
your Vectrix. During charging this will indicate the
charge mode and the charge termination voltage.
Modes are “CP” for constant power, “tr” for
transition or cool down, “EC” for end of charge,
and “CC” for constant current.
13.KM/H INDICATOR
Displays your speed in kilometers per hour.
14.MPH INDICATOR
Displays your speed in miles per hour.
15.LEFT DIR. INDICATOR LAMP TELLTALE
Flashes green when the left turn directional
is on and functioning properly. Illuminates a
steady green if one of the directionals is not
functioning.
16.PARKING/POSITION LAMPS TELLTALE
Illuminates green when the position lamps are in
use and working properly. If either is not working
the icon will flash.
VECTRIX ZEV OWNER’S MANUAL
INSTRUMENT CLUSTER
17.HIGH TEMP TELLTALE
This will illuminate in red when the battery or
key system components exceed safe operating
temperature. If the telltale is flashing, see trouble
shooting guide.
Warning!
The Vectrix will continue to operate, but at a
reduced performance level. Continued operation
could result in permanent damage.
Allow to cool.
18. SIDE/CENTER STAND TELLTALE
An amber light will illuminate if the side stand is
down or lowered.
Warning!
The Vectrix will not operate when the side is in the
down or lowered position. There is an interlock
which prevents the Vectrix from being enabled
unless the side stand is in the up position.
19. DIPPED-BEAM HEADLAMP TELLTALE
When the low beam is selected and operational,
this icon will illuminate as a steady green light. If
non-operational, this icon will flash.
10
VECTRIX ZEV OWNER’S MANUAL
20. MAIN-BEAM HEADLAMP TELLTALE
When the main beam is selected and operational,
this icon will illuminate as a steady blue light. If
non-operational, this icon will flash.
21. BATTERY TELLTALE
This icon will illuminate when the battery voltage
is low, indicating that performance and range
are limited. If the telltale is flashing, see trouble
shooting guide.
Warning!
If, after you have cooled and charged your Vectrix,
the battery telltale continues to illuminate, contact
an authorized dealer.Call authorized Dealer.
22. MAINTENANCE REQUIRED TELLTALE
When this amber colored light is illuminated,
take your Vectrix to an authorized dealer to be
checked.
Warning!
You must get your Vectrix checked if this light is
illuminated. See note on Trip Odometer about fault
codes.
23. REVERSE TELLTALE
Indicates that the Vectrix is in reverse mode.
24. RIGHT DIR. INDICATOR LAMP TELLTALE
Flashes green when the right turn directional
is on and functioning properly. Illuminates a
steady green if one of the directionals is not
functioning.
25. BATTERY LEVEL INDICATOR
The battery level indicator is a 17-bar graphic
chart that shows how much charge is left in the
battery.
26. BATTERY INDICATOR
Indicates the Vectrix is running on battery.
27. LIGHT SENSOR
The light sensor detects the level of ambient light
and adjusts the LCD backlighting.
INSTRUMENT CLUSTER
A1. km/H – mph Selector
This allows you to switch between kilometers and
miles. The pushbutton is labeled “K/M”. Simply push
the button to switch to the desired measurement.
Your desired measurement will be illuminated on the
left LCD screen.
Setting Your Clock:
Simply push the hour or minute
button to the desired time.
Note!
You can switch from 12 hour to 24 hour modes by
holding the hour button for three (3) seconds.
Note!
The default setting is kilometers.
A2. Trip A-B Odometer Selector
Labeled as an “S” on the switch assembly, it allows
you to scroll through Trip A, Trip B and the normal
odometer settings.
A3 Minute
Adjustment
A1 km/H-MPH
Selector
A4 Hour
Adjustment
A2 Trip A-B
ODO Selector
Scrolling and Resetting Trips:
By pushing the A2 button you can scroll between
the odometer, Trip A and Trip B. To reset Trip A or
B, scroll to the desired trip and press the button for
three (3) seconds.
A3. Minute Adjustment
This allows you to change the minutes on your
clock. The push button is marked with an “M” to
signify minutes.
A4. Hour Adjustment
This allows you to change the hour on your clock.
The push button in marked with an “H” to signify
hours.
VECTRIX ZEV OWNER’S MANUAL
11
Key LOCK / IGNITION
Only one key is needed to start your Vectrix, get into
the storage area, open your glove compartment and
lock your bike.
The ignition switch is located in the center of the
Vectrix in front of the stepthrough. The ignition
features a number of positions that allow you to lock
and unlock areas of the Vectrix.
4. GLOVE BOX
In this position you will be able to pop open the
glove box. To do this, push the key down and turn
it counter-clockwise to the glove box position. To
lock the glove box, simply shut the door and it will
automatically lock itself.
5. TRUNK UNLOCK
In this position you will be able to open the trunk.
Note!
To do this push the key down and turn it clockwise
to the trunk position.
Note!
Do not attempt to open your trunk while someone
is sitting on the trunk. This could cause the
mechanism to break.
1. Lock Steering
2. System Off
4. Glove Box
5. Trunk Unlock
Duplicate Keys
See your service center for duplicate keys.
Positions:
1.LOCK STEERING
When the key is turned to this setting, you are
able to lock the steering mechanism. You simply
pull out the key and your Vectrix is fully locked
until reinsertion of the key.
2. SYSTEM OFF
In this position the Vectrix will be off, including the
motor and lights.
3. SYSTEM ON
In this position you will be able to ride the
Vectrix.
12
VECTRIX ZEV OWNER’S MANUAL
3. System On
Left Handlebar Switches
1. MAIN/DIPPED BEAM SWITCH
This switch allows the user to switch from high
to low beam. Push up to select low beam to high
beam or push down to select high beam to low
beam.
2. MAIN-BEAM PASS SWITCH
This switch is used to let other drivers know that
you are passing. Pulse the switch to flash your
main beam. The switch is located on the back
side of the handlebar.
3.LEFT/RIGHT DIRECTION SWITCH
To engage the turn signal, move the switch to
the right to signal a right hand turn and move the
switch to the left to signal a left hand turn. Push
the button back to reset the switch. If a directional
is left on for more than 20 seconds and the bike
is moving, the horn will chirp to alert the rider that
the directional is still active.
Note!
Always use turn signals to make other motorists
aware of your intentions.
4.HORN SWITCH
By tapping the horn you will hear a chirping noise
to alert people you are coming. Or, if you hold
onto the horn switch, it will first chirp and then
make a louder sound.
Main-Beam Pass
Switch
Main/Dipped Beam
Switch
2
1
4
3
Left/Right
Direction Switch
Horn Switch
VECTRIX ZEV OWNER’S MANUAL
13
RIGHT Handlebar Switches/THROTTLE
1. Throttle/Regen Position
The throttle on the right handlebar is a distinctive
feature of your Vectrix. The throttle is the user
interface which determines forward motion as
well as implementing regenerative (regen) braking
and the reverse feature. The bi-directional throttle
is very simple to use.
n Roll the throttle downward (rearward) to
accelerate in the forward direction. (A)
Regenerative Braking /
Reverse
2
B
n Release the throttle and it returns to a neutral
position.
n To activate regenerative braking simply roll the
throttle forward beyond the neutral position and
you will progressively engage in regenerative
braking. (B) Always ‘cover’ the front brake lever
with the index and middle fingers of your right
hand when using regenerative braking to slow
the vehicle. This will ensure that you are ready
to apply the front brake if it becomes necessary
to slow the vehicle more quickly. Never use the
rear brake lever (on the left handlebar) by itself
or with regenerative braking without also using
the front brake lever (on the right handlebar).
Using only the rear brake may result in the rear
tire sliding, particularly when regen is used.
Be ready to pull both the front and rear brake
14
VECTRIX ZEV OWNER’S MANUAL
Acceleration
A
levers (which actuate the front and rear disc
brakes) at all times while riding, including while
using regenerative braking. See “Braking” on
Page 26.
On/Off Cut-off
Switch
RIGHT Handlebar Switches/THROTTLE
n Your Vectrix has the ability to reverse at very low
speeds to assist you with maneuvers such as
backing out of parking spots. Reverse is only
enabled when the Vectrix is completely stopped.
The Vectrix will reverse at a slow speed of
2 mph (3 km/h). Release the throttle and the
reverse drive ceases. To activate reverse from a
complete stop, return the throttle to the neutral
position or a slightly positive position (in the A
direction). Now roll the throttle forward (in the B
direction) to move in reverse. By requiring that
the throttle returns to neutral before activating
reverse, the bike is prevented from going into
reverse immediately after using regen to stop.
2. ON/OFF CUT-OFF SWITCH
The power switch is a fast, convenient method of
shutting down the Vectrix in either an emergency
or under normal operation. Use your right thumb
to operate the power switch. Push down to turn
the switch on and push up to turn the switch off.
VECTRIX ZEV OWNER’S MANUAL
15
MAIN COMPONENTS
Instrument Cluster
(Pg 8)
Rear View Mirrors
Left Handlebar Switches
(Pg 13)
Right Handlebar Switches/
Throttle (Pg 14)
Keylock / Ignition Switch
(Pg 12)
Headlight
(Pg 34)
Glove Box
(Pg 18*)
Side Stand
(Pg 17)
16
VECTRIX ZEV OWNER’S MANUAL
Center Stand
(OPTIONAL)
(Pg 17)
Rear Shock Absorber (Pg 19)
Trunk
(Pg 18)
Charging Cord
(Pg 29)
Battery
(Pg 21)
Rear Wheel Drive
(Pg 20)
Side and Center stands
Side Stand
The side stand is located on the left side of the
Vectrix. To lower the stand, push down on the side
stand bar, which protrudes out from the side stand.
Park on level hard surfaces. Avoid parking on hills or
unstable ground.
To put the stand back up, move the Vectrix to a
vertical position and lift the side stand bar with your
foot.
Center Stand (optional)
The center stand is an optional feature of the Vectrix.
To lower the center stand, push down on the thrust
arm with your foot while slowly pushing the bike in
the rearward direction. The Vectrix should “snap”
onto the stand. To disengage the center stand, rock
the Vectrix forward and make sure the center stand
is properly retracted.
Do not sit on the Vectrix while the stand is down.
Always park in an area where you are visible to other
motorists, so as to avoid possible damage to your
Vectrix.
NOTE!
Warning!
Warning!
Never park your Vectrix on soft earth. You should make
every attempt to park your Vectrix on a level, hard
surface.
The side and center stands must be in the upright
position in order to safely operate the Vectrix. Failure
to move the stand up could result in injury to both you
and the Vectrix. There is an interlock which prevents
the Vectrix from being enabled unless the side stand
is in the up position.
There is a telltale on the middle of the instrument
panel that will illuminate when the side stand is
down.
Note!
Always check the ground before putting the side
or center stand down to ensure that the ground is
stable. Hot temperatures can cause the stand to
sink into the pavement, so it is recommended to
have a small metal plate for the stand to rest on
in high heat.
Thrust Arm
VECTRIX ZEV OWNER’S MANUAL
17
Storage Compartments
UNDER-SEAT HELMET STORAGE/TRUNK
The Vectrix has a hidden storage area for your helmet
located under the passenger seat. Your key controls
the lock to the under-seat storage compartment.
OPENING TRUNK
Push down on key and turn clockwise to the “Trunk”
position while off of the seat to open the trunk area.
The passenger seat will lift up. Pull the seat upward
to get it off of the latch. Inside you will see the
charging cord and a place to store your helmet.
CLOSING THE TRUNK
After checking to ensure everything is secured
properly and not overflowing, hold the passenger
seat and bend the spring to lower the seat. The seat
will automatically lock itself.
TRUNK COMPONENTS
The trunk storage area includes the charging cord for
the Vectrix. The 8 ft (2.4m) charging cord is coiled
in the trunk.
GLOVE BOX COMPARTMENT
Your key will open your glove box. Push down on
the key and turn it counter-clockwise to the glove
box position.
18
VECTRIX ZEV OWNER’S MANUAL
To close your glove box, simply shut the compartment.
The door locks itself with a click.
The glove box contains a panel-mounted 12 VDC,
0.5 AMP mobile phone power point for charging
your mobile phone.
NOTICE
ACCESSORY PORT
12 VDC 0.5 AMPS (6 WATTS)
MAXIMUM
Trunk Position
Glove Position
Rear Shock Absorbers
Your Vectrix is equipped with dual rear adjustable
shock absorbers to enhance your riding experience.
You should periodically inspect the exterior of
the shocks for signs of fluid leakage. If a leak is
indicated, see an authorized dealer at your earliest
convenience.
Shock Absorbers
VECTRIX ZEV OWNER’S MANUAL
19
Rear Wheel Drive
PLANETARY GEARBOX
The single stage planetary gearbox is permanently
sealed and lubricated with no maintenance required.
To vent the gearbox, there is a small vent cap located
on the top side of the motor side swing arm centered
on the motor. This vent should be kept clean of dirt,
debris and excessive water.
Vent Cap
Motor / Gearbox
BRUSHLESS DC MOTOR
The brushless DC motor is mounted in the motor side
swing arm with its shaft connected to the gearbox in
the rear wheel. There is no need for the consumer
to remove the motor cover. Motor cover removal
should only be done by an authorized service agent.
Removing the motor cover could lead to entrance of
dirt and moisture and/or disrupt the adjustment of
the encoder.
Motor Side Swing Arm
20
VECTRIX ZEV OWNER’S MANUAL
Battery Pack
DESCRIPTION OF BATTERY PACK
The proper care of your battery pack is essential for
maximum Vectrix performance. The battery has a
nominal bus voltage of 125 volts DC which, if not
respected, could result in serious injury. Only an
authorized service agent is qualified to have access
to the battery pack.
Your battery pack consists of two boxes located
within the Vectrix frame. Each battery box weighs
approximately 99 lbs. (45 kg). Only an authorized
service agent is qualified to troubleshoot a battery
related issue.
Warning!
Opening battery packs is dangerous. Doing so will
void your warranty. DO NOT OPEN.
The battery pack needs to be kept within distinct
operating temperature. The battery includes two
fans, built into an air plenum, which draw cooling air
through the battery boxes. The fans run in response
to temperature and are active while the Vectrix is
running and while charging the battery. You will detect
the sound of the fans when they are operating.
The battery pack is connected to the motor controller
VECTRIX ZEV OWNER’S MANUAL
21
Battery Pack
through a 125 amp fuse. This fuse is only accessible
to qualified service technicians.
Your battery likes to be charged. You should plug it in
whenever it is convenience to do so. This is referred
to as opportunity charging.
Occasionally the estimated range and fuel gauge may
drop from a few miles/kilometers and a few bars to
zero. This means your charger memory and battery
level need to be synchronized – see troubleshooting
guide.
If this ‘drop off’ continues to occur on a regular basis
it may indicate a problem with the battery contact an
authorized dealer.
22
VECTRIX ZEV OWNER’S MANUAL
Motor Controller
The motor controller is the “brain” of the Vectrix and
provides the interface between the battery pack and
the motor. The design uses a single circuit board for
power system interconnections as well as control
components and onboard power supplies. The motor
controller incorporates Digital Signal Processing
(DSP) technology as part of the proprietary Electronic
Control System (ECS), which provides the flexibility
to incorporate additional features as required.
WARNING!
Only a Vectrix authorized dealer should
troubleshoot or repair a motor controller. Removal
of the cover and/or alteration of the motor
controller in any fashion voids the warranty and is
extremely hazardous.
VECTRIX ZEV OWNER’S MANUAL
23
Use
With any new vehicle you must first get used to the
feel of the vehicle before driving in any dangerous
conditions. Bad weather can cause even an experienced
driver to get into an accident. You should use caution at
all times while riding your Vectrix.
Warning!
This Vectrix is designed for and limited to a top
speed of 62 mph (100 km/h). You should avoid
braking suddenly. Quick braking can cause you to
become unstable and lose control of your Vectrix,
especially on loose pavement and/or wet road
surfaces.
BATTERY CONDITIONING
For maximum performance from the battery pack,
the Vectrix needs to experience five (5) initial
charge/deep discharge cycles. These cycles allow
the battery to become fully conditioned and able to
perform as designed.
Note!
Prior to the initial five (5) charge/deep discharge
cycles, you may experience a lower Vectrix range.
With each initial deep discharge/charge cycle, the
range will improve.
24
VECTRIX ZEV OWNER’S MANUAL
Pre-Ride Checks
Warning!
For safety reasons it is extremely important that
you read and understand this section. Failure to
perform these pre-ride checks could result in
serious injury or death.
CHARGE LEVEL
Look at the charge level on the right LCD module.
If there are less than four (4) bars showing, we
suggest you recharge before use.
STANDS UP
Make sure both the side stand and center stand (if
applicable) are up (retracted).
LIGHTS AND INDICATORS
When you turn the key to “System On,” you will
notice that the entire instrument panel illuminates.
After a few moments all malfunction light telltales
should go off. If they do not go off, have your Vectrix
checked at a dealer. Replace the headlight bulb if it
has burned out before riding.
TIRES
Always check both tires for punctures, tears, or worn
tread. Never ride on balding or bald tires. Maintain
tire pressure at 33 psi (2.2 bar) for the front tire and
40 psi (2.8 bar) for the rear tire.
BRAKE FLUID LEVELS
Refer to the section on brake fluid level. Make sure
that you have the required amount of fluid before
starting the Vectrix.
Interlocks
BRAKE LEVER ENABLE SEQUENCE
Once the “Ready” icon is steady ON, you can begin
the motor enable sequence. First, apply and hold
the left brake, then apply the right brake. “GO” will
appear on the left LCD. The Vectrix is now ready to
drive.
CABLES AND HARNESSES
Can only be exchanged by technically trained
authorized service agent and are not subject for
exchange in the field.
CUT-OFF SWITCH
The cut-off switch needs to be in the “on” (run)
position.
SIDE STAND SWITCH
Make sure the side stand is in the upright position.
CENTER STAND (OPTIONAL)
Make sure the center stand is in the upright
position.
“READY” INDICATION
When you turn your key to the “System On” position,
you will see the “Ready” icon in the left Liquid Crystal
Display (LCD), provided all of the interlocks are
satisfied. The “Ready” icon means that the system
is ready to be enabled.
VECTRIX ZEV OWNER’S MANUAL
25
Braking
The Vectrix Zero-Emission Vehicle includes a
patented regenerative (regen) braking throttle
which is easy to use and will improve your riding
experience. In the regen mode the motor acts as a
generator to apply a load/braking to the rear wheel
while returning energy into the battery pack.
FRONT BRAKE LEVER
To operate the front brake, pull the right hand
brake lever towards the twist grip. The braking is
hydraulically operated, so you need not pull hard on
the lever. Instead squeeze steadily and smoothly.
REAR BRAKE LEVER
To operate the rear brake, pull the left hand brake lever
towards the twist grip. The braking is hydraulically
operated, so you need not pull hard on the lever.
Instead squeeze steadily and smoothly.
26
VECTRIX ZEV OWNER’S MANUAL
PROPER BRAKING
Always ‘cover’ the front brake lever with the index
and middle fingers of your right hand when using
regenerative braking to slow the vehicle. This will
ensure that you are ready to apply the front brake
if it becomes necessary to slow the vehicle more
quickly. Never use the rear brake lever (on the left
handlebar) by itself or with regenerative braking
without also using the front brake lever (on the right
handlebar). Using only the rear brake may result in
the rear tire sliding, particularly when regen is used.
Be ready to pull both the front and rear brake levers
(which actuate the front and rear disc brakes) at all
times while riding, including while using regenerative
braking. See the REGEN section of this Manual on
Page 14 for proper use of regenerative braking.
Rear Brake Lever
Front Brake Lever
Braking
Warning!
You should always use both brake levers for the most effective braking. One lever will not provide you as
effective braking power.
Never brake suddenly or in a harsh manner. This could cause the wheels to lock and you could lose control
of the Vectrix. Bad weather, including slippery wet road, can cause braking to be less effective. Always
use caution in wet conditions. Low tire pressure can reduce braking effectiveness, so checking your tire
pressure is very important.
VECTRIX ZEV OWNER’S MANUAL
27
Parking the Vehicle
n Stop the Vectrix and put either the side or center
stand down for support
n Turn the handlebar all the way to the left and
lock it there by turning the key to the “lock”
position.
n Park the Vectrix in a area visible to other
motorists.
n Never park on soft earth.
Warning!
The use of padlocks that prevent motion is very
dangerous and can affect the operation of the
Vectrix. If you use a padlock to secure your Vectrix,
the padlock must be removed before operating the
Vectrix.
28
VECTRIX ZEV OWNER’S MANUAL
Charging the Battery
The Vectrix includes an 8ft (2.4m) charging cord
which is located in the trunk under the passenger
seat.
The male connector on the charging cord is specific
to the country of use. For instance, in Italy the
plug consists of a 4-conductor assembly. This
accommodates “hot,” “neutral,” “ground” and a
“pilot” pin. In this case the pilot pin is used by the
AC power source (charging station) to detect the
presence of the Vectrix, which in turn enables the
stationary power outlet.
To charge the Vectrix, open the trunk, remove the
cord, close the trunk taking care to route the cord
through the designated slot in the bodywork and plug
the electric two-wheel vehicle into an appropriate
120v/60Hz 220v/50Hz outlet. Once plugged in,
the onboard charger will automatically control the
charging process. During the charging process, the
battery charge icon on the left LCD will be active. As
the charge progresses, the battery level indicator on
the right LCD will increase in level.
The charge is complete when all bars have been
filled on the right LCD on the instrument panel. It is
perfectly fine to unplug the Vectrix from the outlet
and interrupt the cycle. The Vectrix will benefit by
any amount of charging you have time for.
Warning!
Use extreme caution when dealing with electricity.
Use RCD or GFI protected outlet.
The speedometer indicates the charge current times
(X) 10 on the KPH scale.
For example, 110 KPH indicates 11 amps.
Warning!
Though it is not recommended by Vectrix, if you
use an extension cord to charge the bike, make
sure that it is at least a 20A cord and it should be
no longer than 25ft (7.6 m) in length.
Charging Cord
While the bike is charging, the instrument cluster
will display several charge status items. On the left
LCD the ‘estimated range’ field indicates the battery
voltage. The ‘trip’ field indicates the highest battery
module temperature and the ‘clock’ field indicates
total charge time or time remaining during the
transition mode.
On the center LCD, the ‘odometer’ field indicates
the charge mode and the voltage limit. The charge
modes are:
‘CP’ = constant power,
‘TR’ = transition mode,
‘CC’ = constant current and
‘EC’ = end of charge.
VECTRIX ZEV OWNER’S MANUAL
29
Maintenance
Although your Vectrix requires little maintenance,
it is important that you read and follow closely the
maintenance items identified in this Manual as well as
in the Warranty Book.
Warning!
If you are unsure of the problem with your Vectrix,
take it to an autorized dealer to get it checked out or
call 1-877-VECTRIX (832-8749).
30
VECTRIX ZEV OWNER’S MANUAL
Battery Pack
If you notice any discharge coming from your Vectrix
take it to a service center to get the system checked.
Warning!
The Battery Pack is rated at 125 Volts, 30 Amp
hours. Contact with the terminals of the Battery
Pack can result in injury or death.
The onboard smart battery charger monitors the
status/condition of the Battery Pack during normal
operation as well as charging. The Battery Pack is an
integrated system of temperature/voltage monitoring as
well as cooling airflow/control. The charger will detect
any underperformance in the Pack and automatically
perform an “Equalization Charge” of the battery. Such
an event will be seamless to the operator, except that
the charge time will be extended beyond the 3 to 5 hour
typical charging time.
If you have been running the Vectrix for a long period
of time and your battery is very hot, you should wait
until it cools down before charging, as the battery
will take longer to charge when it is very hot (optimal
temperature for charging batteries 25° C/ 77° F).
Depending on the conditions, waiting 1 – 2 hours after
riding before charging is sufficient.
VECTRIX ZEV OWNER’S MANUAL
31
Checking Brake Fluid Level
Your brake fluid should never go below the MIN mark
on the reservoir. Air can enter the reservoir if the
fluid level is below MIN. This could cause problems
in your Vectrix system. Brake fluid should always
be topped off and changed on a routine basis. The
brake fluid reservoirs are located on the handlebar
assembly.
It is recommended that the brake fluid be changed
every two years.
If you find excessive play on the brake lever but the
brake pads are still in good condition, you should go
to an autorized dealer at your earliest convenience to
get the system checked.
Warning!
Brake fluid may damage the Vectrix paint and
plastic parts if accidentally spilled. Brake fluid can
cause damage and injuries if not handled properly
and safely. If the brake fluid gets on your skin, you
should wash it off immediately with running water.
If the brake fluid gets into your eyes, flush them
with running water and seek medical attention.
Never mix old and new fluid. Always check for
proper sealing.
32
VECTRIX ZEV OWNER’S MANUAL
MIN
Checking Brake Pads for Wear
Front Brake
Brake pads have a wear mark. If the grooves in the
friction material are visible, the pad is not worn.
Rear Brake
The rear brake pad material should be at least 1mm
thick for effectiveness.
Note!
See your autorized dealer for brake replacement.
VECTRIX ZEV OWNER’S MANUAL
33
Bulb Replacement
Warning!
Do not change bulbs immediately after running
your Vectrix. Let the lights cool off. Bulbs become
hot when the Vectrix is running and need proper
time to cool off. Hot bulbs can cause severe burns
if handled.
Headlight
To replace the headlight bulb, you will need to work
behind the headlight fairing. Remove the connector
from the bulb. Pull the tab to remove the protective cap.
Release the clip that holds the bulb in place and take the
bulb out of the socket. The headlight is a dual filament 2
X 35 watt Phillips HSR-1.
Note!
Always hold the new bulb from the base. Oil from
human hands can cause the bulb to turn black and
become less brilliant.
LED LIGHTING SYSTEM
Due to the extremely long life of the LED lighting
system, individual LED replacement is not expected.
If a turn signal, stop/tail light, license plate light or
trunk light fails, it is necessary to replace the entire
lighting module which has failed.
34
VECTRIX ZEV OWNER’S MANUAL
Beam Setting
The Vectrix must be in an upright position to check
the beam setting. Make sure the tires are at the
proper inflation. Have one person sit on the Vectrix.
Place the Vectrix opposite a wall, about 10 meters
away. Draw a horizontal line dictated by the headlight
center and a vertical line in line with the Vectrix axis.
It is better to perform this test in dim light. Switch on
the low beam. The height of the light spot should not
exceed 9/10 of the height from ground to headlight
center.
CORRECTING THE LIGHT BEAM
The Vectrix main/dipped beam has been precisely
set at the factory. Please contact your authorized
Vectrix dealer if resetting is required.
VECTRIX ZEV OWNER’S MANUAL
35
Fuses
Warning!
Any and all fuses need to be serviced by an
autorized dealer. Do not attempt to change these
fuses, or you could cause injury or death to
yourself and others.
The fuse protection scheme for your Vectrix limits
access to the fuses to an authorized dealer. You
should not attempt to change any fuse on your
Vectrix.
36
VECTRIX ZEV OWNER’S MANUAL
Tires
PROPER PRESSURE FOR YOUR FRONT AND REAR
TIRE
Tire pressure changes with the temperature and by
altitude. You should check the pressure on your tires
often to ensure a safe ride. The front tire should be
at 32 psi (2.2 bar) and the rear wheel should be at
40 psi (2.8 bar). If you find that the pressure in your
tire is always low and quickly changes from high
to low after being filled with air, see your autorized
dealer to inspect the tire.
Note!
Low tire pressure can result in decreased range
performance. Always check tire pressure to keep at
optimal performance.
REPAIR AND REPLACEMENT OF TIRES
Tires should be checked by an autorized dealer on a
regular basis to ensure that they have enough tread
and are not damaged or punctured in any way. If
you have any questions about your tires, see your
service agent for advice and help.
Warning!
You should replace tires with the standard size
recommended. You should avoid larger tires than
the recommended size. Failure to do this could
result in injury or death.
Note!
Always have the tires balanced after replacing them.
VECTRIX ZEV OWNER’S MANUAL
37
Tires
Proper tread depth
It is recommended to replace the tires when the tread
is below 2 mm.
38
VECTRIX ZEV OWNER’S MANUAL
Warning!
Driving on tires with little or no tread is dangerous
and could cause an accident. Checking your tread
depth is extremely important. Failure to do so
could result in riding on bald tires, which can cause
injury or death, especially in wet conditions.
Cleaning
Washing your Vectrix
As with any vehicle it is important that you wash
your Vectrix on a regular basis to keep the finish
in good condition. Never use harsh detergents or
abrasive cloths on your Vectrix.
When washing your Vectrix, follow the instructions
below:
Remove dirt and mud from your Vectrix with running
water. You may use a soft sponge or brush. Do not
use hard materials which can scratch the paint.
Wash the entire Vectrix with a mild detergent or car
wash soap using a sponge or cloth. The sponge or
soft cloth should be frequently soaked in the soap
solution.
CAUTION
When cleaning, you should avoid using a pressure
washer or high pressure water unit. These units
could damage your Vectrix.
NOTE!
Once the dirt has been completely removed, rinse off
the detergent with running water.
After rinsing, wipe off your Vectrix with a wet
chamois or clean cloth (clean cloths will minimize
scratching) and allow it to dry in the shade.
Check carefully for damage to painted surfaces. If
there is any damage, obtain “touch-up” paint and
“touch up” the damage.
Windshield Cleaning
Clean the windshield with a soft cloth and warm
water with a mild detergent. If scratched, polish with
a commercially available plastic polish. Replace the
windshield if it becomes scratched or discolored so
as to obstruct view. When replacing the windshield,
use a replacement windshield from Vectrix.
CAUTION
Cleaning with any alkaline or strong acid cleaner,
gasoline, brake fluid, alcohol or any other solvent
will damage the windshield.
Clean only with a soft cloth and warm water with
a mild detergent.
Waxing Your Vectrix
After washing your Vectrix, waxing and polishing are
recommended to further protect and beautify the
paint.
n Only use waxes and polishes of good quality.
n When using waxes and polishes, observe the
precautions specified by the manufacturer.
WARNING
Wet brakes can cause poor braking performance
and may lead to an accident.
Avoid a possible accident by expecting longer
stopping distances after washing your Vectrix.
Apply brakes several times to let heat dry the
brake pads or shoes.
NOTE!
Always allow your Vectrix to fully dry before using
it.
Avoid spraying or allowing water to flow over the
following places:
• Ignition Switch
• Break master cylinders
VECTRIX ZEV OWNER’S MANUAL
39
StorING
If you plan on storing your Vectrix for an extended
period of time, follow these procedures:
n Clean the Vectrix and allow it to dry before
storing.
n Place the Vectrix on a service stand.
n Check the Vectrix for problems every few
weeks.
n A cover protects the Vectrix from the elements
and is a good investment.
n The Vectrix must be fully charged and turned off
prior to storage.
n You should not store your Vectrix for more than
three months without re-charging the battery.
The Vectrix battery will become damaged if the above
precautions are not followed.
TRANSPORTING:
If you need to secure your Vectrix onto a pallet or
another vehicle for transporting, it is recommended
that you make use of the two ‘D’ shaped rings at the
base of the front fork triple clamp for securing the
front end of the bike and the rear of the bike can be
secured through the swing arm.
40
VECTRIX ZEV OWNER’S MANUAL
NOTE!
Do not use the plastic around the handlebars
or the throttle area to secure the Vectrix for
transporting.
TRANSPORTING
D-rings
WARNING!
Take special care of the brake hose DO NOT
CRUSH or place the belt above the swing arm.
This can cause possible damage and may result
in unsafe conditions. Carefully place the belt
under the hose and take special care NOT to pull
the brake hose too hard to weaken the connection.
See photo
Representative tie down - front and back.
D-ring locations as seen from under the bike.
Brake
Hose
Rear non-brake side: Protect the swingarm cutting
edges (one side)
Rear brake side
VECTRIX ZEV OWNER’S MANUAL
41
Troubleshooting
All of our bikes are carefully inspected before they are delivered to the customer. Even after the bikes are inspected, some technical problems can occur. The following
chart offers a guide for you to identify a problem and, if possible, fix it yourself. If you are unable to solve a problem with your Vectrix, take it to an authorized Vectrix
technician at your convenience.
42
VECTRIX ZEV OWNER’S MANUAL
Troubleshooting
Symptom
Potential Cause
Potential Solution
Scooter does not turn on
Key not properly engaged
Recheck key in ignition, turn off/on again
Scooter on but no ‘ready’ light
Power on/off switch not engaged
Recheck switch, turn off/on
Scooter plugged in to AC
Unplug scooter and store plug fr riding
Throttle not set
Call Vectrix authorized dealer for instructions
Ready light flashing
Side stand switch not engaged
Check stands/deploy and retract/check connection
Charger not working
A/C power missing
Check A/C outlet for power, A/C source check fuse/voltage
Premature charge termination
Charger and battery unsynchronized
Run bike until battery icon blinks and fuel gauge resets to ‘0’ and charge bike.
Charger firmware out of date
Call dealer for service. Technician must determine charger firmware revision and
update minimum Rev 2012, or thereafter.
Tire pressure
Inflate to correct tire pressure (see tire section)
Deformed front tire
Replace / balance front tire with the same tire supplied from the factory
Bald tire (excess wear)
Replace / balance tire with the same tire supplied from the factory
Cargo box installed
Check the bike behavior without cargo box. Never exceed the maximum load
allowed in the cargo box.
Flashing wrench / battery
No charger output
Contact your authorized dealer
Flashing wrench / battery /
temperature
Battery air-plenum
Contact your authorized dealer
Flashing temperature / battery
Battery temperature greater than 50°C
Or
Battery temperature sensor data error
Contact your authorized dealer
Flashing battery
Shorted cell
Or
15°C temperature difference at once sensor
compared to the average temperature of the
battery pack
Handlebars wobble (shimmy)
VECTRIX ZEV OWNER’S MANUAL
43
Specifications
WARRANTY:
Standard is twenty-four months
CHARGER:
1.5 kW on-board battery charger
EMISSIONS:
Zero*
RECHARGE REQUIREMENTS:
110V-230V (50/60Hz)
WEIGHT:
515 lbs. (234 kg)
RECHARGE TIME
3-5 hours
SEAT HEIGHT:
30.5” (774 mm)
BATTERY DEEP DISCHARGE CYCLES
(80% CHARGE):
1,700
STORAGE CAPACITY:
Under-seat storage for one full-faced helmet, glove
compartment below dash
MOTOR TYPE:
Brushless DC radial air-gap motor
Peak Power: 21 kW peak power at motor shaft
Max Current: 275 Amps
Max Torque: 65 Nm
GEARBOX:
Integrated rear-wheel mounted planetary gear drive
BATTERY TYPE:
Nickel Metal Hydride (NiMH)
RATED BATTERY CAPACITY:
30 Ah, 3.7 kW-h
RATED BATTERY VOLTAGE:
125V
44
VECTRIX ZEV OWNER’S MANUAL
ESTIMATED BATTERY LIFE:
50,000 MILES / 80,000 km
BRAKING:
Patented multi-function throttle provides regenerative
braking and slow speed reverse with Brembo
mechanical brakes front and rear
GROSS VEHICLE WEIGHT:
= 938 lbs. (425 kg)
TIRE PRESSURE
Front: 32 psi (2.2 bar)
Rear: 40 psi (2.8 bar)
*in operation
RANGE
Fundamentals of Vectrix Range
The range of an electric vehicle is defined as the
distance the vehicle will travel on a single full
charge of the battery pack. Just like EPA mileage
estimates on automobiles “your mileage may
vary”. Your range results are a direct reflection of
your driving habits. The more conservative you
ride the better the range you can expect from your
Vectrix.
Some of the factors which affect range include
speed, acceleration, number of star ts & stops,
as well as changes in elevation. The combination
of these factors, as you travel from one point to
another, defines your trip profile. In addition tire
pressure and payload are impor tant considerations.
Our range testing involves the equivalent of a
180 lb (82 kg) driver with no passenger or cargo
driving on a flat/level surface.
Since there are an unlimited number of potential trip
profiles we provide typical range estimates based
upon driving the Vectrix at a constant speed. We
have tested the Vectrix at constant speeds both
on test tracks and dynamometers to establish
the range performance estimates of the bike.
Remember that a constant speed trip/test involves
a single acceleration to the constant speed and a
simple stop at the end. No one actually drives on
public roadways under these conditions however
it does provide a basis for comparisons.
Operating under constant speed conditions our
data indicates the following averages:
Constant Speed
25 mph (40 km/h)
35 mph (56 km/h)
40 mph (64 km/h)
45 mph (72 km/h)
50 mph (81 km/h)
60 mph (97 km/h)
Range
65 miles (105 km)
54 miles ( 87 km)
48 miles ( 77 km)
44 miles (71 km)
36 miles ( 58 km)
20 miles ( 32 km)
In a typical urban driving environment with traffic,
traffic lights and varying driving conditions you
should expect to travel between 30 to 45 miles
on a single battery charge. During constant speed
driving on a level surface the Vectrix consumes
approximately 39 wh/km @ 40km/hr.
We suggest that you drive conservatively when you
first get your Vectrix and get to know your bike and
your commute. Once you become familiar with the
range versus performance of your bike then you can
adjust your driving characteristics if you so desire.
This applies mainly to drivers with trip profiles which
are at the edge of the range envelope. Those of you
with relatively short commutes can expect to ride
quite aggressively and reach your destination with
energy to spare.
1. Does acceleration affect range?
Acceleration is the rate which you are attempting
to increase the speed of your Vectrix. The greater
the acceleration the faster you are depleting the
energy in the battery pack. The harder and more
frequently you accelerate the more adversely you
will affect the range of your Vectrix. Being “first
off the line” means you will also be the first to
drain your energy supply.
Hard Acceleration = Reduced Range
2. Does weight affect range?
The Vectrix at approximately 500 lbs (226.8 kg)
plus a 180 lb (82 kg) driver equates to a gross
vehicle weight of 680 lbs. (308 kg) If you add
50 lbs (23 kg) of cargo the total weight you
are attempting to move is 730 (331 kg) pounds
or 7.3% increase in weight. If then you add a
175 lbs (79 kg) passenger the total weight is
905 lbs (411 kg) or a total weight increase of
33%! The more mass you are pushing/lifting the
more energy it takes to accomplish the mission.
Avoid keeping unnecessary items in your Vectrix
since it will impact your range.
Added Weight = Reduced Range
VECTRIX ZEV OWNER’S MANUAL
45
RANGE
3. Why do I get less range at higher
speeds?
It takes more energy to push a Vectrix faster
because you encounter aerodynamic resistance.
The faster you attempt to travel the more
important this factor becomes. Also it is a
fundamental characteristic of battery energy
storage systems that the amount of energy you
are able to extract from the battery is inversely
proportional to the rate at which you drawing
out the energy. If a battery pack is rated for
30 Ah if you draw 10 amperes of current you
will deliver more energy that if you are drawing
100 amperes of current. Bottom line is that the
more conservative you drive the further you will
travel on a single charge.
Faster Speed = Reduced Range
4.How does tire pressure affect range?
As the Vectrix is ridden, heat is generated in the
tires from deformation at the contact patch. Higher
inflation pressure reduces this deformation,
which results in reduced heating of the tire and
reduced energy loss. A tire that is at 2/3 the
proper inflation pressure will have as much as
30% greater rolling resistance than a tire inflated
to the specified pressure. This difference can
easily be felt when moving the vehicle manually.
More force is required to move the vehicle when
tire pressure is low. Keep the tires inflated to the
specified pressure to maximize range.
Incorrect Tire Pressure = Reduced Range
46
VECTRIX ZEV OWNER’S MANUAL
At Vectrix we understand the exhilarating feeling
you get from aggressive acceleration in either the
forward or regenerative braking modes. This is
very special machine with unique performance
characteristics. However, if maximizing range is your
primary objective, we suggest you drive sensibly and
conservatively since it will extend your range and
provide a safer ride for you and those around you.
Performance Data
MAX SPEED:
62 mph (100 km/h)
WHEELS:
Front: 120/70 -14”; Rear: 140/60 -13”
OPERATING TEMPERATURE:
14°F - 122°F (-10°C to 50°C)
WHEELBASE:
60” (1,525 mm)
ACCELERATION:
0-50 mph (80 km/h) in 6.8 seconds
CONTROLLER:
DSP and IGBT based all-digital electronic control and
motor drive system
RANGE:
35 miles (56 km/h) -55 miles (89 km/h) in average
driving conditions
MAX RANGE:
65 miles (105 km) @ 25 mph (40 km/h)
INSTRUMENTATION:
LCDs display speed, odometer, energy consumption,
battery status, estimated range and system status
FRAME:
Lightweight aluminum frame
WEIGHT ALLOWANCES:
Underseat / Trunk Capacity
26 lbs. (12 kg)
Glove Box Capacity
4 lbs. (2 kg)
Cargo Box and Contents
not to exceed 20 lbs (9 kg)
VECTRIX ZEV OWNER’S MANUAL
47
For USA Versions Only
SAFETY DEFECTS
Contact the National Highway Traffic Safety
Administration (NHTSA) if you believe that this vehicle
has a defect that could cause an accident, injury or
death. Also contact Vectrix Corporation immediately.
If the NHTSA receives multiple complaints, it could
lead to an investigation. The NHTSA may opt to
recall vehicles if it perceives a safety threat. The
NHTSA cannot deal with individual problems with
dealerships or Vectrix Corporation.
THE NHTSA CAN BE REACHED AT:
1-800-424-9393
OR YOU CAN WRITE TO THEM AT:
NHTSA
US Department of Transportation
Washington, DC 20590
END OF US REQUIREMENTS
48
VECTRIX ZEV OWNER’S MANUAL
SWITZERLAND CUSTOMERS
The key switch turns off all of the power supplies
that feed the control electronics. This makes it
impossible for the control electronics to synthesize
the waveform required to make the motor run.
LABEL LOCATIONS
The following pages (50-51) display the locations of
safety labels and the labels themselves.
2
3
1
VECTRIX ZEV OWNER’S MANUAL
49
For USA Versions Only
WARNING
Your Vectrix is equipped with a warning light when the
side stand is lowered (on).
However, it is the rider’s responsibility to ensure that
the side stand is stowed completely before starting
out.
Failure to observe this warning could result in an upset
and consequent bodily injury.
2
NOTICE
Accessory Port
12 VDC 0.5 AMPS (6 WATTS)
MAXIMUM
3
1
Label not visible without removing seat.
50
VECTRIX ZEV OWNER’S MANUAL
Routine Maintenance Record
DATE OF SERVICE
MILEAGE
SERVICE DESCRIPTION
COMMENTS
VECTRIX ZEV OWNER’S MANUAL
51
NOTES
52
VECTRIX ZEV OWNER’S MANUAL