1
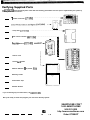
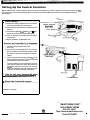
SMARTHOME.COM™ 1-800-SMART-HOME 949-221-9200 http://www.smarthome.com Order #7308KIT Voice Dialer Instructions To Set Up Auto Dial: 1. Program Phone Numbers To have your Central Controller call a friend/neighbor/relative when a break-m occurs, follow the DO NOT program in your local police department steps below to program in up to four telephone numbers. or 9 11; many States and Localities will not allow a recorded message to be sent to the police or 9 STIFF 11. FINES AND PENALTIES MAY RESULT. A B. C. D. E. Slide the Slider Switch to SEC. Press TEL CODE, then number button 3. Controller beeps. Use the number keypad to enter the phone You may select a number of any length. Press the ENTER button Use the number keypad to enter the memory number of the phone number: or 4. The Central Controller will beep twice. F. Repeat steps A-E for the other three phone numbers. 2. Record a Message A With the Slider Switch in INSTALL SEC position, press the RECORD button. The RECORD light on the display panel will appear. B. Speak into the microphone for up to fifteen seconds. A message similar to this one is suggested: Hello. This is the Johnsons home security system. The Johnsons home security system has been breached_ Wait until this message stops, then press on your phone to listen in on the Johnson household you hear anything unusual, please call the police. C. When you are finished, wait until the RECORD light disappears. 3. Review YourMessage A Attach the supplied earphone to the back of the unit. B. Place the earphone earpiece in your ear. C. Slide the Slider Switch to RUN 1 or RUN 2 position D. Press the RECORD button The RECORD light will appear, and your message will be played back through the attached earphone. 4. Testing Your Home Security System Voice Dialer To test de system, you should have installed all of the Door/Window Sensors, programmed in up to four different phone numbers, recorded your personal message, and hooked up several lamps to the Lamp Units. All completed? Good! Were ready to test the system. Note: If you selected the friends/neighbors setting earlier in the setup, let the person who will be receiving your recorded message know you are testing your system and they will be receiving your distress message. A Make sure the Central Controllers Slider Switch is in either the RUN 1 or RUN 2 position. B. Press ARM HOME. The controller will beep once and the ARM LIGHT will turn on the system does not beep, refer to the Arming and Disarming section of your manual). C. Open a monitored door or window. . The Siren will sound . All lights connected to Lamp Units will flash. . After 30 seconds, the system will seize your phone line and automatically call your designated friends/ neighbors. D. Disarm your system. l Enter your 3digit PIN. SMARTHOME.COM™ l Press the DISARM button. 1-800-SMART-HOME 949-221-9200 http://www.smarthome.com Order #7308KIT Welcome to Magnavox Home Security! Congratulations on the purchase of your Magnavox Home Security System. Your new Home Security Controller and accessories use the latest computer technology to detect and report an intrusion in your home. Your Home Security System comes with Door/Window Sensors to protect selected doors or windows from intrusion. It also comes with a Unit that turns the lights on and off at your command. If anyone breaks into your home, your home security system will sound a siren and make the lights flash. You can also program it to automatically call the professional monitoring service when an intrusion is detected. The monitoring service provides professional security monitoring and technical support 24 hours a day, seven days a week. Best of all, you can operate your Home Security System from a distance using the Full-Function Remote. You can also turn lights on and off from a telephone outside your home. This manual explains everything you need to know to install and operate your Home Security System. Table Of Introduction . . . . . . . . . . . . . . . . . . . . . . . . . . . . . . . . . . . . . . . . . . . . . . 2 3 Verifying Supplied Parts Installing the System Setting Up the Central Controller 4 Setting Up the Remote 6 Setting Up the Lamp Unit 7 Setting Up the Door/Window Sensors 9 Setting Up a Motion Detector . Setting Up Professional Monitoring Service Operating the System Arming and Disarming the System . Turning Lamps On and Off. Advanced Operations.. . . . . . . . . . . . . . . . . . . . . . . . . . . . . . . . . . . . Appendices Expanding Your System (How to Order Additional Accessories) . . . 2: Setting Up a Siren 3: Setting Up the Door/Window Sensors with an Extra Magnet Set 4: illustration of Central Controller Illustration of Full-Function Remote 6: Illustration of Remote . . . . . . . . . . . . . . . . . . . . . . . . . . . 7: Troubleshooting Guide Technical Information Important Notices Specifications FCC Information Index Warranty Information SMARTHOME.COM™ 1-800-SMART-HOME 949-221-9200 http://www.smarthome.com Order #7308KIT Verifying Supplied Parts The Home Security System comes with the following parts. Make sure each part is supplied with your system by checking it off on the list below. ......................................... Central Controller .................................................... 1 Lamp Unit Full Function Remote . . . . . . . . . . . . . . . . . . . . . . . . . . . . . . . . . ...* Remote 1 Phone Cord 1 Phone Splitter Alkaline Batteries: AA, 4 AAA, Mounting Screws Double-Stick Tape Window Stickers If you are missing any item listed above, call Now youre ready to install and program your new Home Security System. SMARTHOME.COM™ 1-800-SMART-HOME 949-221-9200 http://www.smarthome.com Order #7308KIT Setting Up the Central Controller Before setting up the Central Controller, choose the doors and windows you want to protect from intrusions. Select the lamps you want to turn on and off automatically. (You can purchase and install additional accessories such as Motion Detectors, Sirens, and Remotes.) .Insert . . . . . . . .a. . .battery. ........ ................................. a. Remove the battery compartment cover from the back of the Controller (near the antenna). b. Pull the battery attachment from the battery compartment. Central Controller Battery Attachment c. Connect the supplied battery and sides aligned as indicated) to the battery attachment. d. Insert the attached g-volt battery into the battery compartment. e. Replace the battery compartment cover. !. Connect l . . . . . . . . . .the . . . . . Controller . . . . . . . . . . . . . . . to . . . .a. . .telephone. . . . . . .. . . . . . . . . a. Plug the phone jack splitter into a wall phone jack. b. Plug one end of the supplied phone cord into the jack on the back of the Controller. Plug the other end of the cord into one of the jacks on the jack splitter. Central Controller c. Connect your phone to the jack splitter. if you have an answering machine, connect the answering machines phone cord to the splitter. This setup allows you to turn the lights on and off using a phone outside your home. (This phone con also allows you to program your security system to immediately alert the professional monitoring service when an intrusion is detected.) 3. Plug the unit into a standard AC outlet, To Electrical Outlet Extend . . . . . . . . . the . . . . . .Controller . . . . . . . . . . . . .s. . .antenna. ...................... (continued on next page) SMARTHOME.COM™ 1-800-SMART-HOME 949-221-9200 http://www.smarthome.com Order #7308KIT Setting Up the Central Controller (continued) Set . . . . .the . . . . . House . . . . . . . . . .Code . . . . . . . .Dial. ........................... a. Open the door on the Controller. b. Locate the lettered House Code Dial on the Controller. Central Controller (front view) c. Each of these letters represents different settings by which your system can operate your AC controlled devices. you live in a house, leave the dial on A. If you live in an apartment or condominium, you may want to select another letter to avoid interference from other systems. d. Use a settings. Slider Switch Enter Button screwdriver to change House Code Select a Personal Identification .Number . . . . . . . . . . . .(PIN). ..... ................................... PIN you to DISARM your security system and access your Central Controller from an outside telephone to control your lighting. a. Set the Controllers Slider Switch, located under the door, to INSTALL HA (Home Automation). b. Press the TEL CODE (Telephone Code) button. c. Use the numbered keypad to enter a your choice. PIN of d. Press the ENTER button. The Central Controller will chime twice to confirm it has accepted the PIN, e. Write your PIN below for future reference. Note: cannot select a PIN when your home security system is armed or when the alarm is triggered (either by a security breach or by the PANIC button). Note: Any time a button is pressed on the Central Controller, the RECORD light flashes. SMARTHOME.COM™ 1-800-SMART-HOME 949-221-9200 http://www.smarthome.com Order #7308KIT Setting Up the Remotes (Key Chain Remote Optional) This section explains how to set up the Full-Function and Security System. Remotes to control lamps and arm or disarm your Home start by setting up the Full-Function Remote. I. Insert . . . . . . . . .the . . . . .batteries. .................................................. a. Remove the battery compartment cover on the back of the Remote. b. Insert four AAA batteries (+ and sides aligned as indicated). House Code should match setting on Function Remote c. Replace the cover. Set . . . . .the . . . . . House . . . . . . . . . . Code . . . . . . . . Dial. .................................... a. Locate the lettered House Code Dial. b. Set the House Code Central Controller. to the same letter as the dial on the 3. Install . . . . . . .the . . . Remote. ........... a. Set the Remote to SEC. b. Set the Controllers Slider Switch to INSTALL SEC. C. Press and hold the ARM INSTANT button on the Function Remote. The Remotes green light flashes; the Controller chimes once. Full-Function Remote d. Return the Controllers Slider Switch to RUN Remote (MX2500). Now lets install the 1. Insert the batteries. ................................................................ a. Remove the battery compartment cover on the back of the Remote. b. Insert two AAA batteries and sides aligned as indicated). c. Replace the cover. 2. Install . . . . . . . . . the . . . . . .Remote. ................................................. a. Set the Controllers Slider Switch to INSTALL SEC. b. Press and hold the Remotes ARM button. The Remotes green light flashes; the Controller chimes once. c. Return the Controllers Slider Switch to RUN 1. House Code Dial should match setting on Central Controller Remote (MX2500 Only) Remote Slider Switch Your Full-Function Remote has a slider switch at the bottom which allows it to control both the lights/appliances of your home and the security functions of your system: LEFT POSITION: Lamps l-8 MIDDLE POSITION: Lamps 9-16 RIGHT POSITION: Functions (Written in Gray) SMARTHOME.COM™ 1-800-SMART-HOME 949-221-9200 http://www.smarthome.com Order #7308KIT Setting Up the Lamp Unit This feature allows you to turn lamps on and off from the Central Controller, the Full-Function Remote, the Remote, outside telephone! Are you worried about coming home to a dark house? call your Home Security System before and even Remote as youre driving into the garage. leaving the office, or press a few buttons on the Your Magnavox Home Security System comes with one Lamp Unit (Additional Lamp Units and other accessories are available, refer to page 20, Expanding Your System). Refer to the Important Notices section on page 29 before installing your Lamp Unit. Caution: On/y use incandescent lamps with this system. Open the door on your .............................................. .Lamp . . . . . . . Unit. !. Set . . . . . the . . . . . .House . . . . . . . . . Code . . . . . . . .Dial. ........................... a. Locate the lettered House Code Dial. b. Set the House Code Dial to the same letter as the House Code Dial on the Central Controller using a screwdriver. AC Outlet Set . . . . .the . . . . . Unit . . . . . . . Code . . . . . . . . Dial. .............................. a. Locate the numbered Unit Code Dial. Unit numbers 1-l 6 can be assigned to control up to 16 different accessories (lamps, appliances, and sirens). The unit numbers you assign correspond with the numbers on the Full-Function Remote and the Central Controller. For example, the unit whose dial is set to will be controlled by the number 1 on the Remote. U nit Door Unit Code Dial b. Select the unit number for the lamp you are installing. House Code Dial settings should match the Central Controller I. Close . . . . . . the . . . . .door . . . . . . on . . . .the . . . . .unit ........ i. Attach . . . . . . . . .the . . . . . unit . . . . . . .to . . . .a. . .lamp ..... a. Unplug the selected lamp. Cord b. Plug the lamp into the Lamp Unit. c. Plug the Lamp Unit a standard AC outlet. d. Turn the lamp on manually. Write . . . . . . .down . . . . . . . the . . . . . unit . . . . . . number ............. a. Remove the plastic that covers the label on the front of the Remote. b. Full-Function Remote the cellophane from the plastic cover. c. Write the locations of the installed units next to the corresponding numbers on the Remote. d. Replace the label and the plastic cover. SMARTHOME.COM™ 1-800-SMART-HOME 949-221-9200 http://www.smarthome.com Order #7308KIT House Code dial should match setting on the Central Controller Setting Up the Lamp Unit (continued) UNIT ON/OFF Turns selected lamp on or off BRIGHT/DIM Brightens or dims selected lamp /ALL LIGHTS ON Turns on lamps ALL LIGHTS OFF Turns off lamps 3. Test . . . . . . .the . . . . . unit. .......................................... a. Set the Controllers Slider Switch to RUN 1. b. Use the numbered keypad to select the desired lamp. c. Press the UNIT ON button. The selected lamp will turn on. d. Use the numbered keypad to select a lamp that is already on. e. Press BRIGHT or DIM to brighten or dim the selected lamp. f. Use the numbered keypad to select a lamp that is already on. g. Press the UNIT OFF button. The selected lamp will turn off. Lamp and Appliance Modules Your Magnavox Security System can only control lamps and appliances when the switches on the lamps and appliances are in the ON position. When you want to turn them on or off, use the Remotes or the Central Controller, not the switch on the lamp or appliance. h. Press the ALL LIGHTS ON button. All lamps attached to the Lamp Units will turn on. i. Press the ALL LIGHTS OFF button. All lamps attached to the Lamp Units will turn off. SMARTHOME.COM™ 1-800-SMART-HOME 949-221-9200 http://www.smarthome.com Order #7308KIT Setting Up the Door/Window Sensors Your Door/Window Sensors communicate with the Central Controller when an intrusion is detected. To ensure proper operation of your system, each Sensor sends a signal to the Controller on a regular basis. Your system also lets you know when batteries need to be replaced. These features ensure maximum security protection. important! Install each Door/Window Sensor one at a time. Make sure to rubberband the magnets together with the arrows facing each other before you insert the batteries for that sensor. DO NOT put batteries into a Door/Window Sensor follow these instructions may result in false security zones. you until you are ready to install that particular Sensor. Failure accidentally separate the magnets while you are installing the Sensor, or if you insert the batteries into all the Door/Window Sensors at the same time, follow these steps to start over: 1. Remove batteries from all Door/Window Sensors. 2. Press the TEST button on each Door/Window Sensor. 3. Set the Controllers Slider Switch to INSTALL SEC, then press the TEL CODE and MONITOR buttons at the same time. 4. Follow the steps below to re-install all Sensors: Uow lets set up the Door/Window Sensors. Attach . . . . . . . . . .ONE . . . . . . . Door/Window . . . . . . . . . . . . . . . . . . . .Sensor. .................. using the supplied a. Attach the Sensor to the double-sided tape or screws. b. Remove the backing of the double-sided tape on the Sensors magnets. C. Attach the magnets no more that the arrows facing each other: Sensor ree-Standing Magnet Door/Window Sensor Magnet apart with Place the free-standing magnet on the sliding or opening part of the window. Place the magnet attached to the Door/Window Sensor on the frame of the window or door (adjacent to the free-standing magnet). Vote: match up the arrows on the magnets as closely as When the frame of the door or the window is not flush the window, Figures A show different ways the magnets be positioned. actual arrows do not have to be pointed each other. However as Figure A shows, the planethat the are in have to line up. Arrows Aligned Insert batteries into ONE Door/Window .Sensor. ...................................................... a. DELAY switch TEST button the battery compartment cover from the front of the Sensor. b. insert two AA batteries (+ and sides aligned as indicated). figure A 3. Set . . . . . the . . . . . .Delay . . . . . . . .Switch. ................................... a. Locate the Delay Switch on the Sensor. Select or to determine when the Siren will sound after a security breach. Selecting MIN causes the siren to sound instantly upon security breach; MAX allows 30 seconds for entering and 60 seconds for exiting before sounding the Siren. You may want to select MAX for doors and MIN for windows. (continued on next page) SMARTHOME.COM™ 1-800-SMART-HOME 949-221-9200 http://www.smarthome.com Order #7308KIT Setting Up the Door/Window Sensors (continued) Program the Sensor. ....................................................... a. Open the door on the Central Controller and set the Slider Switch to INSTALL SEC. View of optional Sensor Placement b. Press and hold the Sensors TEST button until the green light flashes and the Controller chimes once. A Zone Indicator light appear next to the number on the inside label of the Controllers door. This means that the sensor you installed has been designated as security zone by your system. installing more than 8 Door/Window Sensors, press the BYPASS button to view Zone Indicator lights 9-16. C. Return the Controllers Slider Switch to RUN d. Write the location of the Sensor on the inside door of the Controller next to the assigned security zone number. Door/Window Sensor e. Replace the Sensors battery compartment cover. f. Repeat steps l-4 to install each additional sensor. The next available zone number will be assigned to each Sensor you install. 5. Slide the Central Controllers Slider .Switch . . . . . . . . . .to . . . RUN . . . . . . . 1. . . or . . . .RUN . . . . . . .2. .................... Maanets (Arrows across from one another in the same plane.) Door/Window Figure Programming Sensor Creating Magnet Spacers or Wood Spacer Magnets (arrows lined up in the same plane) Door/Window Sensor If your magnets are more than apart you may need to add a plastic or wood spacer below each magnet to get them closer together. When mounting sensors on a metal frame, the frame can interfere with the signal transmission. Adding a spacer can eliminate interference. Security Zone Indicators Zone 1 Zone 2 A rro w Lined s U p Zone 3 Inside Label (write security zone names here: Using Extra Magnet Sets In many homes, two adjacent windows can be protected with one sensor. See page 22 for details on wiring extra sets of magnets. (Optional accessory, refer to Expanding Your System on page 20.) A rro w s L in e l Central Controller SMARTHOME.COM™ 1-800-SMART-HOME 949-221-9200 http://www.smarthome.com Order #7308KIT Setting Up a Motion Detector Your Motion Detector will detect intrusion and report back to the Central Controller if there is a security breach. In order to ensure your Motion Detector is operating correctly, it has been designed to send a status signal back to the Central Controller on a regular basis. In this way, your system will let you know when your batteries in your Motion Detector need replacing, ensuring maximum security protection. As a result, it is important to install the Door/Window Sensors and Motion Detectors one at a time. DO NOT put batteries into a Motion Detector until you are ready to install it. Failure to follow this may result in false security zones being set up. In the event you accidentally insert all batteries at the same time, follow the following steps to start over: Remove all batteries from your Motion Detector. 2. Press the TEST button on the Motion Detector. 3. Set the Slider Selector Switch on the Central Controller to INSTALL SEC. 4. Press the TEL CODE and MONITOR buttons at the same time. 5. Follow the steps below, being careful not to put batteries into the Motion Detector until you are ready to install it. .Insert . . . . . . the . . . . batteries ............. Remove the battery compartment cover on the Motion Detector. Motion Detector (back view) Insert four AA batteries with their polarities (+ and sides) aligned as indicated on the inside of the battery compartment, Replace the cover. .Place . . . . . . . .the . . . . .unit. ........................................ a. The Motion Detector will detect motion up to 40 feet away. deciding where to place it, keep in mind: l l Avoid placing the Motion Detector near a heating/cooling vent, fireplace, TV, or other heat-generating object. Motion Detector installation CODE button The Motion Detector is triggered when a heat-generating object passes across the Motion Detector. b. To test your Motion Detector placement: Press and hold the TEST button for one second, then release it. Walk into the area you are trying to secure. 3. the Motion Detectors light blinks, it has detected you. 4. it does not blink, reposition the Motion Detector and repeat steps 2 3. Motion Detector Arm 5. When you are satisfied with Motion Detector placement and coverage, press and release TEST button, c. Leave the Motion Detector free-standing, or use the supplied Motion Detector Arm and screws to attach the Motion Detector to a wall. Screws SMARTHOME.COM™ 1-800-SMART-HOME 949-221-9200 http://www.smarthome.com Order #7308KIT Setting Up a Motion Detector (continued) Program the Motion Detector. ....................................................... a. Open the door on the Central Controller. Slide the Slider Switch to INSTALL SEC. c. Use a ball-point pen to press the CODE button on the back of the Motion Detector. This will assign a random security zone code for your Motion Detector. This code allows the Central Controller to differentiate the Motion Detector from additional Motion Detectors you may purchase later. d. Press the TEST button on the back of the Motion Detector until the Central Controller beeps. A Zone Indicator Light will appear on the Central Controller near a number on the inside door. That means the Motion Detector you just installed has been designated as that particular zone by your Home Security System. (For example, if a Zone Indicator Light appears by the number on the inside of the Central Controllers door, the Motion Detector has been installed as zone 4.) If you wish, you may write the name or location of this Motion Detector by the number on the door of the Central Controller. Central Controller Slider Switch INSTALL SEC to Door (write name of zone here, e. Slide the switch on the back of the Motion Detector to or 2. If you select the systems alarm will sound immediately when the Motion Detector detects movement. If you select 2, when the Motion Detector detects movement, it will wait a few seconds and try to sense additional movement. If it detects movement a second time, it will sound the systems alarm. SMARTHOME.COM™ 1-800-SMART-HOME 949-221-9200 http://www.smarthome.com Order #7308KIT Setting Up Professional Monitoring Service Monitoring is the most important aspectof home security and maximizes the use of your system. Your new Home Security System has a feature that can be programmed to connect the professional monitoring service when an intrusion is detected. For a small monthly fee, the professional monitoring service will monitor your system 24 hours a day, every day of the year. When security is breached, your Central Controller will automaticallysend a digital alarm signal to the central monitoring station. An Alarm Monitoring Agentwill immediately call your home to verify the status of the alarm. The Monitoring Agent will then dispatch help by providing directions to your home, as well as the exact location of the break in.The Monitoring Agent can also be designated to call you at work, on a pager, on a cellular phone, or at a neighbors. To activate the monitoring service, call I-800-675-3082. A monitoring agreement will be mailed or faxed to you. Programming the System for Monitoring. a. Set the Controllers Slider Switch to RUN b. Pick up your telephones handset. c. Call l-800-675-3082 to be connected with the central monitoring station. d. the programming instructions provided by a Customer Support Representative. !. Testing the System. a. Make sure the Controllers Slider Switch is set to RUN b. Call l-800-675-3082 to notify an Alarm Monitoring Agent that you will be testing the system. c. Press ARM HOME. The Central Controller will chime once and the ARM light will come on. d. Open a secured door or window. The siren will sound. All lights connected to Lamp Units will flash. The system will automatically call the central monitoring station. Wait 30 seconds. e. Disarm the system. Enter your 3-digit PIN using the Controllers numbered keypad. Press the DISARM button. f. The central monitoring station will call within two minutes to confirm the test. Call l-800-675-3082 if the central monitoring station has not called within two minutes. l l l l l Flashing Record Light A flashing record light indicates your Central Controller cannot dial out to the monitoring station. Connect your Central Controller to a phone jack and call l-800-675-3082 for assistance. SMARTHOME.COM™ 1-800-SMART-HOME 949-221-9200 http://www.smarthome.com Order #7308KIT Arming and Disarming the System This section explains how to arm and disarm your new When the system is armed and security is breached, the siren sounds and lamps attached to Lamp Units flash for four minutes. a monitoring system is not disarmed, it automatically calls the professional monitoring service to report an intrusion, The system then re-arms, all lights remain on, and the Controller s ARM light flashes. Also, a zone light on the Controller will indicate which zone was breached. Your Home Security System can be armed and disarmed using the Central Controller, the Full-Function Remote, and the Remote. There are also different modes in which your system can be armed. The two primary modes are HOME and AWAY: ARM HOME: Arms all Door/Window Sensors but disables the Motion Detector(s) (optional accessory). This allows you to move inside your home without setting off the alarm. ARM AWAY: Arms all Door/Window Sensors and Motion Detectors (optional accessory). The Full-Function Remote provides two additional settings in the HOME or AWAY mode: INSTANT: Arms system immediately. DELAY: Arms system after a 60 second exit delay; allows 30 seconds to disarm the system when entering your home. Before arming and disarming your system, you must select a RUN setting. Select either RUN RUN or RUN 2. When unarmed, the system does not chime when a secured door or window is opened. RUN 2: When unarmed, the system will chime twice every time a secured door or window is opened. USING THE CENTRAL CONTROLLER Arming the System: Make sure the Controllers Slider Switch is set to RUN or RUN 2. 2. Press ARM HOME or ARM AWAY. Note: see illustration on the next page, HOME: The system instantly arms all Door/Window Sensors. The Controller chimes once, and the ARM light comes on. AWAY: The Controller chimes for 60 seconds before the system becomes fully armed. Also, a delay allows you to the system when entering your home. If the Central Controller chimes continually in two tones, one or more of the security zones is either open or is failing to check in. TC locate the problem look at the Zone Indicator Light on the Central Controller. The zone(s) which are not secured will: Stay lit if the door/window is open. l To correct the situation, close the door/window. 2. Flash slowly if the Door/Window Sensor is failing to check in. l Replace the batteries in the Door/Window Sensor. SMARTHOME.COM™ 1-800-SMART-HOME 949-221-9200 http://www.smarthome.com Order #7308KIT Arming and Disarming the System (continued) Disarming the System: Enter your 3-digit PIN. 2. Press DISARM; the Controller chimes twice. Arming and Disarming System with Central Controller ARM HOME button BYPASS button DISARM button Numbered Keypad Arming the System with the Central Controller Select the desired RUN mode. 2. Press ARM HOME to arm just the Sensors. Press ARM AWAY to arm the Door/Window Sensors and the Motion Detector, if you have one. Disarming the System with the Central Controller Enter your PIN number. 2. Press the DISARM button. SMARTHOME.COM™ 1-800-SMART-HOME 949-221-9200 http://www.smarthome.com Order #7308KIT Arming and Disarming the System (continued) THE FULL-FUNCTION REMOTE the System: Set theControllers Slider Switch to RUN or RUN 2. 2. Make sure you are withinfeet of the Central Controller. 3. Set the Remotes Slider Switch to SEC. 4. Press HOME/INSTANT, HOME/DELAY, AWAY/INSTANT, or AWAY/DELAY. The green light on the Remote flash Controller chimes once, and the Controllers ARM light comes on. Disarming the System: Make sure you are within 40 feet of the Central Controller. 2. Set the Remotes Slider Switch to SEC. 3. Press one of the DISARM buttons. The green light on the Remote flashes and the Controller chimes twice. 4. Check the Controller ARM s light to make sure the system is disarmed. Note: When an alarm is triggered, the Controllers ARM light continue will to f/ash after the system has been disarmed with the FunctionRemote. Toclear theARM light, enter your PIN and press DISARM on theController. Full-Function Remote A R M H O M E I N S T A Nbutton T ARM HOME DELAY button A R M A W A Y I N S T A Nbutton T ARM AWAY D E L A Ybutton Slider Switch set in S E C position to arm/disarm system SMARTHOME.COM™ 1-800-SMART-HOME 949-221-9200 http://www.smarthome.com Order #7308KIT Arming and Disarming the System (continued) USING THE REMOTE (MX2500 Only) The Remote always arms the system in the ARM AWAY/INSTANT mode. When using the ARM AWAY/INSTANT mode, avoid tripping an alarm by arming and disarming the system outside your home. Arming the System: 1. Make sure the Controllers Slider Switch is set to RUN 1 or RUN 2. 2. Exit your home. (You must be within feet of the Controller.) 3. Press the Remotes ARM button. Thk green light on the Remote flashes. Disarming the System: Press the DISARM button on the Remote. 2. Check the Controllers ARM light to make sure the system is disarmed. Note: When an alarm is triggered, the Controllers ARM light will continue to flash after the system has been disarmed with the Remote. To c/ear the ARM light, enter your PIN and press the DISARM button on the Controller. Now you know how to arm and disarm your Remote. using the Central Controller, the Full-Function Remote, and the Remote (Optional) -ARM button DISARM button SMARTHOME.COM™ 1-800-SMART-HOME 949-221-9200 http://www.smarthome.com Order #7308KIT Turning Lamps On and Off You can turn all lamps attached to the Lamp Unit on and off from the Central Controller or the Full-Function Remote. The Remote will turn lamps(s) set to unit code 1 on or off. You can also call your Home Security System from any outside phone to control lamps. rurning lamps on and off with the Central Controller Set the Controllers Slider Switch to RUN or RUN 2. 2. Use the numbered keypad to select the number of a lamp that is off. 3. Press the UNIT ON button. The selected lamp turns on. Press the number of a lamp that is on. 5. Press and hold the BRIGHT or DIM buttons to brighten or dim the light. Only one light can be brightened or dimmed at a time. 6. Press the number of a lamp that is on. 7. Press the UNIT OFF button. The selected lamp will turn off. 8. Press the ALL LIGHTS ON button. All lamps attached to Lamp Units will turn on. 9. Press and hold the ALL LIGHTS OFF button. All lamps currently on will turn off. rurning lamps on and off with the Full-Function Remote Choose the correct Slider Switch position, Set the Remotes Slider Switch to to control lamps set to numbers 1-8. l l l Set the Remotes Slider Switch to 9-l 6 to control lamps set to numbers 9-16. Set the Remotes Slider Switch to SEC to control all of the lamps simultaneously. 2. Press the appropriate ON/OFF button. Vote: You can use the buttons, the buttons on the Full-Function Remote just as you did on the Central Controller. use the Switch must be set to SEC. rurning a lamp(s) on and off with the LIGHTS Remote Press the ON button, Lamp(s) set to unit number will turn on. 2. Press the OFF button, Lamp(s) set to unit number 1 will turn off. SMARTHOME.COM™ 1-800-SMART-HOME 949-221-9200 http://www.smarthome.com Order #7308KIT Advanced Operations Feature: With the Panic feature, you can instantly trigger an alarm even when your system is unarmed. Activating a Panic alarm will cause the siren to sound and will make the lights flash four minutes. A monitored system will automatically call the professional monitoring service to report an emergency in your home. To use the Panic feature: Press the PANIC button on the Central Controller, the Full-Function Remote, or the remotes, hold the PANIC button for 2 seconds.) Remote. (When using the 2. To disarm: Central Controller: Enter your PIN and press DISARM. Remote Controls: Press DISARM. Phone Control Your Magnavox Home Security System allows you to call your Controller from anywhere outside of your home. Use a touch-tone phone to turn lamps on/off. Note: You can not use this feature with Forwarding or Voice Messaging service. 1. Call home using a touch-tone phone. 2. In approximately seconds, the Central Controller will answer the phone and beep three times. If you own an answering machine, wait until the outgoing message and beep are finished. 3. Enter your 3-digit PIN and wait for three beeps to confirm acceptance of your PIN. 4. Enter the number of the lamp you want to turn on or off using the telephone keypad. For example, to select unit number 1, press to select unit number 13, press 1, then 3. Or, if you want to turn all of the lamps on or off, press 0. 5. Select one of the following options: a. Press the * button to turn the selected lamp on. The system beeps three times. b. Press the # button to turn the selected lamp off, The system beeps twice. 6. Repeat steps 4-5 for additional lamps. 7. Hang up the phone. SMARTHOME.COM™ 1-800-SMART-HOME 949-221-9200 http://www.smarthome.com Order #7308KIT Setting Up a Siren (optional accessory) Your Home Security System is super-safe. It has two alarms: one in the Central Controller and one siren. Both will sound if your security has been breached. The stand-alone Siren, which is louder than the alarm on the Central Controller, will sound approximately five seconds after the Central Controllers alarm. I. Open the door on the Siren. ....................................................... !. Set the house code. ....................................................... a. Locate the House Code Dial (the one with letters A-O written around it). b. Set the House Code Dial to the same letter as the House Code Dial on the Central Controller (step 5, Setting Up the Central Controller, page 5). Standard Household Electrical Outlet Set the unit number. ....................................................... a. Locate the Unit Number Dial (the one that has the numbers l-1 6 written around it). b. Press a unit number for the Siren you are installing. (It can be any unused unit number. You probably wont control the Siren manually, as you will a lamp or appliance, so select a high unit number, such as 15 or 16.) Close . . . . . . . .the . . . . . door . . . . . . . on . . . . .the . . . . .unit. ......................... Plug . . . . . . . the . . . . . .unit . . . . . .into . . . . . .an . . . .AC . . . . .outlet. ..................... a. Decide where to place the Siren. Since this is a secondary alarm, you may want to place it far away from the Central Controller. install the Siren upstairs or in the garage so you can hear the Siren clearly, regardless of where you are in the house. Unit Number Siren House Code Dial Setting should match dial on Central Controller Siren b. Plug the unit into a standard household electrical outlet. Remote Siren Delay When an intrusion is detected, your remote siren will sound approximately 5 seconds after the Central Controllers siren. Central Controller SMARTHOME.COM™ 1-800-SMART-HOME 949-221-9200 http://www.smarthome.com Order #7308KIT Setting Up the Door/Window Sensors with an Extra Magnet Set (optional accessory) Many homes have two doors and windows that can be protected by a single sensor using the Extra Magnet Set. See the illustration below on how to wire the Extra Magnet Set to your Home Security System. Single Wire Double Wire Split Apart Wiring the Magnets Notice on the diagram that the double wire coming out of the sensor is split apart. Each lead is screwed onto a different magnet. The last connection required is a wire from the left magnet to the right magnet. SMARTHOME.COM™ 1-800-SMART-HOME 949-221-9200 http://www.smarthome.com Order #7308KIT Central Controller ARM Light Appears when your system is armed. PANIC Button Instantly triggers the alarm. RECORD Light Flashes anytime a key is pressed. \ \ I \ Time Off Button \ When in INSTALL HA, use to stop the system from Slider Switch Use to install and operate the system. Operation Mode. Alarm does not sound when system is unarmed. R U N 2: Operation Mode. System chimes when a secured door or window is opened and the system is unarmed. INSTALL SEC: you to install Sensors and Remotes, to clear false zones, and to program monitoring INSTALL HA: Allows the system to learn your lighting patterns when used with the Lifestyle button. BAT. LOW Light RUN 1: Appears when the Controller needs a new battery. , Power Light Appears when your system is turned on and plugged into an ARM HOME B Instantly arms all Do Sensors, but not Motion Detectors (optional accessory). Zone Indicator Lights Represents Sensors devices that have been assigned security zone numbers. Also indicates unit numbers when in INSTALL HA. BYPASS Button to view zone lights ENTER Button 16. Use when installing the Light Sensor and Lifestyle Mode. DISARM Button Enter your PIN and press DISARM to stop a PANIC alarm or to disar the system. Numbered Keypad Use to select lamps/appliances to turn on/off; use to enter your PIN; and use to program professional monitoring.. MONITOR Button UNIT ON/OFF Button Use to turn lamps on and off. ALL LIGHTS Buttons Use to turn on or off all lamps connected to a unit. Press to contact the professional monitoring service. Press to clear false zones when pressed with the TEL CODE button (while in INSTALL SEC). BRIGHT/DIM Use to brighten or dim lights attached to Lamp Units. House Code Dial I Use to set a house code with which Central Controller its AC-powered devices. Battery Compartment one battery here. TEL Button Use to program your PIN. Full-Function Remote PANIC Button Press and hold for seconds to instantly trigger an alarm. ARM AWAY Instant Button With the Slider Switch (see below) in SEC tion, system arms all Sensors instantly. ARM HOME INSTANT Button \ With the Slider Switch (see below) in SEC position, system instantly arms allsensors except Motion Detectors (optional accessory). ARM HOME DELAY Button DISARM Buttons With the Slider Switch (see below) inSEC position, press these buttons to disarm your system. With the Slider Switch (see below) in SEC position, system arms all sensors except Motion Detector (optional accessory) after a 60 second delay. ARM AWAY DELAY Button With the Slider Switch (see below) in SEC position, system fully arms after a 60 second delay. ON Buttons Turns lights on when the Slider Switch is set to l-8 or OFF Buttons Turns lights off when Slider Switch is set to i-8 or 9-16. ALL LIGHTS ON Button Turns all lights on when the Slider Switch (see below) is set to SEC. ALL LIGHTS OFF Button Turns all lights off when the Slider Switch (see below) is set to SEC. BRIGHT/DIM Buttons House Code Dial to set a house code with which your Central Controller operates its AC-powered devices. Selected house code must match house code on the Central Controller. Brightens or dims a lamp attached to a Lamp after that Units number has been pressed. Slider Switch Controls specific lamps when set to l-8 or Arms, disarms, and turns all lights on/off when set to SEC. SMARTHOME.COM™ 1-800-SMART-HOME 949-221-9200 http://www.smarthome.com Order #7308KIT Remote (MX2500 only) PANIC Button Press and hold for ger an alarm. ON Button Press to turn on lamp(s) set to Unit 1 OFF Button Press to turn off lamp(s) set to Unit 1 seconds to instantly trig- ARM Button (Instant/Away) Press from outside your home to instantly arm the system. DISARM Button Press before entering your home to disarm the system. SMARTHOME.COM™ 1-800-SMART-HOME 949-221-9200 http://www.smarthome.com Order #7308KIT Magnavox Home Security Troubleshooting Guide Problem Solutions Possible Cause .amp has been dimmed or lamp has been turned Brighten off or turn on selected lamp. ghts wont turn on. ights w ont turn on or off. hasnt been turned on manually Manually turn on lamp. is set to different house code. Change house code to match the Controller. is fluorescent. Use incandescent lamp. unit number pressed on Remote. Check the unit number on the Lamp Unit. have not been pressed firmly enough. Press buttons firmly. Make sure Record light flashes. _amp Unit has been set to different house code Set house code to match Central :han the Central Controller. has been set to different house code than Central Controller. Set the Remotes house code to match the Central Controller. Remotes Slider Switch not in correct position forMove Remotes Slider Switch to correct position for Lamp Unit number (i.e. 1-8 or 9-16). Lamp Unit number. Press correct unit code for the lamp. Lamp Unit set to different unit code than unit number you are pressing. Lamp Unit connected to a wall outlet that is con-Make sure the wall outlet switch and the lamp are on. trolled by an on/off switch. ights wont brighten/dim. Lamp has built-in dimmer. Lamp Unit not selected before pressing BIGHT/DIM. turn on randomly. Controller wont do anything. Lamps with built-in dimmers should not be used with Lamp Units. Press desired Lamp Unit number before pressing BRIGHT/DIM. Neighbor has same house code. Change house code on the Central Controller, Remote, and Lamp Unit. No power. Plug Central Controller into a wall outlet. enter Personal identification Number (PIN). Buttons are not being pressed firmly enough. Set switch on Central Controller to INSTALL HA. Firmly press TEL CODE button, enter your 3-digit PIN, then press the ENTER button. Slider Switch on Central Controller not in INSTALL Move Slider Switch on the Central Controller to HA position. INSTALL HA position. System is armed. Disarm system. Alarm has been triggered. Disarm system. Remote Control has already been installed. Set Central Controller to RUN 2, then press DISARM on Remote. If the Controller chimes, the unit has already been installed. System was left in INSTALL SEC position. Sensors1) Remove all batteries from the Sensor until you Controller chimes randomly while installing are ready to install that specific Sensor. batteries were inserted too soon. Sensors. 2) Move Slider Switch to INSTALL SEC. 3) Press the TEL CODE and MONITOR buttons simultaneously to erase all Sensors. See manual to install all Remotes and Sensors. SMARTHOME.COM™ 1-800-SMART-HOME 949-221-9200 http://www.smarthome.com Order #7308KIT Magnavox Home Security Troubleshooting Guide Enter correct PIN. ontroller locks up. Unplug Central Controller from Remove battery. Reinstall battery. Plug Controller back into ull-Function Remotes Slider Switch in wrong Set switch to SEC. IN wasnt entered. Enter PIN before pressing DISARM button on the DISARM, ARM, and DISARM with remotes. magnets were separate PIN and DISARM button not pressed. PIN not entered correctly. Enter PIN, then press DISARM button. Set Central Controllers Slider Switch to INSTALL HA. Press the TEL CODE button. Re-enter a 3-digit PIN and press ENTER. Controller will chime. SMARTHOME.COM™ 1-800-SMART-HOME 949-221-9200 http://www.smarthome.com Order #7308KIT Magnavox Home Security Troubleshooting Guide turn lights on/off over phone. Remotes house code set to different letter than that of the Central Controller or Lamp Unit. Set Remote Controls Lamp Unit and Central Controller to the same letter. Remote has not been installed. Install Remote using instruction provided. Remotes Slider Switch is in the wrong position. Move Remotes Slider Switch to correct position. (i.e. l-8; 9-16; SEC). Buttons have not been pressed firmly enough. Press buttons firmly. Make sure green light on remote flashes. User has Voice Mail or Call Forwarding. Discontinue service(s); system not compatible. Incorrect PIN was used. system. ies are low or dead. Door/Window Sensor wire has been cut or causing reduced range of Sensor. Extend or add wire on Door/Window Sensor. range due to Central Controller beingmoved since original installation. to a new, centrally-located position in the house. Door/Window Sensor or Motion Detector is shielded by object betweenSensor andCentral Move Central Controller to new central location. False zone has been created during installation. 1) Remove all batteries from Sensor until you are ready to install that Sensor. 2) Move Slider Switch to INSTALL SEC. 3) Press TEL CODE and MONITOR buttons simultaneously (erases all Sensors so you can start again). SMARTHOME.COM™ 1-800-SMART-HOME 949-221-9200 http://www.smarthome.com Order #7308KIT Important Notices To ensure safety when using your it is VERY important to operate it correctly. Please read the following information before installing your system. DONT use a Lamp Unit to control a fluorescent light, a fan, or any kind of appliance. DONT use a Lamp Unit to control a lamp or fixture which already has a dimmer, DONT use an Appliance Unit (optional accessory) to control something which would be dangerousif turned on remotely while unattended, such as an empty coffee pot or an electric fan with poorly-protected blades, etc. DONT leave a wireless intercom or baby monitor in the permanent transmit or Talk mode. Its trans- missions could block out transmissions from the Central Controller or the Remote Controls. DONT install the following items to Lamp and Appliance Units (optional accessory): LAMP UNIT: l any lamp/bulb that exceeds 300 watts. APPLIANCE UNIT (optional accessory): l appliance rated l appliance that operates a Am. resistive (such as a coffee pot or heater). l televisions that exceeds l lamp that exceeds 500 watts inrush current. hp motor load or higher. watts. SMARTHOME.COM™ 1-800-SMART-HOME 949-221-9200 http://www.smarthome.com Order #7308KIT Specifications Base Unit Power Supply Operating Voltage Frequency Battery Supply Battery Low Voltage Standby Time Telephone Interface 120 60 Hz 10% 2% 20 h (Run Mode, No Zone Indicators Lit) Connection Mode 2-Wire Standards and Approvals FCC parts 68 and 15; UL Auto Dialing Line Seizure Delay Between Calls RF Receiver Characteristics RF Frequency RF Range Antenna Type Miscellaneous Audible Alarm Level Operating Temperature Range Quality Index Packaging 3 seconds 310 MHz Normal range 40 ft., Max 100 ft. (when signal unobstructed) Telescopic at 1 m (Typ) 95 0 C 50 C Reliability and Quality 99.5 for 1995 Bulk packaging designed to pass shipping tests Specifications are subject to change without notice. SMARTHOME.COM™ 1-800-SMART-HOME 949-221-9200 http://www.smarthome.com Order #7308KIT