1
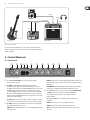
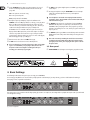
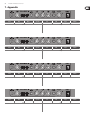
User Manual
V-TONE GM108
True Analog Modeling 15-Watt Guitar Amplifier with
Original 8'' BUGERA Speaker
2
V-TONE GM108 User Manual
Table of Contents
Important Safety Instructions....................................... 3
Legal Disclaimer.............................................................. 3
Limited warranty............................................................. 3
1. Introduction................................................................ 4
1.1 Before you get started....................................................... 4
2. Wiring Hints................................................................ 4
3. Control Elements........................................................ 5
3.1 Front panel............................................................................. 5
3.2 Rear panel.............................................................................. 6
4. Basic Settings.............................................................. 6
5. Audio Connections..................................................... 7
6. Specifications.............................................................. 8
7. Appendix..................................................................... 9
3
V-TONE GM108 User Manual
Important Safety
Instructions
Terminals marked with this symbol carry
electrical current of sufficient magnitude
to constitute risk of electric shock.
Use only high-quality professional speaker cables with
¼" TS or twist-locking plugs pre-installed. All other
installation or modification should be performed only
by qualified personnel.
This symbol, wherever it appears,
alerts you to the presence of uninsulated
dangerous voltage inside the
enclosure - voltage that may be sufficient to constitute a
risk of shock.
This symbol, wherever it appears,
alerts you to important operating and
maintenance instructions in the
accompanying literature. Please read the manual.
Caution
To reduce the risk of electric shock, do not
remove the top cover (or the rear section).
No user serviceable parts inside. Refer servicing to
qualified personnel.
Caution
To reduce the risk of fire or electric shock,
do not expose this appliance to rain and
moisture. The apparatus shall not be exposed to dripping
or splashing liquids and no objects filled with liquids,
such as vases, shall be placed on the apparatus.
9. Do not defeat the safety purpose of the polarized
or grounding-type plug. A polarized plug has two blades
with one wider than the other. A grounding-type plug
has two blades and a third grounding prong. The wide
blade or the third prong are provided for your safety. If the
provided plug does not fit into your outlet, consult an
electrician for replacement of the obsolete outlet.
10. Protect the power cord from being walked on or
pinched particularly at plugs, convenience receptacles,
and the point where they exit from the apparatus.
11. Use only attachments/accessories specified by
the manufacturer.
12. Use only with the
cart, stand, tripod, bracket,
or table specified by the
manufacturer, or sold with
the apparatus. When a cart
is used, use caution when
moving the cart/apparatus
combination to avoid
injury from tip-over.
13. Unplug this apparatus during lightning storms or
when unused for long periods of time.
14. Refer all servicing to qualified service personnel.
Servicing is required when the apparatus has been
damaged in any way, such as power supply cord or plug
is damaged, liquid has been spilled or objects have fallen
into the apparatus, the apparatus has been exposed
to rain or moisture, does not operate normally, or has
been dropped.
15. The apparatus shall be connected to a MAINS socket
outlet with a protective earthing connection.
16. Where the MAINS plug or an appliance coupler is
used as the disconnect device, the disconnect device shall
remain readily operable.
Caution
These service instructions are for use
by qualified service personnel only.
To reduce the risk of electric shock do not perform any
servicing other than that contained in the operation
instructions. Repairs have to be performed by qualified
service personnel.
1. Read these instructions.
2. Keep these instructions.
3. Heed all warnings.
4. Follow all instructions.
5. Do not use this apparatus near water.
6. Clean only with dry cloth.
7. Do not block any ventilation openings. Install in
accordance with the manufacturer’s instructions.
8. Do not install near any heat sources such as
radiators, heat registers, stoves, or other apparatus
(including amplifiers) that produce heat.
LEGAL DISCLAIMER
TECHNICAL SPECIFICATIONS AND APPEARANCES
ARE SUBJECT TO CHANGE WITHOUT NOTICE AND
ACCURACY IS NOT GUARANTEED. BEHRINGER,
KLARK TEKNIK, MIDAS, BUGERA, AND TURBOSOUND
ARE PART OF THE MUSIC GROUP (MUSIC-GROUP.COM).
ALL TRADEMARKS ARE THE PROPERTY OF THEIR
RESPECTIVE OWNERS. MUSIC GROUP ACCEPTS NO
LIABILITY FOR ANY LOSS WHICH MAY BE SUFFERED
BY ANY PERSON WHO RELIES EITHER WHOLLY OR
IN PART UPON ANY DESCRIPTION, PHOTOGRAPH
OR STATEMENT CONTAINED HEREIN. COLORS AND
SPECIFICATIONS MAY VARY FROM ACTUAL PRODUCT.
MUSIC GROUP PRODUCTS ARE SOLD THROUGH
AUTHORIZED FULLFILLERS AND RESELLERS ONLY.
FULLFILLERS AND RESELLERS ARE NOT AGENTS OF
MUSIC GROUP AND HAVE ABSOLUTELY NO AUTHORITY
TO BIND MUSIC GROUP BY ANY EXPRESS OR IMPLIED
UNDERTAKING OR REPRESENTATION. THIS MANUAL
IS COPYRIGHTED. NO PART OF THIS MANUAL MAY
BE REPRODUCED OR TRANSMITTED IN ANY FORM
OR BY ANY MEANS, ELECTRONIC OR MECHANICAL,
INCLUDING PHOTOCOPYING AND RECORDING OF ANY
KIND, FOR ANY PURPOSE, WITHOUT THE EXPRESS
WRITTEN PERMISSION OF MUSIC GROUP IP LTD.
ALL RIGHTS RESERVED.
© 2013 MUSIC Group IP Ltd.
Trident Chambers, Wickhams Cay, P.O. Box 146,
Road Town, Tortola, British Virgin Islands
LIMITED WARRANTY
For the applicable warranty terms and conditions
and additional information regarding MUSIC Group’s
Limited Warranty, please see complete details online at
www.music-group.com/warranty.
4
V-TONE GM108 User Manual
1. Introduction
This one is for keeps!
With the GM108 you’ve got your hands on a sizzling-hot guitar amp that will
push your buttons in all the right places!
Simply cool, simply amazing.
Our one-of-a-kind “V-TONE Analog Modeling” gives you the hottest, most “in”
guitar amp sounds on earth without placing unreasonable demands on the
amount of background knowledge you need to have. The V-TONE GM108 has
everything you need to create exactly the sound you want right at your fingertips.
Wanna change the sound of your amp in a second? Simply use one of the switches
to select another amp or another speaker. And that’s it! Combined with all the
other settings that you can make, you can produce an entire array of different
sounds. And all that without getting yelled at by the neighbors: just plug in your
headphones and start playing! But beware:
◊ High-volume music can damage your hearing and/or your headphones.
Turn the MASTER control to zero (all the way to the left) before you
power up your amp. Always try to play at appropriate volume levels.
Absolute power and tube sound
Protecting your hearing aside, if you crank up your V-TONE GM108, it can cause
quite a stir in your practice room or even on the stage ;-). How your amp is wired
is shown in figures 2.1 and 2.2.
The GM108 with “V-TONE Analog Modeling” gives you a tube sound full of life
that will simply blow you away. From crystal-clear all the way to ultra-distorted,
anything and everything is possible.
In doing so, you remain in full control over the volume: you can create the same
sound, regardless of whether you play at bedroom levels or if you play at full blast
in your practice room.
Jam!
The V-TONE GM108 is simply an awesome practice amp because its CD input
lets you jam to your favorite CDs—without upsetting your neighbors! If you
want (or are told!) to keep it on the quiet side, all you need is some headphones.
The BEHRINGER HPS3000, for example, is the perfect choice for exactly that!
The electronic components of your V-TONE GM108 are well protected in its robust
steel casing. The casing also has high-quality, environment-friendly MDF wood
that is covered with high-resistance leatherette. Your GM108 won’t leave you
stranded even during tough stage use.
◊ The purpose of this manual is to familiarize you with all the functions
of your new amp so you put to good use all that the amp has to offer.
After you have read it through, keep it somewhere where you can later
find it. It’s of no use to you when it’s lost ;-).
1.1 Before you get started
The GM108 was carefully packed at the factory to assure it will survive the
rigors of the road. If the cardboard packaging looks like it’s been through a lot,
please inspect the contents and look for indications of damage. In case your
amp is damaged, DO NOT send it directly to us. Instead, first notify the
store where you bought it as well as the carrier who made the delivery.
Otherwise, you may void your warranty.
Always make sure your V-TONE GM108 gets enough air flow and never put it near
the heating or other heat-emitting equipment to avoid damage to the amp.
2. Wiring Hints
The following illustrations show you how to connect your guitar to the amp.
If you want to use stomp boxes or an effects pedal to experi-ment with different
new sounds, simply connect the guitar directly to the input of your effects unit.
Of course, you will need an additional cable for this purpose to connect the
output of the effects unit to the amp input.
If you own an electronic tuner, you should hook it up pre effects unit to
avoid interference.
◊ Your amp’s speaker is automatically muted when you insert a plug into
the headphone connector (10) .
EP2000
main
outputs
EUROLIVE B1520 PRO
input
instrument input
line input
output
ADJUST
1
2
3
4
GAIN / VOLUME
2ND FUNCTION
COPY
PEDAL
CONFIGURE
BASS EQ
PRESENCE
BYPASS/TUNER
XENYX1204FX
X V-AMP (optional)
electric guitar
Fig. 2.1: V-TONE GM108 setup (example)
V-TONE GM108
5
V-TONE GM108 User Manual
CD input
HPS3000
CD player
instrument input
headphones output
output
input
ADJUST
1
2
3
4
GAIN / VOLUME
2ND FUNCTION
COPY
PEDAL
CONFIGURE
BASS EQ
PRESENCE
BYPASS/TUNER
X V-AMP (optional)
electric guitar
V-TONE GM108
Fig. 2.2: Live setup (example)
Fig. 2.2 shows how your GM108 can be connected to a sound reinforcement
system. This way, your amp can hold its turf even when used for performing live
or with a loud band.
3. Control Elements
3.1 Front panel
(1)
(2)
(3) (4) (5)
(6)
(7)
(8)
(9)
(10)
(11)
(12)
Fig. 3.1: Front panel control elements
(1) Use the INST(RUMENT) INPUT connector to hook up your guitar.
Use a standard ¼" TS cable.
(2) The DRIVE control regulates how much distortion you produce
(depending on what amp, mode and speaker combination you select).
The DRIVE control works in unison with the MASTER control. To some extent,
the DRIVE control also affects the volume. To achieve the same volume
level, turning DRIVE down means you have to somewhat increase MASTER.
The more you crank up DRIVE, the louder it will get, so that you can finally
adjust the volume using MASTER. This way, you can greatly vary your sound
and still be in charge of volume.
For guitar pros: You can use the volume control of your guitar as a creative
tool as well. The more you turn it up, the more distortion you end up with!
(3) The AMP switch lets you decide which one of the three classically inspired
guitar amp sounds you wish to recreate.
TWEED: Offers the legendary American clean sound, with dynamic bass and
clear transparence.
BRITISH: “Aggressive” in the mids, tough and full of punch, that’s how you
can describe this setting. You get the classic rock sound of the most famous
British amps.
CALIF(ORNIAN): Lead and hot rhythms sounds are what you get with this
setting. This is the amp for that typical Nu Metal Californian sound.
(4) Use the MODE switch to select one of the three settings (CLEAN, HI GAIN
and HOT) for the basic sound you selected with the AMP switch.
The following description gives you some rough idea about the
many possibilities.
Experiment with DRIVE to come up with exactly the sound you are
looking for!
CLEAN: as the name says, clean sound, without distortion.
HI GAIN: ranges from “crunchy” to strongly distorted sounds.
HOT: heavily distorted sound with endless sustain and an extra dollop
of presence.
6
V-TONE GM108 User Manual
(5) Use the SPEAKER switch to adjust yet another parameter: select one of
the three outstanding loudspeaker simulations that best fits the amp
you go with.
UK: 4 x 12" speaker in an enclosed casing.
US: 2 x 12" open-back speaker.
FLAT: specially tailored for the GM108.
(6) Hook up the output of your CD player, tape deck or walkman to the
CD INPUT connector. An MD player will do too. This way, you can play music
CDs or even CDs accompanying guitar-playing books and practice at the
same time. Of course, you can do the same using your stereo, but then you
couldn’t hear both signals simultaneously via your headphones!
The CD INPUT comes as a standard ¼" TRS stereo jack connector. If your
CD player features RCA outputs, then you’ll need an adapter or an adapter
cable. You can get both at most audio stores. Fig. 5.3 in chapter 5 shows
you what such an adapter looks like. You can also use a mono cable (fig. 5.4)
without damaging the amp or your CD player.
(7) Wanna have more bass? Then crank LOW all the way up.
(8) The MID control is used to lower or increase mid frequencies.
◊ If you are playing alone, lower these frequencies relative to bass/highs
to get a cool sound. When you’re playing in a band, increase these
frequencies relative to bass/highs to cut through. Just keep on
tweaking your sound until you get it right!
(9) The HIGH control regulates high frequencies. Use HIGH to get your guitar to
sound “sharper”.
(10) Hook up your headphones using the HEADPHONE connector. Your amp’s
loudspeaker is automatically muted as soon as your headphones
are connected.
◊ Some headphones can’t handle extremely high volumes without
beginning to distort. Turn the LEVEL control somewhat down until you
notice the distortion is gone.
(11) The MASTER control governs the overall volume of your V-TONE GM108.
MASTER should always be at zero (all the way to the left) whenever you
hit POWER or when you unplug the cable out of your guitar or your amp.
Otherwise, loud crackling noise can occur, and they are good for neither your
amp nor your ears.
(12) Use POWER to power up your GM108. You should always make sure that the
POWER switch is in the “Off” position when initially connecting the unit to
the mains.
◊ Please take note: Merely switching the unit off does not mean that
it is fully disconnected from the mains. When not using the unit for
prolonged periods of time, please unplug the unit’s power cord from
the power outlet.
3.2 Rear panel
(13) SERIAL NUMBER. Go to behringer.com and register your purchase online.
(13)
1
Fig. 3.2: GM108 rear panel
4. Basic Settings
The following four illustrations show you how you can setup your V-TONE GM108.
These settings greatly differ from one another and let you fully exploit the sound diversity of your amp. That way, you have a solid foundation for working on
developing your own, recognizable sound and tone.
This setting creates a clear sound that is ideal for finger picking. If you want to use stomp boxes, this setting will be very helpful: The unique sound of your effects will
come through more strongly.
Fig. 4.2: Basic setting CLEAN 2
7
V-TONE GM108 User Manual
This is a great setting for playing country, jazz or blues.
A hint: Using the pickup closest to the guitar’s neck lets you achieve a rich, clean sound. Try using two pickups at the same time. You’ll create an open, bell-like sound.
Fig. 4.3: Basic setting CRUNCH
This setting is optimal for distorted rock guitar parts and power chords.
To get a tighter sound, try using the pickups located farther away from the guitar neck.
Fig. 4.4: Basic setting LEAD
This hot lead guitar sound rocks!
With the almost endless choice of different sounds you have at your fingertips,
you will soon develop your own playing style and broaden the limits of your skills.
¼" TRS headphones connector
strain relief clamp
sleeve
This goes for all settings: What guitar you use with your V-TONE GM108 will also
influence the overall sound of your playing. That’s why we can only give you hints
that will make getting started easier. The bulk of the work lies in your hands.
ring
tip
◊ Most guitars sound at their best when volume and tone controls on the
sleeve
ground/shield
guitar are turned as far up as they go.
Experiment with all controls to get more experience and to figure out how to get
the sound you like. When they find a setting they like, many experienced guitarist
write down this setting to remember it for future use. On page 9 you will find
amp illustrations in which you can enter your own favorite settings.
A hint: Photocopy this page so you can keep on re-using it in the future!
ring
right signal
tip
left signal
Fig. 5.2: Wiring of a stereo headphones connector for use with CD INPUT
5. Audio Connections
R
The guitar input of the BEHRINGER V-TONE GM108 comes as mono
¼" TS connector.
◊ Please keep in mind that all equipment has to be grounded at all times.
For your own protection, never change or disable the grounding on
your equipment or on the cables you use!
Unbalanced ¼" TS connector
L
tip
ring
sleeve
R
sleeve
sleeve
tip
L
tip
Fig. 5.3: Stereo adapter cable
strain relief clamp
sleeve
tip
sleeve
tip
sleeve
(ground/shield)
tip
(signal)
Fig. 5.1: Wiring of an unbalanced ¼" TS connector for use with INSTRUMENT INPUT
Fig. 5.4: Mono adapter cable
sleeve
tip
8
V-TONE GM108 User Manual
6. Specifications
Audio Inputs
Guitar input connector
¼" TS mono connector
CD input connector
¼" TRS stereo connector
Audio Outputs
Headphone output connector
¼" TRS stereo connector
System Specifications
Power amp output
15 Watts RMS into 4 Ohms
Loudspeaker
Type
8" vintage design guitar speaker
Impedance
4 Ohms
Power handling
20 Watts
Power Supply
Mains Voltage
USA/Canada
120 V~, 60 Hz
Europe/U.K./Australia
230 V~, 50 Hz
Japan
100 V~, 50 - 60 Hz
Dimensions/Weight
Dimmensions (H x W x D)
approx. 322 x 357 x 162 mm
(approx. 12 11/16 x 14 1/16 x 6 3/8")
Weight
approx. 5.15 kg (approx. 11.3 lbs)
BEHRINGER is constantly striving to maintain the highest professional standards. As a result of these efforts,
modifications may be made from time to time to existing products without prior notice. Specifications and
appearance may differ from those listed or shown.
9
V-TONE GM108 User Manual
7. Appendix
Drive
Amp
Mode
Speaker
Low
Mid
Notes:
Drive
Amp
Mode
Amp
Speaker
Low
Mid
Mode
Amp
Master
Speaker
Low
Mid
High
Master
High
Master
Song:
Mode
Notes:
High
Song:
Notes:
Drive
Master
Song:
Notes:
Drive
High
Speaker
Low
Mid
Song:
10
V-TONE GM108 User Manual
FEDERAL COMMUNICATIONS
COMMISSION COMPLIANCE
INFORMATION
V-TONE GM108
Responsible Party Name:
MUSIC Group Services US Inc.
Address:
18912 North Creek Parkway,
Suite 200 Bothell, WA 98011,
USA
Phone/Fax No.:
Phone: +1 425 672 0816
Fax: +1 425 673 7647
V-TONE GM108
complies with the FCC rules as mentioned in the following paragraph:
This equipment has been tested and found to comply with the limits for a Class B
digital device, pursuant to part 15 of the FCC Rules. These limits are designed
to provide reasonable protection against harmful interference in a residential
installation. This equipment generates, uses and can radiate radio frequency
energy and, if not installed and used in accordance with the instructions, may cause
harmful interference to radio communications. However, there is no guarantee that
interference will not occur in a particular installation. If this equipment does cause
harmful interference to radio or television reception, which can be determined
by turning the equipment off and on, the user is encouraged to try to correct the
interference by one or more of the following measures:
• Reorient or relocate the receiving antenna.
• Increase the separation between the equipment and receiver.
• Connect the equipment into an outlet on a circuit different from that to which the
receiver is connected.
• Consult the dealer or an experienced radio/TV technician for help.
This device complies with Part 15 of the FCC rules. Operation is subject to the
following two conditions:
(1) this device may not cause harmful interference, and
(2) this device must accept any interference received, including interference that may
cause undesired operation.
Important information:
Changes or modifications to the equipment not expressly approved by MUSIC Group
can void the user’s authority to use the equipment.
We Hear You