1
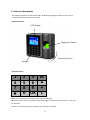
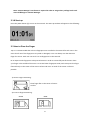
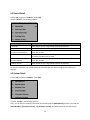
DL-A Biometric Access Control System USER'S MANUAL Table of Contents 1. General Information ......................................................................................................... 1 1.0 Notification.................................................................................................................... 2 1.1 System Overview ........................................................................................................... 2 1.2 Main Features................................................................................................................ 2 2. Basic Concepts ................................................................................................................. 4 2.1 Basic Concepts............................................................................................................... 4 2.1.1 User Enrollment ................................................................................................... 4 2.1.2 User Verification .................................................................................................. 4 2.1.3 Match Threshold Levels ....................................................................................... 4 2.1.4 User ID Number ................................................................................................... 5 2.1.5 Authority (Status) Levels ...................................................................................... 5 2.1.6 Start-up ................................................................................................................ 5 2.2 How to Place the Finger ................................................................................................ 6 2.2.1 More Tips for Fingerprint Record ........................................................................ 7 3. Enrollment and Verification Procedures ........................................................................... 8 3.1 Enrolling User ................................................................................................................ 8 3.1.1 Types of Enrollment ............................................................................................. 9 3.1.2 Fingerprint & Password ..................................................................................... 11 3.2 Testing an Enrollment ................................................................................................. 12 3.3 Backup Enrollment ...................................................................................................... 12 4. System Options ............................................................................................................. 13 4.1 System Options ........................................................................................................... 13 4.1.1 Date Time ........................................................................................................... 13 4.1.2 Language ............................................................................................................ 13 4.1.3 Format................................................................................................................ 13 4.1.4 Advanced Options .............................................................................................. 14 4.2 Log Options ................................................................................................................. 15 4.3 Communication Options ............................................................................................. 15 4.4 Access Control ............................................................................................................. 16 4.4.1 Access Control Setting ...................................................................................... 16 4.4.2 Access Control Function .................................................................................... 17 4.4.3 Time Period Definition ...................................................................................... 17 4.4.4 Grouping Function ............................................................................................ 18 4.4.5 User Access Control Setup ................................................................................ 20 4.4.6 Lock Delay ......................................................................................................... 20 5. System Information ....................................................................................................... 21 6. Specification .................................................................................................................. 22 CAUTION: Changes or modifications not expressly approved by the party responsible for compliance could void the user's authority to operate the equipment. 1. General Information This chapter explains the outlook of David-Link Biometric/Fingerprint Door Access Control Terminal and its basic functions in details. External Overview LCD Display Fingerprint Sensor Proximity Sensor Keypad Keypad Function 1 4 7 2 5 8 0 3 M 6 ▲ 9 ▼ OK C OK: Press to confirm your settings and/or present operation M: Press to enter the menu options. Admin/manager’s fingerprint authentication, if any, will be required C: Press to exit the menu options and/or cancel present operation 4 : Press to scroll up/down the menu : Press to turn on/off the power Number: Press number 0---9 to select or input David-Link Door Access Control Terminal is a simple, easy-to-use terminal. It can be installed at any area where access of the entries requires authority. This terminal combines the latest fingerprint recognition technology with multiple levels of security control to provide the safest environment. 1.0 Notification Do not attempt to service the terminal yourself. Opening the terminal will void your 1- year manufacturer’s limited warranty. Always follow the instructions in this user’s manual. 1. Do not place the terminal in direct sunlight. Bright light may significantly affect fingerprint reads. The terminal is designed for indoor use within a temperature range of 32-110ºF (0-43ºC). Keep the terminal away from heat sources. 2. This terminal is intended to be used as Door Access Control System. Do not use this terminal for other purposes. The terminal warranty does not cover defects or damages arising from improper installation, improper storage, abuse, ordinary wear-and-tear or unauthorized service. 3. Please save your data and records in USB thumb drive or in your computer periodically. David-Link is not responsible for any lost data and records from the terminal and software. 1.1 System Overview DL-A is a Door Access Control System designed for any size of office environment with up to 3,000 authorized users. The system verifies user’s identity based on individual matching fingerprint. 1.2 Main Features • Identification Method: Fingerprint, RFID Card, Password, Fingerprint + Password, or Fingerprint + RFID Card • Identification Speed: ≤ 1 second • Fingerprint Capacity: 3,000 • Management Record Capacity: 1,000 • Storage Capacity: 60,000 • Verification Mode: 1:1 and 1:N 5 • FRR: ≤ 1% • FAR: ≤ 0.0001% • Communication: TCP/IP, RS485, USB • USB Thumb Drive Download Function • Lock Output: NO/NC • Access Control Interface: Wiegand 26/34 • DC/Current: 12V/1A 2. Basic concepts 2.1 Basic concepts This section contains definitions and descriptions of David-Link Biometric Fingerprint Access Control concepts including: • • • • • User Enrollment User Verification Match Threshold Levels User ID Numbers Authority (Status) Levels 2.1.1 User Enrollment During user verification, live fingerprint scan is compared with the matching stored fingerprint template to confirm user’s identity. Each enrollment process takes less than 1 second. All ten fingers can be enrolled and assigned to the same ID number or the same user. Ideally, one finger from each hand should be enrolled so that in case one finger is injured, the alternate finger can still be verified. It is recommended to enroll the left and right index fingers for enrollment. 2.1.2 User Verification Verification process starts when a user enters an ID number, places a finger on the fingerprint sensor, or inputs a password combination for comparison with the stored template. 6 2.1.3 Match Threshold Levels Match Threshold Levels establishes a balance between False Acceptance Rate (FAR) and False Rejection Rate (FRR). FAR is the frequency of a non-authorized user is falsely recognized and granted access to the system. FRR the frequency of an enrolled and authorized user, who should be granted access to the system, is denied on the basis that the system did not recognize. FAR and FRR affect each other. Lower FAR yields to higher FRR. You can set match threshold levels on a per-use basis. The higher the threshold is set, the higher the security is ensured; however, it is recommended to leave this setting as default, threshold value = 3, since the default threshold is commonly accepted as the balance of FAR and FRR rate. In case of fingerprint verification difficulty, one can enter ID number before fingerprint verification (1:1 match) or lower the matching threshold (1: N). Table 2-1 Match threshold description 2.1.4 User ID number Before the fingerprint enrollment, a user is assigned with a User ID Number. This ID number is matched with a user’s identity and the matching fingerprint template during verification process. An ID number is assigned sequentially based on availability; however, you may choose any ID number as desired. 2.1.5 Authority/Privilege Level David-Link DL-A Door Access Control System contains authority/privilege levels: • • • • User: one whose identity must be verified in order to gain access into a facility or to have his/her attendance recorded. Enroll Manager: One who only has access to enroll a new user. General Manager: One who has access to all menu functions, except advanced settings. Super Manager: One who has access to all functions and is allowed to make any change in the system setting. 7 Note: A Super Manager’s enrollment is required in order to assign other privilege levels such as Enroll Manager or General Manager. 2.1.6 Start-up Press the power button [0] to turn on the terminal. The Start-up window will appear as the following: 2.2 How to Place the Finger Tips: It is recommended that at least 2 fingerprints are enrolled in the terminal for each user in the event that if one of the fingerprints is injured or damaged, a user can always user the alternate finger for entries. Each user can enroll 1 to 10 fingerprints in the terminal. DL-A requires each fingerprint to be pressed 3 times in order to successfully enroll the user. Place your finger in the middle of the sensor. To ensure better fingerprint reads, each time press the finger flat and firmly on the center of the sensor surface and cover as much of the sensor surface as possible. 1) Correct Finger Positioning: Place finger flat on the center of sensor surface. 2) Incorrect finger Positioning: Vertical Offset 8 Inclined Lower Note: Please adopt the correct way to place your finger; David-Link is not responsible for the malfunctioning results arising from improper pressing manners. 2.2.1 More Tips for Fingerprint Reads 9 3.0 Enrollment and Verification Procedures This chapter describes user enrollment and verification processes. The following topics are included: • Enrolling User • Testing an Enrollment • Enrolling a User with the Display Finger Option On • Verifying Your Identity • Hints for Successful Enrollments Note: A manager’s fingerprint authentication, if any is set up previously, is required before a new user can be enrolled. For information, see “Authority/Privilege Level” on2.1.5” 3.1 Enrolling User If this is the first enrollment in the new system, everyone is allowed to enroll himself/herself in to the system. However, if there is an Enrollment Manager or above authority level enrolled in the system, you will need a manager or above authority level to confirm for a new enrollment by verifying the enroller or above authority level personnel’s fingerprint before new user enrollment. There are many verification method options for a new user enrollment: fingerprint, proximity card, password, or any combination of the above three. Fingerprint enrollment ideal for most of the people who have better quality fingerprints. Any combination of the three (3) verification method options is for few people with poor quality of fingerprints. To start the enrollment process, press [M], the Enrollment Manager or above authority level personnel, if any, presses his fingerprint grant access to menu options and the following message appears on the display: 10 Press [OK] to enter the Register menu, the following message is displayed: Press [OK] to start the User Enrollment. Then select from the following verification method options: Press [OK] to start the New Registration process. The following message is then displayed: 3.1.1 Types of Enrollment 1. Fingerprint Enrollment 1) Select Fingerprint and press [OK] for new user enrollment and a new enroll ID# will appear: 11 2)Input the Enroll No. (Range: 1 to 999999999) or simply press [OK] to use the first available Enroll No. in the terminal, it will then prompt you to place your finger into the scanner 3)Press the same finger three times to complete the enrollment. Lift your finger each time when you hear a beep sound. When you have successfully been enrolled in the terminal, the display will show “Enroll OK!” 2. Password Enrollment 1) Select Password and press [OK], for new user enrollment and the following message appears: 2) Input the Enroll No. (Range: 1 to 999999999) or simply press [OK] to use the first available Enroll No. in the terminal, the following message appears: 12 3) Input the password (up to 8 digits) then press [OK], the following message appears: 4) Input the password again then press [OK] to save the enrolled data, you may repeat the same processes again for another enrollment. 3. ID Card 1) Select ID Card and press [OK] for new user enrollment, the following message will appear: 2) Input the Enroll No. (Range: 1 to 999999999) or simply press [OK] to use the first available Enroll No. in the terminal, the following message appears: 13 3) Place the ID card near the scanner and the card number will appear, the following message is then displayed: Press [OK] and you have successfully saved the ID Card into the system. 4. 1) Fingerprint & Password Select FP&Pass, then press [OK], for new user enrollment, the following message appears: 2) Input the Enroll No. (Range: 1 to 999999999) or simply press [OK] to use the first available Enroll No. in the terminal, it will then prompt you to place your finger into the scanner 3) Press the same finger three (3) times to complete the enrollment. Lift your finger each time when you hear a beep sound. When you have successfully been enrolled in the terminal, the following message appears for your password enrollment: 14 4) Input your password, the following appears: 5) Input the password again then press [OK], once you successfully entered the password the message “Enroll OK!” will appear. Press [OK] to save. 5. Fingerprint & Card 1)Select FP&Card, then press [OK], for new user enrollment, the following message appears: 2) Input the Enroll No. (Range: 1 to 999999999) or simply press [OK] to use the first available Enroll No. in the terminal, it will then prompt you to place your finger into the scanner 3) Press the same finger three (3) times to complete the enrollment. Lift your finger each time when you hear a beep sound. When you have successfully been enrolled in the terminal, the following message appears for you to scan your ID card: 15 4) Place the ID card near the scanner and the card number will appear, the following message is then displayed Press [OK] and you have successfully saved the Fingerprint and ID Card into the system. 3.2 Testing the Enrollment To confirm if a user is enrolled in the system, simply place a finger on the fingerprint sensor for verification. In case of the event the fingerprint quality is poor, try using another finger or other verification methods (password and proximity card) for enrollment. 3.3 Backup Enrollment To create back up enrollment for any existing user, you must select either Finger, Password, or ID Card option when prompted. Input the correct employee ID # to create back up enrollment. Then repeat the steps for different types of enrollment in 3.1.1. Note: Where system memory permits, it is always recommended to have at least two fingers enrolled for each long-term user. 16 3.4. Managers Three options will be displayed; Enr Man, Gerl Mgr, and SuperMgr. The system requires the SuperMgr to be enrolled first before you can add any type of Manager. After selecting the SuperMgr option, you will be prompted to register or create a backup. Instructions are shown in 3.1.1. 3.5. Delete User 1) Press [M], select “Delete”, press [OK], the following appears: 2) Input the User ID, press [OK] to confirm. Follow the prompts to delete user. Note: Each time a user is deleted, the terminal deletes only 1 fingerprint or password. If a user is registered with multiple fingerprints, the Delete process has to be repeated until all registered fingerprints and passwords are deleted. For example, if a user with 2 registered fingerprints is to be deleted, during the first delete process, a user’s first registered fingerprint will be deleted. The following appears for confirmation of deleting first registered fingerprint and Press [OK]: After pressing [OK], the second registered fingerprint is automatically shown as the following for the confirmation of deleting the second registered fingerprint: 17 Continue to press [OK] until all registered fingerprints, Passwords, or ID Cards are deleted. 3.6. USB Download 1) Press [M], select “Register”, then select “U-down”, the following appears: Glog & Del All Glog Enroll Data Load Data Description Allows you to transfer all users’ attendance records to USB thumb drive and delete all records saved in the terminal. Allows you to only transfer all users’ attendance records to USB thumb drive (without deleting records saved in the terminal). Allows you to transfer all employee data including ID numbers, fingerprint templates, proximity cards, and password to USB thumb drive. This serves as a purpose that if there are multiple terminals via USB thumb drive eliminates the need of having employees to register with multiple terminals. Allows you to load all employee data including ID numbers, fingerprint templates, proximity cards, and password to the device from a USB thumb drive. 18 4.0. Advanced Options 1) Press [MENU], select “Advanced”, and then press [OK]. 4.1. Device Select the “Device” option Setting Delete All Rec Del Enroll Info CancelManager Language DateFormat Screen Saver Admin Qnty Volume 1:N Identify Init. 1:1 Verify Auto Off Default Setting Descriptions Delete all records stored in the terminal. Delete all personnel information (fingerprint, password, or proximity card ID) stored in the terminal. Eliminate manager’s privilege, so the user has no access to the menu functions. Change device language. Support: English, Deutsch, Portuguese, French, Japanese, Korean, Spanish, Traditional Chinese, Chinese Simplified. Set the system’s date format Turn on screen saver when there is no action detected within # of minutes. Set up number of managers allowed in the terminal. Set system volume (1-10). Verify sensitivity setup (users are not recommended to change this setting). Verification sensitivity for ID and Fingerprint setup (users are not recommended to change this setting). Verify user by fingerprint, ID Card, and/or password. Select from: F/P/C: fingerprint, password, or ID card verification C+P: both ID card and password verification F+P: both fingerprint and password verification F+C: both fingerprint and ID card verification C: ID Card verification P: Password verification Set terminal to sleep mode when idle for a specific number of minutes. Restore device to factory default settings, and all current setting will lose. 4.2 Set Time Select “Set Time” to adjust the current date and time settings as the following appears: 19 Default English YMD No 5 6 3 40 F/P/C No To change the date, press and Finally, press [OK] to complete. 4.3 . Then input the correct time on the keypad for time settings. Record Setting 1) Press [M], select “Advanced”, and press [OK]. 2) Select “Logs”, the following appears: 3) Press [1] or [2] to set the warning when the terminal’s memory capacity can only save # more log records before the memory is full. (Enter the number of log records to remind you of the terminal’s memory capacity approaching to its limit). [1]: number of Administrator’s records for reminder warning; [2]: number of User’s records for reminder warning. 4) Press [3] to set number of minutes before a user’s other punch is accepted by the terminal. This function serves the purpose to avoid duplicate punches (Enter # of minutes from 1-255). 20 4.4 Set Communication Select “Set Com” Option, the following message appears: • • • • • • • • • • 4.5 Machine ID: Terminal unique ID (range: 1 to 255). Baud Rate: Choose from 9600, 38400, or 115200. IP address: Enter the IP address according to your networking options. The default IP address is 192.168.1.204. Subnet Mask: Networking connection with the terminal setup. Default Gateway: Networking connection with the terminal setup. Port #: TCP communication port, the default setting is 5005. Password: Set a password (range 1 to 999999) Server IP: Enter the IP address according to your networking options. The default IP address is 192.168.1.200. Server Port: Networking connection with the terminal setup. Server Required: Gives you the option to require a server. Access Control Features • • • • • • • • • • Grouping access control Access control and simple attendance records included Inner integrated single door controller, simple installation. Red and green lights on the panel Device removal alarm function Standard access control steel installation Internet management software, monitor several machines USB flash drive downloads 26 standard output (optional), compatible to other access controller Adopt WFS6.00 High-speed algorithm 21 1) Press [M], select “Advanced”, then select “LockCtrl” and press [OK], the following message appears: 1) Define Time Zone: Define the time and date allowed for access. 2) Define Group Time Zone: Define multiple time and date combinations allowed for access. 3) Access Options: Group selected users to different time zones. 4) Access Mode G Mode: enable or disable group open mode Users: setup how many users’ confirmation to unlock door 5) Unlock Group: Define and authorize access for a combination of different groups of users 6) Lock delay: Given time period in seconds, the lock is released after a user's identity is confirmed 7) DoorSensorSet: Enable this function for additional security. If the terminal is connected with your existing alarm system and the door is supposed to be closed, the terminal will then trigger the alarm to go off when door is open. 8) Alarm Time: Setup the duration of alarm in minutes. 9) Turn off alarm: Turn the alarm off. This function is for an authorized manager to turn off/overwrite the device alarm after the device alarm goes off when an unauthorized fingerprint is rejected 5 times (illegal login). 4.5.1 Access Control Function Each user setup is a combination of group identification, group time period and user time period. Grouping is dispatch user to certain group. Group Time period could select up to three (3) preset time periods. User Time period could also select up to three preset time period as well. • • • A user can be enrolled in different group combination. Open Door Access Time should be in any valid time from the setting. Any newly enrolled user is automatically categorized in the first group. Device will automatically update its setting once any authorized manager or user changes the group. 4.5.2 Time Period Definition Not only that you can restrict access for different users, now you can set up to 50 Time Zones to restrict more on entry access during different time of the day. Each Time Zone consists of up to 7 different time 22 periods (one week). Each user can be applied to up to 3 Time Zones, meaning even the user is registered on the device, he/she can be granted access only within specified times zones. Note: System default time period setting allows a registered user to access the door for entire day. 1) Select “Define Time Zone”. Press [OK] to Access Time Zone # settings 2) For example: For an office environment, if employee works on Saturdays and Sundays, please set the door access time range as below (23:57-23:56). From Mondays to Fridays, please apply the appropriate door access time range according to each employee’s working schedule. (For example: from 8:30 to 18:00). Apply your settings depending on your working schedule (may differ based on employee’s schedule). 4.5.3 Grouping Function Define Group Time Zone function (up to 5 groups) categorizes users into groups; and Combine different groups into up to three (3) Time Zones. 1) Select “Define Group Time Zone”. The screen is displayed as following: 2) Select Group # then Press [OK] to access the setup screen, you can assign up to three (3) Time Zones to a group. 4.5.4 User Access Control Setup User access control setup is based on your preference. 1) Select “Access Options” to check a user’s access control setup status. You can also set up the Group Time Zone/Time Zone for each employee here. • • Belong Group: Categorize users in to different groups. Time Zone: Apply up to three (3) different Time Zones. 2) For example Enter Employee # 0000001 Press [OK] to enter Group Time period. Press Up or Down key. 23 4.4.6 Lock Delay Define the time range (in seconds) that the lock remained released after the user has passed the verification. Select “Lock Delay”. Then press [OK] after you have set up the time in second. 5. System Information Press [M] and select “ViewInfo” and Press [OK] then the following appears: 5.1 Storage Detail 1) Press [M] and select “ViewInfo”, Press [OK]. 2) Select “Reg Data”, the following appears: 1. User Reg 2. Manager Reg 3. Finger 4. Password 5. ID Card Description View number of users registered in the terminal View number of Administrators registered in the terminal View number of fingerprints enrolled in the terminal View number of password combinations stored in the terminal View number of ID cards registered in the terminal 24 5.2 Record Detail 1) Press [M] and select “ViewInfo”, Press [OK]. 2) Press “Record”, the following appears Description 1. User Rec 2. Admin Rec 3. View User Rec (in order of transactions) 4. View Admin Rec View number of user’s log records saved in the terminal. View number of administrator’s log records saved in the terminal. To view a specific user’s log records, input the user’s ID number and press [OK] to view. To view a specific administrator’s log records, input the administrators ID number and press [OK] to view. 5. Preview User Rec To view a specific user’s log records, input the user’s ID number and press [OK] to view. (in order of date) 6. Delete All Rec* View number of user’s log records saved in the terminal. *David-Link is not responsible for any lost data and record. Please make sure you save all your data and records in a safe place. Log records cannot be recovered after you delete all log records saved in the terminal. 5.3 System Detail 1) Press [M] and select “ViewInfo”, Press [OK]. 2) Select “Product”, the following appears: Here, you can find our company information and contact with the [Manufacture] function. Also find you [Serial Number], [Firmware Version], and [Software Version] here when we ask for the information. 25 3) Press [ESC] to exit. 6. Specification Specification Capacity of Fingerprint Capacity of Record Verification Method Access Control Function Electronic Lock Control Attendance Function(optional) Other Output Networking Wiegand Output Display Power Verify Speed FRR FAR Temperature Operation Humidity Operating Language 3,000 60,000 1:1 or 1:N • • • • • • 50 Different Time Zone 5 groups 10 Open door Combination Support Multiple Fingerprint Access Fingerprint, ID Card, and Password Verification Methods Alarm Output, Device Removal Alarm Output, ETC. 12V DC/3A Relay Output Support David-Link Access Control Software Magnetic Lock, Electric Strike, Door Bell, Alarm Ethernet, USB, RS485 Wiegand 26 Output LCD Display 12V DC, Standby Current: 50mA, work current 400mA < 1 second =1% =0.0001% 0°C - 45°C 20%-80% Simplified Chinese, Traditional Chinese, English, Indonesia, Turkish, Japanese, Korean, Spanish, 26