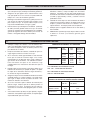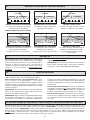
1
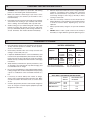
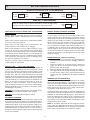
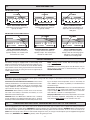
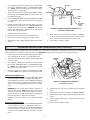
Battery
Charger
Models:
Owner's Manual
520A-PE, 612A-PE, 5216A-PE
Battery Charger
–Save–
Important Safety Instructions
Read Rules for Safe Operation and Instructions Carefully
Working in vicinity of a lead-acid battery is dangerous. Batteries generate explosive gases during normal
battery operation. For this reason, it is of utmost importance that each time before using your charger, you
read this manual and follow the instructions exactly.
WARNING: Handling the cord on this product or cords associated with accessories sold with this product, will expose you to lead, a
chemical known to the State of California to cause cancer and birth defects or other reproductive harm. Wash hands after handling.
A.
1.
GENERAL BATTERY SAFETY
10. Do not use an extension cord unless absolutely necessary.
Use of an improper extension cord could result in fire or
electric shock. If an extension cord must be used, make
sure that:
Before you use your battery charger, be sure to read all
instructions and cautions printed on:
• Battery Charger
• Battery
• Vehicle or unit using battery
2.
3.
4.
5.
6.
7.
8.
9.
• Pins on plug of extension cord are the same number,
size, and shape as those of plug on charger.
• Extension cord is properly wired and in good electrical
condition.
• Wire size is large enough for AC ampere rating of charger,
as specified below:
Use battery charger on LEAD ACID type rechargeable
batteries only, such as used in autos, trucks, tractors,
airplanes, vans, RV's trolling motors, etc. Charger is not
intended to supply power to low-voltage electrical system
other than in an automotive application.
WARNING: Do not use battery charger for charging drycell batteries that are commonly used with home appliances.
These batteries may burst and cause injury to persons and
damage to property.
Use only attachments recommended or sold by
manufacturer. Use of non-recommended attachments may
result in fire, electric shock, or injury.
When disconnecting the battery charger, pull by the plug
not by the cord. Pulling on the cord may cause damage to
cord or plug.
Locate battery power cord so it cannot be stepped on, tripped
over, or subjected to damage or stress.
Do not operate charger with damaged cord or plug. Have
cord replaced immediately.
Do not operate charger if it has received a sharp blow, been
dropped, or otherwise damaged in any way. Take it to a
qualified professional for inspection and repair.
Do not disassemble charger. Take it to a qualified
professional when service or repair is required. Incorrect
reassembly may result in electric shock or fire.
To reduce risk of electric shock, unplug charger from outlet
before attempting any maintenance or cleaning.
Length of cord (feet):
25
50
100
150
AWG size of cord:
18
18
16
14
(American Wire Gauge)
11. Always charge battery in a well ventilated area.
NEVER operate in a closed-in or restricted area without
adequate ventilation.
WARNING: Risk of explosive gas.
12. Locate charger as far away from battery as DC charger
cables permit.
13. Do not expose charger to rain or snow.
14. NEVER charge a frozen battery. If battery fluid (electrolyte)
is frozen, bring into a warm area to thaw before charging.
15. NEVER allow battery acid to drip on charger when reading
specific gravity or filling battery.
16. NEVER set a battery on top of charger.
17. NEVER place charger directly above battery being charged.
Gases from battery will corrode and damage charger.
18. NEVER touch the battery clips together when the charger
is energized.
SCHUMACHER ELECTRIC CORPORATION
801 BUSINESS CENTER DRIVE • MOUNT PROSPECT, ILLINOIS 60056-2179
Send Warranty Product Repairs to: 1025 E. Thompson, Hoopeston, IL 60942-0280
Call Customer Service if you have questions: 1-800-621-5485
00-00-000480/0103
1
B.
PERSONAL PRECAUTIONS AND SAFETY
1.
WARNING: Wear complete eye protection and clothing
protection, when working with lead-acid batteries.
2.
Make sure someone is within range of your voice or close
enough to come to your aid when you work with or near a
lead-acid battery.
3.
Have plenty of fresh water and soap nearby for use if battery
acid contacts skin, clothing, or eyes. If battery acid contacts
skin or clothing, wash immediately with soap and water.
4.
Avoid touching your eyes while working with a battery. Acid
particles (corrosion) may get into your eyes! If acid enters
your eye, immediately flood eye with running cold water for
at least 10 minutes. Get medical attention immediately.
C.
1.
Check the battery voltage, for 6 volt batteries only the 6 volt
10 Amp automatic position is available, all other positions
are for 12 volt batteries.
Clean battery terminals. Take care to keep corrosion from
coming in contact with your eyes.
3.
If required, add distilled water in each cell until battery acid
reaches levels specified by battery manufacturer. This helps
purge excessive gas from cells. Do not overfill. For a battery
without cell caps, carefully follow manufacturer's recharging
instructions.
5.
Remove all personal metal items such as rings, bracelets,
necklaces, and watches when working with a lead-acid
battery. A lead-acid battery can produce a short-circuit
current high enough to weld a ring (or the like) to metal,
causing a severe burn.
6.
Take care not to drop a metal tool or other metal onto the
battery. Metal may cause sparking or short circuit the battery
or another electrical devise. Sparking may cause an
explosion.
7.
Always operate battery charger in an open well ventilated
area.
8.
NEVER smoke or allow a spark or flame in the vicinity of
the battery or engine. Batteries generate explosive gases!
PREPARING TO CHARGE
2.
4.
5.
BATTERY SIZE/RATING
CAR / LIGHT
TRUCKS
MARINE / OR
DEEP CYCLE
Study all battery manufacturer's specific precautions, such
as removing or not removing cell caps while charging, and
recommended rates of charge.
If necessary to remove battery from vehicle to charge,
always remove grounded terminal from battery first. Make
sure all accessories in the vehicle are off, so as not to cause
an arc.
7.
A marine (boat) battery must be removed and charged on
shore. To charge it on board requires equipment specially
designed for marine use.
RES.
CAP
RECHARGE
TIME-HOURS
200-315
315-550
550-850
40-60
60-85
85-150
3-5
5-9
9-13
MCA
220-350
350-600
600-935
AMP HR
24-40
40-70
70-104
3-5
5-9
9-13
CCA: COLD CRANKING AMPS
MCA: MARINE CRANKING AMPS
Be sure area around battery is well ventilated while battery
is being charged. Gas can be forcefully blown away by using
a piece of cardboard or other non-metallic material as a
fan.
6.
CCA
RES. CAP.: RESERVE CAPACITY
AMP HR: AMPERE HOUR
CHARGE TIME USING THE 2 AMP RATE
WITH SMALL AND MEDIUM SIZE BATTERIES
2
SIZE IN
AMP HR
RECHARGE TIME
IN HOURS
LAWN & GARDEN
EQUIPMENT
20-30
30-40
12-18
18-24
MOTORCYCLE
10-15
15-24
6-9
9-21
D.
BATTERY CHARGER CONTROLS
612A-PE & 5216A-PE (6 & 12 Volt Batteries)
(MODE 1)
(MODE 2)
▲
▲
SWITCH
#2
AUTOMATIC
MANUAL
10 amp SWITCH 10 amp
#1
6 Volt
12 Volt
520A-PE (12 Volt Batteries)
Select the 2 Amp setting for small 12 volt batteries and the 10 Amp setting
for larger ones. This charger does not have an engine start feature.
THE 612A-PE & 5216A-PE OFFER FOUR ACTIVE MODES
OF OPERATION.
Modes 1 and 2 are selected by Switch #1, both offer automatic
charging. Mode 1 offers a 10 Amp charge rate for 6 volt batteries.
50 amp
2 amp SWITCH start
#3
12 Volt
12 Volt
(MODE 3)
2 amp
rate
(MODE 4)
SWITCH 10 amp
rate
MANUAL VERSUS AUTOMATIC CHARGING
(612A-PE & 5216A-PE)
For your safety, in the 6 and 12 volt 10 Amp position, these
chargers will only turn on when properly connected to a battery
with a voltage over 0.7 volts. In the 2 Amp position, the charger
will turn on for any condition. If a battery is so depleted of charge
that it’s voltage is less than 0.7 volts, switch to the 2 Amp position for a few seconds then back to the 10 Amp position. You
may use Switch #2 to rapidly toggle between settings. For 12
volt batteries only, you may leave in the 2 Amp position until the
ammeter begins to move up the scale. Note: The longer a battery has been left under this condition the more severe the damage may be to the battery. The damage may not be fully recoverable by charging.
Mode 2 offers a 10 Amp charge rate for 12 volt batteries. Modes
3 and 4 are selected by Switch #3.
Mode 3 offers a 2 Amp charge rate for 12 volt batteries. This
position operates in the manual mode of charging.
Mode 4 offers 50 Amps to assist in engine cranking of 12 volt
systems. Do not use for crank starting of 6 volt systems, doing
so will cause overloading and may result in permanent damage
to the charger. Use the 50 Amp position for crank starting automobiles and light trucks. Use only in combination with a battery
in the vehicle. This will reduce the chance of damaging sensitive electronic equipment in the vehicle.
ENGINE STARTING (612A-PE & 5216A-PE)
1. Connect and disconnect the battery charger following the
instructions given in the section for, "Charging a Battery in
a Vehicle."
2. Charge the battery for 10 minutes before cranking the
engine. This allows you the benefit of drawing current from
both the battery and the charger.
3. Select the 50 Amp Start position and crank the engine.
4. If the engine fails to start, recharge the battery for 10 minutes
or longer and try again. If after several repeated tries the
engine fails to start, a problem may lie elsewhere within the
vehicle.
Switch #2 is used to select the automatic or manual operations
of either Switch #1 or Switch #3.
MANUAL 2 AMP - FOR 12 VOLT BATTERIES.
When the manual 2 Amp position is selected the charger will
continue to charge and will not shut off. You must keep a visual
check on the ammeter to determine when the battery is fully
charged. When the ammeter reads around 1 Amp the battery is
charged. The 2 Amp rate is mainly intended for use with small
batteries like those used with motorcycles and lawn and garden
equipment. For larger batteries the 2 Amp rate may be used for
overnight warming of an automotive battery in cold climate conditions, do not leave connected for more than 12 hours at a
time. Do not, under any conditions, leave the charger permanently connected to a battery for the purpose of maintaining it
during long periods of non-use. Doing so will result in permanent damage to the battery.
AMMETER AND LED INDICATOR(S)
The ammeter gives a reading of the amp draw on the charger.
When a fully discharged battery is connected to the charger, the
ammeter will read the maximum output rating of the 10 amp
charge rate. The charge current will gradually taper down as the
battery approaches full charge. As the charge current tapers,
the ammeter needle will move to the left.
WARNING: In the 2 Amp manual position, the charger will continue to charge even after the battery is fully charged.
For 612A-PE: When fully charged, the ammeter needle will suddenly drop to 0 and a green LED will turn on. For 5216A-PE and
520A-PE, the Full Charge LED glows green. (They also have
Power On LEDs that glow yellow.) The 0 is not printed on the
meter scale, the LEDs are located in its place. When using the 2
Amp setting, use the Full Charge LED as the indicator of a fully
charged battery. Ignore needle.
WARNING: Overcharging will damage the battery.
AUTOMATIC CHARGING
When the battery reaches the full charge state, charge current
is turned off and the charger switches to the maintainer mode of
operation. This action occurs when the ammeter tapers down to
approximately 5 Amps. In this state, the battery voltage is constantly being monitored. When the battery voltage drops to a
predetermined value, charge will turn on for a few seconds replacing the small amount of energy that was lost while the charge
current was at 0 Amps.
NOTE: As the battery approaches the full charge state the ammeter needle and LED will fluctuate back and forth between
CHARGED and CHARGING. For the average size automotive
battery, allow 5 to 10 minutes for the battery to stabilize.
3
E.
READING AMMETER:
METER FOR 612A-PE
D C AMPS
CHARGED
2
4
D C AMPS
CHARGING
6
8
10
CHARGED
12
CHARGE COMPLETE
FULLY DISCHARGED BATTERY
Initial charge current to the battery is
typically 10 Amps.
2
4
D C AMPS
CHARGING
6
8
10
CHARGED
12
CHARGE COMPLETE
APPROACHING FULL CHARGE
Charge current to the battery is
typically 5 Amps.
2
4
CHARGING
6
8
10
12
CHARGE COMPLETE
FULLY CHARGED BATTERY
Charge current to the battery is 0
Amps. And, the Full Charge green
LED glows.
METER FOR 5216A-PE AND 520A-PE
START
FULL CHARGE
POWER ON
FULLY DISCHARGED BATTERY
Initial charge current to the battery is
typically 10 Amps. The needle points
towards the 25% mark.
F.
START
FULL CHARGE
POWER ON
APPROACHING FULL CHARGE
Charge current to the battery is
typically 5 Amps. The needle points
towards the 100% mark.
FULL CHARGE
POWER ON
FULLY CHARGED BATTERY
Charge current to the battery is
0 Amps. And, the Full Charge green
LED glows. The needle points
towards the Full Charge LED.
CIRCUIT BREAKER
This battery charger is equipped with a self-resetting circuit
breaker. This device protects the charger from temporary overloads. In the event of an overload, the circuit breaker will trip
open and after a short cooling off period will reset automatically.
This process is known as cycling and can be recognized by an
audible clicking sound.
G.
START
NOTE: Clicking sound is normal. Wait until charger automatically resets itself.
CAUTION: Persistent clicking (more than 30 minutes) may indicate reverse connection or shorted battery cells. (See
TROUBLESHOOTING).
BATTERY TYPES
Three basic types of lead-acid batteries can be given a charge with this charger: (1) Conventional and Low Maintenance, (2) Maintenance Free, (3) Deep Cycle / Marine.
Conventional and Low Maintenance Batteries. These are the
antimony/lead batteries. Conventional/Low Maintenance batteries require periodic addition of water to the acid solution (electrolyte). Additional water may be added by removing the filler
caps located on the top of the battery.
ing of electrolyte level and provides access to the battery for
water additions, the battery is probably a Low Maintenance/
Conventional type.
Maintenance Free Batteries. These are calcium/lead batteries
and normally do not require water additions. Therefore, filler
caps have been removed from the battery surface. These batteries will have a smooth or sealed appearance.
IMPORTANT: When antimony is known to be one of the materials used in the battery's construction, that battery is a Low
Maintenance/Conventional type.
Deep Cycle Batteries. These heavy duty batteries are used in
boats, construction equipment, sump pumps, etc. They are normally marked DEEP CYCLE on the outside of the case.
CAUTION: Some Low Maintenance batteries have a relatively
smooth top without any apparent battery filler caps. If, however,
the battery manufacturer/distributor recommends periodic check-
H.
OPERATING INSTRUCTIONS: CHARGING BATTERY OUT OF THE VEHICLE
When charging battery out of the vehicle, take care to determine the battery type. To reduce risk of a spark near battery, follow these
steps when battery is outside vehicle. WARNING: A spark near battery may cause battery explosion. WARNING: When removing battery
from vehicle or boat, disconnect grounded pole first. When disconnecting, make sure all accessories are off, so as not to cause an arc.
(NOTE: A marine (boat) battery must be removed and charged on shore. (To charge on board requires special equipment designed for
marine use.) WARNING: When reinstalling battery, attach the ground post first.
4
1.
Check polarity of battery posts. Battery case will be marked
by each post: POSITIVE (POS, P, +) and NEGATIVE (NEG,
N, -). NOTE: The positive battery post usually has a larger
diameter than the negative post.
2.
Attach a 24-inch long (or longer) 6-gauge (AWG) insulated
battery cable to NEGATIVE (NEG, N, -) battery post. (Not
provided with charger.)
3.
Connect POSITIVE (RED) charger clip to POSITIVE (POS,
P, +) post battery. Rock clip back and forth to make good
connection.
4.
NEGATIVE
POSITIVE
BATTERY CHARGER
BATTERY
+ 24", 6 GAUGE
CABLE
POWER
CORD
TO
GROUNDED
POWER
OUTLET
Position yourself and free end of 24 inch cable as far away
from battery as possible. Then connect NEGATIVE (BLACK)
charger clip to free end of cable. WARNING: Do not face
battery when making final connection. Rock clip back and
forth to make a good connection.
FIGURE 7 CONNECT NEGATIVE BATTERY CLIP
TO 24 INCH CABLE END
FIGURE 7 shows the connection.
5.
Plug charger AC cord into 120 volt grounded outlet.
6.
Select auto or manual charging, see charge controls.
7.
When battery is fully charged, unplug charger from AC power
source.
I.
8.
When battery is fully charged and charger is unplugged,
(1) remove clip from end of Negative end of cable, and (2)
remove clip from Positive battery post, in that order.
9.
Clean and store battery charger.
OPERATING INSTRUCTIONS: CHARGING BATTERY IN VEHICLE
When charging battery in vehicle, take care to determine the battery type and which pole is grounded. To reduce risk of a spark near
battery, follow these steps when battery is inside vehicle. WARNING: A spark near the battery may cause battery explosion.
1.
Position AC power cord and DC charging cords to reduce
risk of damage by hood, door, or moving engine parts.
2.
Stay clear of fan blades, belts, pulleys, and other parts that
can cause injury.
3.
Check polarity of battery posts. Battery case will be marked
by each post: POSITIVE (POS, P, +) and NEGATIVE (NEG,
N, -). NOTE: The positive battery post usually has a larger
diameter than the negative post.
4.
Determine which post of battery is grounded (connected)
to chassis. NOTE: The negative post is normally grounded.
GROUND
(NEG)
NEGATIVE GROUNDED POST
5A. For negative-grounded vehicle, connect POSITIVE (RED)
clip from battery charger to POSITIVE (POS, P, +)
ungrounded post of battery. Connect NEGATIVE (BLACK)
clip to vehicle chassis or engine block away from battery.
Connect to a heavy gage metal part of the frame or engine
block.
FIGURE 6 CONNECTION TO NEGATIVE
GROUNDED BATTERY
WARNING: Do not connect clip to carburetor, fuel lines, or
sheet-metal body parts. NOTE: Attach clips to battery post
and twist or rock back an forth several times to make a
good connection. This tends to keep clips from slipping off
terminals and helps to reduce risk of sparking.
FIGURE 6 shows connections for a negative-grounded
battery.
POSITIVE GROUNDED POST
5B. For positive-grounded vehicle, connect NEGATIVE (BLACK)
clip from battery charger to NEGATIVE (NEG, N, -)
ungrounded post of battery. Connect POSITIVE (RED) clip
to vehicle chassis or engine block away from battery.
Connect to a heavy gauge metal part of the frame or engine
block.
6.
Plug charger AC cord into a grounded 120 volt grounded
outlet.
7.
Select either automatic or manual, see charger controls.
8.
When battery is fully charged, unplug charger from AC power
source.
9.
Remove charger clips from (1) chassis and (2) battery post,
in that order.
10. Clean and store battery charger.
5
J.
TROUBLESHOOTING
The battery charger is designed to work automatically. However, If a problem does occur, check the following:
PROBLEM
POSSIBLE
SOLUTION
No meter reading.
Charger is not plugged in
Plug in.
Connections are reversed.
With charger unplugged, reverse clips and
reconnect (rock back and forth to bite in).
Poor electrical connection.
Clean clips and battery poles and reconnect
(roll back and forth to bite in).
AC outlet is dead.
Plug in a lamp or other appliance to check for
voltage.
Battery is defective (will not accept
charge).
Have battery checked.
Battery recently used in vehicle and is
fully charged.
Battery does not need charging.
Charger will not turn on (when
properly connected to power.
(If battery is in vehicle turning on headlights
will lower battery voltage in a few seconds and
charger should then turn on.)
Battery has less than .7 volts set to manual
and retry.
Charger will not turn OFF.
Battery has problem and will not take
full charge.
Have battery checked.
(If in MANUAL, switch to AUTOMATIC).
Ammeter needle pulses (fluctuates)
every few seconds AFTER THREE
HOURS without slowing down.
Two or more batteries connected in
parallel.
Requires more time to charge: continue
charging.
Battery of 200 ampere hours or larger.
Requires more time to charge: continue
charging.
Battery is connected to application that
draws a small current (such as an auto
dome light).
Charging current is less than full
output rating of charger.
Ammeter needle moves to extreme
right, remains a short time, then
returns to zero, accompanied by a
clicking sound.
Battery is partially charged.
Continue charging.
Battery is defective (battery plates are
crusted) and will not accept a full
charge.
Have checked and replace battery.
AC power supply is low.
Plug charger into another grounded AC outlet.
Severely discharged battery (but
otherwise good battery).
Allow charging to continue until battery has
recovered sufficiently to take a charge (Circuit
breaker will continue to cycle and needle will
swing side to side until battery has recovered).
In MANUAL with battery connections
reversed.
Unplug charger and change to correct
connections.
Battery is defective (will not accept
charge)
Have battery checked.
Charger is cycling after circuit breaking
overload.
Wait until charger automatically resets itself
(DO NOT RETURN FOR SERVICE).
6
K.
MAINTENANCE/CLEANING INSTRUCTIONS
Very little maintenance is required for the battery charger. Follow common sense in wiping the charger clean and store in a clean, dry
area.
1.
After use, wipe all battery corrosion and other dirt or oil
from clip, cord, and the charger case. Use a dry cloth.
3.
Have any cracked or frayed cords replaced by a qualified
professional.
2.
Coil charger cords to prevent damage.
4.
Store battery charger in a clean, dry area.
LIMITED WARRANTY
SCHUMACHER ELECTRIC CORPORATION, 801 BUSINESS CENTER DRIVE, MOUNT PROSPECT, ILLINOIS 60056-2179 MAKES THIS LIMITED
WARRANTY TO THE ORIGINAL PURCHASER AT RETAIL OF THIS PRODUCT. THIS LIMITED WARRANTY IS NOT TRANSFERABLE.
Schumacher Electric Corporation warrants the 612A-PE battery charger for three years; 5216A-PE and 520A-PE for five years from date of purchase at retail
against defective material or workmanship. If such should occur, the unit will be repaired or replaced at the option of the manufacturer. It is the obligation of the
purchaser to forward the unit together with proof of purchase, transportation and/or mailing charges prepaid to the manufacturer or its authorized representative.
This limited warranty is void if the product is misused, subjected to careless handling, or repaired by anyone other than the manufacturer or its authorized
representative.
The manufacturer makes no warranty other than this limited warranty and expressly excludes any implied warranty including any warranty for consequential
damages.
THIS IS THE ONLY EXPRESS LIMITED WARRANTY AND THE MANUFACTURER NEITHER ASSUMES NOR AUTHORIZES ANYONE TO ASSUME
OR MAKE ANY OTHER OBLIGATION TOWARDS THE PRODUCT OTHER THAN THIS EXPRESS LIMITED WARRANTY. THE MANUFACTURER
MAKES NO WARRANTY OF MERCHANTABILITY OR FITNESS FOR PURPOSE OF THIS PRODUCT AND EXPRESSLY EXCLUDES SUCH FROM
THIS LIMITED WARRANTY.
SOME STATES DO NOT ALLOW THE EXCLUSION OR LIMITATION OF INCIDENTAL OR CONSEQUENTIAL DAMAGES OR LENGTH OF IMPLIED
WARRANTY SO THE ABOVE LIMITATIONS OR EXCLUSIONS MAY NOT APPLY TO YOU.
THIS WARRANTY GIVES YOU SPECIFIC LEGAL RIGHTS AND YOU MAY ALSO HAVE OTHER RIGHTS WHICH VARY FROM STATE TO STATE.
7
NOTES
8
Cargador
De Bateria
Modelos
Owner's Manual
520A-PE, 612A-PE, 5216A-PE
Instrucciones De Seguridad Importantes
Guarde Estas Instrucciones
Es peligroso trabajar cerca de una batería galvánica. Las baterías generan gases explosivos durante su operación normal. Por esta razón es de suma importancia que cada vez, antes de usar el
cargador, ud. Lea este manual y siga las instrucciones en forma exacta.
ADVERTENCIA - El manejo del cordón en este producto, o de los cordones asociados con los accesorios vendidos con este producto,
le expone a usted al plomo, un producto químico conocido en el Estado de California de causar cáncer y defectos de nacimiento u otros
daños reproductivos. Lávese las manos después de manejar estos cordones.
A.
1.
2.
3.
4.
5.
6.
7.
8.
9.
SEGURIDAD GENERAL CON LAS BATERIAS
Antes de usar su cargador de batería, acuérdese de leer
todas las instrucciones y advertencias impresa sobre:
• El Cargador de Batería
• La Batería Misma
• El vehículo o unidad en que se usa la batería
Use el cargador de batería únicamente en las baterías
GALVÁNICAS tipo recargable, tales como las que se usan
en carros, camiones, tractores, aviones, vans, vehículos
de recreo, motores de trole, etc. El cargador no está
destinado a proporcionar energía a sistemas eléctricos de
bajo voltaje, salvo en el caso de automóviles.
ADVERTENCIA: NO use el cargador de batería para cargar
baterías tipo pila seca que normalmente se usan con
aparatos domésticos. Dichas pilas pueden explosionarse y
causar lesiones a las personas y daños a la propiedad.
Use solamente los accesorios recomendados o vendidos
por el fabricante. El uso de accesorios no recomendados
puede causar incendio, choque eléctrico o lesión.
Al desconectar el cargador de batería, tire del enchufe y no
del cordón. El tirar del cordón puede dañar al cordón o al
enchufe.
Coloque el cordón de energía de la batería en tal forma
que no sea posible pisarlo, tropezarlo ni causarlo daños o
tensiones.
No use el cargador si tiene cordón o enchufe dañado. Haga
reemplazar el cordón inmediatamente.
No use el cargador si ha recibido golpe fuerte, o si ha caído
o sufrido daños de cualquier naturaleza. Llévelo a un
profesional competente para inspección y reparación.
No desarme el cargador. Llévelo donde un profesional
competente cuando haya necesidad de servicio o
reparación. Si lo vuelve a armar en forma incorrecta, puede
causar choque eléctrica o incendio.
Para reducir los riesgos de choques eléctricos, desenchufe
el cargador de la tomacorriente, antes de intentar ningún
mantenimiento o limpieza.
10. No use cables de extensión a no ser que sea absolutamente
necesario. El uso de una extensión incorrecta, puede causar
incendio o choque eléctrico. Si es imprescindible usar una
extensión, asegúrese de lo siguiente:
• Que las clavijas del enchufe sean del mismo número,
tamaño y forma que los del enchufe en el cargador.
• Que la extensión esté debidamente alambrada y en
buenas condiciones.
• Que el tamaño de los cables sea lo suficientemente
grueso en calibre, para el valor nominal de amperios CA
del cargador, según se especifica a continuación:
Largo del cordón (pies):
25
50
100
150
Tamaño AWG del cordón:
18
16
12
10
(American Wire Gauge)
11. Siempre cargue la batería en un sitio bien ventilado. NUNCA
opérelo en un sitio cerrado o restringido que no tenga
ventilación adecuada.
ADVERTENCIA: Hay riesgo de gas explosivo.
12. Coloque el cargador a la mayor distancia de la batería que
permiten los cables CA del cargador.
13. No exponga el cargador a lluvia o nieve.
14. NUNCA cargue una batería congelada. Si el fluido de la
batería (electrólito) está congelado, traiga la batería dentro
de una parte que tenga calor para descongelarlo antes de
cargar.
15. NUNCA permita que el ácido de la batería gotee sobre el
cargador al leer la gravedad específica o al llenar la batería.
16. NUNCA coloque una batería encima del cargador.
17. NUNCA coloque el cargador directamente sobre la batería
que se está cargando. Los gases de la batería causarán
corrosión y daños al cargador.
18. NUNCA haga contacto entre las grapas de la batería cuando
el cargador está activado.
SCHUMACHER ELECTRIC CORPORATION
801 BUSINESS CENTER DRIVE • MOUNT PROSPECT, ILLINOIS 60056-2179
Para reparación del producto baja garantía, envíelo a: 1025 E. Thompson Avenue, Hoopeston, IL 60942-0280.
78521-6851. Para más información comuníquese al Dep. de Servicios al Cliente: 1-800-621-5485
1
B.
PRECAUCIONES Y SEGURIDAD PERSONALES
1.
ADVERTENCIA: Use protección completa tanto para los
ojos como para la ropa, al trabajar con baterías galvánicas.
2.
Asegúrese de que alguien esté lo suficientemente cerca
suyo para poder oír su voz o venir en su ayuda cuando Ud.
trabaja con o cerca de una batería galvánica.
3.
Mantenga cerca bastante agua fresca y jabón para usar en
caso de que el ácido de la batería haga contacto con la
piel, la ropa o los ojos. Si cayese ácido en la piel o en la
ropa, lávela inmediatamente con agua y jabón.
4.
Evite tocarse los ojos al trabajar con una batería. ¡Partículas
de ácido (corrosión) pueden entrar en los ojos! Si el ácido
entra al ojo, enjuague el ojo inmediatamente con cantidades
grandes de agua fría de la llave durante por lo menos 10
minutos. Enseguida obtenga atención médica.
C.
1.
2.
3.
4.
5.
6.
7.
5.
Quítese todo artículo personal de metal, tales como anillos,
brazaletes, collares y relojes al trabajar con una batería
galvánica. Una batería de este tipo puede producir una
corriente de cortocircuito lo suficientemente alta para soldar
un anillo (o algo parecido) a metal, y causarle a Ud. una
quemadura severa.
6.
Cuidado de nunca dejar caer una herramienta de metal ni
ningún otro metal sobre la batería. El metal puede causar
chispeo o producir cortocircuito en la batería o en otro
aparato eléctrico. El chispeo puede causar explosión.
7.
Siempre opere el cargador de batería en un sitio abierto y
bien ventilado.
8.
NUNCA fume ni permita que haya chispa ni llama cerca de
la batería o el motor. ¡Las baterías generan gases
explosivos!
PREPARATIVOS PARA CARGAR
TAMAÑO/VALOR NOMINAL DE LA BATERIA
Verifique el voltaje de la batería. Para las baterias de 6
voltios está disponible únicamente la posición automática
de 6 voltios 10 amperios, todas las demás posiciones son
para baterías de 12 voltios.
CARRO/CAMION
Limpie los terminales de la batería, cuidando de que no le
caiga ninguna sustancia corrosiva en los ojos.
Al ser necesario, añada agua destilada a cada elemento
hasta que el ácido de la batería llegue a los niveles
especificados por el fabricante. Esto ayuda a eliminar el
gas excesivo de los elementos. No sobrellene la batería.
Para una batería sin tapas en los elementos, siga
cuidadosamente las instrucciones del fabricante para el
recargue.
MARINA/O
CICLO PROFUNDO
CCA
LIVIANO
RES.
CAP.
TIEMPO DE
RECARGA
EN HORAS
200-315
315-550
550-850
40-60
60-85
85-150
3-5
5-9
9-13
MCA
220-350
350-600
600-935
AMP HR
24-40
40-70
70-104
3-5
5-9
9-13
CCA: AMPERIOS DE ARRANQUE EN FRIO
Estudie todas las precauciones específicas dadas por el
fabricante de la batería, por ejemplo de quitar o no quitar
las tapas de los elementos mientras cargue la batería, y
los niveles de carga recomendados.
RES. CAP.: CAPACIDAD DE RESERVA
MCA: AMPERIOS DE ARRANQUE MARINO
AMP HR.: AMPERIO-HORA
Asegúrese de que el área alrededor de la batería esté bien
ventilada mientras se cargue la batería. Se puede hacer
que el gas se disipe al usar un pedazo de cartón u otro
material no metálico como abanico.
TIEMPO DE CARGAR UTILIZANDO EL VALOR NOMINAL DE 2
AMPERIOS CON BATERIAS DE TAMAÑO PEQUEÑO Y MEDIANO
TAMAÑO EN
AMP HR
Si se hace necesario quitar la batería del vehículo para
poderla cargar, siempre quite de la batería primero el
terminal que va a tierra. Asegúrese de que todos los
accesorios en el vehículo estén apagados, para no causar
arco.
A una batería marina (de bote) hay que quitarla y cargarla
sobre tierra. Para poderla cargar a bordo, se requiere equipo
especial diseñado para uso marino.
10
TIEMPO DE RECARGA
EN HORAS
EQUIPO PARA
CESPED Y JARDIN
20-30
30-40
12-18
18-24
MOTOCICLETA
10-15
15-24
6-9
9-21
D.
CONTROLES DEL CARGADOR DE BATERÍAS
L
Interruptor 12 Voltios
10 Amperios
#1
L
612A-PE Y 5216A-PE
6 Voltios
10 Amperios
Interruptor
#2
AUTOMÁTICO
2 Amperios Interruptor Arranque a
12 Voltios
50 amperios
#3
MANUAL
520A-PE
Para baterías pequeña de 12 volios utilice carga de 2 Amps, y 10 Amps,
para baterías grandes. Este cargador no cumple la función de arrancador.
ESTE CARGADOR OFRECE 4 MODOS ACTIVOS DE
OPERACIONES
Los modos 1 y 2 se seleccionen mediante el interruptor #1;
ambos proporcionan carga automática. El modo 1 ofrece un
valor nominal de carga de 10 amperios para baterías de 6 voltios.
El modo 2 ofrece valor nominal de carga de 10 voltios para
baterías de 12 voltios. Los modos 3 y 4 se seleccionen mediante
el interruptor #3.
2 Amperios
Arranque a
Interruptor
12 Voltios
10 amperios
CARGUE MANUAL CONTRA CARGUE AUTOMATICO
Para la propia seguridad suya, este cargador al estar en la
posición de 6 y 12 voltios, 10 Amperios, se encenderá
únicamente al estar debidamente conectado a una batería que
cuenta con voltaje mayor de .7 voltios. En la posición de 2
Amperios, el cargador se encenderá para cualquier condición.
Si una batería se encuentra tan vaciada de carga que su voltaje
es menos de .7 voltios, se debe cambiar a la posición de 2
Amperios por unos cuantos segundos, luego otra vez a la
posición de 10 Amperios. Se puede usar el interruptor #2 para
cambiar rápidamente entre las dos posiciones. Para las baterías
de 12 voltios únicamente, se puede quedar en la posición de 2
Amperios hasta que el amperímetro comience a subir en la
escala. Nota: Cuanto más tiempo se deja una batería en esta
condición, tanto más severo puede resultar el daño a la batería.
Este daño quizás no se pueda contrarrestar del todo solamente
por la acción de cargar la batería.
El modo 3 ofrece un valor nominal de carga de 2 Amperios para
baterías de 12 voltios. Esta posición funciona en el modo manual
de cargar.
El modo 4 ofrece 50 Amperios para ayudar en el arranque de
motores con sistemas de 12 voltios. No use este modo para
arranque de sistemas de 6 voltios, pues esto resultará en
sobrecargar y puede causar daños permanentes al cargador.
Use la posición de 50 amperios para arranque de automóviles y
camiones livianos. Use solamente en combinación con batería
en el vehículo. Esto reduce el riesgo de dañar equipo electrónico
sensible en el vehículo.
AMPERIMETRO È INDICADOR (ÈS) DE LED (DIODO
EMITIDOR DE LUZ)
Èl amperímetro proporciona lectura del porcentaje de carga en
la batería mientras se carga. Cuando una batería totalmente
descargada queda conectada al cargador, el amperímetro
mostrará el máximo valor nominal de salida del nivel de carga
a 10 Amps. La corriente de carga irá bajando gradualmente
conforme la batería se acerca a plena carga. Al mismo tiempo
que la corriente de carga baja, la aguja del amperimetro también
se deslizará hacia la izquierda.
El interruptor #2 se usa para seleccionar la operación automática
o manual ya sea para el interruptor #1 o el interruptor #3.
MANUAL A 2 AMPERIOS - PARA BATERIAS DE 12
VOLTIOS SOLAMENTE
Al seleccionar la posición manual de 2 Amperios, el cargador
seguirá cargando y no se apaga por sí solo. Hay que seguir
vigilando al amperímetro para saber cuando la batería está
totalmente cargada. Cuando el amperímetro muestra
aproximadamente 1 Amperio, la batería ya está cargada. El
nivel de 2 Amperios se destina principalmente para usar con
baterías pequeñas tales como las usadas con motocicletas y
equipo de cesped y jardín. Para baterías más grandes el valor
nominal de 2 Amperios puede usarse para calentar una batería
de automóvil durante la noche en condiciones de clima fría,
pero no se debe dejar conectado el cargador por más de 12
horas seguidas. Bajo ninguna circunstancia hay que dejar el
cargador conectado en forma permanente a una batería a fin
de mantenerla durante largos períodos sin uso. El hacer esto
dará por resultado daños permanentes a la batería.
Èn el modelo 612A-PE, al llegar a plena carga, la aguja del
amperimetro bajará repentinamente a 0 y se enciendrá la luz
verde LED. Èn el modelo 5216A-PE la luz LED de carga completa
se pone verde. También cuenta con una luz LED Power On que
se torna amarilla. El 0 no queda impreso en la escala del
amperímetro, la LED se encuentra en su lugar. Cuando
seleccione 2 Amps., observe la luz LED como indicador de que
la batería a sido cargada completamente, ignore la aguja.
NOTA: Cuando la batería se acerca al estado de plena carga,
la aguja del amperímetro y la LED se fluctúan entre CHARGED
y CHARGING. Para el tamaño promedio de batería de automóvil,
espere de 5 a 10 minutos para que la batería se estabilice.
ADVERTENCIA: En la posición manual de 2 Amperios, el
cargador seguirá cargando aún después de que la batería esté
totalmente cargada.
ARRANQUE DEL MOTOR
1. Conecte y desconecte el cargador de batería de acuerdo
con las instrucciones proporcionadas en la sección "Para
Cargar La Batería Dentro del Vehículo".
2. Cargue la batería por 10 minutos antes de encender el
motor. Esto le permite el beneficio de obtener corriente
tanto de la batería como del cargador.
3. Seleccione la posición de 50 Amp Start y encienda el motor.
4. Si el motor no arranca, recargue la batería por 10 minutos
o más, e intente otra vez. Si el motor deja de arrancar
después de varias tentativas, es posible que haya problema
en otra parte del vehículo.
ADVERTENCIA: El sobrecargar causa daños a la batería.
CARGUE AUTOMATICO
Cuando la batería llegue al estado de plena carga, la corriente de
cargar se apaga y el cargador cambia al modo de mantener operación.
Esta acción ocurre cuando al amperímetro baja hasta
aproximadamente 5 Amperios. En este estado el voltaje de la batería
está bajo constante vigilancia. Cuando el voltaje de la batería se baja
hasta un valor predeterminado, la carga se enciende por unos cuantos
segundos, reemplazando así la pequeña cantidad de energía que se
perdió mientras la corriente de carga se encontraba a 0 Amperios.
11
E.
READING THE METER/LECTURA DEL MEDIDOR
PARA EL MODELO 612A-PE
D C AMPS
CHARGED
2
4
CHARGING
6
8
D C AMPS
D C AMPS
10
CHARGED
12
CHARGE COMPLETE
BATERIA TOTALMENTE DESCARGADA
La corriente de carga inicial a la batería
es típicanmente de 10 Amperios
2
CHARGED
CHARGING
4
6
8
10
2
12
CHARGE COMPLETE
ACERCANDOSE A PLEANA CARGA
La corriente de carga a la batería es
típicamente de 5 Amperios
4
CHARGING
6
8
10
12
CHARGE COMPLETE
BATERIA A PLENA CARGA
La corriente de carga a la batería es de 0
amperios y la LED verde se enciende.
PARA EL MODELO 5216A-PE Y 520A-PE
START
FULL CHARGE
POWER ON
BATERIA TOTALMENTE DESCARGADA
La corriente de carga inicial a la batería es
típicanmente de 10 Amperios.
La aguja apunta hacia la marca de 25%.
F.
FULL CHARGE
POWER ON
ACERCANDOSE A PLENA CARGA
La corriente de carga a la batería es
típicamente de 5 Amperios.
La aguja apunta hacia la marca de 100%
FULL CHARGE
POWER ON
BATERIA A PLENA CARGA
La corriente de carga a labatería es de 0
amperios y la LED verde se enciende.
La aguja apunta hacia la luz verde de
carga completa.
DISYUNTOR
NOTA: El sonido a chasquido es normal. Espere hasta que el
cargador se reponga a sí mismo.
Este cargador de batería viene equipado con un disyuntor de
reposición automática. Dicho dispositivo protege al cargador
contra sobrecargas momentáneas. En caso de sobrecarga, el
disyuntor se dispara y después de un corto período de
enfriamiento se repone automáticamente. Este proceso se llama
ciclado y se reconoce mediante un sonido audible como
chasquido.
G.
START
START
PRECAUCION: Un chasquido persistente (más de 30 minutos)
puede señalar conexión invertida o cortocircuito en elementos
de la batería. (Véase SOLUCION DE PROBLEMAS).
TIPOS DE BATERIAS
Con este cargador, se puede dar carga a tres tipos básicos de bateria galvánica: (1) Convencionales y de Bajo Mantenimiento. (2)
Libres de Mantenimiento. (3) Ciclo Profundo/Uso Marino
Baterías Convencionales y de Bajo Mantenimiento. Estas
la batería recomienda comprobar periódicamente el nivel del
son las baterías de antimonio/plomo. Las baterías
electrólito y provee acceso a la batería para poder añadir agua,
Convencionales/y de Bajo Mantenimiento requieren adición
la batería probablemente es del tipo Bajo Mantenimiento/
periódica de agua a la solución de ácido (electrólito). El agua
Convencional.
adicional se puede añadir quitando las tapas que se encuentran
Baterías Libres de Mantenimiento. Estas son las baterías de
encima de la batería.
calcio/plomo y normalmente no requieren adición de agua. Por
IMPORTANTE: Al saber que antimonio es uno de los materiales
consiguiente, las tapas han sido eliminadas de la superficie de
usados en la construcción de la batería, dicha batería es del
la batería. Estas baterías tendrán apariencia lisa o sellada.
tipo Convencional/Bajo Mantenimiento.
Baterías de Ciclo Profundo. Estas baterías para servicio duro
se usan en botes, equipo de construcción, bombas de sumidero,
etc. Normalmente llevan la frase DEEP CYCLE en el exterior
de la caja.
PRECAUCION: Algunas baterías de Bajo Mantenimiento tienen
una superficie relativamente liso y al parecer no llevan tapas
para la llenada. Sin embargo, si el fabricante o distribuidor de
H. INSTRUCCIONES DE OPERACION: PARA CARGAR LA BATERIA FUERA DEL VEHICULO
Al cargar la batería fuera del vehículo, tenga cuidado de confirmar el tipo de batería. Para reducir el riesgo de una chispa cerca de la
batería, siga estos pasos cuando la batería está fuera del vehículo. ADVERTENCIA: Una chispa cerca de la batería puede causar
explosión de la batería. ADVERTENCIA: Si piensa quitar la batería de un vehículo o bote, desconecte primero el polo puesto a tierra.
Al desconectar, asegúrese de que todos los accesorios queden apagados, para no causar arco. (NOTA: A una batería marina (de bote)
hay que quitarla y cargarla sobre tierra. (Para poderla cargar a bordo, se requiere equipo especial diseñado para uso marino).
ADVERTENCIA: Al reinstalar la batería, conecte primero el poste que va a tierra.
12
1.
2.
3.
4.
Compruebe la polaridad de los postes de la batería.
Lacajadela batería será marcada al lado de cada poste.
POSITIVO (POS. P.+) y NEGATIVO (NEG.N.-) NOTA: El
poste positivo de la batería generalmente tiene un diámetro
mayor que el del poste negativo.
NEGATIVO
POSITIVO
BATERIA
Conecte un cable de batería aislado de 24 pulgadas de
largo (o más) de Calibre 6 (AWG) al poste NEGATIVO
(NEG.N,-) de la batería. (Este cable no se provee con el
cargador)
CARGADO DE
BATERIA
+ -
Conecte la grapa POSITIVA (ROJA) del cargador al poste
POSITIVO (POS.P.+) de la batería. Mueva la grapa hacia
adelante y atrás para conseguir buena conexión.
A TOMACORRIENTE
PUESTA A TIERRA
Póngase a sí mismo y el extremo libre del cable de 24
pulgadas lo más lejos posible de la batería. Entonces
conecte la grapa NEGATIVA (NEGRA) del cargador al
extremo libre del cable. ADVERTENCIA: No se ponga
delante de la batería al hacer la conexión final. Mueva la
grapa hacia adelante y atrás para conseguirbuenaconexión.
La FIGURA 7 muestra la conexión.
5.
Enchufe el cordón CA del cargador en una tomacorriente
de 120 voltios puesta a tierra.
6.
Escoja cargue automático o manual; véase "Controles del
Cargador".
CORDON DE
ENERGIA
CABLE DE
24", 6 GAUGE
FIGURA 7 CONECTE LA GRAPA NEGATIVA DE LA BATERIA
AL EXTREMO DEL CABLE DE 24 PULGADAS
7.
Cuando la batería esté a plena carga, desenchufe el
cargador de la fuente de energía CA.
8.
Cuando la batería esté a plena carga y el cargador
desenchufado, (1) quite la grapa del final del extremo
Negativo del cable, y (2) quite la grapa del poste Positivo
de la batería, en ese orden.
9.
Limpie y guarde el cargador de batería.
I. INSTRUCCIONES DE OPERACION: PARA CARGAR LA BATERIA DENTRO DEL VEHICULO
Al cargar una batería dentro del vehículo, tenga cuidado de comprobar el tipo de batería y ver cuál polo está conectado a tierra. Para
reducir el riesgo de una chispa cerca de la batería, siga estos pasos cuando la batería está dentro del vehículo. ADVERTENCIA: Una
chispa cerca de la batería puede causar explosión de la batería.
1.
Sitúe el cordón de energía CA y los cordones de cargar CC
en forma de reducir el riesgo de daños causados por el
capó, la puerta o las piezas móviles del motor.
2.
Manténgase alejado de las hojas del ventilador, las correas,
poleas y otras piezas que pueden causar lesiones.
3.
Compruebe la polaridad de los postes de la batería. La
caja de la batería será marcada al lado de cada poste.
POSITIVO (POS. P.+) y NEGATIVO (NEG.N.-) NOTA: El
poste positivo de la batería generalmente tiene un diámetro
mayor que el del poste negativo.
4.
Determine cual poste de la batería está puesto a tierra
(conectado) al chasis. NOTA: Normalmente es el poste
negativo que está puesto a tierra.
PUESTA A TIERRA
(NEG)
FIGURA 6 CONEXION A UNA BATERIA
CON PUESTA A TIERRA NEGATIVA
POSTE CON PUESTA A TIERRA NEGATIVA
5A. Para un vehículo con puesta a tierra negativa, conecte la
grapa POSITIVA (ROJA) del cargador de batería al poste
POSITIVO (POS.P.+) no puesta a tierra de la batería.
Conecte la grapa NEGATIVA (NEGRA) al chasis del
vehículo o el bloque del motor, alejado de la batería.
Conéctelo a una parte de metal de calibre gruesa del
armazón o del bloque del motor.
NEGATIVO (NEG N.-) no puesta a tierra de la batería.
Conecte la grapa POSITIVA (ROJA) al chasis del vehículo
o el bloque del motor, alejado de la batería. Conéctelo a
una parte de metal de calibre gruesa del armazón o del
bloque del motor.
ADVERTENCIA: No conecte la grapa al carburador, líneas
de combustible, ni secciones del chasis hechas de metal
de chapa. NOTA: Conecte las grapas al poste de la batería
y tuérzalas o muévalas hacia adelante y atrás para
conseguir buena conexión. Esto ayuda a que las grapas
no se deslicen de los terminales a la vez que reduce el
riesgo de chispeo.
POSTE CON PUESTA A TIERRA POSITIVA
5B. Para un vehículo con puesta a tierra positiva, conecte la
grapa NEGATIVA (NEGRA) del cargador de batería al poste
6.
Enchufe el cordón CA del cargador en una tomacorriente
de 120 voltios puesto a tierra.
7.
Escoja automático o manual; véase "Controles del
Cargador."
8.
Cuando la batería esté a plena carga, desenchufe el
cargador de la fuente de energía CA.
9.
Quite las grapas del cargador de (1) el chasis y (2) el poste
de la batería, en ese orden.
10. Limpie y guarde el cargador de batería.
13
J.
SOLUCION DE PROBLEMAS
El cargador de batería está diseñado para funcionar automáticamente. Sin embargo, si se presenta un problema, chequée lo siguiente:
PROBLEMA
POSIBLE EXPLICACION
SOLUCION
No hay lectura en el
amperímetro
Cargador no está enchufado
Conexiones están invertidas
Enchúfelo.
Con el cargador desenchufado, invierte las
grapas y reconecte (muévalas adelante y atrás
para que cogen bien).
Mala conexión eléctrica
Limpie las grapas y los polos de la batería y
reconecte (muévalas adelante y atrás para
que cogen bien).
Tomacorriente CA está muerta.
Enchufe una lámpara u otro aparato para
buscar voltaje
La batería es defectuosa
(no acepta carga)
Haga revisar la batería.
La batería fue usada últimamente en
el vehículo y está a plena carga
La batería no necesita cargarse.
El cargador no enciende (al estar
debidamente conectado a la
energía)
(Si la batería está en el vehículo, el encender
las luces hará bajar el voltaje de la batería por
pocos segundos y entonces el cargador debe
encenderse).
La batería tiene menos de .7 voltios; cambie a
manual e intente otra vez.
El cargador no se APAGA
La batería tiene problema y no acepta
plena carga.
Haga revisar la batería.
La aguja del amperímetro pulsa
(fluctúa) cada dos o tres segundos
DESPUES DE TRES HORAS sin
disminuir.
Hay dos baterías o más conectadas en
paralelo.
Requiere más tiempo para cargarse; siga
cargando.
Es batería de 200 amperio horas o más
Requiere más tiempo para cargarse; siga
cargando.
La batería está conectada a una
aplicación que requiere poca corriente
(tal como la luz de techo de un carro)
La corriente de cargar es menos
que el valor nominal de salida
completa del cargador.
La aguja del amperímetro se
mueve a la extrema derecha,
se queda corto tiempo, luego
vuelve a cero, acompañado
de un sonido a chasquido
La batería está parcialmente cargada
Siga cargando
La batería es defectuosa (las placas
de la batería están encrustadas) y
no acepta plena carga.
Haga revisar y reemplace la batería.
La fuente de energía CA está baja.
Enchufe el cargador en otra tomacorriente CA
puesto a tierra.
Batería bien descargada (pero aparte
de eso, es buena batería)
Siga cargando hasta que la batería se haya
recuperado lo suficiente para aceptar una
carga (El disyuntor seguirá ciclando y la
agua se moverá de un lado a otro hasta que
la batería se haya recuperado)
En MANUAL con las conexiones de la
batería invertidas
Desenchufe el cargador y cambie a
conexiones correctas.
La batería es defectuosa
(no acepta carga)
Haga revisar la batería.
El cargador está ciclando después de
una sobrecarga que hizo disparar el
disyuntor.
Espere hasta que el cargador se reponga
automáticamente. (NO LO DEVUELVA PARA
SERVICIO).
14
K.
INSTRUCCIONES PARA MANTENIMIENTO Y LIMPIEZA
Se requiere poco mantenimiento para el cargador de batería. Use el sentido común al limpiar el cargador con trapo y guárdelo en un
sitio limpio y seco.
1.
Después de usar, quite con trapo toda corrosión de batería
y otro suciedad o aceite de la grapa, cordón y caja del
cargador. Use un trapo seco.
2.
Enrolle los cordones del cargador para evitar daños.
3.
Haga que un profesional competente reemplazca todo
cordón rajado o desgastado.
4.
Guarde el cargador de batería en un sitio limpio y seco.
GARANTIA LIMITADA
LA SCHUMACHER ELECTRIC CORPORATION, 801 BUSINESS CENTER DRIVE, MOUNT PROSPECT, ILLINOIS 60056-2179 HACE ESTA GARANTIA
LIMITADA AL COMPRADOR ORIGINAL AL POR MENOR DE ESTE PRODUCTO. ESTA GARANTIA LIMITADA NO ES TRANSFERIBLE.
La Schumacher Electric Corporation garantiza el cargador de batería modelo 612A-PE por tres años, y el modelo 5216A-PE por cinco años, contados a partir
de la fecha de compra al por menor, contra defectos de material o fabricación. Si tal cosa ocurre, la unidad será reparada o reemplazada, según opción del
fabricante. El comprador tiene la obligación de enviar la unidad, acompañada de la prueba de compra, al fabricante o a su representante autorizado, con el
costo del transporte o de envío por correo ya pagado.
Esta garantía limitada no es válida si el producto ha sido usado incorrectamente, o sometido a manejo negligente, o reparado por cualquier persona o entidad
que no sea el fabricante o su representante autorizado.
El fabricante no hace ninguna otra garantía aparte de la presente garantía limitada, y expresamente excluye cualquier garantía implícita, inclusiva garantía por
daños consecuentes.
LA PRESENTE ES LA UNICA GARANTIA EXPRESA Y LIMITADA Y EL FABRICANTE NI ASUME NI AUTORIZA A NADIE A ASUMIR NI HACER NINGUN
OTRO COMPROMISO CON RELACION A ESTE PRODUCTO QUE NO SEA ESTA GARANTIA LIMITADA Y EXPRESA. EL FABRICANTE NO HACE
NINGUNA GARANTIA DE CAPACIDAD DE COMERCIALIZACION DEL PRODUCTO NI DE SU ADECUACION AL FINALIDAD DE ESTE PRODUCTO Y
EXPRESAMENTE LAS EXCLUYE DE ESTA GARANTIA LIMITADA.
ALGUNOS ESTADOS DE LOS ESTADOS UNIDOS NO PERMITEN LA EXCLUSION O LIMITACIÓN DE DAÑOS INCIDENTALES O CONSECUENTES
O DEL LIMITE DEL PERIODO DE LA GARANTIA IMPLICITA, DE MODO QUE LAS LIMITACIONES O EXCLUSIONES CITADAS ARRIBA PUEDEN NO
SER APLICABLES A UD.
ESTA GARANTIA LE CONCEDE A UD. DERECHOS LEGALES ESPECIFICOS, Y UD. QUIZAS TENGA TAMBIEN OTROS DERECHOS QUE VARIAN
DE ESTADO EN ESTADO.
15
NOTAS
16