1
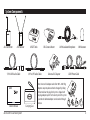
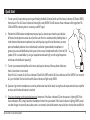
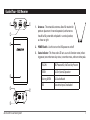
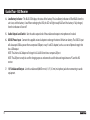
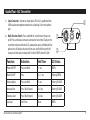
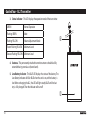
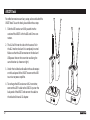
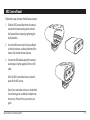
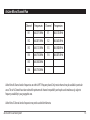
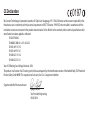
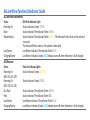
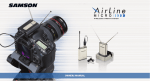
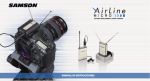
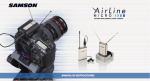
Table of Contents Introduction . . . . . . . . . . . . . . . . . . . . . . . . . . 1 System Components . . . . . . . . . . . . . . . . . . . . . 3 Quick Start . . . . . . . . . . . . . . . . . . . . . . . . . . . 4 Guided Tour - AR2 Receiver . . . . . . . . . . . . . . . . . 7 Guided Tour - AL2 Transmitter . . . . . . . . . . . . . . . 9 AR2DT Dock . . . . . . . . . . . . . . . . . . . . . . . . . . 12 AR2 Camera Mount . . . . . . . . . . . . . . . . . . . . . 13 Specifications . . . . . . . . . . . . . . . . . . . . . . . . . 14 AirLine Micro Channel Plan . . . . . . . . . . . . . . . . 15 Samson Technologies Corp. v2 45 Gilpin Avenue Hauppauge, New York 11788-8816 Phone: 1-800-3-SAMSON Fax: 631-784-2201 www.samsontech.com Introduction Thank you for purchasing the Samson AirLine Micro Camera wireless system, a breakthrough in wireless microphone technology. It is perfectly suited for commercial videographers, corporate, as well as broadcast video professionals. The AirLine Micro utilizes the latest in miniaturized electronic components, as well as lithium-ion batteries, resulting in Samson’s smallest wireless system, while preserving the high-quality audio you expect from a Samson wireless device. The AirLine Micro system ensures clear, interruptionfree performance by combining tone-key with auto-mute. This configuration allows only the transmitter’s audio to pass through the receiver, and mutes the output if there is any interference. The AirLine Micro Camera system is designed so that it can easily be integrated into your current video system, and comes with all of the necessary components to execute your video shoot or live broadcast. The system is comprised of one AL2 belt pack transmitter and one AR2 micro receiver, which are each housed in a durable aluminum chassis. The AR2 micro receiver features an 1/8” unbalanced audio output, with microphone or line level output, USB DC-input, and RF and Battery LED indicators. The system also includes a mounting adaptor that fits into the standard hot shoe, enabling it to be attached to any video camera. The system also includes one 3.5mm-3.5mm and one 3.5mm-XLR audio cable to connect to the audio input of your camera. Also included is an LM10 omni directional lavaliere microphone that allows the performer the freedom to move around while maintaining outstanding audio clarity. The AirLine Micro system utilizes fully rechargeable lithium-ion battery technology. The included AL2 transmitter and AR2 receiver feature internal rechargeable batteries, each allowing 10 hours of battery operation. Both the AL2 and AR2 can be recharged with the included AC adaptor and USB Y-cable, or with the included AR2DT docking station, or by USB bus power when connected to any USB host-equipped device. The AR2 can alternatively be powered by the included AC adaptor, for continuous operation. AirLine Micro Camera System 1 Introduction In this manual, you’ll find a detailed description of the features of your AirLine Micro Camera system, as well as a guided tour of its components, step-by-step instructions for setting up and using your system, and full specifications. If your AirLine Micro Camera system was purchased in the United States, you’ll also find a warranty card enclosed. Don’t forget to fill it out and mail it! This will enable you to receive online technical support, and will allow us to send you updated information about this and other Samson products. If your Airline Micro Camera system was purchased outside of the U.S., contact your local distributor for warranty details. Also, be sure to visit our website (http://www.samsontech.com) for information about our full product line. Special Note for U.S. Purchasers: Should your Airline Micro Camera system ever require servicing, a Return Authorization (RA) number is necessary. Without this number, the unit will not be accepted for return. If your AirLine Micro Camera system was purchased in the United States, please call Samson at 1-800-372-6766 for an RA number prior to shipping your system. If possible, return the unit in its original carton and packing materials. If your AirLine Micro Camera system was purchased outside of the U.S., contact your local distributor for service information. Battery Notice: Lithium-ion batteries are low-maintenance, and provide increased power capabilities in a lighter package, compared with NiCad (nickel-cadmium) batteries. All lithium-ion batteries have a finite number of times that they can be recharged, called a charge cycle. A charge cycle means using all of a battery’s power, but does not necessarily mean a single charge. A lithiumion battery can be recharged when needed, and does not need to be fully discharged (contrasted with a NiCad battery) before charging again. Repetitive full discharges of the battery should be avoided, as lithium-ion batteries need to be utilized continuously for maximum life and performance. If you are not using your wireless system often, be sure to complete a full charge cycle at least every three months. If you need to replace your AL2 or AR2 battery, please contact Samson, or your local distributor. 2 System Components AL2 Transmitter AR2 Receiver 1/8” to XLR Audio Cable Owners Manual AirLine Micro Camera System AR2DT Dock AR2 Camera Mount 1/8” to 1/8” Audio Cable Carrying Case LM10 Lavaliere Microphone Universal AC Adaptor 3 Windscreens USB Y-Power Cable Note: Universal AC Adaptor works from 100V - 240V. Plug adaptors snap into place and can be changed by sliding the button below the plug. Each system is shipped with one plug adaptor specific to the country where the system is purchased. Addional adaptors can be ordered through Samson. 3 Quick Start Please follow these basic procedures for setting up and using your AirLine Micro: 1. For your AirLine Micro system to work properly, both the receiver and transmitter must be on the same channel. Remove all packing materials (save them in case your unit needs to be serviced in the future) and check to make sure that the supplied receiver and transmitter are on the same channel. Note: The channel number is laser-engraved on the back of the AR2 and AL2 chassis. If these channels do not match, please contact Samson Technical Support at 1-800-372-6766. If your unit was purchased outside of the U.S., please contact your local distributor. 2. Before using your AirLine Micro system you should fully recharge the transmitter and receiver batteries. Plug the AC adaptor into a power socket. Connect the USB Y-Cable into the USB socket on the AC adaptor. Plug the two mini-USB connectors into the USB ports on the AL2 transmitter and AR2 receiver. When the transmitter and receiver are completely charged, the BLUE LED indicator will turn off. 3. Remove the USB cable and continue with setup. 4. Physically place the receiver where it will be used (if desired, the AR2 receiver model can be used with the included AR2DT dock) and fully extend the antennas. 5. Turn your audio system off and connect the receiver’s 1/8” unbalanced output jack to the microphone or line level audio input of your video camera, amplifier or mixer. Set the AR2 Mic/Line Level switch to match the input. 6. Turn on the receiver using the Power Switch. When on, the Status Indicator will be steady YELLOW. 4 Quick Start 7. Turn on your AL2 transmitter by pressing and holding the Multi-Function Switch, until the Status Indicator LED flashes GREEN; then release it. The AL2 Status Indicator will now light steady GREEN. The AR2 receiver Status Indicator will change from YELLOW to GREEN, indicating that it is receiving a valid RF signal. 8. Position the LM10 lavaliere microphone onto your lapel, as close to your mouth as possible but off to one side (to prevent a nasal sound) and be sure the mic is unobstructed by clothing. Bear in mind that omnidirectional microphones (mics which pick up signal from all directions) are more prone to feedback problems than unidirectional (cardioid or hypercardioid) microphones. In general, you can avoid feedback by taking care not to use any microphone directly in front of a PA speaker (if this is unavoidable, try using an equalizer to attenuate high- or mid-range frequencies which cause the feedback “squealing”). 9. Turn on your connected amplifier and/or mixer, but keep its volume all the way down. Make sure the AL2 transmitter is not muted. Note: If the AL2 is muted, the AL2 Status Indicator LED will flash GREEN and the AR2 Status Indicator will flash GREEN. To un-mute the AL2, press the Multi-Function Switch and the Status Indicator will light steady GREEN. 10. Speak or sing into the microphone at a normal performance level while slowly raising the audio input control of your amplifier or mixer, until the desired volume is reached. 11. If you hear distortion at the desired volume level, determine if the Status Indicator LED on the receiver is lighting RED. If the Status Indicator is RED, simply move the microphone further from your mouth. If the Status Indicator is lighting GREEN, make sure that the gain structure of your audio system is set correctly (consult the owners manual of your mixer and/or amplifier for AirLine Micro Camera System 5 Quick Start details). If you hear a weak, noisy signal at the desired volume level, make sure that the gain structure of your audio system and the Audio Output Level switch are set correctly. If the Audio Output Level switch is set correctly and the signal coming from the receiver is still weak and/or noisy, simply position the microphone closer to your mouth. If you feel that the level of the microphone needs further adjustment, press and hold the AL2 Multi-Function Switch while the unit is powered on until the Status Indicator turns off; then release the switch. Press and hold the Multi-Function Switch again for five seconds. The AL2 Status Indicator will first flash GREEN, then flash YELLOW, to show that you are in Volume Adjustment mode. Press and release the Multi-Function Switch once, and the microphone volume will increase one level. To continue to adjust the microphone volume, continue to press and release the Multi-Function Switch. There are five levels. With each increasing level, the Status Indicator will flash faster. After level five is reached, the transmitter will cycle back down through the levels each time the Multi-Function Switch is pressed. As the levels decrease, the Status Indicator flashes slower. When the desired level is reached, release the Multi-Function Switch. The AL2 will return to normal operation after 10 seconds, and the Status Indicator will light steady GREEN. 12. Do a walk-around through the intended area of coverage while observing the AR2’s Status Indicator; it should stay steadily GREEN, indicating sufficient RF reception in all areas of intended use. If the AR2’s Status Indicator lights YELLOW, it signals RF dropout (or the receiver may be muted). Reposition the device (or its antennas) as necessary. If extended range coverage is required, another AR2 true diversity receiver (set to the same channel as the transmitter) should be used. 13. If you have followed all of the above the steps and are still experiencing difficulties with your system, please call Samson Technical Support (1-800-372-6766). If you purchased your system outside of the U.S., please contact your local distributor. 6 Guided Tour - AR2 Receiver 1. Antennas - The retractable antennas allow full rotation for optimum placement. In normal operation, both antennas should be fully extended and placed in a vertical position, as shown at right. 2. POWER Switch - Use this to turn the AR2 power on and off. 3. Status Indicator - This three-color LED acts as a multi-function meter, indicating power, transmitter tone-key status, transmitter mute, and transmitter peak. YELLOW AR2 Powered On, No Tone-Key Present GREEN AL2 On, Normal Operation Flashing GREEN AL2 Audio Muted RED Transmitter Input Overloaded AirLine Micro Camera System 7 Guided Tour - AR2 Receiver 4. Low Battery Indicator - This BLUE LED displays the status of the battery. The Low Battery Indicator will flash BLUE when the unit is on, and the battery is low. When recharging the AR2, the LED will light steady BLUE until the battery is fully charged, then the indicator will turn off. 5. Audio Output Level Switch - Sets the audio output level of the unbalanced output to microphone or line level. 6. USB DC Power Input - Connect the supplied universal adaptor to recharge the internal lithium-ion battery. The USB DC input will also accept USB bus power from a computer USB port, or any 5-volt DC adaptor (such as a car or cell phone charger) that has a USB output. NOTE: The Universal AC Adaptor will charge the AL2 & AR2 faster than a computer USB port. NOTE: The USB port can only be used for charging purposes and cannot be used for data exchange between a PC and the AR2 receiver. 7. 1/8” Unbalanced Output - Use this unbalanced (600 Ohm min.) 1/8” (3.5 mm) mini-phone jack when connecting to audio equipment. 8 Guided Tour - AL2 Transmitter 1. Input Connector - Connect an input device. The AL2 is supplied with an LM10 lavaliere microphone connected via a locking 3.5mm mini-phone jack. 2. Multi-Function Switch - Press and hold this switch to turn the unit on or off. Press and release to mute or unmute the transmitter. To adjust the transmitter volume, while the AL2 is powered on, press and hold until the power turns off, release the switch, then press and hold the switch for 5 seconds and the Status Indicator will first flash GREEN, then YELLOW. Function Activation Hold Time LED Status Power ON/OFF Press and Hold > 1 sec GREEN Mute ON/OFF Press 0.2 – 1 sec Flashing GREEN Volume Adjust Press and Hold > 5 sec Flashing YELLOW Increase Gain Press (Total 5 steps) > 0.2 sec Flashing YELLOW Decrease Gain Press (Total 5 steps) > 0.2 sec Flashing YELLOW Set Level Don’t Press 10 sec GREEN AirLine Micro Camera System 9 Guided Tour - AL2 Transmitter 3. Status Indicator - This LED displays the operation mode of the transmitter. GREEN Normal Operation Flashing GREEN Mute Flashing YELLOW Volume Adjustment Mode Fastest Flashing YELLOW Maximum Level Slowest Flashing YELLOW Minimum Level 4. Antenna - This permanently attached transmitter antenna should be fully extended during normal use (do not bend). 5. Low Battery Indicator - This BLUE LED displays the status of the battery. The Low Battery Indicator will flash BLUE when the unit is on, and the battery is low. When recharging the AL2, the LED will light steady BLUE until the battery is fully charged. Then the indicator will turn off. 10 Guided Tour - AL2 Transmitter 6. Attenuation Switch - The AL2 transmitter features a signal attenuation switch that is used to select the input level of “0dB” or “-15dB.” This attenuation switch has been factory preset to “0dB,” providing the optimum level for most situations. If you see the input of microphone repeatedly clipping the output, first try to adjust the gain control as described in step 2, above. If you cannot attenuate the signal low enough using the gain control, choose the “-15dB” level setting. 7. USB DC Power Input - Connect the supplied universal adaptor to recharge the internal lithium-ion battery. The USB DC input will also accept USB bus power from a computer USB port, or any 5-volt DC adaptor (such as a car or cell phone charger) that has a USB output. NOTE: The Universal AC Adaptor will charge the AL2 & AR2 faster than a computer USB port. NOTE: The USB port can only be used for charging purposes and cannot be used for data exchange between a PC and the AL2 transmitter. AirLine Micro Camera System 11 AR2DT Dock For added convenience and easy setup, we have included the AR2DT dock. To use the dock, please follow these steps: 1. Slide the AR2 receiver until fully seated into the section of the AR2DT with the USB and 3.5mm connectors. 2. The AL2 will fit into the side with the cutout. Push the AL2 into the dock until it is completely inserted. Make sure that the USB connector on the dock and USB power inlet on the transmitter are facing the same direction (as shown on right). 3. Attach the included audio cable to the audio output on the back panel of the AR2DT to connect the AR2 to a mixer or power amplifier. 4. To recharge the AR2 receiver and AL2 transmitter, connect the USB Y-cable to the USB DC input on the back panel of the AR2DT and connect the cable to the included Universal AC adaptor. 12 AR2 Camera Mount Follow these steps to mount the AR2 onto a camera: 1. Slide the AR2 Camera Mount into the camera’s standard hot shoe mounting point, and lock the Camera Mount in place by tightening the knurled washer. 2. Insert the AR2 receiver into the Camera Mount so that the antennas are facing the front of the mount. Fully extend the two antennas. 3. Connect the AR2 audio output to the camera’s audio input using the supplied 3.5mm or XLR cable. Note: The AR2 Camera Mount does not provide power for the AR2 receiver. Note: If your camera does not have a standard hot shoe mounting point, an additional adapter may be necessary. Please refer to your camera’s user guide. AirLine Micro Camera System 13 Specifications System Operating Frequency N Band E Band Number of Channels N Band E Band Working Range Audio Frequency Response T.H.D. (Overall) Operating Temperature Storage Temperature 6 4 100 m (300 ft.) line of sight 50 Hz - 15 kHz < 1% (@AF 1 kHz, RF 46 dBu) –18°C (0°F) to +50°C (+122°F) –5°C (23°F) to +35°C (+95°F) AR2 Receiver Audio Output Connector Audio Output Level (Typical) Audio Output Impedance AF Frequency Response Antennas Selectivity S/N Ratio (Overall) 1/8” Unbalanced -30 dBv (Mic), -10 dBv (Line) Unbalanced 600 Ohms 50 Hz - 15 kHz Two 1/4 Wavelength Rod ±150 kHz (AF Out Ratio -60 dB) 90 dB (w/IHF-A Filter) 14 642.375 MHz - 645.750 MHz 863.125 MHz - 864.875 MHz Sensitivity 18 dBu (@ THD 2%) Power RequirementsInternal lithium ion rechargeable battery or AC adaptor Battery Life ~10 hours IndicatorsPower On, Tone Key, Transmitter Mute, Transmitter Peak, Battery Low, Recharging Dimensions 43 mm L x 13 mm W x 60 mm H 1.7” L x 0.51” W x 2.4” H Weight 42 grams (1.5 oz.) AL2 Transmitter Audio Input Level -110 dBv ~ 0 dBv Volume Adjustment Steps 5 RF Transmitter Output 10 mW ERP Power Requirements Internal lithium ion rechargeable battery Battery Life ~10 hours Dimensions 43 mm L x 13 mm W x 60 mm H 1.7” L x 0.51” W x 2.4” H Weight 42 grams (1.5 oz.) AirLine Micro Channel Plan Channel Frequencies Channel Frequencies N1 642.375 MHz E1 863.125 MHz N2 642.875 MHz E2 863.625 MHz N3 644.125 MHz E3 864.500 MHz N4 644.750 MHz E4 864.875 MHz N5 645.500 MHz N6 645.750 MHz Airline Micro N-Channel wireless frequencies are within UHF TV frequency bands. Only certain channels may be available in particular areas. The six N-Channels have been selected for optimum multi-channel compatibility and may be used simultaneously, subject to frequency availability in your geographic area. Airline Micro E-Channel wireless frequencies may not be used in North America. AirLine Micro Camera System 15 CAUTION! Electrical shock can result from removal of the receiver cover. Refer servicing to qualified service personnel. No user-serviceable parts inside. Do not expose to rain or moisture. The circuits inside the receiver and transmitter have been precisely adjusted for optimum performance and compliance with federal regulations. Do not attempt to open the receiver or transmitter. To do so will void the warranty, and may cause improper operation. Power Outlet as a power device should be easy to operate This device complies with part 15 of the FCC rules. Operation is subject to the condition that this device does not cause harmful interference. This device complies with RSS-210 of Industry & Science Canada. Operation is subject to the following two conditions: (1) this device may not cause harmful interference and (2) this device must accept any interference received, including interference that may cause undesired operation. This equipment is intended for use in wireless microphone applications. Equipment is intended for sale in: AT, BE, CH, CY, CZ*, DK, EE, FI*, FR*, DE*, GR*, HU, IE, IS, IT, LV, LT*, LU, MT*, NL, NO*, PL* PT, RO, SK, SI, ES, SE, UK *Subject to license. Please contact your national frequency authority for information on available legal use in your area. Any changes or modifications not expressly approved by Samson Technologies Corp. could void your authority to operate the equipment. If you want to dispose this product, do not mix it with general household waste. There is a separate collection system for used electronic products in accordance with legislation that requires proper treatment, recovery and recycling. Private household in the 28 member states of the EU, in Switzerland and Norway may return their used electronic products free of charge to designated collection facilities or to a retailer (if you purchase a similar new one). For Countries not mentioned above, please contact your local authorities for a correct method of disposal. By doing so you will ensure that your disposed product undergoes the necessary treatment, recovery and recycling and thus prevent potential negative effects on the environment and human health. CE Declaration 0197 We, Samson Technologies Corporation, located at 45 Gilpin Ave, Hauppauge, NY 11788 USA declare under our own responsibility that these devices are in conformity with the essential requirements of R&TTE Directive 1999/5/EC when installed in accordance with the installation instructions contained in the product documentation. To the effect that the standards and/or technical specifications referenced below have been applied as indicated: EN 62479:20102 EN 60065: 2002+A1+A11+A2+A12 EN 301 489-1 V1.9.2 EN 301 489.9 V1.4.1 EN 300 422-1 V1.4.2 EN 300 422-2 V1.3.1 Year of CE Marking (Low Voltage Directive): 2014 The products shall contain the CE marking and shall be accompanied by the identification number of the Notified Body TÜV Rheinland Product Safety GmbH 0197. This equipment will also carry the Class 2 equipment identifier. Signed on behalf of the manufacturer: Douglas Bryant Vice President Engineering 03/03/2014 AirLine Micro Function & Indicator Guide AL2 Belt Pack Transmitter Status Belt Pack Indicator Light Powering On Status Indicator: Steady GREEN. Mute Status Indicator: The indicator flashes GREEN. Volume Adjust Status Indicator: The indicator flashes YELLOW. The indicator flashes faster as the volume is increased. The indicator flashes slower as the volume is decreased. Low Battery Low Battery Indicator: The indicator flashes BLUE. Charging Battery Low Battery Indicator: Steady BLUE. Indicator turns off when the battery is fully charged. AR2 Receiver Status Receiver Indicator Lights Powering On Status Indicator: Steady YELLOW. (AR2: ON, AL2: OFF) Powering On Status Indicator: Steady GREEN. (AR2: ON, AL2: ON) AL2 Mute Status Indicator: The indicator flashes GREEN. Peak Status Indicator: The indicator flashes RED. Low Battery Low Battery Indicator: The indicator flashes BLUE. Charging Battery Low Battery Indicator: Steady BLUE. Indicator turns off when the battery is fully charged.