1
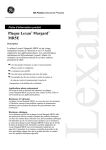
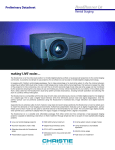
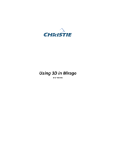
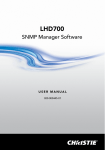
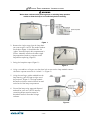
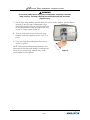
Lamp Replacement Instructions
Introduction
Use the following instructions when replacing a lamp in the Christie DS+60 projector.
It is recommended a lamp be replaced when it has reached its Lamp Limit as defined in the
Lamp menu, has failed or shows a significant decrease in brightness. The Lamp Limit setting
should not exceed the expected lamp life (1500 hrs). Enable the Lamp Message checkbox, in
the Lamp menu to receive a warning message upon power-up indicating the lamp has reached
its defined Lamp Limit.
Lamps that have burned out or failed during operation should be replaced immediately and
not left in the projector.
By design, the projector will automatically change lamp operation modes to maintain
continuous light on the wall. This auto-switching of modes may or may not be directly related
to the lamp. In some cases, a failure of another component in the projector will cause the
change in lamp operation modes, such as a lamp driver failure. Always check the status of a
lamp in the Lamp menu to ensure lamp replacement is required.
For more information on the various lamp operation modes, auto-switching and lamp status
refer to the User’s Manual provided with your projector.
Components Required
Lamp Kit #03-900520-01P (includes one 300W P-VIP lamp, instructions, warranty and RMA
request forms)
#1 Phillips screwdriver
Safety and Warning Guidelines
Read the Lamp Replacement procedure in its entirety before proceeding.
Never stick hands into an empty lamp compartment while the projector is still plugged into
an AC outlet.
Handle a lamp by the housing only. Lamps can be hot even after cool down.
Do not touch the glass surface of the lamp. Fingerprints left on the surface can lead to an
intense accumulation of heat called a “hotspot”, which could potentially result in the lamp
shattering. It is recommended you wear clean, lint-free gloves when working with the lamps to
prevent fingerprints.
Instructions
Please read before proceeding.
1. Press
to power down the projector and allow the lamp to cool for approximately 5
minutes after the fans have turned off before continuing with Step 2. If required, you can
switch lamp modes and cut power to the lamp you want to replace without having to power
down the projector and interrupt a presentation — called a “warm swap”. Check the Lamp
menu to ensure the lamp operation mode has been switched to the other lamp and allow a
lamp cool down period before continuing with Step 2.
NOTE: Opening a lamp door when a lamp is still “live” will cause the projector to
automatically cut power to that lamp — not recommended.
013-100059 (02/05)
1 of 4
Lamp Replacement Instructions
WARNING
Wait at least 5 minutes after powering down or switching lamp operation
modes to allow the lamp to cool sufficiently before removing.
Figure 1.
2. Remove the single screw from the lamp door
you want to open. NOTE: The amber window
on the door (Figure 1.) should be dim. If it
“glows” then the lamp in this compartment is
still on. Manually switch to the other single
lamp operation mode to cut power to the
lamp before replacing. (Figure 2.)
3. Swing the lamp door open. (Figure 2.)
Figure 2.
4. Using a screwdriver or fingers, turn the three lock screws on the lamp module counterclockwise a quarter turn each to “unlock” it. (Figure 3.)
5. Using the two finger guides molded into the
lamp housing, pull the lamp straight out of
the projector. (Figure 3.) The lamp module
disconnects from the terminal block located
at the back of the lamp compartment.
6. Discard the lamp using approved disposal
methods for your area. NOTE: Mercury
containing lamps must be treated as
hazardous waste if discarded in large
volumes.
Figure 3.
2 of 4
Lamp Replacement Instructions
WARNING
Do not stick hands into an empty lamp compartment, especially if the other
lamp is still on. The lamp compartment can become quite hot and cause
physical injury.
7. On the new lamp module, turn the three lock screws to the “unlock” position before
inserting it into the lamp compartment. Align
the lamp with the three pins located at the back
of the compartment. Insert the lamp all the way
in until it is fully seated. (Figure 4.)
8. Turn the three lock screws on the new lamp
module clockwise a quarter turn to “lock” it in
place.
9. Close the lamp door and tighten the screw to
secure it in place.
NOTE: The projector automatically detects a new
lamp and records the serial number in software the
next time it’s powered up. Manual entry of the
serial number is not required.
3 of 4
Figure 4.
Lamp Replacement Instructions
Technical Support
NORTH AMERICA
CHRISTIE Digital Systems, Inc.
809 Wellington St. North
Kitchener, Ontario, Canada N2G 4Y7
Tel. 519-744-8005 (General)
Toll Free 1-800-221-8025 (Technical Support)
Fax 519-749-3302 (Service)
CHRISTIE Digital Systems, Inc.
10550 Camden Drive
Cypress, CA 90630
USA
Tel. 714-236-8610 (General)
Toll Free 1-800-221-8025 (Technical Support)
Fax 519-749-3302 (Service)
EUROPE
CHRISTIE Digital Systems, Inc.
View Point
200 Ashville Way
Wokingham, Berkshire RG41 2PL
United Kingdom
Tel. +44-118-977-8111
Fax +44-118-977-8112
CHRISTIE Digital Systems, Inc.
Willicher Damm 129
D-41061 Mönchengladbach
Germany
Tel. +49-2161-664540
Fax +49-2161-664546
CHRISTIE Digital Systems, Inc.
7, av Georges Pompidou
92593 Levallois-Perret Cedex
France
Tel. +33-(0)1-47-48-28-07
Fax +33-(0)1-47-48-26-06
ASIA-PACIFIC / OTHER
CHRISTIE Digital Systems, Inc.
627A Aljunied Road
# 05-02 Biz Tech Centre
Singapore 389842
Tel. 65-6877-8737
Fax 65-6877-8747
CHRISTIE Sales (Canada)
Tel. 1-800-265-2171
Fax 519-749-3136
CHRISTIE Digital Systems, Inc.
Rm. 1109-1116 Shartex Plaza
No. 88 Zun Yi South Road
Shanghai, 200336
People’s Republic of China
Tel. +86-21-6278-7708
Fax +86-21-6270-5816
CHRISTIE Sales (U.S.)
Tel. 1-800-407-7727 or 1-866-880-4462
Fax 714-503-3375
4 of 4
![CCM-LX [103-115108-01] QUICK SETUP GUIDE](http://vs1.manualzilla.com/store/data/005977333_1-ac67f3228bf0f13da08c247c088ce509-150x150.png)