1
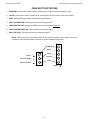
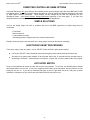
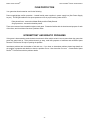
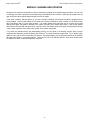
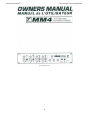
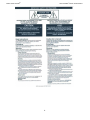
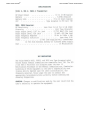
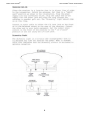
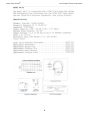
WARNING
Be sure to read this Operation Manual before using your machine to ensure safe operation.
JULY 2008
Federal Communications Commission (FCC) Statement
Note: This equipment has been tested and found to comply with limits for a Class A digital device, pursuant to part
15 of the FCC Rules. These limits designed to provide reasonable protection against harmful interference when the
equipment is operated in a commercial environment. This equipment generates, uses, and can radiate frequency
energy, and, if not installed and used in accordance with the instruction manual may cause harmful interference to
radio communications. Operation of this equipment in a residential area is likely to cause harmful interference in
which case the user will be required to correct the interference at his/her own expense.
***
WARNING:
ALL OF BOB’S SPACE RACERS® GAMES ARE SHIPPED WITH THE SAME KEY AND LOCK SETS.
IT IS IN YOUR BEST INTEREST TO CHANGE THE KEYS AND LOCKS ON YOUR GAMES WHEN YOU RECEIVE
THEM.
*SERVICE POLICY*
At BOB’S SPACE RACERS®, INC., our strength lies in the high quality, long lasting equipment we manufacture.
Should the need arise, we maintain both Technical Support and Customer Service staff.
Technical Support is available whenever you should need it. The direct technical ‘hot line’ is (386) 677-0761. This
line is manned 8:30 am - 5:00 pm, EST, Monday through Friday, excluding holidays. During all other times an
operator will be available to relay your problem to the technician on call. Technical Support will assist you in
troubleshooting a service problem or setting equipment options.
Customer Service telephone lines are manned 8:30 am - 5:00 pm, EST, Monday through Friday, excluding holidays.
Customer Service staff can be reached at (386) 677-0761 they will also take parts orders and research the status of
previous orders.
As always, you can call (386) 677-0761 to reach all other departments, or you can FAX anyone at BOB’S SPACE
RACERS® by calling (386) 677-0794, 24 hours a day. You can, also, e-mail us at [email protected], 24
hours a day.
BOB’S SPACE RACERS®, INC.’S
ONE-YEAR NEW EQUIPMENT WARRANTY
1. INCLUDED IN THIS WARRANTY Bob’s Space Racers®, Inc. warrants to the original purchaser only
that the equipment that is the subject of this sale conforms to its specifications, and is free from defects
under normal service for a one-year period from the original date of delivery. This warranty does not
include any damages resulting from occurrences listed in Paragraph 2 below. This Warranty is not
transferable under any circumstance. Any claims under this warranty must be received in writing by Bob’s
Space Racers®, Inc. within 13 months from the date of delivery. Within a reasonable time of such written
notification Bob’s Space Racers®, Inc. will replace or repair any defective component of the equipment or
part thereof which fails for reasons other than normal services, use, or wear. Light bulbs are specifically
excluded from this warranty and shall be the sole responsibility of the purchaser. Bob’s Space Racers®,
Inc., within its sole discretion, makes the final determination as to whether to repair or replace any
component and whether any such repair or replacement shall be performed where the equipment is located
or at its home facility in Volusia County, Florida, or another facility of its sole choice. Any and all freight
charges for the purposes of repair or replacement shall be paid by the original purchaser. All defective
parts shall be returned to Bob’s Space Racers®, Inc. if requested. Bob’s Space Racers®, Inc. does not
warrant that the equipment will meet any original purchaser’s specific requirements or that the operation of
the equipment will be uninterrupted. These remedies are the original purchaser’s exclusive remedies for
breach of warranty.
2. EXCLUDED BY THIS WARRANTY. Bob’s Space Racers®, Inc. does not warrant (a) any product,
components or parts not manufactured by Bob’s Space Racers®, Inc.; (b) damage caused by use of the
equipment for purposes other than those for which it was designed; (c) defects caused by failure to provide
a suitable installation environment for the equipment; (d) damage caused by unauthorized attachments,
modification, or service; (e) damage caused by normal wear and tear or improper power supply; (f) damage
caused by accident or disaster such as fire, flood, lighting and wind; (g) any other abuse or misuse of the
equipment.
3. EXCLUSIVE WARRANTY. THE FOREGOING WARRANTY IS EXCLUSIVE AND IN LIEU OF
ALL OTHER WARRANTIES OR REMEDIES, WHETHER WRITTEN, ORAL OR IMPLIED. THERE
ARE NO WARRANTIES WHICH EXTEND BEYOND THE DESCRIPTION ON THE FACE HEREOF.
ANY AND ALL IMPLIED WARRANTIES OF MERCHANTABILITY, FITNESS FOR A
PARTICULAR PURPOSE, COURSE OF DEALING OR USAGE OF TRADE ARE HEREBY
EXPRESSLY DISCLAIMED AND EXCLUDED.
BOB’S SPACE RACERS®, INC.’S
ONE-YEAR NEW EQUIPMENT WARRANTY
4. REMEDIES LIMITED.
UNDER NO CIRCUMSTANCES, EXCEPT TO THE EXTENT
PROHIBITED BY APPLICABLE LAW, SHALL BOB’S SPACE RACERS®, INC. BE LIABLE FOR
ANY LOSS OR DAMAGE, DIRECT OR INDIRECT, SPECIAL, INCIDENTAL OR
CONSEQUENTIAL ARISING OUT OF THE USE OR INABILITY TO USE THIS EQUIPMENT
INCLUDING BUT NOT LIMITED TO ANY CLAIM FOR LOSS OR PROFITS, LOSS OF SAVINGS
OR REVENUE, LOSS OF USE OF THE EQUIPMENT, OR ANY ASSOCIATED EQUIPMENT,
FACILITIES OR SERVICE, DOWNTIME, THE CLAIMS OR COST(S) OF THIRD PARTIES
INCLUDING CUSTOMERS, AND INJURY TO PROPERTY.
Some states do not allow limitations on how long an implied warranty lasts or the exclusion or limitation of
incidental or consequential damages, so the above limitations or exclusion may not apply to you. This
warranty gives you specific legal rights and you may also have other rights which vary from state to state.
5. NO OTHER WARRANTIES. Unless modified in writing and signed by both parties, this agreement is
understood to be the complete and exclusive agreement between the parties, superseding all prior
agreements, oral or written, and all other communications between the parties relating to the subject matter
of this agreement. No employee or representative of Bob’s Space Racers®, Inc. or any other party is
authorized to make any other warranty or to assume any other liability in connection with the sale of its
equipment.
6. TIME LIMIT FOR CLAIMS. Any claim for breach of warranty or claims under this warranty must be
received in writing by Bob’s Space Racers®, Inc. within 13 months following delivery of the equipment.
7. FUTURE CHANGES. Bob’s Space Racers®, Inc. reserves the right to reserve, change or modify the
construction and design of its equipment or any component part or parts thereof without incurring the
obligations to make such changes or modifications in present equipment.
8. ALLOCATION OF RISKS. This agreement allocates the risks of equipment failure between Bob’s
Space Racers®, Inc. and the original purchaser. This allocation is recognized by both parties and is
reflected in the price of the goods. THE PURCHASER ACKNOWLEDGES THAT IT HAS READ THIS
AGREEMENT, UNDERSTANDS IT, AND IS BOUND BY ITS TERMS.
9. TO OBTAIN WARRANTY SERVICE. The original purchaser must, at his own expense, bring or ship
the equipment to an authorized location for service. Additionally, the original purchaser must pay all
freight, shipping or transportation charges for the return of the equipment from Bob’s Space Racers®, Inc.
to the original purchaser. Telephone or write:
Bob’s Space Racers®, Inc.
427 15th Street
Daytona Beach, Florida 32117
Telephone number 386-677-0761
FAX 386-677-0794
ADVANCED REPLACEMENT POLICY
After speaking with our Technical Department it may be necessary for Bob’s Space Racers®, Inc. to ship an
assembly item or part to repair your game. We will ship the item(s) according to your preference via United Parcel
Service, Federal Express, US Postal Service, etceteras. Note: we will not ship anything to P.O. Boxes via the US
Postal Service. You will be billed, per your account status, for the total cost of the shipment (which includes shipping
charges).
Upon shipment of the new item(s) a Return Merchandise Authorization Number (RMA #) will be issued for you to use
when returning the defective item(s) to Bob’s Space Racers®, Inc., or you may use the order number. After the
defective item(s) is received by Bob’s Space Racers®, Inc. your account will be issued either a:
1. Warranty credit: if your game is under warranty. (See the Warranty Policy page.) Note: this credit does
not include return shipping charges.
2. Credit for the item(s). Note: this credit does not include return shipping charges, nor does it include the
repair charges for the item(s).
If the item(s) cannot be repaired to the point where it could be shipped to another customer as an Advanced
Replacement item (i.e. cosmetic damage), we will ship your original item(s) back to you. You will be required to
return the Advanced Replacement item(s) or pay for it. You will be responsible for all shipping charges, should you
decide to not keep, and pay for, the Advanced Replacement item(s).
ADVANCED REPLACEMENT ITEM(S) SHIPPING RULES
When you request an Advanced Replacement item from us, we have a few rules for you to follow:
1. DO NOT try to repair the defective item(s) on your own; DO NOT disassemble the defective item(s) prior to
returning it to Bob’s Space Racers®, Inc. – this could cause further damage and the possibility of you not
receiving any credit at all on the item(s). There are not any user serviceable parts inside, and our vendors may
void their warranty on disassembled parts. (Please review the last paragraph of the Advanced Replacement
Policy).
2. Wait for the Advanced Replacement item(s) to arrive prior to returning the defective item(s).
3. When the new item(s) arrive, verify that it is the correct part. If it is not, please note what the differences are and
contact Bob’s Space Racers®, Inc.
4. Return the defective item(s) in the exact same packaging the Advanced Replacement item(s) came in. This
insures no more damage will be done to the item(s) during the return shipping.
Thank you for your cooperation.
OWNER’S MANUAL
BOB’S SPACE RACERS®
™
DOG POUNDER GROUP GAME MANUAL
CONGRATULATIONS!
Congratulations on your purchase of a Bob’s Space Racers® Game! Bob’s Space Racers® continues to lead the
amusement industry in the manufacturing and the operation of amusement games and has operated these games at
several of North America’s largest expositions for the last 30 plus years. Some of these expositions include: The
Canadian National Exhibition, Toronto, Ontario, Canada; The Calgary Stampede, Calgary, Alberta, Canada; The
Minnesota State Fair, St. Paul, Minnesota, USA; The Ohio State Fair, Columbus, Ohio, USA; The Big E, Springfield,
Massachusetts, USA; The South Carolina State Fair, Columbia, South Carolina, USA; and, The Dade County Youth
Fair, Miami, Florida, USA. This experience has allowed us the opportunity to field test each piece of equipment that
we manufacture, and helps us to stay in tune with the amusement industry with its ever-changing trends.
What you are about to read may appear a little overwhelming at first, but it will help you reach the high profits you
seek. Keep in mind we are offering this only as a guide for you to get started. These tips have proved time and
again to work successfully in our own operations over the last thirty years.
BOB’S SPACE RACERS®
™
DOG POUNDER GROUP GAME MANUAL
MANUAL INTRODUCTION
This owner’s manual is divided into several sections beginning with Operator’s Guide, Introduction and Set-up, and
so on. We have provided direction on every aspect of the game from running and maintaining it to pertinent
technical information and troubleshooting problems. We, also, cover coin mechanisms, ticket dispensing, and prize
redemption in the appendix section.
Each section has troubleshooting guides that contain enough information so that the game can be repaired with little
difficulty. If this information is not sufficient, a call to Bob's Space Racers® will provide additional assistance.
Between the manual and the personal assistance, downtime of your game will be minimal. (When you call, we
assume that you have read this manual and have tried the suggested repairs).
BOB’S SPACE RACERS®
™
DOG POUNDER GROUP GAME MANUAL
TABLE OF CONTENTS
INTRODUCTION
Introduction . . . . . . . . . . . . . . . . . . . . . . . . . . . . . . . . . . . . . . . . . . . . . . . . . . . . . . . . . . . . . . . . . .1
Getting Started; Why Breaks Are So Important . . . . . . . . . . . . . . . . . . . . . . . . . . . . . . . . . . . . . .2
Game Operations . . . . . . . . . . . . . . . . . . . . . . . . . . . . . . . . . . . . . . . . . . . . . . . . . . . . . . . . . . . . . 3
What To Do When It Is Slow; What To Do When It Is Busy . . . . . . . . . . . . . . . . . . . . . . . . . . . 5
What To Give Away; Changing Attendants/Operators . . . . . . . . . . . . . . . . . . . . . . . . . . . . . . . ..5
DOG POUNDER™ Group Graphic. . . . . . . . . . . . . . . . . . . . . . . . . . . . . . . . . . . . . . . . . . . . . . ..8
DOG POUNDER™ Group Graphic. . . . . . . . . . . . . . . . . . . . . . . . . . . . . . . . . . . . . . . . . . . . . . ..9
DOG POUNDER™ Arcade Graphic. . . . . . . . . . . . . . . . . . . . . . . . . . . . . . . . . . . . . . . . . . . . . .10
INSTALLATION AND SET-UP
Object of The Game For DOG POUNDER™. . . . . . . . . . . . . . . . . . . . . . . . . . . . . . . . . . . . . . 11
Game Description For DOG POUNDER™. . . . . . . . . . . . . . . . . . . . . . . . . . . . . . . . . . . . . . . .11
Electrical Requirements. . . . . . . . . . . . . . . . . . . . . . . . . . . . . . . . . . . . . . . . . . . . . . . . . . . . . . .. 11
Trailer Set-Up and Hook-Up; Trailer Lead Line Wiring Diagram . . . . . . . . . . . . . . . . . . . . . ...12
OPTION SETTINGS
2400 Electronics Option Register Setting Instructions . . . . . . . . . . . . . . . . . . . . . . . . . . . . . . . .13
DOG POUNDER™ Option Register Settings. . . . . . . . . . . . . . . . . . . . . . . . . . . . . . . . . . . . . . 14
MAINTENANCE
General Game Maintenance . . . . . . . . . . . . . . . . . . . . . . . . . . . . . . . . . . . . . . . . . . . . . . . . . . . . 15
Scheduled Maintenance For All Games . . . . . . . . . . . . . . . . . . . . . . . . . . . . . . . . . . . . . . . . . . ..17
TECHNICAL DATA
Master Module Relay Board Pin-Outs . . . . . . . . . . . . . . . . . . . . . . . . . . . . . . . . . . . . . . . . . . . . 19
Unit Relay Board Pin-Outs . . . . . . . . . . . . . . . . . . . . . . . . . . . . . . . . . . . . . . . . . . . . . . . . . . . . . ??
ELECTRONIC FEATURES
Electronic Module Component Overview; Self-Diagnostics; No Error Features . . . . . . . . . . . .19
Automatic Features; CB Off/Reset . . . . . . . . . . . . . . . . . . . . . . . . . . . . . . . . . . . . . . . . . . . . . . . 19
Push Button Stations and Diagram . . . . . . . . . . . . . . . . . . . . . . . . . . . . . . . . . . . . . . . . . . . . . . ..20
Module Electronic Self Diagnostics. . . . . . . . . . . . . . . . . . . . . . . . . . . . . . . . . . . . . . . . . . . . . ..21
Computer Controlled Game Options; Simple Solutions . . . . . . . . . . . . . . . . . . . . . . . . . . . . . . 22
Electronic Reset Procedures; Activated Switch . . . . . . . . . . . . . . . . . . . . . . . . . . . . . . . . . . . . ..22
Fuse Protection; Intermittent and Erratic Problems . . . . . . . . . . . . . . . . . . . . . . . . . . . . . . . . . ..23
Module Changes and Updates . . . . . . . . . . . . . . . . . . . . . . . . . . . . . . . . . . . . . . . . . . . . . . . . . . 24
Master Module Relay Board Graphic. . . . . . . . . . . . . . . . . . . . . . . . . . . . . . . . . . . . . . . . . . . .27
Master Module Relay Board Pin out. . . . . . . . . . . . . . . . . . . . . . . . . . . . . . . . . . . . . . . . . . . . . . 29
Unit Identifier. . . . . . . . . . . . . . . . . . . . . . . . . . . . . . . . . . . . . . . . . . . . . . . . . . . . . . . . . . . . . . . 31
Various Cabinet Drawings, Hardware, Parts Lists. . . . . . . . . . . . . . . . . . . . . . . . . . . . . . . . . . . .32
Air Compressor. . . . . . . . . . . . . . . . . . . . . . . . . . . . . . . . . . . . . . . . . . . . . . . . . . . . . . . . . . . .. . .56
2400 G Series Modules Accounting System. . . . . . . . . . . . . . . . . . . . . . . . . . . . . . . . . . . . . . . ..60
BOB’S SPACE RACERS®
™
DOG POUNDER GROUP GAME MANUAL
APPENDIX
Sound Systems
BSR Sound Unit. . . . . . . . . . . . . . . . . . . . . . . . . . . . . . . . . . . . . .. . . . . . . . . . . . . . . . . . . .A
Overview; Faceplate Diagram. . . . . . . . . . . . . . . . . . . . . . . . . . . . . . . . . . . . . . . . . . . .. . .A
Replacing the Music Card; Circuit Board Diagram. . . . . . . . . . . . . . . . . . . . . . . . . . .. . . .A
Switching From Manual Mode to Automatic Mode. . . . . . . . . . . . . . . . . . . . . . . . . . . . . .A
Automatic Mode Diagram. . . . . . . . . . . . . . . . . . . . . . . . . . . . . . . . . . . . . . . . . . . . . . . . . A
BSR Multi-Line LCD Diagram. . . . . . . . . . . . . . . . . . . . . . . . . . . . . . . . . . . . . . . . . .. .. . .A
MM-4 Four Channel Powered Mixer
Specifications
Introduction; Microphone and Line Inputs; Numbered Diagram. . . . . . . . . . . . . . . . . . . .B
Channel Level Controls; Clip LED; Master Control; EQ Section. . . . . . . . . . . . . . . . . . . B
Effects Loop; Power Amplifier. . . . . . . . . . . . . . . . .. . . . . . . . . . . . . . . . . .. . . . . . . . . . . .B
Database History Diagrams. . . . . . . . . . .. . . . . . . . . . . . . . . . . . . . . . . . . . . . . . . . . . . . . . B
2400 G MODULE ACCOUNTING
Accounting System. . . . . . . . . . .. . . . . . . . . . . . . . . . . . . . . . . . . . . . . . . . . . . . . . . . . . . .C
2400 G Module Electronics Accounting System Overview. . . . . . . . . . . . . . . . . . . . . . ..C
BOB’S SPACE RACERS®
™
DOG POUNDER GROUP GAME MANUAL
INTRODUCTION
BOB’S SPACE RACERS®
™
DOG POUNDER GROUP GAME MANUAL
INTRODUCTION
The most important thing to remember about the job you are about to begin is to be yourself! Your personality is
what keeps you from sounding like a computer. As you are taught the basic procedures, you’ll also learn how to
adapt them to your own style. Working in the game can be a lot of fun, once you have mastered the proper
technique.
ALWAYS REMEMBER THAT THE CUSTOMER IS THE MOST IMPORTANT PART OF THIS BUSINESS!
SMILE! A smile will do more for your business than anything else. It shows the customer that you are happy and
they will have some fun.
LOOK PEOPLE IN THE EYE! Making eye contact with people lets them know that you are talking to them, and not
just ‘rambling on’. A simple, “Hi! How are you?” or, “Hi there! Are y’all having fun today?” will let them know you
are talking to them. Follow up with, “Come over here and I’ll show you how to play this game!”
USE YOUR FREE HAND to motion the people you’re addressing to come over to your game.
ONCE THE CUSTOMER IS AT THE COUNTER, just be polite and explain the game in a simple manner.
WHEN THE GAME IS OVER, be certain to:
1. Acknowledge the winner.
2. Encourage the non-winners to play again, before they start to walk away.
3. Encourage the winner to play again and show him/her the next prize they could trade-up for if
they won again.
If you keep these basic procedures in mind, everything else should come together.
1
BOB’S SPACE RACERS®
™
DOG POUNDER GROUP GAME MANUAL
GETTING STARTED
No matter what part of the world you may be operating your equipment in, customers are the most important part of
making your operation successful. By keeping the customer happy, you will enjoy increased profits. When a
customer leaves your game one of two things will have occurred: either you have a satisfied customer who will play
that great new game the next time he goes by and will tell his/her friends about it; or, he/she will leave vowing that is
the last time that game will ever get his/her money! Of course we all agree that a happy customer is what success is
all about.
It is the operator’s job to ensure that the customer can easily understand the game and what the prizes are for each
win level. This task can only be achieved by the person who will actually be in the game working with the people.
There are important features to look for when hiring a game attendant. Always look for a friendly, outgoing
personality. Someone who is honest, dependable, and is used to working with money. The attendant is the one
who will be dealing with the customers on a one-on-one and day-to-day basis.
Although working with the public can be extremely trying at times, by insuring proper breaks for your employees you
will eliminate most problems. It is recommended to give the attendant a 30 to 60 minute break every two (2) hours,
this way you will always have a fast, outgoing, upbeat attendant running your game. If the attendant is polite and
friendly, the public will respond the same way.
WHY BREAKS ARE SO IMPORTANT
Operating a game is physically and mentally demanding. We found it is best to have two (2) attendants for each
game, or, three (3) attendants to rotate between two (2) games. This will keep them always at their peak
performance and alertness levels. We also suggest you have a part-time employee who can work during the
busy/peak times. This person is commonly referred to as the ‘second’ attendant. It’s also important for higher
profits. Having two (2) people collecting money can save time and allows the game operation to run much more
quickly and efficiently.
2
BOB’S SPACE RACERS®
™
DOG POUNDER GROUP GAME MANUAL
GETTING READY FOR EACH DAY
We suggest you begin each day by checking the power. This procedure is done to insure that proper power is being
supplied to the game to avoid electrical damage, and/or malfunctions. To check the power coming into your trailer
look for the power checker with a toggle switch on it. This is mounted near the breaker panel. Toggle the switch to
the left to test one leg of the power, then right for the other leg of the power. The needle should read approximately
120VAC on each leg.
If either leg does not read 120VAC you will need to locate the supply generator or the city power connections and
check the voltage source there. This needs to be done every day because your trailer may have been hooked to a
different circuit by a show electrician, from one day to the next, without your knowledge.
If both legs do read 120VAC you can start the game up and check your sound level for both the microphone and the
sound track. We find it helpful to label the knobs on the amp so the operator/attendant can easily distinguish
between each knob.
It is important to be aware of your merchandise inventory throughout the day, especially during peak times. This will
ensure that your game doesn’t run out of prizes.
3
BOB’S SPACE RACERS®
™
DOG POUNDER GROUP GAME MANUAL
GAME OPERATIONS
Okay, it’s time to begin! As each customer passes by they need to by acknowledged with a simple greeting. Such
as:
“Hello!”
“Hi, there!”
Followed by:
“How are you?”
“Have you seen this game?”
“Would you like to try it?”
“Are you ready to try this one?”
“Let me show you how to play!”
Remember, make eye contact with the person you are speaking to when you are trying to persuade them to come
over to play the game.
Getting the customer to the playing counter is half the battle. Once they are at the counter, quickly give a brief
explanation of how to play the game. Then try to get a few more players to begin the race. Note: It’s not necessary
to have a group of players to begin a skill type game (i.e. Sidewinder®, Roll-A-Ball®, Whac-A-Mole®, etc). Also, know
which prize you will be giving out.
During the game quickly check that all players are playing the game properly, and that they are at their correct play
stations. Also, note how many players you have. If possible, note the bystanders and point out any empty positions
for them to join in and play. Use the announcement of winners to encourage others to play. Also, get at least one
(1) player to pay for the next game before you give the winner his/her prize. For example:
Player at station #5 won and players at #1 and #2 were a very close second and third. You might say, “Hey!
#1, you were right there that time! #2 – you should’ve had it! You better try again! This could be your lucky
chance! How about another try?” Remember your winner, “Player #5, you were our lucky winner this time!
Look at what you’ve won!” At this point you hand him/her the prize and continue by pointing to the next
larger prize, “When you win again, you can trade this in for a larger prize!”
4
BOB’S SPACE RACERS®
™
DOG POUNDER GROUP GAME MANUAL
GAME OPERATIONS
We’ve found that by showing the winner the next prize they are easily tempted to play again. Always encourage a
few more players; People are the key to attracting more people to the game.
However, there will be times when only a few customers will be in the playing area.
WHAT TO DO WHEN IT IS SLOW
How fast or slow the operator runs the game is referred to as the ‘pace’. Try to get at least three (3) or four (4)
players at all times. This is commonly referred to as ‘grinding’. Simply pay more attention to the players you have
already, take more time to explain the rules of the game, explain the prize levels – remember the more people you
have at your game the more people will come to your game. If the operator works the crowd as suggested they will
find that two (2) players can easily turn into three (3) or four (4), or many more players.
WHAT TO DO WHEN IT IS BUSY
At some point, while grinding, the operator will become ‘steady’. This simply means that there are at least five (5) or
more players at the game. When players are steady, the operator should pick up the pace. If the operator is really
good he/she can try to entice several players to try the game. At the same time the operator should be trying to get
at least ten or more players for each race – this would be considered busy.
It is important that the operator constantly try to get as many players as possible; remain very courteous; and,
explain or answer game operation questions as simply and as clearly as possible. The operator also needs to speak
clearly and loud enough for everyone to hear.
WHAT TO GIVE AWAY
We found in our operations that 28 to 30 cents on the dollar for give-away has proven the most profitable for us, and
the customer. This works out to be 28 to 30 percent of the cost of play. This is achieved by dividing your cost of
merchandise by your revenue for that race.
5
BOB’S SPACE RACERS®
™
DOG POUNDER GROUP GAME MANUAL
INSTALLATION
AND SET-UP
6
BOB’S SPACE RACERS®
™
DOG POUNDER GROUP GAME MANUAL
DOG POUNDER™ GROUP GAME
8
7
BOB’S SPACE RACERS®
™
DOG POUNDER GROUP GAME MANUAL
DOG POUNDER™ GROUP GAME
9
8
BOB’S SPACE RACERS®
™
DOG POUNDER GROUP GAME MANUAL
OBJECT OF THE GAME
The Dog Pounder™ Game has different options and capabilities; but, the object of the game is the same. A player
uses the hammer to hit the button in an attempt to get as many balls into the Dogs mouth filling the Dogs belly, as
quickly as you can.. When a person gets the correct amount of balls in the Dogs belly they win the game. When the
winning score, they are awarded prizes, or tickets.
GAME DESCRIPTION
For this game it takes a minimum of TWO players top begin a game. After coin–up, the air compressor’s will come
on and supply the reserve air tanks with enough air to make the balls jump into the Dogs mouth when they player
hits the button in from of them. This will then throw balls into the Dogs mouth and be counted as they fill up his belly.
When the correct winning score is reached, the game stops and no more balls will be counted. The winning score is
displayed in front of the person winning the game and the bell will sound and flashing lights will illuminate.
ELECTRICAL REQUIREMENTS
Six Player Unit
Voltage(V)
100-125
100-125
100-125
HZ
60
60
60
Amps
8.5 (operating)
8.5 (operating)
8.5 (operating)
9
BOB’S SPACE RACERS®
™
DOG POUNDER GROUP GAME MANUAL
TRAILER SET-UP AND HOOK-UP
1.
Locate trailer and drop Leveler Jacks. Level trailer front to back and right to left. Unwind lead line from
hitch. Remove hitch and store out of the way.
2.
Unlock awning doors. Raise the doors by use of key switch at the corner of the trailer.
3.
Put pins in awning prop rods; release pressure from Hydraulic Pump by turning the key the other direction.
Remove key.
4.
Hook-up White wire to the Neutral (Common). The Red and Black hook to opposite 110 volt phases.
Green is Earth Ground. NOTE: Use power checker to check for 110 volts on both hot lines.
CAUTION! BE CERTAIN YOU HAVE THE CORRECT POWER SOURCE REQUIREMENTS FOR YOUR
TRAILER: 220V, 60 CYCLE, SINGLE PHASE.
TRAILER LEAD LINE WIRING DIAGRAM
GREEN WIRE: Equipment Ground
BLACK WIRE: 110V AC
RED WIRE: 110V AC
WHITE WIRE: Common/Neutral
EQUIPMENT
GROUND
G
R
E
E
N
COM MON
R
E
D
W
H
I
T
E
B
L
A
C
K
----------110V-------------------110V-------
-----------------------220V-------------------
10
BOB’S SPACE RACERS®
™
DOG POUNDER GROUP GAME MANUAL
SETTING THE OPTION REGISTERS
Enter Options by turning the keyed switch to “on” and waiting until the following message comes up:
“GAME MODE
001”
This means the system is ready to accept changes for the option registers. The MODE button sequences through
each register setting displaying the value in that option register. The UP and DOWN buttons increase or decrease
the value of the current register. The change is NOT made permanent until the ENTER button is pressed. The
ENTER button also advances the screen to the next option register. Pressing the MODE button before pressing
ENTER leaves the register unchanged.
NOTE: The Registers CANNOT be changed in the middle of a race
and if GAME TYPE is changed, the game MUST be powered down.
MULTI-LINE LIQUID CRYSTAL
DISPLAY BOX
GAME MODE
MODE
001
UP DN ENTER
11
BOB’S SPACE RACERS®
™
DOG POUNDER GROUP GAME MANUAL
DOG POUNDER™
PARK VERSION GDP2410 V1.0 B1.2
OPTION REGISTER SETTINGS
REG NAME
GAME MODE
# PLAYERS
BELL TIME
WIN LITE TM
OPER BEACON
BALLY DELAY
BALL SCORE XX
BALLS TO WIN
HIT LEVEL
LO MONEY VAL
HI MONEY VAL
AUTOSTART TM
MIN
0
1
0
0
0
0
1
0
0
1
0
0
MAX
1
12
100
200
50
20
100
20
9
9
255
2
BSR
1
**
20
60
60
28
1
40
12
1
2
2
ACTUAL
________
________
________
________
________
________
________
________
________
________
________
________
UNIT ENABLE
SCORE DELAY
HOLD DELAY
BEACON MODE
Hit Debounce
0
0
0
0
1
1
20
100
1
255
0
5
30
1
100
________
________
________
________
________
**= Based on Number of Players for Game
12
DESCRIPTION
Game Mode,0=continuous
Number of Players
Bell Time in 0.1 Seconds
Beacon Time in 0.0 Seconds
Idle Time Between Games in 1 Sec
Unit to Unit Start Delay .1 Sec
Score Multiplier
Winning Score
Fixed Hit Level (Sweet Spot)
Low Game Money Value
High Game Money Value
Autostart 0=Man, 1=One Button,
2=Auto w/mess>2-Timed
I Button On=1
Score Debounce
Debounce Delay
Steady=0 Flash=1
BOB’S SPACE RACERS®
™
DOG POUNDER GROUP GAME MANUAL
MAINTENANCE
13
BOB’S SPACE RACERS®
™
DOG POUNDER GROUP GAME MANUAL
GENERAL MAINTENANCE INFORMATION
TO CLEAN GAMES:
You may use soapy water on Formica, Plexi-glass, regular glass, Stainless Steel, and other metals without causing
any damage. The following list of cleaners can only be used on the materials they are listed with. If a cleaner is
used on a material that it is not listed with it will cause damage to that material and Bob's Space Racers® will not be
held responsible for repair and/or replacement of that damaged material.
Cleaner
Lacquer Thinner
Mineral Spirits
Clean-On-The-Go Glass
De-Solve-It®
BrillianizeTM
Windex®
3812S Enamel Reducer
Soft Scrub®; CLR®;
Old English® Oil; Baby Oil
Material
Formica; regular glass
Formica; Plexi-glass; Stainless Steel; other metals
Formica; regular glass; Stainless Steel; other metals
Hard surface CleanerTM
Formica; Plexi-glass
Plexi-glass; regular glass
Regular glass
Plexi-glass
Stainless Steel other metals
Formica; Stainless Steel; other metals
14
BOB’S SPACE RACERS®
™
DOG POUNDER GROUP GAME MANUAL
SCHEDULED
MAINTENANCE
15
BOB’S SPACE RACERS®
™
DOG POUNDER GROUP GAME MANUAL
DOG POUNDER ™ SCHEDULED MAINTENANCE
DAILY
1.
2.
3.
4.
5.
6.
7.
Check oil (compressor = 30 weight non-detergent; lubricator = 10 weight non-detergent).
Check dryers; drain if necessary.
Visual inspection of game.
Check bulbs.
Clean all Formica.
Start all units; check for score on each figure head.
Check Win Lights (Beacons). Make sure each unit can win.
OPERATIONAL CHECKS
TEST MODE
1.
Turn the key Switch ON
2.
All 8’s, plus decimal pints will appear in display windows.
3.
Depress player push button down to the 1st position, the decimal points will flash on and off.
4.
Depress player push button all the way down, the middle segment of the display will flash on and off.
5.
Remove the Plexi glass front cover, and place hand down into the sensor field, and moving from left to right,
the various segments of the display will turn off and on.
16
BOB’S SPACE RACERS®
™
DOG POUNDER GROUP GAME MANUAL
BALLY MODE
1. Turn Off the key switch
2. Depress the Bally button on the push button assembly
3. All ball hammocks will cycle for 60 seconds or until the STOP push button is depressed, and the dog belly’s
will remain open, allowing the balls to return to the ball hammock area.
DEMO MODE
1. Kick up player number 1, and hold down on player push button. Player 1 will cycle for 5 seconds, The player
I.D. LED will also flash during the demo test.
2. Repeat this procedure for all players to verify that all positions work correctly.
WEEKLY
1.
2.
3.
4.
6.
7.
Drain air tank.
Clean cooling surfaces of compressor.
Remove counter tops; inspect micro switches or air switches and attached wires or hoses.
Remove countertops; check wires at TB strips.
Lemon oil all Formica.
Check hammers and adjust ropes (adjust hammer so it does not touch mirror).
MONTHLY
1.
2.
3.
4.
5.
Operate safety valves on compressor or tank.
Replace or clean air filter.
Check belt tensions on compressor.
Check pulley clamp bolt and set screws.
Inspect air lines rubber and PVC.
SEMI-ANNUALLY (Twice Each Year)
1.
2.
3.
4.
5.
Inspect valve assemblies.
Check pressure hoses from compressor to tank.
Check discharge line for carbon build-up.
Check contact points in pressure switch.
Lubricate electric motor.
17
BOB’S SPACE RACERS®
™
DOG POUNDER GROUP GAME MANUAL
TECHNICAL DATA
18
BOB’S SPACE RACERS®
™
DOG POUNDER GROUP GAME MANUAL
ELECTRONIC MODULE COMPONENT OVERVIEW
Bob's Space Racers® exclusive module electronics are as easy to change and repair as our old style relay systems.
Modules pop out and pop in if problems arise, no boards or cables to change. Modules can be swapped between
the unit board and the master board. One spare module can repair problems or update your game features. Note:
Game Power must be OFF before adding or removing components.
SELF-DIAGNOSTICS
2400 Electronics are equipped with easy to use self-diagnostic LED’s. These LED’s are easily read to sort out most
problems that can occur in operation. If problems occur our Technical Services can easily identify problems by
noting which of these LED’s are on or off.
NO ERROR FEATURES
Nothing is worse in a group game than having switches stick! This causes an unfair advantage for a player or
disrupts the entire game. 2400 Electronics will not let the unit turn on or it will turn the unit off, when the game starts.
AUTOMATIC FEATURES
New for 2400 Electronics: 1) the 1-button Autostart; 2) the timed Autostart; and, 3) the manual start features.
1. Manual Start: Setting 0 – The operator pushes each start button for sound, game and bell manually at the time
sequence desired.
2. 1-Button Autostart: Setting 1 – This is your 1-button start feature for all sound, game and bell. This is for new
and untrained operators. Hit 1 button and everything sequences in proper order to
start the game, the same every time.
3. Timed Autostart: Set at time desired (This feature is for the serious operations.) “Time is Money” – Set your
time desired and get ready - what you set is when we start.
CB OFF/RESET
All 2400 Electronics have “CB Off” or “Reset” button. This button is used to reset the present game. If units were
inadvertently turned on, press and hold the “CB Off” button. In about two seconds, the game will reset and be ready
for play. This will sometimes cure your odd problems. If “CB Off” doesn’t work, simply physically turn off game
power at main breaker panel, wait 16 seconds, and turn the game power breaker back on. Just remember “Reset to
Repair”.
19
BOB’S SPACE RACERS®
™
DOG POUNDER GROUP GAME MANUAL
PUSH BUTTON STATIONS
1. FORWARD: Pressing the "Forward" button will start the game and turn on the forward I.D. light.
2. CB OFF: Pressing the "CB OFF" button will re-set the game and return the toy to the home position.
3. STOP: Pressing the "Stop" button will cause the game to pause.
4. BELL PUSH BUTTON: Pressing the "Bell" button will ring the bell.
5. DMR PUSH BUTTON: Pressing the "DMR" button will activate the Sound Unit.
6. PRACTICE/DEMO BUTTON: Some models have a practice button.
7. BALLY BUTTON: The bally sequence only lasts two minutes.
NOTE: These are some of the features that you may choose to have on your system, and do not
necessarily reflect the total number of buttons or options available for the game.
FORWARD
BELL
STOP
BELL
CB OFF
IN PLAY LIGHT
DMR
SOUND TRACK
BALLY
20
BOB’S SPACE RACERS®
™
DOG POUNDER GROUP GAME MANUAL
MODULE ELECTRONIC SELF-DIAGNOSTICS
THE MASTER RELAY BOARD
“Green is Go - Red is Stop”: Green LED’s mean everything is connected in proper slots and in proper communication
with other components. Red shows an error in your module or module location. Master 1 and units are
interchangeable. Master 2 (Accounting Module) must be in the master 2 slot only. Player clock must be in player
clock location only. Your spare Unit or Master 1 module is located in the spare slot. (See Board Layout).
WITH 2400 REV. G. ELECTRONICS MODULES
Green LED’s mean everything is connected in their proper slots. A blinking red LED means the module is plugged
into a wrong location. If the module flashes at a constant rate it means it belongs in either a master or unit location
(they don’t care which) and it’s in the wrong location. If a module flashes twice, and goes out for a period of time,
and flashes twice again, that means it belongs in the master 2 position of the master relay board. If the module
flashes three times on the red LED and goes out for a period of time, then flashes three times again, that indicates it
belongs in the number 3 position or the player clock socket of the Master relay board.
21
BOB’S SPACE RACERS®
™
DOG POUNDER GROUP GAME MANUAL
COMPUTER CONTROLLED GAME OPTIONS
In all 2400 Electronics ALL game features and controls can be set and changed using the keyed BSR MULTI-LINE
LCD display panel. The option registers settings are based on years of testing and operating experience and preset
by Bob's Space Racers® technicians. These settings can be changed by the end user depending on your
operational needs. (See Option Register Setting Instructions beginning on the next page.) If you have any
questions about these settings please contact our Technical Services department.
SIMPLE SOLUTIONS
Look for the simple things first, 90% of problems that occur with BSR equipment are simple things that are
overlooked.
- Loose wires
- Bad Connections
- Loose modules or relays
- Something has been changed around by someone else’s action
Example: someone plugs a wire connector into a wrong plug or someone disconnects something.
ELECTRONIC RESET PROCEDURES
There are 2 ways to reset your game. One is “CB OFF” button and 2nd is game power breaker.
First try the “CB OFF” button located at each end of the game where start and stop push buttons are.
Second turn the game power breaker off at the power panel, wait 15 seconds and turn breaker back on.
Something to remember - 2400 electronic is a computer, if it gets “lost” it must be reset to start over properly.
ACTIVATED SWITCH
Hung or stuck switches can cause an unfair and revenue losing problem. To cure this, our 2400 Electronics senses
this problem before it is too late. If one of the symptoms arise where as the foot-switch was the problem, the unit
simply will not turn on. If you have a footswitch that lights up the I.D. light when turned on, and goes out when
footswitch is released, then you must fix the stuck switch before this unit will turn on.
22
BOB’S SPACE RACERS®
™
DOG POUNDER GROUP GAME MANUAL
FUSE PROTECTION
Your game has fuses located at- and for the following:
Power supply/bridge rectifier protection - located beside power supplies in power supply box (See Power Supply
Layout.) The ID light beside the fuse post represents a fuse in proper working order when lit.
Relay board fuses - mounted on Master Relay and Unit Relay Boards.
Surge protectors - mounted on breaker panels.
There are numerous fuses located throughout each game. Please be familiar with the locations and purpose of each
of the fuses, and check them first when a problem arises.
INTERMITTENT AND ERRATIC PROBLEMS
If the game is demonstrating erratic behavior that doesn’t effect multiple units it’s best to power down the game then
power the game back up. If the problem doesn’t go away, recall the symptoms or behaviors and call Bob’s Space
Racers® Tech Service for help in repairing the problem.
Intermittent problems are the hardest to find and cure. If you have an intermittent problem please keep details on
the problem, symptoms and details on when the problem occurs. Note how often it occurs. Contact Bob’s Space
Racers® Tech Services with the problem details.
23
BOB’S SPACE RACERS®
™
DOG POUNDER GROUP GAME MANUAL
MODULE CHANGES AND UPDATES
When you receive an updated or replacement module it can go into one of several sockets on your Master Relay
Board. If the module does not have a label on it, you can put it in any of the positions other than “Master 2" or
“Player Clock”. These specific sockets are labeled on the master relay board. The master relay board is mounted to
the far left side of your control electronics box. The master relay board has four (4) sockets, labeled from left to right,
“Master 1”, “Master 2", “Player Clock”, and “Spare”.
All of the modules have the same features (other than player clock and master 2). If you receive a player clock or
master 2 module they will be labeled as such. If a module is received it is labeled “Master 1” that means it has a
program update for the game. The master 1 socket has the ability to update the program to the rest of the game.
In order to insert any of the modules you must make certain your game electronics is OFF. You will notice that the
three lights on the edge of the module are out completely. At that point insert the module into the correct position,
removing the old module – if one is there. The module should be inserted so the LED’s (small yellow, red and green
lights) are toward the bottom. It should plug securely into place. That module should be at the same height as the
other modules in place and not at any angle. Now you can apply game power – turn on the circuit breaker or plug it
into the wall. All of the modules should light up, at least the green lights.
When a master 2 module (which keeps track of what time it is) is inserted into a game; the time must be set for your
time zone – go to the Multi-Line LC Display Box with the accounting features. Hold down the two middle buttons (the
“UP” and “DOWN”) on the display. (See ACCOUNTING SYSTEM in the APPENDIX for more instructions and a
diagram on this LCD box.) Then turn the key to the “ON” position, it should display “YEAR =” and a value. After
setting the value you want by using the “UP” and “DOWN” buttons PRESS the “ENTER” key.
The four buttons have the following features; the left-hand button is “MODE” as it says in the bottom of the display.
When you press this button it advances to the next option without modifying any settings. The next two buttons are
“UP” and “DOWN”; to change the value of a given setting. When you change the value in the display the setting
does not take until you press the “ENTER” button which is the far right button. If you press the “MODE” button,
instead of “ENTER” you advance to the next location without changing the option; even though you saw the value
change. You must press “ENTER” for it to accept the change. The year value is a two digit number from 00 to 99
(this program takes into account the year 2000) and is accurate to the year 2090.
Now, set the month; which is from 01 for January to 12 for December. Press the “ENTER” button after that value is
set correctly. Next set the time; there is no AM or PM value, we use the 24 hour format. If you want 8:00PM the
setting would be 8 + 12 or 20 for the value then press “ENTER”. The next setting is for minute; set the correct
number of minutes and press
“ENTER”. Turn the key back to the “OFF”, and the Multi-Line LCD Box will return to it’s normal accounting function.
If you receive an updated Player Clock module there are no settings for it, when plugged in it will do it’s job.
If you receive a module and it has no label and it is a replacement you will need to do a systems download in order
to get your game’s current program into the replacement module. If you have received an update Master 1, or
program, the module belongs in the Master 1 location and a download needs to take place in order for the rest of the
game to have all the updates.
To download the programs to the rest of the game, with the game power on (locate the game MULTI-LINE LCD unit)
turn the key to the “on” position. The Multi-Line LC Display should read “GAME TYPE “ and a value. (Refer to
OPTION REGISTER SETTING INSTRUCTIONS for complete instructions and diagram) Press the left “MODE”
button, this will cause the LCD screen to advance through the options. With the left button still depressed, press the
far right button (“ENTER”) for at least one (1) second. After two (2) seconds the display will say “DOWNLOADING
UNIT”. Now you can let off of the buttons and turn the key to the “off” position, and the new/replacement module will
download the program to the rest of the modules ensuring no conflicts between any of them.
24
BOB’S SPACE RACERS®
™
DOG POUNDER GROUP GAME MANUAL
MODULE CHANGES AND UPDATES
During the time it takes to download you will see yellow and red lights on the modules begin to flash or turn dim, this
is informing you that the programs are actually being downloaded into the modules. When that is complete the red
light will go out and the yellow and green light will come on bright.
If you insert a module, and after power up, you see a red light is flashing, this indicates a module is plugged into the
wrong location. If the module flashes at a constant rate it means it belongs in either a master or unit location (they
don’t care which) and it’s in the wrong location. If a module flashes twice and goes out for a period of time and
flashes twice again, that means it belongs in the master 2 position of the master relay board. If the module flashes
three times on the red LED and goes out for a period of time, then flashes three times again, that indicates it belongs
in the number 3 position or the player clock socket of the master relay board.
If you have any problems during the downloading process, or if the game is not working correctly after you have
completed the download, please call Bob’s Space Racers® for further technical support help. Try to identify which
lights are “ON” and on which module they are located. Generally speaking, you should see that most of the modules
have the same lights on, in the same pattern. There may be one or two that are different. Note which locations that
are different, to aid in troubleshooting with a technician.
25
BOB’S SPACE RACERS®
™
DOG POUNDER GROUP GAME MANUAL
CONTROL BOX
Master Accounting Player Unit Unit Unit Unit
Unit
Unit
Clock
#1
#2
#3
#4
Power
Supplies
Unit Unit Unit Unit
#5 #6
#7 #8
26
BOB’S SPACE RACERS®
™
DOG POUNDER GROUP GAME MANUAL
CONTROL BOX CONNECTIONS
27
BOB’S SPACE RACERS®
™
DOG POUNDER GROUP GAME MANUAL
MASTER MODULE RELAY BOARD
1
FEMALE PLUG – MALE PINS
MASTER (J18) & SATELLITE (J19)
PUSHBUTTON STATIONS
BALLY SWITCH
STOP SWITCH
TEST SWITCH
SOUND SWITCH
PRACTICE
SWITCH
SOUND
GROUND
25
FORWARD ID
BELL SWITCH
RESEST
SWITCH
(CB-OFF)
+12V REG
-12V REG
FORWARD SWITCH
4
2
MALE PLUG – FEMALE PINS
HI/LO SWITCH (J20)
#23 – 22/2
2-CHANNEL
CHASE
HI/LO
22/3
INPUT
Chase 1 & 2
6
7
1
1
GROUND
REG
Common
+12V
3
2
5
4
LED SWITCH ARRAY
BLOCK (D5)
3
FEMALE PLUG – MALE PINS
(J22)FORWARD #27 22/4
FORWARD #27 22/4
BELL
OPERATOR BEACON #40 18/3
10 9 8 7 6 5 4 3 2 1
1) +12V REG
2) FORWARD ID
3) PRACTICE
4) SSEQ
5) STOP
6) BALLY
7) FORWARD
8) TEST
9) BELL
10) RESET
RED ADD GREEN
HEAT-SHRINK.
EARTH-GROUND
(-)
8
WIN (+)
28
See next page for 5-8.
BOB’S SPACE RACERS®
™
DOG POUNDER GROUP GAME MANUAL
MASTER MODULE RELAY BOARD (page 2)
5
The connector at J23 is diagrammed on
page 3.
6
FEMALE PLUG – MALE PINS (J8)
JUMPER
7
LED PIN-OUT (D6)
10 9 8 7 6 5 4 3 2 1
1-4) CHASE
5-7) X-MAS TREE
8)
HI/LO
9-10) 2-CHANNEL CHASE
4
6
7
8
4-CHANNEL CHASE (J24 & J25)
#36 – 22/5
CHANNEL 1
CHANNEL 2
CHANNEL 3
CHANNEL 4
1
8
1
3
2
5
#36 – 22/5 & #15 22/2
GLOBE FLASHER & WIN LINE
WIN
CHANNEL 1
CHANNEL 2
CHANNEL 3
CHANNEL 4
REG POWER
REG POWER
29
BOB’S SPACE RACERS®
™
DOG POUNDER GROUP GAME MANUAL
MASTER MODULE RELAY BOARD (page 3)
5 (J23) DIAGRAMS
30
BOB’S SPACE RACERS®
™
DOG POUNDER GROUP GAME MANUAL
UNIT RELAY BOARD
(POPULATED)
31
BOB’S SPACE RACERS®
™
DOG POUNDER GROUP GAME MANUAL
UNIT IDENTIFIER
MASTER
SYSTEM LINK/ADDRESS
UNIT BOARD #1
SYSTEM LINK /ADDRESS
32
BOB’S SPACE RACERS®
™
DOG POUNDER GROUP GAME MANUAL
TRANSITION BOARD
3
7
2
6
1
5
4
12 11 10 9 8
16 15 14 13
19
18 17
8
1
8
33
BOB’S SPACE RACERS®
™
DOG POUNDER GROUP GAME MANUAL
CABINET DRAWINGS ,
HARDWARE, PARTS LISTS
34
BOB’S SPACE RACERS®
™
DOG POUNDER GROUP GAME MANUAL
35
BOB’S SPACE RACERS®
™
DOG POUNDER GROUP GAME MANUAL
HAMMOCK HARDWARE
36
BOB’S SPACE RACERS®
™
DOG POUNDER GROUP GAME MANUAL
HAMMOCK MOUTING
37
BOB’S SPACE RACERS®
™
DOG POUNDER GROUP GAME MANUAL
HAMMOCK INSTALLATION
38
BOB’S SPACE RACERS®
™
DOG POUNDER GROUP GAME MANUAL
PLEXI GLASS MOUNTING
39
BOB’S SPACE RACERS®
™
DOG POUNDER GROUP GAME MANUAL
PARTS LISTING
40
BOB’S SPACE RACERS®
™
DOG POUNDER GROUP GAME MANUAL
41
BOB’S SPACE RACERS®
™
DOG POUNDER GROUP GAME MANUAL
42
BOB’S SPACE RACERS®
™
DOG POUNDER GROUP GAME MANUAL
43
BOB’S SPACE RACERS®
™
DOG POUNDER GROUP GAME MANUAL
44
BOB’S SPACE RACERS®
™
DOG POUNDER GROUP GAME MANUAL
45
BOB’S SPACE RACERS®
™
DOG POUNDER GROUP GAME MANUAL
PARTS LISTING
46
BOB’S SPACE RACERS®
™
DOG POUNDER GROUP GAME MANUAL
DOG HEAD BASE ASSEMBLY
47
BOB’S SPACE RACERS®
™
DOG POUNDER GROUP GAME MANUAL
PLAYFIELD BASE ASSEMBLY
48
BOB’S SPACE RACERS®
™
DOG POUNDER GROUP GAME MANUAL
PLAYFIELD BASE ASSEMBLY
49
BOB’S SPACE RACERS®
™
DOG POUNDER GROUP GAME MANUAL
PLAYFIELD BASE ASSEMBLY
50
BOB’S SPACE RACERS®
™
DOG POUNDER GROUP GAME MANUAL
PLAYFIELD BASE ASSEMBLY
51
BOB’S SPACE RACERS®
™
DOG POUNDER GROUP GAME MANUAL
PARTS LISTING
52
BOB’S SPACE RACERS®
™
DOG POUNDER GROUP GAME MANUAL
53
BOB’S SPACE RACERS®
™
DOG POUNDER GROUP GAME MANUAL
54
BOB’S SPACE RACERS®
™
DOG POUNDER GROUP GAME MANUAL
55
BOB’S SPACE RACERS®
™
DOG POUNDER GROUP GAME MANUAL
56
BOB’S SPACE RACERS®
™
DOG POUNDER GROUP GAME MANUAL
57
BOB’S SPACE RACERS®
™
DOG POUNDER GROUP GAME MANUAL
AIR
COMPRESSOR
58
BOB’S SPACE RACERS®
™
DOG POUNDER GROUP GAME MANUAL
AIR COMPRESSOR MAINTENANCE
Daily: Check for proper oil level (use SAE-30 non-detergent); drain and condensate from receiver and traps; listen
for any unusual noises and check for vibrations.
Weekly: Visually check air filter for debris and dust; clean all external parts of compressor and driver; test safety
valve manually to be certain it does not stick.
Monthly: Inspect entire system for leaks; inspect oil for contamination and change if necessary; check belt tension
and wear.
Three (3) Months: Make a complete oil change; inspect valve assemblies.
59
BOB’S SPACE RACERS®
™
DOG POUNDER GROUP GAME MANUAL
AIR COMPRESSOR AND AIR PRESSURE ADJUSTMENT
All Dog Pounder™ games require compressed air to activate the balls. This is either supplied by the customer or by
an on-board compressor supplied by Bob's Space Racers®. There are two sizes of Compressors used in Dog
Pounder™ Group games, depending upon the number of units in the game.
Air pressure adjustment is very important. Too much pressure can cause the balls to be thrown over the Dog’s
mouth and not into the opening of the Dog’s mouth. The recommended procedure for air pressure adjustment is as
follows:
1. Turn all units on so that all buttons are working.
2. Decrease the regulator pressure by turning the screw on the bottom of the pressure regulator counterclockwise until the Balls are no longer being thrown over the dog’s mouth.
3. Slowly increase the pressure to around 90 P.S.I. and stop as soon as the cylinders are getting a full
extension. Do not increase pressure any further.
If you follow this procedure, the reading on the regulator gauge should be somewhere between 80 and 90 P.S.I.
* * IMPORTANT * *
There is important safety information on the Compressor, as well as proper grounding
instructions, in the Appendix Section on COMPRESSORS. Read this information carefully
before operating the compressor.
60
BOB’S SPACE RACERS®
™
DOG POUNDER GROUP GAME MANUAL
AIR COMPRESSOR
(front view)
61
BOB’S SPACE RACERS®
™
DOG POUNDER GROUP GAME MANUAL
APPENDICES
62
BOB’S SPACE RACERS®
™
DOG POUNDER GROUP GAME MANUAL
BOB’S SPACE RACERS®
™
DOG POUNDER GROUP GAME MANUAL
SOUND SYSTEMS
BOB’S SPACE RACERS®
™
DOG POUNDER GROUP GAME MANUAL
SOUND SYSTEM OVERVIEW
AMPLIFIERS
The amplifiers we have used over the years have, changed. Originally we used a Bogen Amplifier which had a 70V
speaker system. The Yorkville Sound 4200 and KMD 4200 Amplifiers were the next ones used beginning in the
early 1980’s. They are similar in operations with only a cosmetic difference on their face units. The Yorkville Sound
6400 Amplifier was used after that. This was used in some Whac-A-Mole® trailers because they have more
speakers than other games. Presently we use a Yorkville Sound MM4, or MP4, Amplifier System. This unit has
more power and is more user-friendly. The hook-up of all of the above amplifiers is pretty much the same: power,
speaker, etc.
The current sound system comes equipped with overhead microphone cables and includes a hand-held microphone
and wireless microphone system. These kits are designed to operate at different frequencies for the various games
Bob’s Space Racers® manufactures. The transmitter and receiver are set for the same frequency of operation. We
have selected different channels for each of the games to minimize interference of signals from other sound
systems.
We also have CD Players available. We originally used a Pioneer 6-disk player, but have switched to a Sony singledisk player. This switch was done to reduce the maintenance and to simplify the operation.
If you are interested in updating your sound system to one of the newer systems available, please call us at 386677-0761 and ask to speak with a technician. The technician will help you determine exactly what is needed for your
system to be updated.
A
BOB’S SPACE RACERS®
™
DOG POUNDER GROUP GAME MANUAL
A
BOB’S SPACE RACERS®
™
DOG POUNDER GROUP GAME MANUAL
A
BOB’S SPACE RACERS®
™
DOG POUNDER GROUP GAME MANUAL
A
BOB’S SPACE RACERS®
™
DOG POUNDER GROUP GAME MANUAL
A
BOB’S SPACE RACERS®
™
DOG POUNDER GROUP GAME MANUAL
A
BOB’S SPACE RACERS®
™
DOG POUNDER GROUP GAME MANUAL
B
BOB’S SPACE RACERS®
™
DOG POUNDER GROUP GAME MANUAL
B
BOB’S SPACE RACERS®
™
DOG POUNDER GROUP GAME MANUAL
B
BOB’S SPACE RACERS®
™
DOG POUNDER GROUP GAME MANUAL
B
BOB’S SPACE RACERS®
™
DOG POUNDER GROUP GAME MANUAL
B
BOB’S SPACE RACERS®
™
DOG POUNDER GROUP GAME MANUAL
B
BOB’S SPACE RACERS®
™
DOG POUNDER GROUP GAME MANUAL
B
BOB’S SPACE RACERS®
™
DOG POUNDER GROUP GAME MANUAL
B
BOB’S SPACE RACERS®
™
DOG POUNDER GROUP GAME MANUAL
2400 G SERIES MODULES
ACCOUNTING
SYSTEM
BOB’S SPACE RACERS®
™
DOG POUNDER GROUP GAME MANUAL
ACCOUNTING SYSTEM
On the 2400 Electronics the Accounting Systems is integrated in with the game electronics. There is no wiring
harness to connect it to the rest of the game or individual units. The external wiring for the Accounting System,
includes 2 cables plugged into the Master Relay Board. There is a connector marked ‘MASTER 2 PRINTER PORT’
ON THE Master Relay Board, which has a cable that runs down to the printer in the game, and a Ribbon Cable
above the Spare Module that is labeled ‘ACCOUNTING LCD”. Even with the printer or the LCD cable not plugged
in, the accounting system continues to accumulate information. Whenever a good LCD or printer is plugged in, all
the tallied information will be available.
To locate the BSR MULTI-LINE LCD for the accounting system simply read the display. The message on the display
will read out “ACCT2400”, on the bottom left side of the display. When you turn the key on, it will display ‘PRINT
REPORT?’ across the top. On the bottom line it will say ‘NEXT’ above the far left button and above the far right
button it will read ‘yes”. If you press the button below the word “NEXT”, it will sequence through a number of settings
from ‘PRINT REPORT’ to ‘HI PLAYERS’ to ‘HI GAMES’ to ‘LO PLAYERS’ to ‘LO GAMES’, then to ‘erase data’. If
you then press button below the word ‘YES’ when the display reads ‘ERASE DATA’ it will clear the data and default
back to ‘PRINT REPORT’ display.
C
BOB’S SPACE RACERS®
™
DOG POUNDER GROUP GAME MANUAL
2400 G MODULE ELECTRONICS’ ACCOUNTING SYSTEM OVERVIEW
When the display reads ‘PRINT REPORT’ and you press the right hand
button below the ‘YES’, as shown on the previous page, a report will be
printed, similar to the one shown on the left of this page. (See example at
left). If no report is printed then you will need to make certain the printer is
turned on. A green light on the face of the printer unit will come on when
the printer has power to it. Also, check the paper supply to the printer; the
paper is found inside the unit. If these items are fine and you still have no
printing capabilities, then you will need to check the connection on the
Master Relay Board. Examine the ‘MASTER 2 PRINTER PORT’ on the
Master Relay Board and make certain it is securely plugged in.
A printed report will have a heading that includes: 1) the Current Time and
Date; 2) the Game Identification Number; and, 3) the Last Time and Date
the Information was cleared from the Accounting System. Note: You
should recognize it as the last time you cleared your meters! The report
will then print a LEVEL 1 report providing you with the totals since the last
time the system was cleared.
This Accounting System will also keep track of the total dollars for you. If
you have the price sign option and if the price sign reads correctly, then
this system will accumulate how many dollars the game was supposed to
bring in since the last time it was cleared.
After Level 1, the report prints Level 2 which provides you with the number
of races that were 1-player games, 2-player games, 3-player games, et
cetera, up through 16-player games. If you have more than 16 units, then
all of the games played with 16 or more players or more will be tallied on
the “16+ players” line on the printed report.
Below Level 2 is Level 3, this consists of a set of total races that have
ever been played. These values do not get cleared when you ‘ERASE
DATA’ and are considered non-resettable. (This part replaces the
Mechanical Meters you may have in some of your older games).
C
BOB’S SPACE RACERS®
™
DOG POUNDER GROUP GAME MANUAL
2400 G MODULE ELECTRONICS’ ACCOUNTING SYSTEM OVERVIEW
The last part to be printed is Level 4, which is an hourly report. This informs you of how many games were played
each hour the machine was powered up (turned on). If the machine was not powered up there will be no report for
that time frame.
When you are done using the BSR MULTI-LINE LCD, you need to turn the key to the “off” position. This key needs
to be in the “off” position during game operation as well as when the game itself is powered down – it will not affect
the operation of the game. If the key is left in the “on” position during the game operation it will not affect the game,
nor will it affect the function of the BSR MULTI-LINE LCD. However, if the key is left in the “on” position it will affect
your security! It will allow anyone to have access to your game’s financial information and they will be able to erase
it before you have a chance to record it in your books! It is very important that you do not leave the key in the “on”
position for safety and security reasons!
Below that it prints a LEVEL 3 report which is a set of total races since that have ever been played. These values
don’t get cleared when you ‘ERASE DATA’ and are considered non-resettable (they replace the old mechanical
meters).
Lastly it prints the LEVEL 4 report which is a hourly report. This will report how many games were played each hour
the machine was powered up. If the machine was not powered up there will be no report for that hour.
When you are done using the MULTI-LINE LCD to get information, the key should be turned off. This includes
during a race. If the key is left on during a race, from the time that the forward button is pressed, until the end of the
race, the MULTI-LINE LCD display will behave as it had no key in it. It is important however, for security reasons
that you do not leave the key in the machine and you do not leave the key turned on. Any person could clear all the
data if you do.
C
BOB’S SPACE RACERS®
™
DOG POUNDER GROUP GAME MANUAL
UP
WHEN CALLING FOR SERVICE
1. When calling for service, please check the service manual first. Many times the answer to your problem has been
addressed in this documentation.
2. Please make sure you have the serial number of the game ready when you call.
3. If this is a repeat call, please tell the service technician that you have made a previous call regarding this problem.
This way we will be able to retrieve the history on your game allowing us to serve you better and save you time.
4. Please retain proof of purchase for your product. This might be requested for warranty repairs.
5. Please call from the game if possible since we might need you to check certain things on the game while we are on
the telephone with you.
IF YOU HAVE ANY QUESTIONS OR COMMENTS, PLEASE CALL OUR
SERVICE DEPARTMENT AT
(386) 677-0761
(MONDAY – FRIDAY, 8:30AM – 5:00PM EST, EXCLUDING HOLIDAYS)
(or)
EMAIL QUESTIONS TO: [email protected]
(or)
VISIT THE “CUSTOMER SUPPORT” SECTION ON OUR WEBSITE:
WWW.BOBSSPACERACERS.COM