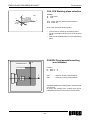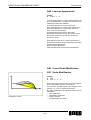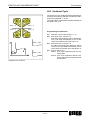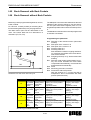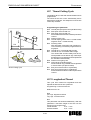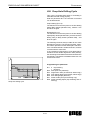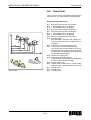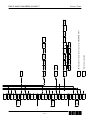
1
EMCO WinNC SINUMERIK 810/820 T Software Description/ Software Version from 13.70 SIEMENS SINUMERIK % / N G 7 X 8 C 9 Z Q 4 I 5 J 6 1 F 2 D 3 L P R +/ M 0 S . T = H + L F B K SINUMERIK SINUMERIK SIEMENS % A B C D E F G H I J K L M N O P Q R S T U V W X Y : = @ ( ) 9 @ * - 1.n 1...n SINUMERIK SIEMENS 1 40 10 OPT. STOP -Z SBL -C RS232 +Z 100 100% EDIT -X 1000 10000 AUX 20 10 6 2 0 60 +X +C SKIP DRY RUN 70 80 90 100 110 120 1x OPT. STOP SBL Software Description EMCO WinNC SINUMERIK 810/820 T Ref.No. EN 1804 Edition I2003-10 EMCO Maier Ges.m.b.H. P.O. Box 131 A-5400 Hallein-Taxach/Austria Phone ++43-(0)62 45-891-0 Fax ++43-(0)62 45-869 65 Internet: www.emco.at E-Mail: [email protected] 6 1 2 3 - +/- 0 . + * RS232 40 10 -Z -C +Z 100 100% EDIT -X 1000 10000 AUX 0 1 8 5 1 AUX 0 7 4 USB > < < +X +C SKIP DRY RUN 1x USB LF SINUMERIK SIEMENS > Z A 1 AUX 20 10 6 2 0 60 70 8 0 90 100 110 120 EMCO W INNC SINUMERIK 810/820 T P REFACE Preface The software EMCO WinNC SINUMERIK 810/820 T Turning is a part of the EMCO education concept on PC basis. Target of this concept is learning to operate and program the original control at the PC. The turning machines of the EMCO PC TURN und CONCEPT TURN series can be directly controlled via PC by means of the EMCO WinNC for the EMCO TURN. The operation is rendered very easy by the use of a digitizer or the control keyboard with TFT flat panel display (optional accessory), and it is didactically especially valuable since it remains very close to the original control. This manual does not include the whole functionality of the control software SINUMERIK 810/820 T Turning, however emphasis was laid on the simple and clear illustration of the most important functions so as to achieve a most comprehensive learning success. In case any questions or proposals for improving this manual should arise, please contact us directly: EMCO MAIER Gesellschaft m. b. H. Department Technical Documentation A-5400 Hallein, Austria All rights reserved, reproduction only by authorization of Messrs. EMCO MAIER © EMCO MAIER Gesellschaft m.b.H., Hallein 2003 2 EMCO W INNC SINUMERIK 810/820 T C ONTENTS Contents A: Key Description D: Programming Control Keyboard, Digitizer Overlay ..................................... A1 Key functions ..................................................................... A2 Address and Numeric Keyboard ......................................... A2 Machine Control Keys ........................................................ A4 PC Keyboard ..................................................................... A6 Screen with Softkeys .......................................................... A7 Program Structure ............................................................. D1 Addresses ........................................................................ D1 Survey of G Commands .................................................... D2 Survey of M Commands .................................................... D2 Survey of Cycles ............................................................... D2 Description of G Commands .............................................. D3 G00 Positioning (Rapid Traverse) ...................................... D3 G01 Linear Interpolation .................................................... D3 G02 Circular Interpolation Clockwise .................................. D4 G03 Circular Interpolation Counterclockwise ....................... D4 G04 Dwell ......................................................................... D5 G09 Exact Stop ................................................................. D5 G10 - G13 Polar Coordinate Interpolation ........................... D5 G25/G26 Programmable working area limitation ................. D6 G16, G18 Working plane selection ..................................... D6 G33 Thread Cutting ........................................................... D7 Cutter Radius Compensation ............................................. D7 G40 Cancel Cutter Radius Compensation .......................... D9 G41 Cutter Radius Compensation Left ............................... D9 G42 Cutter Radius Compensation Right ............................. D9 G48 Leave as Approached .............................................. D10 G50 Cancel Scale Modification ........................................ D10 G51 Scale Modification .................................................... D10 G53 Cancel Zero Offset Blockwise .................................... D11 G54 - G57 Zero Offset 1 - 4 .............................................. D11 G58/G59 Programmable Zero Offsets ............................... D11 G60 Exact Stop Mode...................................................... D12 G62, G64 Deselection Exact Stop Mode ........................... D12 G63 Thread tapping with compenstion chuck .................... D12 G70 Measuring in Inches ................................................. D13 G71 Measuring in Millimetre ............................................ D13 G90 Absolute Programming ............................................. D14 G91 Incremental Programming ........................................ D14 G92 Spindle Speed Limit ................................................. D14 G 92 Cylindrical interpolation ........................................... D15 G94 Feed per Minute ...................................................... D17 G95 Feed per Revolution................................................. D17 G96 Constant Cutting Speed ........................................... D17 G97 Constant Spindle Speed ........................................... D17 G131 Transmit ................................................................ D18 G147 Soft Approach to Contour with Linear ...................... D19 G247 Soft Approach to Contour with Quarter Circle ........... D19 G347 Soft Approach to Contour with Semicircle ................ D19 G148 Soft Leaving with Linear ......................................... D19 G248 Soft Leaving with Quarter Circle .............................. D19 G348 Soft Leaving with Semicircle ................................... D19 Description of M Commands ............................................ D21 M00 Programmed Stop Unconditional .............................. D21 M01 Programmed Stop Conditional .................................. D21 M02 Main Program End ................................................... D21 M03 Main Spindle ON Clockwise...................................... D21 M04 Main Spindle ON Counterclockwise .......................... D21 M05 Main Spindle Off ...................................................... D21 M08 Coolant ON ............................................................. D22 M09 Coolant OFF ........................................................... D22 M17 Subroutine End ....................................................... D22 M20 Tailstock BACK ........................................................ D22 M21 Tailstock FORWARD ................................................ D22 M25 Open Clamping Device ............................................ D22 M26 Close Clamping Device............................................ D22 M30 Main Program End ................................................... D22 M52 C- Axis ON .............................................................. D22 M53 C- Axis OFF ............................................................ D22 M71 Puff Blowing ON ...................................................... D22 M72 Puff Blowing OFF..................................................... D22 B: Basics Reference Points of the EMCO Lathes ................................ B1 Zero Offset ........................................................................ B2 Coordinate System............................................................. B2 Coordinate System with Absolute Programming ............. B2 Coordinate System with Incremental Programming ........ B2 Input of the ........................................................................ B3 Zero Offset ........................................................................ B3 Tool Data Measuring .......................................................... B4 Input of the Tool Data ......................................................... B6 Tool Data Measuring by Scraping ........................................ B7 Tool Data Measuring with the Optical Presetting Device ....... B8 C: Operating Sequences Survey Modes ................................................................... C1 Approach the Reference Point ........................................... C2 Input of the Gear Position .................................................. C2 Setting of Language and Workpiece directory ..................... C2 Input of Programs ............................................................. C3 Call up an existing or new program .............................. C3 Input of a block ........................................................... C3 Insert Block ................................................................. C3 Delete Block ............................................................... C3 Insert Word ................................................................. C3 Alter Word .................................................................. C3 Delete Word ................................................................ C3 Program Input with Guiding Function ............................ C4 Program Input with CAD/CAM Systems ........................ C4 Program Administration ..................................................... C5 Copy Program ............................................................. C5 Rename Program ........................................................ C5 Delete Program........................................................... C5 Data Input-Output ............................................................. C5 Data Input via COM1 / COM2 ...................................... C6 Data Import ................................................................. C6 Data Output ................................................................ C7 Print Data ................................................................... C7 Adjusting the Serial Interface ....................................... C8 Program Run .................................................................... C9 Start of a Part Program ................................................ C9 Messages while program run ....................................... C9 Program Influence ....................................................... C9 Overstore .................................................................. C10 Block Search ............................................................. C10 Program Interruption .................................................. C10 Status Display of the PLC ........................................... C10 Display of the Software Versions ................................. C10 Graphic simulation ........................................................... C11 3 EMCO W INNC SINUMERIK 810/820 T C ONTENTS Description of Cycles ........................................................ D23 L93 Cut-in Cycle .............................................................. D23 L94 Undercut Cycle .......................................................... D24 L95 Stock Removal with Back Pockets .............................. D25 L96 Stock Removal without Back Pockets .......................... D25 L97 Thread Cutting Cycle ................................................. D26 L971 Longitudinal Thread ................................................. D26 L98 Deep Hole Drilling Cycle ............................................ D27 L99 Thread Draft .............................................................. D28 Contour definition ............................................................. D29 Insert Chamfer ........................................................... D29 Insert Radius ............................................................. D29 Line ........................................................................... D29 Arc ............................................................................ D29 Line - Line ................................................................. D30 Line - Arc (tangential) ................................................. D30 Arc - Line (tangential) ................................................. D30 ................................................................................. D30 ................................................................................. D30 Arc - Arc (tangential) ................................................... D30 Subroutines ..................................................................... D31 Subroutine Call in Part Program .................................. D31 Subroutine End with M17 ............................................ D31 Subroutine Nesting ..................................................... D31 Starting Information see attachment E: @-Codes G: Survey Pages Survey Softkey Explanations .............................................. G1 Softkey Menu Survey ........................................................ G6 Survey Guiding ................................................................. G8 H: Alarms and Messages Startup Alarms .................................................................. H1 Control Alarms .................................................................. H2 Machine Alarms ................................................................ H9 4 EMCO WINNC SINUMERIK 810/820 T KEY D ESCRIPTION A: Key Description Control Keyboard, Digitizer Overlay 6,180(5,. 6,(0 (16 1 * ; & = 4 , - . ) ' / 3 5 0 6 7 + /) $ Q 6,180(5,. 6,(0(16 ! 6.,3 '5< 581 [ # % 237 672 3 6%/ ; = 86% & = (',7 & 56 ; $8; $8; 6,180(5,. 6,(0(16 $ % & ' , - 5 6 . / 7 8 Q ! 6.,3 '5< 581 237 6723 6%/ ) * + 0 1 2 3 4 9 : ; < = # /) 6,180(5,. 6,(0(16 [ ( ; = 86% & = (',7 & 56 ; $8; $8; A 1 EMCO WINNC SINUMERIK 810/820 T KEY D ESCRIPTION Key functions Input key Delete input / operator message Delete word / block Alter word Search address / block / word Cursor down / up Cursor left / right Page up / down Acknowledgealarm Actual position in double size letters Address and Numeric Keyboard 1 * ; & = 4 , - . ) ' / 0 6 7 % 3 + SINUMERIK 810T: With the SHIFT key (at the top right edge) you can select the second key function. Pressing again this key selects the first function again. After pressing an address key the SHIFT function is activeautomatically. # . $ 5 function K . /) funkcion 6 SINUMERIK 820T: Every address or number has its own key. Address and numeric keyboard of the SINUMERIK 810 T A 2 EMCO WINNC SINUMERIK 810/820 T KEY D ESCRIPTION A 3 EMCO WINNC SINUMERIK 810/820 T KEY D ESCRIPTION Machine Control Keys The machine control keys are in the lower block of the control keyboard resp. the digitizer overlay. Depending on the used machine and the used accessories not all functions may be active. ; 4 (',7 = 4 = ; Machine control keyboard of the EMCO control keyboard 6.,3 '5< 581 [ 237 6723 6%/ ; & = & = (',7 ; $8; $8; Machine control keyboard of the EMCO PC- Turn Series SKIP (skip blocks will not be executed) DRY RUN (test run of programs) OPT STOP (program stop at M01) RESET Single block machining Program stop / program start ; = 4 4 = Manual axis movement ; Approaching the reference point in all axes Feed stop / feed start Spindle override lower / 100% / higher A 4 EMCO WINNC SINUMERIK 810/820 T KEY D ESCRIPTION Spindel stop / spindle start; spindle start in JOG and INC1...INC10000 mode: Clockwise: perss key short, Counterclockwise: press min. 1 sec. Open / close door Close / open clamping device Tailstock back / forward Swivel tool holder Coolant / puff blowing on / off AUX OFF / AUX ON (auxiliary drives off / on) (',7 Mode selector Feed / rapid feed override switch EMERGENCY OFF (Unlock: pull out button) Key switch for special operations (siehe Maschinenbeschreibung) Additional NC start key Additional key clamping device Consent key No function A 5 ! HQ RO 5 & ,1 73 / 3 72 % 26 6 ) / ( / 5$ ! = 1& 7 5 7$ 6 ; B 0 1 % 3 2 &7 16 J WU 6 7 ( 6 ( 5 U U * *W OW O $$ & 1 , OW $ By pressing the key F1 the modes (JOG, AUTOMATIC,...) will be displayed in the softkey line. * ; a b g / . - + J WU 6 Some alarms will be acknowledged with the key ESC. ( ' 1 ( 7( /( ( ' h 3 2 , 8 = 9 & ; OW $ <1 3 , 58 . '5 6 C = " @ XP 1 * ) ' < VW )H ) ) ) ) 7 5 ( 6 $ ! J U W 6 A 6 XP 1 VH DX 3 HQ RO 5 FN UX ' > 0 ) ( 5 6 2 3 ( 5 ) ) ) : 4 # ) & ,1 & ,1 ) & ,1 72 8 $ ) $ ' 0 * -2 & ,1 A ! EMCO WINNC SINUMERIK 810/820 T PC Keyboard With F12 the function keys PRESET;MDIAUTOM., JOG, REPOS,AUTOMATIC and REF-POINT will be displayed in the softkey The machine functions in the numeric key block are active only with active NUM lock. line. The meaning of the key combination ctrl 2 depends on the machine: EMCO PC TURN 50/55: Puff blowing ON/OFF EMCO PC TURN 100/125/155: coolant ON/OFF KEY D ESCRIPTION The assignement of the accessory functions is described int the chapter "Accessory Functions". EMCO WINNC SINUMERIK 810/820 T KEY D ESCRIPTION Screen with Softkeys At the operating field the following parts are defined: 1 2 3 4 5 6 7 8 Display of the mode Display of the operating conditions Display of the alarm number, text (comment) Display of the notes to the operator Display of inputs from the keyboard Display of the channel number Display of the softkey functions Key "jump back to a higher level menu" (key F2 at the PC) 9 Softkeys (keys F3 - F7 at the PC) 10 Key "Further functions in the same menu" (key F11 at the PC) Softkeys (9) are keys with multiple meaning. The valid meaning will be displayed at the bottom line (7) of the screen. 6,180(5,. 6,(0(16 [ :LQ1&6LQXPHULN7F(0&2 ! Screen with Softkeys A 7 EMCO WINNC SINUMERIK 810/820 T KEY D ESCRIPTION A 8 EMCO WINNC SINUMERIK 810/820 T B ASICS B: Basics Reference Points of the EMCO Lathes M = Machine Zero Point An unchangeable reference point established by the machinemanufacturer. Proceeding from this point the entire machine is measured. At the same time "M" is the origin of the coordinate system. R = Reference Point 1 0 A position in the machine working area which is determined exactly by limit switches. The slide positions are reported to the control by the slides approaching the "R". Required after every power failure. N = Tool Mount Reference Point : Starting point for the measurement of the tools. "N" lies at a suitable point on the tool holder system and is established by the machine manufacturer. W = Workpiece Zero Point Reference points in the working area Starting point for the dimensions in the part program. Can be freely established by the programmer and moved as desired within the part program. B 1 EMCO WINNC SINUMERIK 810/820 T B ASICS Zero Offset With EMCO lathes the machine zero "M" lies on the rotating axis and on the end face of the spindle flange. This position is unsuitable as a starting point for dimensioning. With the so-called zero offset the coordinate system can be moved to a suitable point in the working area of the machine. In the setting data zero offset are four adjustable zero offsets available. 0 : When you define a value in the offset register, this value will be considered with call up in program (G54 - G57) and the coordinate zero point will be shifted from the machine zero M to the workpiece zero W. The workpiece zero point can be shifted within a program with "G58, G59 - programmable zero offset" in any number. More informations see in command description G58, G59. Zero offset from the machine zero point to the workpiece zero point Coordinate System The X coordinate lies in the direction of the cross slide, the Z coordinate lies in the direction of the longitudinal slide. Coordinate values in minus direction describe movements of the tool system towards the workpiece, values in plus direction away from the workpiece. 88 Incremental : : ;; = Coordinate System with Absolute Programming The origin of the coordinate system lies at the machine zero "M" or at the workpiece zero "W" following a programmed zero offset. All target points are described from the origin of the coordinate system by the indication of the respective X and Z distances. X distances are indicated as the diameter (as dimensioned on the drawing) 88 = ;; Absolute Coordinate System with Incremental Programming The origin of the coordinate system lies at the tool mount reference point "N" or at the cutting tip after a tool call-up. With incremental programming the actual pathes of the tool (from point to point) are described. X will be entered as radius. Absolute coordinates relate to a fixed position, incremental coordinates to the tool position. The X and -X in brackets are valid for the PC TURN 50/55 because the tool is in front of the turning centre at this machine. B 2 EMCO WINNC SINUMERIK 810/820 T B ASICS Input of the Zero Offset Four zero offsets can be entered (e.g. for four different clamping devices). [ :LQ1&6LQXPHULN7F(0&2 $8720$7,& • Press the softkey SETTING DATA in any mode. 6(77,1*'$7$=(522))6(7* • Press the softkey ZERO OFFSET. =(522))6(7$'',7,9( =(522))6(7 ; ; < < • The screen shows the input pattern for the zero offset G54. The particular offsets G54 - G57 can be selected with softkeys. • Below ZERO OFFSET the measured values (e.g.: X=0, Z=length of chuck) are entered. * ) * ) * ) * ) • Corrections to this value can be entered below ZO ADDIT. These corrections will be added. ) • Move the cursor to the value to be altered with the Input pattern for Zero Offset G54 keys . • Enter the new value and press the key . • The inverse input mark jumps to the next input field. Input of the Coordinate Rotation [ :LQ1&6LQXPHULN7F(0&2 A coordinate rotation can be programmed for every zero offset. This coordinate rotation becomes active at the call-up of the zero offset. -2* 6(77,1*'$7$&225',1$7(527$7,21 $ * $ * $ * $ * $ * $ * ) ) ) • Press the softkey SETTING DATA in any mode. • Extend softkey line (key ! ) and press softkey ROTAT. ANGLE. ) • The screen shows the input pattern for coordinate rotation. The single rotations for G54 - G57 can be entered in this pattern, the rotations for G58 and G59 are determined in the CNC program. ) • Move the cursor to the value to be altered with the Input pattern for coordinate rotation keys . • Enter the new value and press the key . • The inverse input mark jumps to the next input field. B 3 EMCO WINNC SINUMERIK 810/820 T B ASICS Tool Data Measuring Aim of the tool data measuring: The CNC should use the tool tip for positioning, not the tool mount reference point. 1 Every tool which is used for machining has to be measured. The distances in both axis directions betweentoolmountreferencepointandtooltipareto be measured. / / 7\SH In the so-called tool register the measured length corrections, the cutter radius and the cutter position can be stored. Every tool offset number D1 - D99 is related to a tool. 1 The correction number can be any register number, but has to be considered with tool call in program. / 7\SH Example The length corrections of a tool in the tool turret station 4 have been stored as correction number 41. Direction of the length correction for the tool types Tool call in program: T4 D41 The address T marks the position in the tool turret, the address D marks the correction number belonging to the tool. The length corrections can be measured halfautomatically, cutter radius and cutter position have to be inserted manually. The cutter position must always be inserted! Inserting the cutter radius is only necessary for using the cutter radius compensation with this tool. The tool data measuring occurs for type 1-9: L1: in -X direction absolute from point "N" in radius L2: in -Z direction absolute from point "N" R: cutter radius Type: cutter position (1-9) 5 Tool radius R The tool data measuring occurs for type 10: L1: in -Z direction absolute from point "N" Type: drilling tool (10) B 4 EMCO WINNC SINUMERIK 810/820 T B ASICS Cutter position (Type) Look at the tool like it is clamped at the machine to determine the tool type. For machines with the tool below (in front of) the turning centre (e.g. PC TURN 50/55) the values in brackets must be used because of the opposite +X direction of these machines. Cutter position With "wear" occurs the correction of not exact measured tool data or worn tools after several machining runs. The inserted length corrections will be added to or subtracted from the geometry of the tool incrementally. X+/- .....incremental in diameter Z+/- ...... incremental R+/- .....incremental B 5 EMCO WINNC SINUMERIK 810/820 T B ASICS Input of the Tool Data Select the softkey TOOL OFFSET in any mode. The screen shows the input pattern for tool data. [ :LQ1&6LQXPHULN7F(0&2 $8720$7,& 722/2))6(7 ' • Select the desired tool offset number with the ' $FWXDOWRRORIIVHWQR 7RROQXPEHU 7\SH /*HRPHWU\ /*HRPHWU\ 'LDPHWHU5DGLXV /:HDU /:HDU 'LDPHWHU5DGLXV /%DVH /%DVH ) ) ) ) keys and or by entry of the correction number and the key "search" (e.g. ). • Position the cursor (inverse mark) with the keys and to the desired input field. Enter the desired value with the numeric keyboard. The entered value will be shown at the input line of the screen. ) Input pattern for tool data • Store the correction value with the key in the tool offset register. The cursor jumps to the next input position resp. after input of the last value to the first value of the next tool offset number. Additive input with B 6 , delete with . EMCO WINNC SINUMERIK 810/820 T B ASICS Tool Data Measuring by Scraping Manual Calculation Automatic Calculation • Clampaworkpiecewithexactmeasureddiameter. • Clampaworkpiecewithexactmeasureddiameter. • Select the mode JOG • Select the mode JOG • Traverse with the tool turret disk onto the workpiece (standing spindle) Reduce feed to 1 % Hold a sheet of paper between workpiece and tool turret disk and traverse with the tool turret disk (tool mount reference point) so far onto the workpiece until the paper stucks. • Traverse with the tool turret disk onto the workpiece (standing spindle) Reduce feed to 1 % Hold a sheet of paper between workpiece and tool turret disk and traverse with the tool turret disk (tool mount reference point) so far onto the workpiece until the paper stucks. • Read and note the actual Z position (Z1) of the slide. • Read the actual Z position (Z1) of the slide and key in this value into the input line. • Move away the tool turret from the workpiece and swivel in the first tool to be measured. • Press softkey TO AUTOM. • Move cursor to the input field "reference Z" and take over the actual Z position which was put in into • Traverse with the tool tip onto the face of the workpiece, insert paper, reduce feed. the input line by pressing . • The difference between old and new Z position is the tool offset L2 = Z1 - Z. • Enter workpiece radius as "reference X". • Traverse with the tool tip onto the circumference of the workpiece, insert paper, reduce feed. • Move away the tool turret from the workpiece and swivel in the first tool to be measured. • Read and note actual x position (X1) of the slide. • Traverse with the tool tip onto the face of the workpiece, insert paper, reduce feed. • Slide position X1 and diameter of the workpiece D are diameters; the tool offset L1 is a radius. • L1 = • Enter the type (cutter position) and the cutter radius for the respective tool offset. X1-D 2 • Press softkey TO AUTOM. • Enter tool offset number, ZO no. = 53 and press the softkey STORE Z-AXIS. • Enter the values L1 and L2 and the type (cutter position) and the cutter radius for the respective tool offset.. • Traverse with the tool tip onto the circumference of the workpiece, insert paper, reduce feed. • Repeat this sequence for the following tools. • Press softkey STORE X-AXIS. • Repeat this sequence for the following tools. Note With drilling tools (type 10) L1 is the length of the tool in Z direction. B 7 EMCO WINNC SINUMERIK 810/820 T B ASICS Tool Data Measuring with the Optical Presetting Device Tool data measuring with the optical presetting device occurs in principle in the same way like with scraping. The optical way is more precise because touching will be avoided and the tool is displayed enlarged in the optics. = 1 PP Manual Calculation • Mount the optical presetting device in the working area in a way, that the measuring point can be reached with the reference tool and with all tools to be measured. • Select the mode JOG • Mount the reference tool at station 1 of the tool turret • Swivel in station 1 • Traverse the tip of the reference tool into the reticule of the optics. Note: An object viewed through the optics is mirrored in the X and Z axis. • Read and note actual slide position displayed at the screen.. • The tip of the reference tool is at X height of the tool mount reference point N and in Z direction 30 mm (PC TURN 50/55/155) or 22 mm (PC TURN 120/125: 20 mm tool length + 2mm outstanding length of the holder) in front of N. ZN = Z-30 or Z-22 XN = X • Swivel tool turret and traverse with the first tool to be measured into the reticule. • The difference between the old position of the tool mount reference point (XN, ZN) and the new position are the tool offsets L1, L2. The X values are in diameter and must be halved because L1 is a radius value. Reference tool measuring Concept Turn 50/55 = 1 =PP 1 PP &21&(377851 1 =PP 1 PP &21&(377851 Reference tool measuring Concept Turn 105/155 CONCEPT Turn 50/55 CONCEPT Turn 105/155 1 1 Traverse into the graticule with the tool • Clamp next tool etc. Automatic Calculation • Traverse into the reticule with the first tool. • Enter the type (cutter position) and the cutter radius for the respective tool offset. • Select Softkey TO AUTOM. • Enter tool offset number, ZO no. = (54-57) (not 53) and press the softkeys STORE X-AXIS and STORE Z-AXIS. • Traverse the next tool into the reticule etc. • Traverse with the reference tool into the reticule. • The tip of the reference tool is in X at the position of the tool mount reference point N, in Z 30 mm (PC TURN 50) or 22 mm (PC TURN 120: 20 mm toollength+2mmoutstandinglengthoftheholder) in front of N. ZN = Z-30 or Z-20 XN = X • Store the coordinates XN and ZN in a zero offset (G54-G57). • Swivel in the first tool. Note With drilling tools (type 10) L1 is the length of the tool in Z direction. B 8 EMCO W INNC SINUMERIK 810/820 T OPERATING SEQUENCES C: Operating Sequences Survey Modes AUTOMATIC REFPOINT For working off a part program the control calls up block after block and interprets them. The interpretation considers all corrections which are called up by the program. The so-handled blocks will be worked off one by one. With the JOG keys the tool can be traversed manually. In the submode OVERSTORE (softkey) you can switch on the spindle and swivel the tool turret. This mode is used to approach the reference point. With reaching the reference point the actual position store is set to the value of the reference point coordinates. By that the control acknowledges the position of the tool in the working area. With the following situations the reference point has to be approached: • After switching on the machine • After mains interruption • After alarm "Approach reference point" or "Ref. point not reached". • After collisions or if the slides stucked because of overload. MDI-AUTOMATIC I 1 ... I 10 000 1 You can enter blocks of a part program in the intermediate store. The control works off the inserted blocks and deletes the intermediate store for new entries. In this mode the slides can be traversed for the desired increment (1...10000 in µm/10-4 inch) with JOG ... 10000 means of the JOG keys -X + X -Z +Z . The selected increment (1, 10, 100, ...) must be larger than the machine resolution (smallest possible traverse path), otherwise no movement will occur. C1 EMCO W INNC SINUMERIK 810/820 T OPERATING SEQUENCES Approach the Reference Point Setting of Language and Workpiece directory By approaching the reference point the control will be synchronized with the machine. • Select the mode REFPOINT. • Press the softkey SETTING DATA. • Extend the softkey line with the key • press the softkey GENERAL DATA In the input pattern you can select the language and the workpiece directory. • Press the JOG keys -X or + X resp. -Z or +Z to approach the reference point in the respective > and direction. • With the key REF ALL Workpiece Directory both axes will be approached In the workpiece directory the CNC programs created by the operator will be stored. The workpiece directory is a subdirectory of that directory in which the software was installed. Enter the name of the workpiece directory with the PC keyboard, max. 8 characters, no drives or pathes. Not existing directories will be created. automatically (PC keyboard). Danger of Collisions Take care of obstacles in the working area (chucks, clamped workpieces etc.). Active Language After reaching the reference point the position of the reference point will be displayed at the screen as actual position. Now the control is synchronized with the machine Selection from installed languages, the selected language will be activated with restart of the software. Input with PC keyboard: • DT for German • EN for English • FR for French • SP for Spanish • NL for Netherlands Input of the Gear Position (only for EMCO PC Turn 50) For that the control can supervise the correct spindle speed, the selected gear (belt) position of the machine must be entered. • Press the softkey SETTING DATA in any mode. • Extend the displayed softkey menu with the key • • >. Press the softkey spindle. Move the cursor to the input field (Spindle gear stage" and enter the corresponding gear position.. 1 gear position 1 120 - 2000 U/rev 2 gear position 2 280 - 4000 U/rev C2 EMCO W INNC SINUMERIK 810/820 T OPERATING SEQUENCES Input of Programs Part programs and subroutines can be entered in the modes JOG, AUTOMATIC, INC 1 ... INC 10 000 and REFPOINT. Call up an existing or new program • • • • Press softkey PART PROGRAM Press softkey EDIT Enter program number %... or L... Press softkey SELECT PROGRAM Blocks in an existing program will be displayed. Input of a block Example: N 5 Block number (not necessary) G 1 1. word X N 3 2. word ... ... ... LineFeed - block end (with PC keyboard LF ) or Insert Block Position the cursor before the block, that should follow the inserted block and enter the block to be inserted. Delete Block Position the cursor before the block, enter block number (if no block number; N0) and press key . Insert Word Position the cursor before the word, that should follow the inserted word and enter the word (address and value) to be inserted and press . Alter Word Position the cursor before the word to be altered, enter word and press . Delete Word Position the cursor before the word to be deleted, enter the address (e.g. X) and press the key C3 . EMCO W INNC SINUMERIK 810/820 T OPERATING SEQUENCES Program Input with Guiding Function In an opened program you can enter blocks guided by menus. Frequently used G and M commands are displayed as softkey functions. It is also possible to enter predefined contour drafts without need to calculate intermediate positions. Example: Program contour draft line - circle x WinNC Sinumerik T (c) EMCO • Press softkey GUIDING • Press softkey CONTOUR • Press softkey LINE - CIRCLE • The input pattern beside will be displayed. The selected contour draft (line - circle) is displayed graphically. • Enter with the keyboard the input values one by one. • If in the input fields several values are in curved brackets only one of this values must be entered. If you have entered several values, you can delete the odd values with the softkey PARAM. DELETE. • Press the softkey STORE, SELECT MEMORY or MEMORY MENU when input is finished. • Now the contour draft will be stored as block in the part program with all the entered geometrical values. The software automatically creates a block end (LF) and displays the inserted block. AUTOMATIC CONTOUR LINE - CIRCLE G 03 G 02 Ep2 R Wa Ep1 Wa : R : Ep1 : EP2 : X Z MEMORYF3 SELECT F4 STORE MENU MEMORY F5 F6 A B Z X G DELETE PARAM. F7 Input pattern for guiding line - circle Program Input with CAD/CAM Systems Pricipially NC programs from CAD/CAM systems can be read in into EMCO WinNC SINUMERIK 810/ 820 T. Act as following: • The NC program must be put out in the format of the SINUMERIK 810/820. • Rename the file. The NC programs of WinNC will be stored in the following way: %MPFxxxx main program %SPFxxxx subprogram (xxxx program number) e.g. rename with WINDOWS file manager: from: PART1.81M to: %MPF123 • C4 Import the program with DATA IMPORT (see Data Input/Output) EMCO W INNC SINUMERIK 810/820 T OPERATING SEQUENCES Program Administration • • • Press softkey PART PROGRAM Press softkey PROGR.-HANDLE In the softkey line the functions COPY RENAME DELETE will be displayed. Copy Program Example: • Enter with keyboard: %88=%5 • Press the softkey COPY • The software copies the program %88 and stores it again with the program number %5. The program %88 is still existing. Rename Program Example: • Enter with keyboard: %12=%15 • Press the softkey RENAME • The software renames the program %12 to %15. The program % 12 will not be kept. Delete Program Example: • Enter with keyboard: %22 • Press the softkey DELETE • The software deletes the program %22. Data Input-Output x WinNC Sinumerik T (c) EMCO AUTOMATIC DATA INPUT • • • Available memory: 62589 Zeichen Data type: Interface no. for data in: 2 Interface allocation: 1 = RTS-LINE 2 = RTS-LINE DATA-IN F3 DATAOUT START F4 BTR START F5 DATA F6 IMPORT STOP F7 Input pattern for data input-output C5 Press softkey DATA IN-OUT The input pattern beside will be displayed With "Interface no. for data in:" you can select a serial interface (1 or 2) or a drive (A, B or C). 1 serial interface COM1 2 serial interface COM2 A disk drive A B disk drive B C hard disk drive C, workpiece directory (can be determined with installation or with GENERAL DATA in SETTING DATA) or import/export directory (see WinConfig, 4.1 Alter Directories) EMCO W INNC SINUMERIK 810/820 T OPERATING SEQUENCES Data Input via COM1 / COM2 • • • • • Data Import x WinNC Sinumerik T (c) EMCO AUTOMATIC DATA IMPORT Main program: Begin: % 0 End: % 0 Subroutine: Begin: L End: L Device for data in: TOOL- F3 ZEROOFFSET OFFSET With the function data import you can load data from the drives A, B and C. • Press softkey DATA IMPORT • Select drive (device for data in) • Enter below "Mainprogram" resp "Subprogram" the following program numbers: Begin: the first program to read in End: the last program to read in • Press the softkey MAINPROGRAM or SUBROUT INE to start reading in the data. • Transmission of zero offsets, tool data: Press the softkey START. • With the softkey STOP you can interrupt the data input at any time. 0 0 1 Device allocation: A= Drive A: B= Drive B: C= Program path F4 F6 MAIN- F5 SUBPROGRAM ROUTINE STOP Press softkey DATA IN START. This will start the receiving function of the software. At the right top edge of the screen DIO (Data Input/Output) will be displayed. Destination signs the data from the sender (punched tape drive, ...). Start the sender. With the softkey STOP you can abort the data input at any time, with DATA IN START you can restart data input. A direct call-up of certain data by the software is not possible with data input. F7 Input pattern for data import C6 EMCO W INNC SINUMERIK 810/820 T OPERATING SEQUENCES Data Output x WinNC Sinumerik T (c) EMCO AUTOMATIC DATA OUTPUT Available memory: • • • 63548 Zeichen • Interface no. for data out: 2 Interface allocation: 1 = RTS-LINE 2 = RTS-LINE TOOL- F3 ZEROOFFSET OFFSET F4 MACH. DATA F5 PART- F6 PLCPROGRAM M-DATA Press softkey DATA OUT. The screen shows the input pattern beside. With "Interface no. for data out" you can enter a serial interface (1 or 2) or a drive (A, B or C). If you send data to disks, this data will be sent in the same format as with output to the serial interface. This data have to be read in with DATA IMPORT and must not be copied directly into the workpiece directory. F7 Input pattern for data output x WinNC Sinumerik T (c) EMCO Example: Program output AUTOMATIC DATA OUTPUT Main program: Begin: % 0 End: % 0 Subroutine: Begin: L End: L Interface no. for data out: • • • 0 0 2 Interface allocation: • 1=RTS-LINE 2=RTS-LINE • F3 EXT START F4 MAINPRG F5 SUBROUTF6 STOP START START F7 Press softkey PART PROGRAM The screen shows the input pattern beside Enter below mainprogram resp. subprogram the following numbers: Begin: the first program to be sent End: the last program to be sent Press softkey MAINPRG START resp. SUBROUT START. This will start the send function of the software. With the softkey STOP you can interrupt data output at any time, with MAINPRG START resp. SUBROUT START you restart data output with the first program to be sent. Input pattern for data output - part program Example: Zero offset output x WinNC Sinumerik T (c) EMCO AUTOMATIC DATA OUTPUT ZERO OFFSET/ROTATION You can select to put out zero offsets or coordinate rotations. Channel-no. 0: Output zero offsets Channel-no. 1: Output coordinate rotation Channel no.0 ... ... ... Data output zero offset - rotation x WinNC Sinumerik T (c) EMCO Print Data AUTOMATIC DATA OUTPUT • • • Available memory: 36987 Interface no. for data out: ... • 1 Input pattern for data output - printer C7 Press softkey DATA OUT The screen shows the input pattern beside. With "Interface no. for data out" you can enter P to select a printer. Act like data output EMCO W INNC SINUMERIK 810/820 T OPERATING SEQUENCES Adjusting the Serial Interface x WinNC Sinumerik T (c) EMCO AUTOMATIC PARAMETERS OF SERIAL INTERFACES Baudrate Parity Stopbits Databits COM1 9600 E 1 7 Control parameter ETX-Character code 00000000 00000011 F3 F4 F5 • • COM2 9600 E 1 7 F6 For transmission the interfaces of sender and receiver have to be set similar. Select SETTING DATA - SETTING BITS with softkeys. Settings: Baudrate 110, 300, 600, 1200, 2400, 4800, 9600, 19200 Parity E, O, N Stop bits 1, 2 Data bits 7, 8 Data transmission from / to original control in ISOCode only. ISO: 7 Data bits, Parity even (=E) F7 Input pattern for adjusting the serial interface Control parameter: Bit 0: 1...Transmission will be ceased only with ETX(End of Transmit) Code (not with M30, M17, M2) - this enables transmitting several programs in one sequence Bit 7: 1...Overwrite part program without message 0...Message, if a program is already existing ETX character code: free setable, has to be conform with the code set at the CNC Settings at the original control 810/820 with SETTING DATA - SETTING BITS: 5010 - 5013: 5018 - 5021: 5028: first interface second interface ETX sign 5010, 5012: 00000000 5011, 5013: 11000xxx coded baud rate: 001: 150 bd 010: 300 bd 011: 600 bd 100: 1200 bd 101: 2400 bd 110: 4800 bd 111: 9600 bd NOTE When you use an interface expansion card (e.g. for COM 3 and COM 4), take care that for every interface a separate interrupt is used (e.g.: COM1 - IRQ4, COM2 - IRQ3, COM3 - IRQ11, COM4 - IRQ10). C8 EMCO W INNC SINUMERIK 810/820 T OPERATING SEQUENCES Program Run Start of a Part Program Program Influence Before starting a program the control and the machine must be ready for running the program. • Select the mode AUTOMATIC. • Enter the desired part program number By actuating the following softkeys running programs can be influenced. (e.g.: %79: % • Press the key 7 9 • ). • . Messages while program run Press the softkey PROGRAM CONTROL in the mode AUTOMATIC or MDI-AUTOMATIC. The menu line shows the following softkeys: SKIP YES-NO (skip block) DRY ON-OFF (dryrun) OPT.STOP YES-NO (programmed stop) DEC-SBL YES-NO (decoding single block) Select this functions by pressing the corresponding softkey, deselect by pressing the softkey again. In the first line on the screen the influences on program run will be displayed. Skip block Blocks in the program, which are marked by a slash before the block number (/N ...), now will not be worked off while program run. HALT: AUTO interrupted was pressed. The mode was changed or the key Dryrun For test run without workpiece this function can be activated. All blocks with programmed feed (G01, G02, G03, G33, ...) traverse with dryrun-feed instead of the programmed speed, the spindle stands still. The dryrun-feed is displayed in the setting data. HALT: Single block In single block mode one block was worked off (finished). Go on in program with key . HALT: Pr. stop M00, M01 Programmed interruption of the program process. Continue the program with key Programmed stop When an M01 is present in the part program, the program normally is not stopped. When the softkey function is marked with YES, the program stops with M01. . HALT: Read enable Read enable is a PLC output signal. The current block is not finished (e.g. with tool change). The next program block will be worked off after finishing the current block. Decoding single block This function works in a similar way like the function SINGLE BLOCK. If this function is activated by YES, after every block which is running through decoding, the part program will be stopped. HALT: Dwell time Processing the program is interrupted for the duration of the programmed dwell time. With the key the program can be continued. As difference to the normal single block mode the decoding single block mode stops also with calculation blocks. Application: for testing cycles. FST FEED STOP. This message will be displayed, if the PLC stops the program to execute certain operations (e.g. tool change). C9 EMCO W INNC SINUMERIK 810/820 T OPERATING SEQUENCES Overstore Program Interruption The function OVERSTORE changes one or several values in the intermediate store. For OVERSTORE the program has to be stopped. 1. Way Change to the modes JOG or INC 1 ... INC 10 000. With these changes no RESET occurs. The drives will be stopped with holding the programmed tool path. Display: HALT: AUTO interrupted . • Press key • Extend softkey line (key • • • > ) and press softkey 2. Way OVERSTORE. Now you can enter new values for tool position T, spindle speed S, auxiliary function H and miscellaneous function M. Press the key Press the key The drives will be stopped with holding the programmed tool path. Display: HALT: AUTO interrupted , to activate the alterations and continue the program. The program runs with these new values, until in the program or by repeated OVERSTORE this values will be altered. Status Display of the PLC Only on machines with PLC (Programmable Logical Control) - e.g. PC TURN 50 with tool turret. Block Search • • With this function you can start a program at any block. While block search the same calculations will be proceeded as with normal program run but the slides does not move. • Press the key RESET ( • Select the mode AUTOMATIC. • Extend displayed softkey line ( • softkey BLOCK SEARCH. Enter % for a main program resp. L for a subroutine and press the key • • ). • The data format (H, B, D) need not to be determined. If no format is determined the format is like shown in the table. ) and press Name E A M S DB DW Z T . . Enter the block number for the search target via keyboard and press the key • > . Press the softkey START. The program blocks will be worked off until the given search target is reached. With the key Press softkey DIAGNOSIS Press softkey PLC- STATUS The statii to be displays can be entered directly e.g.: EB10,H H hex B binary D decimal Enter the program number via keyboard and press the key . Address area 0 - 127 0 - 127 0 - 255 0 - 255 0 - 255 0 - 255 0 - 31 0 - 63 Remark input byte output byte marker S-marker data module data word* counter time Format B B B B D H D D *... before DW can be displayed, with DB a data module has to be selected. you can activate the program Display of the Software Versions run. • Press softkey DIAGNOSIS • Press softkey SW VERSION The software version of the control system and the eventually connected RS 485 devices will be displayed. C 10 EMCO W INNC SINUMERIK 810/820 T OPERATING SEQUENCES Graphic simulation NC programs can be simulated graphically. x WinNC Sinumerik T (c) EMCO JOG • Press the softkeys PART PROGRAM and EDIT. PARTPROGRAM +0 X Y 0.000 0.000 F 0.00M • When no program is selected, enter the program number and press the softkey SELECT PROGRAM. X • The softkey 3DVIEW starts the 3D graphic simulation Win 3D View. This is an option and not included in the basic version of WinNC. +0 +0 AREA W-PIECE Z F3 F4 +0 START F5 STOP F6 • Start the graphic simulation with the softkey SIMULATION. F7 RESET Graphic screen • The screen shows the graphic simulation. • Press the softkey AREA W-PIECE, to define the workpiece size and the simulation area. x WinNC Sinumerik T (c) EMCO JOG PARTPROGRAM SIMULATION AREA • The fine lined rectangular shows the workpiece, the bold lined rectangular the visible screen window. The dialog line shows the meaning of the marked dimension. 0.000 0.000 0.000 0.000 • Enter the workpiece size and the simulation area. 0.000 0.000 0.000 F3 F4 F5 F6 SIMULATION F7 Define workpiece size and simulation area With the softkey START the graphic simulation starts. With the softkey STOP the graphic simulation stops. With the softkey RESET the graphic simulation will be aborted. x WinNC Sinumerik T (c) EMCO JOG PARTPROGRAM +0 X Y 0.000 0.000 F 0.00M Movements in rapid traverse will be displayed as dashed lines, movements in working traverse will be displayed as full lines. X +0 +0 AREA- F3 W-PIECE Z F4 START +0 F5 STOP F6 RESET F7 C 11 EMCO W INNC SINUMERIK 810/820 T OPERATING SEQUENCES C 12 EMCO W INNC SINUMERIK 810/820 T PROGRAMMING D: Programming Program Structure NC programming for machine tools according to DIN 66025 is used. The NC program is a sequence of program blocks which are stored in the control. With machining of workpieces these blocks will be read and checked by the computer in the programmed order. The corresponding control signals will be sent to the machine. The NC program consists of: • Program number %1234 N0100 G01 X15 • NC blocks Z-17 Z-17 • Words Z • Address -17 • Number combinations (partly with sign) Parts of an NC program Addresses % ........... program number 1 - 9999 L ............ subroutine number 1 - 9999 N ............ block number 1 - 9999 G ........... path function M ........... miscellaneous function A ............ angle B ............ radius (pos. sign), chamfer (neg. sign), circle radius D ............ tool offset 1 - 49 F ............ feed, dwell I, K ......... circle parameter, thread pitch P ............ number of subroutine runs, scale factor R ............ parameter for cycles S ............ spindle speed, cutting speed T ............ tool call (tool turret position) X, Z ....... position data (X also dwell) LF .......... block end D1 EMCO W INNC SINUMERIK 810/820 T PROGRAMMING Survey of G Commands Survey of M Commands G00 ............. Positioning (rapid traverse) G011 .................... Linear interpolation G02 ............. Circular interpolation clockwise G03 ............. Circular interpolation counterclockwise G04² ............ Dwell G09² ............ Exact stop G10 ............. Polar coordinate interpolation, rapid traverse G11 ............. Polar coordinate interpolation, linear interpolation G12 ............. Polar coordinate interpolation, circular interpolation clockwise G13 ............. Polar coordinate interpolation, circular interpolation counterclockwise G16 ............. Plane selection with free axis selection G18 ............. Plane ZX G25 ............. Minimum working area limitation G26 ............. Maximum working area limitation G33 ............. Thread cutting G401 .................... Cancel cutter radius compensation G41 ............. Cutter radius compensation left G42 ............. Cutter radius compensation right G48² ............ Leave as approached G501 .................... Cancel scale modification G51 ............. Scale modification G53² ............ Cancel zero offset blockwise G541 .................... Zero offset 1 G55 ............. Zero offset 2 G56 ............. Zero offset 3 G57 ............. Zero offset 4 G58 ............. Programmable zero offset 1 G59 ............. Programmable zero offset 2 G60 ............. Exact stop mode G62 ............. Deselection exact stop mode G63 ............. Thread tapping with compenstion chuck G641 .................... Deselection exact stop mode G70 ............. Measuring in inches G71 ............. Measuring in millimetre G80 ............. Deselection of drilling cycles G901 .................... Absolute programming G91 ............. Incremental programming G92² ............ Spindle speed limit G92 P .......... Cylindrical interpolation ON G92 P1 ........ Cylindrical interpolation OFF G94 ............. Feed per minute G951 .................... Feed per revolution G96 ............. Constant cutting speed, feed per revolution G97² ............ Constant spindle speed G130 ........... Transmit OFF G131 ........... Transmit ON G147² .......... Soft approach to contour with linear G148² .......... Soft leaving with linear G247² .......... Soft approach to contour with quarter circle G248² .......... Soft leaving with quarter circle G347² .......... Soft approach to contour with semicircle G348² .......... Soft leaving with semicircle M00 ....... Programmed stop unconditional M01 ....... Programmed stop conditional M02 ....... Main program end M03 ....... Spindle ON clockwise M04 ....... Spindle ON counterclockwise M051 .......... Spindle OFF M08 ....... Coolant ON M091 .......... Coolant OFF M17 ....... Subroutine end M20 ....... Tailstock BACK M21 ....... Tailstock FORWARD M25 ....... Open clamping device M26 ....... Close clamping device M30 ....... Main program end M52 ....... C- axis ON M53 ....... C- axis OFF M71 ....... Puff blowing ON M721 .......... Puff blowing OFF Survey of Cycles L93 ........ Cut-in cycle L94 ........ Undercut cycle L95 ........ Stock removal with back pockets L96 ........ Stock removal without back pockets L97 ........ Thread cutting cycle L98 ........ Deep hole drilling cycle L99 ........ Thread draft L971 ...... Longitudinal thread 1 ................................ Initial status ² .................. Effective blockwise D2 EMCO W INNC SINUMERIK 810/820 T PROGRAMMING Description of G Commands G00 Positioning (Rapid Traverse) Format N.... G00 X... Z... +X 30,5 30 56 The slides are traversed with maximum speed to the programmed target point (tool change position, start point for following machining) ø40 Note • A programmed feed F is suppressed while G01 • The maximum feed is defined by the producer of the machine • The feed override switch is active. Example absolute G90 N50 G00 X40 Z56 -X incremental G91 N50 G00 X-30 Z-30.5 Absolute and incremental measures G01 Linear Interpolation Format N... G01 X... Z.... F.... +X Straight movements with programmed feed in mm/ rev (initial status). 46 20,1 E Example 158.888° absolute G90 ..... N20 G01 X40 Z20.1 F0.1 or N20 G01 X40 A158.888 F0.1 ø40 ø20 S -X incremental G91 ..... N20 G01 X10 Z-25.9 F0.1 S ...... start point E ...... end point Absolute and incremental measures D3 EMCO W INNC SINUMERIK 810/820 T PROGRAMMING G02 Circular Interpolation Clockwise G03 Circular Interpolation Counterclockwise G03 Format N... G02/G03 X... Z... I... K... F... or N... G02/G03 X... Z... B... F... M K G02 X, Z ............ End point of the arc (absolute or incremental) I, K .............. Incremental circle parameter (Distance from the start point to centre of arc, I is related to X, K to Z-axis) B ................. Radius of the arc (arc smaller than semicircle with +B, larger than semicircle with -B), can be entered instead of I, K R E S The tool will be traversed to the end point along the defined arc with the programmed feed F. Note Programming the value 0 for I or K can be omitted. The position of the circle end point will be checked, a tolerance of 100 µm (computing and rounding errors) is allowed. According to DIN 66025 the observation of G02, G03 is always behind the turning axis, no matter whether machining occurs behind or in front of the turning axis. Parameters and rotational direction D4 EMCO W INNC SINUMERIK 810/820 T PROGRAMMING G04 Dwell Format N... G04 X/F... [sec] The tool movements will be stopped for a time defined by X or F (in the last reached position) sharp edges - transititions, cleaning cut-in ground, exact stop Note The dwell time starts at the moment when the tool movement speed is zero. Example N75 G04 X2.5 (dwell time = 2.5sec) G09 Exact Stop Format N... G09 Exact stop active The next block will be worked off after the block with G09 is finished and the slides have reached standstill at the end position. Edges will not be rounded and precise transititions will be reached. G09 is effective blockwise. Exact stop not active G10 - G13 Polar Coordinate Interpolation G10 G11 G12 G13 G1 1 X B 0 G1 B With angle and radius dimensioned drawings can be entered directly with polar coordinates. To determine the traverse path the control needs the centre point, the radius and the angle. The centre point will be entered with cartesian coordinates (X, Z) and entered in absolute measure with first programming. A later incremental input (G91) refers always to the last programmed centre point. The radius will be programmed under address B. The angle will be programmed under address A. The angle is 0° in + direction of the axis that was programmed first with centre point. The input of angle is positive (counterclockwise). A1 A2 Z1 Positioning (rapid traverse) Linear interpolation Circular interpolation clockwise Circular interpolation counterclockwise øX1 Z G10 X1 Z1 A1 B G11 A2 Movements determined by polar coordinates D5 EMCO W INNC SINUMERIK 810/820 T PROGRAMMING G16, G18 Working plane selection Format N... G16 ZXZX N... G18 G18 +X +Y +Z -Z -X G16 Plane selection with free axis selection G18 Plane ZX -Y G16 / G18 selects the working plane. • • • The tool axis is vertical to the working plane. Circle interpolation G2/G3 occurs in the working plane. Polar coordinate interpolation occurs in the working plane. G25/G26 Programmable working area limitation X Protection zone Working area Format:: N... G25 X... Z... N... G26 X... Z... Z G25 ............ minimum working area limitation G26 ............ maximum working area limitation G25/G26 limitates the working area in which the tool can traverse. By that in the working area, a safety area can be established which are locked for tool movements. D6 EMCO W INNC SINUMERIK 810/820 T PROGRAMMING G33 Thread Cutting +X Format N... G33 X... Z... I/K... Z X/2 I/K ........Thread pitch [mm] I ...........in X direction (longitudinal) K ..........in Z direction (face) Straight, tapered and scroll threads can be cut. For thread pitch I or K has to be entered according to the main direction of the thread (longitudinal or face). Machining routines like knurling are also possible. +Z K Note • Feed and spindle override are not active with G33 (100%). • A fair sized undercut has to be machined first. Measures for thread cutting Cutter Radius Compensation During tool measurement the tool tip is merely measured at two points (touching the X and Z axes). The tool offset therefore only describes a theoretical cutter tip. R This point is traversed on the workpiece in the programmed path. Tip radius and theoretical cutter tip With movements in the axis directions (longitudinal and face turning) the points on the tool tip touching the axes are used. No dimensional errors are produced on the workpiece. With simultaneous movements in both axis directions (tapers, radii) the position of the theoretical cutting point no longer coincides with the point on the tip actually cutting. Dimensional errors occur on the workpiece. Maximum contour error without cutter radius compensation with 45° movements: Cutter radius 0,4 mm = 0,16 mm path distance = 0,24 mm distance in X and Z. If cutter radius compensation is used, these dimensional errors are automatically calculated and compensated by the control. Cutting movements parallel to the axes and slant D7 EMCO W INNC SINUMERIK 810/820 T PROGRAMMING Tool pathes with selection / cancellation of the cutter radius compensation R R G42 G42 G40 G40 Frontal approach or leaving of an edge point Approach or leaving of an edge point side behind programmed tool path real traversed tool path G42 With arcs always the tangent of the end or start point of the arc will be approached. R The approaching path to the contour and the leaving path from the contour must be larger than the tool radius R, otherwise program interruption with alarm. R R If contour elements are smaller than the tool tip radius R, contour violations could happen. The software computes three blocks forward to recognize this contour violations and interrupt the program with an alarm. G40 Approach or leaving of an edge point behind Tool pathes with program run with active cutter radius compensation R G42 G42 G41 R G41 Tool path at an internal edge Tool path at an outer edge > 90° programmed tool path real traversed tool path G42 With arcs always the tangent of the end or start point of the arc will be approached. R R G41 R R If contour elements are smaller than the tool tip radius R, contour violations could happen. The software computes three blocks forward to recognize this contour violations and interrupt the program with an alarm. R Tool path at an outer edge < 90° D8 EMCO W INNC SINUMERIK 810/820 T PROGRAMMING G40 Cancel Cutter Radius Compensation The cutter radius compensation will be cancelled by G40. Cancellation is only permitted with a linear traversing command (G00, G01). G00 or G01 can be programmed in the same block or as the first traversing movement after cancellation. G40 is programmed frequently in the block with return to the tool change position. G41 Cutter Radius Compensation Left If the programmed tool path (viewed in the direction of machining) is on the left of the material to be machined, the cutter radius is to be selected with G41. Note • No direct change between G41 and G42 - cancel with G40 previously. • Cutter radius R and cutter position (tool type) must be defined. • Selection is only permitted in conjunction with G00 or G01. • Change of the tool correction is not possible while cutter radius compensation. Definition G41 cutter radius compensation left G42 Cutter Radius Compensation Right If the programmed tool path (viewed in the direction of machining) is on the right of the material to be machined, the cutter radius is to be selected with G42. Note see G41! Definition G42 cutter radius compensation right D9 EMCO W INNC SINUMERIK 810/820 T PROGRAMMING G48 Leave as Approached Format N... G48 X... Y... U... To avoid cutting marks, a contour will be approached and left tangentially. To approach and leave the following functions are available: G147 Soft approach to contour with linear G247 Soft approach to contour with quarter circle G347 Soft approach to contour with semicircle G48 Leave as approached G148 Soft leaving the contour with linear G248 Soft leaving the contour with quarter circle G348 Soft leaving the contour with semicircle see G147 - G348 With calling up G48, G41 or G42 must be active. G48 causes, that the contour will be left in the same way like it was approached. G48 is effective blockwise. After the G48 block G40 is active automatically. G50 Cancel Scale Modification G51 Scale Modification Format: N... G50 N... G51 X... Z... P... With X and Z the base point (PB) for scale modification is determined, with P the scale factor. If X and Z are not determined, the work piece zero point (X = 0, Z = 0) is used as base point. By scale modification the following values will be calculated: • axis coordinates • interpolation parameter • radius / chamfer • programmable zero offset PB Enlarging a contour D 10 EMCO W INNC SINUMERIK 810/820 T PROGRAMMING G53 Cancel Zero Offset Blockwise Format: N... G53 The machine zero point is determined by the machine manufacturer (EMCO lathes: on the rotating axis and on the end face of the spindle flange). Certain working sequences (tool change, measuring position...) are always proceeded at the same position in the working area. With G53 all zero offsets but no tool offset will be suppressed for one block and all position data refer to the machine zero point. G54 - G57 Zero Offset 1 - 4 Format: N... G54/G55/G56/G57 Four positions in the working area can be predetermined as zero points (e.g.: points on fix mounted clamping devices). The values of the zero offsets are stored in the setting data - ZERO OFFSET. These zero offsets are called up with G54 - G57. G54 is initial status and active without call-up. G58/G59 Programmable Zero Offsets Format: N... G58/G59 A... X... Z... These zero offsets will be added to the active zero offset G54 - G57. Normally with G58/G59 the workpiece length will be considered. With A a coordinate rotation can be programmed. With program end, program abortion and RESET G58/G59 will be deleted. The commands G58 and G59 are effective blockwise, the zero offset caused by G58/G59 is active, until it will be altered or cancelled. D 11 EMCO W INNC SINUMERIK 810/820 T PROGRAMMING G60 Exact Stop Mode Format N... G60 Exact stop active A block will be worked off after the slides have been decelerated to standstill. Edges will not be rounded and transititions will be exact. G60 is active until it will be cancelled by G62 or G64. Exact stop not active G62, G64 Deselection Exact Stop Mode Format N... G62/64 X axis velocity P0 Before the target point in X is reached, the Z axis will be accelerated. This enables steady movements. The contour transitition is not exactly sharp-edged (parabola, hyperbola). With this software G62 and G64 have the same effect, but not with the SINUMERIK 810/820 T. P1 P0 P1 contour transitition Z axis P0 P1 Speed characteristics of the slides with G62/G64 G63 Thread tapping with compenstion chuck Format G63 X.. Z.. F.. S.. Thread tapping without synchronisation. The spindle speed is programmed under the address S and a suitable feedrate underthe address F. G63 is effective blockwise. While G63 the feed and spindle override are locked to 100%. The retraction movement (with opposite spindle direction) also must be programmed with G63. Example: Tap M5 (pitch P = 0,8 mm) spindle speed S = 200, therefore F = 160 N10 G1 X0 Z3 S200 F1000 M3 (approach start point) N20 G63 Z-50 F160 (therad tapping, thread depth 50) N30 G63 Z3 M4 (retraction, change of spindle direction) D 12 EMCO W INNC SINUMERIK 810/820 T PROGRAMMING G70 Measuring in Inches Format N5 G70 By programming the following data will be transformed into the inch system: • Path information X, Z • Interpolation parameter I, K • Chamfers, radii +B, -B Notes • For clearness G70 should be defined in the first block of the program. • A change between G70 and G71 within a program is allowed. • A steady setting of the measuring system mm/ inch will be proceeded in DIAGNOSIS, NC-MD. This setting is relevant for all values and will be kept also with power off/on. G71 Measuring in Millimetre Format N5 G71 Comment and notes like G70! D 13 EMCO W INNC SINUMERIK 810/820 T PROGRAMMING G90 Absolute Programming Format N... G90 The addresses have to be programmed as following: X ..........diameter Z+/- ......absolute (referred to the workpiece zero point) Note • Direct switchover within a block between G90 and G91 is not possible. • G90 (G91) may also be programmed with some other G functions (N... G90 G00 X... Z...). G91 Incremental Programming Format N... G91 The addresses have to be programmed as following: X ..........radius Z ..........Incremental (real) traverse path with sign Note see G90. G92 Spindle Speed Limit Format N... G92 S... [U/min] With G92 a maximum spindle speed (rev/min) can be determined for a part program (effective only in connection with G96). Enter the desired maximum speed with address S. This command is used in conjunction with constant cutting speed. D 14 EMCO W INNC SINUMERIK 810/820 T PROGRAMMING G 92 Cylindrical interpolation Format N... G92 P.. C G92 P.. ...... Cylindrical interpolation ON G92 P1 ...... Cylindrical interpolation OFF P ................. Factor for unit circle C ................. Axis name for rotary axis Cylindrical interpolation permits machining of cylindrical paths with one rotary axis and one linear axis. Both linear and circular contours may be programmed. It is not possible to input the interpolation parameters I, J and K. The position of the rotary axis is entered in degrees. The ration is programmed under G92 P... for this purpose. The control forms the ration from the machining diameter and the unit diameter as follows: P= machining diameter unit diameter The unit diameter is derived from the ralation p x π = 360 ab 360 Unit diameter = π in mm or inch No characters other than axis name must be written in a block containing G92P... D 15 EMCO W INNC SINUMERIK 810/820 T PROGRAMMING Example Cylindrical interpolation X G54 G58 Z40 T7 D7 F200 S2=2000 G94 M2=3 M52 Couple in and Positioning of the spindle G92 P0.33 C Cylindrical interpolation ON. Unit diameter = 360/PI = 114.59 P =38.2 /114.59= 0.33 C = Axis name for round axis G0 X45 Z-5 G1 X35 C0 Z-5 G1 Z-15 C22.5 Z-5 C45 Z-15 C67.5 Z-5 C90 Z-15 C112.5 Z-5 C135 Z-15 C157.5 Z-5 C180 Z-15 C202.5 Z-5 C225 Z-15 C247.5 Z-5 C270 Z-15 C292.5 Z-5 C315 Z-15 C337.5 Z-5 C360 X45 G92 P1 Cylindrical interpolation OFF M53 C- axis OFF G0 X80 Z100 M2=5 Spindle for driven tool OFF M30 Y R2,5 360° ø38,2 x π = 120 15 Z Y Z Milled with end milling cutter ø5mm D 16 EMCO W INNC SINUMERIK 810/820 T PROGRAMMING G94 Feed per Minute By G94 all F (feed) values are in mm/min (inch/min). G95 Feed per Revolution By G95 all F (feed) values are in mm/revolution (inch/ revolution). G96 Constant Cutting Speed Unit: m/min feet/min The control computes the spindle speed for the actual diameter continuously. With diameters decreasing to 0 the speed should increase to infinite. In fact it increases to the maximum speed of the machine and the program runs on without alarm. If the maximum speed is to high (e.g.: limited chuck speed, unbalanced work pieces, ...) G92 has to be programmed additionally to delimit the speed. Feed is automatically set to G95 (mm/rev, inch/rev). No zero offset in X direction must be active. G97 Constant Spindle Speed Unit: rev/min G96 will be deselected and the spindle speed will be holded at the last valid value. Afterwards S will be programmed in rev/min. D 17 EMCO W INNC SINUMERIK 810/820 T PROGRAMMING G131 Transmit TRANSMIT - TRANSform - Milling Into Turning The polar coordinate interpolation is adequate for machining the end face of a turned part. Format: G130 .......... Transmit OFF G131 .......... Transmit ON Example- Transmit +Y 5 G54 G58 Z13 T3 D3 M52 6 Startpoint +C 4 Couple in and positioning of the spindle G94 F200 S2=2000 M2=3 Spindle for driven tools on G16 Z X Z X Identify axis for lengh correction. (Attention, L1=Z ; L2=X) G131 Transmit ON G0 X1=30 Y1=10 Z-6 G1 X1=17.32 Y1=10 G41 Y1=0 X1=8.66 Y1=-15 X1=-8.66 Y1=-15 X1=-17.32 Y1=0 X1=-8.66 Y1=15 X1=8.66 Y1=15 X1=17.32 Y1=0 Y1=-10 X1=25 Y1=-10 G40 G130 End of Transmit M53 C- axis OFF M2=5 Spindle for driven tool OFF M30 +X 1=7 C=0 Endpoint 3 Point S 1 2 3 4 5 6 7 E 2 X 17.32 17.32 8.66 -8.66 -17.32 -8.66 8.66 17.32 17.32 Y 10 0 -15 -15 0 15 15 0 -10 D 18 EMCO W INNC SINUMERIK 810/820 T B PROGRAMMING G147 Soft Approach to Contour with Linear G247 Soft Approach to Contour with Quarter Circle G347 Soft Approach to Contour with Semicircle G148 Soft Leaving with Linear G248 Soft Leaving with Quarter Circle G348 Soft Leaving with Semicircle G147 R PS P0 PA B PS PE Format N5 G147/247/347/148/248/348 X... Z... B... Soft approach and leaving with linear • This functions for approaching and leaving a contour are effective blockwise. • In the approaching block have to be determined: the coordinates of the start point P0 of the contour the value B (approaching distance without contour touch) G247 P0 • In the leaving block must be determined: the coordinates of the start point PE after leaving the contour the value B (leaving distance without contour touch) B • In an approaching or leaving block no further traverse movements must be programmed. • After an approaching or leaving block no block must be programmed which contains only auxiliary functions. R PS PA • G41 or G42 must be active before an approaching block. Soft approach and leaving with quarter circle • In the leaving block G40 will be set automatically, that means, G41 or G42 have to be programmed again. G347 P0 B • Soft approaching or leaving is not possible with contours which were programmed with contour drafts. R PS PA Start point before approaching the contour PS Supporting point, will be calculated by the control basing on B P0 End point of the approaching block = start point of the contour PE End point after leaving the contour R Tool radius B Distance without contour touch dashed line: path of the tool tip radius centre PA Soft approach and leaving with semicircle D 19 EMCO W INNC SINUMERIK 810/820 T PROGRAMMING D 20 EMCO W INNC SINUMERIK 810/820 T PROGRAMMING Description of M Commands M Commands are switching or addidional functions (miscalleneous). The M commands can stand alone in a program block or together with other commands. Commands of the same group cancel each other, that means the M command programmed last cancels the previously programmed M command of the same group. Remark The following pages describe the standard M commands. Wheter these M commands are executable depends on the type of the machine and the used accessories. M03 Main Spindle ON Clockwise M00 Programmed Stop Unconditional The spindle is switched on provided that a spindle speed or cutting speed has been programmed, the chip protection door is closed and a workpiece correctly clamped. M03 must be used for all right-hand cutting or overhead clamped tools, if machining occurs behind the turning centre. These command effects a stop in the execution of the part program. Main spindle, feed and coolant will be switched off. The chip protection door can be opened without triggering an alarm. With "NC START" the program run can be M04 Main Spindle ON Counterclockwise continued. After that the main drive will be switched on with all values which were valid before. The same conditions as described under M03 apply here. M03 must be used for all left-hand cutting or normal clamped tools, if machining occurs behind the turning centre. M01 Programmed Stop Conditional M01 works like M00, but only if the function PROGRAMMED STOP YES was switched on by softkey in the menu PROGRAM CONTROL. With "NC START" M05 Main Spindle Off the program run can be The main drive is braked electrically. At the program end the main spindle is automatically switched off. continued. After that the main drive will be switched on with all values which were valid before. M02 Main Program End M02 works like M30. D 21 EMCO W INNC SINUMERIK 810/820 T PROGRAMMING M08 Coolant ON M26 Close Clamping Device only for EMCO PC Turn 120. The coolant will be switched on. only for accessory automatical clamping device on the PC TURN 120. The clamping device closes. See G: Accessory Functions - Automatic Clamping Device M09 Coolant OFF only for EMCO PC Turn 120/125. The coolant will be switched off. M30 Main Program End With M30 all drives are switched off and the control is returned to the start of the program. Moreover, the counter level is increased by 1. M17 Subroutine End M17 will be written in the last block of a subroutine. It can stand alone in this block or with other functions. The call-up of a subroutine and M17 must not stand in the same block (nesting). M52 C- Axis ON only for machines with driven tools. Machine are switched in the round axis operation. M20 Tailstock BACK M53 C- Axis OFF only for accessory automatical tailstock. The tailstock moves back. See G: Accessory Functions - Automatic Tailstock only for machines with driven tools. The round axis operation of the machine are switched off. M21 Tailstock FORWARD M71 Puff Blowing ON only for accessory automatical tailstock. The tailstock moves forward. See G: Accessory Functions - Automatic Tailstock only for accessory puff blowing device The puff blowing device will be switched on. M25 Open Clamping Device M72 Puff Blowing OFF only for accessory automatical clamping device on the PC TURN 120. The clamping device opens. See G: Accessory Functions - Automatic Clamping Device only for accessory puff blowing device The puff blowing device will be switched off. D 22 EMCO W INNC SINUMERIK 810/820 T PROGRAMMING Description of Cycles Cycles will be programmed in the program in a manner, that first the R parameters will be written into the program and then the cycle call with the number of program runs. Example N... R20=... R21=... R22=... R24=... R25=... R26=... R27=... R28=... R29=... R30=... L95 P2 That means that the cycle L95 with the programmed parameters will run 2 times. L93 Cut-in Cycle The cut-in cycle allows machining of grooves longitudinal, face, outside and inside. Note: Both cutting edges of the cut-in tool have to be measured in neighbouring tool data registers (e.g.: D21 and D22). Programming the parameter: R10 R21 R22 R23 R29 R35 R3 0 3 R3 R21 R3 2 4 R3 R26 X R24 R25 R22 R27 R24 R25 R26 R27 R28 R29 R30 R31 R32 R33 R34 R35 R31 R28 Z Dimensions for cut-in D 23 0 for longitudinal, 1 for face cut-in Outer resp. inner diameter Start point in Z Determine the start point Longitudinal cut-in 1 inside/outside right -1 inside/outside left Face cut-in 1 inside right/left -1 outside right left Finishing offset in X Finishing offset in Z Infeed depth Width of cut-in Dwell of the bottom of the cut-in Angle left flank (0° - 89°) Radius (+) or chamfer (-) at the bottom left Cut-in diameter Radius or chamfer at edge of cut-in left Radius or chamfer at bottom of cut-in right Radius or chamfer at edge of cut-in right Angle right flank EMCO W INNC SINUMERIK 810/820 T PROGRAMMING L94 Undercut Cycle The undercut cycle L94 allows undercuts with standard stress according to DIN 509, form E and F with a finished part diameter > 18 mm. The cutter radius compensation will automatically be activated in the cycle. R01 = 4 R01 = 3 R01 = 1 R01 = 2 Programming the parameter: R01 R02 R04 = 4 (E) R03 X R04 R02 R03 R04 = 5 (F) Z Dimensions for undercut D 24 Definition of the cutter position (1 - 4) Start point of the contour in X R02 defines the diameter of the finished part. The cycle adds automatically 2 mm to this value, this position is the start point in X. Start point of the contour in Z For R03 the finished part dimension will be entered. The cycle adds automatically 10 mm to this value, this position is the start point in Z. Sign for form E or F R04=4 Form E for workpieces with one machining side R04=5 Form F for workpieces with two machining sides which are perpendicular to each other. EMCO W INNC SINUMERIK 810/820 T PROGRAMMING L95 Stock Removal with Back Pockets L96 Stock Removal without Back Pockets Machining can be programmed longitudinal, on face, inside, outside. The last point in the subroutine determines the start diameter of the roughing sequence. For face operation this point must be the highest point in X, for longitudinal operation this must be the lowest point in Z. For L95 max. 10 back pockets (in machining direction decreasing diameters) may be programmed. The first contour point will be determined in the circle. The contour draft has to be described in a subroutine (G1, G2, G3). The first block in the subroutine must be programmed in absolute coordinates. Programming the parameter: R20 R26 R24 R25 X R21 R22 R24 R25 R26 R22 R21 R27 R28 R29 R30 Z Dimensions for the stock removal cycle R29=XX X1 X2 X3 X4 1X Roughing axis parallel longitudinal outside Roughing axis parallel face outside Roughing axis parallel longitudinal inside Roughing axis parallel face inside 2X Finishing to finishing offset longitudinal outside Finishing to finishing offset face outside Finishing to finishing offset longitudinal inside Finishing to finishing offset face inside Selection of the desired contour (subroutine number) Start point of the contour in X Start point of the contour in Z Finishing offset in X Finishing offset in Z R24 and R25 are valid for roughing and finishing, with R24=0 and R25=0 the finish dimension will be reached Roughing infeed (X or Z), will be omitted with finishing Selection cutter radius compensation (40, 41, 42), the control activates the cutter radius compensation automatically, correct selection and deselection automatically Feed Machining procedure, see table Feed factor with back pockets With this number (e.g.: 0,7) the feed will be multiplied for dive in movements with back pockets (feed reduction) 3X Roughing axis parallel and one roughing cut contour parallel (rest edges) longitudinal outside Roughing axis parallel and one roughing cut contour parallel (rest edges) face outside Roughing axis parallel and one roughing cut contour parallel (rest edges) longitudinal inside Roughing axis parallel and one roughing cut contour parallel (rest edges) face inside Machining possibilities with R29 D 25 4X Complete machining (roughing, rest eedges, finishing) longitudinal outside Complete machining (roughing, rest eedges, finishing) face outside Complete machining (roughing, rest eedges, finishing) longitudinal inside Complete machining (roughing, rest eedges, finishing) face inside EMCO W INNC SINUMERIK 810/820 T PROGRAMMING L97 Thread Cutting Cycle Longitudinal, face, inside and outside threads can be programmed. The infeed of the tool occurs automatically and is degressively quadratic. This keeps the cross section of the chip constant. Programming the parameter: R20 R21 R22 R27 X R26 R31 R24 R23 R24 R22 R21 R25 R32 Z R26 R27 R25 R20 R29 R28 R29 Thread cutting cycle R31 R32 Thread pitch (always the value parallel to axis) Start point of the thread in X Start point of the thread in Z R21 and R22 describe the real start point at the contour. Number of idle cuts Thread depth (positive value = inside thread, negative value = outside thread) Finishing offset After automatic cut dividing with roughing occurs a finishing cut with the programmed cutting depth. Thread let-in, incremental without sign Thread let-out, incremental without sign The values R26 and R27 always will be entered parallel to axis without sign. With taper threads the correct starting and end points will be calculated automatically. Number of roughing cuts Infeed angle (half flank angle) Flank infeed is only possible with longitudinal or face threads (no taper threads) End point of the thread in X (absolute) End point of the thread in Z (absolute) R31 and R32 describe the real end point at the contour. L971 Longitudinal Thread This cycle was created for longitudinal and less tapered threads and is time optimized. Programming occurs like with L97. Differences to L97: R28 pos. sign: degressive infeed neg. sign: constant infeed R34 This parameter was inserted additionally. With this parameter a retraction height of the tool over the thread can be programmed. Inside threads: 0,01 - 1 mm Outside threads: 0,01 - 3 mm D 26 EMCO W INNC SINUMERIK 810/820 T PROGRAMMING L98 Deep Hole Drilling Cycle This cycle is for drilling deep holes or for drilling in materials with bad cutting property. With the parameter R11 the retraction movement can be determined. Chip breaking (R11=0) The drill dives into the work piece to the first drilling depth (R25), dwells (duration R27), retracts 1 mm and dives in again. Retracting (R11=1) The drill dives into the work piece to the first drilling depth (R25), dwells (duration R27), retracts out of the drilling hole (to R22), dwells (duration R28), and dives in again. The following infeed is always smaller for the value R24 than the previous. The sequence infeed - retraction will be repeated until the end depth is reached.. If the calculated infeed is smaller than R24, it will be constant with the value R24. If the remaining infeed down to end depth R26 is smaller than the double degression value (2xR24), the remaining infeed will be halved and worked off in two infeeds.. Therefore the smallest infeed never can be less than R24/2. X Programming the parameter: R26 R11 Z R22 R25 - R24 R22 R24 R25 R26 R27 R28 R25 Deep hole drilling cycle D 27 0 chip breaking 1 retracting Start point in Z (absolute) Degression value (incremental, without sign) First drilling depth (incremental, without sign) End drilling depth (absolute) Dwell at start point (for retracting only) Dwell at drilling depth (chip breaking and retracting) EMCO W INNC SINUMERIK 810/820 T PROGRAMMING L99 Thread Draft This cycle is for cutting of following threads (longitudinal or face). The single pitches can be different. Programming the parameter: X R11 R12 R13 R14 R21 R22 R23 R24 R25 R27 R43 R42 R26 R27 R11 R12 R24 R23 R22 R21 R13 R14 R26 R41 Z R25 R36 R28 R29 R29 R35 R36 R41 R42 R43 Thread draft D 28 Start point of the thread in X absolute 1. intermediate point in X absolute 2. intermediate point in X absolute End point of the thread in X absolute Start point of the thread in Z absolute 1. intermediate point in Z absolute 2. intermediate point in Z absolute End point of the thread in Z absolute Finishing offset After automatic cut dividing with roughing occurs a finishing cut with the programmed cutting depth. Tread let-in, incremental without sign Tread let-out, incremental without sign The values R26 and R27 always will be entered parallel to axis without sign. With taper threads the correct starting and end points will be calculated automatically. Number of roughing cuts Infeed angle (half flank angle) Flank infeed is only possible with longitudinal or face threads (no taper threads) Number of idle cuts Thread depth (positive value = inside thread, negative value = outside thread, face thread) Thread pitch 1 Thread pitch 2 Thread pitch 3 EMCO W INNC SINUMERIK 810/820 T PROGRAMMING Contour definition This way of programming can be used if intersection point coordinates are missing. Multiple point drafts for contour definition are offered in different forms and may be combined at will. Intersection points will be calculated by the software from coordinate values or angles. +X +X A=1 44° ° 220 A= +Z Angles are always related to the +Z direction. +Z Angles refer to the +Z direction The following contour drafts are offered: Insert Chamfer -B For chamfers B is entered as negative number. X2+Z2 X3+Z3 G1 X2... Z2... B-... LF G1 X3... Z3... LF Inserting a chamfer Insert Radius X2+Z2 For radii B is entered as positive number. The entered radius must not be larger than the smaller one of the two lines. +B X3+Z3 G1 X2... Z2... B+... LF G1 X3... Z3... LF Inserting a radius Line X/Z By entering the angle A and one target point coordinate the line will be computed. A G1 A... X... or G1 A... Z... Line determined by angle and one end coordinate Arc X2 / Z2 B Description of the arc by radius B, centre point I, K and one target point coordinate. I G2 I... K... B... X2... or G2 I... K... B... Z2... X1+Z1 K Arc defined by radius, centre and one end coordinate D 29 EMCO W INNC SINUMERIK 810/820 T PROGRAMMING Line - Line +B Angle A, one coordinate of the first point and both coordinates of the target point. Radii +B or chamfers -B can be inserted; if the next following block is a G1 block, they also can be added on. G1 A... X1... G1 X2... Z2... or G1 A... Z1... G1 X2... Z2... -B X2+Z2 X1 / Z1 +B A +B -B A2 X2+Z2 Second possibility: Angles A1 and A2, both coordinates of the target point +B A1 G1 A1... A2... X2... Z2... Contour draft line - line Line - Arc (tangential) Angle A, radius B and both coordinates of the target point. B X+Z A G3 A... B... X... Z... Contour draft line - arc (tangential) Arc - Line (tangential) X+Z Radius B, angle A and both coordinates of the target points. B A G2 B... A... X... Z... Contour draft arc - line (tangential) Arc - Arc (tangential) K2 K1 The path command G2, G3 will be programmed for the first arc. The second path command is always opposite and will not be programmed. The interpolation parameter I2, K2 of the second arc are related to the end point of this arc. Both interpolation parameter have to be programmed, even if the value is 0. I1 I2 X+Z Contour draft arc - arc (tangential) G2 I1... K1... I2... K2... X... Z... D 30 EMCO W INNC SINUMERIK 810/820 T PROGRAMMING Subroutines Function sequences which are repeated multiple can be programmed as subroutines. Contour descriptions for cycles also will be entered as subroutine. The numbers L90 - L100 are reserved for cycles and must not be used for subroutines. Subroutine Call in Part Program %12334 .............................. .............................. .............................. .............................. L222 P5 .............................. .............................. .............................. .............................. M30 5x e.g.: L 123 P1 L222 ............................ ............................ ............................ ............................ ............................ ............................ ............................ ............................ M17 Multiple call of a subroutine L123 P1 LF subroutine subroutine number number of subroutine runs (max. 99) Subroutine End with M17 e.g.: N150 M17 LF Subroutine Nesting %12334 .............................. .............................. .............................. .............................. L222 P5 .............................. .............................. .............................. .............................. M30 A fourfold nesting of subroutines is possible. Block search is possible into the forth subroutine level. 5x L222 ............................ ............................ ............................ L333 P2 ............................ ............................ ............................ ............................ M17 2x L333 ............................ ............................ ............................ ............................ ............................ ............................ ............................ ............................ M17 Nesting subroutines D 31 EMCO W INNC SINUMERIK 810/820 T PROGRAMMING D 32 EMCO W INNC SINUMERIK 810/820 T @-CODES E: @-Codes The CNC controls SINUMERIK 810 and SINUMERIK 820 can be programmed with @-comdes. @-codes allow to program jumps in program, queries, branches etc. The @-codes can be included in the main program or in subprograms that can be used e.g. as cycles. Note: For normal NC-programming the @-codes are almost not used, because the G and M commands and the standard cycles are enough. You will need the @-codes when you want to design your own cycles with parameter interchange etc.. Programming @-codes is an advanced, complex way of programming. In the following the @-codes that work with WinNC are listed with a short description only. Key y → 0: 1: 2: 3: 4: 5: 6: 7: 8: Relational operator <rop> . . . . No condition = . . . . equal to <> . . . . Not equal to > . . . . Greater than >= . . . . Greater than or equal to < . . . . Less than <= . . . . Less than or equal to . . . . True . . . . Not E1 EMCO W INNC SINUMERIK 810/820 T @- Befehl <Const><R Par 1> ... <R Par n> <R Par 1><R Par 2> <Const><R Par n> ... <R Par 1> <R Par 1><R Par 2> <Const> <R Par>** <Var> <Wert 1><Const 1> <Wert 2><Const 2> @111 ... ... <Wert n><Const n> @040 @041 @042 @043 @100 @100 @12y <Var><Wert><Const> @13y <Var><Wert><Const> @-CODES Funktion Sichern der angegebenen lokalen R-Parameter auf den Stack Sichern einer Gruppe lokaler R-Parameter auf den Stack Gesicherte R-Parameter vom Stack holen Gruppe der gesicherten R-Parameter vom Stack holen Absoluter Sprung zu NC-Satz Case-Verzweigung IF-THEN-ELSE-Anweisung y Ñ Vergleichsoperator <Vop> Var Ñ R-Parameter oder Pointer Wiederholungs-Anweisung mit Abfrage der Wiederholbedingung am Anfang y Ñ Vergleichsoperator <Vop> Wiederholungs-Anweisung mit Abfrage der Wiederholbedingung am Ende y Ñ Vergleichsoperator <Vop> Wiederholungs-Anweisung mit Wiederholungen solange bis @151 <Var><Wert 2><Const> <Var> inkrementell <Wert 2> erreicht hat Wiederholungs-Anweisung mit Wiederholungen solange bis @161 <Var><Wert 2><Const> <Var> dekrementell <Wert 2> erreicht hat @200 <Var> Lösche Variable @201 <Var><Wert> Lade Variable mit Wert @202 <Var 1><Var 2> Tauschen der Variableninhalte Lösche Eingabezwischenspeicher @210 <Wert 3><Wert 4> Wert 3: EZS-Anfangsadresse Wert 4: EZS-Endadresse Maschinendaten NC @300 <Var><Wert 1> Wert 1: Adresse 0 ... 4999 Maschinendaten NC-Bits @302 <Var><Wert 1><Wert 2> Wert 1: Byte-Adresse 5000 ... 6999 Wert 2: Bit-Adresse 0 ... 7 Settingdaten NC @310 <Var><Wert 1> Wert 1: Adresse 0 ... 4999 Werkzeugkorrektur Wert 1: 0 @320 <Var><Wert 1><Wert 2><Wert 3> Wert 2: D-Nr. 1 ... 99 Wert 3: P-Nr. 0 ... (9) Einstellbare Nullpunktverschiebung (G54 - G57) Wert 1: Gruppe 1 ... 4 (G54 - G57) @330 <Var><Wert 1><Wert 2><Wert 3> Wert 2: Achs-Nr. 1, 2, ... Wert 3: 0/1 (Grob/Fein) Programmierbare Nullpunktverschiebung (G58, G59) @331 <Var><Wert 1><Wert 2> Wert 1: Gruppe 1 oder 2 (G58 oder G59) Wert 2: Achs-Nr. 1, 2, ... Summenverschiebung @336 <Var><Wert 2> Wert 2: Achs-Nr. 1, 2,... Programmierte Spindeldrehzahl lesen @342 <Var><Wert 1><Wert 3> Wert 1: Kanal-Nr. 0 ... 3 Wert 2: Spindel-Nr. 1 ... 6 @14y <Var><Wert><Const> E2 EMCO W INNC SINUMERIK 810/820 T @- Befehl @345 <Var><Wert 1><Wert 2> @360 <Var><Wert 2> @361 <Var><Wert 2> @363 <Var><Wert 2> @364 <Var><Wert 2> @367 <Var><Wert 1> @36a <Var><Wert 1> @36b <Var><Wert 1><Wert 3> @371 <Var><Wert 1><Wert 3> @3e4 <Var><Wert 1> @420 <Wert1><Wert2><Wert3><Wert> @423 <Wert1><Wert2><Wert3><Wert> @430 <Wert1><Wert2><Wert3><Wert> @431 <Wert1><Wert2><Wert3><Wert> @432 <Wert1><Wert2><Wert> @440 <Wert3><Wert> @442 <Wert3><Wert> @446 <Wert> @447 <Wert> @-CODES Funktion Programmierte Schnittgeschwindigkeit Wert 1: Kanal-Nr. 0, 1, 2 Wert 2: 0 = G96 Achs-Position-Ist werkstückbezogen Wert 2: Achs-Nr. 1, 2, ... Achs-Position-Ist maschinenbezogen Wert 2: Achs-Nr. 1, 2, ... Spindelpositions-Istwert Wert 2: Spindel-Nr. 1 ... 6 Spindeldrehzahl-Istwert Wert 2: Spindel-Nr. 1 ... 6 Achsnummer der aktuellen Ebene/Leitspindelnummer in RParameter <Var> lesen: Var+0: Nr. der waagrechten Achse Var+1: Nr. der senkrechten Achse Var+2: Nr. der Achse senkrecht zur Ebene Var+3: Nr. der waagrechten Achse Var+4: Nr. der Achse, in der Länge 2 wirkt (Werkzeugtyp 30) Wert 1: Kanal-Nr. 0, 1, 2 D-Funktion Ist Wert 1 = 0 Lesen der G-Funktion aus dem Arbeitsspeicher des aktuellen Satzes Wert 1: Kanal-Nr. 0, 1, 2 Wert 3: Interne G-Gruppe, zu der G-Funktion gehört 0 ... 15 Sonderbits Wert 1: Kanal-Nr. 0 .. 2 = kanalabhängig, 99 = kanalunabhängig Aktive Getriebestufe lesen Wert 1: Spindel-Nr. 0 bis 6 Werkzeugkorrektur Wert 1: 0 Wert 2: D-Nr. 1 ... 99 Wert 3: P-Nr. 0 ... 7 (9) Werkzeugkorrektur additiv Wert 1: 0 Wert 2: D-Nr. 1 ... 99 Wert 3: P-Nr. 0 ... 7 (9) Einstellbare Nullpunktverschiebung additiv Wert 1: Gruppe 1 ... 4 (G54 - G57) Wert 2: Achs-Nr. 1, 2, ... Wert 3: 0/1 (Grob/Fein) Einstellbare Nullpunktverschiebung (G54 - G57) Wert 1: Gruppe 1 ... 4 (G54 - G57) Wert 2: Achs-Nr. 1, 2, ... Wert 3: 0/1 (Grob/Fein) Programmierbare Nullpunktverschiebung (G58, G59) Wert 1: Gruppe 1 oder 2 (G58 oder G59) Wert 2: Achs-Nr. 1, 2, ... Programmierte Achsposition Wert 3: Achs-Nr. 1, 2, ... Programmierte Spindeldrehzahl Wert 3: Spindel-NR. 0 ... 6 Programmierter Radius Programmierter Winkel E3 EMCO W INNC SINUMERIK 810/820 T @- Befehl @448 <Wert3><Wert> @4e1 <Wert1><Wert2><Wert> @610 @613 @614 @620 @621 @622 @630 @631 @632 @634 @637 @640 @641 <Var> = <Wert 1> + <Wert 2> <Var> = <Wert 1> - <Wert 2> <Var> = <Wert 1> x <Wert 2> <Var> = <Wert 1> / <Wert 2> <Var><Wert> <Var><Wert> <Var><Wert 1><Wert 2> <Var> <Var> <Var> <Var><Wert> <Var><Wert> <Var><Wert> <Var><Wert> <Var><Wert 1><Wert 2> <Var><Wert> <Var><Wert> @710 <Var 1><Var 2> @711 <Var 1><Var 2><Var 31> @713 <Var> @714 @-CODES Funktion Programmierter Interpolationsparameter für Kreis und Gewinde Wert 3: Achs-Nr. 1, 2, ... Spindel-Beschleunigungskonstante schreiben Wert 1: Spindel-Nr. 0 bis 6 Wert 2: Getriebestufe 1 bis 8 Wert 3: Spindelbeschleunigungszeitkonstante 0 bis 16000 Addition Subtraktion Multiplikation Division Betragsbildung Quadratwurzel Wurzel aus Quadratsumme Inkrementiern von <Var> mit 1 Dekrementiern von <Var> mit 1 Ganzzahliger Anteil Sinus Cosinus Tangens Arcus Sinus Winkel aus zwei Vektorkomponenten nat. Logarithmus e Exponentialfunktion Referenzaufbereitung Var 1: Ausg.daten ab Var 1 Var 2: Eing.datum ab Var 2 Schnittpunktberechnung Var 1: Ausg.daten ab Var 1 Var 2: Erste Kontur ab Var 2 Var 3: mit 0 vorbesetzen Startvorbereitung für Zyklen Var: Ausgangsdaten ab Var Stop der Decodierung, bis Zwischenspeicher leer ist E4 EMCO WINNC SINUMERIK 810/820 T SURVEY PAGES G: Survey Pages Survey Softkey Explanations ACTUAL BLOCK (Current block) The current block is the block currently being processed. The display shows: The block before the current block, the current block and the block after the current block. CONTOUR This function simplifies programming of workpiece contours with the transfer of values directly from the drawing and graphic displays. You can select the following elements and combinations: • Line • Line - circle • Circle • Circle - line • Circle - circle • 2 - point definition • 2 - angle definition ADD. FUNCTION (Additional function) The additional functions (5th M Group) fixed by the machine tool manufacturer are grouped together in this function. Preselect: softkey „GUIDING“ AREA W-PIECE (Work piece area) You enter the simulation area, and the workpiece dimensions. COPY You copy a part program and re-enter it into memory under another program number. AXIAL You enter the setting data for the axes. CORR. BLOCK (Correction block) An error in the program is marked with the cursor (correction pointer). BLOCK END You select the character for „Block End (LF)“ via softkey. Preselect: „GUIDING“ softkey. CURRENT PRG PTR (current program pointer) The display shows the subroutine nesting with number of runs and actual block number of the subroutine. BLOCK NUMBER The block number is automatically generated by the control in steps of five. CURRENT VALUES The display shows the values valid for the current operating sequence. BLOCK SEARCH Block search makes it possible to start the operation at any point in the program. During block search, the same calculations are carried out as in normal program operation, however there is no axis movement. CYCLES The following are displayed: • The stored cycle numbers • The number of characters used • The free memory space Cycles are protected subroutines which can be called for frequently used technologies or for machinespecific operations (stock removal cycles, drilling cycles, tool change cycles). The values required are defined as parameter assignments before the cycles are called (cycle parameter assignment). BTR START not active CIRCLE You select the G functions for circular interpolation with this softkey. Preselect: „GUIDING“ softkey (operator prompting). G 1 EMCO WINNC SINUMERIK 810/820 T SURVEY PAGES DATA IMPORT Data import. EDIT EDIT leads to „SELECT PROGRAM“, „GUIDING“ and „SIMULATION“. Editing means: Input of a program into the memory or changing or altering a program already in the memory. DATA-IN START (Start data input) You start data input. DATA IN-OUT The data (part program, settable zero offsets, machine data, R parameters, tool offset, PLC program, PLC operator messages, PLC machine data, user programs) are read in from an external device (e.g. punched tape reader) or output to an external device (e.g. printer). Data input and output is handled via interface 1 or 2, drive A, B or C or printer. ETX START Output of the end of block character (end of text) EXT ZO not active FEED You select the G functions for the type of feed via softkey. Preselect: softkey „GUIDING“. GENERAL DATA Select the path for workpiece programs and actual language.. DATA OUT You select data output. You decide the data type with the subsequent softkeys. Using „START“ (in „PART PROGRAM“ with „MAINPRG. START“ or „SUBROUT. START“) you activate data output. G FUNCT. You select the G functions from groups G0 to G12 via softkeys. Preselect: „GUIDING“ softkey. DEC-SBL YES-NO (Decoding single block on-off) With „YES“, the blocks are processed single. The function is activatet at the end of the block in which decoding takes place with the signal present (program control). GUIDING The operator guiding (operator prompting) speeds up and simplifies the input of part programs. Apart from geometric functions (G function, contour definition) you can also input machining cycles and technological functions (feedrate, spindle speed) via softkeys. DELETE Using „DELETE“ you clear one or more part programs in the program memory. I/O Setting the serial interface. DELETE PRE-VER not active LINE You select the G functions for threading via softkeys. DIAGNOSIS All current alarms are displayed separately as NC alarms, PLC alarms, PLC alarms and PLC messages. Other displays are for service purposes. LIST OF TOOLS The location number and tool number of worn tools is displayed. DIRECTORY The following is displayed: • The stored part program numbers • The number of characters used • The free memory space MACH DATA not active MAINPRG. START (Main program start) You activate the output of part programs. DNC Setting of the serial DNC interface. MAIN PROGRAM The following is shown in the display which appears if you press this softkey: • the numbers of the main programs stored • the number of characters taken up in memory • the free memory capacity. After "DATA OUT" or "DATA IMPORT" you can select input or output of main programs with "MAIN PROGRAM" DRF ASSIGNM not active. DRF YES-NO not active. DRY RUN YES-NO With „YES“, the axes are traversed at the dry run feedrate, not the programmed feedrate. The dry run feedrate is set via setting data. G 2 EMCO WINNC SINUMERIK 810/820 T SURVEY PAGES MOVE not active PROG. HANDL. (Program handling) You can copy, rename and delete the program in the program memory. NC ALARM All current NC alarms are displayed. PROGRAM CONTROL (Influencing the program) The key leads to the following functions: • SKIP BLOCK • DRY RUN FEEDRATE • PROGRAMMED STOP • RAPID OVERRIDE • DECODING SINGLE BLOCK • DRF ENABLE • DRF HANDWHEEL NC MD (NC machine data) The NC machine data are displayed. OPS not active OPT. STOP YES-NO (Programmed stop ON-OFF) With „Yes“, the processing of the program is stopped at the point at which the „M01“ command is programmed. PROGRAM END You select the functions of the „M02“ (end of program) group via softkeys. OVERR. YES-NO not active PROGR. ZO. (Programmmable zero offset) Display or entering the zero offset values for G58 and G59. OVERSTORE You can change the value of the T, D, S, H, M word in the buffer memory. PART PROGRAM The „PART PROGRAM“ softkey leads to: • EDIT • CORR BLOCK • DIRECTORY • PROG HANDL This key is not used to select a program for processing. After „DATA OUT“, you can select program output with the softkey „PART PROGRAM“. RENAME You can change the program number. The program itself remains unchanged. REORG not active RESET Simulation is interrupted and returned to the reset state. PLANE Select the machining plane in simulation and contour definition. ROTAT ANGLE Input of the coordinate rotation for the single zero offsets G54-G57. PLC ALARM All current PLC alarms are displayed. R PARAMETER After „DATA OUT“, you can select the output of R parameters with the „R PARAMETER“ softkey. PLC BITS Display or altering the PLC bits. R PARAMETERS You input the R parameters as setting data. PLC M-DATA not active SCALE MODIF. (Scale modification) Input of setting data for scale modification. PLC MESSAGE All current PLC messages are displayed PLC STATUS The PLC status shows the current state of all inputs, outputs, flags, timers, counters and data words on the screen: • E = Input byte • A = Output byte • M = Flag byte • T = Timer • Z = Counter • DB = Data block • DW = Data word SELECT PROGRAM Call-up main program or subroutine. G 3 EMCO WINNC SINUMERIK 810/820 T SURVEY PAGES SETTING DATA Using setting data, the operator (user) fixes certain operating states. Setting data are adjustable for: • Programmable and settable zero offsets • External zero offsets • R parameters • Spindle data • Axial data • Scale modification • Data transfer • General data (setting data bits). STORE PLANE Planes defined via machine data (G17, G18, G19) or by manual input (G16) are stored as the basic plane with this softkey and used for further program execution („flexible plane selection“). STORE MENU Store the values entered and jump back to the main menu. SUBROUTINE (Subroutine) This softkey is used to display: • The stored subroutine numbers • The number of characters used • The free memory space SIMULATION To test the program the programmed movements are shown on the screen display. Programming errors are displayed as alarms. SUBROUT. START (Subroutine Start) Activation of output of subroutines via the universal interface. SINGLE BLOCK After „Program start“ only one block is processed. The next blocks is only processed after another operation of „Program Start“. SW VERSION This softkey is used for display the software version. SKIP YES-NO With „YES“ selected, the blocks marked with an oblique (/) are skiped during program processing (Program control). TEACHIN PL BACK not active SPECIAL BLOCK You select G04, G92, M19, G58, G50 and G51 with this softkey. THREAD Select the G functions for thread cutting with this softkey. SPECIAL FUNCT. The special functions M00, M01. (1st M Group) and M36, M37 (4th M Group) are grouped together in this function. TO AUTOM (Automatic tool offset) By traversing to the desired reference plane, the tool offset can be measured and stored. SPINDLE You select the M function for the spindle motion with this softkey. Preselect: „GUIDING“ softkey In "SETTING DATA": Enter the gear position of the PC TURN 50 with SPINDLE. TOOL OFFSET The tool offset takes into account the tool dimensions and wear. The tool offset is stored under a tool offset number, D1 to D99, in the tool offset memory. Via the „TOOL OFFSET“ softkey after „DATA OUT“, you select the output of tool offsets. START You activate the selected softkey function. UNLOCK not active STOP You stop the activated softkey function. WORK CYCLE (Machining cycle) Using a softkey you can select cycles for frequently occurring machining sequences. Preselect: „GUIDING“ softkey. STORE PRESET: GUIDING: not active store without leaving the menu STORE CHOICE Store the values entered and jump back to the selection menu. G 4 EMCO WINNC SINUMERIK 810/820 T SURVEY PAGES WORKING AREALIM (Working area limitation) The minimum and maximum working area limits of the defined axes appear in the display. You can modify the values displayed. ZERO OFFSET The settable zero offsets are input as setting data. Programmable and external zero offsets are displayed on the screen. After "DATA OUT" or "DATA IMPORT" you can select input or output of zero offsets with "ZERO OFFSET". ZO AUTOM (Automatic zero offset) By traversing to the desired reference plane, the zero offset can be measured and stored. G 5 G 6 REPOS JOG MDIAUTOM PRESET OVERSTORE DIAGNOSIS SETTING DATA TOOL OFFSET OVERSTORE ZO AUTOM TO AUTOM DIAGNOSIS PARTPROGRAM DATA IN-OUT SETTING DATA TOOL OFFSET DIAGNOSIS PROGRAM CONTROL SETTING DATA TOOL OFFSET DIAGNOSIS PARTPROGRAM DATA IN-OUT SETTING DATA TOOL OFFSET DELETE PRE-OFF STORE DATA OUT DATA IN START SELECT PROGRAM EDIT ETX. START see GUIDING GUIDING TEACHIN PL.BACK START ZEROOFFSET G55 G54 TOOL OFFSET PROGR. ZO ZERO OFFSET SIMULATION AREA W-PIECE SIMULATION CORR. BLOCK STOP MACH. DATA BTR. START G56 EXT. ZO E START G17 PLANE PLANE DIRECTORY ETX START PARTPROGRAM DATA IMPORT G57 R PARAMETERs SINGLE YES-NO STOP G18 PLANE SKIP YES-NO RESET G19 PLANE LOCK E OPT. STP YES-NO PROGR. CONTROL G16 PLANE UNLOCK CYCLE COPY STOP TOOL OFFSET I/O SETTING BITS SUBROUTINE SUBROUT. START R-PARAMETER DRF ASSIGNM SPINDLE MAINPROGRAM PROG.HANDL. MAINPRG. START PLCM-DATA STOP WORKING AREALIM AXIAL E SIMULATION BLOCK SEARCH STORE PLANE MOVE START RENAME MAIN PROGR. DNC PLC BITS ZEROOFFSET SCALE MODIF. ROTAT. ANGLE EMCO WinNC SINUMERIK 810T Softkey Menu Survey E SIMULATION DELETE SUBROUT. E GENERAL DATA E REORG STOP E EMCO WINNC SINUMERIK 810/820 T SURVEY PAGES G 7 REFPOINT INC FEED 1 ... 10 000 AUTOMATIC DIAGNOSIS PARTPROGRAM DATA IN-OUT SETTING DATA TOOL OFFSET OVERSTORE HAND WHEEL ZO AUTOM TO AUTOM DIAGNOSIS PARTPROGRAM DATA IN-OUT SETTING DATA TOOL OFFSET OPS OVERSTORE DIAGNOSIS PROGRAM CONTROL BLOCK SEARCH ACTUAL BLOCK PARTPROGRAM DATA IN-OUT SETTING DATA TOOL OFFSET NCALARM STORE X-AXIS SKIP YES-NO START E AXIAL DATA 1 GENERAL DATA AXIAL DATA 2 PLCSTATUS OVERR. YES-NO SPINDLE DATA SW VERSION DEC.-SBL YES-NO MACHINE BITS NC MD DRF YES- NO PLC MD DRF SERVICE AXIS function is not realized EMCO specific function (does not exist on SINUMERIK 810T) PLCMESSAGE OPT. STP YES-NO PLCALARM STORE Z-AXIS DRY YES-NO SERVICE SPINDLE SERVICE DRIVE EMCO WINNC SINUMERIK 810/820 T SURVEY PAGES G 8 G 62 G 247 G 248 G 60 G 147 G 148 LINE STORE MENU BLOCK END G 00 STORE LINE CIRCLE CIRCLE STORE CHOICE G 95 G 09 G 10 G 12 FEED G 11 G 13 G 48 G 63 G 56 PLANE G 97 BLOCK END G 110 PARAM. DELETE CIRCLE LINE G 96 G 348 G 347 G 64 G 55 G 42 G 90 BLOCK END G 35 G 34 G 33 G 09 THREAD CIRCLE LINE G 94 G 01 G 54 G 53 G 03 G 41 G 40 G 02 G 71 G FUNCT G 70 BLOCK NUMBER X-Y CIRCLE CIRCLE BLOCK END G 111 BLOCK END G 57 G 91 Z-X 2-POINT GEOM. PATH Y-Z 2-ANGLE STORE MENU CONTOUR DEFIN. PLANE STORE CHOICE STORE MENU STORE STORE MENU LONGIT. INT. ROUGH CONTOUR STORE CHOICE DRILL M 04 SPINDLE STORE CHOICE TRANSV. EXTERN FINISH CUT STORE MENU THREAD M 03 FEED PITCH LONGIT. EXT. ROUGH STOCK REMOVAL WORKCYCLE OUTSIDE LEFT G 59 G 92 M 19 RIGHT INTERN. INSIDE LEFT SWARF REMOVAL EXTERN. TAPER BLOCK END G 51 PROG. ZO LEFT EXTERN. INSIDE RIGHT LONGIT. INTERN. THREAD THREAD M 01 M 02 ADD. FUNCT. G 50 SCALE MODIF LEFT INTERN. TRANSV. INTERN. TAPER M 36 M 17 PROGRAM END Survey Guiding RIGHT EXTERN. OUTSIDE RIGHT CHIP BREAK. PITCH EXTERN. THREAD M 00 SPECIAL FUNCT. BLOCK END BLOCK END M 37 M30 BLOCK END EMCO WinNC SINUMERIK 810T BLOCK END G 58 G 04 UNDER CUTTING BLOCK END SPECIAL BLOCK FORM F STORE CHOICE TRANSV. INTERN COMP. MACHIN. FORM E GROOVE M 05 TOOL BLOCK END BLOCK END BLOCK END EMCO WINNC SINUMERIK 810/820 T SURVEY PAGES EMCO WINNC SINUMERIK 810/820 T ALARMS / MESSAGES H: Alarms and Messages Startup Alarms These alarms can occur only with starting WinNC or WinCTS. Baud rate: 110, 300, 600, 1200, 2400, 4800, 9600, 19200 Number of data bits: 7 or 8 Number of stop bits: 1 or 2 Parity: none, even or odd Remedy: Change the settings of the serial interface in the WINDOWS system control (connections). 0014 Serial interface ... not present Remedy: Select an existing serial interface. 0015- 0023 (various alarms) Remedy: Restart WINDOWS. If these alarm occur repeatedly,contactEMCO. 0024 Invalid entry for control keyboard interface in the profile ... Cause: The connection of the control keyboard in the file project.ini is invalid. Remedy: Setting with WinConfig 0025 Invalid entry for digitizer interface in the profile ... analogous to 0024 0026 Invalid entry for notebook option in the profile ... Cause: The notebook entry in the file project.ini is invalid. Remedy: Setting with WinConfig 0027 Error creating the start window Remedy: Restart WINDOWS. If this alarm occurs repeatedly,contactEMCO. 0028 Invalid entry for window representation in the profile ... Cause: The presentation entry in the file project.ini is invalid. Remedy: Setting with WinConfig 0029 Error initializing a timer Remedy: Close all other WINDOWS applications or restart WINDOWS. 0030 Windows 3.1 or higher required WinNC requires WINDOWS version 3.1 or higher. 0031 - 0036 (various alarms) see 0002 0001 Error creating the file ... Remedy: Check whether the directories exist, which are entered in the .INI files. Check whether writing access is possible to these directories. Check whether the disk is full. 0002 Error opening the file ... Remedy: Check whether the directories exist, which are entered in the .INI files. Check whether reading access is possible to these directories (number of simultaneous open files). Copy the correct file in the corresponding directory. 0003 Error reading the file ... see 0002. 0004 Error writing the file ... see 0001 0005 Too less RAM ... Remedy: Close other WINDOWS applications Restart WINDOWS 0006 Non compatible software version ... Remedy: Software update. 0007 Invalid licence version ... Remedy: Contact EMCO. 0011 Serial interface ... for digitizer is already in use Cause: The serial interface no. ... is already occupiedbyanotherdevice. Remedy: Remove the other device and connect the digitizer or define another serial interface for the digitizer. 0012 Serial interface ... for control keyboard is already in use analogous to 0011 0013 Invalid settings for serial interface ... Cause: The actual settings of the serial interface are not allowed for WinNC. Allowed settings: H 1 EMCO WINNC SINUMERIK 810/820 T ALARMS / MESSAGES 0037 Memory allocation failure Remedy: Close all other WINDOWS applications or restart WINDOWS. 0038 Unauthorized software version Contact EMCO. 0039 Project data non compatible to software version Possible error after updates, contact EMCO. 0040 Invalid entry for DNC interface in the profile ... Cause: The DNC entry in the file project.ini is invalid. Remedy: Setting with WinConfig 0100 Mailslot could not be created Cause: Insufficient memory in the memory area below 640 kB. Remedy: Close all other applications, restart WINDOWS. If this is not successfull, remove not necessary device and drivers entries in config.sys or load them in the upper memory area. 0101 For WinCTS Windows for Workgroups 3.11 or higher is required WinCTS requires WINDOWS for WORKGROUPS version 3.11 or higher. 0102 Error creating the reference table for keybitmaps Remedy: Restart WINDOWS. If this alarm occurs repeatedly,contactEMCO. 0103 Invalid entry for WinCTS status in the profile ... Cause: The CTS entry in the file project.ini is invalid. Remedy: ContactEMCO 0104 Error getting the workgroup name Remedy: Restart WINDOWS. If this alarm occurs repeatedly,contactEMCO. 0105 No workgroup found Remedy: Insert the computer into the workgroup for WinCTS, if necessary set up a workgroup for the WinCTS computers. 0106 Invalid entry for the number of keys to record in the profile ... Cause: The KeyFifoSize entry in the file winnc.ini is invalid. Remedy: Correct the number, e.g. 50(see WinConfig). 0107 - 0110 (various alarms) Remedy: Restart WINDOWS. If this alarm occurs repeatedly,contactEMCO. Control Alarms These alarms can occur only with operating and programming the control functions or with running CNC programs. 16 Parity error (RS232) Cause: data I/O: data transmition error character overflow Remedy: set same parity for sender and receiver 17 Overflow error (RS232) Cause: data I/O: data transmition error parity 18 Frame error (RS232) Cause: data I/O: data transmition error data frame Remedy: ev. set same configuration for both RS232 30 PP memory overflow (RS232) Cause: data I/O: unknown data type, error data 32 Data format error (RS232) Cause: data I/O: error while opening file 1040 ORDxx DAC limit X Cause: step motor in X felt out of pace Remedy: e.g. select lower feed or chip cross section, check slides for smooth running, approach reference point 1041 ORDxx DAC limit Y see alarm 1040 1042 ORDxx DAC limit Z see alarm 1040 1480 ORDxx SW overtravel switch X Cause: software end switch in X overtravelled Remedy: traverse back manually 1481 ORDxx SW overtravel switch Y see alarm 1480 1482 ORDxx SW overtravel switch Z see alarm 1480 1560 Nxxxx Set speed to high/low Cause: too high/low S-value Remedy: correct program, enter belt gage in setting data 2040 Block not in memory Cause: Block search target not found Remedy: correctprogram 2041 CNC program not foand Cause: NC Program (subroutine, contour routine) not found; with NC start no program was selected Remedy: correct call up or create program H 2 EMCO WINNC SINUMERIK 810/820 T ALARMS / MESSAGES 2046 Block greater than 120 characters Cause: NC block is too long (with loading a program) Remedy: divide NC block in several blocks with DOS editor 2076 Nxxxx Wrong G02/G03 Cause: wrong rotational direction for tangential draft arc-line programmed Remedy: correctprogram 2077 Nxxxx Incorrect block sequence Cause: chamfer/radius: no 2. traverse block was programmed Remedy: correctprogram 2048 Nxxxx Circle end point error Cause: invalid circle, invalid circle centre, radius too small Remedy: correctprogram 2081 Nxxxx CRC not allowed Cause: thread,changeofcorrectiondirection/mirror axis/tool correction not allowed with CRC, circle not in selected CRC plane, change of plane while CRC Remedy: correctprogram 2060 Nxxxx Pogramming error TO, ZO Cause: D number too great, tool type not allowed Remedy: correctprogram 2061 Nxxxx General program error Cause: NC block structure wrong, block number, M/H/Gcodenotallowed,invalidcombinationofGcommands,radius/dwellprogrammedtwice,dwelltimetoolong,circlealready programmed, general block structure error withcalculatingoperation Remedy: correctprogram 2082 Nxxxx CRC not determinable Cause: plane change CRC not allowed, invalid contourelement,contourviolationfullcircle, contour element too short Remedy: correctprogram 2160 Nxxxx Scale factor not allowed 2062 Nxxxx Feed missing / not progr. Cause: F value too great, attempt to start with F=0, also with G95/96, if S=0 or M5 Remedy: correctprogram 2171 Nxxxx Approach not possible Cause: no tool correction, tool radius = 0 (CRC) Remedy: select tool, enter tool radius in tool data 2172 Nxxxx Retract not possible Cause: error with selection CRC Remedy: correctprogram 2063 Nxxxx Thread lead to high Cause: thread pitch too great / missing, feed with threads reaches 80% of rapid speed Remedy: correct program, smaller pitch or lower speed with threads 2501 ORDxx Synchronisation-error AC Remedy: RESET, report to EMCO if repeatable 2502 ORDxx Synchronisation-error AC Remedy: RESET, report to EMCO if repeatable 2065 Nxxxx Pos behind SW overtr. switch Cause: target point programmed out of software end switch or circle path overtravels software end switch Remedy: correctprogram 2503 ORDxx Synchronisation-error AC Remedy: RESET, report to EMCO if repeatable 2504 ORDxx Insuff. RAM for interpreter Cause: not enough RAM memory, continuation of the program not possible Remedy: close all other WINDOWS applications, ceaseprogram,removeresidentprograms (from AUTOEXEC.BAT and CONFIG.SYS), restart PC 2068 Nxxxx Pos behind working area Cause: targetpointprogrammedoutofworkingarea Remedy: correctprogram 2072 Nxxxx Incorrect input value Cause: chamfer/radius too large Remedy: correctprogram 2505 ORDxx Insuff. RAM for interpreter see 2504 2073 Nxxxx No intersection point Cause: no intersection point with contour definition arc-line Remedy: correctprogram 2506 ORDxx Insufficient RAM see 2504 2074 Nxxxx Wrong angle value Cause: no contour draft is possible with that angle Remedy: correctprogram 2507 ORDxx Referencepoint not active Remedy: approachreferencepoint 2508 ORDxx Intenal error NC core Remedy: RESET, report to EMCO if repeatable 2075 Nxxxx Incorrect radius value Cause: wrong circle centre point or radius Remedy: correctprogram H 3 EMCO WINNC SINUMERIK 810/820 T ALARMS / MESSAGES 2520 ORDxx RS485 device absent Cause: With program start not all necessary RS485 participant were present or while program run a participant failed. (AC) Axis controller (SPS) PLC (MT) Controlkeyboard Remedy: switch on RS485 participant (machine, control keyboard), check cables and connectors, check terminator plug, report to EMCO if repeatable 2550 ORDxx PLC simulation error Remedy: reporttoEMCOifrepeatable 2551 ORDxx PLC simulation error Remedy: reporttoEMCOifrepeatable 2562 Read error on CNC program Cause: error of program file, disk or hard disk error Remedy: solve problem on DOS level, eventually reinstall software 2614 Nxxxx Internal error MSD Remedy: reporttoEMCOifrepeatable 2521 ORDxx RS485 communication error Remedy: switch off / on the PC, report to EMCO if repeatable 2650 Nxxxx Wrong Cycle-Call Cause: invalid cycle call, if cycle will be called with Gcode Remedy: reporttoEMCOifrepeatable 2522 ORDxx RS485 communication error Cause: internal error Remedy: switch on/off PC, report to EMCO if repeatable 2849 Nxxxx Internal error CRC Remedy: reporttoEMCOifrepeatable 2904 Nxxxx Helix Z path too large The angle between the helix and the tangent to the arc must be less than 45°. Remedy: correctprogram 2523 ORDxx INIT error on RS485 PC-board see "Installation of the Software, Mistakes with Installation of the Software" 2524 ORDxx Gen.-Failure RS485 PC-board Remedy: switch off/on PC, report to EMCO if repeatable 3000 Nxxxx General Program error Cause: no circle parameter programmed, wrong plane for circle (G17/18/19), chamfer/ radius/thread pitch already programmed, thread pitch missing, ... Remedy: correctprogram 2525 ORDxx Transmit error RS485 Remedy: checkRS485cablesandconnectors,check terminator plug, check for external electromagneticinterferences 3001 Nxxxx More than 5 geomety parameter Cause: wrong parameter for contour draft Remedy: correctprogram 2526 ORDxx Transmit error RS485 see 2525 3002 Nxxxx Polar/radius error Cause: No centre point specified, centre point in wrong plane (G17/18/19) Remedy: correctprogram 2527 ORDxx Internal error AC Remedy: switch off/on machine, report to EMCO if repeatable 2528 ORDxx Operating system error PLC Remedy: switch off/on machine, report to EMCO if repeatable 3003 Nxxxx Invalid address The entered address is not allowed. Remedy: correctprogram 2529 ORDxx External keyboard error Remedy: The control keyboard must be switched on after the PC when it is connected to RS232, switch off/on external keyboard,reportto EMCOifrepeatable 3004 Nxxxx CL800 Error Cause: generalcycleerrorwithcyclelanguageCL800, wrong parameter, invalid value, incorrect contour program, M17 in contour program missing Remedy: correctprogram 2540 ORDxx Error on storing setting-data Cause: hard disk full, wrong path determined, missing write access Remedy: check hard disk, if repeatable reinstall software 3005 Nxxxx Contour definition error Cause: novalidcontourdraftwiththeprogrammed coordinates, invalid parameter, invalid values Remedy: correctprogram 2545 ORDxx Drive / Device not ready Remedy: insert disk, close drive 2546 ORDxx Checksum error machine-data Remedy: reporttoEMCOifrepeatable H 4 EMCO WINNC SINUMERIK 810/820 T ALARMS / MESSAGES 3006 Nxxxx Wrong block structure Cause: too much M/H/T/D/S/G commands in one block, G commands of the same group twiceprogrammedinblock,circlewithmore than 2 axes or polar coordinate centre point with more than 2 axes, scale factor programmed twice in a block, change of plane / zero offset / tool change / mirror while contour draft, no valid contour draft with the programmed addresses Remedy: correctprogram 4103 Nxxxx Tool to wide Remedy: L93: use other tool 3008 Nxxxx Subroutine error Cause: subroutine counter invalid subroutine end with M30 nesting depth override Remedy: correct subroutine counter program M17, max. 4 subroutines nested 4180 Nxxxx Option not available ! Remedy: order option (L841, L94) 4120 Nxxxx Spindle rotat. dir. n. progr. Remedy: L94: program spindle direction 4121 Nxxxx Spindle not in tol. range 4122 Nxxxx Calculated feed too large Remedy: L841: reduce feed 4140 Nxxxx Fin. part diam. too small Remedy: alter program 4200 Nxxxx Check definition of R Remedy: correct R32 6000 - 7999 Machine alarms see "Machine Alarms" 3011 Nxxxx To many axes/axis twice Cause: the position (axis) was already programmed,toomuchaxeswithblockwiththread/ mirror Remedy: correctprogram 8004 ORDxx Failure main-drive unit 8005 - 8009 ORDxx Internal error AC Remedy: reporttoEMCOifrepeatable 8010 ORDxx Syncr. error main drive Cause: synchronisation mark missing for main drive Remedy: report to service technician, if repeatable 3012 Nxxxx Block not in memory Cause: program end without M30, jump target not found Remedy: correctprogram 8011 - 8013 ORDxx Internal error AC Remedy: report to EMCO, if repeatable 3021 Nxxxx CRC contour error Cause: The tool radius is too large in relation to the smallest contour element, contour violation with full circle, programmed arc radius smaller than the tool radius Remedy: correctprogram 8014 ORDxx Decel.-time of axis too high Remedy: report to service technician, if repeatable 8018 ORDxx Internal error AC Remedy: report to EMCO, if repeatable 8021 ORDxx Internal error AC Remedy: report to EMCO, if repeatable 3042 Wrong picture Remedy: switch off / on the PC, reprot to EMCO if repeatable 8022 ORDxx Internal error AC Remedy: report to EMCO, if repeatable 3049 Wrong simulation area Cause: With graphik simulation no or an invalid simulation area was put in Remedy: put in/correct simulation area 8023 ORDxx Invalid Z value for helix Cause: The Z value of the helix must be smaller than the length of the arc to be traversed Remedy: Program correction 3081 Nxxxx CRC not selected for approaching Cause: With soft approaching / leaving a contour G41 or G42 must be active Remedy: correctprogram 8100 Fatal init error AC Cause: Internal error Remedy: Restart software or reinstall when necessary, report to EMCO, if repeatable. 4100 Nxxxx No D-number active Cause: cycle alarm: no tooloffset active Remedy: activate tool correction (D) 8101 Fatal init error AC 4101 Nxxxx Cutter radius = 0 Remedy: enter cutter radius 8102 Fatal init error AC see 8101. 4102 Nxxxx Cutter radius too large Remedy: correct cutter radius 8103 Fatal init error AC see 8101. see 8101. H 5 EMCO WINNC SINUMERIK 810/820 T ALARMS / MESSAGES 8104 Fatal system error AC see 8101. 8122 Internal AC mailbox overrun Cause: Internal error Remedy: Restart software or reinstall when necessary, report to EMCO, if repeatable. 8105 Fatal init error AC see 8101. 8123 Open error on record file Cause: Internal error Remedy: Restart software or reinstall when necessary, report to EMCO, if repeatable. 8106 No PC-COM card found Cause: PC-COM board can not be accessed (ev. notmounted). Remedy: Mount board, adjust other address with jumper 8124 Write error on record file Cause: Internal error Remedy: Restart software or reinstall when necessary, report to EMCO, if repeatable. 8107 PC-COM card not working see 8106. 8108 Fatal error on PC-COM card see 8106. 8109 Fatal error on PC-COM card see 8106. 8125 Invalid memory for record buffer Cause: Insufficient RAM, record time exceeding. Remedy: Restart software, ev. remove drivers etc. to gain more RAM, reduce record time. 8110 PC-COM init message missing Cause: Internal error Remedy: Restart software or reinstall when necessary, report to EMCO, if repeatable. 8126 AC Interpolation overrun Cause: Ev. insufficient computer performance. Remedy: Set a longer interrupt time in WinConfig. This may result in poorer path accuracy. 8111 Wrong configuration of PC-COM see 8110. 8127 Insufficient memory Cause: Insufficient RAM Remedy: Close other programs, restart software, ev. remove drivers etc. to gain more RAM. 8113 Invalid data (pccom.hex) see 8110. 8128 Invalid message to AC Cause: Internal error Remedy: Restart software or reinstall when necessary, report to EMCO, if repeatable. 8114 Programming error on PC-COM see 8110. 8115 PC-COM packet acknowledge missing see 8110. 8129 Invalid MSD data - axisconfig. see 8128. 8116 PC-COM startup error see 8110. 8130 Internal init error AC see 8128. 8117 Fatal init data error (pccom.hex) see 8110. 8130 Internal init error AC see 8128. 8118 Fatal init error AC see 8110, ev. insufficient RAM memory 8132 Axis accessed by multiple channels see 8128. 8119 PC interrupt no. not valid Cause: The PC interrupt number can not be used. Remedy: Find out free interrupt number in the Windows95 system control (allowed: 5,7,10, 11, 12, 3, 4 und 5) and enter this number in WinConfig. 8133 Insufficient NC block memory AC see 8128. 8134 Too much center points programmed see 8128. 8120 PC interrupt no. unmaskable see 8119 8135 No centerpoint programmed see 8128. 8121 Invalid command to PC-COM Cause: Internal error or defective cable Remedy: Check cables (screw it); Restart software or reinstall when necessary, report to EMCO, if repeatable. 8136 Circle radius too small see 8128. H 6 EMCO WINNC SINUMERIK 810/820 T ALARMS / MESSAGES 8137 Invalid for Helix specified Cause: Wrong axis for helix. The combination of linear and circular axes does not match. Remedy: Program correction. 8158 Bero width too large (referencing) see 8142 or Bero hardware error (contact EMCO Service). 8159 Function not implemented Bedeutung: In normal operation this function can not beexecuted 8140 Maschine (ACIF) not responding Cause: Machine off or not connected. Remedy: Switch on machine or connect. 8160 Axis synchronization lost axis 3..7 Cause: Axis spins or slide is locked, axis synchronisation was lost Remedy: Approachreferencepoint 8141 Internal PC-COM error Cause: Internal error Remedy: Restart software or reinstall when necessary, report to EMCO, if repeatable. 8164 Software limit switch max axis 3..7 Cause: Axis is at traverse area end Remedy: Retract axis 8142 ACIF Program error Cause: Internal error Remedy: Restart software or reinstall when necessary, report to EMCO, if repeatable. 8168 Software limit overtravel axis 3..7 Cause: Axis is at traverse area end Remedy: Retract axis 8143 ACIF packet acknowledge missing see 8142. 8172 Communication error to machine Cause: Internal error Remedy: Restart software or reinstall when necessary, report to EMCO, if repeatable. Check connection PC - machine, eventually eliminate distortion sources. 8144 ACIF startup error see 8142. 8145 Fatal init data error (acif.hex) see 8142. 8146 Multiple request for axis see 8142. 8173 INC while NC program is running 8174 INC not allowed 8147 Invalid PC-COM state (DPRAM) see 8142. 8175 MSD file could not be opened Cause: Internal error Remedy: Restart software oder bei Bedarf neu installieren, report to EMCO, if repeatable. 8148 Invalid PC-COM command (CNo) see 8142. 8149 Invalid PC-COM command (Len) see 8142. 8176 PLS file could not be opened see 8175. 8150 Fatal ACIF error see 8142. 8177 PLS file could not be accessed see 8175. 8151 AC Init Error (missing RPG file) see 8142. 8178 PLS file could not be written see 8175. 8152 AC Init Error (RPG file format) see 8142. 8179 ACS file could not be opened see 8175. 8153 FPGA program timeout on ACIF see 8142. 8180 ACS file could not be accessed see 8175. 8154 Invalid Command to PC-COM see 8142. 8181 ACS file could not be written see 8175. 8155 Invalid FPGA packet acknowledge see 8142 or hardware error on ACIF board (contact EMCO Service). 8182 Gear change not allowed 8183 Gear too high 8184 Invalid interpolaton command 8156 Sync within 1.5 revol. not found see 8142 or Bero hardware error (contact EMCO Service). 8185 Forbidden MSD data change see 8175. 8157 Data record done see 8142. 8186 MSD file could not be opened see 8175. H 7 EMCO WINNC SINUMERIK 810/820 T ALARMS / MESSAGES 8187 PLC program error see 8175. 8208 Invalid application message see 8199. 8188 Gear command invalid see 8175. 8211 Feed too high (thread) Cause: Thread pitch too large / missing, Feed for thread reaches 80% of rapid feed Remedy: Program correction, lower pitch or lower spindle speed for thread 8189 Invalid channel assignement see 8175. 8190 Invalid channel within message 9001 unknown parameter ! Cause: SPS diagnosis, unknown parameter entered 8191 Invalid jog feed unit 8192 Invalid axis in command 9002 Par.-number not allowed ! Cause: SPS diagnosis, unknown parameter numberentered 8193 Fatal PLC error see 8175. 8194 Thread without length 9003 unknown display-format ! SPS-diagnosis 8195 No thread slope in leading axis Remedy: Program thread pitch 9004 DB not existant ! SPS-diagnosis 8196 Too manny axis for thread Remedy: Program max. 2 axes for thread. 9005 DW not existant ! SPS-diagnosis 8197 Thread not long enough Cause: Thread length too short. With transition from one thread to the other the length of the second thread must be sufficient to produce a correct thread. Remedy: Longer second thread or replace it by a linear interpolation (G1). 9006 Invalid COM-port ! SPS-diagnosis 9007 Data-transmition activ ! dataI/O 9011 No files found ! dataI/O 8198 Internal error (to manny threads) see 8175. 9014 File already exists ! 8199 Internal error (thread state) Cause: Internal error Remedy: Restart software or reinstall when necessary, report to EMCO, if repeatable. dataI/O 9015 Error while opening file ! dataI/O 9016 Error while reading file ! data I/O: error while opening a file 8200 Thread without spindle on Remedy: Switch on spindle 9017 Error while writing file ! data I/O: error while writing a file 8201 Internal thread error (IPO) see 8199. 9018 Invalid COM configuration ! dataI/O 8201 Internal thread error (IPO) see 8199. 9019 No digitizer initial data foand ! Cause: a digitizer was set, but not calibrated Remedy: calibrate digitizer (set edge points), see "External Input Devices" 8203 Fatal AC error (0-ptr IPO) see 8199. 8204 Fatal init error: PLC/IPO running see 8199. 9020 No valid input ! Cause: digitizer was activated on invalied field 8205 PLC Runtime exceeded Cause: Insufficient computer performance 8206 Invalid PLC M-group initialisation see 8199. 9021 COM-port is already used ! Cause: Anotherdeviceisalreadyconnectedtothis COM port. 8207 Invalid PLC machine data see 8199. 9022 Digitizer not connected Remedy: Connect digitizer, switch on ... H 8 EMCO WINNC SINUMERIK 810/820 T ALARMS / MESSAGES 9023 Control keyboard not connected Remedy: Connect control keyboard, switch on ... Machine Alarms These alarms are released by the machine. The alarms are different for the PC TURN 50/55 and the PC TURN 120/125/155. The alarms 6000 - 6999 normally must be acknowledged with RESET. The alarms 7000 - 7999 are messages which will disappear usually when the alarm releasing situation is eliminated. 9024 General RS232 communication error Remedy: Correct settings of the serial interface. 9500 Invalid memory for program Cause: the PC has not enough free RAM Remedy: Close all other WINDOWS applications, eventually remove resident programs from RAM, restart PC PC TURN 50/55 The following alarms are valid for the PC TURN 50/55. 9501 Error while saving program Cause: disk full? 9502 Too less memory (loading prog.) see 9500 6000: EMERGENCY OFF The EMERGENCY OFF key was pressed. Remove the endangering situation and restart machine and software. 9508 Selected menu not found Remedy: report to EMCO, if repeatable 9509 Too less memory for picture Remedy: report to EMCO, if repeatable 6001: CYCLE TIME EXCEEDS LIMIT Contact EMCO Service. 9510 Mem.-fail. block-search buffer Remedy: report to EMCO, if repeatable 6002: NO PLC PROGRAM LOADED Contact EMCO Service. 9511 Projection error block search Remedy: report to EMCO, if repeatable 6003: DB NOT EXISTENT Contact EMCO Service. 9540 Error in BFM / BFM not foand Remedy: report to EMCO, if repeatable 6004: RAM ERROR ON PLC BOARD Contact EMCO Service. 6009: FAILURE SAFETY CIRCUIT Defective door limit switch or main contactor. Operating the machine is not possible. Contact EMCO Service. 6010: X-AXIS NOT READY Step motor board defective or too hot, 24 V fuse defective. Check fuses and switch box fan filter. Contact EMCO Service. 6011: Y-AXIS NOT READY see 6010. 6012: Z-AXIS NOT READY see 6010. 6013: MAIN DRIVE NOT READY Main drive power supply defective, cable defective, fuse defective. Check fuse. Contact EMCO service. 6014: NO SPEED FOR MAIN SPINDLE This alarm will be released, when the spindle speed is lower than 20 rpm because of overload. Alter cutting data (feed, infeed, spindle speed). H 9 EMCO WINNC SINUMERIK 810/820 T ALARMS / MESSAGES 6019: VICE TIMEOUT 24 V fuse defective, hardware defective. Contact EMCO service. 6048: DIVIDING TIME EXCEEDED Dividing head stucks, insufficient pressured air supply, hardwaredefective. Check for collision, check pressured air supply or contact EMCO service. 6020: VICE FAILURE 24 V fuse defective, hardware defective. Contact EMCO service. 6049: INTERLOCKING TIME EXCEEDED see 6048 6024: DOOR NOT CLOSED The door was opened while a machine movement. The program will be aborted. 6050: FAILURE DIVIDING DEVICE Hardware defective. Contact EMCO service. 6025: GEARBOX COVER NOT CLOSED The gearbox cover was opened while a machine movement. A running CNC program will be aborted. Close the cover to continue. 7000: INVALID TOOL NUMBER The CNC program will be stopped. Interrupt program with RESET and correct the program. 6027: DOOR LIMIT SWITCH DEFECTIVE The limit switch of the automatic door is displaced, defective,wrongcabled. Contact EMCO service. 7007: FEED HOLD In the robotic mode a HIGH signal is at input E3.7. Feed Stop is active until a low signal is at E3.7. 6028: DOOR TIMEOUT The automatic door stucks, the pressured air supply is insufficient, the limit switch is displaced. Check door, pressured air supply, limit switch or contact EMCO service. 7017: GO FOR REFERENCE POINT Approach the reference point. 7040: DOOR OPEN The main drive can not be switched on and NC-Start can not be activated. Some accessories can be operated only with open machine door. Close the machine to run a program. 6030: NO PART CLAMPED No workpiece inserted, vice cheek displaced, control cam displaced, hardware defective. Adjust or contact EMCO service. 6041: TOOL CHANGE TIMEOUT Tool turret stucks (collision?), 24 V fuse defective, hardwaredefective. A running CNC program will be stopped. Check for a collision or contact EMCO service. 7043: PIECE COUNT REACHED A predetermined number of program runs was reached. NC-Start is locked. Reset the counter to continue. 7050: NO PART CLAMPED After switching on or after an alarm the vice is neither at the open position nor at the closed position. NC-Start is locked. Traverse the vice manually on a valid end position. 6042: TOOL CHANGE TIMEOUT see 6041. 6043: TOOL CHANGE TIMEOUT see 6041. 7051: DIVIDING DEVICE NOT INTERLOCKED After switching on or after an alarm the dividing head is not in a lock position. NC-Start is locked. 6044: TOOL TURRET SYNC ERROR Hardware defective. Contact EMCO service. 6046: TOOL TURRET SYNC MISSING Hardware defective. Contact EMCO service. H 10 EMCO WINNC SINUMERIK 810/820 T ALARMS / MESSAGES PC TURN 120/125/155 The following alarms are valid for the PC TURN 120/125/155. 6013: MAIN DRIVE NOT READY Main drive power supply defective or main drive too hot, fuse defective, over- or undervoltage from mains. A running program will be stopped, the auxilliary drives will be switched off. Check fuses or contact EMCO Service. 6000: EMERGENCY OFF The EMERGENCY OFF key was pressed. The reference position will be lost, the auxiliary drives will be switched off. Remove the endangering situation and restart machine and software. 6001: PLC-CYCLE TIME EXCEEDING The auxiliary drives will be switched off. Contact EMCO Service. 6014: NO MAIN SPINDLE SPEED This alarm will be released, when the spindle speed is lower than 20 rpm because of overload. Alter cutting data (feed, infeed, spindle speed). The CNC program will be aborted, the auxiliary drives will be switched off. 6002: PLC - NO PROGRAM CHARGED The auxiliary drives will be switched off. Contact EMCO Service. 6024: MACHINE DOOR OPEN The door was opened while a machine movement. The program will be aborted. 6003: PLC - NO DATA UNIT The auxiliary drives will be switched off. Contact EMCO Service. 6040: TOOL TURRET INDEX FAILURE The tool turret is in no locked position, tool turret sensor board defective, cabling defective, fuse defective. A running CNC program will be stopped. Swivel the tool turret with the tool turret key, check fuses or contact EMCO service. 6004: PLC - RAM MEMORY FAILURE The auxiliary drives will be switched off. Contact EMCO Service. 6041: TOOL CHANGE TIMEOUT Tool drum stucks (collision?), fuse defective, hardwaredefective. A running CNC program will be stopped. Check for collisions, check fuses or contact EMCO service. 6008: MISSING CAN SUBSCRIBER Check fuses or contact EMCO Service. 6009: SAFETY CIRCUIT FAULT Defective step motor system. A running CNC program will be interrupted, the auxiliary drives will be stopped, the reference position will be lost. Contact EMCO Service. 6043: TOOL CHANGE TIMEOUT Tool drum stucks (collision?), fuse defective, hardwaredefective. A running CNC program will be stopped. Check for collisions, check fuses or contact EMCO service. 6010: DRIVE X-AXIS NOT READY The step motor board is defective or too hot, a fuse is defective, over- or undervoltage from mains. A running program will be stopped, the auxiliary drives will be switched off, the reference position will be lost. Check fuses or contact EMCO service. 6046: TOOL TURRET ENCODER FAULT Fuse defective, hardware defective. Check fuses or contact EMCO service. 6048: CHUCK NOT READY Attempt to start the spindle with open chuck or without clamped workpiece. Chuck stucks mechanically, insufficient pressured air supply, fuse defective, hardware defective. Check fuses or contact EMCO service. 6011: DRIVE Y-AXIS NOT READY see 6010. 6012: DRIVE Z-AXIS NOT READY see 6010. 6049: COLLET NOT READY see 6048 H 11 EMCO WINNC SINUMERIK 810/820 T ALARMS / MESSAGES 7018: TURN KEY SWITCH With NC-Start the key switch was in position "setting operation". NC-Start is locked. Turn the key switch in the position "automatic" to run a program. 6050: M25 DURING SPINDLE ROTATION With M25 the main spindle must stand still (consider run-out time, evtl. program a dwell) 6055: NO PART CLAMPED This alarm occurs when with rotating spindle the clampingdeviceorthetailstockreachtheendposition. The workpiece has been pushed out of the chuck or has been pushed into the chuck by the tailstock. Check clamping device settings, clamping forces, alter cutting data. 7020: SPECIAL OPERATION MODE ACTIVE Specialoperationmode:Themachinedoorisopened, the auxiliary drives are switched on, the key switch is in position "setting operation" and the consent key is pressed. Manual traversing the axes is possible with open door. Swivelling the tool turret is possible with open door. Running a CNC program is possible only with standing spindle (DRYRUN) and SINGLE block operation. For safety: If the consent key is pressed for more than 40 sec. the function of this key is interrupted, the consent key must be released and pressed again. 6056: QUILL NOT READY Attempt to start the spindle or to move an axis or to swivel the tool turret with undefined tailstock position. Tailstock is locked mechanically (collision), insufficient pressured air supply, fuse defective, magnetic switch defective. Check for collisions, check fuses or contact EMCO service. 7021: TOOL TURRET NOT LOCKED The tool turret operating was interrupted. NC start and spindle start are locked. Press the tool turret key in the RESET status of the control. 6057: M20/M21 DURING SPINDLE ROTATION With M20/M21 the main spindle must stand still (consider run-out time, evtl. program a dwell) 6058: M25/M26 DURING QUILL FORWARD ToactuatetheclampingdeviceinanNCprogramwith M25 or M26 the tailstock must be in back end position. 7038: LUBRICATION SYSTEM FAULT The pressure switch is defective or gagged. NC-Start is locked. This alarm can be reset only by switching off and on the machine. Contact EMCO service. 6064: AUTOMATIC DOOR NOT READY Door stucks mechanically (collision), insufficient pressured air supply, limit switch defective, fuse defective. Check for collisions, check fuses or contact EMCO service. 7039: LUBRICATION SYSTEM FAULT Not enough lubricant, the pressure switch is defective. NC-Start is locked. Checkthelubricantandlubricatemanuallyorcontact EMCO service. 7000: INVALID TOOL NUMBER PROGRAMMED The tool position was programmed larger than 8. The CNC program will be stopped. Interrupt program with RESET and correct the program. 7040: MACHINE DOOR OPEN The main drive can not be switched on and NC-Start cannotbeactivated(exceptspecialoperationmode) Close the machine to run a program. 7016: SWITCH ON AUXILIARY DRIVES The auxiliary drives are off. Press the AUX ON key for at least 0.5 sec. (to avoid accidentally switching on) to switch on the auxiliary drives (also a lubricating pulse will be released). 7042: INITIALIZE MACHINE DOOR Every movement and NC-Start are locked. Open and close the machine door to initialize the safety circuits. 7043: PIECE COUNT REACHED A predetermined number of program runs was reached. NC-Start is locked. Reset the counter to continue. 7017: REFERENCE MACHINE Approach the reference point. When the reference point is not active, manual movements are possible only with key switch at position "setting operation". H 12 EMCO WINNC SINUMERIK 810/820 T ALARMS / MESSAGES 7048: CHUCK OPEN This message shows that the chuck is open. It will disappear if a workpiece will be clamped. 7049: CHUCK - NO PART CLAMPED No part is clamped, the spindle can not be switched on. 7050: COLLET OPEN This message shows that the collet is open. It will disappear if a workpiece will be clamped. 7051: COLLET - NO PART CLAMPED No part is clamped, the spindle can not be switched on. 7052: QUILL IN UNDEFINED POSITION The tailstock is in no defined position. All axis movements, the spindle and the tool turret are locked. Drive the tailstock in back end position or clamp a workpiece with the tailstock. 7053: QUILL - NO PART CLAMPED The tailstock reached the front end position. Traverse the tailstock back to the back end position to continue. H 13 EMCO WINNC SINUMERIK 810/820 T ALARMS / MESSAGES H 14