1
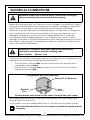
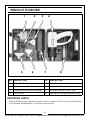
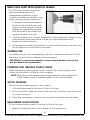
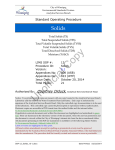
HOT AIR GUN
MODEL NO: CHG2000B
PART NO: 3400755
USER INSTRUCTIONS
GC0314
INTRODUCTION
Thank you for purchasing this CLARKE Hot Air Gun.
Before attempting to use this product, please read this manual thoroughly and
follow the instructions carefully. In doing so you will ensure the safety of yourself
and that of others around you, and you can look forward to your purchase
giving you long and satisfactory service.
GUARANTEE
This product is guaranteed against faulty manufacture for a period of 12
months from the date of purchase. Please keep your receipt which will be
required as proof of purchase.
This guarantee is invalid if the product is found to have been abused or
tampered with in any way, or not used for the purpose for which it was
intended.
Faulty goods should be returned to their place of purchase, no product can
be returned to us without prior permission. This guarantee does not effect your
statutory rights.
GENERAL SAFETY RULES
WARNING: WHEN USING ELECTRIC TOOLS, BASIC SAFETY PRECAUTIONS
SHOULD ALWAYS BE FOLLOWED TO REDUCE THE RISK OF FIRE, ELECTRIC
SHOCK AND PERSONNAL INJURY INCLUDING THE FOLLOWING. READ ALL
THESE INSTRUCTIONS BEFORE ATTEMPTING TO OPERATE THIS PRODUCT
AND SAVE THESE INSTRUCTIONS FOR FUTURE REFERENCE.
GENERAL SAFETY IN THE WORKPLACE
1. ALWAYS ensure that air can circulate around the hot air gun and that the
air vents are unobstructed.
2. ALWAYS keep work area clean & tidy. Cluttered work areas and benches
invite accidents.
3. NEVER over-reach. Keep proper footing and balance at all times.
4. NEVER store equipment in a wet/damp environment or expose to rain.
5. ALWAYS ensure the workplace is well lit. Ensure that lighting is placed so
that you will not be working in your own shadow.
2
Parts & Service: 020 8988 7400 / E-mail: [email protected] or [email protected]
6. KEEP other persons away. Do not let persons, especially children, not
involved in the work, touch the tool or extension cable and keep them
away from the work area.
7. NEVER operate a power tool when under the influence of alcohol, drugs or
medication.
8. Do not use power tools in the presence of flammable liquids or gasses.
9. Stay alert, watch what you are doing, use common sense and do not
operate the power tool when you are tired.
CARE OF POWER TOOLS
1. Read this manual carefully. Learn the tool’s applications and limitations, as
well as the specific potential hazards peculiar to it.
2. ALWAYS keep guards in place and in working order. A guard or other part
that is damaged should be properly repaired or replaced by an authorised
service centre, unless otherwise indicated in this instruction manual.
3. Don’t force the tool and use the correct attachment. It will do the job
better and safer, at the rate for which it was intended.
4. ALWAYS disconnect the power tool from the power supply before carrying
out any repairs or changing of accessories.
5. Before further use of the tool, it should be carefully checked to determine
that it will operate properly and perform its intended function. Check for
alignment of moving parts, binding of moving parts, breakage of parts,
mountings or other condition that may affect its operation.
6. Have defective switches repaired by an authorised service centre. Do not
use a power tool if the switch does not turn it on and off.
7. ALWAYS check for any damage or any condition that could affect the
operation of the tool. Damaged parts should be properly repaired.
8. Have your tool repaired by a qualified person. This tool complies with the
relevant safety rules. Repairs should only be carried out by qualified
persons using original spare parts, otherwise this may result in considerable
danger to the user.
9. NEVER use this product for any other purpose than that described in this
booklet.
10. Never abuse the power cable by yanking the cable to disconnect it from
the socket. Keep the cable away from heat, oil or sharp edges.
11. Guard against electric shock. Avoid body contact with earthed or
grounded surfaces.
12. If the tool should be used outdoors, use only extension cables intended for
outdoor use and marked accordingly.
3
Parts & Service: 020 8988 7400 / E-mail: [email protected] or [email protected]
13. Avoid accidental starting by making sure the power switch is off before
plugging in the power cable.
ADDITIONAL SAFETY RULES FOR HOT AIR GUNS
CAUTION: WITH ALL MACHINES, THERE ARE CERTAIN HAZARDS
INVOLVED WITH THEIR OPERATION AND USE. EXERCISING RESPECT AND
CAUTION WILL CONSIDERABLY LESSEN THE RISK OF PERSONAL INJURY.
HOWEVER, IF NORMAL SAFETY PRECAUTIONS ARE OVERLOOKED, OR
IGNORED, PERSONAL INJURY TO THE OPERATOR, OR DAMAGE TO
PROPERTY MAY RESULT.
1. ALWAYS keep the mains cable well away from the hot air gun, particularly if
laying it down temporarily during use.
2. ALWAYS switch the hot air gun OFF after use and allow it to cool before
storing. Stand it with the nozzle pointing upwards.
3. Never leave the hot air gun unattended when it is switched on.
4. Always wear safety gloves and never touch the hot nozzle.
5. NEVER point the gun at any person or animal.
6. NEVER use in a flammable atmosphere, e.g. where solvent vapours are
present.
7. Never use the hot air gun as a hair dryer.
8. Be aware that heat generated by the gun could cause nearby materials
to ignite - particularly in confined spaces. Take all necessary precautions have a fire extinguisher, or means to extinguish a fire to hand.
9. BE AWARE that fumes given off by paint etc., could be toxic. Take all
necessary precautions - consult paint manufacturer etc where necessary.
10. DO NOT attempt any electrical repair yourself, consult a qualified
electrician or the Clarke Service Department.
11. When finished take great care to place the gun where it cannot cause
damage to property or other equipment, and cannot be accidentally
touched by persons in the area. Stand upright while it cools.
12. Do not stand on a soft surface. The air gun could topple over or the air
intakes become blocked.
4
Parts & Service: 020 8988 7400 / E-mail: [email protected] or [email protected]
ELECTRICAL CONNECTIONS
WARNING! Read these electrical safety instructions thoroughly
before connecting the product to the mains supply.
Before switching the product on, make sure that the voltage of your electricity supply is
the same as that indicated on the rating plate. This product is designed to operate on
230VAC 50Hz. Connecting it to any other power source may cause damage.
This product may be fitted with a non-rewireable plug. If it is necessary to change the
fuse in the plug, the fuse cover must be refitted. If the fuse cover becomes lost or
damaged, the plug must not be used until a suitable replacement is obtained.
If the plug has to be changed because it is not suitable for your socket, or due to
damage, it should be cut off and a replacement fitted, following the wiring instructions
shown below. The old plug must be disposed of safely, as insertion into a mains socket
could cause an electrical hazard.
WARNING! The wires in the power cable of this product are
coloured in accordance with the following code:
Blue = Neutral
Brown = Live
If the colours of the wires in the power cable of this product do not correspond with the
markings on the terminals of your plug, proceed as follows.
• The wire which is coloured Blue must be connected to the terminal which is
marked N or coloured Black.
• The wire which is coloured Brown must be connected to the terminal which is
marked L or coloured Red.
Plug must be BS1363/A approved.
Always fit a 5 Amp fuse.
Live
Neutral
(Brown)
(Blue)
Ensure that the outer sheath of the cable is firmly held by the clamp
We strongly recommend that this machine is connected to the mains supply via a
Residual Current Device (RCD)
If in any doubt, consult a qualified electrician. DO NOT attempt any repairs yourself.
This symbol indicates that this is a Class II product, and does not require an earth
connection.
5
Parts & Service: 020 8988 7400 / E-mail: [email protected] or [email protected]
PRODUCT OVERVIEW
1
5
2
3
6
NO DESCRIPTION
4
7
NO
8
DESCRIPTION
1
Reflector Nozzle
5
Glass Protection Nozzle
2
Concentrator Nozzle
6
Defuser Nozzle
3
Triangular Shavehook (scraper)
7
Moulded Plastic Carry Case
4
Hot Air Gun
8
Handle for Triangular Shave Hook
INVENTORY CHECK
Before starting work, please check contents against the list above and advise
your dealer immediately if any parts are missing.
6
Parts & Service: 020 8988 7400 / E-mail: [email protected] or [email protected]
OPERATION
Before starting work it is recommended that you heat a test piece to ensure
you have the correct heat setting. In addition you should always take steps to
protect sensitive or delicate areas where the effect of heat could cause
damage (i.e. glass and plastics). Do not apply heat to the same place for a
long time.
After the work has been completed, switch the gun OFF, disconnect from the
mains supply and allow to cool in a safe place.
Take care not to drop the gun as this could seriously damage the heating
element.
REMOVING PAINT AND DISSOLVING ADHESIVES
1. Fit the shavehook (scraper) nozzle to the front of the gun.
2. With the ‘0/1/2’ switch in the ‘0’ (OFF) position plug the hot air gun into the
mains supply.
3. Set the switch to either position 1 or 2 according to how much heat is
required. (see Specification on page 10).
• Ensure the nozzle is pointing away from you.
4. Bring the nozzle of the hot air gun to the work piece approximately 3 cm
from the surface.
• The exact distance between the nozzle and the work piece will be
dependent on the material being worked on.
• Paint will rapidly become soft and blister, at which point it can be
removed with the triangular shave hook. Do not allow paint to burn
as this will make the removal process more difficult.
• Most adhesives dissolve when heated and these can then be
removed, taking care that any parts from which glue is removed are
heat resistant.
• Heating and paint removal are performed simultaneously, with the
shave hook following the hot air gun.
5. Clean the shavehook blade quickly if paint/glue becomes stuck to it.
• Profiled parts may be cleaned with a suitable wire brush once paint
is softened.
• Normally only one pass is required to remove both thick and thin
layers of paint.
7
Parts & Service: 020 8988 7400 / E-mail: [email protected] or [email protected]
REMOVING PAINT FROM WINDOW FRAMES
DO NOT point the gun directly at
glass and always ensure it is
adequately protected. A glass
protection nozzle is provided for use
when stripping window frames etc.
1. Fit the glass protection nozzle to
the front of the hot air gun and
angle it so that the gun can be
placed up against the window,
with the cowl of the nozzle, flat
against the glass as shown.
2. It will be necessary to change the position of the protection nozzle as you
work around the window pane. Ensure you wear adequate hand
protection when doing so.
3. The protection nozzle must be kept in contact with the work at all times, but
do not spend too much time in one area.
GENERAL USE
To prevent the gun from overheating, maintain a minimum distance of 3 cm
between the end of the nozzle and the work piece.
IMPORTANT: In continuous operation, never exceed the duty cycle for the
unit as stated in the specification.
FORMING AND WELDING PLASTIC PARTS
When bending or forming plastic parts, work slowly and with great care
observing the effects of heat on such materials.
NOTE: With plastics, the temperature range between solid, pliable and
liquid states is narrow, therefore great care should be taken.
WOOD STAINING
Wood can be stained giving a ‘rustic’ effect.
1. Fit the diffuser nozzle to the front of the hot air gun.
2. Do not hold the nozzle too close to the wood as this may cause the wood
to colour unevenly.
3. Use a fine sandpaper to remove any singed wood fibres when finished.
HEAT SHRINK SLEEVE FITTING
Fit the concentrating nozzle to the front of the hot air gun.
1. Select a suitable size heat shrink sleeve for the work piece.
8
Parts & Service: 020 8988 7400 / E-mail: [email protected] or [email protected]
2. Heat the sleeve evenly.
DE-FREEZING WATER PIPES
Fit the reflector nozzle to the front of the hot air gun.
1. Always heat frozen areas inwards from the edge to the centre.
2. Take special care when defrosting plastic pipes.
3. Provide protection against heat damage to nearby paint and wall
coverings where necessary.
4. Be aware that copper gas pipes can be difficult to distinguish from copper
water pipes. Always check first.
5. Copper pipes are soldered together, therefore should not be heated
above 200oC.
MAINTENANCE
This hot air gun is maintenance free, except always ensure that the air intake
vents are kept clean. If used in a dusty environment clean the tool with low
pressure compressed air.
ENVIRONMENTAL PROTECTION
Through the purchase of this product, the customer is taking on the obligation
to deal with any waste electrical/electronic equipment in accordance with
the WEEE Regulations in relation to the treatment, recycling, recovery and
environmentally sound disposal of the WEEE.
In effect, this means that this product must not be disposed of with general
household waste. It must be disposed of according to the laws governing
Waste Electrical and Electronic Equipment (WEEE) at a rcognised disposal
facility.
9
Parts & Service: 020 8988 7400 / E-mail: [email protected] or [email protected]
SPARES & ACCESSORIES
ITEM
DESCRIPTION
PART NUMBER
1
Air Nozzle Cover
HT2000B01
2
Concentrator Nozzle
HT2000B02
3
Diffuser Nozzle
HT2000B03
4
Glass Protector Nozzle
HT2000B04
5
Reflector for Nozzle
HT2000B05
6
Triangular Shave Hook
HT2000B06
7
Triangular Shave Hook Handle
HT2000B07
SPECIFICATION
Model Number
CHG2000B
Dimensions (D x W x H)
244 x 74 x 255 mm
Product Weight
0.71 kg
Operating Voltage/Frequency 230 V - 50 Hz
Input Power
2000 W
Electrical Insulation Class
II
Operating Temperature
Min: -10oC, max 50oC
Duty Cycle
10 minutes on and 3 minutes off, as one cycle.
Temperature Settings:
Setting 1:
Setting 2:
350oC
550oC
Air Flow Settings:
Setting 1:
Setting 2:
300 litres/min
500 litres/min
10
Parts & Service: 020 8988 7400 / E-mail: [email protected] or [email protected]
DECLARATION OF CONFORMITY
11
Parts & Service: 020 8988 7400 / E-mail: [email protected] or [email protected]