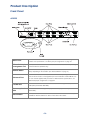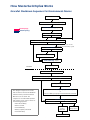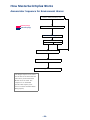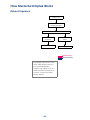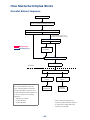
1
MasterSwitch™ plus
Power Distribution Unit
AP9225
AP9225EXP
User’s Guide
MasterSwitch plus
Contents
Product Description . . . . . . . . . . . . . . . . . . . . 7
Introduction . . . . . . . . . . . . . . . . . . . . . . . . . . . . . . . 7
What MasterSwitch Plus can do for you 7
Finding the information you are looking for 8
Front Panel . . . . . . . . . . . . . . . . . . . . . . . . . . . . . . . . 9
AP9225 9
LEDs . . . . . . . . . . . . . . . . . . . . . . . . . . . . . . . . . . . . 10
Descriptions 10
Rear Panel . . . . . . . . . . . . . . . . . . . . . . . . . . . . . . . . 11
AP9225 11
Manual Button . . . . . . . . . . . . . . . . . . . . . . . . . . . . . 11
Description 11
How MasterSwitch Plus Works . . . . . . . . . . . 12
MasterSwitch Plus Properties . . . . . . . . . . . . . . . . . . 12
Overview 12
Outlet properties 12
Configuring your MasterSwitch Plus unit 13
Learning the behavior of MasterSwitch Plus properties 13
Configuring an outlet for on-demand operation 14
Configuring an outlet for unattended shutdown 15
Unit/Outlet Start-up Sequence . . . . . . . . . . . . . . . . . 16
Graceful Shutdown Sequence . . . . . . . . . . . . . . . . . 17
Graceful Shutdown Sequence for On-battery Events . 18
Graceful Shutdown Sequence for Environment Alarms 19
Annunciator Sequence for Environment Alarms . . . . 20
Delayed On Sequence . . . . . . . . . . . . . . . . . . . . . . . 21
Reboot Sequence . . . . . . . . . . . . . . . . . . . . . . . . . . . 22
Graceful Reboot Sequence . . . . . . . . . . . . . . . . . . . . 23
How to Manage MasterSwitch Plus . . . . . . . 24
Remote Management Interfaces . . . . . . . . . . . . . . . . 24
Overview 24
Web interface 24
Control Console interface 25
SNMP 26
iii
Contents
Password-Protected User Accounts . . . . . . . . . . . . . . 27
Overview 27
Account access to Main menu headings 27
Auto-configuring MasterSwitch Plus 27
Menu Item Definitions. . . . . . . . . . . . . . . . . . 28
Outlets . . . . . . . . . . . . . . . . . . . . . . . . . . . . . . . . . . . 28
Control 28
Notes on outlets 29
MasterSwitch Plus . . . . . . . . . . . . . . . . . . . . . . . . . . 30
Device configuration 30
Outlet configuration 31
Environment . . . . . . . . . . . . . . . . . . . . . . . . . . . . . . 33
Status 33
Configuration 34
Event Log . . . . . . . . . . . . . . . . . . . . . . . . . . . . . . . . 35
Event Log 35
Accessing the Event Log using the FTP interface 35
Retrieving the Event Log using the FTP interface 36
Viewing the Event Log 36
Deleting an Event Log in the FTP interface 36
Network . . . . . . . . . . . . . . . . . . . . . . . . . . . . . . . . . 37
TCP/IP 37
TFTP/FTP 37
Telnet/Web 38
SNMP 38
SNMP: access control 38
SNMP: Trap Receiver 39
System . . . . . . . . . . . . . . . . . . . . . . . . . . . . . . . . . . . 40
User Manager 40
Outlet User Manager 41
Identification 41
Date/Time 42
File Transfer 42
Tools 43
Links 43
–iv–
Contents
Security and Help Features . . . . . . . . . . . . . . 44
Security Features . . . . . . . . . . . . . . . . . . . . . . . . . . . 44
Overview 44
Port assignments 44
User names, passwords and community names 44
Authentication versus encryption 45
MD5 authentication 45
MD5 authentication, continued 46
Web interface MD5 authentication 46
Help Features . . . . . . . . . . . . . . . . . . . . . . . . . . . . . . 47
Overview 47
Navigating through the help files 47
Managing the Expansion Unit. . . . . . . . . . . . 48
Introduction . . . . . . . . . . . . . . . . . . . . . . . . . . . . . . . 48
Overview 48
Navigating through the menus 48
Main Menu . . . . . . . . . . . . . . . . . . . . . . . . . . . . . . . 49
Item definitions 49
Unit Properties Menu . . . . . . . . . . . . . . . . . . . . . . . . 51
Item definitions 51
Outlet Properties Menu . . . . . . . . . . . . . . . . . . . . . . 52
Overview 52
Graceful Shutdown menu items 52
Annunciator menu items 54
Environmental Monitoring Card menu 54
Product Information . . . . . . . . . . . . . . . . . . . 55
Accessories Affected by MasterSwitch Plus . . . . . . . . 55
PowerChute Plus 55
Management Peripherals 55
Warranty Information . . . . . . . . . . . . . . . . . . . . . . . 56
Limited warranty 56
Warranty limitations 56
Troubleshooting . . . . . . . . . . . . . . . . . . . . . . . . . . . . 57
Troubleshooting suggestions 57
If problems persist 59
–v–
Contents
Life-Support Policy . . . . . . . . . . . . . . . . . . . . . . . . . . 60
General policy 60
Examples of life-support devices 60
Specifications . . . . . . . . . . . . . . . . . . . . . . . . . . . . . . 61
Basic port interface 61
Basic port pin assignments 61
Advanced port interface 62
Advanced
port pin assignments 62
Product specifications 63
–vi–
MasterSwitch plus
Product Description
Introduction
What
MasterSwitchplus
can do for you
MasterSwitch plus allows you to individually control power to connected
equipment and gracefully shut down or reboot up to eight connected
servers of different operating systems. In order to manage your system
effectively and efficiently, MasterSwitch plus:
• allows you to configure three password-protected accounts that
ensure restricted access to system-, device-, and outlet-level
services.
• automatically shuts down connected servers attached to an APC
UPS when the UPS enters an on-battery state and turns off
connected equipment after the server confirms shutdown.
• shuts down servers before cycling power to the connected
equipment (Graceful Reboot).
• controls eight on-board power outlets for complete and flexible
management of connected equipment.
• manages connected equipment through Web, Control Console, or
SNMP interfaces.
• can power-down connected equipment outlet by outlet to conserve
battery backup power.
• allows users to configure the sequence in which outlets receive
power upon start-up.
• connects serially to up to three expansion units (AP9225EXP),
providing control of 32 connected devices with one IP address.
• provides MD5 security—enhanced security for remote access
through the World Wide Web.
• includes full SNMP support for all outlet and unit properties.
• offers Event Logging for descriptions of events that occur with
MasterSwitch plus.
–7–
Product Description
Product Description continued
Finding the
information you
are looking for
This User Guide provides detailed information on how to configure
MasterSwitch plus to fit your needs, including discussions on how to
operate MasterSwitch plus using unit and outlet properties (page 12),
how to manage the unit through the available Web, Control Console and
SNMP interfaces (page 24), and complete definitions for all unit and
outlet properties (page 28). It also includes information for special
circumstances such as:
• If you purchased only the expansion unit (AP9225EXP) and need
information on how to manage the PDU without the management
card included with AP9225, see “Managing the Expansion Unit” on
page 48.
• If you need information on our Warranty and Life-Support policies,
see “Product Information” on page 55.
• If you have PowerChute plus software or other management
peripherals besides MasterSwitch plus and need to know how
these accessories will be affected, see “Accessories Affected by
MasterSwitch Plus” on page 55.
In addition to the information included in this user guide, you can find
the following documents on the CD included with MasterSwitch plus:
Document
Description
Location
MasterSwitch plus
Installation and
Quick Start Manual
(Install.pdf)
Procedures for setting up the
unit and for configuring the
required network settings.
Printed manual
included with
MasterSwitch plus
and on the CD in the
MS_Plus directory.
Exonly.pdf
Instructions for setting up and
configuring the expansion unit
(AP9225EXP) without AP9225.
On the CD in the
MS_Plus directory.
Addendum.pdf
Detailed information on the Web/
SNMP Card Wizard, firmware,
and configuration file transfers.
On the CD in the
MS_Plus directory.
Refguide.chm
Quick look-up reference guide to
accompany the user guide.
On the CD in the
MS_Plus directory.
README.txt
Instructions for auto-configuring
your unit(s).
On the CD in the
apcConfigUtility
directory.
Mibguide.pdf
Procedures on how to manage
your unit(s) using SNMP.
On the CD in the
Snmp directory.
–8–
Product Description
Front Panel
AP9225
Basic Ports
Connect the unit to servers running PowerChute or built-in UPS monitoring
software. For specifications, see “Basic port pin assignments” on page 61.
MasterSwitch plus
management card
Allows you to use a Web browser, Telnet, or a serial interface to remotely manage
connected devices (AP9225 only).
Manual Button
Used to issue a Battery Capacity Override command or cancel a Master Power On
Delay, depending on the situation. (See “Manual Button” on page 11.)
Advanced Port
Allows the connected server to communicate with a UPS operating in Smart Mode
and can also be used as a management port. For information on Smart Mode, see
the user manual supplied with your UPS. For Advanced Port specifications, see
“Advanced port pin assignments” on page 62
To UPS Port
Used to connect the unit to a UPS or another unit with the supplied daisy-chain
cable (APC part number 940-1000)
Accessory Card
Slot
Provides slot for APC management peripheral cards (only on the Expansion unit—
AP9225EXP).
Reset Button
Allows you to reset the MasterSwitch Plus network interface.This button is only
available on AP9225 and has no affect on the state of the outlets.
–9–
Product Description
LEDs
l
Descriptions
LED
Basic port
MasterSwitch
plus Status
Management
Card Status
(AP9225 only)
Management
Card
Link-RX/TX
(AP9225 only)
Status
Description
On
The Outlet is on.
Off
The Outlet is off.
Mostly off
The Outlet is scheduled to turn on.
Mostly on
The Outlet is scheduled to turn off.
Flashing green
The outlet cannot turn on due to an
Environmental alarm.
Flashing green
The UPS is in Sleep mode.
Steady green
The UPS is operating Normally.
Steady red
The UPS has experienced an AC Fail condition
(UPS is On Battery).
Flashing red
The UPS has asserted a Low Battery indication.
Flashing green
and red
MasterSwitch Plus is unable to communicate
with the UPS.
Off
MasterSwitch Plus has no power.
Solid green
MasterSwitch Plus has valid network settings.
Flashing green
MasterSwitch Plus does not have valid network
settings. See the Installation Manual for more
information.
Flashing red
slowly
MasterSwitch Plus is making a BOOTP request.
Solid red
A hardware failure has been detected by
MasterSwitch Plus.
Off
The device(s) that connects MasterSwitch Plus
to the network, whether a router, hub, or
concentrator, is off or not operating correctly.
Constant
Green
MasterSwitch Plus is connected to a functioning
network.
Flashing
Green
MasterSwitch Plus is receiving data packets
from the network.
Continued on next page
–10–
Product Description
Rear Panel
AP9225
.
Manual Button
Description
The Manual button is used to cancel two different commands. If this
button is pressed for at least 1 / 2 second and then released, one of the
following results will occur:
• If the MasterSwitch plus is waiting for the Master Power On Delay
to expire, then MasterSwitch plus will issue a cancel command.
The diagram in “Unit/Outlet Start-up Sequence” on page 16
illustrates the outlet’s behavior when the Master Power On Delay
is cancelled.
• If the configuration contains a UPS and the UPS is operating on
AC power, then MasterSwitch plus will issue a Battery Capacity
Override command. The diagram in “Unit/Outlet Start-up
Sequence” on page 16 illustrates the outlet’s behavior when the
Battery Capacity Override command is issued.
• If neither of the above conditions are true, then pressing the
Manual button will have no effect.
–11–
MasterSwitch plus
How MasterSwitch plus Works
MasterSwitchplus Properties
Overview
There are two main categories of properties associated with
MasterSwitch Plus: unit properties and outlet properties. Unit properties
allow you to customize the behavior of MasterSwitch Plus; outlet
properties allow you to customize the behavior of individual outlets.
Outlet properties
Outlet properties are governed by two operating modes: Annunciator
and Graceful Shutdown. Some outlet properties are common to both
control modes, while other properties are specific to an operating mode.
The table below lists each outlet property and its default setting.
.
Available in what
control mode?
Property
Default setting for outlet #s___
1
2
3
4
5
6
7
8
Outlet Control Mode
NA
Graceful Shutdown Mode
Name:
Both
1
2
3
4
5
6
7
8
Power On Time Delay (seconds)
Graceful Shutdown
0
2
4
6
8
10
12
14
Battery Capacity Threshold
Graceful Shutdown
0%
Low Battery Warning Control (minutes)
Graceful Shutdown
4.5
Power Off Time Delay (seconds)
Graceful Shutdown
120
UPS Low Battery Multiplier
Graceful Shutdown
1
Will Device Confirm
Graceful Shutdown
No
Restart Delay
Graceful Shutdown
Remain Off
Reboot Duration (seconds)
Graceful Shutdown
5
Initial State (non-alarm)
Annunciator
Off
Alarm Action Delay (seconds)
Both
15
Environment Alarm Masks
Both
Disabled (for each Environment alarm)
Outlet #___
Note: Unit and outlet properties retain their value (default or
configured) even after power has been removed from
MasterSwitch Plus.
–12–
How MasterSwitchplus Works
MasterSwitchplus Properties continued
Configuring your
MasterSwitchplus
unit
Learning the
behavior of
MasterSwitchplus
properties
Configuration of MasterSwitch Plus is dependent upon your application.
You can use only “on-demand” operations (On, Off, Shutdown, and
Reboot) or you can couple on-demand operations with “unattended”
shutdown features. If you plan to use only on-demand operations, see
“Configuring an outlet for on-demand operation” on page 14. If you plan
to use the “unattended” shutdown features of MasterSwitch Plus in
addition to the on-demand operations also, see “Configuring an outlet
for unattended shutdown” on page 15.
The diagrams on pages 16–23 define the behaviors for every event
recognized by the MasterSwitch plus unit. You customize the unit‘s
behavior by choosing specific values for the unit and outlet properties.
All outlet and unit properties on the diagrams are a highlighted hotlink
that lead you to the property’s definition. All outlet and unit properties
are defined in the section titled “Menu Item Definitions”, starting on
page 28.
–13–
How MasterSwitchplus Works
MasterSwitchplus Properties continued
Configuring an
outlet for ondemand operation
Configuring an outlet for On-demand operation requires selecting
values for the following properties:
Used in Sequence Diagram (Page #)
Definition
(Page #)
“Unit/Outlet Start-up Sequence” on page 16
page 30
Outlet Control Mode
No sequence diagram available.
page 31
Reboot Duration
“Reboot Sequence” on page 22 and “Graceful
Reboot Sequence” on page 23
page 31
Device Confirm
“Graceful Shutdown Sequence” on page 17,
“Graceful Shutdown Sequence for On-battery
Events” on page 18, “Graceful Shutdown
Sequence for Environment Alarms” on
page 19, and “Graceful Reboot Sequence” on
page 23
page 31
Power Off Delay
“Graceful Shutdown Sequence” on page 17
“Graceful Shutdown Sequence for On-battery
Events” on page 18, “Graceful Shutdown
Sequence for Environment Alarms” on
page 19, and “Graceful Reboot Sequence” on
page 23
page 31
Restart Delay
“Graceful Shutdown Sequence” on page 17
page 31
Power On Delay
“Unit/Outlet Start-up Sequence” on page 16,
“Graceful Shutdown Sequence” on
page 17,“Graceful Shutdown Sequence for
On-battery Events” on page 18, “Graceful
Shutdown Sequence for Environment Alarms”
on page 19, and “Delayed On Sequence” on
page 21
page 31
Property
Unit Properties
Power On Time
Delay
Outlet Properties
Continued on next page
–14–
How MasterSwitchplus Works
MasterSwitchplus Properties continued
Configuring an
outlet for
unattended
Configuring an outlet for unattended shutdown requires selecting values
for the following properties:
Property
Used in Sequence Diagram (Page #)
shutdown
Definition
(Page #)
Unit Properties
Power On Time
Delay
“Unit/Outlet Start-up Sequence” on
page 16
page 30
Outlet Properties
Graceful Shutdown
page 31
• UPS Low Battery
Multiplier
“Graceful Shutdown Sequence for
On-battery Events” on page 18
page 32
• Low Battery
Warning Control
“Graceful Shutdown Sequence for
On-battery Events” on page 18
page 31
• Device Confirm
“Graceful Shutdown Sequence” on page 17,
“Graceful Shutdown Sequence for
On-battery Events” on page 18, “Graceful
Shutdown Sequence for Environment
Alarms” on page 19, and “Graceful Reboot
page 31
Sequence” on page 23
• Power Off Delay
“Graceful Shutdown Sequence for
On-battery Events” on page 18, “Graceful
Shutdown Sequence for Environment
Alarms” on page 19, and “Graceful Reboot
page 31
Sequence” on page 23
Annunciator
• Alarm Action
Delay
page 31
“Graceful Shutdown Sequence for
Environment Alarms” on page 19, and
“Annunciator Sequence for Environment
Alarms” on page 20
–15–
page 32
How MasterSwitchplus Works
Unit/Outlet Start-up Sequence
Power is applied to
MasterSwitchplus
Unit Property‡
Outlet Property†
Power On Time Delay‡ Expires
or
You issue a Cancel Command
Outlet Control Mode†
Annunciator
Graceful Shutdown
Initial State†
Does the configuration contain a UPS?
On
Outlet is
turned on
Off
No
Outlet is
turned off
Yes
UPS is operating on
AC power
UPS exceeds Battery Capacity
Threshold†
or
You issue a Battery Capacity Threshold
Override command
When power is applied to MasterSwitch
plus, the unit follows this sequence of
behaviors. The Unit/Outlet Startup
Sequence is an unattended operation
that requires you to choose values for the
following properties:
• Power on Time Delay (unit property)
• Outlet Control Mode
• Initial State
• Battery Capacity Threshold
• Power On Delay
Power On Delay†
Remain Off
Delay
Power on Delay
expires
Outlet
remains off
–16–
Outlet is
turned on
How MasterSwitchplus Works
Graceful Shutdown Sequence
Outlet is on
You issue a Graceful Shutdown command
Is there a cable connected to the Basic Port?
No
Yes
MasterSwitchplus asserts AC Fail
and Low Battery signals
Unit Property‡
Outlet Property†
Device Confirm†
Yes
No
Server confirms
shutdown
Power Off Delay† Expires
Outlet is
turned off
Shutdown
Restart
Restart Delay†
Remain Off
Graceful Shutdown is a coordinated
effort between MasterSwitchplus and
the connected device to shutdown the
device in an orderly manner. The
Graceful Shutdown Sequence is an
on-demand operation that requires you
to choose values for the following
properties:
• Device Confirm
• Power Off Delay
• Restart Delay
• Power On Delay
Delay
You issue a
Cancel
command
Restart
Delay
expires
Outlet
remains off
Power On
Delay†
expires
Outlet is
turned on
–17–
How MasterSwitchplus Works
Graceful Shutdown Sequence for On-battery Events
UPS indicates AC
power restored or
Cancel command is
issued
Outlet is on
UPS indicates AC power failure
MasterSwitchplus Asserts AC Fail Signal
Low Battery Warning Control†
Never
UPS battery is
exhausted
Programmed Delay
Programmed
Delay Expires
On Runtime Remaining
UPS Runtime Remaining falls below UPS Low Battery
Warning Threshold x UPS Low Battery Multiplier†
Is there a cable connected to the Basic Port?
No
Yes
Outlet is
turned off
MasterSwitchplus
Asserts Low
Device Confirm†
Battery Signal
Yes
No
Server confirms shutdown
Unit Property‡
Outlet Property†
Power Off Delay† expires
Outlet is turned off
Shutdown
Restart
UPS is operating on AC power
This diagram sequences the events
that an outlet set to Graceful Shutdown
will follow when your UPS goes on
battery. The sequence is an
unattended operation that requires you
to choose values for the following
properties:
• Low Battery Warning Control
• UPS Low Battery Multiplier
• Device Confirm
• Power Off Delay
• Battery Capacity Threshold
• Power On Delay
UPS exceeds Battery Capacity Threshold†
or
Battery Capacity Threshold Override command is issued
Power On Delay†
Remain Off
–18–
Delay
You issue a
Cancel
command
Power On
Delay†
expires
Outlet
remains off
Outlet is
turned on
How MasterSwitchplus Works
Graceful Shutdown Sequence for Environment Alarms
.
Outlet is turned on
Environmental Monitor asserts alarm
Alarm Action Delay† expires
Unit Property‡
Outlet Property†
Is the alarm still active?
Yes
No
Is there a cable connected to the Basic Port?
Yes
No
MasterSwitch plus asserts
AC Fail and Low Battery signals
Device Confirm†
Yes
No
Server confirms shutdown
Power Off Delay† expires
Shutdown
Outlet is turned off
Restart
Environmental Monitor clears alarm
Does the configuration contain a UPS?
No
Yes
UPS is operating on AC power
This diagram sequences the events
that an outlet set to Graceful Shutdown
will follow when your Environmental
Monitor issues an alarm. The
sequence is an unattended operation
that requires you to choose values for
the following properties:
• Alarm Action Delay
• Device Confirm
• Power Off Delay
• Battery Capacity Threshold
• Power On Delay
UPS exceeds Battery Capacity Threshold†
or
You issue Battery Capacity Threshold Override command
Power On Delay†
Remain Off
Delay
You issue a
Cancel
command
Outlet remains off
–19–
Power On
Delay expires
How MasterSwitchplus Works
Annunciator Sequence for Environment Alarms
Outlet in initial (non-alarm) state
Unit Property‡
Environment alarm is asserted
Outlet Property†
Alarm Action Delay† expires
Is the alarm still active?
Yes
No
Outlet state is toggled to alarm state.
Environment alarm is cleared
Outlet state is toggled to initial/alarm state.
This diagram sequences the events
that an outlet set to Annunciator will
follow when your Environmental
Monitor issues an alarm. The
sequence is an unattended
operation that requires you to
choose a value for the Alarm Action
Delay property.
–20–
How MasterSwitchplus Works
Delayed On Sequence
Outlet is off
You issue a Delayed On
command
Power On Delay†
Remain Off
Delay
You issue a
Cancel
command
Power On
Time Delay
expires
Outlet remains
off
Outlet is
turned on
Unit Property‡
Outlet Property†
This diagram sequences the events
that an outlet will follow when you
issue a Delayed On command. The
sequence is an on-demand
operation that requires you to choose
a value for the Power On Delay
property.
–21–
How MasterSwitchplus Works
Reboot Sequence
Outlet is on
You issue an Immediate
Reboot command
Outlet is turned off
You issue a Cancel
command
Reboot Duration†
expires
Outlet remains off
Outlet is turned on
Unit Property‡
Outlet Property†
This diagram sequences the events
that an outlet will follow when you
issue an Immediate Reboot
command. The sequence is an ondemand operation that requires you
to choose a value for the Reboot
Duration property.
–22–
How MasterSwitchplus Works
Graceful Reboot Sequence
Outlet is on
You issue a Graceful Reboot command
Is there a cable connected to the Basic Port?
No
Yes
MasterSwitch plus asserts
AC Fail and Low Battery signals
Device Confirm†
Yes
No
Unit Property‡
Outlet Property†
Server confirms
shutdown
Power Off Delay† expires
Outlet is turned off
Shutdown
Restart
*All rebooted outlets are shut down
This diagram sequences the events
that an outlet will follow when you
issue a Graceful Reboot command.
The Graceful Reboot sequence is an
on-demand operation that requires you
to choose values for the following
properties:
• Will Device Confirm?
• Power Off Delay
• Reboot Duration
Cancel command is
issued
Reboot Duration†
expires
Outlet
remains off
Outlet is
turned on
*
–23–
If this command is applied to all
outlets, the Reboot Duration delay for
an outlet will not begin until all the
outlets have shut down.
MasterSwitch plus
How to Manage MasterSwitch plus
Remote Management Interfaces
Overview
Once MasterSwitch plus has the proper network settings (see the
MasterSwitch plus Installation and Quick Configuration Manual for
instructions), MasterSwitch plus and an Environmental Monitoring Card
can be managed remotely on Web, Control Console, and SNMP
interfaces. Only one user at-a-time may access your MasterSwitch plus
unit. Serial Interface users have precedence over Telnet users and
Telnet users have precedence over Web users. Maps of each interface
are on page 64 and page 65.
Web interface
Use a Web browser to access the Web connection to MasterSwitch
plus. In the URL Location field, type http:// followed by your
MasterSwitch plus unit’s IP address. Alternately, you can enter the DNS
name (requires a DNS server entry for the Management Card). See the
example below:
http://170.241.17.51
If the MasterSwitch plus unit’s Web Port is set to a value other than the
default value of 80, enter the System IP address followed by a colon and
the configured Web Port value (in this example 8000). See the example
below:
http://170.241.17.51:8000
After entering your MasterSwitch plus unit’s IP address, press ENTER; a
prompt will ask for your user name and password. For first time use, the
default Administrator user name and password is apc, all lower case.
See page 64 for a map of the Web interface.
Note: Some Web interface features, including data verification,
Assistant Online, and MD5 authentication require that you
enable JavaScript or Java.
Continued on next page
–24–
How to Manage MasterSwitch plus
Remote Management Interfaces continued
Control Console
interface
In addition to using the Web, you can also manage MasterSwitch plus
and an Environmental Monitoring Card using Telnet for remote over-thenetwork management or using a serial interface for local management.
All menus on the Control Console list items by number and name. To
enter an item, type the item number, press ENTER, follow any on-screen
directions. Menus that configure values have an Accept Changes menu
item. If you want to save any changes that you made before you exit a
menu, use the Accept Changes item. In addition to saving changes
before exiting a menu, you can also:
• Press ENTER to refresh the menu.
• Press ESC to go back to the previous menu.
• Type ? and then press ENTER to access brief descriptions of menu
items (if the menu has help available).
• Use CTRL-D to toggle between MasterSwitch plus and
Environment menus.
• Use CTRL-C to return to the main menu (Control Console).
To access the Control Console through Telnet, start a Telnet session
and follow the prompts. (See the Installation and Quick Configuration
Manual for detailed instructions on starting a Telnet session.) To use a
serial interface to access the Control Console:
1. Use the supplied smart-signaling cable (APC part number 9400024C) to connect the terminal port to the Advanced Port on
MasterSwitch plus.
Continued on next page
–25–
How to Manage MasterSwitch plus
Remote Management Interfaces continued
Control Console
interface,
continued
2. Check the terminal port for the following communication
settings:
Baud Rate
2400
Data Bits
8
Stop Bits
1
Parity
None
Handshaking
None
Local Echo
Off
Terminal Type
ANSI (VT100)
Note: To change the communications settings using HyperTerminal,
follow the steps below in the order given:
a. Make the needed changes.
b. Select Disconnect in the Call menu.
c. Select Connect in the Call menu.
3. Press ENTER and log into the Control Console.
The procedure for logging into the Control Console is the same
for both Telnet and a serial interface. When prompted, type your
user name and press ENTER and then type your password and
press ENTER.
See page 65 for a map of the Control Console.
SNMP
MasterSwitch plus fully supports SNMP—all unit and outlet properties
are configurable through SNMP. For complete instructions on how to
use SNMP to manage MasterSwitch plus, open the Mibguide.pdf file in
the Snmp folder on the CD.
–26–
How to Manage MasterSwitch plus
Password-Protected User Accounts
Overview
MasterSwitch plus provides three types of password-protected accounts
that allow you to control access to MasterSwitch plus. Each type of
account provides a different level of access to the MasterSwitch plus
menus. There is one Administrator account, one Device Manager
Account and up to 32 User accounts.
Account access to
Administrator and Device Manager accounts have access to all outlets.
Outlet User accounts only have access to outlets assigned to their
account. Users who have access to the Administrator account configure
and manage all other accounts. For instructions on configuring Device
Manager and Outlet User accounts, see “User Manager” on page 40
and “Outlet User Manager” on page 41. The table below lists the
account access to each MasterSwitch plus Menu.
Main menu
headings
Event Log
Network
System
Logout
Help
Links
Administrator
Yes
Yes
Yes
Yes
Yes
Yes
Yes
Yes
Yes
Device Manager
Yes
Yes
Yes
Yes
No
No
Yes
Yes
Yes
Outlet User
Yes
No
No
No
No
No
Yes
Yes
Yes
Outlets
Environment
Account
Type
Auto-configuring
MasterSwitch plus
Configuration
MasterSwitch plus
Access to MasterSwitch plus Menus
Unit properties, outlet properties, and user accounts can be downloaded
to MasterSwitch plus from a configuration file. For details on autoconfiguring your MasterSwitch plus unit(s),open the README.txt file in
the apcConfigUtility directory on the CD.
–27–
MasterSwitch plus
Menu Item Definitions
Outlets
Control
Item
Definition
Immediate On
Immediately turns an outlet on. This command is available any
time after the unit’s Power On Time Delay has expired and the
outlet is off. (Available in both Annunciator and Graceful
Shutdown modes.)
Sequenced On
Turns on every outlet according to its Power On Delay time.
(This is only available for Master Control of Outlets in Graceful
Shutdown mode.)
Delayed On
Turns an outlet on after the outlet’s Turn On Delay expires.
The “Delayed On Sequence” on page 21 illustrates this
command. This command is available any time after the unit’s
Power On Time Delay has expired and the outlet is off. (Only
available in Graceful Shutdown mode.)
Immediate Off
Immediately turns an outlet off. (Available in both Annuciator
and Graceful Shutdown modes.)
Graceful Reboot
Gracefully shuts down and restarts an outlet. If the server is
running shutdown software, such as PowerChute Plus, and is
connected to MasterSwitch plus with the appropriate signaling
cable, this operation will ensure that your server’s operating
system is shutdown before the outlet is turned off. Otherwise,
it will turn off the outlet after the Power Off Time Delay expires.
The outlet will be restarted after the Reboot Duration expires.
The “Graceful Reboot Sequence” on page 23 illustrates the
this command. (Only available in Graceful Shutdown mode.)
Note: If this command is applied to all outlets, then the
Reboot Duration delay for an outlet will not begin until
all the outlets have shut down.
Continued on next page
–28–
Menu Item Definitions
Outlets continued
Control, continued
Notes on outlets
Item
Definition
Immediate
Reboot
Immediately turns an outlet off and turns it back on after the
outlet’s Reboot Duration expires. The “Reboot Sequence” on
page 22 illustrates the this command. (Only available in
Graceful Shutdown mode.)
Shutdown
Gracefully shuts down and optionally restarts an outlet. If the
server is running shutdown software, such as PowerChute
Plus, and is connected to MasterSwitch plus with the
appropriate signaling cable, this operation will ensure that your
server’s operating system is shutdown before the outlet is
turned off. Otherwise, it will turn off the outlet after the Power
Off Time Delay expires. You can program the outlet to restart
automatically by specifying a Restart Delay. The Restart Delay
can be set to as long as 999.9 hours. The “Graceful Shutdown
Sequence” on page 17 illustrates the this command. (Only
available in Graceful Shutdown mode.)
Override
Allows an outlet to restart when the UPS battery charge has not
exceeded the Battery Capacity Threshold. The sequence
diagrams on page 18 and page 19 illustrate the use of this
command. (Only available in Graceful Shutdown mode.)
Cancel
Cancels a delayed startup or shutdown. The sequence
diagrams on pages 18–19 and pages 21–23 illustrate the use
of this command. (Only available in Graceful Shutdown mode.)
On the Web interface, if the Outlet number is orange, the outlet is in
Annunciator mode. This limits the Control Action of the outlet to No
Action, Immediate On, and Immediate Off.
–29–
Menu Item Definitions
MasterSwitch plus
Device
configuration
Property
Description
Available Settings
Device Name
A string of characters used to
identify the MasterSwitch plus
unit.
ASCII characters
The time that MasterSwitch plus
will delay after AC power is
applied before starting the
outlet’s power on sequence.
Range: 0–2:46:39
Default: 0
Manual Button
Governs whether or not the
manual button functions.
Enabled: the button functions
according to the description
in “Manual Button” on
page 11.
Disabled: no function
Default: Enabled
Restore Factory
Defaults
Reinstates the original settings
for your MasterSwitch plus unit.
All unit properties are set to the
defaults shown in this table.
Outlet Properties are restored to
the defaults shown on page 12.
(Control Console only)
Enter Yes to restore defaults or
ESC to cancel request.
View
Manufacturing
Data
Displays the following
information: Model Number,
Manufacture Date, Hardware
Rev, Firmware Rev, and Serial
Number.
These items are provided for
your information on the Control
Console and cannot be
configured.
View Self-Test
Results
Allows you to display the results
of the unit’s last power up
self-test. The tests performed
are:
Program Memory: confirms
whether or not the EPROM
chip is working properly.
Non-Volatile Memory: confirms
whether or not the EEPROM
chip is working properly.
(Control Console only)
Pass or Fail
Power On Time
Delay
A maximum of 23 printable
Default = unnamed
Continued on next page
–30–
Menu Item Definitions
MasterSwitch plus continued
Outlet
configuration
Item
Definition
Available Settings
Outlet Name
Identifies each outlet.
23 characters maximum
Outlet Control
Mode
Establishes mode for associated
outlet. All on-demand operations are
available when the Outlet Control
mode is set to Graceful Shutdown.
When set to Annunciator, only
Immediate On and Immediate Off
operations are available.
Graceful Shutdown or
Annunciator
Outlet Link
The Outlet’s HTTP link in URL form or
a Telnet address.
(http://site.com page.htm)
(789.456.123.456)
Restart Delay
The delay between an outlet shutting
off due to a Graceful Shutdown and
the outlet being restarted.
Range: 0–999:54
Note: Time is rounded
down by 6-minute
intervals
Power On
Delay
Determines the time interval between
the triggering event and the outlet
being turned on.
Range: 0–2:46:39
Power Off
Delay
The time from the triggering event
(such as a server confirming a
shutdown) until the outlet is turned
off.
Range: 0–2:46:39
Reboot
Duration
The delay between the outlet shutting
off because of Reboot and the outlet
restarting.
Range: 0–2:46:39
Device
Confirm
Indicates whether the device
connected to the outlet can assert a
shutdown signal.
Yes
No
Selects the method MasterSwitch
plus uses for determining when to
assert the outlet’s Low Battery signal
after the UPS has gone on battery.
Programmed Delay:
0–16:39:54
On Runtime Remaining:
When the UPS runtime
remaining falls below
the UPS’s UPS Low
Battery Signal Time
Never
Low Battery
Warning
Control
Continued on next page
–31–
Menu Item Definitions
MasterSwitch plus continued
Outlet
configuration,
Item
Definition
Available Settings
UPS Low
Battery
Multiplier
Adjusts the UPS Low Battery Signal
Time. This property allows each outlet
to be programmed to generate a low
battery signal at a different time.
MasterSwitch plus will assert the
outlet’s Low Battery signal when both
of the following conditions apply:
• the Low Battery Warning Control is
set to On Runtime Remaining or
Programmed Delay,and
• the UPS is on battery and the UPS
runtime remaining falls below the
product of the UPS Low Battery
signal time and the UPS Low
Battery Multipliers.
Range: 1–7
Battery
Capacity
Threshold
Sets the minimum percentage of
Battery Capacity required of the UPS
before an outlet can be turned on.
Range: 0–100%
Environment
Alarm Actions
Enable or disable Environment alarms
for each outlet independently.
Enabled
Disabled
Initial State
(non-alarm)
Defines the initial state of the outlet.
Off
On
Alarm Action
Delay
The amount of time that an
Environment alarm must be asserted
before the unit reacts to the alarm.
Range: 0–2:45:00
continued
–32–
Menu Item Definitions
Environment
Status
Item
Definition
Probes
Temperature
The temperature (in Celsius) sensed by
Environment probes.
High Temperature
Violation
Reports whether the high temperature threshold is
disabled or (when enabled) whether the current
temperature exceeds the threshold (Yes or No).
Low Temperature Violation
Reports whether the low temperature threshold is
disabled or (when enabled) whether the current
temperature exceeds the threshold (Yes or No).
Humidity
The relative humidity (as a percentage) sensed by
the Environment probes.
High Humidity Violation
Reports whether the high humidity threshold is
disabled or (when enabled) whether the current
humidity exceeds the threshold (Yes or No).
Low Humidity Violation
Determines whether the low humidity threshold is
disabled or (when enabled) if the current humidity
exceeds the threshold. (Yes or No)
Trap Thresholds
Defines the high and low temperature (in Celsius)
and relative humidity (as a percentage) thresholds
the Environmental Monitoring Card will use to
identify a trap condition. (On the Control Console.)
Send Traps On
Enables or disables sending traps for each
threshold. (On the Control Console.)
Note:If your configuration contains an AP9225, you
must enable the Send Traps On alarm property in
order for the Environmental Monitor to generate an
alarm.
–33–
Menu Item Definitions
Environment continued
Configuration
.
Item
Definition
Contacts
Device 1 (Contact Zone 1) Alarm
through Device 4 (Contact Zone
4) Alarm:
The contacts by number and name, and
whether a contact alarm is disabled or
(when enabled) if the contact senses an
alarm condition (Yes or No).
Threshold (Probes 1 & 2):
• High Temperature
• Low Temperature
• High Humidity
• Low Humidity
Thresholds that the Environmental
Monitoring Card will use to identify a trap
condition. (You must enable the Traps
item (Send Traps on) in order for
MasterSwitch plus to react to the alarm.)
Contact Name (Zones 1–4)
Defines a name for each contact (8
characters maximum) and enables or
disables the contact alarm.
–34–
Menu Item Definitions
Event Log
Event Log
Accessing the
Event Log using
the FTP interface
The Event Log displays the MasterSwitch plus unit’s last 300 events.
You can view the Event Log by selecting the Event Log menu in the
Web interface or by pressing CTRL + L in the Control Console.
Item
Description
Date
Date the event occurred (DD/MM/YYYY)
Time
Time the event occurred (HH:MM:SS)
Event
Description of the event.
You can retrieve the Event Log using client side FTP (For example, from
an MS-DOS prompt, type ftp card-ip where card-ip is the IP address
of your MasterSwitch plus unit.) After logging into the unit's FTP server,
type dir. You will see a listing similar to the following:
ftp>dir
200 Command okay.
150 Opening data connection for /.
--wx-wx-wx 1 apc apc 262144 Dec 23 1999
aos253.bin
--wx-wx-wx 1 apc apc 458752 Dec 23 1999
msp202.bin
-r--r--r-- 1 apc apc 4096 Dec 29 1999 event.txt
226 Closing data connection.
ftp: 194 bytes received in 0.00Seconds
194000.00Kbytes/sec.
ftp>
Continued on next page
–35–
Menu Item Definitions
Event Log continued
Retrieving the
Event Log using
the FTP interface
Viewing the Event
Log
To retrieve the Event Log, type get event.txt. The MasterSwitch
plus unit will transmit the Event Log to your specified drive. The unit
ensures that up to the last 300 events will be transmitted; however, it
could be more. You will see a list similar to the following:
ftp>get event.txt
200 Command okay.
150 Opening data connection for event.txt
226 Closing data connection.
ftp: 3694 bytes received in 0.11Seconds
33.58Kbytes/sec.
ftp>
After getting the event.txt file you can easily view it using your favorite
spreadsheet. The file is TAB delimited so it will format nicely into
columns.
Note:
The MasterSwitch plus unit always uses four-digit year
representation when logging and displaying event data.
However, sometimes when importing the event.txt file into a
spreadsheet, the spreadsheet will display the date fields as only
two-digit years. This can be fixed by selecting a different date
format in the spreadsheet.
The event.txt file includes some additional information not directly
shown or necessary in the Web and Control Console Event Log
screens. These include the following:
• The version of the event.txt file format (first field).
• The Date and Time the event.txt file was retrieved.
• The Name, Contact, Location, and IP address of the unit’s
management card.
• An unique Event Code for every type of event.
Deleting an Event
Log in the FTP
interface
To delete the Event Log, type del event.txt. No confirmation is
required. A new event.txt file is immediately created since a Deleted Log
event occurs. You will see a list similar to the following:
ftp>del event.txt
250 Requested file action okay, completed.
ftp>
–36–
Menu Item Definitions
Network
TCP/IP
Item
Description
System IP
The MasterSwitch plus IP
address.
Subnet Mask
The network subnet mask.
Default Gateway
The local default gateway (router
address).
BOOTP
Enables or disables BOOTP
requests for TCP/IP settings at
startup.
TFTP/FTP
Item
Definition
TFTP Client
The network address of the TFTP server
used for downloads.
Remote Server IP
FTP Client
Remote Server IP:
The network address of the FTP server
used for downloads.
User Name
The user name for access to the FTP
server.
Password:
The password for access to the FTP
server.
FTP Server
Access:
Enable or Disable FTP server access.
Port:
The TCP/IP port on which the FTP server
for the Management Card resides.
Default: port 21
–37–
Menu Item Definitions
Network continued
Telnet/Web
.
Item
Definition
Telnet
Access
Enables or Disables Telnet Access.
Port
The TCP/IP port where the Telnet server for the MasterSwitch
plus unit resides.
Default: port 23
Web
SNMP
Access
Enables or Disables Web Access.
Port
The TCP/IP port where the Web server for the MasterSwitch
plus unit resides.
Default: port 80
.
Item
Definition
SNMP Access
Enables or disables SNMP access.
Access Control
Controls access to each of the four SNMP channels.
Trap Receiver
Defines the NMSs (up to 4) that traps are sent to.
SNMP: access
control
Item
Definition
Community
Name
Password the NMS (identified by the NMS IP option) must
use for SNMP access to MasterSwitch plus. The allowed
access type is defined by the Access Type option.
Note: Up to 15 characters.
NMS IP
Configures the channel to allow only one NMS (using a
specific NMS IP address), or all NMSs (using 0.0.0.0 for the
NMS IP value), to have access to the channel.
Access Type
Defines whether an NMS (identified by the NMS IP option)
can Write (use Gets and Sets), Read (use only Gets), or be
Disabled (cannot use Gets and Sets at all).
Continued on next page
–38–
Menu Item Definitions
Network continued
SNMP: Trap
Receiver
Item
Definition
Community Name
Password MasterSwitch plus uses when it sends
traps to the NMS identified by the Receiver NMS IP
option.
Note: Up to 15 characters.
Receiver NMS IP
The specific NMS (using its IP address) that will
receive traps sent by MasterSwitch plus.
Note: To send no traps to any NMS set the Trap
Receiver IP to 0.0.0.0
Trap Generation
Enables or Disables MasterSwitch plus to send
traps to the NMS identified by the Receiver NMS IP
option
Authentication Traps
Enables or Disables MasterSwitch plus to send
authentication traps to the NMS identified by the
Receiver NMS IP
–39–
Menu Item Definitions
System
User Manager
.
Item
Definition
Auto Logout
The amount of time of inactivity before the user is automatically
logged out.
Default: 3 minutes.
Authentication
A setting of Basic causes the Web Interface to use standard
HTTP 1.1 login (base64 encoded passwords); MD5 causes the
Web Interface to use an MD5-based authentication login. In
order for MD5 to function properly, you must enable cookies in
your browser.
Default: Basic
Administrator
User Name
User name (10 characters maximum).
Default: apc
Password
Password only for HTTP 1.1 authentication (10 characters
maximum).
Default: apc
Authentication
Phrase
Authentication phrase (only for MD5), Phrase must be 15–32
characters long.
Default: admin user phrase
Device Manager User
User Name
User name (10 characters maximum).
Default: apc
Password
Password only for HTTP 1.1 authentication (10 characters
maximum).
Default: apc
Authentication
Phrase
Authentication phrase for MD5. The phrase must be 15–32
characters long.
Default: device user phrase
Continued on next page
–40–
Menu Item Definitions
System continued
Outlet User
Manager
Item
Definition
User Name
Outlet user name for both HTTP 1.1 and MD5
authentication. (10 characters maximum.)
Note: A User Name in Orange indicates the user
account has been disabled.
Password
Outlet user password for HTTP 1.1
authentication. (10 characters maximum.)
Authentication Phrase
Outlet user authentication phrase for MD5. The
phrase must be 15–32 characters long
User Description
Identification/description of outlet user. (30
characters maximum)
Account Status
Enables, disables, or deletes Outlet’s account.
Note: A disabled account prevents the Outlet
User of the account from logging in.
Device Outlet Access
Selects the outlets users will only have access to.
Outlet User List. The Current Outlet User List is a summary of the
existing enabled or disabled accounts. The Outlet Access column
provides a summary of which outlets users have permission to access.
Identification
Item
Definition
Name
The system name used to identify the device. Name will
be used for sysName OID in SNMP agent.
Contact
The contact or owner of the device. Will be used for
sysContact OID in SNMP agent.
Location
The physical location of the device. Will be used for
sysLocation OID in SNMP agent
Continued on next page
–41–
Menu Item Definitions
System continued
Date/Time
.
Item
Definition
Date
The date for the system in the form of: MM/DD/YY.
Time
The time for the system in the form of: HH:MM:SS
(24 hour time).
File Transfer
Item
Description
Describe the Current transfer settings
Remote TFTP Server IP
IP address of the remote TFTP server
defined in Network’s TFTP/FTP settings.
TFTP: Remote Server IP
Remote FTP Server IP
IP address of the remote FTP server
defined in Network’s TFTP/FTP settings.
FTP: Remote Server IP
Remote FTP ServerUser Name
User name of the FTP server defined in
Network’s TFTP/FTP settings.
FTP Client: User Name
Remote FTP Server Password
Password of the FTP server defined in
Network’s TFTP/FTP settings.
FTP Client: Password
Configure the Name of the File to Download
Filename
The name of the file to be downloaded
Initiate the Transfer
Result of LastFile Transfer
Displays the results of the last file
transfer.
Initiate File Transfer Via
Chooses whether the file will be
transferred via TFTP or FTP
Continued on next page
–42–
Menu Item Definitions
System continued
Tools
Item
Description
No Action
Causes no action.
Reboot Card
Re-initializes the Management Card’s
operation.
Note: Loads are NOT rebooted.
Reset Card to Defaults
Restores all configuration settings to default
(values are stored in Management Card’s
EEPROM).
Warning: This will reset the TCP/IP settings
and enable BOOTP!
Reset Card to Defaults Except
TCP/IP
Links
Restores all configuration settings to default
except TCP/IP settings (values are stored in
Management Card’s EEPROM).
.
Item
Definition
User Links
Name
The link name (up to 3) that will appear on the menu bar.
URL
The HTTP link in URL form: http://mysite.com/
mypage.com.
APC Links
Name
View the names of the APC links.
URL
Define the URL of each APC link.
Note:
This option is not available on the Control Console interface.
–43–
MasterSwitch plus
Security and Help Features
Security Features
Overview
MasterSwitch plus provides several different security options,
depending on the access interface you are using. This chapter
describes these individual security elements. In general, MasterSwitch
plus provides a reasonable level of access and authentication control.
As a network device that passes information across the network,
MasterSwitch plus is subject to the same exposure as other devices on
the network. Protecting intranet networks that are connected to external
networks (e.g., the Internet) with devices such as firewalls is also an
important element in security.
Port assignments
It is possible to define the TCP ports that the Telnet, FTP, and Web
servers are listening for. These ports are initially set at the standard
“well known port” for the particular protocol. To hide the interfaces, you
can use arbitrary port numbers from 5000–65535. When an interface
uses a non-standard port, it is required to specify the port when using a
client interface, such as a Web browser. Hiding the servers provides a
level of security. The non-standard port address becomes an extra
“password.”
User names,
The Administrator, Device Manager, and Outlet User names and
passwords are for logging on to the Control Console and Web
interfaces. All user names, passwords, and community names for
SNMP are transferred over the network as plain text. A user who is
capable of monitoring the network traffic can determine the user names
and passwords required to access MasterSwitch plus. Any similar
device using Telnet, a Web server, or an SNMPv1 agent will have the
same constraints because of the limitations in the protocols.
passwords and
community names
Continued on next page
–44–
Security and Help Features
Security Features continued
Authentication
versus encryption
MD5
authentication
MasterSwitch plus does not currently use any type of encryption. All the
data and communication between MasterSwitch plus and the client
interfaces, such as Telnet and the Web server, are able to be captured.
For almost all applications, however, sensitive data is not being
transferred. MasterSwitch plus does control access by providing basic
authentication through user names, passwords and IP addresses. While
these basic security features are sufficient for most environments,
MasterSwitch plus can also provide a greater level of security by
enabling MD5 authentication for the Web interface.
The Web interface option for MD5 authentication enables a higher level
of access security than that provided by the basic HTTP authentication
scheme. The MD5 scheme is similar to CHAP and PAP remote access
protocols. When MD5 is enabled, the Web server requests a user name
and a password phrase (distinct from the password). The user name
and password phrase are not transmitted over the network, as in basic
authentication. A Java login applet combines the user name, password
phrase, and a session-unique challenge number to calculate an MD5
hash number. The hash number is then returned to the server so that it
can verify that the user has the correct login information. By passing
back only the hash number, the login information is not revealed. In
addition to the login authentication, each form post for configuration or
control operations is also authenticated with a unique challenge and
hash response. This scheme does not involve any encryption, so pages
are transmitted in their plain-text form. After the authentication login,
subsequent page access is restricted by IP addresses and a hidden
session cookie. In order for MD5 authentication to function properly, you
must have cookies enabled in your browser.
Since the MD5 authentication scheme is available only for the Web
interface, you must disable the less secure interfaces, including Telnet,
FTP, and SNMP. For SNMP, it is possible to disable write-only access so
that read and trap facilities are still available.
Continued on next page
–45–
Security and Help Features
Security Features continued
MD5
authentication,
continued
The MD5 authentication scheme provides a much higher level of
security than the plain-text type access methods. However,
sophisticated attacks are almost impossible to prevent. Well-configured
firewalls are an essential element in an overall security scheme. For
additional information on MD5 authentication, see RFC document #1321
at the Web site of the Internet Engineering Task Force. For CHAP, see
RFC document #1994.
Web interface
MD5
Interface
Security Access
Notes
authentication
Serial Interface
Control Console
– User name & password
Always enabled.
Telnet Control
Console
– User name & password
– Selectable server port
– Server Enable/Disable
The user name and
password are
transmitted plain-text.
SNMP
FTP Server
Web Server
–
–
–
–
Community Name
NMS IP filters
Agent Enable/Disable
Four access communities
with read/write/disable
capability
IP filters only allow
access from designated
IP addresses.
– User name & password
– Selectable server port
– Server Enable/Disable
Administrator access
only.
–
–
–
–
In basic HTTP
authentication mode, the
user name and
password are
transmitted base-64
encoded (no encryption).
In MD5, authentication
mode uses user name
and password phrase.
User name & password
Selectable server port
Server Enable/Disable
MD5 Authentication option
–46–
Security and Help Features
Help Features
Overview
MasterSwitch plus provides help menus on each interface to assist you
if you are having trouble finding what you need. The help menu is
located on the lower, left-hand side of the screen on the Web interface.
On the Control Console, type ? to access the help menu.
Navigating
Contents. The Contents screen provides a complete listing of the help
through the help
information.
files
Interactive Assistant. Interactive Assistant brings APC Customer Service
to the Web. When you select Interactive Assistant, MasterSwitch plus
will transmit information about the Management Card to APC’s Assistant
Online server. The server will process the information and tell you if a
newer version of firmware is available and how to proceed. Interactive
Assistant can also link you to extensive context-sensitive help.
About Card. About Card provides information about MasterSwitch plus
covering the Hardware factory, Application module, and APC OS (AOS)
information. About Card is where you will find the serial number,
hardware revision, and the date and time the version and AOS was
loaded.
Local Help Pages. MasterSwitch plus has internal help pages that can be
accessed by selecting Help in the Navigation frame or by clicking the ?
at the end of black title bars.
–47–
MasterSwitch plus
Managing the Expansion Unit
Introduction
Overview
If you have purchased only the MasterSwitch plus Expansion Unit
(AP9225 EXP) and your configuration does not include an AP9225, you
can configure the Expansion Unit through MasterSwitch plus menus.
For information on how to access these menus, see the Control
Console Interface Map on page 65.
Note:
Navigating
through the
menus
When logging in, you will not need a username.
The MasterSwitch plus menus allow you to manage the MasterSwitch
plus unit and an Environmental Monitoring Card. All menus list items by
number and name. To navigate through the menus, you will need to
remember the following list of operations:
• To enter a selection on any of the menus, type its related one- or
two-character command and press ENTER.
• To see the results of the last changes you have made, it will
sometimes be necessary to press ENTER.
• To return to the previous screen, press ESC.
• To exit the MasterSwitch plus menus, type Q (case-sensitive) at the
Main menu.
–48–
Managing the Expansion Unit
Main Menu
Item definitions
.
Item
Description
Version
Displays the version of the MasterSwitch plus firmware.
Unit Name
Identifies the MasterSwitch plus unit that has been accessed.
Note: The Unit Name can be changed in the Unit Properties menu.
UPS State
Displays the status of the UPS. The possible states are:
Inactive: UPS is in sleep mode
On Line: UPS is operating normally
AC Fail: UPS is operating on battery
Unknown:communication with UPS has failed
Outlet Name
Identifies each outlet.
Note: Each outlet’s names is changeable at the associated outlet properties
menu.
Outlet State
Displays the current state of the outlet. The possible states are:
On: outlet is turned on
On in hh:mm:ss: outlet will be turned on after the specified time period elapses
Off: outlet is turned off
Off in hh:mm:ss: outlet will be turned off after the specified time period elapses
To Change Unit Properties
Instructs you to enter an U to access the Unit Properties menu.
Note: The Enable/Disable Alarms setting on the Outlet Properties menus controls the behavior of an individual outlet with regard to Environment
alarms
To Change Outlet
Properties
Instructs you to enter the associated outlet number (1–8) to access its outlet
properties.
To Change Environmental
Monitoring Card
Properties
Instructs you to enter M to access the Environmental Monitoring Card properties
menu (available only if an Environmental Monitoring Card is present).
To Change Units
Instructs you to enter an I to access the next MasterSwitch plus unit in the
cascading setup.
–49–
Managing the Expansion Unit
Main Menu continued
Item definitions,
continued
To Change Outlet States
Instructs you to enter various commands to initiate on-demand outlet actions.
After entering a command, you will be asked to enter an outlet number (1–8) to
perform the action on the associated outlet or you will be asked to enter an A to
perform the action on all of the outlets.The various commands you may enter
are:
N: On—Immediately turns an outlet on. This command is available any time
after the unit’s Power On Time Delay has expired and the outlet is off.
S: Shutdown—Gracefully shuts down and optionally restarts an outlet. If the
server is running shutdown software, such as PowerChute Plus, and is
connected to MasterSwitch plus with the appropriate signaling cable, this
operation will ensure that your server’s operating system is shutdown before
the outlet is turned off. Otherwise, it will turn off the outlet after the Power Off
Time Delay expires. You can program the outlet to restart automatically by
specifying a Restart Delay. The Restart Delay can be set to as long as 999.9
hours. The sequence diagram on page 17 illustrates the this command.
C: Cancel—Cancels a delayed startup or shutdown. The sequence diagrams
on pages 16–19 and pages 21–22 illustrate the use of this command.
D: Delayed On—Turns an outlet on after the outlet’s Turn On Delay expires.
The sequence diagram on page 21 illustrates this command. This command
is available any time after the unit’s Power On Time Delay has expired and
the outlet is off.
F: Off—Immediately turns an outlet off.
R: Reboot—Immediately turns an outlet off and turns it back on after the
outlet’s Reboot Duration expires. The sequence diagram on page 22
illustrates the this command.After selecting Reboot, you are prompted with
the following: “Shutdown Gracefully? (Y/N)
Y: Graceful Reboot—Gracefully shuts down and restarts an outlet. If the
server is running shutdown software, such as PowerChuteplus, and is
connected to MasterSwitch plus with the appropriate signaling cable, this
operation will ensure that your server’s operating system is shutdown before
the outlet is turned off. Otherwise, it will turn off the outlet after the Power Off
Time Delay expires. The outlet will be restarted after the Reboot Duration
expires. The sequence diagram on page 23 illustrates the this command.
Note: If this command is applied to all outlets, then the Reboot Duration delay
for an outlet will not begin until all the outlets have shut down.
O: Override—Allows an outlet to restart when the UPS battery charge has not
exceeded the Battery Capacity Threshold. The sequence diagrams on
pages 16 and 19 illustrate the use of this command.
–50–
Managing the Expansion Unit
Unit Properties Menu
Item definitions
.
Item
Description
Name
A string of characters used to identify the MasterSwitch plus unit.
Allows a maximum of 23 printable ASCII characters
Default: unnamed
Address
Allows you to specify the units address (1–4) in a cascading setup. Enter 1 for the
unit connected closest to the UPS, 2 for the unit adjacent to unit 1, and so on for up
to four units. See the document included on the CD titled Setup of the MasterSwitch
plus Expansion Unit for instructions on setting up Expansion Unit addresses.
Default: 1
Note: If the addresses for all units are note set up properly, the units will not operate properly.
Manual Button
Allows you to enable/disable the unit’s manual button. If enabled, the button
functions according to the description on page 11. If disabled, the button does not
function.
Default: Enabled
Password
Allows you to set the unit’s password. The password is case-sensitive and can be
up to 9 printable characters.
Default: apc (lower case)
Restore Factory
Defaults
Reinstates the original settings for your MasterSwitch plus unit. All unit properties
are set to the defaults shown in this table. Outlet Properties are restored to the
defaults shown on page 12.
View Manufacturing
Data
Displays the following information: Model Number, Manufacture Date, Hardware
Rev, Firmware Rev, and Serial Number. These items are provided for your
information and cannot be configured.
View Self-Test
Results
Allows you to display the results (Passed or Failed) of the unit’s last power up selftest. The tests performed are:
Program Memory: confirms whether or not the EPROM chip is working properly.
Non-Volatile Memory: confirms whether or not the EEPROM is working properly.
Menu Timeout
Period
Automatically logs you off after the specified period of inactivity.
Power On Time
Delay
The time that MasterSwitch plus will delay after AC power is applied before starting
the outlet’s power on sequence.
Range: 0–2:46:39
Default: 0
Continued on next page
–51–
Managing the Expansion Unit
Outlet Properties Menu
Overview
MasterSwitch plus has eight Outlet Properties menus—one for each
outlet. To access these menus, enter an outlet number (1–8) from the
Main menu. The Outlet Properties menu varies according to the Outlet
Control mode setting of the chosen outlet.
Graceful
Shutdown menu
items
Item
Definition
Available Settings
Outlet Name
Identifies each outlet.
23 characters maximum
Outlet Control
Mode
Establishes mode for associated outlet.
Graceful Shutdown or
Annunciator
Will Device
Confirm
Indicates whether the device
connected to the outlet can assert a
shutdown signal.
Yes
No
Programmed Delay:
0–16:39:54
Selects the method MasterSwitch plus On Runtime Remaining:
When the UPS runtime
Low Battery
uses for determining when to assert the
Warning Control outlet’s Low Battery signal after the
remaining falls below
the UPS’s UPS Low
UPS has gone on battery.
Battery Signal Time
Never
UPS Low
Battery
Multiplier
Adjusts the UPS Low Battery Signal
Time. This property allows each outlet
to be programmed to generate a low
battery signal at a different time.
MasterSwitch plus will assert the
outlet’s Low Battery signal when both
of the following conditions apply:
• the Low Battery Warning Control is
set to On Runtime Remaining or
Programmed Delay,and
• the UPS is on battery and the UPS
runtime remaining falls below the
product of the UPS Low Battery
signal time and the UPS Low
Battery Multipliers.
Range: 1–7
Continued on next page
–52–
Managing the Expansion Unit
Outlet Properties Menu continued
Graceful
Shutdown menu
Item
Definition
Available Settings
Restart Delay
The delay between an outlet shutting
off due to a Graceful Shutdown and
the outlet being restarted.
Range: 0–999:54
Note: Time is rounded
down by 6-minute
intervals
Power Off
Delay
The time from the triggering event
(such as a server confirming a
shutdown) until the outlet is turned off.
Range: 0–2:46:39
Power On
Delay
Determines the time interval between
the triggering event and the outlet
being turned on.
Range: 0–2:46:39
Reboot
Duration
The delay between the outlet shutting
off because of Reboot and the outlet
restarting.
Range: 0–2:46:39
Battery
Capacity
Threshold
Sets the minimum percentage of
Battery Capacity required of the UPS
before an outlet can be turned on.
Range: 0–100%
Enable/
Disable UPS
Alarms
Environment Alarm Masks: Indicates
whether or not an outlet will react to a
specific Environment alarm.
Enabled and disabled for
each of the twelve
Environmental alarms.
Select Another
Outlet
Allows you choose an another outlet to configure.
Alarm Action
Delay
The amount of time that an
Environment alarm must be asserted
before the unit reacts to the alarm.
items, continued
Range: 0–2:45:00
Continued on next page
–53–
Managing the Expansion Unit
Outlet Properties Menu continued
Annunciator menu
items
Environmental
Monitoring Card
menu
Item
Definition
Available Settings
Outlet Name
Identifies each outlet.
20 characters maximum
Outlet Control
Mode
Establishes mode for associated outlet.
Graceful Shutdown or
Annunciator
Initial State
Defines the initial state of the outlet.
Off
On
Alarm Action
Delay
The amount of time that an Environment
alarm must be asserted before the unit Range: 0–2:45:00
reacts to the alarm.
Enable/Disable
UPS Alarms
Environment Alarm Masks: Indicates
whether or not an outlet will react to a
specific Environment alarm.
Select Another
Outlet
Allows you choose an another outlet to configure.
Settings are enabled and
disabled for each of the 12
Environmental Monitoring
Card alarms.
.
Item
Description
Temp (Celcius)
Displays the current ambient temperature reading of each attached
probe. Temperature is displayed in ##.## degrees Celsius.
Humidity
Displays the current relative humidity reading of each attached
probe. Humidity is displayed in ###.#% relative humidity.
Low Limit
Allows you to disable or set the low alarm threshold for temperature
and humidity for each probe. Temperature threshold is in degrees
Celsius and humidity is in percent relative humidity. If alarm limits
are exceeded, an alarm will be asserted to all outlets whose
Enable/Disable Alarm settings for that alarm are set to Enabled.
High Limit
Allows you to disable or set the low alarm threshold for temperature
and humidity for each probe. Temperature threshold is in degrees
Celsius and humidity is in percent relative humidity. If alarm limits
are exceeded, an alarm will be asserted to all outlets whose
Enable/Disable Alarm settings for that alarm are set to Enabled.
Disable All
Alarms
Allows you to control Environmental Monitoring Card operation.
The options are:
Yes: all alarm limits are set to Disabled. MasterSwitch plus will
ignore all Environment alarms.
No: all alarm limits are reset to previous configuration.
–54–
MasterSwitch plus
Product Information
Accessories Affected by MasterSwitch plus
PowerChute Plus
The Scheduled Shutdown and Shut Down System Now commands are
available in PowerChute Plus to perform actions on the server
connected to Outlet #1 of MasterSwitch plus. However, the Shut Down
System Now command will turn off Outlet #1 and will require you to turn
it on through the User Interface to restart. Additional settings affected
include those listed in the following table.
PowerChute Plus Setting
Relationship to MasterSwitch plus
UPS Low Battery Signal Time
Multiplied by the UPS Low Battery Multiplier for
each outlet of MasterSwitch plus. See page 32
for more information.
UPS Turn Off Delay
Overridden by the Power Off Delay for each
outlet of MasterSwitch plus. See page 31 for
more information.
UPS Wakeup Delay Time
Overridden by the Power On Delay for each
outlet in MasterSwitch plus. See page 31.
UPS Wakeup Delay
(Capacity)
Overridden by the Battery Capacity Threshold
for each outlet in MasterSwitch plus. See
page 32 for more information.
Management
UPS control commands available with APC accessories are not
Peripherals
supported when used with MasterSwitch plus. Therefore, on-demand
operation through APC accessories is not supported at this time.
–55–
Product Information
Warranty Information
Limited warranty
American Power Conversion (APC) warrants MasterSwitch plus to be
free from defects in materials and workmanship for a period of two
years from the date of purchase. Its obligation under this warranty is
limited to repairing or replacing, at its own sole option, any such
defective products. This warranty does not apply to equipment that has
been damaged by accident, negligence, or misapplication or has been
altered or modified in any way. This warranty applies only to the original
purchaser.
Warranty
Except as provided herein, American Power Conversion makes no
warranties, express or implied, including warranties of merchantability
and fitness for a particular purpose.
limitations
Some jurisdictions do not permit limitation or exclusion of implied
warranties; therefore, the aforesaid limitation(s) or exclusion(s) may not
apply to the purchaser.
Except as provided above, in no event will APC be liable for direct,
indirect, special, incidental, or consequential damages arising out of the
use of this product, even if advised of the possibility of such damage.
Specifically, APC is not liable for any costs, such as lost profits or
revenue, loss of equipment, loss of use of equipment, loss of software,
loss of data, costs of substitutes, claims by third parties, or otherwise.
This warranty gives you specific legal rights and you may also have
other rights, which vary from state to state.
–56–
Product Information
Troubleshooting
Troubleshooting
suggestions
Problem
A server connected
to a Basic port
does not detect On
Battery or Low
Battery signal.
One or more
servers shuts down
when the UPS is on
battery, but does
not reboot when
power returns
To UPS Status LED
is flashing green
and red.
Possible Cause
Solution
Wrong cable is being
used.
Verify that you are using the correct
cable. Refer to “Choosing additional
cables: Table 1,” in the Installation
and Quick Start Manual.
Server shutdown
software is not
configured for simple
signaling.
Configure PowerChute Plus for
simple signaling. For instructions,
see the documentation supplied
with PowerChute Plus.
PowerChute Plus is
configured to start
shutdown on an AC
Fail event and the
shutdown time for
operating system is
set too short.
If the MasterSwitch plus Low Battery
Warning Control is set to
Programmed Delay, make the delay
shorter than the AC Fail shutdown
delay in PowerChute Plus
FlexEvents.
MasterSwitch plus
Low Battery Warning
Control
is set to Programmed
Delay
If the server is capable of UPS
shutdown, consider setting the Will
Device Confirm property to Yes.
Communication cable
is not fastened
securely or the wrong
cable is being used.
Verify that all cables are securely
fastened and that the cable has APC
part number 940-1000.
UPS is connected to
the wrong port.
Verify that the UPS is connected to
the To UPS port on MasterSwitch
plus.
Continued on next page
–57–
Product Information
Troubleshooting continued
Troubleshooting
suggestions,
Problem
continued
Possible Cause
UPS is not capable of
To UPS Status LED
is flashing green
and red.
Cannot access the
MasterSwitch plus
Control Console.
One or more
outlets turn off
when the UPS is
On Battery, but do
not restart when
power returns.
The UPS is On
Battery and the
server does not
shut down the OS.
advanced
communication.
Solution
Only Smart-UPS, Matrix-UPS and
the Symmetra PowerArray can
communicate with MasterSwitch
plus.
There is a problem
with the UPS.
Contact Technical Support at the
number listed on the back cover of
this manual.
Serial Interface is
using incompatible
terminal settings.
Change serial interface settings to
match the MasterSwitch plus baud
rate (2400), with 8 data bits, no
parity, 1 stop bit, and no flow control.
Power On Time Delay
is set to Remain Off.
Change the Power On Time Delay
setting.
Battery Capacity
Threshold has not
been exceeded.
Reduce the Battery Capacity
Threshold setting or perform an ondemand override.
A Measure-UPS alarm
for the outlet is active.
Clear the alarm.
Low Battery Warning
Control is set to Never.
Change the Low Battery Warning
Control setting.
Will Device Confirm is
set to Yes and: a) the
server is not
confirming OS
shutdown, or b) the
wrong cable is being
used.
a) Some versions of PowerChute
Plus do not support the Confirm
feature. See the documentation
supplied with PowerChute Plus.
b) Verify that you are using the
correct cable. Refer to “Choosing
additional cables: Table 1,” in the
Installation and Quick Start Manual.
Continued on next page
–58–
Product Information
Troubleshooting continued
If problems persist
For problems not covered in the troubleshooting chart (“Troubleshooting
suggestions” on page 57) or if the problem persists, follow this
procedure:
1. Note the serial number and date of purchase of the MasterSwitch plus unit. Contact Customer Support at a phone number
or address on the back cover of this manual.
2. Be prepared to provide a description of the problem. A
technician will help solve the problem over the phone, if
possible, or will give you a return material authorization (RMA)
number.
3. If the MasterSwitch plus unit is under warranty, repairs or
replacement is free of charge. If the warranty has expired, there
will be a charge for repair or replacement.
4. Pack the MasterSwitch plus unit carefully to avoid damage in
transit. Damage sustained in transit is not covered under the
warranty. Enclose a letter in the package with your name,
address, RMA number, a copy of the sales receipt, daytime
phone number, and check (if applicable).
5. Mark the RMA number clearly on the outside of the shipping
carton. The factory will not accept any materials without this
marking.
6. Return the MasterSwitch plus unit by insured, prepaid carrier to
the address provided by the Customer Support technician.
–59–
Product Information
Life-Support Policy
General policy
As a general policy, American Power Conversion (APC) does not
recommend the use of any of its products in life-support applications
where failure or malfunction of the APC product can be reasonably
expected to cause failure of the life-support device or to significantly
affect its safety or effectiveness. APC does not recommend the use of
any of its products in direct patient care. APC will not knowingly sell its
products for use in such applications unless it receives in writing
assurances satisfactory to APC that (a) the risks of injury or damage
have been minimized, (b) the customer assumes all such risks, and (c)
the liability of American Power Conversion is adequately protected
under the circumstances.
Examples of life-
The term life-support device includes but is not limited to: neonatal
oxygen analyzers, nerve stimulators (whether used for anesthesia, pain
relief, or other purposes), autotransfusion devices, blood pumps,
defibrillators, arrhythmia detectors and alarms, pacemakers,
hemodialysis systems, peritoneal dialysis systems, neonatal ventilator
incubators, ventilators for both adults and infants, anesthesia
ventilators, and infusion pumps, and any other devices designated as
“critical” by the U.S. FDA.
support devices
Hospital-grade wiring and leakage current protection may be ordered as
options on many APC UPS systems. APC does not claim that units with
these modifications are certified or listed as Hospital Grade by APC or
any other organization. Therefore these units do not meet the
requirements for use in direct patient care.
–60–
Product Information
Specifications
Basic port
interface
The following limitations and capabilities apply to the Basic port
interface (Ports 1–8) of MasterSwitch plus:
• Pins 3, 5, and 6 are open collector outputs which must be pulled
up to a common referenced supply no greater than +40 Vdc. The
transistors are capable of a maximum non-inductive load of
25 mAdc. Use only Pin 4 as the common.
• The output at Pin 2 generates a LO-to-HI RS-232 level when the
device is signaling an On Battery condition. The pin is normally at
a LO RS-232 level.
• The MasterSwitch plus unit may be signaled to shut down the UPS
by applying a HI RS-232 level to Pin 1 for 4.5 seconds. Shutdown
is also dependent on the UPS status and the MasterSwitch plus
shutdown mode (see“MasterSwitchplus Properties” on page 12).
Basic port pin
assignments
Continued on next page
–61–
Product Information
Specifications continued
Advanced port
interface
The Advanced port of MasterSwitch plus has the same limitations and
capabilities as the Basic ports (see “Basic port interface” on page 61),
with the following additional limitations and capabilities:
• Applying a momentary (approximately 1 second) high RS-232
level to Pin 7 turns the UPS and its loads on. A momentary low RS232 level turns the UPS and loads off. Pin 7 should be normally
unconnected. This signal is passed through the MasterSwitch
plus.
• DC operating voltage is available on Pin 8 of the Advanced port.
This may be the UPS battery voltage or the voltage from an
external adapter, whichever is greater.
Advanced
port pin
assignments
Continued on next page
–62–
Product Information
Specifications continued
Product
specifications
Item
Specification
Electrical
Input:
Nominal input voltage
Acceptable input voltage
Nominal input frequency
Overcurrent protection
Input connector
120 VAC
100–140 VAC
50/60 Hz
15 A resettable circuit breaker
15 ft (4.5 m) attached NEMA
5-15 line cord
Output:
Output connectors
8 NEMA 5-15 receptacles
Maximum total current draw:
15 A
Physical
Size (H × W × D):
Stand-alone
With mounting brackets
2.125 × 17.0 × 6.5 in
(5.4 × 43.2 × 16.5 cm)
1.875 × 19.0 × 6.5 in
(4.8 × 48.3 × 16.5 cm)
Weight:
7.75 lb (3.51 kg)
Shipping weight:
12.0 lb (5.45 kg)
Environmental
Elevation (above MSL):
Operating
Storage
0 to 10,000 ft (0 to 3000 m)
0 to 50,000 ft (0 to 15 000 m)
Temperature:
Operating
Storage
32 to 104°F (0 to 40°C)
32 to 113°F (0 to 45°C)
Operating Humidity:
0 to 95%, non-condensing
Approvals
EMC verification:
FCC Class A; DOC Class A
Safety Agency:
CSA; UL
–63–
MasterSwitchplus Web Interface
Status Summary
Event Log
MasterSwitch plus
Describes the MasterSwitch plus status
These are the events that have occurred
on this system
Date
Time
Event
Environment
Describes the Environment status
Web/SNMP Management Card
Describes the Management Card status
Network
TCP/IP
Configure the TCP/IP settings
Outlets
Control and Status of Outlets
Master Outlet Control for accessible outlets
Control Actions: Immediate On, Sequenced On,
Immediate Off, Graceful Reboot, Immediate Reboot,
Shutdown, Override, Cancel
Individual Outlet Control for accessible outlets
Control Actions: Immediate On, Delayed On,
Immediate Off, Graceful Reboot, Immediate Reboot,
Shutdown, Override, Cancel
System IP
Subnet Mask
Default Gateway
BOOTP (enable/disable)
TFTP/FTP
Configure TFTP client settings
Configure FTP client settings
Configure FTP server access settings
Telnet/Web
Configure Telnet Server Access Settings
Configure Web Server Access Settings
MasterSwitchplus
Device configuration
Configure the MasterSwitch plus device settings
Device Name
Manual Button (enable/disable)
Power On Time Delay
Outlet configuration
Configure MasterSwitch plus outlet name,
mode, and link settings
SNMP
Configure SNMP access settings
Configure SNMP access control settings
Configure SNMP trap receiver settings
System
Outlet (unit #:outlet #): Restart Delay, Power On Delay,
Reboot Duration, Alarm Action Delay, Device Confirm,
Low Battery Warning Control, UPS Low Battery
Multiplier, Battery Capacity Threshold, Initial State
Outlet Name
Outlet Control Mode (Graceful Shutdown,
Annunciator)
Outlet Link (URL)
User Manager
Configure user access settings
Auto Logout (1, 2, 3, 4, 5, 8, 10 minutes)
Authentication (Basic/MD5)
Configure the administrator settings
User Name
Password
Authentication Phrase
Configure the device manager user settings
User Name
Password
Authentication Phrase
Enable/Disable Environment Alarm Actions
Outlets 1–8; Zones 1–4
Outlets 1–8; Probe 1
Outlets 1–8; Probe 2
Outlet User Manager
Current Outlet User List
Add New User
Environment
Identification
Configure the system name, contact, and location
Status
Current data reported from probes
Current Status of the contacts
Date/Time
Configure the system date and time
Configuration
Environment Probe Settings
Threshold (Probes 1 & 2): High Temperature, Low
Temperature, High Humidity, Low Humidity
Traps (enabled/disabled)
Environment Contact Settings
Contact Name (Zones 1–4)
Trap (enabled/disabled)
File Transfer
Describes the current file transfer settings
Configure the name of the file to download
Initiate file transfer
Result of last file transfer
Initiate file transfer via (No action/FTP/TFTP)
Tools
Initiate a system action
Action (No action, Reboot, Reset to defaults, Reset to
defaults except TCP/IP)
Links
Configure the User Links
Configure the APC Links
–64–
MasterSwitch plus Control Console Interface
Device Manager Menu
MasterSwitchplus (1–4)
Name, State, Mode Outlet 1-8
Outlet Control
Immediate On
Delayed On
Immediate Off
Immediate Reboot
Graceful Reboot
Shutdown
Override
Cancel
Outlet Configuration
Outlet Name
Outlet Control Mode
Will Device Confirm
Low Batt Warn Ctrl
UPS Low Battery Multiplier
Restart Delay
Power Off Delay
Power On Delay
Reboot Duration
Battery Capacity Threshold
Accept Changes
Environment Alarms Configuration
Zone 1–4 (enable/disable)
Probe 1 HUMIDITY LOW Limit
Probe 1 HUMIDITY HIGH Limit
Probe 1 TEMP LOW Limit
Probe 1 TEMP HIGH Limit
Probe 2 HUMIDITY LOW Limit
Probe 2 HUMIDITY HIGH Limit
Probe 2 TEMP LOW Limit
Probe 2 TEMP HIGH Limit
Accept Changes
Environment
About Environmental Monitor
Contact Settings
Thresholds
High Temperature
Low Temperature
High Humidity
Low Humidity
Send Traps On
(enable/disable)
Threshold And Contact Details
Contact (1–4)
Name
Contact Zone (1–4)
enable/disable
Trap Thresholds Probe 1, 2
Current Threshold Violations
Current Contact Alarms
Firmware version
Network Menu
TCP/IP
lSystem IP
Subnet Mask
Default Gateway
BOOTP (enable/disable)
TFTP Client
FTP client
Remote server IP address
FTP server
Remote Server IP
User Name
Password
Telnet
Access
Port
Access
Port
Web
Access
Port
SNMP
Settings
Access control settings
Trap receiver settings
Ping Utility
Ping Address
System Menu
User Manager
Administrator
Device Manager User
Manage Outlet Users
Auto Logout
Authentication
Accept Changes
Identification
Name
Contact
Location
Accept Changes
Date/Time
File Transfer
Settings
XMODEM
TFTP Client
FTP Client
Logout
–65–
Tools
Reboot
Reset to Defaults
Reset to Defaults Except TCP/IP
About System
MasterSwitch plus
Model Number
Serial Number
Manufacture Date
MAC Address
Flash Vendor
Web/SNMP Management Card AOS
MasterSwitch plus
Index
A
About Card, 47
Accessing MasterSwitch Plus, 27
Accessories, availability of UPS control
commands with, 55
Accessory card slot, 9
Accounts, access to main menu
headings, 27
Administrator account
configuring, 40
Advanced port, 9
pin assignments, 62
Alarm Action Delay, 32
unattended shutdown, 15
Annunciator, 15
expansion unit, 54
sequence for environmental
alarms, 20
AP9225EXP (MasterSwitch Plus Expansion Unit), managing, 48
Authentication, 40, 45
Auto-configuration, 8, 27
B
Basic port, 9, 61
LED, 10
pin assignments, 61
Battery Capacity Threshold, 32
BOOTP, 37
C
Cancel, 29
Card slot, for accessories, 9
Community names, 44
Configuration, 13
environmental monitor, 34
expansion unit, 8
MasterSwitch Plus unit, 30
network settings, 8, 24
outlet, 31
user names and passwords, 41
Configuring an outlet
on-demand-only operation, 14
unattended shutdown, 15
Configuring user names & passwords, 40
Contact Name, 34
Contacts, configuring settings for, 34
Control action, 28
cancel, 29
delayed on, 28
immediate off, 28
immediate on, 28
immediate reboot, 29
override, 29
sequenced on, 28
shutdown, 29
Control Console
interface and structure, 25
Control Mode, 14, 31
outlet properties associated with, 12
Control of Outlets, 28
sequence for on-battery events, 18
H
Help Features, 44, 47
about card, 47
Interactive Assistant, 47
I
D
Date/Time, changing, 42
Default gateway, 37
Delayed On, 28
sequence, 21
Device Confirm, 31
on-demand, 14
unattended shutdown, 15
Device Manager account
configuring, 40
Device Name, 30
E
Encryption, 45
Environment Alarm Actions, 32
Environment Alarms, graceful shutdown
sequence, 19
Environment Menu, 33
expansion unit, 54
Environmental Alarms
annunciator sequence for, 20
Event Log Menu
FTP interface, 35
viewing, 36
Expansion Unit
configuring, 8
managing, 48
F
File Transfers, 8
using TFTP/FTP, 37
G
Graceful Reboot, 28
sequence, 23
Graceful Shutdown, 15
expansion unit, 52
sequence, 17
sequence for environment alarms, 19
–66–
Identification, 41
Immediate Off, 28
Immediate On, 28
Immediate Reboot, 29
Initial State, 32
Interactive Assistant, 47
L
LEDs
descriptions, 10
Life-Support, policy, 60
Links, 43
Local Help Pages, 47
Low Battery Warning Control, 31
unattended shutdown, 15
M
Main Menu, 28
expansion unit, 49
Main Menu Headings, account
access to, 27
Management Card, 9
Link-RX/TX LED, 10
status LED, 10
Managing MasterSwitch Plus, 24
Managing the Expansion Unit, 48
Manual Button, 9, 11
device configuration menu, 30
MasterSwitch Plus
management card, 9
operating, 12
product information, 55
MasterSwitch Plus Menu, device
configuration, 30
N
Navigating
through expansion unit menus, 48
Index
through help files, 47
Network Menu, 37
Non-Standard Port Address, 44
O
On-battery events, graceful shutdown
sequence, 18
On-demand operation
with PowerChute Plus, 55
On-demand-only configuration, 14
Orange Outlet Number, 29
Outlet configuration, 31
Outlet Control Mode, 14, 31
Outlet Link, 31
Outlet Name, 31
Outlet Properties, 31
expansion unit, 52
Outlet User account
configuring, 41
Outlet User List, 41
Outlet User Manager, 41
Outlet User, security, 44
Outlets Menu
control menu, 28
Override, 29
P
Password protection, 27
Passwords, 44
configuration, 41
Pin assignments
advanced port, 62
basic port, 61
Port address, non-standard, 44
Power Off Delay, 31
on-demand, 14
unattended shutdown, 15
Power On Delay, 31
on-demand, 14
Power On Time Delay, 30
on-demand, 14
unattended shutdown, 15
PowerChute Plus, using with MasterSwitch Plus, 55
Probes, configuring settings for, 33
Probes, readings of, 33
Product description, 7
Product information, 55
Product specifications, 63
Properties
outlet, 31
R
Rear panel, 11
Reboot, sequence, 22
Reboot Card, 43
Reboot Duration, 31
on-demand, 14
Reference guide, 8
Remote management, 24
Reset button, 9
Reset Card to Defaults, 43
Restart Delay, 31
on-demand, 14
Restore Factory Defaults, 30
S
Security, 44
security, 27
Send Traps On, 33
Sequenced On, 28
Shutdown, 29
SmartSlot accessory housing, 9
SNMP, 26
access control, 38
configuring for, 38
managing your unit through, 8
trap receiver, 39
Specifications, 63
Subnet mask, 37
System IP, 37
System Menu, 40
–67–
T
TCP/IP, 37
Telnet/Web, configuring for, 38
TFTP/FTP, 37
Thesholds, battery capacity, 32
Thresholds, probes, 34
To UPS Port, 9
Tools, system menu, 43
Trap Thresholds, 33
Troubleshooting, 57
U
Unattended shutdown configuration, 15
Unit Properties Menu, expansion unit, 51
Unit/Outlet Start-Up Sequence,
Start-Up of Unit/Outlets, 16
UPS Low Battery Multiplier, 32
unattended shutdown, 15
UPSControl Commands, availability with
MasterSwitch plus, 55
User accounts, 27
User Interfaces, 24
User Manager, 40
User Names, 44
configuration, 41
V
View Manufacturing Data, 30
View Self-Test Results, 30
W
Warranty, 56
Web Interface, 24
MD5 authentication, 46
APC Worldwide Customer Support
Customer support for this or any other APC product is available at no charge in any of the
following ways:
•
Visit the APC Web site to find answers to frequently asked questions (FAQs), to access
documents in the APC Knowledge Base, and to submit customer support requests.
– http://www.apcc.com (Corporate Headquarters)
Connect by links to APC Web pages for specific countries and regions, each of which
provides customer support information.
– http://www.apcc.com/support/
Submit customer support requests.
•
Contact an APC Customer Support Center by telephone or e-mail.
– Regional centers:
APC Headquarters (U.S. and
Canada)
(1) (800) 800-4272 (toll free)
Latin America
(1) (401) 789-5735 (United States)
[email protected]
Europe, Middle East, Africa
(353) (91) 702020 (Ireland)
[email protected]
Japan
(03) 5434-2021
[email protected]
– Local, country-specific centers: go to http://www.apcc.com/support/contact for
contact information.
•
Contact the APC representative or other distributor from whom you purchased your APC
product for information on how to obtain local customer support.
Entire contents copyright © 2000 American Power Conversion. All rights reserved. Reproduction
in whole or in part without permission is prohibited. APC, MasterSwitch and NetShelter are trademarks or
registered trademarks of American Power Conversion Corporation. All other trademarks,
product names, and corporate names are the property of their respective
owners and are used for informational purposes only.
990-6012B
08/2000