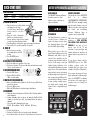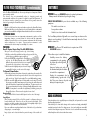
1
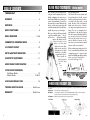
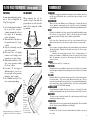
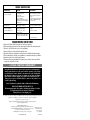
TROUBLE SHOOTING GUIDE
SYMPTOM
CAUSE
SOLUTION
Detector chatters
or beeps erratically
• Using detector indoors
• Using detector near
power lines
• Using 2 detectors in
close proximity
• Highly oxidized buried object
• Environmental electromagnetic
interference
• Discharged batteries
• Wrong type of batteries
• Multiple targets present
• Highly oxidized target
• Sensitivity set too high
• Use detector outdoors only
• Move away from power lines
• Keep 2 detectors at least 20’
apart
• Only dig up repeatable signals
• Reduce sensitivity until erratic
signals cease
Constant low tone or constant
repeating tones
LCD does not lock
on to one target ID
or emits multiple tones
No power, no sounds
• Dead batteries
• Batteries connected improperly
• Cord not connected securely
• Replace batteries
• Use only 9V alkaline batteries
• Move coil slowly at different
angles
• Reduce sensitivity
OWNER’S MANUAL
• Replace batteries
• Check connections
TREASURE HUNTER’S CODE OF ETHICS:
• Always check Federal, State, County and local laws before searching.
• Respect private property and do not enter private property without the owner’s permission.
• Take care to refill all holes and try not to leave any damage.
• Remove and dispose of any and all trash and litter found.
• Appreciate and protect our inheritance of natural resources, wildlife and private property.
• Act as an ambassador for the hobby, use thoughtfulness, consideration and courtesy at all times.
• Never destroy historical or archaeological treasures.
• All treasure hunters may be judged by the example you set; always conduct yourself with
courtesy and consideration of others
5-YEAR LIMITED WARRANTY
Bounty Hunter Metal Detectors are warranted against defects in workmanship or
materials under normal use for five years from date of purchase to the original
user. Liability in all events is limited to the purchase price paid. Liability under
this Warranty is limited to replacing or repairing, at our option, any Bounty
Hunter Detector returned, shipping cost prepaid, to First Texas Products, LP.
Damage due to neglect, accidental damage or misuse of this product is not
covered by this warranty.
Proof of purchase is required to make a claim under this warranty.
NOTE TO FOREIGN COUNTRY CUSTOMERS
This warranty may vary in other countries, check with your distributor for details.
Factory warranty follows the channel of distribution.
Warranty does not cover shipping costs.
Copyright ©2008 by First Texas Products, L.P.
All rights reserved, including the right to reproduce this book, or parts thereof, in any form, except for the
inclusion of brief quotations in a review.
The Pioneer 505 is a professional metal detector. The concepts
and terminology can be quite unfamiliar if you are new to the
hobby. To understand it quickly and to get the most enjoyment
possible from your detector, we strongly recommend that you:
1) Watch the video. It is 21 minutes long.
2) Turn the Sensitivity knob to a low setting if you get false
signals. A little practice is required to understand when and how
you can use the sensitivity at or near 100%.
3) Do not use indoors. This detector is for outdoor use only. Many
household appliances emit electromagnetic energy, which can
interfere with the detector.
If conducting an indoor
demonstration, turn the sensitivity down and keep the search
coil away from all floors, walls and metal objects.
4) Read this manual.
Most importantly, review the Summary of Operating Modes and
the Quick-Start Demo.
Published by First Texas Products, L.P.
Bounty Hunter® and Pioneer® are registered trademarks of First Texas Products, L.P.
The BOUNTY HUNTER PIONEER series of metal detectors is not associated
or connected in any way with Pioneer Corporation or
its PIONEER brand audio and video products or other products.
www.detecting.com
First Texas Products, LP
1465-H Henry Brennan
El Paso, TX 79936
(915) 633-8354
M505B 4/08
5) Use 9volt ALKALINE batteries only.
TABLE OF CONTENTS
TERMINOLOGY . . . . . . . . . . . . . . . . . . . . . . . . . . . . . . .3
ASSEMBLY . . . . . . . . . . . . . . . . . . . . . . . . . . . . . . . . . . .4
BATTERIES . . . . . . . . . . . . . . . . . . . . . . . . . . . . . . . . . . .5
QUICK-START DEMO . . . . . . . . . . . . . . . . . . . . . . . . . . .6
BASIC OPERATION . . . . . . . . . . . . . . . . . . . . . . . . .7 & 8
SUMMARY OF OPERATING MODES . . . . . . . . . . . . . . .9
LCD TARGET DISPLAY . . . . . . . . . . . . . . . . . . . . . . . . .10
DEPTH & BATTERY INDICATORS . . . . . . . . . . . . . . . .11
SENSITIVITY ADJUSTMENT . . . . . . . . . . . . . . . . . . . .11
AUDIO TARGET IDENTIFICATION . . . . . . . . . . . . . . .12
IN THE FIELD TECHNIQUES
No-Motion Modes . . . . . . . . . . . . . . . . . . . . . . . . . .12
Motion Modes . . . . . . . . . . . . . . . . . . . . . . . . .13 & 15
4-INCH GOLD NUGGET COIL . . . . . . . . . . . . . . . . . . . .15
TROUBLE SHOOTING GUIDE . . . . . . . . . . . . .Back Cover
WARRANTY . . . . . . . . . . . . . . . . . . . . . . . . . . .Back Cover
2
IN THE FIELD TECHNIQUES - Motion modes
After selecting your operating mode,
swing the search coil gently side-to-side,
slightly overlapping each sweep as you
move forward. Make sure you keep your
search coil approximately 1 inch above
the ground as you search. Raising it in the
sweep, or at the ends of your sweep, will
cause false readings. Move slowly; hurrying will only cause you to miss targets.
Most good objects will respond with
a good repeatable signal.
If a signal does not
repeat after swinging the coil directly over the
suspected target a few
times, it is more than
likely trash metal. False
signals can be caused by
trashy ground, electrical
interference, or by large
irregular trash objects.
These signals are
easily recognized
by their often
broken
or
non-repeatable nature.
The Pioneer 505 is a very sensitive and
deep-seeking detector. It will respond
loudly to many targets that other detectors would only detect with a weak
signal. Because of this, trash-induced
signals and other sources of interference may cause signals that seem confusing. The key to managing these
false signals is to dig only those targets
that emit a strong repeatable signal. As
you sweep the search coil back and
forth over the ground, learn to recognize the difference between the signals that occur at random and signals
that are stable and repeatable.
When searching very trashy ground, it is
best to scan small areas with slow, short
overlapping sweeps. To prevent erratic
signals and difficult pinpointing in trashy
areas, use the Bounty Hunter
4-Inch Gold Nugget Coil.
WHAT
READS
LIKE THIS
…MAY
ACTUALLY
BE THIS
4-INCH GOLD NUGGET COIL
The standard 8-inch coil is great for most detecting applications. In special situations, a smaller coil
is needed.
Tight Spaces The 4-inch coil can fit into tight spaces.
Black Sand
“Sees through” black sand, or other highly mineralized soils, because the ratio of
metal to detection area is higher. Perfect for gold prospecting.
Trashy Areas Narrow detection field can better separate objects.
15
IN THE FIELD TECHNIQUES - Motion modes
PINPOINTING
COIL MOVEMENT
Accurate pinpointing takes practice
and is best accomplished by
“X-ing” the target area.
When swinging the coil, be
careful to keep it level with the
ground about one inch from the
surface. Never swing the coil like
a pendulum.
1. Once a buried target is indicated
by a good tone response,
continue sweeping the coil over
the target in a narrowing
side-to-side pattern.
2. Take visual note of the place on
the ground where the “beep”
sounds.
3. Stop the coil directly over this
spot on the ground.
4. Now move the coil straight
forward and straight back
towards you a couple of times.
5. Again make visual note of the
spot on the ground at which
the “beep” sounds.
6. If needed, “X” the target at
different angles to “zero in” on
the exact spot on the ground at
which the “beep” sounds.
7. Use All-Metal mode (p15) for
more accurate pinpointing.
When pinpointing a target, try drawing an “X”,
as illustrated, over where the tone is induced.
14
WRONG
TERMINOLOGY
ELIMINATION
Reference to a metal being "eliminated" means that the detector will not emit a tone,
nor light up an LCD indicator, when a specified object passes through the coil’s
detection field.
DISCRIMINATION
When the detector emits different tones for different types of metals, and when the
detector "eliminates" certain metals, we refer to this as the detector "discriminating"
among different types of metals. Discrimination is a fixed-start-point elimination system.
NOTCH
Notching is the elimination of an item, or range of items, within the metallic spectrum.
We "notch-out" an object selectively. Objects to the left and right on the metallic
spectrum are retained. Notching creates a variable rejection window.
RELIC
A relic is an object of interest by reason of its age or its association with the past.
Many relics are made of iron, but can also be made of bronze or precious metals.
IRON
CORRECT
Iron is a common, low-grade metal that is often an undesirable target in certain metal
detecting applications. Examples of undesirable iron objects are old cans, pipes,
bolts, and nails.
Sometimes, the desired target is made of iron. Property markers, for
instance, can contain iron. Valuable relics can also be composed of iron; cannon
balls, old armaments, and parts of old structures and vehicles can also be
composed of iron.
FERROUS
Metals which are made of, or contain, iron.
PINPOINTING
Pinpointing is the process of finding the exact location of a buried object. Long-buried
metals can appear exactly like the surrounding earth, and can therefore be very hard
to isolate.
PULL-TABS
The
coil
should
be swung
in a
halfcircle
movement
as
illustrated
here.
Repeat this
motion
every step
you take to
guarantee that
the area is being
covered thoroughly.
Discarded pull-tabs from beverage containers are the most bothersome trash items
for treasure hunters. They come in many different shapes and sizes. We have
incorporated special features into the detector to let you automatically eliminate the
most common types, using the AutoNotch Mode. Since there are many different
types, some must be "Notched-Out" manually.
GROUND BALANCE
Ground Balancing is the ability of the detector to ignore, or "see through," the earth’s
naturally occurring minerals, and only sound a tone when a metal object is detected.
WATERPROOF
The search coil can be submerged in water. The control housing and cable-to-housing
connection must, however, stay dry.
COINSHOOTING
Finding buried coins is the most popular metal detecting application. The most valuable
are very old; take care in unearthing them to avoid damage.
CACHE HUNTING
Pronounced “cash”. A cache is a buried or hidden valuable stored inside a case, strong
box, or bag.
3
AUDIO TARGET ID -Motion modes only
EASY ASSEMBLY
Assembling your Pioneer 505 Metal
Detector is easy and requires no tools.
Just follow these steps:
Knurled
Knob
Bolt
1 Using the supplied bolt and knurled
●
IRON & STEEL:
knob, attach the search coil to the
lower stem.
2 If your model is equipped with a 3●
piece stem, open the plastic locking
nut on the upper tube by rotating it
counterclockwise. Then slide the
middle tube into the upper tube,
inserting the silver button into the
locating hole which is 1/2” behind the
plastic locking nut. Now tighten the
plastic locking nut.
Search Coil
Bottom view
of the lower stem and slide the
lower stem into the upper stem.
4 Wind the search coil cable around
●
Lower
Stem
Upper
Stem
Lower
Stem
the stem. Leave enough slack in the
cable to let you adjust the coil when
you are hunting on uneven ground.
Then tighten the knob at the end of
the search coil.
Search
Coil
Cable
Note: To adjust the coil,
Upper
Stem
simply loosen the knob.
In the DISCRIMINATION mode most
iron and steel objects will induce a low
tone. Highly oxidized iron can induce a
high tone, depending on the
Disc/Notch control setting. For
instance, some rusted bottle caps will
induce a high tone and indicate to the
right of the LCD target display.
GOLD:
3 Press the button on the upper end
●
Adjust the stem to a length that lets
you maintain a comfortable upright
posture, with your arm relaxed at
your side.
In the DISC, NOTCH or AUTONOTCH
modes, the detector emits three
distinct tones, which classify metal
objects into categories
Bottom side
Gold objects will induce a low or
medium tone, depending on their
sizes. Very small gold objects will
indicate on the left-most segment.
Large gold objects will read under the
Zinc segment. If you are gold
prospecting, you will usually be
looking for natural gold in an area
which it does not contain much trash,
and can therefore ignore the specific
segment descriptions.
Plug
Control
Housing
5 Insert
●
the coil’s plug into the
matching connector on the control
housing. Be sure the holes and pins
line up correctly.
PULL TABS:
Pull tabs are the most bothersome
trash items for detectorist. Most will
induce a medium tone. Most will be
eliminated automatically in the AUTO
NOTCH mode, or alternatively be
manually “notched out” in NOTCH
mode with the Disc/Notch control. The
older pull tabs (those not attached to
the can after opening) are sometimes
broken in half; these broken tabs can
induce low tones. Highly oxidized pull
tabs can also induce high tones.
It can be very difficult to differentiate
pull tabs from gold rings. When they
both induce medium tones, you might
notice a “double beep” from a gold
ring but a “single beep” from pull tabs.
To achieve this distinction, sweep the
search coil very slowly, and at different
angles. Two tones might signal as the
detector passes over each side of the
round ring.
COPPER, SILVER & BRASS:
Most valuable coins are composed of
these metals and will usually induce a
high tone. Valuable objects other than
coinage can also be composed of
copper, silver and brass.
LOW TONE
MEDIUM TONE
HIGH TONE
Nails & Bottle Caps,
Gold & Nickel
Old & New Pull Tabs, Zinc,
Pennies (Post 1982), Larger
Gold Objects
Copper, Silver & Brass
Copper Pennies (Pre 1982)
Caution:
• Do not force the plug in.
Excess force will cause damage.
• To disconnect the cable, pull on the
plug. Do not pull on the cable.
4
Connector
on back of
control housing
Audio Target Identification (ATI) classifies metals into three categories.
13
IN THE FIELD TECHNIQUES - No-motion modes
In the No-Motion All-Metal Mode, coil sweep technique is not important. Rather,
user retuning is critical.
The detector does not automatically adjust to changing ground and
environmental conditions; the operator is required to make the adjustment. If
the detector sounds a constant tone over all areas of the ground, retune the
detector by pressing the GroundTrac button.
RETUNING
Keep the coil still, just above the ground surface, and press the GroundTrac button.
Make sure that the spot on the ground you chose for tuning did not contain metal;
pass over the area with the coil again to insure that the detector does not emit a tone.
TEMPERATURE CHANGE
If the detector moves from one temperature environment to another, or if the
temperature changes, you must retune the detector until the temperature
stabilizes. If you move from a cooler to a warmer environment, the detector may
emit a constant tone; if so, retune. If you move from a warmer to cooler
environment, the detector may lose sensitivity; if so, retune.
PINPOINTING
How To Pinpoint Targets Using The ALL-METAL Mode
BATTERIES
IMPORTANT: Always use ALKALINE batteries for optimal performance.
Always remove the batteries for prolonged storage.
CHECK THE BATTERIES if your detector exhibits any of the following
symptoms:
1
●
2
●
3
●
The unit does not turn on.
Low speaker volume.
Unable to tune detector with the discriminate knob.
The Low Battery indicator light will come on and stay on whenever the
batteries need replacing. It should flash momentarily when the Power
Switch is turned on.
IMPORTANT: Your Pioneer 505 metal detector requires two 9-Volt
ALKALINE batteries.
When you’ve discovered a target you wish to dig, do the following:
1. Hold the searchcoil about half an inch above the ground, off to the
side of where you think the target probably is.
2. Tap the ALL METAL touchpad button. This will put
you into the All Metal Pinpoint mode. NOTE:
unlike the other modes, this mode does not require
the searchcoil to be in motion to detect a target.
3. Lift the searchcoil slightly, and pass it over the target. The
sound will be loudest over the center of the target.
To Narrow It Down Further:
4. Now that you know about where the target is, again lower the searchcoil to
about half an inch above the ground, near the center of the target but not
right over the top. Tap the button again. The sound will instantly go away.
5. Lift the searchcoil slightly and move it horizontally over the target. The audible response zone will be much narrower. If you move the searchcoil around
right and left and also forward and back, making an “X” pattern over the target, you can determine the location of the target usually within an inch or two.
NOTE: if at any time it seems like the signal may be drifting, just tap the
Ground-Trac button. This restores the signal to its zero level.
Detection Field
The No-Motion Mode’s detection field depends on the size of the target.
Large Objects
After detecting a target, lift the coil off the ground to a distance where you
hear the faintest tone. Move the coil over the ground at this height. If the
tone does not fade, you have detected a large or irregularly shaped object.
Outline the object with slow coil movements.
If you can outline an area larger than the size of the inside coil, you then have
a large target, or several targets.
Large objects can be detected when they enter the range of the outside coil.
12
Follow these steps to install the batteries.
1 Carefully remove the battery
●
compartment door by pressing
the release clip on the right side
of the door.
2 Snap one battery onto each of
●
the terminals and place the batteries inside the compartment.
3
● Replace the compartment door by
carefully inserting opposite side of clip
first. Then press down on clip side until
battery door snaps into place.
Release
Clip
USING HEADPHONES
Using headphones (not supplied) improves battery life, and prevents the sounds
from annoying bystanders.
It also allows you to hear subtle changes in the sound more clearly, particularly if
searching in a noisy location. For safety reasons, do not use headphones near traffic
or where other dangers are present. This device is to be used with interconnecting
cables/headphone cables shorter than three meters.
5
QUICK-START DEMO
I. SUPPLIES NEEDED
• Nickel
• Quarter
• A small piece of aluminum foil
• Dime
• A Nail
• A large screwdriver or other large iron object
• A Zinc Penny (dated after 1982)
II. POSITION THE DETECTOR
a. Place the detector on a table, with the search
coil hanging over the edge.
(or better, have a friend hold the
detector, with the coil off the
ground)
b. Keep the search coil away from
walls, floors, and metal objects.
c. Remove watches, rings and other jewelry
or metal objects from hands and wrists.
d. Turn off appliances or lights that cause electromagnetic interference.
e. Pivot search coil to a position parallel to the ground.
III. POWER UP
a. Turn the detector on and turn
the sensitivity knob to the 3:00
position.
b. Press ALL-METAL button.
c. Press the GroundTrac button.
IV. HOLD OBJECTS OVER SEARCH COIL
a. Notice the single tone, regardless of the object.
b. Motion is not required. The detector will emit sound whenever a metal
object is over the search coil.
V. ENTER DISCRIMINATION MODE
a. Press the DISC button.
b. Move the Disc/Notch Knob
100% counterclockwise.
VI. WAVE OBJECTS OVER SEARCH COIL
a. Wave coins with flat surface parallel to coil. This is how you’ll find them
buried in the ground.
b. Notice the different tones.
c. Watch the LCD indicator for depth and target identification.
BATTERY/ DEPTH INDICATORS & SENSITIVITY ADJUSTMENT
BATTERY INDICATOR:
SENSITIVITY ADJUSTMENT:
The LOW BATT indicator will flash as
the unit is powered on. If the
indicator comes on and stays on,
replace the batteries.
The principle use for the SENSITIVITY
knob
is
to
eliminate
ELECTROMAGNETIC INTERFERENCE
(EMI). EMI is both naturally-occurring
and man-made. Common sources of
EMI are power lines, both suspended
and buried, and broadcasting
antennas. Machinery, when in
operation, can also produce EMI.
DEPTH INDICATOR:
The Depth Indicator is accurate for
coin-sized objects. It indicates the
depth of the target, in inches. Large
and irregularly-shaped objects will
yield less reliable depth readings
When passing over an object, the
depth indicator will light up and stay
illuminated until another object is
scanned. Pass repeatedly over the
suspected target and pause briefly at
the end of each sweep to read your
display. Repeated indication at the
same depth level indicates an accurate
target detector. If the depth indication
varies with each sweep, try sweeping
at different angles; there may be more
than one target present. With practice,
you will learn the difference between
accurate readings, multiple targets,
and highly erratic readings which
evidence trash or irregularly shaped
objects.
EMI comes from most household
appliances, so YOUR DETECTOR
CAN BEHAVE VERY ERRATICALLY
INDOORS. If you want to test it
indoors, turn off the TV and
microwave. If you have lights with
dimmer switches, also turn these off;
dimmer switches can produce lots of
EMI.
If your detector chatters with the
SENSITIVITY knob in the 100%
clockwise position, reduce the
sensitivity until the chatter stops
(usually to the 1:00 or 3:00 position).
If you suspect the presence of deeper
targets underneath a shallower target,
reduce the SENSITIVITY to eliminate
the detection of the deeper target to
properly locate and identify the
shallower target.:
VII. DISCRIMINATE
a. Waive the nail and slowly turn the Disc/Notch Knob clockwise until the
nail is eliminated.
b. Continue eliminating objects one-by-one, by turning the Disc/Notch Knob
clockwise as you wave each object. Stop turning after the zinc penny is
eliminated.
c. The objects will be eliminated in this order:
1) Nail 2) ScrewDriver 3) Foil 4) Nickel 5) Penney
VIII. NOTCH
6
a. Press the Notch button.
b. Position the Disc/Notch Knob so that the penny is eliminated.
c. Notice that the nickel is now detected. The penny has been "notched-out."
Depth indicator locked on 8 inches
11
LCD TARGET DISPLAY -Motion modes only
READING THE DISPLAY
The LCD Target Display is accurate in
the Motion Modes only.
The Liquid Crystal Display (LCD) shows
the PROBABLE identification of the
targeted metal, as well as the PROBABLE
depth of the target, in inches.
Pass the search coil repeatedly over a
target, and observe the target readout.
The detector will register a repeated,
unchanging target identification when a
buried target has been located and
identified. If, upon repeated passes over
the same spot, the target identification
reads inconsistently, the target is probably
a trash item, or oxidized metal. With
practice, you will learn to unearth only the
repeatable signals.
The segment identifications are highly
accurate, when detecting the objects
described on the label. For example, if
you pass the coil repeatedly over a nickel,
your detector will repeatedly register a
nickel. However, if you repeatedly register
a nickel, for an unknown buried object,
you could be detecting some other
metallic object with the same magnetic
signature as a nickel.
GOLD TARGETS Gold objects will
register on the left side of the LCD scale.
Gold flakes will register under Iron/Foil
Small gold items will register under Pull
Tab.
Medium-sized gold items will register
under S-caps.
Large gold items will register as Zinc 1¢.
SILVER TARGETS: Silver objects will
register to the right of the scale, under
25¢, 50¢, or $1, depending on the size
of the object. The larger the object, the
farther to the right it will register.
10
IRON/FOIL: All sizes of iron and
aluminum objects will register on the
far-left side of the scale. This could
indicate a worthless item such as a nail,
or a more valuable historic iron relic.
BASIC OPERATION
TURN THE DETECTOR ON
Click the left knob to the on position.
Three tones will sound.
The detector automatically enters the DISC Mode.
NO-MOTION ALL-METAL MODE
PULL TAB: All older pull tabs from
beverage cans will register here. Most
newer pull tabs will register here. Many
gold rings will also register here.
To operate in this mode:
• Hold the search coil over the ground surface, about 1/2 inch.
• Press ALL-METAL,then press GROUND TRAC Button.
S-CAPS: Older screw caps from glass
bottles will register here. Large gold
rings, like a class ring, could also register
here. Some non-U.S. coins of recent
vintage will also register here.
The detector will emit only one monotone sound, regardless of the type
of metal detected.
If the detector emits a constant tone, retune the detector with the search
coil just above the ground surface. Make sure that the ground area chosen
for tuning the detector does not contain metal; if unsure, switch into DISC
mode and verify that the detector does not emit tones as you sweep the coil
over the chosen spot.
1¢ ZINC: Newer pennies (post-1982)
will register here. Many non-U.S. coins
of recent vintage will also register here.
10¢: Dimes and pre-1982 pennies will
register here. Older, pre-1982, pennies
are composed of copper, which has a
metallic signature similar to a dime.
Caution: The target indications are
visual references. Many other types of
metal can fall under any one of these
categories. You will experience a
trash-to-treasure ratio when treasure
hunting. The more you practice, the
lower you will push your trash-totreasure ratio. While the Pioneer 505
will eliminate or indicate the presence
of most common trash items, it is
impossible to accurately classify ALL
buried objects. The LCD provides a
visual reference to minimize the
detection of trash objects. By using the
target ID in conjunction with
discrimination control and the threetone audio identification system
(discussed later), you can further
reduce the trash-to-treasure ratio.
Ground conditions can change over short distances. Until you become
familiar with the detector’s volume level, retune the detector periodically by
pressing the GroundTrac button.
Temperature changes also require retuning. If the detector emits a
constant tone, or loses sensitivity, retune. If you have stored the detector
indoors and move outdoors immediately to a different temperature
environment and begin detecting, retune the detector periodically until the
coil temperature stabilizes. This retuning is only necessary in the ALL-METAL
Mode.
MOTION ALL-METAL Mode
To operate in this mode:
• Turn the right knob, Disc/Notch, 100% counterclockwise, to the off
position.
• Press the DISC button.
• Reduce the Sensitivity Control to the 2:00 or 3:00 position.
• Sweep the coil over the surface of the ground.
The detector will emit one of three tones, depending on the type of metal
detected.
The top display will indicate the type of metal targeted.
The bottom display will indicate the depth, in inches, of coin-sized objects.
A worthwhile target is evidenced by a consistent tone, and a repeatable
target and depth indication as you sweep back and forth over the same spot
more next page
7
BASIC OPERATION continued
on the ground. Non-repeatable tones indicate the presence of trash objects
or highly oxidized metals.
You can increase the level of sensitivity, depending on the ground
conditions. If the detector emits false signals, simply reduce the Sensitivity
until the false signals cease. The detector will work well with the Sensitivity
in the 2:00 or 3:00 position, but higher Sensitivity settings will increase depth
detection. If you need maximum depth detection, operate in the ALL-METAL
Mode, which allows for higher Sensitivity control settings.
DISCRIMINATION Mode
To operate in this mode:
• Press the DISC button.
• Reduce the Sensitivity Control to
the 2:00 or 3:00 position.
• Sweep the coil over the surface
of the ground.
• Turn the right knob, Disc/Notch,
to eliminate unwanted items
from detection as illustrated to
the right:
NOTCH Mode
To operate in this mode:
• Press the NOTCH button.
• Use the Disc/Notch Knob to eliminate medium tone trash items from
detection, but still retain low and high tone valuables.
AUTONOTCH Mode
To operate in this mode:
• Press the AUTONOTCH button.
• Most pull-tabs and medium tone trash items are automatically
eliminated.
• The Disc/Notch Knob operates as in the NOTCH mode.
To change into any mode at any time, simply press the desired button.
The GroundTrac button only functions when in the All-Metal Mode.
8
SUMMARY OF OPERATING MODES
I. NO-MOTION ALL-METAL MODE
• Deepest Seeking Mode
• No motion is required
• All metals will be detected
• One tone only
• Manual Ground Balance: User must tune and retune with the GroundTrac button.
To Operate:
1) Press All-Metal button.
2) Press GroundTrac button, and re-tune as necessary.
Applications:
Pinpointing Objects located in motion modes
Relic Hunting
Cache Hunting
Household applications: finding lost items, locating property markers
II. MOTION ALL-METAL MODE
• Motion Required
• All metals will be detected
• Three-tone Audio Target Identification
To Operate:
1) Press DISC button.
2) Keep Disc/Notch Knob 100% counterclockwise.
3) Reduce Sensitivity Knob in event of false signaling.
Applications:
Relic Hunting
Cache Hunting
Household applications: finding lost items, locating property markers
III. DISCRIMINATION MODE
•
•
•
•
•
Motion Required
Three-tone audio target identification
Disc/Notch Knob allows user to eliminate unwanted items.
Discrimination is a fixed-start-point system. Items are cumulatively eliminated.
As you turn the knob farther clockwise, more objects are eliminated, including the first items
eliminated.
• Reduce Sensitivity if the detector emits false or non-repeatable signals.
• Automatic Ground Balance: detector automatically adjusts to ground mineralization as you
sweep the coil.
To Operate:
1) Press DISC button
2) Move Disc/Notch Knob to desired setting.
3) Reduce Sensitivity Knob in event of false signaling.
Applications:
Coin-Shooting
Jewelry Hunting
IV. NOTCH MODE
• Automatically eliminates all ferrous objects.
• Disc/Notch Knob allows user to eliminate medium-tone trash items, but retain low and
high-tone valuables.
To Operate:
1) Press NOTCH button.
Other Operations and Applications: same as Discrimination Mode.
V. AUTONOTCH MODE
• Automatically eliminates all ferrous objects.
• Automatically eliminates most pull-tabs.
• Disc/Notch Knob allows user to eliminate medium-tone trash items, but retain low and
high-tone valuables.
To Operate:
1) Press AUTONOTCH button
Other Operations and Applications: same as Discrimination Mode.
9
LCD TARGET DISPLAY -Motion modes only
READING THE DISPLAY
The LCD Target Display is accurate in
the Motion Modes only.
The Liquid Crystal Display (LCD) shows
the PROBABLE identification of the
targeted metal, as well as the PROBABLE
depth of the target, in inches.
Pass the search coil repeatedly over a
target, and observe the target readout.
The detector will register a repeated,
unchanging target identification when a
buried target has been located and
identified. If, upon repeated passes over
the same spot, the target identification
reads inconsistently, the target is probably
a trash item, or oxidized metal. With
practice, you will learn to unearth only the
repeatable signals.
The segment identifications are highly
accurate, when detecting the objects
described on the label. For example, if
you pass the coil repeatedly over a nickel,
your detector will repeatedly register a
nickel. However, if you repeatedly register
a nickel, for an unknown buried object,
you could be detecting some other
metallic object with the same magnetic
signature as a nickel.
GOLD TARGETS Gold objects will
register on the left side of the LCD scale.
Gold flakes will register under Iron/Foil
Small gold items will register under Pull
Tab.
Medium-sized gold items will register
under S-caps.
Large gold items will register as Zinc 1¢.
SILVER TARGETS: Silver objects will
register to the right of the scale, under
25¢, 50¢, or $1, depending on the size
of the object. The larger the object, the
farther to the right it will register.
10
IRON/FOIL: All sizes of iron and
aluminum objects will register on the
far-left side of the scale. This could
indicate a worthless item such as a nail,
or a more valuable historic iron relic.
BASIC OPERATION
TURN THE DETECTOR ON
Click the left knob to the on position.
Three tones will sound.
The detector automatically enters the DISC Mode.
NO-MOTION ALL-METAL MODE
PULL TAB: All older pull tabs from
beverage cans will register here. Most
newer pull tabs will register here. Many
gold rings will also register here.
To operate in this mode:
• Hold the search coil over the ground surface, about 1/2 inch.
• Press ALL-METAL,then press GROUND TRAC Button.
S-CAPS: Older screw caps from glass
bottles will register here. Large gold
rings, like a class ring, could also register
here. Some non-U.S. coins of recent
vintage will also register here.
The detector will emit only one monotone sound, regardless of the type
of metal detected.
If the detector emits a constant tone, retune the detector with the search
coil just above the ground surface. Make sure that the ground area chosen
for tuning the detector does not contain metal; if unsure, switch into DISC
mode and verify that the detector does not emit tones as you sweep the coil
over the chosen spot.
1¢ ZINC: Newer pennies (post-1982)
will register here. Many non-U.S. coins
of recent vintage will also register here.
10¢: Dimes and pre-1982 pennies will
register here. Older, pre-1982, pennies
are composed of copper, which has a
metallic signature similar to a dime.
Caution: The target indications are
visual references. Many other types of
metal can fall under any one of these
categories. You will experience a
trash-to-treasure ratio when treasure
hunting. The more you practice, the
lower you will push your trash-totreasure ratio. While the Pioneer 505
will eliminate or indicate the presence
of most common trash items, it is
impossible to accurately classify ALL
buried objects. The LCD provides a
visual reference to minimize the
detection of trash objects. By using the
target ID in conjunction with
discrimination control and the threetone audio identification system
(discussed later), you can further
reduce the trash-to-treasure ratio.
Ground conditions can change over short distances. Until you become
familiar with the detector’s volume level, retune the detector periodically by
pressing the GroundTrac button.
Temperature changes also require retuning. If the detector emits a
constant tone, or loses sensitivity, retune. If you have stored the detector
indoors and move outdoors immediately to a different temperature
environment and begin detecting, retune the detector periodically until the
coil temperature stabilizes. This retuning is only necessary in the ALL-METAL
Mode.
MOTION ALL-METAL Mode
To operate in this mode:
• Turn the right knob, Disc/Notch, 100% counterclockwise, to the off
position.
• Press the DISC button.
• Reduce the Sensitivity Control to the 2:00 or 3:00 position.
• Sweep the coil over the surface of the ground.
The detector will emit one of three tones, depending on the type of metal
detected.
The top display will indicate the type of metal targeted.
The bottom display will indicate the depth, in inches, of coin-sized objects.
A worthwhile target is evidenced by a consistent tone, and a repeatable
target and depth indication as you sweep back and forth over the same spot
more next page
7
QUICK-START DEMO
I. SUPPLIES NEEDED
• Nickel
• Quarter
• A small piece of aluminum foil
• Dime
• A Nail
• A large screwdriver or other large iron object
• A Zinc Penny (dated after 1982)
II. POSITION THE DETECTOR
a. Place the detector on a table, with the search
coil hanging over the edge.
(or better, have a friend hold the
detector, with the coil off the
ground)
b. Keep the search coil away from
walls, floors, and metal objects.
c. Remove watches, rings and other jewelry
or metal objects from hands and wrists.
d. Turn off appliances or lights that cause electromagnetic interference.
e. Pivot search coil to a position parallel to the ground.
III. POWER UP
a. Turn the detector on and turn
the sensitivity knob to the 3:00
position.
b. Press ALL-METAL button.
c. Press the GroundTrac button.
IV. HOLD OBJECTS OVER SEARCH COIL
a. Notice the single tone, regardless of the object.
b. Motion is not required. The detector will emit sound whenever a metal
object is over the search coil.
V. ENTER DISCRIMINATION MODE
a. Press the DISC button.
b. Move the Disc/Notch Knob
100% counterclockwise.
VI. WAVE OBJECTS OVER SEARCH COIL
a. Wave coins with flat surface parallel to coil. This is how you’ll find them
buried in the ground.
b. Notice the different tones.
c. Watch the LCD indicator for depth and target identification.
BATTERY/ DEPTH INDICATORS & SENSITIVITY ADJUSTMENT
BATTERY INDICATOR:
SENSITIVITY ADJUSTMENT:
The LOW BATT indicator will flash as
the unit is powered on. If the
indicator comes on and stays on,
replace the batteries.
The principle use for the SENSITIVITY
knob
is
to
eliminate
ELECTROMAGNETIC INTERFERENCE
(EMI). EMI is both naturally-occurring
and man-made. Common sources of
EMI are power lines, both suspended
and buried, and broadcasting
antennas. Machinery, when in
operation, can also produce EMI.
DEPTH INDICATOR:
The Depth Indicator is accurate for
coin-sized objects. It indicates the
depth of the target, in inches. Large
and irregularly-shaped objects will
yield less reliable depth readings
When passing over an object, the
depth indicator will light up and stay
illuminated until another object is
scanned. Pass repeatedly over the
suspected target and pause briefly at
the end of each sweep to read your
display. Repeated indication at the
same depth level indicates an accurate
target detector. If the depth indication
varies with each sweep, try sweeping
at different angles; there may be more
than one target present. With practice,
you will learn the difference between
accurate readings, multiple targets,
and highly erratic readings which
evidence trash or irregularly shaped
objects.
EMI comes from most household
appliances, so YOUR DETECTOR
CAN BEHAVE VERY ERRATICALLY
INDOORS. If you want to test it
indoors, turn off the TV and
microwave. If you have lights with
dimmer switches, also turn these off;
dimmer switches can produce lots of
EMI.
If your detector chatters with the
SENSITIVITY knob in the 100%
clockwise position, reduce the
sensitivity until the chatter stops
(usually to the 1:00 or 3:00 position).
If you suspect the presence of deeper
targets underneath a shallower target,
reduce the SENSITIVITY to eliminate
the detection of the deeper target to
properly locate and identify the
shallower target.:
VII. DISCRIMINATE
a. Waive the nail and slowly turn the Disc/Notch Knob clockwise until the
nail is eliminated.
b. Continue eliminating objects one-by-one, by turning the Disc/Notch Knob
clockwise as you wave each object. Stop turning after the zinc penny is
eliminated.
c. The objects will be eliminated in this order:
1) Nail 2) ScrewDriver 3) Foil 4) Nickel 5) Penney
VIII. NOTCH
6
a. Press the Notch button.
b. Position the Disc/Notch Knob so that the penny is eliminated.
c. Notice that the nickel is now detected. The penny has been "notched-out."
Depth indicator locked on 8 inches
11
IN THE FIELD TECHNIQUES - No-motion modes
In the No-Motion All-Metal Mode, coil sweep technique is not important. Rather,
user retuning is critical.
The detector does not automatically adjust to changing ground and
environmental conditions; the operator is required to make the adjustment. If
the detector sounds a constant tone over all areas of the ground, retune the
detector by pressing the GroundTrac button.
RETUNING
Keep the coil still, just above the ground surface, and press the GroundTrac button.
Make sure that the spot on the ground you chose for tuning did not contain metal;
pass over the area with the coil again to insure that the detector does not emit a tone.
TEMPERATURE CHANGE
If the detector moves from one temperature environment to another, or if the
temperature changes, you must retune the detector until the temperature
stabilizes. If you move from a cooler to a warmer environment, the detector may
emit a constant tone; if so, retune. If you move from a warmer to cooler
environment, the detector may lose sensitivity; if so, retune.
PINPOINTING
How To Pinpoint Targets Using The ALL-METAL Mode
BATTERIES
IMPORTANT: Always use ALKALINE batteries for optimal performance.
Always remove the batteries for prolonged storage.
CHECK THE BATTERIES if your detector exhibits any of the following
symptoms:
1
●
2
●
3
●
The unit does not turn on.
Low speaker volume.
Unable to tune detector with the discriminate knob.
The Low Battery indicator light will come on and stay on whenever the
batteries need replacing. It should flash momentarily when the Power
Switch is turned on.
IMPORTANT: Your Pioneer 505 metal detector requires two 9-Volt
ALKALINE batteries.
When you’ve discovered a target you wish to dig, do the following:
1. Hold the searchcoil about half an inch above the ground, off to the
side of where you think the target probably is.
2. Tap the ALL METAL touchpad button. This will put
you into the All Metal Pinpoint mode. NOTE:
unlike the other modes, this mode does not require
the searchcoil to be in motion to detect a target.
3. Lift the searchcoil slightly, and pass it over the target. The
sound will be loudest over the center of the target.
To Narrow It Down Further:
4. Now that you know about where the target is, again lower the searchcoil to
about half an inch above the ground, near the center of the target but not
right over the top. Tap the button again. The sound will instantly go away.
5. Lift the searchcoil slightly and move it horizontally over the target. The audible response zone will be much narrower. If you move the searchcoil around
right and left and also forward and back, making an “X” pattern over the target, you can determine the location of the target usually within an inch or two.
NOTE: if at any time it seems like the signal may be drifting, just tap the
Ground-Trac button. This restores the signal to its zero level.
Detection Field
The No-Motion Mode’s detection field depends on the size of the target.
Large Objects
After detecting a target, lift the coil off the ground to a distance where you
hear the faintest tone. Move the coil over the ground at this height. If the
tone does not fade, you have detected a large or irregularly shaped object.
Outline the object with slow coil movements.
If you can outline an area larger than the size of the inside coil, you then have
a large target, or several targets.
Large objects can be detected when they enter the range of the outside coil.
12
Follow these steps to install the batteries.
1 Carefully remove the battery
●
compartment door by pressing
the release clip on the right side
of the door.
2 Snap one battery onto each of
●
the terminals and place the batteries inside the compartment.
3
● Replace the compartment door by
carefully inserting opposite side of clip
first. Then press down on clip side until
battery door snaps into place.
Release
Clip
USING HEADPHONES
Using headphones (not supplied) improves battery life, and prevents the sounds
from annoying bystanders.
It also allows you to hear subtle changes in the sound more clearly, particularly if
searching in a noisy location. For safety reasons, do not use headphones near traffic
or where other dangers are present. This device is to be used with interconnecting
cables/headphone cables shorter than three meters.
5
AUDIO TARGET ID -Motion modes only
EASY ASSEMBLY
Assembling your Pioneer 505 Metal
Detector is easy and requires no tools.
Just follow these steps:
Knurled
Knob
Bolt
1 Using the supplied bolt and knurled
●
IRON & STEEL:
knob, attach the search coil to the
lower stem.
2 If your model is equipped with a 3●
piece stem, open the plastic locking
nut on the upper tube by rotating it
counterclockwise. Then slide the
middle tube into the upper tube,
inserting the silver button into the
locating hole which is 1/2” behind the
plastic locking nut. Now tighten the
plastic locking nut.
Search Coil
Bottom view
of the lower stem and slide the
lower stem into the upper stem.
4 Wind the search coil cable around
●
Lower
Stem
Upper
Stem
Lower
Stem
the stem. Leave enough slack in the
cable to let you adjust the coil when
you are hunting on uneven ground.
Then tighten the knob at the end of
the search coil.
Search
Coil
Cable
Note: To adjust the coil,
Upper
Stem
simply loosen the knob.
In the DISCRIMINATION mode most
iron and steel objects will induce a low
tone. Highly oxidized iron can induce a
high tone, depending on the
Disc/Notch control setting. For
instance, some rusted bottle caps will
induce a high tone and indicate to the
right of the LCD target display.
GOLD:
3 Press the button on the upper end
●
Adjust the stem to a length that lets
you maintain a comfortable upright
posture, with your arm relaxed at
your side.
In the DISC, NOTCH or AUTONOTCH
modes, the detector emits three
distinct tones, which classify metal
objects into categories
Bottom side
Gold objects will induce a low or
medium tone, depending on their
sizes. Very small gold objects will
indicate on the left-most segment.
Large gold objects will read under the
Zinc segment. If you are gold
prospecting, you will usually be
looking for natural gold in an area
which it does not contain much trash,
and can therefore ignore the specific
segment descriptions.
Plug
Control
Housing
5 Insert
●
the coil’s plug into the
matching connector on the control
housing. Be sure the holes and pins
line up correctly.
PULL TABS:
Pull tabs are the most bothersome
trash items for detectorist. Most will
induce a medium tone. Most will be
eliminated automatically in the AUTO
NOTCH mode, or alternatively be
manually “notched out” in NOTCH
mode with the Disc/Notch control. The
older pull tabs (those not attached to
the can after opening) are sometimes
broken in half; these broken tabs can
induce low tones. Highly oxidized pull
tabs can also induce high tones.
It can be very difficult to differentiate
pull tabs from gold rings. When they
both induce medium tones, you might
notice a “double beep” from a gold
ring but a “single beep” from pull tabs.
To achieve this distinction, sweep the
search coil very slowly, and at different
angles. Two tones might signal as the
detector passes over each side of the
round ring.
COPPER, SILVER & BRASS:
Most valuable coins are composed of
these metals and will usually induce a
high tone. Valuable objects other than
coinage can also be composed of
copper, silver and brass.
LOW TONE
MEDIUM TONE
HIGH TONE
Nails & Bottle Caps,
Gold & Nickel
Old & New Pull Tabs, Zinc,
Pennies (Post 1982), Larger
Gold Objects
Copper, Silver & Brass
Copper Pennies (Pre 1982)
Caution:
• Do not force the plug in.
Excess force will cause damage.
• To disconnect the cable, pull on the
plug. Do not pull on the cable.
4
Connector
on back of
control housing
Audio Target Identification (ATI) classifies metals into three categories.
13
IN THE FIELD TECHNIQUES - Motion modes
PINPOINTING
COIL MOVEMENT
Accurate pinpointing takes practice
and is best accomplished by
“X-ing” the target area.
When swinging the coil, be
careful to keep it level with the
ground about one inch from the
surface. Never swing the coil like
a pendulum.
1. Once a buried target is indicated
by a good tone response,
continue sweeping the coil over
the target in a narrowing
side-to-side pattern.
2. Take visual note of the place on
the ground where the “beep”
sounds.
3. Stop the coil directly over this
spot on the ground.
4. Now move the coil straight
forward and straight back
towards you a couple of times.
5. Again make visual note of the
spot on the ground at which
the “beep” sounds.
6. If needed, “X” the target at
different angles to “zero in” on
the exact spot on the ground at
which the “beep” sounds.
7. Use All-Metal mode (p15) for
more accurate pinpointing.
When pinpointing a target, try drawing an “X”,
as illustrated, over where the tone is induced.
14
WRONG
TERMINOLOGY
ELIMINATION
Reference to a metal being "eliminated" means that the detector will not emit a tone,
nor light up an LCD indicator, when a specified object passes through the coil’s
detection field.
DISCRIMINATION
When the detector emits different tones for different types of metals, and when the
detector "eliminates" certain metals, we refer to this as the detector "discriminating"
among different types of metals. Discrimination is a fixed-start-point elimination system.
NOTCH
Notching is the elimination of an item, or range of items, within the metallic spectrum.
We "notch-out" an object selectively. Objects to the left and right on the metallic
spectrum are retained. Notching creates a variable rejection window.
RELIC
A relic is an object of interest by reason of its age or its association with the past.
Many relics are made of iron, but can also be made of bronze or precious metals.
IRON
CORRECT
Iron is a common, low-grade metal that is often an undesirable target in certain metal
detecting applications. Examples of undesirable iron objects are old cans, pipes,
bolts, and nails.
Sometimes, the desired target is made of iron. Property markers, for
instance, can contain iron. Valuable relics can also be composed of iron; cannon
balls, old armaments, and parts of old structures and vehicles can also be
composed of iron.
FERROUS
Metals which are made of, or contain, iron.
PINPOINTING
Pinpointing is the process of finding the exact location of a buried object. Long-buried
metals can appear exactly like the surrounding earth, and can therefore be very hard
to isolate.
PULL-TABS
The
coil
should
be swung
in a
halfcircle
movement
as
illustrated
here.
Repeat this
motion
every step
you take to
guarantee that
the area is being
covered thoroughly.
Discarded pull-tabs from beverage containers are the most bothersome trash items
for treasure hunters. They come in many different shapes and sizes. We have
incorporated special features into the detector to let you automatically eliminate the
most common types, using the AutoNotch Mode. Since there are many different
types, some must be "Notched-Out" manually.
GROUND BALANCE
Ground Balancing is the ability of the detector to ignore, or "see through," the earth’s
naturally occurring minerals, and only sound a tone when a metal object is detected.
WATERPROOF
The search coil can be submerged in water. The control housing and cable-to-housing
connection must, however, stay dry.
COINSHOOTING
Finding buried coins is the most popular metal detecting application. The most valuable
are very old; take care in unearthing them to avoid damage.
CACHE HUNTING
Pronounced “cash”. A cache is a buried or hidden valuable stored inside a case, strong
box, or bag.
3
TABLE OF CONTENTS
TERMINOLOGY . . . . . . . . . . . . . . . . . . . . . . . . . . . . . . .3
ASSEMBLY . . . . . . . . . . . . . . . . . . . . . . . . . . . . . . . . . . .4
BATTERIES . . . . . . . . . . . . . . . . . . . . . . . . . . . . . . . . . . .5
QUICK-START DEMO . . . . . . . . . . . . . . . . . . . . . . . . . . .6
BASIC OPERATION . . . . . . . . . . . . . . . . . . . . . . . . .7 & 8
SUMMARY OF OPERATING MODES . . . . . . . . . . . . . . .9
LCD TARGET DISPLAY . . . . . . . . . . . . . . . . . . . . . . . . .10
DEPTH & BATTERY INDICATORS . . . . . . . . . . . . . . . .11
SENSITIVITY ADJUSTMENT . . . . . . . . . . . . . . . . . . . .11
AUDIO TARGET IDENTIFICATION . . . . . . . . . . . . . . .12
IN THE FIELD TECHNIQUES
No-Motion Modes . . . . . . . . . . . . . . . . . . . . . . . . . .12
Motion Modes . . . . . . . . . . . . . . . . . . . . . . . . .13 & 15
4-INCH GOLD NUGGET COIL . . . . . . . . . . . . . . . . . . . .15
TROUBLE SHOOTING GUIDE . . . . . . . . . . . . .Back Cover
WARRANTY . . . . . . . . . . . . . . . . . . . . . . . . . . .Back Cover
2
IN THE FIELD TECHNIQUES - Motion modes
After selecting your operating mode,
swing the search coil gently side-to-side,
slightly overlapping each sweep as you
move forward. Make sure you keep your
search coil approximately 1 inch above
the ground as you search. Raising it in the
sweep, or at the ends of your sweep, will
cause false readings. Move slowly; hurrying will only cause you to miss targets.
Most good objects will respond with
a good repeatable signal.
If a signal does not
repeat after swinging the coil directly over the
suspected target a few
times, it is more than
likely trash metal. False
signals can be caused by
trashy ground, electrical
interference, or by large
irregular trash objects.
These signals are
easily recognized
by their often
broken
or
non-repeatable nature.
The Pioneer 505 is a very sensitive and
deep-seeking detector. It will respond
loudly to many targets that other detectors would only detect with a weak
signal. Because of this, trash-induced
signals and other sources of interference may cause signals that seem confusing. The key to managing these
false signals is to dig only those targets
that emit a strong repeatable signal. As
you sweep the search coil back and
forth over the ground, learn to recognize the difference between the signals that occur at random and signals
that are stable and repeatable.
When searching very trashy ground, it is
best to scan small areas with slow, short
overlapping sweeps. To prevent erratic
signals and difficult pinpointing in trashy
areas, use the Bounty Hunter
4-Inch Gold Nugget Coil.
WHAT
READS
LIKE THIS
…MAY
ACTUALLY
BE THIS
4-INCH GOLD NUGGET COIL
The standard 8-inch coil is great for most detecting applications. In special situations, a smaller coil
is needed.
Tight Spaces The 4-inch coil can fit into tight spaces.
Black Sand
“Sees through” black sand, or other highly mineralized soils, because the ratio of
metal to detection area is higher. Perfect for gold prospecting.
Trashy Areas Narrow detection field can better separate objects.
15
TROUBLE SHOOTING GUIDE
SYMPTOM
CAUSE
SOLUTION
Detector chatters
or beeps erratically
• Using detector indoors
• Using detector near
power lines
• Using 2 detectors in
close proximity
• Highly oxidized buried object
• Environmental electromagnetic
interference
• Discharged batteries
• Wrong type of batteries
• Multiple targets present
• Highly oxidized target
• Sensitivity set too high
• Use detector outdoors only
• Move away from power lines
• Keep 2 detectors at least 20’
apart
• Only dig up repeatable signals
• Reduce sensitivity until erratic
signals cease
Constant low tone or constant
repeating tones
LCD does not lock
on to one target ID
or emits multiple tones
No power, no sounds
• Dead batteries
• Batteries connected improperly
• Cord not connected securely
• Replace batteries
• Use only 9V alkaline batteries
• Move coil slowly at different
angles
• Reduce sensitivity
• Replace batteries
• Check connections
TREASURE HUNTER’S CODE OF ETHICS:
• Always check Federal, State, County and local laws before searching.
• Respect private property and do not enter private property without the owner’s permission.
• Take care to refill all holes and try not to leave any damage.
• Remove and dispose of any and all trash and litter found.
• Appreciate and protect our inheritance of natural resources, wildlife and private property.
• Act as an ambassador for the hobby, use thoughtfulness, consideration and courtesy at all times.
• Never destroy historical or archaeological treasures.
• All treasure hunters may be judged by the example you set; always conduct yourself with
courtesy and consideration of others
5-YEAR LIMITED WARRANTY
Bounty Hunter Metal Detectors are warranted against defects in workmanship or
materials under normal use for five years from date of purchase to the original
user. Liability in all events is limited to the purchase price paid. Liability under
this Warranty is limited to replacing or repairing, at our option, any Bounty
Hunter Detector returned, shipping cost prepaid, to First Texas Products, LLC.
Damage due to neglect, accidental damage or misuse of this product is not
covered by this warranty.
Proof of purchase is required to make a claim under this warranty.
NOTE TO CUSTOMERS OUTSIDE THE U.S.A.
This warranty may vary in other countries, check with your distributor for details.
Factory warranty follows the channel of distribution.
Warranty does not cover shipping costs.
According to FCC part 15.21 Changes or Modifications made to this device not expressly approved by the party
responsible for compliance could void the users authority to operate this equipment.
Copyright ©2010 by First Texas Products, L.L.C.
All rights reserved, including the right to reproduce this book, or parts thereof, in any form, except for the
inclusion of brief quotations in a review.
Published by First Texas Products, L.L.C.
Bounty Hunter® and Pioneer® are registered trademarks of First Texas Products, L.L.C.
The BOUNTY HUNTER PIONEER series of metal detectors is not associated
or connected in any way with Pioneer Corporation or
its PIONEER brand audio and video products or other products.
www.detecting.com
First Texas Products, LLC
1465-H Henry Brennan
El Paso, TX 79936
(915) 633-8354
M505B 063010