1
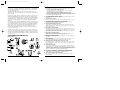
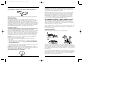
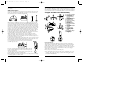
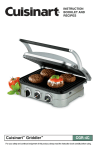
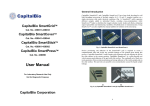
CSB-55 IB-3028D
8/12/03
6:52 PM
Page 1
®
INSTRUCTION
BOOKLET
SMARTSTICK™ EXTENDIBLE SHAFT HAND BLENDER
CSB-55
CSB-55 IB-3028D
8/12/03
6:52 PM
Page 2
TABLE OF CONTENTS:
Important Safeguards ..................................................................................pg. 2
Introduction.................................................................................................pg. 3
Features and Benefits ..................................................................................pg. 4
Before You Begin.........................................................................................pg. 6
Hand Blender Assembly..............................................................................pg. 6
Shaft Length Adjustment ............................................................................pg. 7
Hand Blender Operation ............................................................................pg. 8
Helpful Hints...............................................................................................pg. 9
Attachments .................................................................................................pg.10
Storage Stand for Countertop Use.............................................................pg.11
Storage Stand for Wall Mount ...................................................................pg.12
Chopper Grinder Parts and Assembly........................................................pg.13
Chopper Grinder Tips for Processing Food..............................................pg.16
Processing Foods.........................................................................................pg.18
Cleaning.......................................................................................................pg.20
SmartStick™ Hand Blender ....................................................................pg.20
SmartStick™ Mini Prep® Chopper Grinder Attachment ......................pg.20
Recipe Suggestions......................................................................................pg.21
Warranty ......................................................................................................pg.27
Template for Wall Mount Storage..............................................................pg.28
IMPORTANT SAFEGUARDS
When using an electrical appliance, basic safety precautions should always be
followed including the following:
1. READ ALL INSTRUCTIONS.
2. To protect against electrical shock, do not put the motor body, cord or
electrical plug of this Hand Blender in water or other liquid. The drive
shaft of this appliance, where blades are interchanged, has been designed
for submersion in water or other liquids. Never submerge any other
portion of this unit. If Hand Blender falls into liquid, remove immediately.
Do not reach into the liquid without unplugging the unit first.
3. This appliance should not be used by children. To avoid possible accidental injury, close supervision is necessary when any appliance is used by or
near children.
4. Unplug from outlet when not in use, before putting on or taking
off parts, and before cleaning. To unplug, grasp plug and pull from
electrical outlet. Never pull cord.
5. Avoid contacting moving parts.
6. During operation keep hands, hair, clothing, as well as spatulas and other
utensils away from attachments and any mixing container to reduce risk
of injury to persons, and/or damage to the appliance. A spatula may be
used, but must be used only when the unit is not operating.
7. Do not operate any appliance with a damaged cord or plug or after the
appliance has malfunctioned or has been dropped or damaged in any way
or is not operating properly. Return the appliance to the nearest
2
Cuisinart Repair Center for examination, repair, mechanical or electrical
adjustment.
8. Remove detachable shaft from the blender before washing the blades
or shaft.
9. Blades are SHARP. Handle carefully when removing, inserting
or cleaning.
10. When mixing liquids, especially hot liquids, use a tall container or make
small quantities at a time to reduce spillage, splattering and possibility of
injury from burning.
11. To reduce the risk of injury, never place chopper grinder attachment cutting blade on base without first putting prep bowl properly in place.
12. Be certain the chopper grinder attachment cover is securely locked in
place before operating appliance. Do not attempt to remove cover until
blade has stopped rotating.
13. Check prep bowl for presence of foreign objects before using.
14. The use of attachments or accessories not recommended by Cuisinart
may cause fire, electrical shock, or risk of injury.
15. Do not use outdoors.
16. Do not let any cord hang over the edge of the table or counter. Do not
let cord contact hot surfaces, including stovetop.
17. Make sure the appliance is “off”, the motor has stopped completely, and
the appliance is unplugged from outlet before putting on or taking off
attachments, and before cleaning.
18. To reduce the risk of fire or electric shock, do not operate any heating
appliance beneath the mounting unit.
19. Do not mount the storage bracket/ unit over or near any portion of a
heating or cooking appliance or a sink or basin.
SAVE THESE INSTRUCTIONS
FOR HOUSEHOLD USE ONLY
NOTICE
This appliance has a polarized plug (one blade is wider than the other). As a
safety feature, this plug will fit in a polarized outlet only one way. If the plug
does not fit fully in the outlet, reverse the plug. If it still does not fit, contact
a qualified electrician. Do not attempt to defeat this safety feature.
INTRODUCTION
Get to the bottom of Great Cooking!
The SmartStick™ Extendable Shaft adjusts to your needs. With the
SmartStick™ Extendable Shaft Hand Blender you can comfortably blend
long, tall pots of hot soup and great sauces without getting your hands messy
or your sleeves stained. And, since the handle is above the rim you won’t be
straining to reach the bottom of that steaming pot.
3
CSB-55 IB-3028D
8/12/03
6:52 PM
Page 4
Not only is the SmartStick™ Hand Blender a great kitchen tool for hot
foods, it’s great for stirring and freshening entire pitchers of cold drinks like
icy lemonade, refreshing iced tea, pulpy orange juice, tomato juice or fruit
smoothies. Milk Shakes too!
1.
a. Motor Body with Control Handle:
Contains powerful AC motor. Variable 4-speed control and one step
ON/OFF button located on top of handle.
The Extendable Shaft easily adjusts up to two inches! Simply rotate the
adjustment ring on the shaft, pull the shaft to the length you want, and then
tighten the ring.
b. Detachable Shaft with Adjustable Shaft Length:
Easy to use, easy to clean and easy to store. Detach from motor body by pressing
release button. Rinse under faucet or put in top shelf of dishwasher to clean.
Adjust shaft length with adjustment ring.
Inspired by great chefs and their restaurant tools, we bring to your home a true
innovation in Hand Blenders. Armed with a powerful motor and heavy-duty
blade, the SmartStick™ Hand Blender lets you whip potatoes, blend diet drinks
and milk shakes, chop cooked vegetables, and purée fruits. Add the whipping
disc, and you can make whipped cream, mayonnaise, egg whites and milk
drinks too.
2.
3.
4.
5.
6.
7.
8.
9.
P
3
10. Mixing Beaker, dishwasher & microwave safe:
S
2
TM
EXTENDABLE
SHAFT
See-thru Mixing Beaker is marked in liters and cups for convenient measuring.
Use for drinks, shakes, salad dressings, etc. Designed for easy gripping and
drip-free pouring.
®
SmartStick
TM
EXTENDABLE
SHAFT
12
PRESS BUTTON TO DETACH
Motor
Body
®
PRESS BUTTON TO DETACH
Use only this piece for wall mounting.
Connect to other half for countertop storage.
®
®
®
SmartStick™
SmartStick
TM
TEND, TWIST RING BELOW AND PULL
TWIST BACK TO LOCK IN PLACE
MINI PREP®
Chopper Grinder Attachment
Shaft
Release
Button
PRESS BUTTON TO DETACH
TO E X
11. Convenient Storage:
SmartStick™
MINI PREP®
Chopper Grinder Attachment
EXTENDABLE
SHAFT
4
Storage stand is made of two pieces. One side holds the detachable shaft. The
other holds the motor body with control handle. The 2 storage pieces snap
together for compact countertop storage. To hang the Hand Blender from the
wall bracket, detach and mount one to the wall and hang the entire appliance as
shown. Use anchor and screws included with this appliance.
.
5
1b
TO E X
.
TEND, TWIST RING BELOW AND PULL
TWIST BACK TO LOCK IN PLACE
8
10
OZ
16
500ml
2
1 2/3
12 1 1/2
400
10 1 1/4
350
8
1 1/3
1
1
300
6
3/4
4
200
TM
2
150
Store blender
motor body
this side
100
11
Store blender
shaft this side
50
PRESS BUTTON TO DETACH
®
DISHWASHER AND MICROWAVE SAFE
®
Connect to other half for countertop storage.
Chop, mince & grind with the Cuisinart Chopper Grinder attachment.
Attaches to blender motor body in place of the blender shaft.
1 1/2
1/3
SmartStick
EXTENDABLE
SHAFT
7
2/3
250
®
12. SmartStick™ Mini Prep® Chopper Grinder Attachment:
CUPS
2
14 1 3/4
450
4
Easy-To-Clean:
The Smartstick™ Extendable Shaft Hand Blender has a smooth surface that
wipes clean instantly and easily. Detachable shaft is dishwasher safe.
®
SmartStick
Detachable Whipping Disc:
Detach blade and replace with this disc for whipping cream and creating other
delectables.
13
6
Detachable Blending Blade:
Blade can be detached from shaft to replace with the whipping disc, or for
cleaning. Blade can also be cleaned without detaching.
11
ES
Maximum Comfort Handle:
The Hand Blender handle and power button are designed around the way you
actually hold a stirring utensil. The shape of this handle gives you comfortable
control and easy access to the power button. Rubberized handle gives better
grip, especially when your hands are wet.
MODEL CSB-55
R
Shaft Length Adjustment Ring:
Adjust shaft length by turning this ring to the left (counterclockwise), then
pulling shaft to the desired length. Always tighten ring before use by turning
to the right (clockwise).
FEATURES AND BENEFITS
1 2 3 4
Extendable Blending Shaft (patent pending):
Shaft extends an extra 2 inches. Easily reaches the bottom of tall pot or
pitcher while keeping your hands clean and safe.
Cuisinart, the company that invented food processors, brings many years of
expertise to this chopper grinder attachment. Simply remove the detachable
shaft from the SmartStick™ Hand Blender, using the convenient release button. Then attach the SmartStick™ Mini Prep® Chopper Grinder Attachment.
You’re ready to go.
1a
4-Speed Slide Control:
Located on top of handle, lever easily slides from left to right to increase speed.
By adding the SmartStick™ Mini Prep® Chopper Grinder Attachment you
can prepare an entire meal.
2
One Step ON/OFF (Power) Button:
Press and hold the rubberized power button to operate blender. Release button to
stop motor.
The natural grip lets you hold this Hand Blender much like a stirring utensil, so
it’s comfortable and natural. The rubber grip gives you a great hold if your hands
are wet, and four distinct speeds give you precise control. With the ON/OFF
button on the top you can control the SmartStick™ Hand Blender with your
thumb. And, the cord is designed to get out of your way while you cook.
3
Two Stages Snap Together Easily:
Disassemble for compact storage separately or together in storage stand.
1/4
13. Reversible Chopper Grinder Blade:
Choose best direction depending on task. One direction is sharp. The other
direction is blunt.
5
CSB-55 IB-3028D
8/12/03
6:52 PM
Page 6
BEFORE YOU BEGIN
SHAFT LENGTH ADJUSTMENT
Place the package containing the Cuisinart SmartStick™ Extendable Shaft
Hand Blender on a sturdy surface. Unpack the SmartStick™ from its box by
removing the upper protective insert. Gently slide the unit from the box.
Remove all support materials from the box and replace the upper insert. Save
packaging for possible repacking of the unit.
Your SmartStick™ Extendable Shaft Hand Blender has a shaft that extends up
to 2 additional inches. This feature was developed with two major benefits in
mind. One benefit is that you can mix and blend in tall pots, pitchers, glasses
or other mixing containers. This makes the SmartStick™ Hand Blender
more useful than other Hand Blenders.
Note: The blending blade is extremely sharp. Use caution when
removing and unpacking the storage stand. The blending blade is
stored in the storage stand.
The second goal is comfort. You may find that using this appliance is more
comfortable to hold with the shaft extended, even if you do not require the
longer shaft for blending.
Before using the Cuisinart® SmartStick™ Extendable Shaft Hand Blender for
the first time, we recommend that you wipe the unit with a clean, damp cloth
to remove any dirt or dust. Dry it thoroughly with a soft absorbent cloth.
Handle carefully; wash each individual blade attachment, mixing container
and detachable shaft by hand or in the dishwasher. Dry thoroughly before
use. Read all instructions completely for detailed operating procedures.
TO EX
TO EX
TEND, TWIST RING BELOW AND PULL
TWIST BACK TO LOCK IN PLACE
TEND, TWIST RING BELOW AND PULL
TWIST BACK TO LOCK IN PLACE
.
.
HAND BLENDER ASSEMBLY
Note: To avoid possibility of personal injury always be sure to unplug
the power cord from electrical wall socket before attaching or removing
blades and/or attachments.
A. Attach blade or whipping disc to blender shaft.
For your safety, always detach the shaft from motor body.
To insert the blade or whipping disc, hold the stem of the blade/disc
between your fingers. Match the raised notches on the shaft to the open
slots on the stem.
Once properly aligned, slide the blade/disc onto the stem and push
firmly into position. To ensure that the blade/disc is securely in place,
carefully press the center end of each attachment back toward the shaft.
It is important to properly secure the blade/disc to prevent separation
during use. Do not begin operating Cuisinart SmartStick™ Hand
Blender until the desired blade/disc is secured!
A
B. Attach detachable
blender shaft to
motor control body.
Align blender shaft with the
motor body as shown in
illustration. Slide the pieces
together till you hear and
feel the pieces click together.
It may be helpful to
press the release button
when assembling.
It will be easier to adjust the shaft length when it is attached to the Hand
Blender. Follow these steps to adjust:
1. Hold the SmartStick™ Hand Blender firmly with both hands.
Hold the main body securely in one hand.
2. With the other hand rotate the Shaft Adjustment Ring to the left
(counterclockwise) to loosen the shaft. This will be about a one quarter
turn. Do not overturn.
3. Extend the shaft to the desired length by pulling on the lower end of the
shaft. The shaft can be adjusted up to 2 inches. When you have reached
the maximum possible length of the shaft, you will feel resistance. Do not
pull any further.
®
SmartStick
TM
EXTENDABLE
SHAFT
PRESS BUTTON TO DETACH
TO E X
Making the Shaft Longer.
.
TEND, TWIST RING BELOW AND PULL
TWIST BACK TO LOCK IN PLACE
4. When you have located the most desirable length, rotate the Shaft
Adjustment Ring to the right (clockwise) to tighten the shaft. Do not overtighten as you may damage the threads on the shaft.
5. You are ready to use the SmartStick™ Hand Blender with shaft extended.
Note: After blending, rinse the shaft including the extended segment.
B
6
7
CSB-55 IB-3028D
8/12/03
6:52 PM
Page 8
Tips:
3.
Adjust Shaft Length.
Only adjust if longer shaft length is needed for tall pots or pitchers.
See Shaft Length Adjustment, page 7.
1. Immediately after blending, rinse the entire shaft before mixtures dry. This
will make the unit easier to clean.
4. ON
2. Clean by running under faucet, or putting in top shelf of dishwasher.
2. Speed Adjustment Lever
Making the Shaft Shorter.
1. Rotate the Shaft Adjustment Ring to the left (counterclockwise) to loosen
the shaft. This will be about a one quarter turn. Do not overturn.
1 2 3 4
2. Retract the shaft to the desired length by pushing on the lower end of the
shaft. Do not grab the blender blade.
P
R
ES
S
3. When the shaft is totally retracted, rotate the Shaft Adjustment Ring to
the right to tighten the shaft. Do not over tighten or you may damage the
threads on the shaft.
Rotate to left
to loosen
Press for ON
Release for OFF
Rotate to right
to tighten
TEND, TWIST RING BELOW AND P
TWIST BACK TO LOCK IN PLACE
ULL.
TO EX
TEND, TWIST RING BELOW AND PULL
TWIST BACK TO LOCK IN PLACE
.
®
TM
5.
®
TO EX
TEND, TWIST RING BELOW AND PULL
TWIST BACK TO LOCK IN PLACE
EXTENDABLE
SHAFT
.
TM
PRESS BUTTON TO DETACH
Press and hold ON/OFF switch to turn appliance ON.
The SmartStick™ Hand Blender will continue to run as long as the
switch is pressed in. To turn Hand Blender off, release ON/OFF switch
and the motor will stop.
EXTENDABLE
SHAFT
TM
SmartStick
EXTENDABLE
SHAFT
PRESS BUTTON TO DETACH
SmartStick
SmartStick
®
®
SmartStick
TM
4.
TO EX
OFF
Unplug immediately after use.
PRESS BUTTON TO DETACH
EXTENDABLE
SHAFT
TO E X
.
TEND, TWIST RING BELOW AND PULL
TWIST BACK TO LOCK IN PLACE
PRESS BUTTON TO DETACH
pull
TO EX
TEND, TWIST RING BELOW AND PULL
TWIST BACK TO LOCK IN PLACE
1. Cut most solid foods into 1/2" cubes for easy blending. Suggestion: use
Chopper Grinder for chopping and grinding solid foods.
Shaft Length
Adjustment
Ring
2. Pour liquid ingredients into the mixing container first unless recipe
instructs otherwise.
Grasp here
and pull
to extend
HAND BLENDER OPERATION
Turning SmartStick™ Extendable Shaft Hand Blender ON/OFF:
Keep hands, hair, clothing, and other utensils away from blending blade.
1.
Plug electrical cord into an electrical wall socket.
If a wall switch controls current to the socket, be sure the switch is ON.
2.
Adjust Speed Setting.
Rotate the Speed Setting Lever clockwise to increase speed, counterclockwise to decrease speed. Speeds increase from left to right with
Speed 1 being the slowest, and Speed 4 the fastest.
8
Helpful Hints.
.
3. To avoid splashing, do not pull the Hand Blender out of the mixture while
it is running.
4. Do not let Hand Blender stand in a hot pot on stove while not in use.
5. To prevent splashing, don’t turn the Hand Blender on until the blade is
beneath the surface of the mixture.
6. Do not put fruit pits, bones, or other hard material into the blending
mixture as these are liable to damage the blades.
7. Do not fill mixing containers too full. The level of mixture will rise when
blending and can overflow.
8. Adding liquids that are warm, not cold, facilitates blending solids with
liquids.
9. For recipes calling for ice, use crushed ice (not whole cubes) for best
results.
9
8/12/03
6:52 PM
Page 10
ATTACHMENTS:
(A) BLENDING / MIXING / CHOPPING / MINCING BLADE
Always use Speeds 3 and 4 when blending, mixing, chopping and puréeing
with the metal blade.
Blending & Mixing.
The specially designed blade is for mixing and stirring all kinds of foods,
including salad dressings, powdered drink products, and sauces. It is ideal for
combining dry ingredients, and can be used to emulsify mayonnaise too.
This blade mixes and stirs while adding only a minimum of air to your mixture.
A gentle up-and-down motion is all you need to make the most flavorful, fullbodied liquid recipes. Be careful never to remove the Cuisinart® SmartStick™
Extendable Shaft Hand Blender from the liquid while in operation.
Chopping & Mixing.
This blade also chops and purées cooked fruits, vegetables, baby foods, and
cooked meats/poultry. To chop or mince, always cut food into uniform pieces
of 1/2" to ensure perfect results. Keep the Cuisinart® SmartStick™
Extendable Shaft Hand Blender directly over the food being processed, while
placing a free hand on the mixing container for support. You may wish to
place your free hand over the top of the container to prevent chopped ingredients from escaping. Use a forceful up-and-down motion when chopping
and blending. This allows the blade to process the food more efficiently.
10
The Whipping attachment is specially designed to add air and volume to
mixtures. Perfect for aerating egg whites and cream, this attachment adds
air that makes mixtures light, frothy and thick.
When using this attachment, make sure there is extra room in the mixing
container for the recipe to grow! For most recipes such as mayonnaise,
beaten egg whites and whipped cream, hold the end of the SmartStick™
Hand Blender in the bottom of the container and turn it on for about
15 seconds. Then continue to process, gently lifting the Hand Blender
almost to the top of the liquid until the mixture is thick.
STORAGE STAND / WALL BRACKETS
The SmartStick™ Extendable Shaft Hand Blender includes a two part
storage stand that can be assembled into a single piece for countertop use.
You can also separate the stand into two pieces, and mount one of the pieces
on your wall to use as a wall storage bracket.
Storage stand kit consists of six (6) pieces: two anchor bolts, two plastic wall
anchors, and two storage pieces that can fit together for countertop use or
separate for wall mount.
Countertop Option.
The two storage pieces fit together. (See diagram below).
1
3
TO E X
.
TEND, TWIST RING BELOW AND PULL
TWIST BACK TO LOCK IN PLACE
2
®
SmartStick
TM
EXTENDABLE
SHAFT
PRESS BUTTON TO DETACH
Store blender
motor body
this side
NOTE: If a piece of food becomes lodged in the guard surrounding the
blade, follow the safety instructions below:
1. Release the power button and unplug the electrical cord from the
wall socket.
2. After the power source is disconnected, use a spatula to carefully remove
the food lodged in the guard. Avoid injury. Do not use your fingers to
remove lodged objects.
3. After the lodged food has been removed you may plug the electrical cord
into the wall socket and continue blending.
NOTE: The maximum rating is based on the Blending Blade attachment
that draw the greatest load (power or current) and that other recommended
attachments may draw significantly less power or current.
(B) WHIPPING DISC ATTACHMENT
Use Speeds 1 and 2 for whipping with the whipping disc.
Store blender
shaft this side
CSB-55 IB-3028D
®
Connect to other half for countertop storage.
Align the two pieces back to back on a flat surface, with the ring shaped
reservoirs facing right and left. The raised walls should be in the middle. Lift
up the right piece, align the two tabs in the back with the two slots of the left
piece. Gently slide the tabs into the slots until both pieces are resting flat on
the countertop.
To store SmartStick™ Hand Blender, detach the shaft and place the bottom
part (blade guard) into one of the reservoirs. Place the motor body (right side
up) into the other reservoir. You should be able to read the SmartStick™
logo, when the motor body is in the stand.
11
CSB-55 IB-3028D
8/12/03
6:52 PM
Page 12
The counter storage unit can be placed in a cupboard or on a shelf if not on
the counter.
Wall Mount Option
Separate the two plastic storage stand pieces. You will need only one for wall
mount. (See diagrams below). The unit you must use is the section that has
the round storage hole to hold the whipping disk.
Mini Chopper Grinder Storage.
The SmartStick™ Mini Prep® Chopper Grinder Attachment stores neatly on
the countertop in a minimum of space. Store the unit assembled to prevent loss
of parts. Store the blades as you would sharp knives—out of reach of children.
Chopper Grinder Parts and Assembly
E
F
F
G
N
Wall
Anchor
L
Anchor
Bolt
When selecting a mounting location, be sure to leave enough room above the
storage stand for your hand to remove the SmartStick™ Hand Blender. Also be
sure to leave enough room below the stand to allow the appliance to hang freely.
You will need to drill two holes 2 5/8" apart from each other, measured from
the center of each hole. To assist in proper location of holes for the mounting
screws, remove the wall mount template from this instruction book. Place the
template over the back of the wall unit, aligning the outline of the template
with the wall bracket. When you have done this, place the template and wall
bracket against the wall in the desired location. Remove the wall bracket,
leaving the template in place. Mark the wall with a pencil in the locations for
screw holes indicated by the template. Remove the template.
With a drill, make a 3/16" starter hole for each screw. Place the plastic
anchor in each hole. Push completely into the hole with fingers, or tap in
gently with a hammer. Screw a mounting screw into each hole leaving 1/8" to
1/4" of the head and screw exposed.
G
M
K
J
E
H
®
SmartStick™
MINI PREP®
Chopper Grinder Attachment
I
B
G
A
C
F
D
A. Chopper Grinder
Prep Bowl
B. Cover Slots (3)
for Attaching
Cover
C. Metal Blade
Assembly Shaft
D. Rubber Feet
E. Blade Assembly
F. Blade Ring
G. Plastic Blade
Sheath
H. Chopper Grinder
Cover
I. Lift Tabs
J. Chopper Grinder
Spline
K. Central Hub
Holding Ribs
L. Curved Sharp
Edge
M. Flat Blunt Edge
N. Ridges for
Gripping
®
SmartStick
TM
EXTENDABLE
SHAFT
PRESS BUTTON TO DETACH
®
SmartStick™
MINI PREP®
Chopper Grinder Attachment
Position the two mounting holes of the wall bracket over the screw heads and
slide wall bracket down the wall until the bracket is resting against the screw
head, and will not slide any further. If the wall bracket feels too
loose against the wall, remove bracket, put screws further into
wall and replace bracket.
®
SmartStick™
MINI PREP®
Chopper Grinder Attachment
Reversible Blade.
®
SmartStick
TM
EXTENDABLE
SHAFT
PRESS BUTTON TO DETACH
®
Use only this piece for wall mounting.
Connect to other half for countertop storage.
Place the assembled SmartStick™ Hand Blender into the wall
bracket. The unit will hang from the bracket, held in place by
the motor body width.
To reduce the risk of fire or electric shock, do not operate any
heating appliance beneath the mounting unit.
Do not mount the storage bracket/ unit over or near any portion of a heating
or cooking appliance or a sink or basin.
12
The Cuisinart SmartStick™ Mini Prep® Chopper Grinder attachment is
equipped with a reversible blade. This blade is sharp on one side and blunt
on the other. The blade is attached to a plastic ring which slides over the
blade assembly shaft, so it can be easily turned over to select the appropriate
blade. A guide for proper blade selection follows in the section, Chopper
Grinder Tips for Processing Foods.
Before you process any food, assemble the parts.
1. Place the Prep Bowl on a flat, dry, stable surface. It should be close to an
electrical outlet of the same voltage as stated on the rating plate on the
SmartStick™ Hand Blender.
13
CSB-55 IB-3028D
8/12/03
6:52 PM
Page 14
2. The metal blade assembly shaft is attached to the bottom of the Prep
Bowl. If not already in place, slide the fully assembled Blade Assembly over
the top of the blade assembly shaft.
2a. Putting together the Blade Assembly:
Connect the Blade Ring (F) to the Plastic Blade Sheath (G). Line up the
blade ring opening with the plastic sheath. Let the blade ring slide to the
bottom of the plastic sheath. HOLD THE BLADE RING BY THE
CENTRAL HUB HOLDING RIBS (grips)(K) ONLY. DO NOT
TOUCH THE RAZOR SHARP BLADES.
F
2a
K
of the Plastic Blade Sheath. Let the Blade Ring slide down to the bottom of the Plastic Blade Sheath. The lower blade should almost touch
the bottom of the Prep Bowl.
Lift the Prep Bowl, holding it firmly from the bottom. Pick up the Blade
Ring by its hub holding ribs (grips) and turn it very slightly clockwise.
This locks it in place on the Plastic Blade Sheath and prevents it from
sliding up during processing.
3. Connect the SmartStick™ Hand Blender
3
Motor Body to the top of the Chopper
Grinder Attachment Cover. Align the spline
in the Chopper Grinder Cover’s drive shaft
with the ribbed opening on the underside of
the motor body. When aligned properly, slide
Motor
Body Bottom
the two pieces together until they mate. You
and Chopper
will feel and hear a slight click. It may be
Grinder
Cover Top
helpful to press the rubber release button
View
when sliding these pieces together.
4. With the Hand Blender in place, locate the
Chopper Grinder cover and place it on top of
the prep bowl.
®
SmartStick
TM
N
EXTENDABLE
SHAFT
G
PRESS BUTTON TO DETACH
Note these important features of the Blade Ring. The Blade Ring can be
placed over the Plastic Blade Sheath in two different ways:
®
SmartStick™
If you hold it this way (A), you will see the word “Sharp” on the blade.
Assemble the blade this side up to use the sharp edge. (see the section on
processing food for information about when to use the sharp edge.)
A.
SHARP SIDE
If you hold it this way (B), you will see no writing on the blade. Assemble
the blade this side up to use the blunt edge. (See the section on processing
food for information about when to use the blunt edge.)
MINI PREP®
Chopper Grinder Attachment
4a. Be sure that the 3 ridges at the top of the
Blade Assembly line up with the 3-arm
propeller gear in the underside of the chopper grinder cover, and that
the cover is seated all around the top of the prep bowl.
4b.To properly seat the cover you must line up the three molded pins from
the cover with the 3 slots at the top of the Prep Bowl. Rotate cover
counterclockwise to secure it to the prep bowl. Rotate the cover until
the pins are in the far left position in the slots.
4
®
SmartStick
TM
EXTENDABLE
SHAFT
4b
B.
®
SmartStick
TM
EXTENDABLE
SHAFT
Inside View
of Chopper
Grinder
Cover
PRESS BUTTON TO DETACH
PRESS BUTTON TO DETACH
®
SmartStick™
MINI PREP®
Chopper Grinder Attachment
®
®
BLUNT SIDE UP
SmartStick™
4a
SmartStick
TM
MINI PREP®
Chopper Grinder Attachment
EXTENDABLE
SHAFT
There are notches (C) on opposite sides of the interior of the hub. These
fit over ridges on the sides of the Plastic Blade Sheath.
C.
PRESS BUTTON TO DETACH
Notch
®
SmartStick™
MINI PREP®
Chopper Grinder Attachment
Pick up the Blade Ring by its hub holding ribs (grips) and line up the
notches in the interior of the Blade Ring hub with the ridges on the sides
14
Inside View
of Prep Bowl
15
CSB-55 IB-3028D
8/12/03
6:52 PM
Page 16
5. Plug the power cord of the SmartStick™ Hand Blender into an electrical
outlet.
6. Place one hand on the cover of the Chopper Grinder attachment while gripping the SmartStick™ Hand Blender motor body handle with the other.
Select the appropriate speed on the speed control, then press the ON/OFF
button with your thumb to start the motor and run the chopper grinder. To
turn the unit off, remove your thumb from the ON/OFF button.
7. WHEN THE BLADE STOPS MOVING, unplug the SmartStick™
Hand Blender, remove the motor body from the chopper grinder cover,
and remove the cover from the Prep Bowl.
8. Disassembling the Blade Assembly Lift the Plastic Blade Sheath.
Holding the Blade Ring stationary (using the Central Hub Holding Ribs)
carefully turn the Plastic Sheath clockwise, then guide the Blade Ring up
over the Plastic Sheath.
CHOPPER GRINDER TIPS for
PROCESSING FOOD
Preparing the Food
Size:
Always cut food into pieces of even size - about 1/4 to 1/2 inch (6-12mm) to
a side. If you don’t start with pieces that are small and uniform, you will not
get an even chop.
Quantity:
Do not overload the Prep Bowl. Overloading causes inconsistent results
and it strains the motor. Use the quantities given in the chart on page 19
as a guide.
Selecting the Right Blade Edge:
Pulse action:
Use pulse action to prevent overprocessing. To coarsely chop, two or three
pulses are often enough. Be sure to check the food frequently to prevent
overprocessing.
Continuous-hold action:
Continuous-hold action is best when you want to finely chop or mince food.
For some very hard foods, it is best to pulse several times and then run
continuously to reach the desired consistency.
When you operate the unit for more than 10 seconds, use a pulse action
every 10 seconds or so to allow food to drop to the bottom of the Prep Bowl.
This provides more consistent results.
Never operate the Chopper Grinder continuously for longer than 1
minute at a time.
Note: The Prep Bowl may become scratched when you use it for grinding
coffee, grain and spices. This does not affect the performance of the
SmartStick™ Mini Prep® Chopper Grinder.
Adding Liquid:
You cannot add liquids such as water, oil or flavoring while the machine is
running. You will need to stop the Hand Blender, remove the lid, add liquid
and then replace the lid before continuing to process.
Removing Food from the Sides of the Bowl:
Occasionally food will stick to the sides of the bowl as you process. Stop the
machine to clear it away. AFTER THE BLADE HAS STOPPED
MOVING, remove the cover, and use a small spatula to scrape the food
from the sides of the bowl back into the center.
Reversing the Blade in the Middle of a Processing Task:
While preparing some recipes, you may want to switch the blade from sharp
to blunt or vice versa.
Use the sharp edge for chopping, puréeing and mixing. It is the right choice,
for example, for chopping soft, fragile food such as herbs, celery, onions,
garlic, nuts, chocolate and most cheeses. It is also the right choice for
puréeing cooked vegetables and mixing salad dressing.
1. Unplug the SmartStick™ Hand Blender.
For some foods, use the blunt edge. Try the sharp blade first. If not satisfied
with results, try the blunt blade for grinding coffee beans and spices, and for
chopping hard food such as peppercorns and seeds.
3. Remove the cover from the Prep Bowl.
Selecting the Right Operating Speed:
5. Remove the contents of the bowl to another container.
Always use Speed 4 with the Chopper Grinder.
Note: Due to the powerful motor provided with this unit, Cuisinart recommends using both hands to support the SmartStick™ Mini Prep® Chopper
Grinder during operation. Place one hand on the SmartStick™ Hand
Blender control handle to operate the unit. With the other hand, grasp the
round top of the Chopper Grinder attachment and apply downward pressure
on the entire unit to prevent it from moving.
16
2. Remove the Hand Blender Motor Body from the Chopper Grinder
Attachment.
4. Lift the Plastic Sheath by its gripping ridges and remove the Blade
Assembly. NEVER TOUCH THE BLADE ITSELF.
6. Carefully remove the Blade Ring, holding it by its Central Hub Holding
Ribs. Turn blade upside down and reinsert it on the Sheath.
7. Insert the Plastic Sheath over the central opening of the empty bowl.
8. Insert the food to be processed.
9. Replace the cover, locking it into place.
17
CSB-55 IB-3028D
8/12/03
6:52 PM
Page 18
10. Connect the Hand Blender motor body to the Chopper Grinder
Attachment.
Operating Techniques:
11. Plug the SmartStick™ Hand Blender into the electrical outlet and
continue processing.
Chop, grind, and purée small amounts of food with the SmartStick™ Mini
Prep® Chopper Grinder attachment. This table lists a number of ingredients in
alphabetical order, and shows the recommended method of processing for each.
Processing Food
Speed 3 or Speed 4 should always be used with the Chopper Grinder
Attachment. Use the sharp blade for most chopping tasks.
1. Place the Prep Bowl firmly on a flat sturdy surface like a countertop. Be
sure the blade is assembled using the blade edge that is appropriate for
the food to be processed.
Frequent uses for Chopper Grinder
Ingredient
Comments
3. Place the Chopper Grinder cover on top of the prep bowl. Be sure the
cover is properly seated.
carrots, uncooked
1/2 cup in 1/2" pieces
4. Select Speed 4 on the SmartStick™ Hand Blender Speed Control.
celery
1/2 cup in 1/2" pieces, remove strings
5. Press the ON/OFF button on the SmartStick™ Hand Blender Speed
Control to run the Chopper Grinder.
cheese (hard)
grate no more than 1 ounce
at a time, cut into 1/4" pieces
Note: Due to the powerful motor provided with this unit, Cuisinart
recommends using one hand to support the Chopper Grinder
during operation.
bread crumbs
1/2 cup day old bread in 1/2" pieces
6. When you have finished processing the food, stop the machine by taking
your thumb or finger off the ON/OFF button.
chocolate
grate no more than 1 ounce at a time, break into 4 pieces,
chill in freezer for 3 minutes before chopping
7. WHEN THE BLADE STOPS MOVING, remove the SmartStick™
Hand Blender motor body from the Chopper Grinder cover, and remove
the cover from the Chopper Grinder.
garlic
1 clove, peeled; mince up to 3-4 cloves
ginger root
1/2 ounce (about a 1" piece), cut into 1/4" pieces
herbs, fresh
1/2 cup, must be clean and dry
nuts
1/2 cup, shells removed
onion
1/2 cup in 1/2" pieces
vegetables-cooked
1/2 cup in 1/2" pieces
vegetables-uncooked
1/2 cup in 1/2" pieces
2. Place food in the Prep Bowl. Be sure the food is cut in small pieces, and
the bowl is not overloaded.
8. Unplug the unit.
9. Carefully remove the Blade Assembly, holding it by the gripping ridges
on the Plastic Sheath. NEVER TOUCH THE BLADE ITSELF.
10. Remove food with the spatula.
Note: Do not operate the SmartStick™ Chopper Grinder attachment
without food contents in the Prep Bowl.
18
19
CSB-55 IB-3028D
8/12/03
6:52 PM
Page 20
CLEANING:
RECIPE SUGGESTIONS
Smartstick™ Hand Blender
Sauces/Soups
Always clean the SmartStick™ Extendable Shaft Hand Blender
thoroughly after using.
Remove the shaft with the blade from the motor body. The shaft with the
blade and the mixing/measuring beaker can be cleaned in the dishwasher, or
by hand in hot water with a mild detergent. It is not necessary to remove the
blade from the shaft.
Clean the motor body with a sponge or damp cloth only. Do not use abrasive
cleansers which could scratch the surface.
Never immerse the motor body in water.
When the appliance has malfunctioned or has been dropped or damaged in
any way or it is not operating properly, return the appliance to the nearest
Cuisinart Repair Center for examination, repair, mechanical or electrical
adjustment.
Suggestion: When processing foods with color (like carrots), the plastic parts
of the appliance can become discolored. Wipe these parts with cooking oil
before cleaning them with a mild detergent.
SmartStick™ Mini Prep® Chopper Grinder
Attachment
To simplify cleaning, rinse the Prep Bowl, cover and blade immediately after
use, so that food won’t dry onto them. Wash Blade Ring, Plastic Sheath, and
Prep Bowl in warm soapy water. Rinse and dry. Wipe the underside of the
Chopper Grinder cover with a sponge or damp cloth to remove any food. Do
not submerge the cover in water or place in the dishwasher. Wash the blade
carefully. Avoid leaving it in soapy water where it may disappear from sight.
If you have a dishwasher, you can wash the Prep Bowl Blade Assembly on the
upper shelf. Insert the Prep Bowl upside down. Put the blade in the
cutlery basket. Unload the dishwasher carefully to avoid contact with the
sharp blade. Wipe the motor body and top of the cover with a damp sponge
or cloth. Dry it immediately. Never submerge the motor body or the cover in
water or other liquid.
LENTIL VEGETABLE SOUP
Lentil and tomato flavors combine as they simmer together to create a rich,
hearty soup.
Makes 6 quarts (about 24 8-ounce servings)
1/2
8
4
4
4
9
4
2
4
1
2
cup olive oil
medium celery ribs, peeled, cut into 1" pieces
medium carrots, peeled, cut into 1" pieces
medium onions, peeled, cut into 1" pieces
medium red bell peppers, cored, cut into 1" pieces
cups water
28-ounce cans plum tomatoes, drained
cups lentils
tablespoons red wine vinegar
tablespoon chili powder
Pepper and salt to taste
cups coarsely chopped parsley
Heat oil in a large stockpot over medium-high heat. Add celery, carrots,
onions and peppers; cover and cook, stirring often, until soft, about 10
minutes. Add water, tomatoes, lentils, vinegar, chili powder, pepper and salt.
Increase heat to high. Cover and bring to the boil. Reduce heat to low and
simmer, partially covered, stirring occasionally, until lentils are tender, about
30-35 minutes. Insert the SmartStick™ Extendable Shaft Hand Blender fitted with the metal blade. Set on Speed 4 and blend until puréed, about 2-1/2
minutes. Stir in parsley.
Soup may be frozen in an airtight container for later use.
Nutritional information per serving:
Calories 218 (25% from fat) • carbo. 32g • prot. 9g • fat 6g • sat. fat 1g • chol. 0mg
sod. 292mg
The SmartStick™ Mini Prep® Chopper Grinder attachment is intended for
HOUSEHOLD USE ONLY. Any service, other than cleaning and normal
user maintenance, should be performed by an authorized Cuisinart Service
Representative.
20
21
CSB-55 IB-3028D
8/12/03
6:52 PM
Page 22
FRESH TOMATO - ZUCCHINI BISQUE
This light bisque is highlighted with green and white flecks of shredded
zucchini.
Makes 2-1/2 quarts (about 10 8-ounce servings)
3
1
1
4
3
3
2
3/4
1
4
2
tablespoons olive oil
large garlic clove, peeled
large onion, peeled, cut into 1" pieces
cups low sodium beef broth
pounds tomatoes, stems removed, cut into 1" pieces
tablespoons tomato paste
teaspoons sugar
Black pepper and salt to taste
cup half and half
large zucchini, shredded
tablespoons chopped parsley
tablespoons chopped fresh marjoram
Heat oil in a large stockpot over medium heat. Add garlic and onion; sauté
until tender but not browned, about 4 - 6 minutes. Add broth, tomatoes,
tomato paste, sugar, pepper and salt. Increase heat to high and bring to a
boil; reduce heat to medium and cook, partially covered, until tomatoes are
tender, about 20 minutes.
Insert the SmartStick™ Extendable Shaft Hand Blender fitted with the metal
blade and process on Speed 4 until well combined, about 35-45 seconds. Add
half and half; blend until just combined, about 10 seconds. Bring to a simmer
over medium heat. Add zucchini, parsley and marjoram and gently cook until
just tender, about 2 - 4 minutes.
Nutritional information per serving:
Calories 127(50% from fat) • carbo. 12g • prot. 4g • fat 7g • sat. fat 2g • chol. 7mg
sod. 54mg
QUICK CUISINART TOMATO SAUCE
Our basic recipe. Add your own special ingredients to create a signature sauce.
Makes 3-3/4 quarts (about 30 4-ounce servings)
2
10
5
2-1/2
2-1/2
2
tablespoons olive oil
shallots, peeled, coarsely chopped
28-ounce cans whole tomatoes, drained
teaspoons dried oregano
teaspoons sugar
teaspoons salt
Heat oil in a stockpot over medium heat. Add shallots and sauté until
translucent, about 2 - 3 minutes. Add tomatoes and remaining ingredients;
reduce heat to low. Cover and simmer, stirring occasionally, until thick, about
25 - 30 minutes. Insert the SmartStick™ Extendable Shaft Hand Blender
fitted with the metal blade. Process on Speed 4 until smooth, about
1-1/2 minutes. If a chunkier texture is desired, process for about 1 minute.
Nutritional information per serving:
Calories 41 (22% from fat) • carbo. 7g • prot. 1g • fat 1g • sat. fat 0g • chol. 0mg
sod. 169mg
BUTTERNUT - PEAR SOUP
A truly impressive combination of flavors plus lovely color and texture
distinguish this soup.
Makes 3 quarts (about 12 8-ounce servings)
2
3
2
2
2-1/2
1-1/2
6
2/3
1/4
1/4
medium leeks
tablespoons butter
medium carrots, peeled, cut into 1" pieces
medium celery ribs, peeled, cut into 1" pieces
pounds butternut squash, peeled, seeded, cut into 1" pieces
pounds Bartlett pears, peeled, cored, cut into 1" pieces
cups low fat reduced sodium chicken broth
Bouquet garni (bay leaf, sprig thyme, parsley sprigtie
together in cheese cloth)
cup half and half
teaspoon cayenne pepper
teaspoon nutmeg
Pepper and salt to taste
Trim leeks at root end and 1" above white; slit lengthwise and rinse well
under cold running water. Cut into 1" pieces.
22
23
CSB-55 IB-3028D
8/12/03
6:52 PM
Page 24
Place butter in a stockpot and melt over medium heat. Add leeks, carrots and
celery; sauté until softened but not browned, about 6-8 minutes, stirring
occasionally. Add squash, pears, broth and bouquet garni. Increase heat to
high; cover and bring to a boil. Reduce heat to low and simmer, partially
covered, until vegetables are tender, about 20 minutes. Insert the
SmartStick™ Extendable Shaft Hand Blender fitted with the metal blade.
Set to Speed 4 and process until smooth, about 1-1/2 minutes. Add half
and half, cayenne pepper, nutmeg, pepper and salt. Blend on Speed 4 until
combined, about 15 seconds. Serve warm.
Nutritional information per serving:
STRAWBERRY COCKTAILS
This strawberry-banana cocktail is similar to a frozen daiquiri. For a
creamy nonalcoholic version, substitute whole milk for the rum.
Makes 3-1/2 cups (about 7 4-ounce servings)
1
1
4
4
1
Calories 145 (31% from fat) • carbo. 21g • prot. 4g • fat 5g • sat. fat 3g • chol. 13mg
sod. 210mg
Place first 5 ingredients (not ice) in a tall pitcher (about 1-1/2 quart capacity).
Insert the SmartStick™ Extendable Shaft Hand Blender fitted with the metal
blade. Set on Speed 4 and blend with a gentle up-and-down motion until
combined, about 20 seconds. Pour into glasses filled with crushed ice and
garnish with whole fresh strawberries, if desired.
Beverages
CARIBE PUNCH
Apricot nectar and citrus juices mellow with rum to make a delectable, tart
refresher.
Nutritional information per serving:
Calories 122 (0% from fat) • carbo. 13g • prot. 0g • fat 0g • sat. fat 0g • chol. 0mg
sod. 2mg
CUISINART BLOODY MARYS
Makes 1 quart (about 6 5-ounce servings)
1
1
1
3/4
1/4
1
2
1
12-ounce bag frozen unsweetened strawberries, thawed
medium banana, peeled, cut into 1" pieces
tablespoons superfine sugar
tablespoons freshly squeezed lime juice
cup light rum
Crushed ice
cup apricot nectar, chilled
cup orange juice, chilled
cup pineapple juice, chilled
cup dark rum
cup freshly squeezed lime juice (about 3 medium limes)
tablespoon grenadine syrup
small limes, thinly sliced
small orange, thinly sliced
Put first 6 ingredients in a tall pitcher (about 1-1/2 quart capacity). Insert the
SmartStick™ Extendable Shaft Hand Blender fitted with the metal blade. Set
on Speed 4 and process with a gentle up-and-down motion until frothy,
about 10 seconds. Add sliced fruit and serve over ice.
Nutritional information per serving:
Calories 160 • (0% from fat) • carbo. 32g • prot. 1g • fat 0g • sat. fat 0g • chol. 0mg
sod. 3mg
This spicy, cool and refreshing drink is delicious for brunch or an outdoor
summer party.
Makes 1 quart (about 6 5-ounce servings)
3
2
2
1/2
1/4
5
3/4
cups tomato juice
tablespoons fresh lemon juice
teaspoons Worcestershire sauce
teaspoon garlic powder
teaspoon black pepper
drops Tabasco sauce
cup Vodka
Fresh cilantro sprigs
Fresh celery ribs
Place first 7 (not cilantro or celery) ingredients into a tall pitcher (about 11/2 quart capacity). Insert the SmartStick™ Extendable Shaft Hand Blender
fitted with the metal blade. Set on Speed 4 and process with a gentle up-anddown motion until combined, about 10 seconds. Add vodka and process to
mix, about 5 seconds. Pour into glasses filled with ice; garnish with cilantro
and celery.
Nutritional information per serving:
Calories 91 (0% from fat) • carbo. 6g • prot. 1g • fat 0g • sat. fat 0g • chol. 0mg
sod. 437mg
24
25
CSB-55 IB-3028D
8/12/03
6:52 PM
Page 26
Desserts
FOR HOUSEHOLD USE ONLY
SWEETENED WHIPPED CREAM
Whip cream to a fluffy consistency in seconds.
Makes 1-1/2 cups whipped cream
1
2
1/2
cup whipping cream*
teaspoons sugar
teaspoon vanilla extract
Place all ingredients in Mixing Beaker. Place the SmartStick™ Extendable
Shaft Hand Blender fitted with the Whipping Disc, into the Beaker. Set on
Speed 2, turn the Hand Blender ON and run for 10 seconds. Then use a
gentle up-and-down motion to whip the cream until thickened, about 55-60
seconds.
*You may substitute heavy cream
Nutritional information per tablespoon:
Calories 40 (90% from fat) • carbo. 1g • prot. 0g • fat 4g • sat. fat 3g • chol. 16mg
sod. 4mg
CUISINART® SMARTSTICK™ EXTENDABLE SHAFT
HAND BLENDER 3-YEAR LIMITED WARRANTY
This limited warranty is available to consumers only. You are a consumer if
you own a Cuisinart® SmartStick™ Extendable Shaft Hand Blender which
was purchased at retail for personal, family or household use. Except as otherwise required under applicable state law, this warranty is not available to
retailers or other commercial purchasers or owners.
We warrant that your Cuisinart® SmartStick™ Extendable Shaft Hand
Blender will be free of defects in materials and workmanship under normal
home use for three years from the original date of purchase.
We suggest you complete and return the enclosed warranty registration card
promptly. However, return of the card is not a condition of this warranty and
does not eliminate the need for the consumer to maintain the original receipt
of purchase.
If your unit should prove to be defective within the warranty period, we will
repair or replace it at our option without charge to you. To obtain warranty
service, simply send the defective product to: Cuisinart, 150 Milford Road.,
E. Windsor, NJ 08520 or call toll-free 800-726-0190.
To facilitate the speed and accuracy of your return, please also enclose $7.00
for shipping and handling of the product. CA residents need only provide
proof of purchase. Please be sure to include a return address, description of
the product defect, product serial number and any other information
pertinent to the product’s return. Please pay by check or money order.
Your Cuisinart® SmartStick™ Extendable Shaft Hand Blender has been manufactured to the strictest specifications and has been designed for use with
authorized Cuisinart® accessories and replacement parts. This warranty
expressly excludes any defects or damages caused by accessories, replacement
parts or repair service other than those which have been authorized by
Cuisinart. This limited warranty does not cover any damage caused by
accident, misuse, shipment or other than ordinary household use.
THIS WARRANTY EXCLUDES ALL INCIDENTAL OR CONSEQUENTIAL DAMAGES. SOME STATES DO NOT ALLOW THE
EXCLUSION OR LIMITATION OF THESE DAMAGES, SO THESE
EXCLUSIONS MAY NOT APPLY TO YOU. ALL APPLICABLE
IMPLIED WARRANTIES, INCLUDING THE IMPLIED WARRANTY
OF MERCHANTABILITY AND FITNESS FOR A PARTICULAR
PURPOSE, GIVEN TO YOU BY LAW ARE HEREBY LIMITED IN
DURATION TO THIS WARRANTY. This warranty gives you specific
legal rights and you may have other rights which vary from state to state.
If you have any questions about the safety features of your Cuisinart®
SmartStick™ Extendable Shaft Hand Blender, please call us, toll-free,
at 800-726-0190.
26
27
CSB-55 IB-3028D
COFFEE
MAKERS
8/12/03
FOOD
PROCESSORS
6:52 PM
TOASTERS
HAND
MIXERS
Page 28
BLENDERS
COOKWARE
ICE CREAM
MAKERS
Cuisinart offers an extensive assortment of top quality products to make life in the
kitchen easier than ever. Try some of our other countertop appliances and
cookware, and you’ll see why we are Your Kitchen Resource TM.
©2000 Cuisinart
Cuisinart® is a registered trademark of Cuisinart
150 Milford Road
East Windsor, NJ 08520
Printed in China
99CU13009
28
IB-3028D