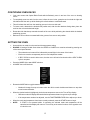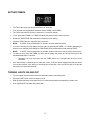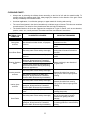
1
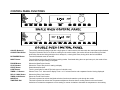
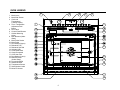
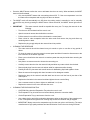
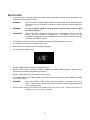
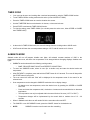
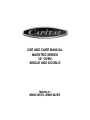
USE AND CARE MANUAL
MAESTRO SERIES
30” OVEN
SINGLE AND DOUBLE
MODELS:
MWO301ES, MWO302ES
A SPECIAL MESSAGE TO CUSTOMERS
Dear Valued Customer,
Congratulations on making a smart choice! You have joined an elite group of cooking
enthusiasts who demand only the very best from their appliances. A Capital Cooking appliance
promises years of enjoyment and maximum performance, allowing cooks everywhere to create
culinary memories that last a lifetime.
Because of the unique features found in our appliances, we urge you to read this manual
thoroughly before installation and use. Please RETAIN THIS MANUAL FOR FUTURE
REFERENCE; it is an invaluable guide to help you better understand your Capital Cooking
appliance.
Since your satisfaction is our topmost priority, please feel free to contact our service experts.
You may reach us toll free at (866) 402-4600, or dial the factory direct at (562) 903-1168. You
can fax us a list of your concerns, comments, and/or compliments at (562) 903-1167, or drop
us an e-mail at [email protected]. Feel free to also write us at:
13211 East Florence Ave.
Santa Fe Springs, CA 90670
Our products are proudly designed and manufactured in America and we trust that our strict
adherence to the highest quality assurance standards will provide you with years of trouble
free gourmet cooking.
Happy Cooking!
Chairman
Capital Cooking Equipment, Inc.
1
TABLE OF CONTENTS
A SPECIAL MESSAGE TO CUSTOMERS ............................................................................................................... 1
TABLE OF CONTENTS............................................................................................................................................. 2
WARNINGS AND GENERAL SAFETY ..................................................................................................................... 3
WARNINGS AND GENERAL SAFETY (continued).................................................................................................. 4
CONTROL PANEL FUNCTIONS .............................................................................................................................. 5
OVEN LEGEND......................................................................................................................................................... 6
OVEN FEATURES DEFINED ................................................................................................................................... 7
OVEN FEATURES DEFINED (continued) ................................................................................................................ 8
USE OF YOUR OVEN............................................................................................................................................... 9
INITIAL OVEN SETUP .......................................................................................................................................... 9
CLOCK.............................................................................................................................................................. 9
FAHRENHEIT OR CELSIUS TEMPERATURE DISPLAY ............................................................................... 9
CONTROL BEEPER......................................................................................................................................... 9
OVEN LIGHTS .................................................................................................................................................. 9
OVEN HEATING MODES DEFINED ...................................................................................................................... 10
PRE-HEAT ...................................................................................................................................................... 10
BAKE............................................................................................................................................................... 10
DELICATE BAKE............................................................................................................................................ 10
BROIL ............................................................................................................................................................. 10
PERFECT CONVECTION .............................................................................................................................. 10
CONVECTION COOKING .............................................................................................................................. 10
ROAST............................................................................................................................................................ 10
OVEN HEATING MODES DEFINED (continued) ................................................................................................... 11
OVEN USE (Before Cooking).................................................................................................................................. 11
PREPARATION................................................................................................................................................... 11
POSITIONING OVEN RACKS ............................................................................................................................ 12
SETTING THE OVEN ......................................................................................................................................... 12
WHILE THE OVEN IS RUNNING ....................................................................................................................... 13
TURNING THE OVEN OFF ................................................................................................................................ 13
SECURING THE OVEN CONTROL ................................................................................................................... 14
ADJUSTING THE OVEN MODE AND/OR TEMPERATURE ............................................................................. 14
SETTING TIMERS .............................................................................................................................................. 15
TURNING LIGHTS ON AND OFF....................................................................................................................... 15
SPECIAL FUNCTIONS............................................................................................................................................ 16
SELF CLEAN ...................................................................................................................................................... 16
CONVECTION (Upper and Lower Oven on Double) .......................................................................................... 17
ROTISSERIE (Upper Oven only on Double)....................................................................................................... 17
MOIST (Single Oven or Upper Oven only on Double) ........................................................................................ 18
PROBE (Upper and Lower Oven on Double)...................................................................................................... 20
DELAY COOK ..................................................................................................................................................... 21
TIMED COOK...................................................................................................................................................... 22
SABBATH MODE................................................................................................................................................ 22
TIPS ......................................................................................................................................................................... 23
CARE AND MAINTENANCE................................................................................................................................... 24
MEAT PROBE: ............................................................................................................................................... 24
MEAT PROBE SOCKET:................................................................................................................................ 24
ROTISSERIE MOTOR SOCKET: ................................................................................................................... 24
ROTISSERIE SPIT ROD AND FORKS: ......................................................................................................... 24
BROIL PAN: .................................................................................................................................................... 24
CLEANING CHART: ....................................................................................................................................... 25
TROUBLESHOOTING............................................................................................................................................. 26
SERVICE INFORMATION....................................................................................................................................... 27
WARRANTY ............................................................................................................................................................ 28
2
WARNINGS AND GENERAL SAFETY
WARNING
Do not install or use this product near water or outdoors, for example, near a kitchen sink, in a wet basement or
near a swimming pool.
GENERAL SAFETY PRECAUTIONS:
To reduce the risk of fire, electric shock, serious injury or death when using your appliance, follow basic safety
precautions, including the following:
1.
2.
3.
4.
5.
6.
7.
8.
9.
10.
11.
12.
13.
14.
15.
16.
17.
18.
19.
20.
Read the provided use and care manual before operating this appliance.
Keep packaging materials away from children. Plastic sheets and bags can cause suffocation.
If your oven is found to be damaged upon receipt, contact your dealer or builder immediately. Do not
install or use a damaged appliance or if the conduit is damaged.
This oven must be properly installed and grounded by a qualified installer according to these
installation instructions prior to use. The installer must show the customer the location of the circuit
breaker panel or fuse box so that they know where and how to turn off electric power to the oven.
Capital Cooking Equipment is not responsible for service required to correct a faulty installation. The
owner is responsible to make sure this appliance is properly installed.
To avoid electric shock hazard, do not install this appliance outside or near water. Do not install or use
this appliance if it has been exposed to water.
To prevent damage, do not use the oven handles as lift points or for moving the oven.
Do not install, repair or replace any part of the oven yourself unless specifically recommended in the
literature accompanying it. All other service must be performed by a qualified service technician.
Electric power to the oven must be turned off at the circuit breaker or fuse box prior to performing any
type of service or installation.
This oven is to be used only for cooking tasks expected of a home appliance. This oven is not intended
for commercial use.
Do not climb or sit on any part of the appliance.
Do not leave children or pets alone or unattended in the area around the oven. Do not allow children to
play with the controls, pull on the handle or touch other parts of the oven.
Do not store items of interest to children above the oven. Children can be burned or injured while
climbing on the appliance.
Do not tamper with the controls. Do not adjust or alter any part of the oven unless specifically
instructed to do so by this manual.
Secure the oven to the cabinet using the supplied mounting screws to prevent injury due to the unit
tipping forward,
Only use dry pot holders to prevent steam burns when moving items in or out of the oven.
Do not use water on grease fires. Smother any flames with a lid, cookie sheet, or flat tray. Use baking
soda or a foam fire extinguisher to extinguish flaming grease.
Keep flammable items, such as paper, cardboard, plastic and cloth away from hot surfaces. Do not put
such items in the oven. Do not allow pot holders to touch hot surfaces.
Do not wear loose or hanging apparel while using the oven. Do not allow clothing to come into contact
with the interior of the oven and the surrounding areas during and immediately after use.
Do not use the oven for storage.
Do not touch the interior surfaces of the oven during use. After use, make sure these surfaces have
had sufficient time to cool before touching them.
3
WARNINGS AND GENERAL SAFETY (continued)
21.
22.
23.
24.
25.
26.
27.
28.
29.
30.
31.
32.
33.
34.
Do not touch outside surfaces of the oven during the self-clean cycle, which may become hot.
Do not line the oven with aluminum foil or other materials while cooking or cleaning.
Do not leave metal objects, such as aluminum foil, the meat probe, cookie sheets, etc., on the bottom
of the oven. Objects left on the bottom of the oven could damage the oven.
Light lenses must always be in place when the oven is in use to protect the light bulbs from breakage.
Oven racks are to be positioned when the oven is cool to prevent burns. If racks require repositioning
when the oven is in use, a dry pot holder is to be used.
Do not heat unopened food containers (baby food jars, and cans). Pressure can build up and may
cause the container to burst and cause injury.
Do not store combustible, flammable, or explosive materials in the oven or in adjacent cabinets.
Use caution when opening the oven door to prevent burns from escaping hot air or steam. Opening the
door slowly will allow hot air and steam to escape.
Use caution when adding liquids to food or containers in a hot oven. Steam can cause serious burns or
scalding.
Never use the appliance for Warming or Heating the room.
Do not obstruct any venting areas or slots. The unit must be installed in manner which will keep the
area below the door unobstructed to allow free air flow.
Only clean parts as listed in the Use and Care Manual.
Do not clean the oven door gaskets. The door gaskets are essential for a good seal of the oven. Care
is to be taken during cleaning to prevent rubbing, damaging, or moving the gasket from its installed
position.
Prior to self-cleaning the oven, remove broiler pans, pots, other utensils and wipe up excess spillage.
4
CONTROL PANEL FUNCTIONS
CANCEL Button(s):
CONVECTION Button:
ROTISSERIE Button:
MOIST Button:
PROBE Button:
CLOCK button:
START Button:
LIGHT Button:
TIMER 1 / 2 Buttons:
DELAY COOK Button:
TIMED COOK Button:
MODE Dial:
TIME/TEMP Dial:
Turns off any selected cooking mode with a single press. It is also used to lock and unlock the control panel when desired.
Turns the Convection Fan On or Off when cooking for convection modes. Convection will not function during Pre-Heat
and Perfect Convection during which the fan is always On, or during Self-Clean, during which the fan is disabled.
Turns the Rotisserie motor On and Off.
Turns the Moist function On and Off during cooking modes. If activated during the oven pre-heat cycle, the mode will not
become active until pre-heating is complete.
Selects the Meat Probe function
Selects the Time of Day clock for setting or display
Starts selected functions.
Turn the oven lights On and Off (for both ovens of a double oven).
Selects Timer 1 or 2. Also used to display Timer 1 or 2 if a timer is active and a separate function is being displayed.
Selects the Delay Cook function
Select the Timed Cook function
This knob is pressed to activate the Mode selection function and rotated to cycle through the modes
This knob is pressed to activate the Temperature adjustment function when a cooking mode is active and rotated
clockwise to increase the temperature or time setting or counter clockwise to decrease the temperature or time setting.
OVEN LEGEND
1
1. Mode Icons
2. Mode Dial / Button
3. Clock and
Temperature /
Function Display
4. Time / Temperature
Adjustment Dial /
Button
5. Door Latch
6. Control Panel Buttons
7. Cabinet Mounting
Holes
8. Broil Element (Under
Glass)
9. Meat Probe Socket
10. Meat Probe
11. Door Gasket (Upper)
12. Rotisserie Fork
13. Rotisserie Spit Rod
14. Halogen Light
15. Oven Roller Rack
16. Hinge Receptacle
17. Oven Heat Vent
18. Door Gasket (Lower)
19. Bake Elements
(Under Glass)
20. Convection Baffle
21. Rotisserie Motor
22. Temperature Sensor
23. Serial Number Label
24. Moist Fill Access
2
7
3
5
4
6
23
24
15
21
20
19
16
7
18
6
OVEN FEATURES DEFINED
1. Mode Icons:
These icons illuminate to show which oven mode is being used. All icons will light up when Mode
selection is started and a single mode will be highlighted when the Mode Selector Dial is rotated and
Mode is selected.
2. Mode Dial / Button
The Mode Dial / Button will start Mode selection when pressed once and is rotated to
toggle between modes.
3. Clock and Temperature / Function Display
Displays the Time of Day when the oven or Timers are not in use. A single oven will display the set
temperature on the right side of the Time. A double oven will display Upper Oven Temperature on the
Left and Lower Oven Temperature on the right of the Time. Other oven status icons will be displayed
in this area during oven use.
4. Time / Temperature Adjustment Dial / Button
The Time / Temperature Adjustment Dial / Button will allow adjustment of the set temperature, time of
day, or timer settings when rotated. The temperature adjustment mode can be entered by pressing
the dial while the oven is in operation (except for Self-Clean) then rotating to change the temperature.
5. Door Latch
The Door Latch locks the door during the Self Clean cycle for safety.
6. Control Panel Buttons
The Control Panel is a smooth glass panel with button areas indicated by ovals. The button functions
are activated by a light touch. The CONVECTION, ROTISSERIE, and MOIST buttons will illuminate
when these functions are active.
7. Cabinet Mounting Holes
Mounting holes are located on the front and inside surfaces of the stainless trim and are used to
secure the oven to the cabinet.
8. Broil Element
A high intensity dual ribbon broiler is located under glass at the top of the oven.
9. Meat Probe Socket
Located above the top rack in the upper left front of the oven, this socket is where the meat probe is
plugged in to allow the oven to sense the temperature of large meat or poultry dishes and the put the
oven into Hold when the food is cooked.
10. Meat Probe
The Meat Probe plugs into the Meat Probe Socket in the wall of the oven and into the food being
cooked. The Meat Probe can then be set to the desired food temperature for cooking.
11. Door Gasket (Upper)
The Door Gasket is used to retain heat within the oven
12. Rotisserie Fork
Two Rotisserie Forks are provided with the oven and are used to secure food to the Rotisserie Spit
Rod during cooking.
13. Rotisserie Spit Rod
The Rotisserie Spit Rod is used in combination with the Rotisserie Forks to hold food when cooking in
Rotisserie mode.
7
OVEN FEATURES DEFINED (continued)
14. Halogen Light
Two high intensity low voltage halogen lights are provided for each oven and are located to give
maximum illumination throughout the cooking area.
15. Oven Roller Rack
Three oven racks are provided per oven. Each rack is hinged for easy insertion and removal from the
oven and allows the full width of the oven to be used when cooking. Rollers on each rack provide
smooth movement when cooking or checking food.
16. Hinge Receptacle
The hinge receptacles hold the oven doors in place and allow easy removal of the doors when
installing the oven.
17. Oven Heat Vent
Cool air circulates through the oven door to keep it cool during cooking and hot air is exhausted
through the Oven Heat Vent at the bottom of the oven. Do not block or bend this area when the oven
is in use or during installation.
18. Door Gasket (Lower)
The Door Gasket is used to retain heat within the oven
19. Bake Elements (Under Glass)
Dual Bake Elements are located under black Ceran glass for even heating and easy cleaning.
20. Convection Baffle
The convection baffle is mounted to the rear of the oven and covers a remote third heating element
while evenly distributing heated are throughout the oven.
21. Rotisserie Motor
The rotisserie motor interface is located in the right rear of the oven. The square pointed end of the
Rotisserie Spit Rod is placed into the receptacle and the opposite end is secured in the front bracket
to allow rotisserie cooking.
22. Temperature Sensor
The temperature sensor reads the oven temperature and sends it to the control
23. Serial Number Label
The serial number is required for any service or warranty calls.
24. Water Reservoir Access
Provides access to the water reservoir for Moist mode to fill and empty.
8
USE OF YOUR OVEN
INITIAL OVEN SETUP
CLOCK
•
•
•
•
•
•
•
•
When powered up and prior to pressing any buttons the clock will flash 12:00 and will increase each
minute.
To set the oven clock press the CLOCK button on the control panel once.
The clock will blink indicating it is ready to be set and the AM or PM icon will be displayed.
Set the correct time by rotating the TEMP/TIME knob on the right side of the control panel clockwise to
increase the time and counter clockwise to decrease the time.
Once the present time has been selected, press the START button to set the time.
A 12 hour clock display is the default but may be changed.
If a 24 hour military type clock display is desired, press and hold the CLOCK button for 6 seconds. “12 hr”
or “24 hr” will be displayed and can be toggled by pressing the TIME/TEMP knob. Press START to select
the desired display type.
Note: AM or PM will only be displayed during the setting of the clock.
FAHRENHEIT OR CELSIUS TEMPERATURE DISPLAY
•
•
•
Temperature is displayed in Fahrenheit as a default but may be changed to Celsius if desired.
To change the temperature readout to degrees Celsius select the BROIL mode and set it to HIGH.
Start the mode and press and hold the TIME/TEMP button for 6 seconds. “F” (Fahrenheit) will be
displayed as the current mode as a factory default. It can be toggled to “C” (Celsius) by pressing the
TEMP/TIME knob. Press START to select the desired mode.
CONTROL BEEPER
•
•
•
•
An audio beeper is used to indicate presses of the control, indicate alarm expiration, end of cycles, etc.
The beeper may be disabled if desired.
To disable the beeper, press and hold the DELAY COOK button for 6 seconds. “On” or “Off” will be
displayed (On is the default). The state of the beeper can be toggled by pressing the TEMP/TIME knob.
Press START to select.
OVEN LIGHTS
•
•
Oven lights may be turned On and Off by pressing the LIGHT button on the control panel.
In a double oven both the upper and lower oven lights will be turned On and Off when the LIGHT button is
pressed.
9
OVEN HEATING MODES DEFINED
Your Oven features cooking modes which are used in most forms of in-house cooking.
PRE-HEAT
Most recipes call for an oven to be heated to a particular temperature prior to the start of cooking. This
heating of the oven is the Pre-Heat mode and uses high intensity heat from the top, bottom, and rear of the
oven to quickly and evenly heat the oven. The Convection Fan is also used during Pre-Heat to rapidly
distribute the heat throughout the oven. The same heating is used for Rapid Recovery when the oven
temperature is reduced by over 100° F from the oven setting.
NOTE: Due the high intensity heat generated during Pre-Heat, food should NOT be placed in the oven until
the oven indicated Pre-Heat is complete. This will be indicated by the PRE icon turning off and a beep tone by
the oven to indicate the set temperature has been achieved.
BAKE
The most traditional type of oven heating, Bake generates most heat across the entire bottom of the oven.
DELICATE BAKE
Delicate Bake is very similar to Bake and also heats from the oven bottom but Delicate Bake generates most
heat around the outer edge of the oven bottom. Perimeter heating helps prevent scorching of delicate items
that can occur when using the more intense standard Bake.
BROIL
Broil uses the top element which rapidly generates searing heat desired for cooking steaks, chops, some fish,
and for toasting breads. Carefully select the distance from the Broiler glass to prevent overcooking or burning
foods.
PERFECT CONVECTION
Perfect Convection uses no direct heat but heats the air being moved around the oven with a concealed
Convection Element behind the Convection Baffle. This is a good general cooking mode and also used for
multi rack cooking since it cooks food indirectly by heating and moving the air in the oven preventing hot
spots.
CONVECTION COOKING
All cooking modes can also be Convection Cooking modes by activating the CONVECTION button which
turns on the Convection Fan. This will circulate the heated air throughout the oven and more evenly distribute
heat. Some traditional dishes that desire a bottom crust should not use the Convection option to allow the
bottom heat to create the crust.
NOTE:
Convection cooking reduces cook times by 10% and reduces the cooking temperature by
approximately 25 degrees.
ROAST
Roast uses both top and bottom heat to improve searing of large meat and poultry items. More heat is
generated at the bottom of the oven when roasting due to the common use of heavy roasting pans.
10
OVEN HEATING MODES DEFINED (continued)
SELF CLEAN
Self Clean is a special heating function that raises the oven temperature to levels that will burn most food
byproducts to ash. It is a 3 hour heating cycle but due to the extreme heat generated, the oven door is
automatically locked when the cycle is started.
Daily oven cleaning can be accomplished with mild detergent and water with a non-abrasive sponge but a
Self Clean cycle performed once or twice a year or after particularly high splatter cooking will eliminate
unseen build up within the oven and reduce the generation of smoke during cooking.
HOLD
The HOLD function is automatic and is entered when a Timed Cook or Meat Probe function has been
completed.
HOLD will reduce the oven temperature setting to 150° F using the perimeter Bake heating element to sustain
the temperature while reducing the concentration of heat.
The HOLD mode is timed for 2 hours.
NOTE:
Food should not remain in the oven after the HOLD function has ended. Food safe temperature
has been established at 140° F below which bacteria will grow.
OVEN USE (Before Cooking)
WARNING:
Do not line the oven bottom with foil or cover it with any material. Your oven has been
manufactured for easy cleaning of spills and soiling. Lining with foil or covering will negatively
affect the cooking performance of your oven and may cause fire hazards.
WARNING:
Position oven racks when the oven is cool. If the oven is hot and racks must be repositioned,
always use clean, dry pot holders to prevent steam burns.
WARNING:
To prevent unnecessary odors, always clean large spills or food particles from the oven prior to
heating.
PREPARATION
Before you start cooking, prepare the following:
•
Check timing for preparation and cooking of all dishes prior to starting for good meal planning.
•
Have your food, ingredients, spices, etc, ready and all required tools handy (oven mitts, tongs, spoons,
basting brushes, etc.)
•
Know your recipe and have it handy for reference. Know your set temperature, approximate cooking time
(and food weight if time is weight based), internal doneness temperature.
•
Prepare an area for hot foods out of the oven. Good preparation can prevent injury, damage, or other
mishaps.
11
POSITIONING OVEN RACKS
•
Your oven comes with Capital Roller Racks which effortlessly move in and out of the oven on bearing
rollers.
•
To completely remove a rack from the oven, before the oven is hot, grasp the rack on both the right and
left sides and lift the rack up while allowing the roller brackets to rotate downward.
•
This will release the rack from the retaining grooves in the oven side wall.
•
To insert a rack, determine the desired rack position and, with the roller brackets facing down, place the
rack into the oven at the desired height.
•
Rotate the roller brackets up towards the walls of the oven while positioning the wheels within the desired
positioning grooves.
•
Make sure all four rollers are seated within the grooves for a secure rack position.
SETTING THE OVEN
•
Know which oven mode is to be used and the temperature setting.
•
DOUBLE: If setting a Double Oven either the UPPER or LOWER oven must be selected by pressing one
of the control panel buttons.
o
The selected oven button will be indicated by a small light in the center of the button.
o
Each oven must be set separately and can use independent modes.
o
If SELF CLEAN is used in either oven, the other oven will not be functional until the SELF CLEAN
cycle is complete.
•
Press the MODE dial to start MODE selection.
•
All MODE icons will illuminate.
•
Rotate the MODE dial to toggle between modes.
o
•
Modes will change from top to bottom when the dial is turned clockwise and bottom to top when
turned counterclockwise.
When the desired mode is highlighted, check the set temperature next to the Time of Day display.
o
Different modes will display different default temperatures based on typical recipe settings.
o
If the temperature needs to be adjusted, use the TIME/TEMPERATURE dial to adjust up or down.
•
When the mode and temperature have been correctly selected, press the START button to begin.
•
NOTE:
If START is not pressed within 10 seconds, the selected mode and temperature will be
cancelled and the display will return to Time of Day or the active functions of the opposite oven
of a double oven.
12
WHILE THE OVEN IS RUNNING
•
•
•
When a cooking mode is started the PRE icon will appear in the clock display. This indicates the oven is
Pre-Heating.
o
BROIL mode does not use a Pre-Heat cycle.
o
The displayed temperature will increase until the set temperature is reached.
o
When the set temperature is reached the oven will sound a beep tone and the PRE icon will turn
off.
o
Once the set temperature has been reached it will be displayed continuously.
o
DOUBLE: To view the opposite oven status of a double oven when both are being used, press
the UPPER or LOWER buttons to toggle the display.
o
The convection fan automatically turns on in Pre-Heat and off when the oven reaches
temperature (unless a Convection mode is selected).
While the oven is in use an ON icon will turn on and off or flash.
o
Once heated your oven will cycle the heating elements only as required to maintain the set
temperature of the oven.
o
When the ON icon is on, the heating elements are turned on and when it is not visible the heating
elements are off.
o
When the ON icon is flashing the heaters are about to turn on or off.
The oven uses a cooling fan to keep the oven cool.
o
The cooling fan turns on automatically when the oven inside temperature reaches 300° F and
turns off when the oven cools to 200° F.
o
BROIL and SELF CLEAN modes turn the cooling fan on immediately upon starting the mode.
•
Keep the door closed as often as possible to maintain a uniform temperature in the oven. The oven was
designed to operate in all modes (including BROIL) with the door completely closed.
•
IMPORTANT:
If the oven door is left open for a period of time while cooking or the temperature
setting is increased by 150° or more, the oven will go into a rapid recovery mode. This
is the same heating as PRE HEAT and uses intense heat from the BROIL, BAKE, and
CONVECTION Elements as well as the Convection Fan to heat the oven quickly. This
can cause foods to burn.
TURNING THE OVEN OFF
•
To cancel a cooking mode and turn the oven Off use the CANCEL button.
o
•
DOUBLE: The left side CANCEL button will cancel only the UPPER oven functions. The right
side CANCEL button will only cancel the LOWER oven functions.
The CANCEL button will not turn off the oven lights. Use the LIGHT button.
13
SECURING THE OVEN CONTROL
•
The oven control can be locked into a Secure mode to prevent accidentally turning the oven by children
or when cleaning.
•
The Secure mode will disable all buttons and switches except the CANCEL buttons.
•
To Secure the oven control, press and hold the CANCEL button (either button on a double oven) for 5
seconds.
•
The oven control will beep and the display will show OFF in the temperature readout areas of the display.
•
To unlock the oven control, press and hold the CANCEL button (either button on a double oven) for 5
seconds.
•
The oven control will beep and the display will no longer show OFF.
•
The oven control is unlocked and ready for use.
ADJUSTING THE OVEN MODE AND/OR TEMPERATURE
•
If the temperature must be adjusted in the current mode press the TIME/TEMP dial/button once. This will
enter the TEMPERATURE adjustment mode.
o
DOUBLE:
For a double oven, select the desired oven first by pressing either the UPPER or
LOWER buttons. Each oven must be altered separately.
•
Rotate the TIME/TEMPERATURE dial to the desired temperature.
•
Press START to set the new temperature.
o
•
NOTE:
If START is not pressed within 10 seconds, the previously set temperature will
remain the current setting and the mode will continue unchanged.
If the cooking mode must be changed while the oven is ON the mode must be Cancelled and a new
mode selected.
o
DOUBLE: The left side CANCEL button will cancel only the UPPER oven functions. The right
side CANCEL button will only cancel the LOWER oven functions.
14
SETTING TIMERS
•
The Timers are timers only and do not affect oven functions.
•
Your oven has two independent countdown timers: TIMER 1 and TIMER 2.
•
The Timers may each be set from 5 seconds to 11 hours 50 minutes.
•
To set, press either TIMER 1 or TIMER 2 buttons (they each have the same functions).
•
Rotate the TIMER/TEMP dial clockwise to increase the timer setting.
•
Press the START button to begin the timer countdown.
•
NOTE:
•
If a timer is running you may change the timer value by pressing the TIMER 1 or 2 button (depending on
which is to be changed), and rotating the TIME/TEMP dial to the desired time and pressing START.
•
NOTE:
•
To cancel a timer, press the TIMER key twice and the setting will change to 0:00 and will revert to the
standard display after 10 seconds.
o
•
If START is not pressed within 10 seconds, the timer will be cancelled.
If START is not pressed within 10 seconds, the timer will revert to the previously running timer.
Alternately you may press and hold the TIMER button for 3 seconds and the timer will be
cancelled.
If the timer setting or remaining time is more than 1 hour, a HR icon will be displayed and the time will be
in hours and minutes. If the setting or remaining time is less than 1 hour the HR icon will be off and the
time will be in minutes and seconds.
TURNING LIGHTS ON AND OFF
•
The oven lights may be turned on and off as desired to better view cooking food.
•
Press the LIGHT button to turn the lights on or off.
•
Both the upper and lower oven lights will turn on when the light switch is actuated on a double oven.
•
Oven lights DO NOT operate during Self Clean.
15
SPECIAL FUNCTIONS
SELF CLEAN
•
WARNING:
Remove all racks, cooking vessels, utensils, meat probe and all other items from the
oven prior to cleaning.
•
IMPORTANT:
Clean excess spillage, grease and other cooking byproducts from the oven prior to
Self Cleaning.
•
WARNING:
Do not line the oven with aluminum foil or other materials. They may melt, burn or
cause permanent damage to the oven.
•
WARNING:
Do not touch the outer surfaces of the oven during the Self-Clean cycle as the oven
may be hot.
•
WARNING:
The oven door is automatically locked during the Self Clean cycle. Do not try and open
or force the door open. Damage to the oven may occur.
•
NOTE:
Some smoke and odors are normally present during the Self Clean cycle as the food
residue burns off.
•
NOTE:
Some noise may occur during the cleaning cycle and when the oven is cooling after
the cycle ends. Metallic clicking and popping sounds are normal and are caused by
the heat expanding or contracting the metal of the oven.
•
The Self Clean function heats the oven to temperatures that burn off most food residue in the oven. The
oven can be wiped down with moist sponge after cooling to remove the ashen residue.
•
The Self Clean function runs for 3 hours and takes approximately an additional 1 to 2 hours to cool down.
•
The oven door automatically locks when the Self Clean function is started and will unlock automatically
when the oven cools to less than 400° F.
•
To use SELF CLEAN :
o
Follow all listed WARNINGS
o
Select an oven on a double oven or press the MODE dial and rotate to select SELF CLEAN.
o
Press START. The door latch will lock the door and a LOCK icon will be displayed on the control.
o
The PRE icon and ON icon will be displayed on the control to indicate the oven is heating.
o
PRE will be displayed for approximately 45 minutes. This is used to rapidly heat up the oven to
SELF CLEAN temperatures.
o
The ON icon will display when the heaters are on to maintain Self Clean temperatures.
o
The control will display a countdown of 3 hours in the clock section.
o
When the Self Clean cycle is complete the Time of Day will be displayed and the LOCK icon will
remain on until the oven is cool enough for the door to unlock (approximately 400° F).
o
When the oven is cool the interior may be wiped down with a damp sponge and mild detergent to
remove the ash residue.
o
If solids remain stuck to the oven bottom glass, they may be removed by lightly scraping with a
flat razor blade (Use Caution when using a razor to prevent injury).
16
CONVECTION (Upper and Lower Oven on Double)
•
The CONVECTION button turns the oven Convection Fan on during a cooking mode providing an
additional four modes of cooking.
•
CONVECTION used in combination with BAKE, DELICATE, BAKE, BROIL, or ROAST uses the same
heat sources as the standard set mode but evenly moves the heated air throughout the oven.
•
When cooking is complete and a mode is cancelled, the CONVECTION fan will automatically turn off.
•
To use CONVECTION:
o
After an oven is pre-heated, select the oven on a double oven by pressing either UPPER or
LOWER.
o
Press the CONVECTION button.
o
The button will illuminate and the Convection Fan will turn on.
o
The Convection Fan may be turned off at any time by selecting the desired oven and pressing the
CONVECTION button again. The button light and fan will turn off.
o
The Convection Fan will also turn off when an oven cooking mode is cancelled.
•
NOTE:
The Convection Fan automatically turns ON during PRE HEAT and OFF at the end of
PRE HEAT unless otherwise selected.
•
NOTE:
CONVECTION is not selectable during SELF CLEAN.
•
IMPORTANT:
If the oven door is left open for a period of time while cooking or the temperature
setting is increased by 150° or more, the oven will go into a rapid recovery mode. This
is the same heating as PRE HEAT and uses intense heat from the BROIL, BAKE, and
CONVECTION Elements as well as the Convection Fan to heat the oven quickly. This
may cause foods to burn.
ROTISSERIE (Upper Oven only on Double)
•
WARNING:
Do not place food or the drip pan in the oven until the Pre-Heat cycle is complete! The
Pre-Heat cycle generates intense heat from the bottom, top and rear of the oven and
will burn food and may cause damage to any items placed on the oven bottom or the
oven itself.
•
WARNING:
Never attempt to use the MEAT PROBE with the ROTISSERIE.
•
WARNING:
Always turn the ROTISSERIE motor OFF when checking the food temperature with
and instant read thermometer.
•
IMPORTANT:
Always check food clearances to the oven walls and drip pan prior to heating the oven
Make
adjustments
prior
to
turning
on
the
BROILER.
To check clearances, place the food on the Rotisserie rod with the forks secured and
place in a cool oven. Turn the Rotisserie motor On and make sure no contact is made
with any surfaces.
•
IMPORTANT:
Always place a drip pan below the food when Rotisserie cooking in your oven. This will
catch all drippings during cooking.
•
IMPORTANT:
BROIL is the cooking mode for use with ROTISSERIE. DO NOT use BAKE,
DELICATE BAKE, or ROAST since these all use bottom heat and will directly heat the
drip pan and not the food.
17
•
WARNING:
•
The ROTISSERIE button turns the Rotisserie motor ON and OFF when Rotisserie cooking.
•
The ROTISSERIE button illuminates when ON.
•
The ROTISSERIE button can be turned on and off at any time except when Self Clean is selected.
•
Periodically check the food on the Rotisserie to make sure it does not contact oven
walls or the drip pan. Food may become loose during cooking and may require repositioning of the Rotisserie forks or securing the food with cooking string.
o
This allows the cook to verify the food is securely fastened to the Rotisserie Spit Rod with the
Rotisserie Forks prior to placing in a hot oven.
o
This also allows clearances between the food and the top of the oven and the drip pan placed on
the bottom of the oven prior to Pre-Heating.
IMPORTANT:
It is recommended that the BROIL mode be CANCELLED anytime food is being
inserted or removed from the oven when using the ROTISSERIE to prevent burns.
The BROIL element heats rapidly and will have minimal affect upon cooking if turned
OFF when inserting or removing food.
MOIST (Single Oven or Upper Oven only on Double)
The MOIST feature adds a small amount of water to the oven every minute when cooking, resulting in moister
foods. Water is stored in a Water Reservoir behind the door and flows into an Evaporation Tray below the
convection baffle inside the oven.
•
IMPORTANT:
ONLY USE DISTILLED WATER TO FILL THE RESERVOIR. Regular tap water will
cause a build up of minerals in the orifice of the moist system and may cause clogging.
•
NOTE:
The Moist feature will not function unless a cooking mode is active and Pre-Heat is
complete.
•
WARNING:
Moist mode should only be used with a temperature setting over 250° F. Lower
temperatures will not evaporate the water and water will accumulate in the evaporation
tray.
•
NOTE:
The Moist feature will not function in SELF CLEAN or BROIL.
•
IMPORTANT:
Open the door as few times as possible during MOIST cooking. Frequent opening of
the door will allow the moisture and heat to escape the oven and will prevent the mode
from being effective.
•
IMPORTANT:
Prior to turning the oven on, make sure the Evaporation Tray is installed in the back of
the oven.
•
To use the MOIST feature, first add distilled water to the water reservoir.
•
o
Open the oven door and access the water reservoir through the panel in the upper right side of
the intake slots.
o
Pull the reservoir out until the filling port is in front of the control panel.
o
Remove the vented plug from the fill port and pour clean distilled water into the tube to just below
the top. DO NOT OVERFLOW!
o
Replace the plug snugly.
o
Push the reservoir back into the vent and replace and secure the reservoir cover.
Set the desired cooking mode and temperature and allow the oven to Pre Heat. The MOIST feature will
not begin to function until the PRE HEAT cycle is complete.
18
•
Press the MOIST button to allow the oven to add water into the oven cavity. When activated, the MOIST
button will be illuminated.
o
Only use the MOIST feature with oven settings above 250° F. If the oven temperature is too low
the water will not evaporate and may drip onto the oven bottom.
•
The MOIST mode will automatically turn Off when the cooking mode is cancelled or can be manually
turned Off at any time by pressing the MOIST button. When turned Off, the MOIST button light will turn
Off.
•
IMPORTANT:
•
•
The water reservoir should be emptied after every use. To empty the reservoir do the
following:
o
Turn the oven OFF and wait until the oven is cool.
o
Open the reservoir access door behind the oven door.
o
Pull the reservoir out until front of the tube clears the control panel.
o
Place a bowl or other receptacle below the tube mouth and remove the plug and allow any
remaining water to drain.
o
Replace the plug snugly and push the reservoir back into position.
CLEANING THE RESERVOIR
o
The water reservoir should be cleaned every six months or prior to use after a long period of
disuse.
o
To clean the reservoir, open the reservoir access panel and slide it forward to allow access to the
tube connector on the bottom right side.
o
Place a pan or bowl below the reservoir to catch any water that may be inside when removing the
feed tube.
o
Use pliers or a crescent wrench to loosen the connecting nut.
o
Carefully remove the tube from the reservoir body and allow any water to drain into the bowl.
o
Remove both plugs from the reservoir and set aside for replacement after cleaning.
o
Partially fill with very hot water and a small amount of dishwashing liquid and agitate to clean.
o
Rinse the reservoir thoroughly with clean hot water until no detergent remains.
o
Replace the plugs in the reservoir and slide back into the oven until the front is just clear of the
control panel.
o
Replace the feed tube in the reservoir and hand tighten the nut onto the fitting.
o
Use a crescent wrench or pliers to tighten an additional ¼ to ½ turn.
o
Replace the reservoir in the oven and close the cover.
CLEANING THE EVAPORATION TRAY
o
CAUTION! Only clean the Evaporation Tray when the oven is cool!
o
The Evaporation Tray is inside the oven located directly below the convection baffle.
o
Lift the Evaporation Tray up and remove from the oven.
o
Use a damp cloth to and mild non-abrasive detergent to wipe out the interior of the container prior
to use. Food particles and grease from cooking may fall into the container and get trapped.
o
IMPORTANT! Always remove the evaporation tray from the oven prior to self cleaning. The tray is
manufactured of high quality stainless steel and will discolor if left in the oven during self clean.
19
PROBE (Upper and Lower Oven on Double)
PROBE allows the oven to monitor the food temperature as it cooks and stops cooking when the food is done.
The Meat Probe is inserted into the food to monitor the internal temperature. When the food is done, the cooking
mode will change to HOLD mode for two hours.
•
The PROBE function is used in conjunction with a cooking mode set to the recipe cooking temperature.
•
WARNING:
The PROBE function cannot be used with BROIL or SELF CLEAN modes to prevent
damage to the Meat Probe.
•
WARNING:
The PROBE should not be used when cooking at temperatures higher than 450° F.
•
To use the PROBE function the following steps are to be followed:
o
Set rack positions when the oven is cool.
o
Set the desired cooking mode and cooking temperature.
o
Allow the oven to complete the Pre-Heat cycle.
o
Press the PROBE button.
o
Set the desired internal temperature of the food to be cooked.
o
Insert the sharp end of the Meat Probe into the thickest section of the food (i.e. the center of a
roast or the thigh of a turkey).
o
Plug the opposite end of the probe into the Meat Probe Socket.
o
The oven will show the internal temperature of the food in the temperature display.
o
NOTE:
o
When the desired temperature is achieved, the oven will go into HOLD mode, which will lower the
oven temperature setting to 150° F and will remain on for 2 hours.
When the Meat Probe is placed into cold food the temperature will not indicate lower
than 95° F.
•
WARNING:
To maintain food safe conditions, food should be removed from the oven prior to the
end of the HOLD cycle.
•
IMPORTANT:
To prevent possible damage, do not fully immerse the probe in water when cleaning.
When washing the Meat Probe, use water with a mild detergent and wipe clean the
metal skewer section, body and cord.
20
DELAY COOK
•
Your oven can be set to start cooking at a desired time by presetting a cooking mode, temperature, and
setting a start time in DELAY COOK.
•
WARNING:
When using DELAY COOK, always maintain food safe habits and be extremely careful
of access to the oven by children or adults who may be injured or cause damage by a
live oven.
•
WARNING:
Do not use DELAY COOK for foods subject to spoiling (dairy products, eggs,
uncooked poultry, etc.
•
IMPORTANT:
When using DELAY COOK the Pre-Heat cycle is eliminated to prevent food from
burning. The oven will take an additional 20 – 40 minutes to heat to the set
temperature. Please take note of the additional time that may be required to heat the
oven when using DELAY COOK.
•
To use DELAY COOK, first set the oven racks to the desired position while the oven is cool.
•
For a Double Oven, select the desired cooking oven.
•
Select and set the cooking mode and cooking temperature.
•
Press the DELAY COOK button.
•
Use the TIME/TEMP dial to adjust the desired start time.
•
DELAY COOK may be used with the MEAT PROBE and TIMED COOK functions if desired. These
modes are set normally as described in this manual.
•
DELAY COOK may be used with the Self Clean function.
•
To view the setting, press TIMED COOK (for a double press the active oven, either UPPER or LOWER
then TIMED COOK)
•
WARNING:
•
DELAY COOK cannot be set with the Self Clean function if the oven or one, or both of the ovens of a
double oven, is in use, still hot, or locked.
When using DELAY COOK, with the Self Clean function, make sure to remove all
racks, cooking vessels, utensils, wipe up excess spills and remove large food particles
prior to setting the oven.
21
TIMED COOK
•
Your oven can be set to end cooking after a set time has passed by using the TIMED COOK function.
•
To set TIMED COOK a cooking mode must be active (or set with DELAY COOK).
•
Press the TIMED COOK button to enter the duration time screen.
•
Use the TIME/TEMP dial to set the duration in minutes, or hours and minutes.
•
Press START to activate the TIMED COOK function.
•
To view the setting, press TIMED COOK (for a double press the active oven, either UPPER or LOWER
then TIMED COOK)
•
At the end of a TIMED COOK mode, the oven will change from the cooking mode to HOLD mode.
•
HOLD mode will lower the oven temperature setting to 150° F and will remain on for 2 hours.
SABBATH MODE
Sabbath mode will turn off beepers, disable oven lights, will maintain constant readouts of “SAb” in the
temperature readout zone, will allow oven temperature to be changed without changing displays, disables oven
lights.
•
SABBATH can be selected for the following cooking modes;
o
BAKE, DELICATE BAKE, ROAST, and PERFECT CONVECTION.
•
To enter into SABBATH mode, select an oven (for a double oven) and start the desired mode and
temperature.
•
After PRE HEAT is complete, press and hold the START button for 4-5 seconds. The oven will beep while
the START button is being held.
•
The oven control will tone and “SAb” will be displayed in the temperature area of the control for the
selected oven.
•
Oven temperature can be changed in SABBATH mode but with no display change.
o
To change oven set temperature, select the desired oven by pressing the UPPER or LOWER
BUTTON.
o
Press and rotate the temperature dial, clockwise to increase and counterclockwise to decrease
temperature.
o
The temperature can only be adjusted within the normal limits of the oven (135° F to 550° F)
o
Temperature changes will be implemented by the control within a random time of 15 – 30
seconds.
•
When in Sabbath mode the oven will remain ON in the set mode until turned OFF.
•
The CANCEL or turn Off SABBATH mode, press the CANCEL button for the desired oven.
•
NOTE:
SABBATH must be reset for each use after cancelling.
22
TIPS
General
•
Always center your cookware within the oven from front to back and side to side to ensure even heating.
•
Darker containers will absorb more heat and will provide a darker or crisper crust while lighter pans and
vessels will reflect more heat and provide a more uniform heat.
•
Use low sided or flat cooking vessels, such as cookie sheets, when cooking with convection and even
heat is desired around the food. This will allow the heated air moving within the oven to envelope the food
and provide even heating. High sided vessels will restrict the heated air flow and may affect even
cooking.
•
When cooking large roasts or poultry, it is recommended to use a V-rack within a roasting pan. This
allows even heating of the food and catches the drippings for flavor. Follow the recommendations of
recipes or cookbooks for specific types of recommended cookware.
•
Open the oven door only when required! Opening the door allows heat to escape and requires the oven
to recover which can affect cooking. Check food by using the oven light and viewing through the door
glass whenever possible.
•
Never use a cooking vessel that completely cover the oven from side to side and front to back. There
must be room for heat to circulate within the oven to allow even cooking.
•
Food continues to cook even after removing from the oven. To prevent overcooking, remove the food
when the internal temperature is slightly below the desired temperature. Allow the food to rest and
monitor temperature for doneness.
•
If a recipe, such as frozen pizza, requires food be placed in a cold oven, use DELAY COOK, set for a
short delay, to eliminate PRE HEAT.
Broiling
•
Always broil with the oven door completely closed.
•
Check your rack position with the food on the broil pan when the oven is cold. If the food is too close to
the broiler it may burn. The broiler rapidly produces intense heat!
Rotisserie Cooking
•
Always check clearances prior to heating the oven!
•
Always spend the extra time required to balance the food on the rotisserie spit. Try and roll the spit in
your hands prior to placing in the oven. If it is unbalanced, reposition the forks until it rolls well. An
unbalanced load can cook unevenly, and cause the food to come loose during cooking, etc.
•
Rotisserie cooking is a slow cooking process. Lower the temperature of the BROILER setting and
periodically check doneness with a meat thermometer when the rotisserie is stopped.
•
Foods selected for ROTISSERIE cooking in the oven should be sized so they are not too close to the
BROIL glass when secured. If it is too close the outside will over cook prior to the inside being cooked.
Multi Rack Cooking
•
If cooking on multiple racks the PERFECT CONVECTION mode is recommended. All other modes will
provide less even heat on the various levels of cooking.
•
When multi-rack cooking, leave as much room around each cooking vessel as possible to allow the
heated air to flow as evenly as possible throughout the oven and around the food.
23
CARE AND MAINTENANCE
WARNING:
Do not touch the interior surfaces of the oven during use. After use, make sure these surfaces
have had sufficient time to cool before touching them.
WARNING:
Do not clean the oven door gaskets. The door gaskets are essential for a good seal of the oven.
Care is to be taken during cleaning to prevent rubbing, damaging, or moving the gasket from its
installed position.
MEAT PROBE:
•
Clean the meat probe by lightly scrubbing the skewer, cord, and plug housing with mild detergent and
water after each use.
•
Do not fully immerse the meat probe. Lightly wipe the plug end with a moist cloth and dry after cleaning.
MEAT PROBE SOCKET:
•
Wipe the area around the meat probe socket according to the table below.
•
Prevent water from directly entering the socket.
•
Remove food or cleaning products that may enter the opening of the socket with a toothpick or other nonmetallic implement.
ROTISSERIE MOTOR SOCKET:
•
Wipe the area around the rotisserie motor socket according to the table below.
•
Remove any food that may be stuck to the socket.
ROTISSERIE SPIT ROD AND FORKS:
•
WARNING: Use caution when cleaning the spit rod and forks. They are sharp and can cause injury!
•
Wash the rotisserie spit rod and forks with mild detergent and/or mild abrasive.
•
To prevent sticking, remove and cleaning the threaded fasteners on the forks and clean separately, then
replace after cleaning.
•
Rotisserie forks are dishwasher safe.
BROIL PAN:
•
Wash the broil pan and cover with mild detergent and/or mild abrasive after each use.
24
CLEANING CHART:
•
Always start by selecting the mildest cleaner according to the kind of soil and the material soiled. To
prevent marring the stainless steel finish, always apply the cleaners in the direction of the grain. Rinse
and dry immediately to avoid water marks.
•
Use clean applicators, i.e. soft cloths, sponges, or paper towels for cleaning and scouring.
•
The use of brand names in the char is intended only to indicate a type of cleaner. This does not constitute
an endorsement. The omission of any brand name does not imply its inadequacy.
•
The brands listed on the chart are suggested as examples of a type of cleaner, such as non-abrasive,
powder, cream, etc., use all products in accordance with the manufacturer’s instructions.
PART /
MATERIAL / SOIL
CONDITION
Outer glass
surfaces
SUGGESTED CLEANERS
Non-Abrasive window cleaner, all purpose
cleaners
Abrasive cleaners may leave
scratches over time
Always use clean dry cloths for best
results
Hot sudsy water. Rinse and dry thoroughly
Inner windows have a heat reflective
coating that will scratch if abrasives
are used
Non-Abrasive window cleaner, all purpose
cleaners
Always use clean dry cloths for best
results
Inner Door Glass
Exterior Stainless
Steel
Non-abrasive cleaners; hot water and
detergent, diluted ammonia, Fantastic®,
Formula 409®. Rinse and dry immediately
Cleaner polish. Stainless Steel Magic® to
protect the finish form staining and pitting;
enhances appearance
Hot sudsy water. Rinse and dry thoroughly
Interior porcelain
surfaces
Non-abrasive cleaners; hot water and
detergent, diluted ammonia, Fantastic®,
Formula 409®. Rinse and dry immediately
Hot sudsy water. Rinse and dry thoroughly
Interior glass
surfaces
IMPORTANT REMINDERS
Non-abrasive cleaners; hot water and
detergent, diluted ammonia, Fantastic®,
Formula 409®. Rinse and dry immediately
Heavy soiling may be lightly scraped with a
razor.
Hot sudsy water. Rinse and dry thoroughly
Oven Racks
Lightly abrasive cleaners; hot water and
detergent, diluted ammonia, Fantastic®,
Formula 409®. Rinse and dry immediately
25
Always rub lightly in the direction of
the grain lines
Remove all residue from oven by
wiping with a clean wet sponge after
cleaning
Remove all residue from oven by
wiping with a clean wet sponge after
cleaning
Always use extreme caution when
handling sharp tools
Remove from oven for cleaning. Take
care to prevent paste or powder
cleaners from getting into roller
bearings
Scrub with a lightly abrasive sponge
or cleaning products to remove heavy
staining
TROUBLESHOOTING
Before calling for service, reference the following table for common problems that may enable self diagnosis or
can resolve the problem:
SYMPTOM
Clock is off and controls
do not function
Oven is not heating
Door will not open
POSSIBLE CAUSE
POSSIBLE SOLUTION
Power is off
Check breaker
Wiring improperly connected
Oven is improperly set
Call electrician to properly connect wiring
Check oven temperature and mode setting
Verify that the desired oven has been set for cooking
on a double by pressing UPPER or LOWER as
appropriate
Check oven display for DELAY icon
Check oven display for HoLD icon. Oven setting
changes to 150° F
Opposite oven set on a
double oven
DELAY COOK has been set
TIMED COOK mode has
expired
Oven is in SELF CLEAN or
SELF CLEAN has
completed and oven is
cooling
Allow oven to cool. SELF CLEAN cannot start until
oven is below 250° F.
Oven is still hot
SELF CLEAN will not
start
Door is not completely
closed
Double Oven: Opposite
oven is in use
Close oven door tightly to allow door latch to lock door
Oven is in Sabbath mode
Lights will not turn on
Oven is in SELF CLEAN
Control Panel is locked
Oven will not turn on
Control Panel is locked
Pots or pans may be
blocking heat
Oven is not heating
evenly
Oven may require cleaning
Food is too close to heat
Lots of smoke
Racks are hard to move
Lights do not illuminate
well
Allow SELF CLEAN cycle to complete and oven to
cool. Check oven display for LOCK icon.
Oven has excess spill or
splatter
Rollers or tracks may be
dirty
Racks may have been left in
oven during SELF CLEAN
Turn off opposite oven. SELF CLEAN will not function
if any other function is on
Check oven display for Sab. Press CANCEL to
remove Sabbath mode and allow use of lights
Check oven icons for SELF CLEAN display. Lights do
not operate in SELF CLEAN
Check oven display for OFF readout. Press and hold
CANCEL button to unlock
Check oven display for OFF readout. Press and hold
CANCEL button to unlock
Center all pots and pans when placing in oven to allow
heat to evenly circulate in oven
When oven is cool, wipe down excess spillage and
splatter. SELF CLEAN oven to remove residue.
Arrange oven racks to allow even heating. Proximity to
top or bottom of oven will increase heat in those areas.
Clean oven. If oven is in SELF CLEAN, smoke is
normal.
Clean with mild detergent when racks and/or are cool.
Rack may require replacement
Clean lenses when oven is cool with water and mild
detergent.
Lightly scrape excess splatter off lenses.
Light lenses may be dirty
26
SERVICE INFORMATION
If none of the above has occurred, contact our customer service department at (866) 402-4600.
Before you call for service, please have the following information available:
•
Model Number
•
Serial Number
•
Date of Installation
•
Copy of Receipt or Invoice
•
A brief description of the problem
Your satisfaction is our top priority. If the problem persists or is not resolved to your satisfaction by our service
consultant, please write to us or fax us a letter at:
Capital Cooking Equipment, Inc.
Attn:
Customer Service Manager
13211 Florence Ave.
Santa Fe Springs, CA 92670
USA
Fax Number:
(562) 903-1167
Email:
[email protected]
27
WARRANTY
•
One (1) year full parts and labor, covers the entire unit.
WILL PAY FOR:
All repair labor and parts found to be defective due to material or workmanship for on (1) full year (from date of
purchase) “in home” WARRANTY. This does not apply if the unit was subjected to other than normal household
use. An Authorized Factory Agency must provide Service during normal working hours. No charges will be made
for repair or replacement at the location of original installation or factory for parts returned pre-paid, through the
dealer and claimed within the warranty period, and found to be defective by Capital Cooking. Call claims,
regardless of warranty or non-warranty must be documented with photos and detailed description and/or narrative
of the problem.
This warranty shall not apply, nor can we assume responsibility for damage that might result from failure to follow
manufacturer’s instructions or local codes where the appliance has been tempered with or altered in any way or
which, in our judgment, has been subjected to misuse, negligence, or accident. Implied warranty shall not extend
beyond the duration of this written warranty. This warranty is in lieu of all warranties, expressed or implied and all
other obligations or liability in connection with the sale of this product.
WILL NOT PAY FOR:
•
Installation or start-up
•
Shipping damage
•
Service by an unauthorized agency
•
Use of unauthorized parts
•
Service during hours other than normal working hours
•
Improper installation
•
Service visit to teach you how to operate the appliance, correct the installation, reset circuit
breakers or replace fuses.
•
Repair other than normal household use
•
Damage caused by accident, abuse, alteration, misuse, incorrect installation or installation not in
accordance with local codes
•
Unit installed in non-residential applications
This warranty applies to appliances used in residential application only. It does not cover their
use in commercial situations. This warranty is for products purchased and retained in the 50
States of the U.S.A., the District of Columbia and Canada. This warranty applies even if you
should move during the warranty period. Should the original purchaser sell the appliance during
the warranty period, the new owner continues to be protected until the expiration date of the
original purchaser’s warranty period.
28
THESE SPECIFICATIONS ARE FOR PLANNING PURPOSES ONLY.
CONSULT WITH AN AUTHORIZED TECHNICIAN FOR YOUR SPECIFIC INSTALLATION DETAIL
REQUIREMENTS. FOR THE MOST UP TO DATE INFORMATION, CONTACT CAPITAL COOKING
EQUIPMENT, INC. INDICATING THE MODEL NUMBER.
WE RESERVE THE RIGHT TO CHANGE THESE SPECIFICATIONS OR DESIGN WITHOUT NOTICE.
THE POWER OF PERFORMANCE
TM
Capital Cooking Equipment, Inc.
13211 E. Florence Ave.
Santa Fe Springs, CA 90670 USA
866.402.4600 Toll Free
562.903.1167 Fax
MADE IN USA
www.capital-cooking.com
Part #: 87094-01
29