1
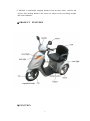
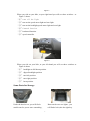
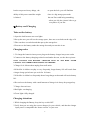
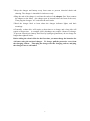
EMMO T300
User’s Manual
Read this manual completely before riding your electric bicycle
1
CONTENTS
CONTENTS…………………………………………………………………………2
INTRODUCTION…………………………………………………………………..3
SPECIFICATIONS…………………………………………………………………3
SAVE RECOMMENDATION……………………………………………………..4
Ride Recommendation………………………………………………………….4
Operating Reminders and Suggestions………………………………………..4
PRODUCTV FEATURES………………………………………………………..5
FUNCTION………………………………………………………………………….6
The basis operation……………………………………………………………...6
Some Parts for Storage………………………………………………………….7
BATTERY AND CHARGING…………………………………………………….8
Take out the battery……………………………………………………………...8
Charging notice…………………………………………………………………...8
Charging Attentions……………………………………………………………...9
2
Ⅰ.INTRODUCTION
First of all thanks for your interested in our electric bike Moto 2,we promise
that it will bring you different feeling when you ride it and also bring you a happy
journey.
The electric bike Moto is unique designed for the senior citizens or disabled
people,the soft seat will protect you from the shock when you ride on uneven
road.The switch controlled by your hand is easier to operate than the handle bar.
Please read this manual thoroughly and carefully to become familiar with all
operation instructions prior to operating your electric bike. Should you have any
questions concerning the electric bike operation or maintenance, please contact your
local dealer.
Your Moto has many unique features not found on other scooters. With proper care
and maintenance, you should enjoy many years of dependable service from your unit.
Ⅱ.SPECIFICATIONS
Battery Voltage
24Volt Dc,24Ah
Motor Wattage
500w
Wheel Size
16”*2.5”
Top Speed
15km/h
Charging Time
4-8h
Distance of full charge
40km
Grade ability
18°
Max rider weight
180kgs
Left and Right Indicators
Yes
Rear View mirrors
Yes
3
Ⅲ. SAVE RECOMMENDATION
Ride Recommendation
1. Always conduct a Safety Check before you ride your Moto, Be thoroughly
familiar with the controls of your.
2. Always wear shoes that will stay on your feet and will stay on the floorboard.
3. Think about your speed, and keep your speed consistent with safe operating
conditions.
4. Never ride with headphones. They mask traffic sounds, distract you from
concentrating on your surroundings, causing you to lose control.
5. Never carry anything which obstructs your vision or your complete control of
the Moto, or which could become entangled in the moving parts of the Moto.
6. Never hitch a ride by holding on to another vehicle.
7. Never ride your Moto while under the influence of alcohol or other drugs.
8. If possible, avoid riding in bad weather, when visibility is obscured, at dusk or
in the dark, or when you are very tired. Each of these conditions increases the
risk of accident.
9. Never allow children to ride. Never allow others to ride without reading and
understanding these instructions.
10.Keep the motor dry to aviod dampness.
Operating Reminders and Suggestions
1. Review all instructions carefully before riding the Moto.
2. Follow all rules and regulations in your area for operating a motorized bicycle.
Obey the same road laws as all other road vehicles, including yielding the
right-of-way to pedestrians, and stopping at red lights and stop signs.
3. Ride predictably and in a straight line. Never ride against traffic.
4. Ride defensively. To other road users, you may be hard to see.
5. Concentrate on the path ahead. Avoid potholes, gravel, dirt, wet road, oil,
curbs, speed bumps, drain grates and other obstacles.
6. Be alert for unexpected events, such as opening car doors or cars backing out
of concealed driveways.
7. Be extra careful at intersections and when preparing to pass other vehicles.
8. Don't carry packages or passengers that will interfere with your visibility or
control of the bike. Don't use items that may restrict your hearing.
4
9. Maintain a comfortable stopping distance from all other riders, vehicles and
objects. Safe braking distance and forces are subject to the prevailing weather
and road conditions.
Ⅳ.PRODUCT
FEATURES
Ⅴ.FUNCTION
5
The basis operation
Figure 1
Figure 1 is the power switch of the bike ,
“①” turn off the power
“②” turn on the power
Figure 2
Figure 2 is the two speed modes switch
“①” low speed position
“②” fast speed position,
6
Figure 3
When you ride on your bike, at your right hand you will see three switches,as
Figure 3 shows .
“①”turn off the light
“②”turn on the speed meter light and rear light
“③”turn on the headlight,speed meter light and rear light
“④”forward function
“⑤”backward function
“⑥”speed controller
Figure 4
When you ride on your bike ,at your left hand you will see three switches as
Figure 4 shows .
“①” headlight on full beam position
“②” dipped headlight position
“③” turn left position
“④” turn right position
“⑤” horn position
Some Parts for Storage
Under the head cover ,you will find a
Between the two rear lights , you
small room for you to store something ,
will find a lock ,take the right key
7
but do not put too heavy things , the
to open the lock ,you will find that
ability of this part to stand the weight
there is a big storage part under
is limited.
the seat.You could bring something
when you ride the electric bike to go
everywhere if you like .
Ⅵ.Battery and Charging
Take out the battery
1.Open the lock between two rear lights
2.Put up the seat ,you will see the storage space ,there are seven bolts on the edge of it
3.Take out these seven bolts and then put up the storage box .
4.You can see the battery under the storage box and you can take it out.
Charging notice
1. To charge the batteries insert power plug on the battery charger into power outlet
2.Connect to the battery-charging socket located under the seat, see the above picture
ONLY CONNECT THE BATTERY CHARGER LEAD TO THE BIKE. NEVER
CONNECT ANY OTHER POWER SOURCE TO THE BIKE.
3.Charge for 4~8 hours then unplug from wall outlet
4.If the bike is ridden everyday or very frequently, longer battery life will result from
a longer charge period once per week for 10+hours
5.If the bike is ridden less frequently then a long charge each month will assist battery
life.
6.Do not leave the battery with a small amount of charge in it always keep topped up
7.Charge after each use.
8.Red light= on charging
9.Green light= fully charged
Charging Attentions
1.While charging the Battery, keep the key switch OFF.
2.Verify that you are using the correct charger for your vehicle, and that the charger
input power is compatible the “house current” in your area.
8
3.Keep the charger and battery away from water to prevent electrical shock and
shorting. The charger is intended for indoor use only.
4.Plug the end of the charger’s cord into the socket of the adaptor first. Next connect
the adaptor to the Moto (the charger port in located below the front of the seat).
Then plug the chargers’ AC cords into the wall outlet.
5.Read the charger label to learn about the charger indicator lights, and their
meanings.
6.Generally, a short drive will require a short time to re-charge, and a long ride will
require a longer time. A complete (90%) discharge may require 6 hours to recharge.
To prevent electrolysis (battery fluid loss by hydrogen generation,) do not charge for
longer than eighteen hours.
Before riding the electric bike for the first time, you must charge the batteries for
4-6 hours using the enclosed charger. To charge, pull the protective cover from
the charging sockets. Then plug the charger into the charging sockets, and plug
the chargers into a wall outlet.
9