1
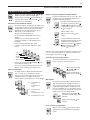
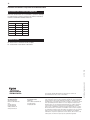
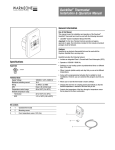
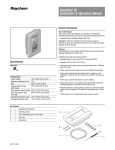
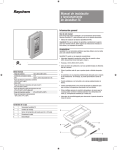
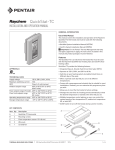
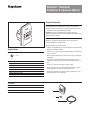
QuickStat™ Thermostat
Installation & Operation Manual
General Information
Use of this Manual
This manual covers the installation and operation of the Raychem®
QuickStat™ thermostat and must be used with the following document:
• QuickNet™ System Installation Manual (H57704)
Important: For the Tyco Thermal Controls warranty and agency
approvals to apply, the instructions included in this manual and product
packages must be followed.
Features
QuickStat is an electronic thermostat that must be used with the
Raychem QuickNet floor warming mats.
QuickStat provides the following features:
• Includes an integrated Class A, Ground-fault Circuit Interrupter (GFCI).
Specifications
• Operates at 120/240 V 50/60 Hz.
Approvals
• Switches on your heating system at predetermined times on different
days of the week.
C
US
E157297
• Offers 4 periods (called events) each day that you can set at different
temperatures.
LISTED
2D03
• Comes with a preprogrammed schedule that is suitable for most
installations. However, you can customize this program any time you
wish.
Technical Data
Supply Voltage
Maximum switching current
Wiring
GFCI
Temperature control range
Ambient temperature range
Thermostat
GFCI
120/240 V ±15%, 50/60 Hz
16 A
12 AWG to 22 AWG
Class A (5 mA trip level)
40 to 104˚F (5 to 40°C)
• Allows you to reset the thermostat to factory settings.
• Changes the start time of a heating period automatically so that the
desired temperature is reached at the time that you set.
• Controls the temperature of the floor through a temperature sensor
that is placed in the floor construction.
32 to 104˚F (0 to 40°C)
–31 to 149˚F (–35 to 65°C)
Kit contents
A
1
QuickStat thermostat
B
2
Mounting screws
C
1
Floor temperature sensor 10 ft (3m)
A
B
C
2
QuickStat Installation & Operation Manual
Installation
Important: This thermostat must be installed according to all national
and local electrical codes. The installation must be performed by qualified personnel.
Mounting the thermostat in the electrical box
1. Use a screwdriver to remove the cover.
Locating the floor temperature sensor
The floor temperature sensor is installed under the floor surface. See the
QuickNet System Installation Manual (H57704), Section 6, for more
details.
If required, the sensor cable can be extended to about 300 ft (91 m).
Wiring the thermostat
WARNING: TURN OFF THE POWER TO THE CIRCUIT
AT THE MAIN POWER PANEL TO AVOID ELECTRIC SHOCK.
1. Connect power to the thermostat’s line terminals marked “L1 (L)”
and “L2 (N)”.
2. Connect the floor warming cold lead to the load terminals marked
“Load 16A Max”.
2. Mount the thermostat in the wall socket and re-attached the cover.
Thermostat Controls and Display Symbols
The following figure shows the thermostat controls:
QuickStat®
GFCI Class A
LINE
Line (black)
L1 (L)
240/(120)VAC
Neutral (white)
L2 (N)
SENSOR
LOAD
16A
Max.
Cold lead
Reset button
Cold lead
Red light indicating
ground-fault
Adjustment up
Reset
OK - accept
GFCI
Test
1/4" (6 mm)
Strip length
R
Test button
Adjustment down
Pin button for
adjusting clock
Reset button for
factory settings
Digital
display
3. Connect the floor temperature sensor to the screw-less terminals
marked “Sensor”. Push on the terminal spring with a screwdriver and
insert the wires.
The following figure shows the symbols that appear in the display
window while you are programming:
A
C
)
)V
A
(L
L1
20
(N
)
(1
0/
Hig UT
po h VolION
wer ta :
su ge pp D
ly is
co
be
DU
fore nnec
38 AL V
se t
40
rvic
19 W OLT
20 /240 AG
ing
W/2 V E
12 AC 50/6
0V (1 0
AC 6A Hz
(16A)
)
E
N
S
O
R
1
M 6A
ax
.
LO
A
D
Night
S
24
Wake
L2
Q
G uic
F k
s
LI CI Sta
N Cla t
E s
®
4-event symbol:
Clock function
Out
CA
Manual mode
Home
% switch-on time
Time and
temperature
Day number
Heating on
3
QuickStat Installation & Operation Manual
Initializing the Thermostat
Testing GFCI
Setting the thermostat into operation
The first time you power up the thermostat, the time and day will flash
and must be set. You will also need to select the time scale (12 h or 24
h) and temperature scale (°F or °C). If you need to adjust the time or day
in the future, i.e. for for daylight savings time, simply insert a pin into
the hole ( ) and make the necessary adjustments. Setting time and
temperature scale can also be done in the Advanced Settings and ReadOut section on page 5.
Press the UP ( ) or DOWN ( ) buttons to set the correct time and
press the OK ( ) button.
Actions
To check the GFCI:
1. Testing can only be performed if the thermostat has a heating
demand.
2. Adjust the set point until the heating symbol ( ) appears, use the
( ) button, to increase the temperature. Wait 10 seconds to let
the thermostat adjust to the new set point.
3. Press the "TEST" button.
Setting the current time
Display
You must test the GFCI to verify correct installation and function.
Result
The test is successful if the red light on the thermostat lights, and the
display signs disappear. If this does not occur, check the installation.
1. Press the RESET button to reset the GFCI. The red light should
disappear and the display will return to normal appearance.
2. Press the OK ( ) button to cancel the previously set temperature.
3. If the test fails, check your heating cable and the thermostat.
Setting the current day
Then press the UP ( ) or DOWN ( ) button to set the correct day
of the week and press the OK ( ) button.
Display
Actions
Result
If the GFCI trips in normal operation without pressing the TEST button,
there could be a ground fault. To check whether it is a ground fault or
nuisance tripping, press RESET. If the red light turns off and does not
come on again, it was nuisance tripping and the system is functioning
properly. If the ground fault cannot be reset, there is a ground fault.
Check your heating cable, the sensor cable and the thermostat. Replace
if necessary.
Care and maintenance
You should perform the GFCI test monthly.
Setting the temperature and time preferences
Press the UP ( ) button to select 12 hour or 24 hour clock and to
select Fahrenheit or Celsius and press the OK ( ) button.
Display
Actions
Result
Factory settings
The following table shows the default settings that are programmed into
the thermostat from the factory. You can accept the factory settings, or
customize them to meet your needs. See Programming on page 4 to
customize your settings.
4-event time and temperature
Day 1 - 5
Time
Temperature
6:00 a.m.
77°F / 25°C
8:00 a.m.
68°F / 20°C
4:00 p.m.
77°F / 25°C
10:00 p.m.
68°F / 20°C
6:00 a.m.
77°F / 25°C
11:00 p.m.
68°F / 20°C
Day 6 - 7
Other settings
4-event sequence
5:2
Hi-Low temp.
104°F / 41°C
Scale
12 H / °F
Adaptive control
ON
OFF / OFF
If you wish to reset the thermostat to factory settings, simply push the
pin button marked “R” for 3 seconds and the thermostat returns to
factory settings. Time, day and scale for time (12h, 24h) and temperature (˚F, ˚C) read-outs are also reset.
4
QuickStat Installation & Operation Manual
Daily Use of the Thermostat
Programming
4-event clock mode
4-event time and temperature
Each day has been split into 4 events describing a typical day. When the
thermostat is in 4-event mode it will automatically adjust according to
the required temperature and required time. The factory preset program
has 5 days with 4 events, and 2 days with 2 events. For more details,
see Programming.
The table below shows the default time and temperature settings, however, you can easily change each setting as needed. For example, in the
morning you may want the floor to be warm at 7:00 a.m. and the temperature to be 80˚F, and so on for other events.
Simply follow these steps:
Press the OK ( ) button for 3 seconds and the start time displays.
Press the UP ( ) or DOWN ( ) button until you reach your desired
time. Press the OK ( ) button to confirm. Your selected time displays.
Then, press the UP ( ) or DOWN ( ) button until you reach your
desired temperature. Press the OK ( ) button to confirm. Your selected
temperature displays.
Repeat these two actions for the remaining events.
These settings will be valid with days 1-5 showing on the display. To
program the days 6 and 7, repeat the above. Days 6 and 7 are usually
Saturday and Sunday, and only have two events.
4-event clock mode:
The clock function symbol ( ) and one of the 4-event
symbols (
) will be indicated.
For more details, see Programming.
The temperature can be set within the range of 41°F to 104˚F. It is also
possible to select the heating OFF at that event by reducing the setting to
41˚F, and then pressing the ( ) once more.
Press OK ( ) button for 3 seconds to begin programming
Day 1 - 5
Time
Temperature
Time
Temperature
Temporary override:
Wake
settings
To temporarily override the temperature in the 4-event
schedule program, press the UP ( ) or DOWN ( ) button once, to show the temperature, and press again to
increase or decrease the temperature. The display will
flash for 5 seconds, and will then revert to the time. The
override will operate until the next programmed event
when the unit will resume the automatic program.
Out
settings
Home
settings
Cancel comfort mode:
To cancel the override state, press the OK ( ) button
twice.
Night
settings
Permanent override:
During holidays, the scheduled 4-event program can be
overridden. Press the OK ( ) button, and then the UP ( )
or DOWN ( ) button until the override temperature is set.
The unit will operate at this temperature until you change
the temperature or cancel the permanent override state.
Cancel manual mode:
To cancel the permanent override state, press the OK ( )
button once, and the unit will resume automatic function.
Turning thermostat off:
To turn the thermostat OFF, press the DOWN ( ) button
until you reach 41˚F, press the OK ( ) button, then press
the ( ) once more.
DO NOT USE THE TEST BUTTON ON THE GFCI TO
SWITCH OFF THE HEATING SYSTEM. The GFCI automatically resets after a power outage.
Day 6 - 7
Wake
settings
Night
settings
5
QuickStat Installation & Operation Manual
Advanced Settings and Read-Out
Press both the UP ( ) and DOWN ( ) buttons together
for 3 seconds. "INFO" is displayed.
Press the UP ( ) button until you reach the desired sub
menu. Select the sub menu with the OK ( ) button.
Maximum and minimum allowed temperature range
The temperature setting range of 41˚F to 104˚F can be
limited to prevent a too high or too low temperature from
being selected.
Set the maximum allowed temperature.
Use the UP ( ) or DOWN ( ) button to
increase or reduce and the OK ( ) button
to accept.
Monitoring energy consumption
The thermostat calculates the average time it has been
switched on allowing you to monitor your energy consumption. The thermostat displays the total switch-on
time as a percentage for the last 2 days, 30 days or 365
days.
Next "LoLi" is displayed.
Press the OK ( ) button to continue.
Calculation of operational costs per day:
(switch-on time:100) x kW x kWh-price x 24 h per day
Example:
Read-out: 30% in the latest 365 days
Size of heating system: 1.2 kW (ask the installer)
Cost of power: 0.2 USD/ kWh - Calculation:
(30:100) x 1.2 kW x 0.2 USD/ kWh x 24 h = 1.7 USD per day
Set the minimum temperature that the
floor should never fall below. Use the UP
( ) or DOWN ( ) button to increase or
reduce and the OK ( ) button to accept.
Note: It is possible to select the heating OFF as your "LoLi" setting by
reducing the setting to 41˚F, and then pressing the ( ) once more.
2 days
30 days
365 days
Software version
Temperature sensor
Time and temperature scale selection
You can select either ˚F˚ or C scale, and 12 or 24 hour
clock as follows:
Press the UP ( ) or DOWN ( ) button to show the different readouts.
Press the UP ( ) or DOWN
( ) button to change settings.
Confirm the required scale
with the OK ( ) button.
No changes can be made here. Use the OK ( ) button to
end.
4-event sequence
The present event sequence flashes: Days 1-5, followed by
days 6-7. To change, press the UP ( ) button until you
have days 1-6 and then day 7 flashing, or all 7 days are
flashing. Select the required sequence with the OK ( )
button.
5-2:
4 events in 5 days +
2 events in 2 days.
6-1:
4 events in 6 days +
2 events in 1 day
7-0:
4 events in 7 days
Adaptive function
This function enables the thermostat to calculate when it
needs to switch ON so that the required temperature is
reached at the set time. With a start time of 7:00 a.m.
therefore, the thermostat may switch ON as early as 6:00
a.m. so that the desired temperature of 77˚F is achieved
by 7:00 a.m. Without this function set, the thermostat will
start to heat at the time you set.
Press the DOWN ( ) button to switch
between on and off.
Press the OK ( ) button to confirm.
Ending the programming sequence
Press the OK ( ) button to end programming and to
return to scheduled program.
6
QuickStat Installation & Operation Manual
Sensor Testing
If the sensor is disconnected or short-circuited, the heating system is
turned off. Test your sensor according to the following resistance table:
Sensor
Temp (˚C)
Temp (˚F)
Value (ohm)
–10
–14
64000
0
32
38000
10
50
23300
20
68
14800
30
86
9700
Error Codes
Tyco, Raychem, QuickNet and QuickStat are trademarks of Tyco Thermal Controls LLC
or its affiliates.
Worldwide Headquarters
Tyco Thermal Controls
Canada
Tyco Thermal Controls
300 Constitution Drive
Menlo Park, CA 94025-1164
USA
Tel (800) 545-6258
Fax (800) 596-5004
[email protected]
www.tycothermal.com
250 West St.
Trenton, Ontario Canada K8V 5S2
Tel (800) 545-6258
Fax (800) 596-5004
Important: All information, including illustrations, is believed to be reliable.
Users, however, should independently evaluate the suitability of each product for
their particular application. Tyco Thermal Controls makes no warranties as to the
accuracy or completeness of the information, and disclaims any liability regarding
its use. Tyco Thermal Controls' only obligations are those in the Tyco Thermal
Controls Standard Terms and Conditions of Sale for this product, and in no case
will Tyco Thermal Controls or its distributors be liable for any incidental, indirect,
or consequential damages arising from the sale, resale, use, or misuse of the
product. Specifications are subject to change without notice. In addition, Tyco
Thermal Controls reserves the right to make changes—without notification to
Buyer—to processing or materials that do not affect compliance with any applicable specification.
© 2005 Tyco Thermal Controls LLC
H57725 12/05
E0: Internal error. The thermostat must be replaced.
E2: External sensor short-circuited or disconnected.
Instructions d’installation et
d’opération du thermostat
QuickStat™
Information générale
Utilisation de ce manuel
Ce manuel couvre l’installation et l’utilisation du thermostat Raychem®
QuickStat™, et doit être utilisé avec le document suivant :
• Manuel d’installation du système QuickNet™ (H57704)
Important : La garantie de Tyco Thermal Controls et les homologations
ne sont valides que si les instructions de l'emballage et du présent
manuel sont respectées.
Caractéristiques
QuickStat est un thermostat électronique qui doit être utilisé avec les
tapis chauffants Raychem QuickNet.
Caractéristiques du thermostat QuickStat :
• Disjoncteur différentiel de classe A intégré.
Spécifications
• Fonctionne sous 120/240 V 50/60 Hz.
Approbations
• Alimente votre système chauffant à des heures prédéterminées pour
les différents jours de la semaine.
C
US
E157297
LISTED
2D03
• 4 périodes (ou événements) par jour pour le réglage de températures
différentes.
• Programme standard convenant pour la plupart des installations.
Caractéristiques techniques
Tension d’alimentation
Capacité de commutation
Câblage
Disjoncteur différentiel
120/240 V ±15%, 50/60 Hz
16 A
Fils 12 AWG à 22 AWG
Classe A (niveau de
déclenchement :5 mA)
Gamme de réglage de la température 5 à 40 °C (40 à 104 ˚F)
Gamme de température ambiante
Thermostat
0 à 40 °C (32 à 104 ˚F)
Disjoncteur
–35 à 65 °C (–31 à 149 ˚F)
• Ce programme peut être personnalisé à volonté.
• Réinitialisation pour retrouver les réglages d’usine du thermostat.
• Préchauffage automatique pour que la température désirée soit
atteinte à l’heure programmée.
• Règle la température du sol au moyen d’une sonde incorporée dans la
construction du plancher.
Contenu de kit
A
1
thermostat QuickStat
B
2
vis de fixation
C
1
sonde de température de plancher avec fil de 3 m (10 pi)
A
B
C
8
Instructions d’opération et d’utilisation du thermostat QuickStat
Montage du thermostat dans la boîte électrique
Installation
1. À l’aide d’un tournevis, retirer le couvercle.
Important: L’installation de ce thermostat doit être conforme aux codes
de l’électricité national et local. Elle doit être faite par un technicien
qualifié.
Position de la sonde de température
La sonde de température doit être installée sous la surface du plancher.
Voir le manuel d’installation du système QuickNet (H57704), chapitre 6,
pour plus de détails.
Si nécessaire, la longueur du câble de la sonde peut être prolongée
jusqu’à 91 m (300 pi).
Câblage du thermostat
ATTENTION : POUR ÉVITER LES CHOCS ÉLECTRIQUES, ISOLER
LE CIRCUIT D’ALIMENTATION AU NIVEAU DU TABLEAU DE DISTRIBUTION ÉLECTRIQUE.
1. Brancher les fils de l’alimentation secteur du thermostat aux bornes
marquées « L1 (L) » et « L2 (N) ».
2. Connecter le fil froid du système de chauffage aux bornes marquées «
Load 16A Max ».
2. Monter le thermostat dans la prise murale et replacer le couvercle.
Commandes du thermostat et symboles affichés
La figure ci-dessous indique les commandes du thermostat :
QuickStat®
GFCI Class A
LINE
Phase (noir)
L1 (L)
240/(120)VAC
Fil froid
Voyant rouge
signalant un courtcircuit à la terre
Fil froid
Bouton de test.
Neutre (blanc)
L2 (N)
SENSOR
LOAD
Bouton PLUS
Bouton de réarmement
Reset
Bouton OK - Accepter
GFCI
Test
R
16A
Max.
6 mm (1/4 po)
Dénuder
Bouton MOINS
Mini-bouton de
réglage de l'horloge
Mini-bouton
de réinitialisation
Afficheur
La figure ci-dessous illustre les symboles qui apparaissent sur l’afficheur
pendant la programmation :
3. Brancher la sonde de température du plancher aux bornes sans vis
marquées « Sensor ». Appuyer sur le ressort de la borne avec un
tournevis et engager les fils dénudés.
Symboles 4 événements:
Fonction horloge
Réveil
Nuit
Départ
C
)
)V
A
(L
®
Retour à la maison
20
L1
L2
(N
)
(1
0/
Hig UT
po h VolION
wer ta :
su ge pp D
ly is
co
be
DU
fore nnec
38 AL V
se t
40
rvic
19 W OLT
20 /240 AG
ing
W/2 V E
12 AC 50/6
0V (1 0
AC 6A Hz
(16A)
)
1
M 6A
ax
.
LO
A
D
E
N
S
O
R
% chauffage
S
24
Q
G uic
F k
s
LI CI Sta
N Cla t
E s
A
Mode manuel
Heure et
température
Jour de
la semaine
Chauffage actif
CA
9
Instructions d’installation et d’opération du thermostat QuickStat
Initialisation du thermostat
Avant la mise en service du thermostat
Lorsque vous branchez le thermostat, l’heure et le jour clignotent pour
vous rappeler qu’ils doivent être programmés. Après avoir réglé l’heure
et le jour, vous pouvez choisir entre l’horloge 12 heures ou 24 heures et
l’échelle de température (°F or °C). Si vous devez régler l’heure ou le
jour dans le futur, par exemple pour le passage à l’heure d’été, il suffit
d’introduire une épingle dans le petit trou ( ) et de faire les réglages
nécessaires. Le mode d’application de l’heure et l’échelle de température
peuvent également être changés dans la section Réglages avancés et
Affichage, page 5.
Setting the current time
Appuyez sur le bouton PLUS ( ) ou MOINS ( ) jusqu’à obtenir
l’heure désirée, appuyez sur le bouton OK ( ).
Affichage
Actions
Résultat
Si le test est normal, le voyant rouge GFCI s’allume et l’affichage du
thermostat disparaît. Si ce n’est pas le cas, vérifiez l’installation.
1. Appuyez sur le bouton RESET de réarmement du disjoncteur. Le
voyant rouge doit s’éteindre et l’affichage, réapparaître.
2. Appuyez sur le bouton OK ( ) pour annuler le changement de
température de consigne.
3. Si le résultat du test n’est pas normal, vérifiez le câble de
chauffage et le thermostat.
Si le disjoncteur différentiel se déclenche en fonctionnement normal
(sans que vous ayez appuyé sur le bouton TEST), il peut s’agir d’un
court-circuit à la terre. Pour déterminer s’il s’agit d’un défaut ou d’une
fausse alarme, appuyez sur le bouton de réarmement (RESET). Si le voyant rouge s’éteint et ne se rallume pas, c’était une fausse alarme et votre
système fonctionne normalement. Si le disjoncteur ne peut pas être réarmé, il y a probablement un court-circuit à la terre.
Vérifiez le câble de chauffage, le câble de la sonde et le thermostat.
Remplacez tout élément défectueux.
Jour de la semaine
À l’aide des boutons PLUS ( ) et MOINS ( ) choisissez le jour de
la semaine actuel et appuyez sur le bouton OK ( ).
Affichage
Actions
Résultat
Essais et entretien
Le disjoncteur différentiel devrait être testé une fois par mois.
Réglages d’origine
Le tableau ci-après indique les réglages par défaut qui ont été programmés en usine pour le thermostat. Si ces réglages ne vous conviennent
pas, vous pouvez les changer à volonté. Voir « Programmation », page 4
pour personnaliser votre thermostat.
Réglage des préférences de température et d’heure
Séquence 4 événements Heure et Température
Appuyez sur le bouton PLUS ( ) pour sélectionner l’horloge 12
heures (AM/PM) ou l’horloge 24 heures, de même pour l’échelle
Fahrenheit ou Celsius, et appuyez sur le bouton OK ( ).
Jours 1 - 5
Affichage
Actions
Résultat
Heure
Température
6:00 a.m.
77°F / 25°C
8:00 a.m.
68°F / 20°C
4:00 p.m.
77°F / 25°C
10:00 p.m.
68°F / 20°C
6:00 a.m.
77°F / 25°C
11:00 p.m.
68°F / 20°C
Jours 6 - 7
Autres réglages
Test du disjoncteur différentiel
Séquence 4 événements
5:2
Le test du disjoncteur permet de vérifier que l’installation est correcte et
que le système fonctionne normalement.
Temp. maxi/mini
104°F / 41°C
Échelle
12 H / °F
Mode adaptatif
ON
Pour tester le disjoncteur différentiel :
1. Le test ne peut se faire que si le thermostat détecte une demande
de chauffage.
2. Réglez le point de consigne jusqu’à ce que le symbole de
chauffage ( ) apparaisse; appuyez sur le bouton ( ) pour augmenter la température. Attendez 10 secondes que le thermostat
s’ajuste au nouveau point de consigne.
3. Appuyez sur le bouton « TEST ».
OFF / OFF
Pour réinitialiser le thermostat à sa configuration d’origine, enfoncez une
pointe dans le petit bouton marqué « R » et maintenez-le pendant 3 secondes. Le thermostat revient à ses réglages d’origine. L’heure, le jour et
le type d’heure (12 heures, 24 heures), ainsi que l’échelle de température (˚F, ˚C) sont également réinitialisés.
10
Instructions d’opération et d’utilisation du thermostat QuickStat
Utilisation quotidienne du thermostat
Programmation
Mode horloge 4 événements
Heures et températures 4 événements
Chaque jour est divisé en 4 événements préréglés. Si le thermostat est
en mode 4 événements, il commande automatiquement la température
requise au moment programmé. Le programme d’origine, réglé en usine,
comporte 5 jours à 4 événements et 2 jours à 2 événements. Pour plus
de détails, voir « Programmation ».
Le tableau ci-après illustre les réglages par défaut des heures et des
températures. Vous pouvez cependant les changer à volonté. Par exemple, le matin vous pouvez vouloir que le plancher soit chaud à 7 heures
a.m. et que la température soit de 80 ˚F, et ainsi de suite pour les autres
événements. Pour programmer le thermostat :
Appuyez sur le bouton OK ( ) pendant 3 secondes pour faire apparaître
l’heure de début.
Utilisez les boutons PLUS ( ) et MOINS ( ) pour fixer l’heure désirée.
Appuyez sur le bouton OK ( ) pour confirmer. L’heure sélectionnée est
affichée.
Appuyez ensuite sur le bouton PLUS ( ) ou le bouton MOINS ( ) pour
fixer la température désirée. Appuyez sur le bouton OK ( ) pour confirmer. La température sélectionnée est affichée.
Répétez ces deux séquences d’opérations pour les autres événements.
Mode 4 événements :
Le symbole de la fonction horloge ( ) et l’un des 4 symboles d’événement (
) s’affichent.
Pour plus de détails, voir « Programmation ».
Mode confort temporaire :
Pour changer manuellement la température du
programme à 4 événements, appuyez sur le bouton PLUS
( ) ou le bouton MOINS ( ) une fois pour faire apparaître la température et utilisez le bouton approprié pour
augmenter ou diminuer sa valeur. L’affichage clignote pendant 5 secondes et l’heure réapparaît. Le changement
n'est valide que jusqu’au prochain événement programmé,
après quoi le thermostat revient à son programme
automatique.
Annulation du mode confort :
Pour annuler le mode confort, appuyez deux fois sur le
bouton OK ( ).
Mode manuel permanent :
Pendant les vacances, le programme normal à 4 événements peut être désactivé. Appuyez sur le bouton OK ( )
puis sur le bouton PLUS ( ) ou le bouton MOINS ( )
pour fixer la température désirée. Le thermostat fonctionnera à cette température jusqu’à ce que vous la changiez
ou que vous annuliez le mode permanent.
Annulation du mode manuel permanent :
Pour annuler le mode manuel permanent, appuyez une
fois sur le bouton OK ( ) : le thermostat reprend son
fonctionnement automatique.
Arrêt complet du chauffage :
Pour arrêter le chauffage, appuyez sur le bouton MOINS
( ) jusqu’à ce que la température atteigne 41 ˚F, puis
appuyez sur le bouton OK ( ) et à nouveau sur ( ).
N’UTILISEZ PAS LE BOUTON TEST DU DISJONCTEUR
DIFFÉRENTIEL POUR COUPER LE CHAUFFAGE. Le disjoncteur différentiel se réarme automatiquement après une
panne de courant.
Ces réglages seront appliqués aux jours 1-5 indiqués sur l’affichage.
Pour programmer les jours 6 et 7, répétez les opérations ci-dessus. Les
jours 6 et 7 correspondent normalement au samedi et au dimanche et ne
comportent que deux événements.
La température peut être réglée entre 41 °F et 104 ˚F. Il est également
possible d'arrêter le chauffage d’un événement en réduisant la température à 41 ˚F et en appuyant à nouveau sur le bouton ( ).
11
Instructions d’installation et d’opération du thermostat QuickStat
Réglages et affichages avancés
Appuyez sur les deux boutons PLUS ( ) et MOINS ( )
pendant 3 secondes : l’afficheur indique « INFO ».
Appuyez sur le bouton PLUS ( ) jusqu’à l’affichage du
sous-menu désiré. Appuyez sur le bouton OK ( ) pour
sélectionner le sous-menu affiché.
Réglage de la gamme de températures maximum-minimum
La gamme de températures totale, de 41 ˚F à 104 ˚F, peut
être limitée pour éviter que quelqu’un sélectionne une
température trop haute ou trop basse.
Pour régler la température maximum permise, appuyez sur les boutons PLUS ( )
ou MOINS ( ) pour augmenter ou réduire
la température, puis appuyez sur le bouton
OK ( ) pour confirmer.
Surveillance de votre consommation d’énergie
Le thermostat calcule la durée moyenne de chauffage pour
vous permettre de calculer votre consommation d’énergie.
La valeur affichée est le pourcentage du temps total de
chauffage au cours des deux derniers jours, des 30
derniers jours ou des 365 derniers jours.
Calcul des frais de chauffage par jour :
(% chauffage/100) x kW x prix kWh x 24 h par jour
L’afficheur indique « LoLi ».
Appuyez sur le bouton OK ( ) pour
continuer.
Exemple:
Affichage : 30 % au cours des 365 jours écoulés
Puissance de chauffage : 1,2 kW (demandez à votre
installateur)
Coût de l'électricité: 0,10 $Can/ kWh - Calcul :
(30/100) x 1,2 kW x 0,10 $Can/ kWh x 24 h = 0,86 $
par jour
Vous pouvez maintenant sélectionner la
température minimale au-dessus de laquelle le plancher ne descendra jamais.
Utilisez les boutons PLUS ( ) et MOINS
( ) pour augmenter ou réduire, et le
bouton OK ( ) pour accepter.
Remarque : Pour couper complètement le chauffage, sélectionnez pour «
LoLi » une valeur de température de 41 ˚F, appuyez sur OK pour confirmer et appuyez encore une fois sur( ).
2 days
30 days
365 days
Software version
Temperature sensor
Choisir l'horloge et l'échelle de température
Appuyez sur le bouton PLUS ( ) ou MOINS ( ) pour
voir les différents affichages.
Pour choisir l’indication en ˚F ou en ˚C, et l’horloge 12
heures ou 24 heures, procédez comme suit :
Vous ne pouvez faire aucun changement dans ce mode.
Appuyez sur le bouton OK ( ) pour quitter le mode.
Appuyez sur le bouton PLUS
( ) ou MOINS ( ) pour
changer d'option.
Acceptez la valeur affichée en
appuyant sur le bouton OK ( ).
Séquence à 4 événements
La séquence actuelle est affichée par le clignotement des
jours : 1-5, suivis de 6-7. Pour changer la séquence,
appuyez sur le bouton PLUS ( ) jusqu’à ce que les jours
1-6 clignotent, puis les 7 ensemble. Pour choisir la
séquence qui vous convient, appuyez sur le bouton OK ( ).
Mode adaptatif
5-2: 4 événements sur
5 jours +
2 événements sur
2 jours.
6-1: 4 événements sur
6 jours +
2 événements sur 1 jour
7-0: 4 événements sur 7 jours
Ce mode permet au thermostat de calculer lui-même la
durée du préchauffage pour la température désirée. Si
vous avez fixé une heure de début de 7:00 a.m., le thermostat allumera (par exemple) le chauffage à 6:00 a.m.
pour que la température de 77 ˚F soit atteinte à 7:00 a.m.
Si ce mode n’est pas activé, le thermostat commencera à
chauffer à l'heure que vous avez programmée.
Appuyez sur le bouton MOINS ( )
pour alterner entre ON (activé) et OFF
(désactivé).
Appuyez sur le bouton OK ( ) pour
continuer.
Fin de la séquence de programmation
Appuyez sur le bouton OK ( ) pour sortir du mode programmation et revenir au fonctionnement programmé
normal.
12
Instructions d’installation et d’opération du thermostat QuickStat
Vérification de la sonde de température
Si la sonde est déconnectée ou en court-circuit, le système de chauffage
ne fonctionnera pas. L’état de la sonde peut être vérifié en mesurant sa
résistance conformément au tableau ci-dessous.
Sonde
Temp (˚C)
Temp (˚F)
Valeur (ohm)
–10
–14
64000
0
32
38000
10
50
23300
20
68
14800
30
86
9700
Codes d’erreur
Tyco, Raychem, QuickNet and QuickStat sont des marques de commerce de
Tyco Thermal Controls LLC ou de ses sociétés affiliées.
Worldwide Headquarters
Tyco Thermal Controls
300 Constitution Drive
Menlo Park, CA 94025-1164
USA
Tel (800) 545-6258
Fax (800) 596-5004
[email protected]
www.tycothermal.com
Canada
Tyco Thermal Controls
250 West St.
Trenton, Ontario Canada K8V 5S2
Tel (800) 545-6258
Fax (800) 596-5004
Avertissement important: Toute l’information donnée ici, y compris les illustrations, est, à
notre connaissance, exacte. Il incombe cependant à l’utilisateur de s’assurer indépendamment que chaque produit convient à l’application envisagée. Tyco Thermal Controls ne
peut affirmer que ces renseignements sont exacts et complets et, en conséquence, décline
toute responsabilité quant à leur utilisation. Les seules obligations acceptées par Tyco
Thermal Controls sont celles qui figurent explicitement dans les conditions générales de
vente du produit en question, à l’exclusion de toute responsabilité de Tyco Thermal
Controls ou de ses distributeurs à l’égard de dommages incidents, indirects ou consécutifs découlant de la vente, de la revente ou de l’utilisation normale ou abusive du produit.
Les spécifications techniques peuvent être modifiées sans préavis. De plus, Tyco Thermal
Controls se réserve le droit de changer ses procédés de fabrication et les matériaux
entrant dans la composition du produit sans en aviser l’acheteur, dans la mesure où cela
n’affecte pas la conformité à l’une quelconque des spécifications applicables.
© 2005 Tyco Thermal Controls LLC
H57725 12/05
E0 : Erreur interne. Le thermostat doit être remplacé.
E2 : Sonde externe en court-circuit ou déconnecté.