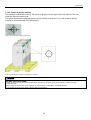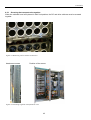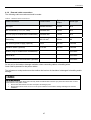
1
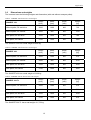
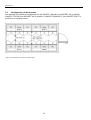
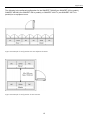
SINVERT 350, SINVERT 420 and SINVERT 500 TL
Operating Instructions – 11/2009
SINVERT
Answers for environment.
Introduction
1
Description
2
Application
3
Installation
4
Support
5
SINVERT
SINVERT 350,
SINVERT 420 and
SINVERT 500 TL
Operating Instructions
Edition 11/2009
Safety instructions
These Operating Instructions contain information which you should observe to ensure your own personal safety
as well as to protect the product and connected equipment. The notices referring to your personal safety are
highlighted in the manual by a safety alert symbol. Notices referring only to equipment damage have no safety
alert symbol. Warnings are shown in descending order according to the degree of danger as follows.
DANGER
indicates that death or severe personal injury will result if proper precautions are not taken.
WARNING
indicates that death or severe personal injury may result if proper precautions are not taken.
CAUTION
with a safety alert symbol indicates that minor personal injury can result if proper precautions are not taken.
CAUTION
without a safety alert symbol indicates that damage to property may result if proper precautions are not taken.
CAUTION
indicates that an unwanted result or state may occur if the relevant instruction is not observed.
In the event of a number of levels of danger prevailing simultaneously, the warning corresponding to the highest
level of danger is always used. A warning that uses a safety alert symbol indicating possible personal injury may
also include a warning relating to material damage.
Qualified personnel
The associated equipment / system may only be set up and operated in conjunction with this documentation.
Commissioning and operation of a device/system may only be performed by qualified personnel. For the purpose
of the safety information in these Operating Instructions, a "qualified person" is someone who is authorized to
energize, ground, and tag equipment, systems, and circuits in accordance with established safety procedures.
Proper handling
Note the following:
WARNING
The equipment may only be used for the applications specified in the catalog and technical description and only
in conjunction with non-Siemens equipment and components if these have been specifically recommended or
approved by Siemens. This product can function correctly and reliably only if it is transported, stored,
assembled, and installed correctly, and operated and maintained as recommended.
Trademarks
All names shown with the trademark symbol ® are registered trademarks of Siemens AG. Third parties using for
their own purposes any other names in this document which refer to trademarks might infringe upon the rights of
the trademark owners.
Disclaimer of liability
We have checked that the contents of this document correspond to the hardware and software described.
However, since deviations cannot be precluded entirely, we cannot guarantee full consistency. The information
given in this publication is reviewed at regular intervals and any corrections that might be necessary are made in
the subsequent editions.
Siemens AG
Ⓟ 11/2009
Copyright © Siemens AG 2009
Subject to change
Contents
1
Introduction ........................................................................................................ 8
1.1
About this documentation............................................................................ 8
1.1.1
1.1.2
1.1.3
2
Description ....................................................................................................... 10
2.1
3
Scope of validity ...................................................................................... 8
Target group ............................................................................................ 9
History ..................................................................................................... 9
Application................................................................................................. 10
Application ....................................................................................................... 12
3.1
Scope of delivery....................................................................................... 12
3.2
Dimensions and weights ........................................................................... 13
3.3
Configuration of the inverters .................................................................... 14
3.4
Medium-voltage components .................................................................... 16
3.5
Footprint .................................................................................................... 18
3.6
Installation requirements ........................................................................... 19
3.7
Ambient conditions .................................................................................... 20
3.7.1
3.7.2
3.7.3
Storage .................................................................................................. 20
Transport ............................................................................................... 20
Operation............................................................................................... 20
3.8
Cooling air inlet.......................................................................................... 21
3.9
Cooling air flow for inverters ...................................................................... 22
3.10
Cable entry ................................................................................................ 24
3.11
Grounding and lightning protection ........................................................... 25
3.11.1
3.11.2
3.12
Delivery of the inverters............................................................................. 27
3.13
Storage...................................................................................................... 28
3.14
Shipping .................................................................................................... 29
3.14.1
3.14.2
3.15
General safety guidelines .................................................................. 31
Center of gravity marking .................................................................. 33
Moving the cabinets .................................................................................. 34
3.15.1
3.15.2
3.15.3
3.15.4
4
Grounding concept ............................................................................ 25
Lightning protection ........................................................................... 26
Lifting the DC and drive cabinet ........................................................ 35
Lifting the SINVERT 350 and SINVERT 420 AC cabinet .................. 37
Lifting the SINVERT 500 TL AC cabinet............................................ 38
Lifting the cabinet off the transport pallet........................................... 39
Installation ........................................................................................................ 41
4.1
Installation requirements ........................................................................... 41
4.2
Mechanical installation .............................................................................. 42
4.2.1
4.2.2
4.3
4.3.1
4.3.2
4.3.3
Screwing the transport units together.................................................... 43
Bolting the cabinets to the floor ............................................................. 44
Electrical installation.................................................................................. 45
Observe the five safety rules ................................................................. 46
External cable connections.................................................................... 47
Connecting the power cables and control cables .................................. 48
4.4
4.4.1
4.4.2
5
Communication ......................................................................................... 57
Profibus ................................................................................................. 58
RS422/Ethernet ..................................................................................... 59
Support ............................................................................................................. 60
5.1
Contact addresses .................................................................................... 60
Tables
Table 3-1 SINVERT 350 dimensions and weights ....................................................... 13
Table 3-2 SINVERT 420 dimensions and weights ....................................................... 13
Table 3-3 SINVERT 500 TL dimensions and weights................................................... 13
Table 3-4 Ambient conditions for storage.................................................................. 20
Table 3-5 Ambient conditions for transport ............................................................... 20
Table 3-6 Ambient conditions for operation .............................................................. 20
Table 4-1 External cable connections ........................................................................ 47
Figures
Figure 2-1 Overview of PV system ............................................................................. 10
Figure 2-2 SINVERT 420 M ......................................................................................... 11
Figure 2-3 SINVERT 420 M with doors opened .......................................................... 11
Figure 2-4 SINVERT 500 TL ........................................................................................ 11
Figure 3-1 Example of inverter configuration ............................................................ 14
Figure 3-2 Example of configuration with two adjacent inverters ............................. 15
Figure 3-3 Example of configuration of two inverters ............................................... 15
Figure 3-4 Configuration of medium- and low-voltage components ......................... 16
Figure 3-5 Separate installation of medium- and low-voltage components............... 16
Figure 3-6 Pressure relief for medium-voltage switchgear......................................... 17
Figure 3-7 Footprint of SINVERT 350, 420, or 500 TL ................................................ 18
Figure 3-8 Cooling air inlet cutouts for SINVERT 350, 420, or 500 TL ........................ 21
Figure 3-9 Airflow in inverter cabinets....................................................................... 22
Figure 3-10 Example: Airflow in an inverter station................................................... 23
Figure 3-11 The use of air channels for inverters is not permissible .......................... 23
Figure 3-12 DC and drive cabinet .............................................................................. 29
Figure 3-13 SINVERT 350 or SINVERT 420 AC cabinet................................................ 29
Figure 3-14 Impermissible tipping of the inverter ..................................................... 31
Figure 3-15 Center of gravity marking....................................................................... 33
Figure 3-16 Center of gravity marking on inverter..................................................... 33
Figure 3-17 Correct handling with crane and transport plates................................... 35
Figure 3-18 Correct handling: Transporting the inverter in a straight line ................. 35
Figure 3-19 Incorrect handling: Swinging or tipping the inverter cabinet ................. 35
Figure 3-20 Transport by crane: Ropes of different lengths are not allowed ............. 35
Figure 3-21 Transport by forklift................................................................................ 36
Figure 3-22 Impermissible transport by forklift: Loading from the front side ............ 36
Figure 3-23 Crane hooks ........................................................................................... 37
Figure 3-24 SINVERT 500 TL AC cabinet..................................................................... 38
Figure 3-25 Location of screws on the DC and drive cabinet ..................................... 39
Figure 3-26 Location of screws on the AC cabinet ..................................................... 39
Figure 3-27 Moving the cabinet off the standard pallet............................................. 39
Figure 4-1 Mounting set for cabinet connection........................................................ 43
Figure 4-2 Screwing together transportation units.................................................... 43
Figure 4-3 Accessory kit ferrite rings.......................................................................... 48
Figure 4-4 Cable connection inverter – drive............................................................. 49
Figure 4-5 Position Cable connection inverter – DC link ............................................ 50
Figure 4-6 Cable connection inverter – DC link.......................................................... 50
Figure 4-7 Cable routing for DC link 2 inverters......................................................... 51
Figure 4-8 Cable routing for DC link 3 inverters......................................................... 51
Figure 4-9 Cable routing for DC link4 inverters.......................................................... 51
Figure 4-10 Cable connection for AC power supply ................................................... 52
Figure 4-11 SINVERT 500 TL AC power cable connection .......................................... 52
Figure 4-12 Strain relief for cables............................................................................. 52
Figure 4-13 Position of the terminal strip-OPT in the SINVERT 350/420..................... 53
Figure 4-14 Position of the terminal strip -OPT in the SINVERT 500 TL ...................... 54
Figure 4-15 Cable connection for DC power supply................................................... 55
Figure 4-16 Connection of the control cables............................................................ 56
Figure 4-17 SINVERT communication scheme ........................................................... 57
Figure 4-18 Profibus connection................................................................................ 58
Figure 4-19 Profibus cable routing for a master/slave combination........................... 58
Figure 4-20 Cable routing of the RS422 bus .............................................................. 59
Figure 4-21 Rear of operator panel............................................................................ 59
Figure 4-22 Com server ............................................................................................. 59
Introduction
1.1 About this documentation
1
Introduction
1.1
About this documentation
This manual will provide you with guidance in the use of SINVERT PV inverters. It provides you with a
detailed overview of all the information you need to know about SINVERT PV inverters.
We have checked that the contents of this document correspond to the hardware and software
described. However, since deviations cannot be precluded entirely, we cannot guarantee full consistency.
The information given in this publication is reviewed at regular intervals and any corrections that might be
necessary are made in the subsequent editions.
We would be pleased to receive any feedback or suggestions for improvements from you. You will find
our contact details in Chapter 5 "Support".
1.1.1 Scope of validity
This system manual is valid for the following basic models of the SINVERT PV inverter:
• SINVERT 350 M
• SINVERT 420 M
• SINVERT 500 M TL
and their master-slave variants:
• SINVERT 700 MS (two SINVERT 350 inverters in parallel)
• SINVERT 1000 MS (three SINVERT 350 inverters in parallel)
• SINVERT 1400 MS (four SINVERT 350 inverters in parallel)
•
•
•
SINVERT 850 MS (two SINVERT 420 inverters in parallel)
SINVERT 1300 MS (three SINVERT 420 inverters in parallel)
SINVERT 1700 MS (four SINVERT 420 inverters in parallel)
•
•
•
SINVERT 1000 MS TL (two SINVERT 500 TL inverters in parallel)
SINVERT 1500 MS TL (three SINVERT 500 TL inverters in parallel)
SINVERT 2000 MS TL (four SINVERT 500 TL inverters in parallel)
8
Introduction
1.1 About this documentation
1.1.2 Target group
This documentation contains information of interest to the following target groups:
•
•
•
Installation personnel
Commissioning personnel
Service personnel
1.1.3 History
Currently released editions of this manual:
Edition
Remark
11/2009
First edition
9
Description
2.1 Application
2
Description
2.1
Application
The SINVERT PV inverter is a fully assembled, ready-to-connect inverter unit for PV installations.
1
2
3
Figure 2-1 Overview of PV system
1
The inverter transforms the DC voltage produced by the PV modules into an AC voltage.
2
The AC output voltage is transformed to the grid voltage by a medium-voltage transformer.
3
The PV solar system can thus be connected to the medium-voltage grid.
10
Description
2.1 Application
Figure 2-2 SINVERT 420 M
Figure 2-3 SINVERT 420 M with doors opened
Figure 2-4 SINVERT 500 TL
11
Application
3.1 Scope of delivery
3
Application
3.1
Scope of delivery
The scope of delivery includes:
•
Inverter cabinet with
• PROFIBUS cable, 1x10 mm diameter
• RS422 cable, 1x10 mm diameter
• Circuit manual
• Operating Instructions
• Operating Manual
• PP solar CD
• Ferrite
• Mounting set for cabinet connection
•
Accessory kit with
• DC link cable with M12 cable lug, diameter approx. 35 mm
The option to extend the switch-on voltage to 900 V DC (DC chopper) includes the following accessory
pack
•
•
•
Braking resistor
2x70 mm² (black) 15 m each for braking resistor, M8 cable lugs at both ends
1x35 mm² (yellow/green) 15 m each for braking resistor, cover on one end, M8 cable lug on
the other
12
Application
3.2 Dimensions and weights
3.2
Dimensions and weights
The inverters have the following weights and dimensions (with and without transport pallet):
Table 3-1 SINVERT 350 dimensions and weights
Height
[mm]
Width
[mm]
Depth
[mm]
Weight
[kg]
Without pallet, DC and drive
2000
1800
800
730
Without pallet, AC cabinet
2000
900
800
1330
With pallet, DC and drive
2235
1850
950
790
With pallet, AC cabinet
2130
1000
950
1360
Height
[mm]
Width
[mm]
Depth
[mm]
Weight
[kg]
Without pallet, DC and drive
2000
1800
800
970
Without pallet, AC cabinet
2000
900
800
1630
With pallet, DC and drive
2235
1850
950
1030
With pallet, AC cabinet
2130
1000
950
1660
Height
[mm]
Width
[mm]
Depth
[mm]
Weight
[kg]
Without pallet, DC and drive
2000
1800
800
970
Without pallet, AC cabinet
2000
900
800
780
With pallet, DC and drive
2235
1850
950
1030
With pallet, AC cabinet
2130
1000
950
810
SINVERT 350
The SINVERT 350 has a total weight of 2060 kg.
Table 3-2 SINVERT 420 dimensions and weights
SINVERT 420
The SINVERT 420 has a total weight of 2,600 kg.
Table 3-3 SINVERT 500 TL dimensions and weights
SINVERT 500 TL
The SINVERT 500 TL has a total weight of 1,750 kg.
13
Application
3.3 Configuration of the inverters
3.3
Configuration of the inverters
The following is the preferred configuration for the SINVERT 1400 MS (four SINVERT 350 in parallel),
SINVERT 1700 MS (four SINVERT 420 in parallel), or SINVERT 2000 MS TL (four SINVERT 500 TL in
parallel) in an equipment room:
Figure 3-1 Example of inverter configuration
14
Application
3.3 Configuration of the inverters
The following is the preferred configuration for the SINVERT 700 MS (two SINVERT 350 in parallel),
SINVERT 850 MS (two SINVERT 420 in parallel), or SINVERT 1000 TL (two SINVERT 500 TL in
parallel) in an equipment room:
Figure 3-2 Example of configuration with two adjacent inverters
Figure 3-3 Example of configuration of two inverters
15
Application
3.4 Medium-voltage components
3.4
Medium-voltage components
Figure 3-4 Configuration of medium- and low-voltage components
Figure 3-5 Separate installation of medium- and low-voltage components
16
Application
3.4 Medium-voltage components
Figure 3-6 Pressure relief for medium-voltage switchgear
Covers for pressure relief openings and associated air channels, expanded metal grids, etc., are not part
of the switchgear and shall be provided by the customer.
The dimensions of the room and the necessary pressure relief openings depend on the type of
switchgear and the amount of short-circuit current.
If pressure relief openings are required, these are to be arranged such that, based on their function
(blowing out in the event of an arc) there is only a minimal risk of personal injury and property damage.
The transformer room must be well ventilated and offer the necessary electrical clearances.
The relevant fire safety and environmental regulations are to be observed depending on the type of
transformer (oil or resin transformer).
17
Application
3.5 Footprint
3.5
Footprint
The following diagram shows the inverter footprint:
Figure 3-7 Footprint of SINVERT 350, 420, or 500 TL
18
Application
3.6 Installation requirements
3.6
Installation requirements
The base of the inverter station must have sufficient capacity to carry the weight of the inverter.
The inverter station must be designed for the wind and snow loads present at the installation site.
The inverter cabinets can be placed close to walls. An air gap of at least 20 mm is required.
To ensure adequate ventilation, the necessary distance to the ceiling must be maintained. A minimum
distance of 400 mm must be observed.
Air channels are not permissible.
The air inlets (on the front and underneath) and the air outlet (on the top) on the inverter cabinet must not
be covered or blocked.
Blocking the air inlet leads to a rise in temperature inside the inverter. As a result, the inverter
performance can be reduced or it can be switched off.
Enough space must be provided in front of the cabinets so that easy access is ensured, for example, for
maintenance work on the inverter.
An appropriate escape route should also be kept clear.
With the cabinet doors fully open, the passage width must be at least 500 mm.
With closed cabinet doors, the passage must be at least 800 mm but should not exceed 1500 mm.
The units may be installed next to each other without a gap.
Further assembly requirements may arise due to local regulations, for example in areas with high risk of
earthquakes or other increased risks.
19
Application
3.7 Ambient conditions
3.7
Ambient conditions
3.7.1
Storage
Table 3-4 Ambient conditions for storage
3.7.2
Ambient temperature
-25 °C to 70 °C
Relative humidity
≤85%, non-condensing
Transport
Table 3-5 Ambient conditions for transport
Ambient temperature
-25 °C to 70 °C
Relative humidity
≤85%, non-condensing
3.7.3
Operation
Table 3-6 Ambient conditions for operation
Ambient temperature
0 °C to 50 °C (with derating)
Relative humidity
≤85%, non-condensing
Other climate conditions according to class
3K3 according to IEC 60 721-3-3
Chemically active substances in accordance with class
3C2 according to IEC 60 721 3-3
20
Application
3.8 Cooling air inlet
3.8
Cooling air inlet
The inverters must be provided with cooling air through the floor.
The required floor cutouts for an inverter are shown in the following diagram:
Figure 3-8 Cooling air inlet cutouts for SINVERT 350, 420, or 500 TL
CAUTION
Danger of mechanical damage
Inverters with low-voltage transformers must be provided with cooling air through the floor.
Insufficient cooling will lead to mechanical damage.
21
Application
3.9 Cooling air flow for inverters
3.9
Cooling air flow for inverters
For air intake from below, the inverter must be installed above an open lower floor (cooling air inflow and
cable entry from below).
The requirements for cooling air are:
Each SINVERT 350 requires 5400 m³ per hour at a temperature of max. 40 °C.
Each SINVERT 420 requires 6,000 m³ per hour at a temperature of max. 40 °C.
Each SINVERT 500 TL requires 4,800 m³ per hour at a temperature of max. 40 °C.
Figure 3-9 Airflow in inverter cabinets
22
Application
3.9 Cooling air flow for inverters
Figure 3-10 Example: Airflow in an inverter station
Figure 3-11 The use of air channels for inverters is not permissible
23
Application
3.10 Cable entry
3.10
Cable entry
The required cable entries for an inverter are:
• 8 x 95-300 mm² single core; four DC 250 A inputs
• 8 x 300 mm² single core; AC outputs L1,L2,L3 + PEN 630 A (if the medium-voltage transformer is
not located in a container)
• Communications cable (according to the desired communications options)
All cables must be suitable for outdoor use.
Examples:
• Power cables: NYY-O
24
Application
3.11 Grounding and lightning protection
3.11
Grounding and lightning protection
Building lightning strike protection is described in IEC 62305-3 (EN 62305-3). Among other things, this
standard establishes the classification of individual lightning strike protection systems and indicates the
resulting lightning strike protection measures required.
Grounding and lightning strike protection are to be set up in conformance with IEC62305.
3.11.1 Grounding concept
The design and dimensioning of the grounding system are the main criteria for channeling the lightning
current into the ground (high-frequency behavior) and to reduce dangerous peak currents.
In accordance with DIN EN 62305-3 a low grounding resistance (under 10 Ω, measured at a low
frequency) is recommended.
To avoid high potential differences between the various grounding systems, these are all connected to
the same grounding system.
This is done by connecting the electrical operating areas and the PV field grounding systems to a
comprehensive meshed grounding system.
By meshing all grounding systems, potential differences between the various plant parts are greatly
reduced. In addition, lightning-induced voltage loads on the electrical interconnections between the
buildings are also reduced.
Mesh sizes of 20 m x 20 m up to 40 m x 40 m have proved economically and technically useful in larger
PV systems.
25
Application
3.11 Grounding and lightning protection
3.11.2 Lightning protection
A lightning protection system consists of an external lightning protection system and an internal lightning
protection system.
Using appropriate external lightning protection, the effect of a direct lightning strike into a building can be
mitigated in a controlled way, and the lightning current can be discharged into the ground.
Measures in an external lightning protection include a lightning collector, a lightning arrester, and a
grounding system.
The task of a lightning collector is to prevent direct lightning strikes.
The arrangement and positioning of lightning collectors can be established using three methods:
• Rolling ball method
• Mesh method
• Protection angle method
If the inverter station has a roof made of metal that runs around the roof corners, lightning rods can be
attached to the corners of the station roof.
The lightning conductor has the task of passing the captured lightning current to a grounding system
without leading to undue rises in temperature and mechanical damage.
In a Class III lightning protection system, the typical distance between the lightning conductors in the
same system is 15 m.
The lightning conductors should be connected to the metal roof and must lead directly to the grounding
system.
Measures for interior lightning protection to protect the inverter against mechanical damage include a
surge arrester (Classes I and II) and central potential equalization.
Each inverter station must be provided with central equipotential bonding connected to the grounding
system.
26
Application
3.12 Delivery of the inverters
3.12
Delivery of the inverters
Please check that the consignment is complete against the accompanying dispatch documentation. If any
items are missing from the consignment, please notify the relevant contact person immediately.
27
Application
3.13 Storage
3.13
Storage
For the storage of the inverter units, the following conditions must be strictly observed.
•
•
The inverters are intended for indoor installation in a clean and dry environment.
They must be protected against temperature extremes (min. 25°C and max. 70°C) and
excessive humidity (max. 85%).
In the event of ingress of dirt or liquid into the equipment, formation of condensation, damage or any
other failures to comply with the prescribed storage conditions, the equipment must not be commissioned
until the correct remedial procedure has been discussed with and approved by Siemens AG. In the case
of noncompliance with the above, Siemens AG will not accept liability for damage arising from
unauthorized commissioning.
Note
Risk to life! Unauthorized commissioning!
Cabinets which have been stored in conditions that do not meet the prescribed standard must not be commissioned. Failure
to comply with storage standards may result in electric shock, other serious injury or substantial property damage.
28
Application
3.14 Shipping
3.14
Shipping
In the following sections, note the following:
• "Transportation unit" refers to the converter cabinet before it has been unpacked;
• "Cabinet" refers to the converter cabinet after it has been unpacked
A SINVERT 350, 420, or 500 TL inverter is delivered in two transportation units. The first transportation
unit consists of a DC and drive cabinet, made up of two cabinets screwed together. The second
transportation unit is the AC cabinet.
The following diagrams show the two parts of the inverter:
Figure 3-12 DC and drive cabinet
Figure 3-13 SINVERT 350 or SINVERT 420 AC cabinet
29
Application
3.14 Shipping
Before moving the converter boxes to their final installation site, it is recommended that the cable for the
DC input and the AC main power connection are first routed and prepared. Since the cables are very
rigid, moving and connecting them after cabinet installation can be very difficult.
The inverter cabinets are mounted on transport pallets as standard. They can thus be moved by forklift or
pallet truck.
30
Application
3.14 Shipping
3.14.1 General safety guidelines
Pay attention to the safety-related instructions in this section and on the packaging for:
• transport
• storage
• proper handling
In this way you will prevent personal injury and material damage.
Particular care must be taken during transportation and handling to ensure that no components are bent
and/or no alterations made to isolating distances.
WARNING
Transportation in accordance with proper procedures
If you lift and transport the device incorrectly or use impermissible means of transport, this can result in death, serious injury, or
material damage.
The transport unit/cabinet is heavy. The center of gravity is in the upper half of the cabinet. This can cause the device to topple
over.
The transport unit/cabinet must only be transported by trained personnel using the permitted means of transportation and lifting
equipment. The devices must not pushed over or tipped.
Figure 3-14 Impermissible tipping of the inverter
31
Application
3.14 Shipping
Tipping the cabinet too far can cause it to topple over and may damage the transport pallet (see figure 33). Tipping the cabinet may cause serious personal injury or substantial material damage. It is therefore
essential that you read and carefully follow the safety notice below:
WARNING
Risk to life! Tipping!
A cabinet, whether with or without pallet, must never be tipped in any direction.
The cabinet is very heavy. Tipping it too far and causing it to topple over can therefore result in serious injury, death and
substantial property damage.
The cabinets are screwed together with transport locks (upward-pointing screws) on the pallet.
For safety reasons, these screws must be checked before moving the cabinet. Otherwise there is a risk
the cabinets will tip over during transport.
Like all electrical systems, the inverter cabinets must also be handled carefully and in compliance with
the instructions of this manual.
They must be handled in compliance with all safety regulations. For proper handling, all necessary aids
should be used.
The proper transportation and storage, along with careful operation and maintenance procedures, play
an essential role for the proper and safe operation of the device.
WARNING
The device may not be exposed to any mechanical shock or vibration during transport and storage. The device must be protected
from moisture (rain) and extreme temperatures. Improper lifting or transport of the device can lead to accidents with serious
injuries or even fatalities and considerable property damage.
32
Application
3.14 Shipping
3.14.2 Center of gravity marking
The transport unit/cabinet is heavy. The center of gravity is in the upper half of the cabinet. This can
cause the device to topple over.
The weight distribution is indicated directly on the inverter (see figure 3-5) by the center of gravity
marking in accordance with ISO 780/symbol 7.
Figure 3-15 Center of gravity marking
Figure 3-16 Center of gravity marking on inverter
WARNING
Take center of gravity into account
A sticker or stamp showing the precise specifications regarding the center of gravity of the cabinet is attached on each
transportation unit.
Failure to take into account the center of gravity can result in death, severe injury, or material damage.
You must take into account the center of gravity during transportation.
33
Application
3.15 Moving the cabinets
3.15
Moving the cabinets
The transport unit/cabinet should be transported with extreme care. Driving over bumps should be
avoided whenever possible.
It should be noted that force is exerted via the pallet during transport and in positioning the transportation
unit on the forklift.
When using a crane, the allowable transport weight and the center of gravity should be observed.
If the center of gravity is not in the middle of the cabinet, appropriate and undamaged lifting equipment
must always be used (e.g. transport plates). A transport plate reduces the force exerted on the device
and prevents damage.
WARNING
Transportation in accordance with proper procedures
Improper movement of the transportation unit with a crane can cause the device to fall or tip over, which can lead to accidents
resulting in death, serious injury, or property damage.
The instructions for the safe transportation and the information on the transport unit (such as indication of the center of gravity)
must be observed.
34
Application
3.15 Moving the cabinets
3.15.1 Lifting the DC and drive cabinet
The combined DC and drive cabinet can be lifted completely using a crane. To do this, the crane can
easily grasp the provided transport plates on the top of the cabinet.
The transportation unit must not swing or tip over.
Figure 3-17 Correct handling with crane and
transport plates
Figure 3-18 Correct handling: Transporting the inverter in a
straight line
Figure 3-19 Incorrect handling: Swinging or tipping
the inverter cabinet
Figure 3-20 Transport by crane: Ropes of different lengths are
not allowed
35
Application
3.15 Moving the cabinets
Figure 3-21 Transport by forklift
Figure 3-22 Impermissible transport by forklift: Loading from the front side
WARNING
Use of an appropriate forklift
If the forks are too short, the transportation unit/cabinet can tip over, which can lead to accidents resulting in death, serious injury,
or damage to the cabinet.
The forks of the truck must protrude at the rear of the transport pallet. The weight should not be lifted with the floor boards of the
transportation units.
The devices may only be transported by forklifts that have been approved for this purpose.
36
Application
3.15 Moving the cabinets
3.15.2 Lifting the SINVERT 350 and SINVERT 420 AC cabinet
If the AC cabinet is to be lifted with a crane, a special crane hook must be used, or the crane must be
mounted directly on the transformer.
The AC cabinet housing cannot support the weight of the transformer.
The special hook must be able to lift a weight of 1,800 kg. The fork of the hook must have the right length
(long enough to carry the transformer and short enough so that with the rear panel installed it does not
extend beyond the cabinet). In most cases, the lifting fork must be adjusted to the right length. Do not
remove the rear panel of the cabinet, because you cannot reattach the panel once the cabinet is installed
on-site (direct against the building wall).
Figure 3-23 Crane hooks
Forks completely inserted
underneath
Standard fork is too long
To use the crane hook, proceed as follows:
• Remove the cabinet doors.
• Place rubber mats between hook and transformer so that the cabinet cannot slip from the hook
(metal on metal does not provide sufficient grip).
• Insert the hook directly beneath the transformer (to lift it).
• Attach the cabinet top side to the hook using straps (to prevent tipping).
37
Application
3.15 Moving the cabinets
3.15.3 Lifting the SINVERT 500 TL AC cabinet
The SINVERT 500 TL AC cabinet can be lifted with a crane. To do so, the crane should be attached to
the transport plates on the top side of the cabinet.
The cabinet must not be allowed to swing or tip over.
Further information can be found in the operating instructions for the AC and drive cabinets.
Figure 3-24 SINVERT 500 TL AC cabinet
38
Application
3.15 Moving the cabinets
3.15.4 Lifting the cabinet off the transport pallet
The cabinets are attached to the pallet by means of transport locks (upward-facing screws). To lift the
cabinets off the pallet, you first need to undo the screw nuts.
To slide the cabinets off the pallet, you need to push the screws out downwards far enough (e.g. using a
hammer and a thick nail), so that the surface of the pallet becomes smooth.
Figure 3-25 Location of screws on the DC and drive cabinet
Figure 3-26 Location of screws on the AC cabinet
All cabinets can be moved on rollers placed under the cabinet frame. As rollers, you should use solid
metal rods with a length of 20 cm and a diameter of 2 cm.
The cabinet can be slid off the pallet onto rollers.
Figure 3-27 Moving the cabinet off the standard pallet
39
Application
3.15 Moving the cabinets
Use a crowbar to lift the cabinet so that you can place the rollers under the frame. If you want to change
the rolling direction, you must lift the cabinet again, turn the rollers by 90° and place them under the
frame again.
You may need to strengthen the floor (with metal sheets) before you move the cabinets over it. Make
sure that the metal sheets are placed such that you will be able to remove them again once the inverters
have been installed.
In order to move or roll the cabinet off the pallet, you will need a solid metal bar or a strong pipe of
100 cm in length and 6 cm in diameter. Then proceed as follows:
• Adjust the pallet so that it is level with the adjacent surface (e.g. floor of the equipment room).
• Cover the gap between the pallet and floor with a metal sheet (5 to 10 cm) so that the rollers do
not get caught in the gap.
• Place a roller on the metal sheet and under the cabinet frame.
• Place a thick roller under the cabinet at a position where there are no cross-planks in the pallet.
• With the assistance of installation personnel, push the cabinet off the pallet.
• As the cabinet moves forward, place more rollers underneath.
NOTE
Use thick-walled steel rods. Round steel bars, round wooden timbers, or steel rollers enclosed in concrete are also suitable for
the purpose.
The bars must have a minimum diameter of 6 cm.
The bars must be at least 1/5 longer than the transportation unit / cabinet.
40
Installation
4.1 Installation requirements
4
Installation
4.1
Installation requirements
To ensure the installation of the inverter under the right environmental conditions, the following guidelines
must be adhered to.
The inverters are designed with IP20 protection. This means:
• They are protected against the ingress of solid foreign bodies with a size of ≥ 12.5 mm.
• They are not protected against the ingress of water.
• They are intended for installation in indoor areas.
The inverter must be stored and operated within the acceptable temperature ranges.
Proper ventilation and air currents must be provided.
Proper grounding procedures must be used on each inverter.
41
Installation
4.2 Mechanical installation
4.2
Mechanical installation
CAUTION
Danger of mechanical damage
The forces occurring during transport may exert mechanical pressure on the components.
This can cause damage to the device.
•
•
The cabinets must be precisely aligned in a row to avoid shearing forces when the bases are attached with screws.
Ensure that the installation area for the inverters is completely flat.
42
Installation
4.2 Mechanical installation
4.2.1 Screwing the transport units together
When the cabinets have been placed in their final position, the DC and drive cabinets must be screwed
together.
Figure 4-1 Mounting set for cabinet connection
Attachment screws
Position of the screws
Figure 4-2 Screwing together transportation units
43
Installation
4.2 Mechanical installation
4.2.2 Bolting the cabinets to the floor
Information on the attachment holes can be found in the floor plan. Each cabinet has four holes through
which it can be bolted to the floor. The mounting dimensions are shown on the dimensional drawings.
The open space between the top of the inverter cabinet and the ceiling is also set out in this installation
guide.
44
Installation
4.3 Electrical installation
4.3
Electrical installation
Installation of cables
Cables that can cause disruptions or are themselves vulnerable to disruption, must be moved as far apart
from each other as possible.
The resistance to errors is improved by installing the cables close to the ground potential. Therefore, you
should move these cables to corners and the ground surface.
Unused wires should be grounded at least at one end.
Low-voltage cables are divided into at least four classes. Each cable class is laid in a different way, and
these cables are bundled only with (or close to) cables of their own class. Cables of different classes
must intersect at right angles, especially when they carry sensitive, interference-prone signals.
• Class 1:
unshielded cables for ≤ 60 V DC
unshielded cables for ≤ 25 V AC
shielded cables for analog signals
shielded bus and data cables
• Class 2:
unshielded cables for > 60 V DC and ≤ 230 V DC
unshielded cables for > 25 V AC and ≤ 230 V AC
• Class 3:
unshielded cables for > 230 V AC/DC and ≤ 1000 V AC/DC
• Class 4:
unshielded cables for AC/DC > 1000 V
CAUTION
Danger of mechanical damage
The cable must be laid so that it is short-circuit-proof
The cables must be bundled (three phases in a bundle) and because of the electrodynamic forces caused by short circuit
currents, they must be secured.
It is recommended that laid cables are attached every 30 cm.
WARNING
To ensure the safe operation of the devices, they may be installed and commissioned only by qualified personnel in full
compliance with the warnings referred to in this manual.
In particular, the general and regional installation and safety regulations regarding work on dangerous voltage installations
(e.g. EN 61800-5-1) and the relevant provisions regarding the use of proper tools and personal protective measures must
be observed.
45
Installation
4.3 Electrical installation
4.3.1 Observe the five safety rules
For your personal safety and to avoid damage, the following safety instructions and all safety-relevant
guidelines in the product documentation must be observed. In particular, the safety instructions attached
to the product itself and the "Safety Instructions" chapter in all instruction manuals must be followed.
DANGER
Danger of high voltage
High voltages can cause death or severe injury if safety instructions are not followed or the device is used in an
inappropriate manner.
It should be ensured that only qualified and trained personnel carry out work on the unit.
The five safety rules are to be observed at all times and in each phase of work.
The five safety rules:
1. Isolate from power supply.
2. Secure against switching on again.
3. Make sure that the equipment is de-energized
4. Ground and short the device.
5. Cover or place guards on parts that are still live.
46
Installation
4.3 Electrical installation
4.3.2 External cable connections
The following cable connections should be made:
Table 4-1 External cable connections
Cable connection
Cross-section
Tightening
torque
Screw type
DC input
4x2x95-300 mm2
32 Nm
M10
AC connection (L1, L2, L3, PEN)
3x2x240 mm2
70 Nm
M12
DC link (only for master/slave combination)
2x2x240 mm2
70 Nm
M12
Grounding
min. 16 mm2
25 Nm
M8
AC auxiliary power supply (optional)
4 mm2
0.5 Nm
Terminal
Weather station (optional)
0.75 mm2
0.5 Nm
Terminal
RS422 (only for master/slave combination)
Connector
PROFIBUS
Connector
RJ45 for Ethernet communication (optional)
Connector
Do not pull on the leads or damage insulation when connecting cables or handling wires.
Strain relief is planned for the power cables.
Test all parts on receipt and ensure that neither the lead nor its insulation is damaged in handling and/or
storage.
WARNING
Testing cable insulation
Improperly laid or damaged cables and incorrectly attached cable shields can heat up in places and cause fires or shortcircuits wherever they make contact.
•
Ensure that cable shields are intact and replace all damaged parts.
•
Ensure that no short-circuit can occur on the power cables due to insulation damage resulting from incorrect
installation.
47
Installation
4.3 Electrical installation
4.3.3 Connecting the power cables and control cables
Remove all fuses for the AC main power supply to the inverter, remove all the fuses from the DC inputs,
and disconnect all the auxiliary circuits in the inverter cabinet.
Remove all fuses and disconnect the auxiliary circuits in the AC distribution cabinet (if present).
Before connecting, ensure that the cables are without power (isolated). If necessary, disconnect the
cable connection on the other side and prevent it from switching on again. Remove fuses and store them
safely, lock the circuit breaker, attach warning labels.
Ensure that all necessary safety measures have been taken at the installation site.
Always exercise the utmost caution, since high DC and AC voltages can cause fatal injuries.
Inverter-drive connection
The individual cabinet sections must be connected to each other (connection between drive and AC
cabinet). The connecting cables are in the AC cabinet - one end is connected to the transformer. The
other cable end must be connected to the drive (take care to match the three phases). The cables should
be positioned before the cabinets are installed, as they later may no longer be accessible. The power and
control cables are connected according to the circuit diagram.
Do not forget to attach the ferrite rings to the cables between the inverter and the transformer. All cables
must pass through these magnetic core rings.
Figure 4-3 Accessory kit ferrite rings
48
Installation
4.3 Electrical installation
Copper rail on the drive and prepared cable
Cable connected, ferrite rings attached
Figure 4-4 Cable connection inverter – drive
49
Installation
4.3 Electrical installation
Connection inverter – DC link
In a master/slave combination, connect the DC link to the supplied cables (240 mm², single-core). Each
connection is made using two parallel cables for each polarity, thus forming a ring.
Ensure the correct polarity.
Ensure that the screws are tight and the cable has sufficient strain relief.
Location of the DC link
Figure 4-5 Position Cable connection inverter – DC link
CAUTION
The polarity in the master and slave devices differs as follows:
Copper rails for DC link in SINVERT 350/420
master and
SINVERT 500 TL master and slave
NEG
Copper rail for DC link in
SINVERT 350/420 slave
POS
POS
Figure 4-6 Cable connection inverter – DC link
50
NEG
Installation
4.3 Electrical installation
CAUTION
The configuration of the inverters according to chapter 3.3 should be taken into account for the length of the cables.
Figure 4-7 Cable routing for DC link 2 inverters
Figure 4-8 Cable routing for DC link 3 inverters
Figure 4-9 Cable routing for DC link4 inverters
51
Installation
4.3 Electrical installation
AC main power supply
Connect the AC cables (going towards the MS transformer) and the PEN conductor.
Ensure that the phase sequence is correct (clockwise).
Ensure that the screws are tight and the cable has sufficient strain relief.
Figure 4-10 Cable connection for AC power supply
Figure 4-11 SINVERT 500 TL AC power cable connection
Figure 4-12 Strain relief for cables
52
Installation
4.3 Electrical installation
AC auxiliary power (self/external supply)
The SINVERT 350/420 inverters have a self-supply option (delivery state).
The jumpers on the terminal strip –OPT are set as shown.
With an external supply, the jumpers must be re-set at the terminal strip:
From terminal strip-OPT
101-102
104-105
107-108
110-111
To terminal strip-OPT
102-103
105-106
108-109
111-112
Jumpers
External supply connector panel
Figure 4-13 Position of the terminal strip-OPT in the SINVERT 350/420
With external supply, connect the AC cable (3~ 400 V AC, neutral and PE) with the terminal strip –OPT:
L1 to 103
L2 to 106
L3 to 109
N to 112
PE to 113
Only external supply is possible in the SINVERT 500 TL.
53
Installation
4.3 Electrical installation
Figure 4-14 Position of the terminal strip -OPT in the SINVERT 500 TL
54
Installation
4.3 Electrical installation
DC input
Connect the DC cables (corresponding to the connection drawings and the cable list).
Ensure the correct polarity.
Ensure that the screws are tight and the cable has sufficient strain relief.
Location of the DC infeed
DC input connection
Figure 4-15 Cable connection for DC power supply
55
Installation
4.3 Electrical installation
Internal control cable
Plug in the connector in the AC cabinet (for the control cable coming from the drive cabinet).
Control cable in the drive cabinet
Connected control cable
Figure 4-16 Connection of the control cables
Grounding
Ensure equipotential bonding between the cabinets that are not screwed together (between master and
slaves). Use a single-core, yellow-green cable with a cross section of min. 16 mm ², which is connected
to the housing frame using terminals and screws. This will prevent the current from flowing in the shield of
the communication cables (due to different potentials of the inverters).
You should also carry out the equipotential bonding if all inverters are grounded via a PEN conductor.
56
Installation
4.4 Communication
4.4
Communication
Communications cables and sensors should be connected only by people with the appropriate electrical
training.
Route communications and signal cables (Profibus, MPI, PPsolar, weather station, COM, LAN,
telephone) separately (and far away) from power cables. Power cables should cross only at right angles.
To the extent possible, you should run these cables along the top of the cabinet.
For bus connections, the order in which you connect the individual units is not important. Route the
cables so that the cable length is as short as possible and power cables are kept as far away as possible.
Figure 4-17 SINVERT communication scheme
57
Installation
4.4 Communication
4.4.1 Profibus
If you have a system in master-slave combination, you must route the Profibus cable between the
inverters.
The Profibus cable (violet) must begin with the S7 CPU and end with an ET200. Both ends of the
Profibus connection must be terminated with the end switch in the Profibus connector.
The shield of the Profibus cable must be grounded on all housings.
ET 200
CUd with ADB
Figure 4-18 Profibus connection
Figure 4-19 Profibus cable routing for a master/slave combination
58
Installation
4.4 Communication
4.4.2 RS422/Ethernet
In a master/slave combination, the RS422 bus cable must be laid between the inverters.
All inverters with PPsolar (installed on a PC) can be monitored simultaneously via the RS422 bus
connected to the X5 plug-in connector on the rear of the operator panel.
The Com server transforms the RS422 bus into an Ethernet connection. The Com server is located in the
master cabinet.
On earlier SINVERT inverters, the SU1 interface converter transformed the RS422 bus into a serial
RS232 connection.
Figure 4-20 Cable routing of the RS422 bus
Figure 4-21 Rear of operator panel
Figure 4-22 Com server
59
Support
5.1 Contact addresses
5
Support
5.1
Contact addresses
The support hotline for SINVERT can be reached via the contact methods listed below from Monday to
Friday between 8 am and 5 pm:
Phone:
Fax:
E-mail:
Internet:
+49 911 750-2211
+49 911 750-2246
[email protected]
www.siemens.de/sinvert
www.siemens.com/sinvert
60
Further information
www.siemens.com/sinvert
Siemens AG
Industry Sector, IA SE S PV
P.O. Box 2355
90713 Fuerth
GERMANY
www.siemens.de/sinvert
Subject to change
© Siemens AG 2009