1
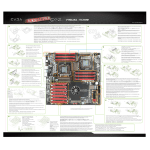
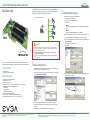
Teradici® APEX™ 2800 Server Offload Card By EVGA
Quick Start Guide
The Teradici APEX 2800 server offload card by EVGA is specifically designed to
offload PCoIP image encoding from the server’s CPU, significantly reducing CPU
utilization and ensuring consistent application performance.
Compatible endpoint devices
1. Enable remote login on the VMware ESXi server:
Distributed network
PCoIP zero clients
zero management
a. Press F2 to enter customization.
b. Enter your User name and Password.
c. Enable SSH.
reduced cost, footprint
• ESXi 4.1
Select Troubleshooting Mode Options > Enable Remote Tech Support
(SSH)
PCoIP soft clients
• ESXi 5.0
Select Troubleshooting Mode Options > Enable SSH
PCoIP displays and phones
Send encoded pixels only
Virtual desktops
2 Install the ESXi driver package
mobile platforms
2. Copy the driver package from your PC to the ESXi server using secure copy:
PCoIP soft clients
existing desktops
thin clients
WARNING
1. Always power down and disconnect devices from AC power before handling
them, as some circuitry on the server PC can continue to operate even though
the front panel power switch is OFF.
Failure to disconnect the device from AC power can result in personal
injury or equipment damage.
a. Download and install WinSCP (Windows Secure Copy) on your PC.
b. Start WinSCP and specify your ESXi server Host name (IP address), User
name and Password.
c. Make sure the File protocol is SCP.
d. Click Login.
2. Always ensure correct anti-static handling is observed to avoid potential ESD
damage in the card.
Thank you for purchasing the Teradici APEX 2800 server offload card by EVGA.
This Quick Start Guide will help you to install and configure your APEX 2800 card.
Package Contents
• APEX 2800 card
• Quick Start Guide (this document)
System requirements
1 Install the APEX 2800 card
1. Make sure all virtual machines hosted by the server are powered down or
migrated to another server before continuing.
2. In the VMware vSphere client, right click on the ESXi server in the inventory
and select Enter Maintenance Mode.
e. Drag the apex2800-version-esxi-version-xxxxxx.zip package to the /tmp
folder on your ESXi server.
•
•
•
•
•
PCI Express x8 compatible card slot
VMware ESXi 4.1 or 5.0
VMware View™ 4.6 or 5.0
PCoIP Zero Client (3.4.x or later) or VMware View client (4.6 or later)
Supported virtual machine operating systems:
• Windows XP
• Windows Vista
• Windows 7 (32 and 64-bit)
• PCoIP® protocol optimized network
• Maximum of two (2) Teradici APEX 2800 cards per server
• Obtain the latest drivers at www.evga.com/support/download
3. Make sure the server is turned off and disconnected from AC power.
4. Insert the APEX 2800 into a free PCI Express slot and secure the metal
bracket.
5. Plug the server into a surge-protected AC outlet and power on.
© 2004-2012 Teradici Corporation. All rights reserved.
Teradici, PCoIP, PC-over-IP, and APEX are trademarks of Teradici Corporation and may be registered in the United States and/or other countries.
All other trademarks are properties of their respective owners. Specifications are subject to change without notice.
TER1104010-5
©2000-2012 EVGA Corp. EVGA, EVBot, the EVBot logo, the EVGA logo and combinations thereof are trademarks of EVGA Corp. All rights reserved Inc.
All brands, products and companies are trademarks or registered trademarks of their respective companies. EVGA Corp. reserves the right to change
product specifications without prior notice.
Teradici® APEX™ 2800 Server Offload Card Quick Start Guide
3. Connect to the ESXi server using a SSH client (e.g. PuTTy) from your PC
and install the driver package:
a. Navigate to the /tmp folder.
b. Enter the following command:
• ESXi 4.1
esxupdate --bundle apex2800-version-esxi-version-xxxxxx.zip
update
3 Install the virtual machine driver
Install the APEX 2800 virtual machine driver on each virtual machine.
5 View the APEX 2800 status
The APEX 2800 is now installed and configured.
1. Power up the virtual machine.
2. Open a console window to the virtual machine from vSphere client.
1. Verify the working status of the Teradici APEX 2800:
• ESXi 4.1
In your SSH session, enter the following command:
pcoip-ctrl -I
The following message appears when the installation completes:
• ESXi 5.0
In your SSH session, enter the following command:
/opt/teradici/pcoip-ctrl -I
3. Run the apex2800-version-xxxxxx.exe installer on the virtual machine and
follow the steps that appear.
(Note: This package must be installed from VM’s Console in the vSphere
client — it cannot be installed from within a PCoIP session to the virtual
machine.)
4. After the installation completes, choose to reboot the machine later.
• ESXi 5.0
esxcli software vib install -d /tmp/apex2800-version-esxi-versionxxxxxx.zip
The following message appears when the installation completes:
IMPORTANT
Make sure to power the virtual machine off and back on again. This
ensures that ESXi will inspect the updated virtual machine image.
4 Verify global policies settings
1. Verify global policies settings in View Connection Server:
• Make sure that PCoIP hardware acceleration is enabled in the Global
Policies, if any policies inherit from it.
• In any custom policies, make sure the option for enabling and disabling
PCoIP hardware acceleration is set to allow.
For further information, please refer to “Teradici APEX 2800 Administrator’s
Guide”, available at http://techsupport.teradici.com.
Need more help?
Further information is available at http://techsupport.teradici.com.
• Free self-registration
• PCoIP documentation and FAQ
• PCoIP network design checklist
• PCoIP products download
• Support ticket requests
EVGA Warranty
4. Reboot the ESXi server.
5. In vSphere client, right click on the ESXi server in the inventory and select
Exit Maintenance Mode.
© 2004-2012 Teradici Corporation. All rights reserved.
Teradici, PCoIP, PC-over-IP, and APEX are trademarks of Teradici Corporation and may be registered in the United States and/or other countries.
All other trademarks are properties of their respective owners. Specifications are subject to change without notice.
TER1104010-5
This EVGA product has a 3 year limited warranty from the date of purchase.
For more information please visit: www.evga.com/warranty
EVGA Corporation ▪ 2900 Saturn Street, Suite B ▪ Brea, CA 92821
EVGA Toll Free Number (888) 880-EVGA
©2000-2012 EVGA Corp. EVGA, EVBot, the EVBot logo, the EVGA logo and combinations thereof are trademarks of EVGA Corp. All rights reserved Inc.
All brands, products and companies are trademarks or registered trademarks of their respective companies. EVGA Corp. reserves the right to change
product specifications without prior notice.