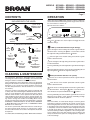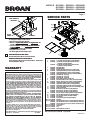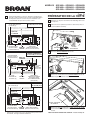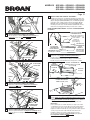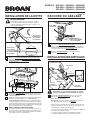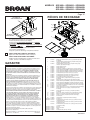
1
MODELS QP330BL•QP330SS•QP330WW
QP336BL•QP336SS•QP336WW
QP342BL•QP342SS•QP342WW
Page 1
EVOLUTION 3
QP3SeriesRangeHoods
TM
READANDSAVETHESEINSTRUCTIONS
FORDOMESTICCOOKINGONLY
WARNING
TOREDUCETHERISKOFFIRE,ELECTRICSHOCK,ORINJURYTOPERSONS,OBSERVETHEFOLLOWING:
1. Usethisunitonlyinthemannerintendedbythemanufacturer.
If you have questions, contact the manufacturer at the addressortelephonenumberlistedinthewarranty.
2. Beforeservicingorcleaningunit,switchpoweroffatservice
panel and lock the service disconnecting means to prevent
powerfrombeingswitchedonaccidentally.Whentheservice
disconnecting means cannot be locked, securely fasten a
prominentwarningdevice,suchasatag,totheservicepanel.
3. Installationworkandelectricalwiringmustbedonebyaqualified person(s) in accordance with all applicable codes and
standards,includingfire-ratedconstruction.
4. Sufficientairisneededforpropercombustionandexhaustingofgasesthroughtheflue(chimney)offuelburningequipment to prevent backdrafting. Follow the heating equipment
manufacturer’sguidelineandsafetystandardssuchasthose
publishedbytheNationalFireProtectionAssociation(NFPA),
and theAmerican Society of Heating, Refrigeration andAir
Conditioning Engineers (ASHRAE), and the local code authorities.
5. Thisproductmayhavesharpedges.Becarefultoavoidcuts
andabrasionsduringinstallationandcleaning.
6. When cutting or drilling into wall or ceiling, do not damage
electricalwiringandotherhiddenutilities.
7. Ductedfansmustalwaysbeventedtotheoutdoors.
8. Useonlymetalductwork.
9. Donotusethisfanwithanysolid-statespeedcontroldevice.
10.Asanalternative,thisproductmaybeinstalledwiththeULapproved cord kit designated for the product, following instructionspackedwiththecordkit.
11.Thisunitmustbegrounded.
TOREDUCETHERISKOFARANGETOPGREASEFIRE:
1. Never leave surface units unattended at high settings.
Boiloverscausesmokingandgreasyspilloversthatmayignite.Heatoilsslowlyonlowormediumsettings.
2. Always turn hood ON when cooking at high heat or when
cookingflamingfoods(i.e.CrepesSuzette,CherriesJubilee,
PeppercornBeefFlambé).
3. Clean ventilating fans frequently. Grease should not be allowedtoaccumulateonfanorfilter.
4. Useproperpansize.Alwaysusecookwareappropriateforthe
sizeofthesurfaceelement.
TO REDUCE THE RISK OF INJURY TO PERSONS IN THE
EVENT OF A RANGE TOP GREASE FIRE, OBSERVE THE
FOLLOWING:*
1. SMOTHERFLAMESwithaclose-fittinglid,cookiesheet,or
metaltray,thenturnofftheburner.BECAREFULTOPREVENT BURNS. If the flames do not go out immediately,
EVACUATEANDCALLTHEFIREDEPARTMENT.
WARNING
2. NEVERPICKUPAFLAMINGPAN—Youmaybeburnedor
spreadthefire.
3. DONOTUSEWATER,includingwetdishclothsortowels-
violentsteamexplosionwillresult.
4. UseanextinguisherONLYif:
A. You know you have a ClassABC extinguisher and you
alreadyknowhowtooperateit.
B. Thefireissmallandcontainedintheareawhereitstarted.
C. Thefiredepartmentisbeingcalled.
D. Youcanfightthefirewithyourbacktoanexit.
*Basedon“KitchenFireSafetyTips”publishedbyNFPA.
CAUTION
1. Forindooruseonly.
2. Forgeneralventilatinguseonly.Donotusetoexhausthazardousorexplosivematerialsandvapors.
3. To avoid motor bearing damage and noisy and/or unbalanced impeller, keep drywall spray, construction dust, etc.,
offpowerunit.
4. Do not use over cooking equipment greater than 60,000
BTU/hr.astheblowermotorwillshutdownintermittantly.
5. Yourhoodmotorhasathermaloverloadwhichwillautomaticallyshutoffthemotorifitbecomesoverheated.Themotor
willrestartwhenitcoolsdown.Ifthemotorcontinuestoshut
offandrestart,havethehoodserviced.
6. ThetopofthehoodMUSTNOTBELESSthan24”andata
maximumof30”abovecooktopforbestcaptureofcooking
impurities.
7. Thishoodisnotintendedtobeusedasashelf.
8. Please read specification label on product for further informationandrequirements.
NOTE Ifhoodistobeinstallednon-ducted:
Purchaseasetof(2)non-ductedfiltersfor30”wide
hoods(ModelBPPF30)&36”widehoods(Model
BPPF36)orasetof(3)non-ductedfiltersfor42”wide
hoods(ModelBPPF42)fromyourlocaldistributoror
retailerandattachthemtothealuminummeshfilters.
Registeryourproductonlineat:www.broan.com
Installer: Leave this manual
with the homeowner.
Homeowner: Cleaning, Maintenance and
Operating instructions on page 2.
MODELS QP330BL•QP330SS•QP330WW
QP336BL•QP336SS•QP336WW
QP342BL•QP342SS•QP342WW
Page 2
CONTENTS
OPERATION
INCLUDED WITH THE HOOD:
(1) 3¼” X 10”
DAMPER / DUCT
CONNECTOR
AlwaysturnthehoodONbeforecookinginordertoestablishan
airflowinthekitchen.Afterturningofftherange,letthehoodrun
forafewminutestocleartheair.
Operatethehoodasfollows:
GREASE
FILTERS
(2 - FOR 30” & 36” HOODS)
3 - FOR 42” HOODS)
(1) 7” ROUND
DUCT
CONNECTOR
(4)
HALOGEN
BULBS
NOTE
The and
buttonsareusedtoadjustandtogglethemenu
andtimersettings.
(1) PARTS BAG CONTAINING:
(3)
WIRE
NUTS
(9)
#8 X 1/4”
DUCT
CONNECTOR
SCREWS
(1)
BULB
SUCTION
CUP TOOL
(5)
#10 X 5/8”
RD. HD.
MOUNTING
SCREWS
(1)
NON-DUCT
DIVERTER
LIGHT(3-PushbuttonSwitches4-lightSettings)
Turnsthelightonthelowsettingandactivatesagreenindicator
abovethebutton.Pressingthe buttonasecondtimeactivates
thenighttimesettingandilluminatesthe indicator.
(2)
#8 X 5/16”
MACHINE
SCREWS
&
(2)
#8 WASHERS
FOR NON-DUCT
DIVERTER
CLEANING&MAINTENANCE
Forperformance,appearance,andhealthreasons,cleanfilter,
fanandgrease-ladensurfaces.Useonlyacleanclothandmild
detergentsolutiononstainlessandpaintedsurfaces.
Cleanall-metalfiltersinthedishwasherusinganon-phosphate
detergent.Discolorationofthefiltermayoccurifusingphosphate
detergents,orasaresultoflocalwaterconditions-butthiswill
notaffectfilterperformance.Thisdiscolorationisnotcoveredby
thewarranty.
Clean the non-duct recirculating filter surfaces frequently with
adampclothandamilddetergent.DONOTimmersefiltersin
waterorputindishwasher.Thespecial“CleanSense”feature
indicateswhenthefilteristobereplaced.Theblueandyellow
stripswillblendtogreenwhenitistimetochangethefilter.The
“CleanSense”featureworksbestwhenfacingtowardthecooking surface. Change the non-duct recirculating filters every 6
months.Forreplacementnon-ductrecirculatingfilters-purchase
S99010353 or Model BPPF30 for 30 wide hoods”, S99010354
orModelBPPF36for36”widehoods,orS99010360orModel
BPPF42for42”widehoods.
Themotorispermanentlylubricatedandneverneedsoiling.If
themotorbearingsmakeexcessiveorunusualnoise,replace
themotorwiththeexactservicemotor.Theimpellershouldalso
bereplaced.
Use120V,50W,shieldedhalogenbulbs-MR16withGU10base.
Turnsthelightonthemediumsettingandactivatesagreen
indicatorabovethebutton.
Turnsthelightonthehighsettingandactivatesagreenindicatorabovethebutton.
Pressingandholdingthesamelightbuttonagainwillturnthelights
off.
Whenthenighttimesettingisactive,pressingandholdingthelow
lightsettingbutton willturnthenighttimesettingoff.
FAN(3-PushbuttonSwitches4-fanspeeds)
Turnsthefanonthelowspeedandactivatesagreenindicator
abovethebutton.
Turns the fan on the medium speed and activates a green
indicatorabovethebutton.
Turnsthefanonthehighspeedandactivatesagreenindicatorabovethebutton.Pressingthe
buttonasecondtimeacti-
vatestheboostfanspeedandilluminatesthe
indicator.
Pressingandholdingthesamefanbuttonagainwillturnthefanoff.
When the boost speed is active, pressing and holding the high
speedbuttonwillturntheboostspeedoff.
NOTE
This hood utilizes an offset blower design to achieve greater
performanceandlowersoundlevels.Asaresult,youmaynotice
thatcookingimpuritiesaremoreattractedtoonesideorappear
tobepulled-infasterthantheyappearontheoppositeside.This
iscompletelynormal.Thehoodhasbeendesignedandtested
toprovidegoodcaptureofcookingimpuritiesandodorsunder
all normalcookingconditionsregardlessofthecookinglocation
onthecooktop.Pleasenotethatcookingontherearburnerswill
alwaysresultinthebestcaptureofcookingimpurities,regardless
ofthehooddesign.
MODELS QP330BL•QP330SS•QP330WW
QP336BL•QP336SS•QP336WW
QP342BL•QP342SS•QP342WW
Page 3
CLOCKSETTING
10-MINUTEDELAYOFF
Whenyourhoodfanison(anyspeed)pressthe
buttonto
activatethedelayofffeature.Whenactivated,thehoodfanwill
automaticallyturnoffafter10-minuteshaselapsed.Thedelay
featureisactivewhenthefollowingappearontheLEDscreen:
Agreenindicatorilluminatedabovethedelay
button,anu-
mericcountdown“10-0”,andaclockwiserotatingLED.Thedelay
buttoncanbepressedonceagain,tostopthedelaycountdown.
Pressingthe
buttonagainwillresumethedelaycountdown.
Pressingandholdingthebuttonwillturnoffthefeature.
Pressthe
buttontoactivatethetimersettingfeature.Use
the and
buttonstoreduceoradvancethetimersettingto
thedesiredduration.Whenthedesiredtimersettingisreached,
allow3secondswithoutpressinganyadditionalbuttonorpress
button once again. The timer will then activate, and
thecountdownwillbedisplayedontheLEDscreenalongwith
button. After the timer has
an green indicator above the
reached “0:00”, an audible beep will be heard. The beep will
ispressedonceagain.The
continueuntilthetimerbutton
timer countdown can be stopped at any time by pressing the
once again. Pressing the
button again will resume
thetimercountdown.Pressingandholdingthe
buttonwill
turnoffthefeature.Notethatwhenboththetimeranddelayoff
featuresareactivetogether,thetimerfunctionwillbeilluminated
ontheLEDdisplay,andthedelayoffcountdownwillbeactive,
butnotdisplayed.
buttonstosettheappropriate
hours for the clock. A small indicator will illuminate in the left
corneroftheLEDscreentodesignate“pm”.Afterthehoursare
set,pressthe
buttontoadvancethemenutotheminutese-
lection.TheminuteswillbeginblinkingintheLEDscreen.Use
the and
buttonstosettheminutes.Pressthe
button
againtoadvancethemenutoselect“display”settings.
DISPLAY(default from factory - display ON)
Your hood offers many settings that can be accessed and adjusted by scrolling through the feature menu. Your hood fan
mustbeofftobeabletoactivateandaccessthefeaturemenu.
buttonwhenthehoodfanisoffwillactivatethe
featuremenu.Pressingthe
or
buttontotoggletheLEDscreenon(don)oroff(doFF).
Whenthedisplayoff(doFF)featureisselected,theLEDdisplay
clockilluminationisdisabled.Pressthe
buttonagaintoad-
vancethemenutoselectthe“Sleep”setting.
SLEEPMODE(default from factory - OFF)
TheLEDscreenwilldisplaythe“Sleep”feature-S-.Usethe
or
buttontotoggletheSleepfeatureon(Son)oroff(Soff).
WhentheSleepon(Son)featureisselected,theLEDscreen
andfan/lightLEDindicatorsaredisabled.Theambientlightsensor,delay-offandtimerfeatureswillalsobedisabled.Allcontrols
for the fan and light operation, including Heat Sentry, are still
active.Pressthe
buttonagaintoadvancethefeaturemenu
toselectthe“AmbientLightSensor”setting.Note:Toaccessthe
featuremenuwhentheSleepModeisactive,pressandholdthe
buttonfor2seconds.
AMBIENTLIGHTSENSOR(default from factory - Level 1 ON)
FEATUREMENU
Pressingthe
buttononce,the“hours”willbeginblinkinginthe
TheLEDscreenwilldisplaythedisplayfeature-d-.Usethe
TIMER
the
Pressthe
LEDscreen.Usethe and
buttonagainwhenthefeature
menuisactivewillscrollthroughthevariousfeaturesthatcan
beadjusted/set.Whenthefeaturemenuisactive,ifabuttonis
notpressedwithin10secondsorafterscrollingthroughallmenu
settings, the feature menu will automatically be exited, and all
selectedsettingswillbesaved.Agreenindicatorabovethe
iconwillilluminatewhenthefeaturemenuisactive.Thefollowingfeaturescanbeadjustedsequentially:
Therearetwolevelsettingsfortheambientlightsensor.When
either of the two settings is active, the light sensor will detect
a low level of light in your kitchen, and will automatically turn
thetasklightsonthehoodtothenighttimesetting.Theother
light settings are still functional. If selected when the ambient
lightsensorisactive,theywilltemporarilyoveridetheambient
lightsensoruntiltheyareturnedoff.Thelevel1(Aon1)ambient
lightsensorsettingwillrequireyourkitchentobemoredarkthan
thelevel2(Aon2)settingbeforeactivatingthenighttimesetting.
The LED screen will display the ambient light sensor function
-A-.Usethe or
buttontoselectthelightsensorsetting
Aon1,Aon2, orAoFF. The Off (AoFF) setting deactivates the
automatic ambient light sensor feature so the night time light
operationismanual.
Notethatthefeaturemenucanbeexitedanytimebynotpressinganybutton(s)for10secondsorbyscrollingthroughtheentire
featuremenu.
MODELS QP330BL•QP330SS•QP330WW
QP336BL•QP336SS•QP336WW
QP342BL•QP342SS•QP342WW
Page 4
HEATSENTRYSYSTEM
This range hood is equipped with an advanced Heat Sentry
system that monitors excessive temperature and automatically
adjuststhefantotheappropriatesetting.
1)Ifthefanison,theHeatSentrysystemwillincreasethefan
settingwhenthetemperatureiselevated.Ifthetemperaturecontinuestorise,theHeatSentrysystemwillcontinuetoincrease
thefansettinguntilthetemperatureisstabilizedorreduced.The
flashinglightabovethefanbuttonshowstheHeatSentrysystem
fansetting.Oncethetemperaturehasreduced,theHeatSentry
systemwillchangethefantotheoriginalsetting.
MAKE-UPAIRDAMPER
ThehoodiscompatiblewithBroanMake-UpAirDamperModel
MD6TorModelMD8T(optional).Purchaseseparately.
MaketheconnectiontotheMake-UpAirDamperwithlowvoltagewiring,asshown.SeeMake-UpAirDamperinstructionsfor
additionalinformation.
BACKOFHOOD
2)Ifthefanisoff,theHeatSentrysystemwillautomaticallyturn
thefanontoitshighestspeedwhenthetemperatureisabove
normal.WhentheHeatSentrysystemison,thelightabovethe
highspeedfanbuttonwillflashonandoff.Afterthetemperature
hasloweredtonormal,thefanspeedwillbereduceduntilthe
temperaturehasstabilized,thenthefanwillturnoff.
LOW-VOLTAGECONNECTOR
FORMAKE-UPAIRDAMPER
RANGE
HOOD
MAKE-UP AIR
DAMPER
LOW-VOLTAGE
WIRES
Note:Canadianversiondoesnothavethisfunction.
120
VAC
FUSES
RANGEHOODCONTROLBOARD
MAIN
FUSE
24
VAC
DAMPER
MOTOR
LIGHT
FUSE
REMOTECONTROL
The hood is compatible with Broan RF Remote Control Model
BCR1(optional).Purchaseseparately.
PREPAREHOODLOCATION
ROOF CAP
TheRangeHoodControlBoardcontainsaMainFuseanda
LightFusetoprotectthecontrolsfrompowersurges.Ifafusehas
opened(blown),thegreenfansettingorlightsettingindicatorswill
notoperateproperlywhenthefanorlightbuttonsarepressed,and
thefanandlightswillnotturnon.
3¼" X 10" or
7" ROUND DUCT
(For vertical
discharge)
SOFFIT
Newfusescanbepurchasedatyourlocalelectronicsupplystore.
Use8A,120V,5mmdiameter,20mmlong,fast-acting,cartridgetypefuses.
HOUSE WIRING
(Top or Back of hood)
CABINET
Toreplaceafuse:
1. Disconnectpoweratserviceentrance.
2. Removefiltersandbottompan.
3. Removeandinspectfuse.Ifitisnotopen(blown),additional
diagnosticsareneeded.
WALL CAP
HOOD
24" - 30" ABOVE
COOKING SURFACE
1
3¼" X 10" DUCT
(For horizontal discharge)
Determinewhetherhoodwilldischargevertically(3¼”
x10”or7”Round),orhorizontally(3¼”x10”only).For
verticalorhorizontaldischarge,runductworkbetween
thehoodlocationandaroofcaporwallcap.Forbest
results,useaminimumnumberoftransitionsandelbows.
MODELS QP330BL•QP330SS•QP330WW
QP336BL•QP336SS•QP336WW
QP342BL•QP342SS•QP342WW
Page 5
Usetheproperdiagrambelow,forplacementofductwork
andelectricalcutoutincabinetorwall.Foranon-ducted
installation,DONOTcutaductaccesshole.
3¼”X10”
VERTICALDUCTING
HOOD MOUNTING SCREWS (5)
11 5/8" (30" hood)
11 5/8" (30" hood)
14 5/8" (36" hood)
14 5/8" (36" hood)
17 5/8" (42" hood)
17 5/8" (42" hood)
CABINET FRONT
CABINET
BOTTOM
5¼"
4½"
*
67/8"
5¼"
VERTICAL DUCT
ACCESS HOLE
3
Removepartsbagfrominsidethefoampackagingend
cap.
4
Removeallprotectivepolyfilmfromthehood(stainless
steelhoodsonly).
107/8"
11" 21/8"
25/8"
¾"
WOOD SHIMS
(recessed-bottom
cabinets only)
WOOD SHIMS
(recessed-bottom
cabinets only)
CABINET
BOTTOM
PREPARETHEHOOD
ç
2
ELECTRICAL
ACCESS HOLE
(in cabinet bottom)
CENTER
LINE
(2)
LIFT
OUT
3¼”X10”
HORIZONTALDUCTING
ç
(1)
PULL
DOWN
ALUMINUM
FILTERS
5
RemovetheAluminumFiltersfromthehood.
6
Remove6ScrewsholdingBottomPantohood.Setbottompanandscrewsaside.
35/8"
CABINET FRONT
13/8"
3/8"
*
4"
HORIZONTAL DUCT
ACCESS HOLE
ELECTRICAL
ACCESS
HOLE
(in wall)
5¼"
67/8"
11 5/8" (30" hood)
11 5/8" (30" hood)
14 5/8" (36" hood)
14 5/8" (36" hood)
17 5/8" (42" hood)
17 5/8" (42" hood)
MAKE-UP AIR
HOOD
DAMPER ELECTRICAL
MOUNTING
CENTER
CONNECTION HOLE
SCREWS (5)
LINE
(in wall)
5¼"
HOOD MOUNTING SCREWS (5)
11 5/8" (30" hood)
11 5/8" (30" hood)
14 5/8" (36" hood)
14 5/8" (36" hood)
17 5/8" (42" hood)
17 5/8" (42" hood)
8" DIA.
HOLE
45/8"
7-IN.ROUND
DUCTING
* 6 /"
7-IN. ROUND
DUCT
ACCESS
HOLE
7 8
11"
107/8"
21/8"
25/8"
ELECTRICAL
ACCESS HOLE
(in cabinet bottom)
Notetheextrawoodshimandmountingscrewnearthe
* cabinetfront,onthecabinetcenterline.
DAMPER/
DUCTCONNECTOR
7
Remove2ScrewsholdingDamper/DuctConnector
tohood.Removedamper/ductconnectorfrominsidethe
hood.
FORDUCTEDINSTALLATIONS-SkiptoStep12.
MODELS QP330BL•QP330SS•QP330WW
QP336BL•QP336SS•QP336WW
QP342BL•QP342SS•QP342WW
Page 6
11 NON-DUCTEDINSTALLATIONONLY:
Purchaseasetof(2)non-ductedfiltersfor30”widehoods
(ModelBPPF30)&36”widehoods(ModelBPPF36)or
asetof(3)non-ductedfiltersfor42”widehoods(Model
BPPF42)fromyourlocaldistributororretailer.Attachthe
non-ductedfilterstothealuminummeshfiltersfollowing
instructionspackedwiththenon-ductedfilters.
NON-DUCT
DIVERTER
8
FORNON-DUCTEDINSTALLATIONS-Skipto“INSTALL
THE HOOD”.
7”ROUND
KNOCKOUT
PLATE(also
remove3¼”x10”
verticalplate)
NON-DUCTEDINSTALLATIONONLY:
Frompartsbag:AttachNon-DuctDivertertoAirBox
with2Screwsand2Washers.
SCREWS
3¼”X10”
VERTICAL
KNOCKOUT
PLATE
3¼”X10”
HORIZONTAL
KNOCKOUT
PLATE
12 DUCTEDINSTALLATIONONLY:
Remove3¼”x10vertical,3¼”x10”horizontal,or7-inch
roundknockoutplate(s)asappropriateforyourducting
method.
NON-DUCT
PLATE
NON-DUCT
PLATE
TOP/BACK
EDGEOF
HOOD
3¼”X10”
DAMPER/DUCTCONNECTOR
DAMPER
FLAP
PIVOT
ç
SLOT
NON-DUCT
PLENUM
9
NON-DUCTEDINSTALLATIONONLY:
Remove2ScrewsholdingNon-DuctPlatetoNon-Duct
Plenumandremoveplate.
7”ROUND
DUCT
PLATE
SCREWS
NON-DUCT
PLATE
10 NON-DUCTEDINSTALLATIONONLY:
InsertshortendofNon-DuctPlateintoNon-Duct
PlenumSlot.Attachwith2ScrewsremovedinStep9.
13 DUCTEDINSTALLATIONONLY:
Attach3¼”x10”Damper/DuctConnector(ifusing3¼”
x10”duct)or7”RoundDuctPlate(ifusing7-inchround
duct)overtheknockoutopening.
Notes:
Toaccomodateoff-centerductwork,the3¼”x10”damper/
ductconnectorcanbeinstalledupto½”oneitherside
ofthehoodcenterandthe7”roundductplatecanbe
installedupto½”oneithersideofthehoodcenter.
Installthe3¼”x10”Damper/DuctConnectorwiththe
DamperFlapPivotnearesttheTop/BackEdgeofHood.
MODELS QP330BL•QP330SS•QP330WW
QP336BL•QP336SS•QP336WW
QP342BL•QP342SS•QP342WW
Page 7
INSTALLTHEHOOD
CONNECTTHEWIRING
WARNING
Toreducetheriskofelectricalshock,switchpoweroff
atservicepanel.Lockortagservicepaneltoprevent powerfrombeingswitchedonaccidentally.
GROUND
SCREW
ELECTRICAL
WIRINGBOX
COVER
ELECTRICAL
POWER
CABLE
KNOCKOUT
14
RemoveElectricalWiringBoxCoverfrominside
ofhoodandappropriateElectricalPowerCable
Knockoutfromtoporbackofhood.
HOUSE
POWERCABLE
18
ConnectHousePowerCabletorangehoodwiring-
BLACKtoBLACK,WHITEtoWHITE,andGREENor
BAREWIREtoGroundScrew.Replaceelectricalwiring
boxcover.
19
Re-attachBottomPanwith6ScrewsremovedinStep6.
INSTALLLIGHTBULBS
SUCTION
CUPTOOL
HALOGEN
BULB
HOUSE
POWERCABLE
(2)
ROTATE
CLOCKWISE
LIGHTPANEL
SCREWS
15
RunHousePowerCablebetweenservicepanelandhood
location.Attachpowercabletohoodusingappropriateclamp.
16
Hanghoodfrom(4)mountingscrewsdrivenpart-wayinto
cabinetlocations(showninillustrationsunder“PREPARE
HOODLOCATION”).Mountingscrewsareincludedinparts
bag.Slidehoodbacktowardswalluntilmountingscrew
headsareengagedinnarrowendofkeyholeslotsintopof
hood.Tightenscrewssecurely.Add5thmountingscrewin
centerholeinhoodandtightensecurely.
17
DUCTEDINSTALLATIONONLY:
Connectductworktohoodanduseducttapetomakejoints
secureandair-tight.Makesurethedamper/ductconnector
enterstheductworkandthatthedamperopensandcloses
freely.
(1)
PUSHIN
LIGHTPANEL
CAUTION:Bulbsmaybehot.Refertobulb
packagingforfurtherinformation.
20
Install(4)HalogenBulbs(includedwithhood).Use120
V,50W,shieldedhalogenbulbs-MR16withGU10base.
NOTE:SuctionCupTool(includedwithhood)canbe
usedtoinstallandremovelightbulbs.
Alignpinsonbulbwithlargediameteropeningonsocket,
thenpushbulbintowardshoodandrotateclockwiseuntil
firmlyseated.
Thepositionofthebulbsocket(depth)isadjustableand
mayrequireadjustmentwhen:
a)certainbrandsofbulbsaredifficulttoinstall.
b)thebulbprotrudestoofarbelowthelightpanel.
MODELS QP330BL•QP330SS•QP330WW
QP336BL•QP336SS•QP336WW
QP342BL•QP342SS•QP342WW
Page 8
SERVICEPARTS
LAMPSOCKET
BRACKET
15
1
12
14
16
11
10
LIGHT
PANEL
SCREWS
17
4
18
13
7
DUCTEDINSTALLATIONONLY:
Re-installaluminumfiltersremovedinStep5.
NON-DUCTEDINSTALLATIONONLY:
Installaluminumfiltersandnon-ductedfilters-purchased
andassembledinStep11.
WARRANTY
OneYearLimitedWarranty
Broan-NuTonewarrantstotheoriginalconsumerpurchaserofitsproductsthatsuch
products will be free from defects in materials or workmanship for a period of one
(1) year from the date of original purchase. THERE ARE NO OTHER WARRANTIES,
EXPRESSORIMPLIED,INCLUDING,BUTNOTLIMITEDTO,IMPLIEDWARRANTIES
OFMERCHANTABILITYORFITNESSFORAPARTICULARPURPOSE.
Duringthisoneyearperiod,Broan-NuTonewill,atitsoption,repairorreplace,without
charge, any product or part which is found to be defective under normal use and
service.THISWARRANTYDOESNOTEXTENDTOFLUORESCENTLAMPSTARTERS,
TUBES, HALOGEN AND INCANDESCENT BULBS, FUSES, FILTERS, DUCTS, ROOF
CAPS,WALLCAPSANDOTHERACCESSORIESFORDUCTING.Thiswarrantydoes
notcover(a)normalmaintenanceandserviceor(b)anyproductsorpartswhichhave
beensubjecttomisuse,negligence,accident,impropermaintenanceorrepair(other
than by Broan-NuTone), faulty installation or installation contrary to recommended
installationinstructions.
Thedurationofanyimpliedwarrantyislimitedtotheoneyearperiodasspecifiedforthe
expresswarranty.Somestatesdonotallowlimitationonhowlonganimpliedwarranty
lasts,sotheabovelimitationmaynotapplytoyou.
BROAN-NUTONE’S OBLIGATION TO REPAIR OR REPLACE, AT BROAN-NUTONE’S
OPTION, SHALL BE THE PURCHASER’S SOLE AND EXCLUSIVE REMEDY UNDER
THIS WARRANTY. BROAN-NUTONE SHALL NOT BE LIABLE FOR INCIDENTAL,
CONSEQUENTIAL OR SPECIAL DAMAGES ARISING OUT OF OR IN CONNECTION
WITHPRODUCTUSEORPERFORMANCE.Somestatesdonotallowtheexclusionor
limitationofincidentalorconsequentialdamages,sotheabovelimitationorexclusion
maynotapplytoyou.Thiswarrantygivesyouspecificlegalrights,andyoumayalso
have other rights, which vary from state to state. This warranty supersedes all prior
warranties.
To qualify for warranty service, you must (a) notify Broan-NuTone at the address or
telephone number below, (b) give the model number and part identification and (c)
describe the nature of any defect in the product or part. At the time of requesting
warrantyservice,youmustpresentevidenceoftheoriginalpurchasedate.
Broan-NuToneLLC,926W.StateStreet,Hartford,Wisconsin53027
www.broan.com800-558-1711
Broan-NuToneCanada,Inc.,1140TristarDrive,Mississauga,OntarioCanadaL5T1H9
www.broan.ca877-896-1119
Rev.08/2007
5
8
6
21
3
9
Tochangethedepthofbulbsockets:
-Removebottompan(SeeStep6).
-Remove2LightPanelScrewsandLightPanel.Set screwsaside.
-Loosen2ScrewsholdingLampSocketBracketto LightPanel.
-Adjustsocket/brackettodesireddepth.
-Re-tightenscrewssecurely.
-Re-attachlightpanelandbottompan.
2
KEY NO. PART NO.
DESCRIPTION
1
2
3
4
5
6
7
8
9
10
11
12
13
14
15
16
17
18
7”RoundDuctPlate(includesmountinghardware)
UserInterfaceAssemblyWhite(includesinterface,
nameplate,mountinghardware)
UserInterfaceAssemblyBlack(includesinterface,
nameplate,mountinghardware)
Nameplate,White
Nameplate,Black
CapacitorKit(includeswirenuts,mountingscrew)
LightPanelRHWhite(includesmountinghardware)
LightPanelRHBlack(includesmountinghardware)
LightPanelRHStainless(includesmountinghardware)
FilterKitfor30”(2perbag)
FilterKitfor36”(2perbag)
FilterKitfor42”(3perbag)
BlowerWheel(includesmountingnut)
MotorKit(includesmotor,isolators,mountinghardware)
Damper/DuctConnector(includesmountinghardware)
LightPanelLHWhite(includesmountinghardware)
LightPanelLHBlack(includesmountinghardware)
LightPanelLHStainless(includesmountinghardware)
LampSocket(includeslampsocket,wirenuts,mountingscrews)
LampSocketBracket
BottomPan30”(includesmountinghardware)
BottomPan36”(includesmountinghardware)
BottomPan42”(includesmountinghardware)
Non-ductPlenum(includesgasket&mountinghardware)
Non-ductDiverter(includesmountinghardware)
Non-ductPlate(includesmountinghardware)
CircuitBoard
Transformer(includesmountinghardware)
PartsBag
Non-DuctFilterKitfor30”(2charcoalfiltersand8filterclips)
Non-DuctFilterKitfor36”(2charcoalfiltersand8filterclips)
Non-DuctFilterKitfor42”(3charcoalfiltersand12filterclips)
SuctionCupTool
HeatSensor
Fuse
RibbonCableKit(contains3)
NotShown
NotShown
NotShown
NotShown
NotShown
NotShown
97017727
97018256
97018257
99528258
99528259
97018251
97018225
97018226
97018227
97018205
97018206
97018207
97018220
97018223
97017728
97018229
97018230
97018231
97017731
97018233
97018239
97018240
97018241
97018242
97018243
97018244
97018260
97018262
97018224
99010353
99010354
99010360
99526707
97018252
97018253
97018261
OrderreplacementpartsbyPARTNO.-notbyKEYNO.
99527291C
MODÈLES QP330BL•QP330SS•QP330WW
QP336BL•QP336SS•QP336WW
QP342BL•QP342SS•QP342WW
Page 9
EVOLUTION 3Hottesde
cuisinedesérieQP3
TM
LIRECESDIRECTIVESETLESCONSERVER
POURUSAGEDOMESTIQUESEULEMENT
AVERTISSEMENT
AFIN DE DIMINUER LES RISQUES D’INCENDIE, D’ÉLECTROCUTIONOUDEBLESSURES,SUIVEZCESDIRECTIVES:
1. N’utilisez cet appareil que de la manière prévue par le fabricant.
Si vous avez des questions, communiquez avec le fabricant à
l’adresseouaunumérodetéléphoneindiquésdanslagarantie.
2. Avantdeprocéderàl’entretienouaunettoyagedel’appareil,coupez
l’alimentation du panneau électrique et verrouillez l’interrupteur
principal afin d’empêcher que le courant ne soit accidentellement
rétabli.S’ilestimpossibledeverrouillerl’interrupteurprincipal,fixez
solidementunmessaged’avertissement,parexempleuneétiquette,
surlepanneauélectrique.
3. Laposedel’appareiletles travauxd’électricitédoiventêtreeffectués
par des personnes qualifiées conformément à la réglementation
envigueur,notammentlesnormesdeconstructionayanttraitàla
protectioncontrelesincendies.
4. Quantitésuffisanted’airestnécessairepourbrûlerlesgazproduits
par les appareils à combustion et les évacuer dans le conduit de
fumée (cheminée). Respectez la ligne directrice du fabricant
d’appareils de chauffage et les normes de sécurité, notamment
celles publiées par la National Fire ProtectionAssociation (NFPA),
l’American Society for Heating, Refrigeration and Air Conditioning
Engineers(ASHRAE)etlescodesdesautoritéslocales.
5. Ceproduitpeutcomporterdesarêtestranchantes.Prenezgardeaux
coupuresetauxéraflureslorsdel’installationetdunettoyage.
6. Veillez à ne pas endommager le câblage électrique ou d’autres
équipements non apparents lors de la découpe ou du perçage du
murouduplafond.
7. Lesventilateurscanalisésdoiventtoujoursrejeterl’airàl’extérieur.
8. N’utilisez quedesconduitsmétalliques.
9. N’utilisez pas de commande de régime à semi-conducteurs avec
ceventilateur.
10.Ceproduitpeutégalementêtreinstalléavecunensembledecordon
électrique homologué UL de conception spéciale, en suivant les
instructionsaccompagnantl’ensembledecordonélectrique.
11. Cetappareildoitêtrereliéàunemiseàlaterre.
POUR RÉDUIRE LES RISQUES D’INCENDIE CAUSÉS PAR DE LA
GRAISSESURLEPLANDECUISSON:
1. Ne laissez jamais les éléments de surface allumés à haute
température. Les débordements peuvent causer de la fumée et
occasionnerdesécoulementsdegraisseinflammables.L’huiledoit
êtrechaufféegraduellementàbasseouàmoyennetempérature.
2. Mettez toujours la hotte en MARCHE lors de la cuisson à feu vif
oulorsdelacuissond’alimentsàflamber(parex.,crêpesSuzette,
cerisesjubilé,bœufaupoivreflambé).
3. Nettoyezsouventlahotte.Nelaissezpaslagraisses’accumulersur
leventilateuroulesfiltres.
4. Utilisez des casseroles de dimension appropriée. Utilisez toujours
une batterie de cuisine adaptée à la dimension de la surface
chauffante.
OBSERVEZ LES CONSIGNES SUIVANTES DE MANIÈRE À
RÉDUIRE LES RISQUES DE BLESSURES CORPORELLES EN
CAS D’INCENDIE CAUSÉ PAR DE LA GRAISSE SUR LE PLAN
DECUISSON:*
1. ÉTOUFFEZLESFLAMMESàl’aided’uncouvercleétanche,d’une
tôle à biscuits ou d’un plateau en métal puis éteignez le brûleur.
FAITESATTENTIONDENEPASVOUSBRÛLER.Silesflammesne
s’éteignentpasimmédiatement,QUITTEZLESLIEUXETAPPELEZ
LESERVICEDESINCENDIES.
AVERTISSEMENT
2. NESOULEVEZJAMAISUNECASSEROLEENFLAMMES–vous
pourriezvousbrûleroupropagerl’incendie.
3. N’UTILISEZPASD’EAU,nideserviettesoudelingesmouillés–une
violenteexplosiondevapeurpourraitsurvenir.
4. UtilisezunextincteurSEULEMENTsi:
A. Voussavezqu’ilestdeclasseABCetvousconnaissezdéjàson
modedefonctionnement.
B. L’incendien’estpastrèsimportantetnesepropagepas.
C. Lespompiersontétéavisés.
D. Vouspouvezcombattrel’incendieenfaisantdosàunesortie.
*ConseilstirésdelapublicationdelaNFPA«KitchenFireSafetyTips».
ATTENTION
1. Pourusageintérieurseulement.
2. Pour ventilation générale uniquement. Ne pas utiliser cet appareil
pour évacuer des matières ou des vapeurs dangereuses ou
explosives.
3. Pournepas endommagerlesroulementsdumoteur,déséquilibrer
lespalesoulesrendrebruyantes,protégezl’appareildelapoussière
deplâtre,deconstruction,etc.
4. Ne pas utiliser cette hotte au-dessus d’un appareil de cuisson
dépassant60000BTU/heurecarlemoteurduventilateurs’arrêtera
parintermittence.
5. Le moteur de la hotte est muni d’un dispositif de protection de
surchargeélectriquequicoupeautomatiquementlemoteurencas
desurchauffe.Ilseremetenmarchelorsqu’ilarefroidi.Faitesréparer
lahottesilemoteurcontinueàfonctionnerparintermittence.
6. Pour mieux capter les vapeurs de cuisson, le haut de la hotte
DOITÊTREAUMINIMUMà61cm(24po)etaumaximumà76cm
(30po)au-dessusdelasurfacedecuisson.
7. Cettehotten’estpasconçuepourservird’étagère.
8. Veuillezlirel’étiquettedespécificationsduproduitpourobtenirplus
derenseignements,notammentsurlesexigences.
REMARQUE
Silahotteestinstalléesansconduit:
Veuillezvousprocurerunensemblede(2)filtres
pourhottessansconduitde76cm(30po)delargeur
(ModèleBPPF30)ou91,4cm(36po)delargeur
(ModèleBPPF36)ouunensemblede(3)filtrespour
hottessansconduitde107cm(42po)delargeur
(ModèleBPPF42)chezvotredistributeurlocalou
votredétaillantetlesfixerauxfiltresenaluminium.
Enregistrezvotreproduitenligneà:www.broan.com
Installateur : Veuillez remettre ce manuel
au propriétaire.
Propriétaire : Nettoyage, entretien et mode
d’emploi à la page 10.
MODÈLES QP330BL•QP330SS•QP330WW
QP336BL•QP336SS•QP336WW
QP342BL•QP342SS•QP342WW
Page 10
CONTENU
FONCTIONNEMENT
INCLUS AVEC LA HOTTE :
FILTRES À
GRAISSES
(2 - POUR HOTTES
DE 76 ET 91,4 CM /
30 ET 36 PO) 3 - POUR
HOTTES DE 107 CM / 42 PO)
(4)
AMPOULES
HALOGÈNES
(1) CLAPET /
RACCORD
DE CONDUIT
DE 8,3 X 25,4 CM
(3-¼ X 10 PO)
(1) RACCORD DE
CONDUIT ROND
DE 17,8 CM (7 PO)
(1) SAC DE PIÈCES CONTENANT :
(3)
SERREFILS
(9) VIS
N° 8 X 1/4 PO
POUR
RACCORD
DE CONDUIT
(1)
VENTOUSE
POUR
AMPOULE
(5) VIS DE
MONTAGE À
TÊTE RONDE
N° 10 X 5/8 PO
(1)
DÉFLECTEUR
NON
CANALISÉ
(2) VIS
MÉCANIQUES
N° 8 X 5/16 PO
ET
(2)
RONDELLES N° 8
POUR
DÉFLECTEUR
NON CANALISÉ
NETTOYAGEETENTRETIEN
Pourdesraisonsdesanté,deperformanceetd’apparence,nettoyezle
filtre,leventilateuretlessurfacesgraisseuses.Utilisez seulementun
chiffonpropreetunesolutiondedétergentdouxsurl’acierinoxydable
etlessurfacespeintes.
Nettoyez les filtres entièrement métalliques au lave-vaisselle avec un
détergentsansphosphate.Unedécolorationdufiltrepeutseproduiresi
desdétergentsphosphatéssontutilisésetselonlesconditionslocales
del’eau,sanstoutefoisaffecterlerendementdufiltre.Cettedécoloration
n’estpascouverteparlagarantie.
Nettoyezsouventlessurfacesdesfiltresderecirculationavecunlinge
humideetundétergentdoux.NEPLONGEZPASlesfiltresdansl’eau
et ne les mettez pas au lave-vaisselle. La fonction « Clean Sense »
indiquequandlefiltredoitêtreremplacé.Lesbandesbleuesetjaunes
secombinentetdeviennentverteslorsqu’ilesttempsdechangerlefiltre.
La caractéristique « Clean Sense » fonctionne mieux lorsqu’elle est
tournéeverslasurfacedecuisson.Remplacezlesfiltresderecirculation
sansconduittouslessixmois.Pourremplacerlesfiltresderecirculation-
veuillezacheterlesfiltresS99010353ouModèleBPPF30pourleshottes
de 76 cm (30 po) de largeur, Modèle S99010354 ou BPPF36 pour les
hottesde91,4cm(36po)delargeur,ouModèleS99010360ouBPPF42
pourleshottesde107cm(42po)delargeur.
Le moteur est lubrifié en permanence et n’a pas besoin d’être huilé.
Silesroulementsdumoteursontanormalementbruyants,remplacez
le moteur exactement par le même modèle. La roue à ailettes doit
aussiêtreremplacée.
Utilisezdesampouleshalogènesavecécrande120V,50W-MR16
àculotGU10.
MetteztoujourslahotteenMARCHEavantdecuisinerafind’établirune
circulation d’air dans la cuisine. Laissez la hotte fonctionner quelques
minutesaprèsl’arrêtdelacuisinièreafindenettoyerl’air.
Pourutiliserlahotte,faitescommesuit:
REMARQUE
Lesboutons et
serventàconfigurerlemenuetlaminuterieetà
passerdel’unàl’autre.
ÉCLAIRAGE(3boutons-poussoirs4réglagesd’éclairage)
Allumel’éclairageàfaibleintensitéetactiveuntémoinvertau-dessus
dubouton.Appuyerdenouveausur activeleréglagedenuitetillumine
letémoin
.
Allume l’éclairage à moyenne intensité et active un témoin vert
au-dessusdubouton.
Allumel’éclairageàhauteintensitéetactiveuntémoinvertau-dessus
dubouton.
Appuyerdenouveausurlemêmeboutonetlemainteniréteintl’éclairage.
Lorsqueleréglagedenuitestactivé,appuyerdenouveausurlebouton
d’éclairageàfaibleintensité etlemaintenirdésactiveleréglagedenuit.
VENTILATEUR (3boutons-poussoirs4régimesdeventilateur)
Met le ventilateur en marche au régime lent et active un témoin vert
au-dessusdubouton.
Metleventilateurenmarcheaurégimemoyenetactiveuntémoinvert
au-dessusdubouton.
Metleventilateurenmarcheaurégimeélevéetactiveuntémoinvert
au-dessus du bouton.Appuyer de nouveau sur le bouton
ventilateuràlavitessemaximaleetillumineletémoin
active le
.
Appuyersurlemêmeboutonetlemaintenirarrêteleventilateur.
Lorsquelavitessemaximaleestactivée,appuyersurleboutonderégime
élevéetlemaintenirdésactivelavitessemaximale.
REMARQUE
Cettehottecomporteunventilateuràconceptiondécaléeoffrantunmeilleur
rendement tout en réduisant le niveau sonore. Par conséquent, vous
remarquerezpeut-êtrequelesimpuretésdecuissonsontdavantageattirées
d’uncôtéousemblentaspiréesplusrapidementquedel’autrecôté,cequiest
normal.Lahotteaétéconçueettestéepourcapterlesimpuretésetodeurs
decuissondansdesconditionsnormales,quelquesoitl’endroitoùlacuisson
s’effectuesurlacuisinière.Veuilleznoterquecuisinersurlesbrûleursarrière
permettoujoursunemeilleurecaptationdesimpuretésdecuisson,quelle
quesoitlaconceptiondelahotte.
MODÈLES QP330BL•QP330SS•QP330WW
QP336BL•QP336SS•QP336WW
QP342BL•QP342SS•QP342WW
Page 11
RÉGLAGEDEL’HEURE
ARRÊTDIFFÉRÉDE10MINUTES
La hotte étant en marche (à n’importe quelle vitesse), appuyez sur
le bouton
pour activer la fonction d’arrêt différé. Le ventilateur
s’arrêtera automatiquement après un délai de 10 minutes. La fonction
d’arrêt différé est active lorsque ce qui suit apparaît sur l’écran DEL :
Un témoin vert s’allume au-dessus du bouton d’arrêt différé un
compteàrebours«10à0»s’afficheainsiquedesDELs’allumenten
tournantdanslesenshoraire.Appuyezdenouveausurleboutond’arrêt
différépourinterromprelecompteàrebours.Appuyezdenouveausurle
bouton
pourreprendrelecompteàrebours.Appuyersurlebouton
etlemaintenirdésactivecettefonction.
Appuyez une fois sur le bouton
, les « heures » commencent à
clignoter sur l’écran DEL. Utilisez les boutons et
pour régler
correctementl’heuredel’horloge.Unpetittémoins’allumedanslecoin
gauche de l’écran DEL pour indiquer « pm ». Une fois l’heure réglée,
appuyez sur le bouton
pour avancer au menu de sélection des
minutes.Lesminutessemettentàclignotersurl’écranDEL.Utilisezles
boutons et
bouton
pourréglerlesminutes.Appuyezdenouveausurle
pouravanceraumenuderéglagedel’«affichage».
AFFICHAGE(par défaut à l’usine, l’affichage est EN MARCHE)
L’écranDELaffichelafonctiond’affichage-d-.Utilisezlebouton ou
pourpasserentrel’écranDELallumé(don)ouéteint(doFF).Lorsque
MINUTERIE
Appuyez sur le bouton
pour activer la fonction de minuterie.
Utilisez les boutons et
pour reculer ou avancer le réglage de
la minuterie à la durée voulue. Une fois la minuterie réglée comme
la fonction d’affichage éteint (doFF) est sélectionnée, l’affichage DEL
del’horlogeestdésactivé.Appuyezdenouveausurlebouton
pour
avanceraumenudesélection«Sommeil».
souhaité,attendez3secondessansappuyersuraucunautreboutonou
FONCTIONSOMMEIL(par défaut à l’usine - DÉSACTIVÉE)
appuyezdenouveausurlebouton
Laminuterieestalorsactivée
et le compte à rebours s’affiche sur l’écran DEL, tandis qu’un voyant
L’écranDELafficheralafonction«Sommeil»-S-.Utilisezlebouton
vert s’allume au-dessus du bouton ou
pourpasserentrelafonctionSommeilactivée(Son)oudésactivée
Lorsque la minuterie atteint
(Soff).LorsquelafonctionSommeilestactivée(Son),l’écranDELetles
«0:00»,unsignalsonoresefaitentendre.Lesignalcontinuejusqu’à
voyantsDELduventilateuretdel’éclairagesontdésactivés.Lecapteur
ce que l’on ait appuyé de nouveau sur le bouton
Le compte à
de lumière ambiante, la fonction d’arrêt différé et la minuterie sont
reboursdelaminuteriepeutêtreinterrompuentouttempsenappuyant
égalementdésactivés.Lescommandesduventilateuretdel’éclairage,
denouveausurlebouton
y compris celles du détecteur de chaleur, sont actives. Appuyez de
bouton
Sivousappuyezencoreunefoissurle
,laminuteriereprendlecompteàrebours.Pourdésactiver
nouveau sur le bouton
pour avancer au menu de sélection du
cette fonction, appuyez sur le bouton
et maintenez-le. Veuillez
noter que si les fonctions de minuterie et d’arrêt différé sont activées
«Capteurdelumièreambiante».Remarque:Pouraccéderaumenude
ensemble, la minuterie sera illuminée sur l’écran DEL, tandis que la
etmaintenez-le2secondes.
fonctionslorsquelemodeSommeilestactif,appuyezsurlebouton
fonctiond’arrêtdifféréseraactivemaispasaffichée.
CAPTEUR DE LUMIÈREAMBIANTE (par défaut à l’usine - Niveau
MENUDEFONCTIONS
1 MARCHE)
Votre hotte comporte de nombreux réglages auxquels vous pouvez
Il y a deux réglages de niveau pour le capteur de lumière ambiante.
accéderenfaisantdéfilerlemenudefonctions.Lahottedoitêtrearrêtée
Quand l’un ou l’autre niveau est actif, le capteur de lumière détecte
pour être en mesure d’accéder au menu de fonctions. Appuyez sur
un faible niveau de lumière dans la cuisine et règle automatiquement
pendant que la hotte est arrêtée pour activer le menu
les témoins de la hotte sur le mode de nuit. Les autres réglages de
de fonctions. Pendant que le menu est actif, appuyez de nouveau
l’éclairage demeurent fonctionnels. Si la sélection est effectuée alors
sur le bouton
pour faire défiler les diverses fonctions à régler ou
que le capteur de lumière est actif, elle supplante temporairement le
configurer.Silemenudefonctionsestactifmaisqu’aucunboutonn’est
capteurdelumièrejusqu’àcequel’éclairagesoitéteintLeréglagedu
presséaprès10secondesouaprèsavoirfaitdéfilertouslesréglagesdu
capteurdelumièreambiantedeniveau1(Aon1)exigequelacuisinesoit
menu,lahottequitteautomatiquementlemenudefonctionsettousles
plussombrequeleréglagedeniveau2(Aon2)avantd’activerlemode
réglagessontenregistrés.Untémoinverts’allumeau-dessusdel’icône
denuit.L’écranDELaffichelafonctiondecapteurdelumièreambiante
le bouton
lorsque le menu de fonctions est actif. Les fonctions suivantes
peuventêtrerégléesl’uneaprèsl’autre:
-A-.Utilisezlebouton ou
poursélectionnerleréglageducapteur
de lumière Aon1 (niveau 1), Aon2 (niveau 2) ou AoFF (désactivé).
LasélectionAoFFdésactivelafonctiondecapteurdelumièreambiante
desortequelefonctionnementdenuitsoitmanuel.
Veuilleznoterquevouspouvezquitterlemenudefonctionsentouttemps
enn’appuyantsuraucunboutonpendant10secondesouenfaisantdéfiler
touteslesfonctionsdumenu.
MODÈLES QP330BL•QP330SS•QP330WW
QP336BL•QP336SS•QP336WW
QP342BL•QP342SS•QP342WW
Page 12
SYSTÈMEDEDÉTECTEURDECHALEUR
Cette hotte comporte un système perfectionné de détecteur de
chaleur capable de déceler une température excessive et de régler
automatiquementleventilateuraurégimeadéquat.
1) Sileventilateurestenmarche,lesystèmededétecteurdechaleur
augmentelavitesseduventilateuraufuretàmesurequelatempérature
s’élève.Silatempératurecontinuedes’élever,lesystèmededétecteur
augmentelavitesseduventilateurjusqu’àstabilisationouabaissement
delatempérature.Levoyantclignotantsituéau-dessusduboutondu
ventilateur indique le réglage établi par le système de détecteur. Une
foislatempératureabaissée,lesystèmededétecteurrétablitleréglage
originalduventilateur.
CLAPETD’AIRDECOMPENSATION
La hotte est compatible avec le Clapet d’air de compensation Broan
modèleMD6ToumodèleMD8T(enoption).Venduséparément.
Connectezleclapetd’airdecompensationavecdesfilsdebassetension,
telqu’illustré.Pourdeplusamplesinformations,consultezlesdirectives
duclapetd’airdecompensation.
ARRIÈREDELAHOTTE
2) Si le ventilateur est arrêté, le système de détecteur règle
automatiquement le ventilateur à la vitesse maximale lorsque la
température est au-dessus de la normale. Lorsque le système de
détecteurestactivé,levoyantlumineuxsituéau-dessusduboutonde
régimeélevéduventilateurclignote.Unefoislatempératurerevenueàla
normale,lavitesseduventilateurestréduitejusqu’àcequelatempérature
soitstabilisée,puisleventilateurs’arrête.
CONNECTEURBASSETENSIONPOUR
CLAPETD’AIRDECOMPENSATION
HOTTE DE
CUISINIÈRE
Note:Laversioncanadiennenepossèdepascettefonction.
CLAPET D’AIR DE
COMPENSATION
FILS DE BASSE
TENSION
FUSES
120
VCA
PANNEAUDECOMMANDEDELAHOTTEDECUISINE
FUSIBLE
PRINCIPAL
FUSIBLEDE
L’ÉCLAIRAGE
24
VCA
MOTEUR
DE CLAPET
TÉLÉCOMMANDE
LahotteestcompatibleaveclaTélécommandeRFBroanmodèleBCR1
(enoption).Venduséparément.
PRÉPARATIONDEL’EMPLACEMENTDELAHOTTE
CAPUCHON DE TOIT
Lepanneaudecommandedelahottecomprendunfusibleprincipal
etunfusibled’éclairagepourleprotégercontrelessurtensions.Siun
fusibleasauté(grillé),lesvoyantsvertsindiquantlaforceduventilateur
etdel’éclairagenes’allumentpasnormalementlorsquel’onappuiesur
lesboutonsduventilateuretdel’éclairage,etnileventilateurnilalumière
nefonctionnent.
Vous pouvez vous procurer un nouveau fusible chez votre magasin
d’électroniquelocal.Utilisezdesfusiblesde8A,120V,5mmdediamètre,
20mmdelong,àactionrapide,detypecartouche.
Pourremplacer unfusible:
1. Coupezlecourantaupanneauélectrique.
2. Enlevezlesfiltres etlepanneauinférieur.
3. Enlevezetinspectezlefusible.S’iln’apassauté(grillé),undiagnostic
pluspoussédoitêtreeffectué.
CONDUIT 8,3 x 25,4 cm
(3-¼ x 10 po) ou ROND
de 17,8 cm (7 po)
(Pour évacuation
verticale)
SOFFITE
CÂBLAGE (au-dessus
ou à l’arrière de la hotte)
ARMOIRE
HOTTE
61 à 76,2 cm (24 à 30 po)
AU-DESSUS DE LA
SURFACE DE CUISSON
1
CAPUCHON MURAL
CONDUIT
8,3 x 25,4 cm (3-¼ x 10 po)
(Pour évacuation horizontale)
Déterminezsil’évacuationseferaàlaverticale(conduitde
8,3x25,4cm[3-¼x10po]ouconduitrondde17,8cm[7po]),
ouàl’horizontale(8,3x25,4cm[3-¼x10po]seulement).Pour
uneévacuationverticaleouhorizontale,installezlesconduits
entreuncapuchondetoitouuncapuchonmural.Pourobtenirles
meilleursrésultats,utilisezunminimumdecoudesetdetransitions.
MODÈLES QP330BL•QP330SS•QP330WW
QP336BL•QP336SS•QP336WW
QP342BL•QP342SS•QP342WW
Page 13
2
Àl’aidedesdiagrammesci-dessous,déterminezl’emplacement
exactdescoupesàeffectuerpourleconduitetlefild’alimentation
électriquedansl’armoireoulemur.Pouruneinstallationsans
conduit,NEPASdécouperdetroupourleconduit.
CONDUITVERTICAL
8,3X25,4CM(3-¼X10PO)
VIS DE MONTAGE DE
LA HOTTE (5)
29,5 cm (hotte de 30 po / 76 cm)
29,5 cm (hotte de 30 po / 76 cm)
37,1 cm (hotte de 36 po / 91,4 cm)
37,1 cm (hotte de 36 po / 91,4 cm)
44,8 cm (hotte de 42 po / 107 cm)
44,8 cm (hotte de 42 po / 107 cm)
PRÉPARATIONDELAHOTTE
3
Retirezlesacdepiècesdel’intérieurdel’emballagedemousse
ducapuchon.
4
Enleveztouteslespelliculesprotectricesdelahotte(hottesen
acierinoxydableseulement).
AVANT DE
L’ARMOIRE
*
17,5 cm
(6 7/8 po)
13,3 cm
(5 1/4 po)
27,9 cm 5,4 cm
TROU D’ACCÈS DU
(11 po) (2 1/8 po)
13,3 cm
(5 1/4 po)
27,6 cm
(10 7/8 po)
11,4 cm
CONDUIT VERTICAL
(4 1/2 po)
1,9 cm (3/4 po)
ç
DESSOUS
DE L'ARMOIRE
6,7 cm
(2 5/8 po)
TROU POUR
CALES DE BOIS
CÂBLE ÉLECTRIQUE
(armoires à base LIGNE DE
en retrait seulement) CENTRE (dans le fond de l'armoire)
CALES DE BOIS
(armoires à base en
AVANT DE
retrait seulement)
L’ARMOIRE
(2)
SOULEVER
ç
(1)
TIRER
VERSLE
BAS
FILTRES
D’ALUMINIUM
5
Retirezlesfiltresd’aluminiumdelahotte.
6
Enlevezlessixvismaintenantlepanneauinférieurdelahotte.
Mettezlepanneauinférieuretlesvisdecôté.
CONDUITHORIZONTAL
8,3X25,4CM(3-¼X10PO)
9,2 cm (3 5/8 po)
3,5 cm (1 3/8 po)
1 cm (3/8 po)
10,2 cm
DESSOUS
DE
L'ARMOIRE
*
TROU POUR
CÂBLE
ÉLECTRIQUE
(dans le mur)
TROU D'ACCÈS DU
CONDUIT HORIZONTAL
13,3 cm
(5 1/4 po)
29,5 cm (hotte de 30 po / 76 cm)
37,1 cm (hotte de 36 po / 91,4 cm)
44,8 cm (hotte de 42 po / 107 cm)
VIS DE
MONTAGE DE
LA HOTTE (5)
13,3 cm
(5 1/4 po)
17,5 cm
(6 7/8 po)
29,5 cm (hotte de 30 po / 76 cm)
37,1 cm (hotte de 36 po / 91,4 cm)
44,8 cm (hotte de 42 po / 107 cm)
TROU POUR
CÂBLE ÉLECTRIQUE
DU CLAPET D’AIR
DE COMPENSATION
(dans le mur)
LIGNE DE
CENTRE
CONDUITROND
DE17,8CM(7PO)
VIS DE MONTAGE
DE LA HOTTE (5)
29,5 cm (hotte de 30 po / 76 cm)
29,5 cm (hotte de 30 po / 76 cm)
37,1 cm (hotte de 36 po / 91,4 cm)
37,1 cm (hotte de 36 po / 91,4 cm)
44,8 cm (hotte de 42 po / 107 cm)
44,8 cm (hotte de 42 po / 107 cm)
AVANT DE
L’ARMOIRE
TROU DE
*
CM
DESSOUS (820,3
PO) DE
DIAMÈTRE
DE
TROU D’ACCÈS
L'ARMOIRE
POUR
11,7 cm
*
CONDUIT ROND
17,8 cm (7 po)
17,5 cm
(6 7/8 po)
27,9 cm 5,4 cm
(11 po) (2 1/8 po)
27,6 cm
(10 7/8 po)
6,7 cm
(2 5/8 po)
CLAPET/RACCORD
DECONDUIT
CALES DE BOIS
TROU POUR
(armoires à base
LIGNE DE CÂBLE ÉLECTRIQUE
en retrait seulement) CENTRE (dans le fond de l'armoire)
7
Remarquez la cale de bois et la vis supplémentaires près de l’avant
de l’armoire, sur la ligne centrale de l’armoire.
POURLESINSTALLATIONSAVECCONDUIT–Passezàl’étape12.
Enlevezlesdeuxvismaintenantleclapet/raccorddeconduit
surlahotte.Enlevezleclapet/raccorddeconduitàl’intérieurde
lahotte.
MODÈLES QP330BL•QP330SS•QP330WW
QP336BL•QP336SS•QP336WW
QP342BL•QP342SS•QP342WW
Page 14
11 INSTALLATIONSANSCONDUITSEULEMENT:
Veuillezvousprocurerunensemblede(2)filtrespourhottessans
conduitde76cm(30po)delargeur(ModèleBPPF30)ou91,4cm
(36po)delargeur(ModèleBPPF36)ouunensemblede(3)filtres
pourhottessansconduitde107cm(42po)delargeur(Modèle
BPPF42)chezvotredistributeurlocalouvotredétaillant.Fixez
lesfiltrespourhottesansconduitauxfiltresd’aluminiumselonles
instructionsaccompagnantlesfiltrespourhottesansconduit.
DÉFLECTEUR
NONCANALISÉ
INSTALLATIONSSANSCONDUIT-Passezà«INSTALLATIONDE
LAHOTTE».
8
OUVERTURERONDE
PRÉAMORCÉEDE
17,8cm(7po)(enlevez
égalementlaplaque
pourconduit
verticalde
8,3x25,4cm
[3-¼x10po])
INSTALLATIONSANSCONDUITSEULEMENT:
Dusacdepièces:Fixezledéflecteurnoncanaliséàla
boîteàairàl’aidede2viset2rondelles.
VIS
OUVERTURE
PRÉAMORCÉE
POUR
CONDUIT
VERTICALDE
8,3X25,4CM
(3-¼X10PO)
OUVERTURE
PRÉAMORCÉE
POURCONDUIT
HORIZONTALDE8,3X
25,4CM(3-¼X10PO)
12 INSTALLATIONAVECCONDUITSSEULEMENT:
Enlevezlaoulesplaquesd’ouverturepréamorcéepour
conduitverticalde8,3x25,4cm(3-¼x10po),conduit
horizontalde8,3x25,4cm(3-¼x10po)ouconduitrond
de17,8cm(7po)selonlaméthodechoisiepourlesconduits.
PLAQUENON
CANALISÉE
BORD
SUPÉRIEUR
ARRIÈREDE
LAHOTTE
PLAQUENON
CANALISÉE
CLAPET/RACCORDDE
CONDUITDE8,3X25,4CM
(3-¼X10PO)
PIVOTDU
CLAPET
ç
FENTE
9
CAISSONNON
CANALISÉ
PLAQUEDECONDUIT
ROND17,8CM(7PO)
INSTALLATIONSANSCONDUITSEULEMENT:
Enlevezles2visretenantlaplaquenoncanaliséeau
caissonnoncanaliséetretirezlaplaque.
VIS
13
PLAQUENON
CANALISÉE
10
INSTALLATIONSANSCONDUITSEULEMENT:
Insérezlapetiteextrémitédelaplaquenoncanaliséedansla
fenteducaissonnoncanalisé.Fixez-laavecles2visenlevées
àl’étape9.
INSTALLATIONAVECCONDUITSSEULEMENT:
Fixezleclapet/raccorddeconduitde8,3x25,4cm(3-¼x10po)
(sivousutilisezunconduitde8,3x25,4cm[3-1/4x10po])ou
laplaquedeconduitrondde17,8cm(7po)(sivousutilisezun
conduitrondde17,8cm[7po])surl’ouverturepréamorcée.
Remarques:
Pouraccommoderlesconduitsdécentrés,leclapet/raccordde
conduitde8,3x25,4cm(3-1/4x10po)peutêtreinstalléjusqu’à
1,3cm(½po)d’uncôtéoudel’autreducentredelahotteetla
plaquedeconduitrondde17,8cm(7po)peutêtreinstalléejusqu’à
1,3cm(½po)d’uncôtéoudel’autreducentredelahotte.
Installezleclapet/raccorddeconduitde8,3x25,4cm
(3-1/4x10po)enplaçantlepivotduclapetleplusprèsdu
bordsupérieurarrièredelahotte.
MODÈLES QP330BL•QP330SS•QP330WW
QP336BL•QP336SS•QP336WW
QP342BL•QP342SS•QP342WW
INSTALLATIONDELAHOTTE
Page 15
RACCORDDUCÂBLAGE
AVERTISSEMENT
Pourréduirelesrisquesdechocélectrique,coupezle
courantdupanneauélectrique.Verrouillezouposezun
sceausurlepanneauafind’éviterquelecourantnesoit
rétabliaccidentellement.
VISDEMISE
ÀLATERRE
COUVERCLE
DUBOÎTIERDE
CONNEXION
ÉLECTRIQUE
OUVERTURE
PRÉAMORCÉE
DUCÂBLE
D’ALIMENTATION
ÉLECTRIQUE
14
Enlevezlecouvercleduboîtierdeconnexionélectrique
àl’intérieurdelahotteetl’ouverturepréamorcéedecâble
d’alimentationélectriqueappropriéesurledessusouà
l’arrièredelahotte.
CÂBLEÉLECTRIQE
DELAMAISON
18
Connectezlecâbleélectriquedelamaisonaveclesfilsde
lahotte-leNOIRavecleNOIR,leBLANCavecleBLANC,et
leVERTouFILNUaveclavisdemiseàlaterre.Replacezle
couvercleduboîtierdeconnexionélectrique.
19
Reposezlepanneauinférieuravecles6visenlevéesà
l’étape6.
INSTALLATIONDESAMPOULES
VENTOUSE
AMPOULE
HALOGÈNE
CÂBLEÉLECTRIQUE
DELAMAISON
(2)
TOURNER
DANSLESENS
HORAIRE
VISDU
PANNEAU
D’ÉCLAIRAGE
15
16
17
Acheminezlefild’alimentationélectriquedupanneauélectrique
jusqu’àl’emplacementdelahotte.Fixezlecâbleàlahotteavecle
connecteurapproprié.
Suspendezlahotteàl’aidede(4)visàmoitiévisséesauxendroits
marquéssousl’armoire(illustrésous«PRÉPARATIONDE
L’EMPLACEMENTDELAHOTTE»).Cesvissontinclusesdansle
sacdepièces.Glissezlahotteverslemurdemanièreàengagerla
têtedesvisdanslafentedestrousdeserruredudessusdelahotte.
Serrezlesvisfermement.Ajoutezlacinquièmevisdemontagedans
letroucentraldelahotteetserrez-lafermement.
INSTALLATIONAVECCONDUITSSEULEMENT:
Raccordezleconduitàlahotteetassurez-vousquelesjointssont
bienfixésetétanchesàl’aidederubanpourconduit.Assurez-vous
queleclapet/raccorddeconduits’insèreàl’intérieurduconduitet
queleclapets’ouvreetsefermelibrement.
(1)
ENFONCER
PANNEAU
D’ÉCLAIRAGE
ATTENTION:Lesampoulespeuventêtretrèschaudes.
Pourplusd’informations,voirl’emballagedel’ampoule.
20
Installez(4)ampouleshalogènes(inclusesaveclahotte).
Utilisezdesampouleshalogènesavecécrande120V,
50W-MR16àculotGU10.
REMARQUE:Vouspouvezutiliserlaventouse(incluseavec
lahotte)pourinstallerouenleverlesampoules.
Alignezlesbornesdel’ampoulesurlagrandeouverturedusocle,
puispoussezl’ampouleverslahotteettournez-ladanslesens
horairejusqu’àcequ’ellesoitbienappuyée.
Lapositiondusocledel’ampoule(saprofondeur)estréglableet
peutexigerunajustementlorsque:
a)certainesmarquesd’ampoulesontdifficilesàinstaller.
b)l’ampouledépassetropsouslepanneaud’éclairage.
MODÈLES QP330BL•QP330SS•QP330WW
QP336BL•QP336SS•QP336WW
QP342BL•QP342SS•QP342WW
Page 16
PIÈCESDERECHANGE
SUPPORTDU
SOCLED’AMPOULE
15
1
12
14
16
11
10
PANNEAU
D’ÉCLAIRAGE
VIS
21
INSTALLATIONAVECCONDUITSSEULEMENT:
Replacezlesfiltresd’aluminiumenlevésàl’étape5.
INSTALLATIONSANSCONDUITSEULEMENT:
Installezlesfiltresd’aluminiumetlesfiltrespourhottesans
conduit-achetésetassemblésàl’étape11.
GARANTIE
Garantielimitéed’unan
Broan-NuTonegarantitauconsommateuretacheteurinitialdesesproduitsqueceux-ci
sontexemptsdetoutvicedematériauoudefabricationpourunepérioded’un(1)an
àcompterdeladated’achatoriginale.CETTEGARANTIENECOMPORTEAUCUNE
AUTREGARANTIE,EXPRESSEOUTACITE,YCOMPRIS,MAISSANSS’YLIMITER,
LESGARANTIESTACITESDEVALEURMARCHANDEOUD’ADAPTATIONÀUNUSAGE
PARTICULIER.
Durantcettepérioded’unan,Broan-NuTonerépareraouremplaceragratuitement,àsa
discrétion,toutproduitoutoutepiècejugésdéfectueuxdansdesconditionsnormales
d’utilisation.CETTEGARANTIENES’APPLIQUEPASAUXTUBESFLUORESCENTS
ETAUXDÉMARREURS,NIAUXAMPOULESHALOGÈNESOUINCANDESCENTES,
FUSIBLES,FILTRES,CONDUITS,CAPUCHONSDETOIT,CAPUCHONSMURAUXET
AUTRESACCESSOIRESPOURCONDUITS.Cettegarantienecouvrepas(a)lesfrais
d’entretienoudeservicenormauxni(b)toutproduitoutoutepiècesoumisàunabus,
unenégligence,unaccident,unentretienouuneréparationinadéquats(autresqueceux
effectuésparBroan-NuTone),unemauvaiseinstallationouuneinstallationcontraireaux
instructionsrecommandées.
Laduréedetoutegarantietaciteestlimitéeàcettepérioded’unan,telquestipulépourla
garantieexpresse.Certainsterritoiresouprovincesinterdisantdelimiterladuréed’une
garantietacite,lalimitationci-dessuspeutnepass’appliqueràvotresituation.
L’OBLIGATIONPOURBROAN-NUTONEDERÉPAREROUDEREMPLACERLEPRODUIT,
ÀSADISCRÉTION,CONSTITUELESEULRECOURSDEL’ACHETEURENVERTUDE
LAPRÉSENTEGARANTIE.BROAN-NUTONENEPEUTÊTRETENUERESPONSABLE
DESDOMMAGESINDIRECTSOUCONSÉCUTIFSNIDESDOMMAGES-INTÉRÊTS
PARTICULIERSDÉCOULANTDEL’UTILISATIONOUDURENDEMENTDUPRODUIT.
Certainsterritoiresouprovincesnepermettantpaslalimitationoul’exclusiondes
dommagesindirectsouconsécutifs,lalimitationci-dessuspeutnepass’appliquerà
votresituation.Laprésentegarantievousconfèredesdroitsspécifiquesreconnusparla
loi.D’autresdroitspourraientégalementvousêtreaccordésselonlalégislationlocaleen
vigueur.Laprésentegarantieremplacetouteslesautresgarantiesprécédentes.
Pourvousprévaloirdecettegarantie,vousdevez(a)aviserBroan-NuToneàl’adresse
ouaunumérodetéléphoneindiquésci-dessous,(b)donnerlenumérodemodèledu
produitetlenumérod’identificationdelapièceet(c)décrirelanaturedeladéfectuosité
duproduitoudelapièce.Lorsdevotredemandedegarantie,vousdevezprésenterune
preuvedeladated’achatoriginale.
Broan-NuToneLLC,926W.StateStreet,Hartford,Wisconsin53027
www.broan.com800-558-1711
Broan-NuToneCanada,Inc.,1140TristarDrive,Mississauga,OntarioCanadaL5T1H9
www.broan.ca877-896-1119
Rév.08/2007
3
9
Pourchangerlaprofondeurdessoclesd’ampoule:
-Enlevezlepanneauinférieur(voirétape6).
-Enlevezles2visdupanneaud’éclairageetlepanneau
d’éclairage.Gardezlesvisdecôté.
-Desserrezles2visretenantlesupportdusocled’ampoule
aupanneaud’éclairage.
-Réglezlesupport/socleàlaprofondeurvoulue.
-Resserrezlesvisfermement.
-Reposezlepanneaud’éclairageetlepanneauinférieur.
2
17
4
18
5
13
8
6
REPÈRE
1
7
N° DE PIÈCE
97017727
2
97018256
97018257
3
4
5
6
7
8
99528258
99528259
97018251
97018225
97018226
97018227
97018205
97018206
97018207
97018220
97018223
9
10
11
12
13
97017728
97018229
97018230
97018231
97017731
97018233
97018239
97018240
97018241
14
15
16
17
18
Nonillustré
Nonillustré
97018242
97018243
97018244
97018260
97018262
97018224
99010353
99010354
99010360
Nonillustré
Nonillustré
Nonillustré
Nonillustré
99526707
97018252
97018253
97018261
DESCRIPTION
Plaquepourconduitrondde17,8cm(7po)(comprendlaquincaillerie
demontage)
Ensembled’interfaceutilisateurblanche(comprendinterface,plaque
indicatrice,quincailleriedemontage)
Ensembled’interfaceutilisateurnoire(comprendinterface,plaque
indicatrice,quincailleriedemontage)
Plaqueindicatrice,blanche
Plaqueindicatrice,noire
Ensembledecondensateur(comprendécrousàfil,visdemontage)
Panneaud’éclairageblancDROIT(comprendlaquincailleriedemontage)
Panneaud’éclairagenoirDROIT(comprendlaquincailleriedemontage)
Panneaud’éclairageinoxDROIT(comprendlaquincailleriedemontage)
Ensembledefiltrespourhottede76cm(30po)(2parsac)
Ensembledefiltrespourhottede91,4cm(36po)(2parsac)
Ensembledefiltrespourhottede107cm(42po)(2parsac)
Roueàailettes(incluantl’écroudemontage)
Ensembledemoteur(comprendmoteur,isolateurs,quincaillerie
demontage)
Clapet/raccorddeconduit(incluantlaquincailleriedemontage)
Panneaud’éclairageblancGAUCHE(comprendlaquincailleriedemontage)
Panneaud’éclairagenoirGAUCHE(comprendlaquincailleriedemontage)
Panneaud’éclairageinoxGAUCHE(comprendlaquincailleriedemontage)
Socled’ampoule(comprendsocled’ampoule,écrousàfil,visdemontage)
Supportdesocled’ampoule
Panneauinférieurde76cm(30po)(comprendlaquincailleriedemontage)
Panneauinférieurde91,4cm(36po)(comprendlaquincaillerie
demontage)
Panneauinférieurde107cm(42po)(comprendlaquincaillerie
demontage)
Caissonnoncanalisé(comprendlejointetlaquincailleriedemontage)
Déflecteurnoncanalisé(comprendlaquincailleriedemontage)
Plaquenoncanalisée(comprendlaquincailleriedemontage)
Circuitimprimé
Transformateur(comprendlaquincailleriedemontage)
Sacdepièces
Ensembledefiltrespourhottede76cm(30po)(2filtresaucharbon
et8attachesdefiltre)
Ensembledefiltrespourhottede91,4cm(36po)(2filtresaucharbon
et8attachesdefiltre)
Ensembledefiltrespourhottede107cm(42po)(2filtresaucharbon
et12attachesdefiltre)
Ventouse
Détecteurdechaleur
Fusible
Ensembledecâble-ruban(encontient3)
VeuillezcommanderlespiècesparN°PIÈCE-etnonparN°REPÈRE.
99527291C
MODELOS QP330BL•QP330SS•QP330WW
QP336BL•QP336SS•QP336WW
QP342BL•QP342SS•QP342WW
Página 17
EVOLUTION 3
CampanasSerieQP3
LEAYCONSERVEESTASINSTRUCCIONES
TM
SOLAMENTEPARACOCINARENCASA
ADVERTENCIA
PARAREDUCIRELRIESGODEINCENDIO,DESCARGAELÉCTRICA
OLESIONESPERSONALES,OBSERVELOSIGUIENTE:
1. Uselaunidadsólodelamaneraindicadaporelfabricante.Sitiene
preguntas,comuníqueseconelfabricantealadirecciónoalnúmero
telefónicoqueseincluyeenlagarantía.
2. Antes de dar servicio a la unidad o de limpiarla, interrumpa el
suministroeléctricoenelpaneldeservicioybloqueelosmediosde
desconexióndelservicioparaevitarquelaelectricidadsereanude
accidentalmente. Cuando no sea posible bloquear los medios de
desconexióndelservicio,fijefirmementeunaseñaldeadvertencia
(comounaetiqueta)enunlugarvisibledelpaneldeservicio.
3. El trabajo de instalación y cableado eléctrico debe ser realizado
por personal calificado y de conformidad con todos los códigos y
normascorrespondientes,incluidoslosdeconstrucciónespecíficos
contraincendios.
4. Airesuficienteesnecesarioparalacombustiónadecuadayextracción
adecuadas de los gases a través del tubo de humos (chimenea) del
equipo quemador de combustible, a fin de evitar el contratiro. Siga
las normas de los equipos de combustión, como las establecidas
en los códigos locales y las publicadas por laAsociación Nacional de
ProteccióncontraIncendios(NationalFireProtectionAssociation,NFPA)
ylaSociedadAmericanadeIngenierosdeCalefacción,Refrigeracióny
AireAcondicionado(AmericanSocietyforHeating,RefrigerationandAir
ConditioningEngineers,ASHRAE)yelcódigodelasautoridadeslocales.
5. Esteproductopodríatenerbordesafilados.Trabajeconcuidadopara
evitarcortadasyabrasionesdurantelainstalaciónylalimpieza.
6. Alcortaroperforaratravésdelaparedodeltecho,tengacuidado
denodañarelcableadoeléctriconiotrosserviciosocultos.
7. Los ventiladores en conductos siempre deben ventearse hacia
elexterior.
8. Utiliceúnicamenteconductosmetálicos.
9. No use este ventilador junto con ningún dispositivo de control de
velocidaddeestadosólido.
10.Comoalternativa,sepuedeinstalaresteproductoconeljuegode
cabledealimentaciónaprobadoporULydiseñadoparaelproducto,
siguiendolasinstruccionesincluidasconelcable.
11. Estaunidaddebeestarconectadaatierra.
PARA REDUCIR EL RIESGO DE INCENDIO PROVOCADO POR
GRASAPRESENTEENLAESTUFA:
1. Nunca deje desatendidas las unidades de la superficie cuando
esténenajustesaltosdecalor.Losalimentosenebulliciónprovocan
derramesgrasososyconhumoquesepuedenincendiar.Caliente
elaceitelentamenteenajustesdecalorbajoomedio.
2. Siempre ENCIENDA la campana cuando esté cocinando a altas
temperaturasoflameandoalimentos(porejemplo,crepasSuzette,
cerezasJubilee,bistecconpimientaflameado).
3. Limpiefrecuentementelosventiladores.Nopermitalaacumulación
degrasaenelventiladornienelfiltro.
4. Use una cacerola del tamaño adecuado. Siempre use utensilios
de cocina que sean apropiados para el tamaño del elemento de
lasuperficie.
PARA REDUCIR EL RIESGO DE LESIONES A LAS PERSONAS
EN CASO DE UN INCENDIO PRODUCIDO POR GRASA EN UNA
ESTUFA,OBSERVELOSIGUIENTE*:
1. APAGUELASLLAMASconunatapadeajusteexacto,unacharola
paragalletasounabandejademetal,ydespuésapagueelquemador.
PROCEDACONCUIDADOPARAEVITARQUEMADURAS.Silas
llamasnoseapaganinmediatamente,EVACUEELÁREAYLLAME
ALOSBOMBEROS.
ADVERTENCIA
2. NUNCA LEVANTE UNA CACEROLA INCENDIADA porque podría
sufrirquemadurasopropagarelincendio.
3. NOTRATE DEAPAGAR EL FUEGO CONAGUA ni con trapos o
toallasdecocinamojados,puesocasionaráunaexplosiónviolenta
devapor.
4. UseunextintorSÓLOsi:
A. TieneunextintordelaClaseABCyyasabecómofunciona.
B. Elincendioespequeñoyestáconfinadoeneláreaenlaque
seinició.
C. VaallamaralDepartamentodeBomberos.
D. Puedecombatirelincendioteniendolaespaldaorientadahacia
unasalida.
*Basadoen“KitchenFireSafetyTips”(Sugerenciasparalaseguridad
contraincendiosenlacocina)publicadoporNFPA.
PRECAUCIÓN
1. Sólodebeusarsebajotecho.
2. Sólo para usarse como medio de ventilación general. No debe
usarse para la extracción de materiales ni vapores peligrosos
oexplosivos.
3. Para evitar daños a los cojinetes del motor y rotores ruidosos o
desbalanceados, mantenga la unidad eléctrica al resguardo de
rociadosdeyeso,polvodeconstrucción,etc.
4. Nouseequipoparacocinarmayorde60,000BTU/hr,pueselmotor
ventiladorseapagarádemaneraintermitente.
5. Este motor de campana tiene una protección contra sobrecargas
térmicas que automáticamente apagará el motor en caso de
sobrecalentamiento.Elmotorreanudarásufuncionamientocuando
seenfríe.Sielmotorcontinúaapagándoseyencendiéndose,solicite
servicioparalacampana.
6. LapartesuperiordelacampanaNODEBEESTARAMENOSde
24pulg.(61cm)yaunmáximode30pulg.(76cm)porarribadela
estufa,paracaptarmejorlasimpurezasquesurgenalcocinar.
7. Estácampananoestádiseñadaparausarsecomorepisa.
8. Lealaetiquetadeespecificacionesquetieneelproductoparaver
informaciónyrequisitosadicionales.
NOTA
Silacampanasevaainstalarenunsistemasinconductos:
Compreunjuegodedos(2)filtrosparasistemassin
conductosparalascampanasde30pulg.(76cm)
(ModeloBPPF30)yparalascampanasde36pulg.
(91.4cm)(ModeloBPPF36)ounjuegodetres(3)filtros
parasistemassinconductosparalascampanasde42pulg.
(107cm)(ModeloBPPF42)consudistribuidorominorista
local,yacóplelosalosfiltrosdemalladealuminio.
RegistresuproductoenInterneten:www.broan.com
Aviso al instalador: Deje este manual
con el dueño de la casa.
Aviso al dueño de la casa: En la página 18
encontrará las instrucciones de limpieza,
mantenimiento y funcionamiento.
MODELOS QP330BL•QP330SS•QP330WW
QP336BL•QP336SS•QP336WW
QP342BL•QP342SS•QP342WW
Página 18
CONTENIDO
FUNCIONAMIENTO
SE INCLUYE CON LA CAMPANA:
(1)
CONECTOR PARA
REGULADOR/
CONDUCTO
DE 3¼ X 10 PULG.
(8.3 X 25.4 CM)
FILTROS PARA
GRASA (2 PARA
LAS CAMPANAS
DE 30 Y 36 PULG. (76 Y 91.4 CM)
Y 3 PARA LAS CAMPANAS
DE 42 PULG. (107 CM)
(1)
CONECTOR PARA
(4) BOMBILLAS
CONDUCTO REDONDO
DE HALÓGENO
DE 7 PULG. (17.8 CM)
(1) BOLSA DE PIEZAS QUE CONTIENE:
(3)
TUERCAS
PARA
CABLE
(9)
TORNILLOS
PARA
CONECTOR DE
CONDUCTO
#8 X 1/4 PULG.
(1)
HERRAMIENTA
DE VENTOSA
PARA LAS
BOMBILLAS
(5)
TORNILLOS
DE MONTAJE
DE CABEZA
REDONDA
#10 X 5/8 PULG.
(1)
DESVIADOR
SIN
CONDUCTO
ENCIENDAsiemprelacampanaantesdecomenzaracocinar,afinde
establecerunflujodeaireenlacocina.Despuésdeapagarlaestufa,deje
quelacampanafuncioneduranteunoscuantosminutosparadespejar
elaire.
Parahacerfuncionarlacampana,hagalosiguiente:
NOTA
Losbotones y
seusanparaajustaryalternarlosajustesdelmenú
y deltemporizador.
LUZ(3interruptoresdebotonesy4ajustesdeluces)
TEnciendelaluzenelajustebajoyactivaunindicadorverdearribadel
botón.Alpresionarelbotón unasegundavezseactivaelajustedela
horanocturnayseiluminaelindicador
(2)
TORNILLOS
MAQUINADOS
#8 X 5/16 PULG.
Y
(2)
ARANDELAS
#8 PARA
DESVIADOR
SIN CONDUCTO
LIMPIEZAYMANTENIMIENTO
Pormotivosdedesempeño,aparienciaysalud,limpieelfiltro,elventilador
y lassuperficiesquetengangrasa.Utiliceúnicamenteuntrapolimpio
y unasolucióndedetergentesuaveensuperficiesdeaceroinoxidable
y pintadas.
Limpie los filtros completamente metálicos en el lavaplatos con un
detergente sin fosfatos. La decoloración del filtro puede ocurrir si se
utilizandetergentesconfosfatoocomoresultadodelacondicióndelagua
local,peroestonoafectaráelrendimientodelfiltro.Estadecoloraciónno
estácubiertaporlagarantía.
Limpie frecuentemente las superficies del filtro de recirculación sin
conductoconunpañohúmedoyundetergentesuave.NOsumerjalos
filtrosenaguaniloscoloqueenellavaplatos.Lacaracterísticaespecial
“CleanSense”indicacuandoesnecesarioreemplazarunfiltro.Cuando
seaelmomentodecambiarelfiltro,lasbandasazulesyamarillasse
combinarányadquiriránuncolorverde.La característica“CleanSense”
funciona mejor cuando se coloca orientada hacia la superficie para
cocinar.Cambielosfiltrosderecirculacióncada6meses.Parareemplazar
losfiltrosdecirculacióndesistemassinconducto,compreelS99010353
oelModeloBPPF30paracampanasde30pulg.(76cm),elS99010354
oModeloBPPF36paracampanasde36pulg.(91.4cm),oelS99010360
oelModeloBPPF42paracampanasde42pulg.(107cm).
El motor está permanentemente lubricado y no necesitará nunca
ponerleaceite.Siloscojinetesdelmotorestánhaciendoruidoexcesivo
oinusual,reemplaceelmotorconelmotordeservicioexacto.También
debereemplazarelimpulsor.
Utilice bombillas de halógeno con escudo protector de 120V, 50 W
(MR16conbaseGU10).
.
Enciendelaluzenelajustemedioyactivaunindicadorverdearriba
delbotón.
Enciende la luz en el ajuste alto y activa un indicador verde arriba
delbotón.
Alpresionarysostenerelmismobotóndenuevoseapagarálaluz.
Conelajustedehoranocturnaactivado,alpresionarysostenerelbotón
deluzenajustebajo haráqueseapagueelajustedelahoranocturna.
VENTILADOR (3 interruptores de botones y 4 velocidades
deventilador)
Enciendeelventiladorenlavelocidadbajayactivaunindicadorverde
arribadelbotón.
Enciendeelventiladorenlavelocidadmediayactivaunindicador
verdearribadelbotón.
Enciendeelventiladorenlavelocidadaltayactivaunindicadorverde
arribadelbotón.Alpresionarelbotón
unasegundavezseactivala
velocidadderefuerzodelventiladoryseiluminaelindicador
.
Alpresionarysostenerelmismobotóndenuevoseapagaráelventilador.
Cuando está activa la velocidad de refuerzo, al presionar y sostener el
botóndealtavelocidadseapagarálavelocidadderefuerzo.
NOTA
Esta campana utiliza un ventilador de compensación, diseñado para
obtenerunmejordesempeñoymenoresnivelesderuido.Comoresultado,
talvezsedécuentadequelasimpurezasalcocinarseatraenmása
unlado,oaparentanatraerseconmásrapidezdeloquepareceenel
ladoopuesto.Estoestotalmentenormal.Lacampanahasidodiseñada
y probada para captar bien las impurezas y los olores al cocinar en
condiciones normales, sin importar la ubicación donde se cocine en
laestufa.Tomeencuentaquealcocinarenlosquemadorestraseros
siempretendrácomoresultadounamejorcaptacióndelasimpurezas,
sinimportareldiseñodelacampana.
MODELOS QP330BL•QP330SS•QP330WW
QP336BL•QP336SS•QP336WW
QP342BL•QP342SS•QP342WW
Página 19
AJUSTESDELRELOJ
APAGADOCONRETARDODE10MINUTOS
Cuando el ventilador de la campana esté encendido (en cualquier
velocidad),presioneelbotón
paraactivarlafuncióndeapagado
conretardo.Cuandoseactiva,elventiladordelacampanaseapagará
automáticamentedespuésdequetranscurran10minutos.Estafunción
seactivacuandoaparecelosiguienteenlapantalladediodosLED:Un
indicadorverdeiluminadoarribadelbotónderetardo
,unconteo
numérico descendente (10 a 0) y un LED que gira hacia la derecha.
Si presiona otra vez el botón de retardo, el conteo descendente se
detendrá. Si presiona otra vez el botón
se reanudará el conteo
Presioneunavezelbotón
;las“horas”comenzaránadestellarenla
pantalladeLED.Uselosbotones y
paraajustarelhorarioadecuado
enelreloj.Unpequeñoindicadorseiluminaráenlaesquinaizquierdade
lapantalladeLEDparadesignar“pm”.Despuésdeconfigurarlashoras,
presione el botón
para hacer avanzar al menú a la selección de
minutos.LosminutoscomenzaránadestellarenlapantalladeLED.Use
losbotones y
paraconfigurarlosminutos.Presioneotravezelbotón
paraqueavanceelmenúparaseleccionarlosajustesde“pantalla”.
PANTALLA (el valor predeterminado de fábrica es que la pantalla
descendente del retardo.Al presionar y sostener el botón se apagará
está ENCENDIDA)
lafunción.
La pantalla de LED mostrará la función de la pantalla, -d-. Use el
botón o
TEMPORIZADOR
Presioneelbotón
paraactivarlafuncióndeajustedeltemporizador.
Use los botones y
para retrasar o avanzar el ajuste del
temporizadoraladuracióndeseada.Cuandolleguealajustedeseadodel
temporizador,permita3segundossinpresionarotrobotón,opresione
denuevoelbotón
para encender (d on) o apagar (doFF) la pantalla de
LED.Cuandoseseleccionelafuncióndepantallaapagada(doFF),se
inhabilitalailuminacióndelrelojenlapantalladeLED.Presioneotravez
elbotón
paraqueavanceelmenúparaseleccionarlosajustesde
“Suspensión”.
.Eltemporizadorseactivaráysevisualizaráel
MODODESUSPENSIÓN (valor predeterminado de fábrica: APAGADO)
conteodescendenteenlapantalladeLED,juntoconunindicadorverde
La pantalla de LED mostrará la función de “Suspensión”, -S-. Use el
arribadelbotón
botón o
.Despuésdequeeltemporizadorlleguea“0:00”,se
para activar (S on) o apagar (Soff) la función de
escucharáunsonidoaudible.Elsonidocontinuaráhastaquesepresione
Suspensión.CuandoseleccionelafuncióndeactivarSuspensión(Son),
denuevoel
lapantalladeLEDylosindicadoresLEDdelasluces/elventiladorestán
botóndeltemporizador.Elconteodeltemporizadorse
puededetenerencualquiermomentopresionandodenuevoel
presionaotravezelbotón
.Si
inhabilitados. Las funciones del sensor de luz ambiental, el apagado
,sereanudaráelconteodescendente
conretardoyeltemporizadortambiénestaráninhabilitadas.Todoslos
deltemporizador.Alpresionarysostenerelbotón
seapagarála
controlesdefuncionamientodelventiladorylasluces,incluidoelsistema
función.Tomeencuentaquecuandoseactivanjuntaslasfuncionesde
HeatSentry,siguenactivos.Presioneotravezelbotón
temporizadoryretardo,lafuncióndeltemporizadorestaráiluminadaen
avanceelmenúparaseleccionarlosajustesde“Sensordeluzambiental”.
la pantalla de LED; y el conteo descendente del apagado con retardo
Nota: Para tener acceso al menú de funciones cuando esté activo
estaráactivo,peronoseverá.
el modo Suspensión, presione y sostenga el botón
MENÚDEFUNCIONES
paraque
durante 2
segundos.
YSu campana cuenta con muchas funciones que se pueden acceder
SENSORDELUZAMBIENTAL (valor predeterminado de fabrica: Nivel 1 ACTIVADO)
y ajustardesplazándoseporelmenúdefunciones.Lacampanadebe
Elsensorde luzambientaltienedosajustesdenivel.Cuandoalgunode
estar apagada para poder activar y acceder al menú. Si presiona
losdosestáactivo,elsensordeluzdetectaráunniveldeluzbajoensu
el botón cocina,yencenderáautomáticamentelaslucesdetareaenlacampana
cuando el ventilador de la campana esté apagado, se
activará el menú de funciones. Al presionar de nuevo el botón
segúnelajustedelhorarionocturno. Losotrosajustesdelaluzsiguen
cuandoelmenúdefuncionesestéactivo,sedesplazaráatravésdelas
funcionando.Silosseleccionacuandoelsensordeluzambientalesté
diversasfuncionesquesepuedenajustar/configurar.Cuandoelmenú
activo, anularán temporalmente el sensor de luz ambiental hasta que
de funciones está activo, si no se presiona un botón en un plazo de
se apaguen. El ajuste del sensor de luz ambiental de nivel 1 (Aon1)
10segundos,odespuésdedesplazarseportodoslosajustesdelmenú,
va a requerir que la cocina esté más oscura que el ajuste de nivel 2
saldrá automáticamente del menú de funciones y todos los ajustes
(Aon2) antes de activar el ajuste de horario nocturno. La pantalla de
seleccionados quedarán guardados. Un indicador verde arriba del
LEDmostrarálafuncióndelsensordeluzambienta,-A-.Useelbotón
icono
seiluminarácuandoelmenúdefuncionesestéactivo.Las
siguientesfuncionessepuedenajustarensecuencia:
o
para seleccionar al ajuste del sensor enAon1,Aon2 oAoFF.
El ajuste de apagado (AoFF) desactiva la función del sensor, de tal
maneraqueelfuncionamientodelaluzenhorarionocturnoesmanual.
Tome en cuenta que puede salir en cualquier momento del menú de
funcionesdejandodepresionarcualquierbotóndurante10segundos,
odesplazándoseportodoelmenúdefunciones.
MODELOS QP330BL•QP330SS•QP330WW
QP336BL•QP336SS•QP336WW
QP342BL•QP342SS•QP342WW
Página 20
SISTEMAHEATSENTRY
EstacampanaestáequipadaconunsistemaHeatSentrydeavanzada
que vigila el exceso de temperatura y ajusta automáticamente al
ventiladorenlavelocidadadecuada.
1) Sielventiladorestáencendido,elsistemaHeatSentryaumentará
la velocidad del ventilador cuando la temperatura está elevada. Si la
temperaturasiguesubiendo,elsistemaHeatSentryseguiráaumentando
lavelocidaddelventiladorhastaquelatemperaturaseestabiliceose
reduzca. La luz destellante arriba del botón del ventilador muestra la
velocidad del ventilador del sistema Heat Sentry. Una vez que se ha
reducidolatemperatura,elsistemaregresaráalventiladorasuvelocidad
original.
REGULADORDEAIREDEREPUESTO
LacampanaescompatibleconelreguladordeairederepuestoBroan,
ModeloMD6ToModeloMD8T(opcional).Secompraporseparado.
Realice la conexión del regulador de aire de repuesto con cableado
debajovoltaje,comoseilustra.Consulteinformaciónadicionalenlas
instruccionesdelreguladordeairederepuesto.
POSTERIORDELACAMPANA
2)Sielventiladorestáapagado,elsistemaencenderáautomáticamente
elventiladorasuvelocidadmáximacuandolatemperaturaestéporarriba
delonormal.Cuandoelsistemaestáencendido,laluzarribadelbotón
dealtavelocidaddelventiladorseencenderáyapagará.Despuésde
quelatemperaturabajeavaloresnormales,lavelocidaddelventilador
sereduciráhastaqueseestabilicelatemperaturayluegoelventilador
seapagará.
CONECTORDEBAJOVOLTAJEPARAEL
REGULADORDEAIREDEREPUESTO
CAMPANA
DE ESTUFA
Nota:laversióncanadiensenotieneestafunción.
REGULADOR DE
AIRE DE REPUESTO
CABLES DE
BAJO VOLTAJE
FUSIBLES
120
VCA
TABLERODECONTROLDELACAMPANA
FUSIBLE
PRINCIPAL
FUSIBLE
DELALUZ
24
VCA
MOTOR DEL
REGULADOR
CONTROLREMOTO
LacampanaescompatibleconelcontrolremotodeRFdeBroan,Modelo
BCR1(opcional).Secompraporseparado.
PREPAREELLUGARDONDESE
VAAINSTALARLACAMPANA
TAPA DE TECHO
ElTablerodecontroldelacampanacontieneunfusibleprincipalyun
fusibledelaluzparaprotegerloscontrolesdelassobrecargasdeenergía.
Siunfusibleestáabierto(sefundió),elindicadorverdedelventiladorode
laluznofuncionaráadecuadamentecuandosepresionenlosbotonesdel
ventiladorodelaluz,ynielventiladornilaslucesseencenderán.
Puedecomprarfusiblesnuevosenunatiendadesuministroselectrónicos
de su localidad. Utilice fusibles tipo cartucho de acción rápida de 8A,
120V,de5mmdediámetroy20mmdelargo.
Parareemplazarunfusible:
1. Desconectelaenergíaenlaentradadeservicio.
2. Retirelosfiltrosyelrecipienteinferior.
3. Quiteyreviseelfusible.Sinoestáabierto(fundido),necesitarárealizar
diagnósticosadicionales.
CONDUCTO DE 3¼ x 10 pulg.
(8.3 x 25.4 cm) o CONDUCTO
REDONDO de 7 pulg. (17.8 cm)
(para descarga vertical)
PLAFÓN
CABLEADO ELÉCTRICO
DOMÉSTICO (parte superior
o posterior de la campana)
GABINETE
CAMPANA
DE 24 a 30 pulg.
(61 a 76 cm)
POR ENCIMA DE LA
SUPERFICIE DE COCINADO
1
TAPA DE PARED
CONDUCTO DE 3¼ x 10 pulg.
(8.3 x 25.4 cm)
(para descarga horizontal)
Determinesiladescargadelacampanavaaservertical
(conductode3¼x10pulg.[8.3x25.4cm]oredondode7pulg.
[17.8cm])uhorizontal(sóloconductode3¼x10pulg.[8.3x
25.4cm]).Paradescargaverticaluhorizontal,coloquelared
deconductosentreellugardondevaainstalarlacampanay
eltapóndetechootapóndepared.Paraobtenerlosmejores
resultados,utiliceunacantidadmínimadetransicionesycodos.
MODELOS QP330BL•QP330SS•QP330WW
QP336BL•QP336SS•QP336WW
QP342BL•QP342SS•QP342WW
Guíeseporeldiagramacorrespondiente(acontinuación)para
colocarlosconductosyhacerelcorteexactoparalaconexión
eléctricaenelgabineteoenlapared.Parainstalacionesen
sistemassinconductos,NOhaganingúnorificiodeacceso
paraconducto.
CONDUCTOVERTICAL
DE3¼X10PULG.
(8.3X25.4CM)
TORNILLOS DE MONTAJE
DE LA CAMPANA (5)
11 5/8 pulg. (29.5 cm)
(campana de 30 pulg./76 cm)
11 5/8 pulg. (29.5 cm)
(campana de 30 pulg./76 cm)
14 5/8 pulg. (37.1 cm)
(campana de 36 pulg./91.4 cm)
14 5/8 pulg. (37.1 cm)
(campana de 36 pulg./91.4 cm)
17 5/8 pulg. (44.8 cm)
(campana de 42 pulg./107 cm)
17 5/8 pulg. (44.8 cm)
(campana de 42 pulg./107 cm)
FRENTE DEL
GABINETE
PARTE INFERIOR
DEL GABINETE
4½”
(11.4 cm)
¾”
*
6 7/8”
(17.5 cm)
5¼”
(13.3 cm)
11”
2 1/8”
ORIFICIO DE ACCESO PARA (27.9 cm) (5.4 cm)
CONDUCTO VERTICAL
5¼”
(13.3 cm)
PREPARELACAMPANA
3
Quitelabolsadepiezasdelinteriordelatapadelextremodel
empaquedeespuma.
4
Quitetodoelforrodeplásticoprotectordelacampana
(únicamentecampanasdeaceroinoxidable).
10 7/8”
(27.6 cm)
2 5/8”
(6.7 cm)
(1.9 cm)
CUÑAS DE
MADERA
(sólo gabinetes de
fondo empotrado)
Página 21
ç
2
LÍNEA
CENTRAL
(2)
LEVANTAR
HACIA
FUERA
ORIFICIO DE
ACCESO
PARA CABLES
ELÉCTRICOS
(en el fondo del gabinete)
CONDUCTOHORIZONTALDE
3¼X10PULG.(8.3X25.4CM)
CUÑAS DE MADERA
(sólo gabinetes de FRENTE DEL
fondo empotrado)
GABINETE
ç
(1)
JALAR
HACIA
ABAJO
FILTROSDE
ALUMINIO
5
Quitelosfiltrosdealuminiodelacampana.
6
Quitelos6tornillosquesostienenelrecipienteinferiorala
campana.Dejeaunladoelrecipienteinferiorylostornillos.
3 5/8” (9.2 cm)
1 3/8” (3.5 cm)
3/8” (1 cm)
*
4”
ORIFICIO DE ACCESO PARA
(10.1 cm)
CONDUCTO HORIZONTAL
PARTE
INFERIOR
DEL GABINETE
5¼”
(13.3 cm)
5¼”
(13.3 cm)
6 7/8” (17.5 cm)
11 5/8 pulg. (29.5 cm)
(campana de 30 pulg./76 cm)
11 5/8 pulg. (29.5 cm)
(campana de 30 pulg./76 cm)
14 5/8 pulg. (37.1 cm)
(campana de 36 pulg./91.4 cm)
14 5/8 pulg. (37.1 cm)
(campana de 36 pulg./91.4 cm)
17 5/8 pulg. (44.8 cm)
(campana de 42 pulg./107 cm)
17 5/8 pulg. (44.8 cm)
(campana de 42 pulg./107 cm)
TORNILLOS
DE MONTAJE
DE LA
CAMPANA (5)
LÍNEA
CENTRAL
ORIFICIO DE
ACCESO PARA
CABLES
ELÉCTRICOS
(en la pared)
ORIFICIO PARA LA
CONEXIÓN ELÉCTRICA
DEL REGULADOR
DE AIRE DE REPUESTO
(en la pared)
CONDUCTO
REDONDODE
7PULG.(17.8CM)
TORNILLOS DE MONTAJE
DE LA CAMPANA (5)
11 5/8 pulg. (29.5 cm)
(campana de 30 pulg./76 cm)
11 5/8 pulg. (29.5 cm)
(campana de 30 pulg./76 cm)
14 5/8 pulg. (37.1 cm)
(campana de 36 pulg./91.4 cm)
14 5/8 pulg. (37.1 cm)
(campana de 36 pulg./91.4 cm)
17 5/8 pulg. (44.8 cm)
(campana de 42 pulg./107 cm)
17 5/8 pulg. (44.8 cm)
(campana de 42 pulg./107 cm)
FRENTE DEL
GABINETE
AGUJ. de
PARTE pulg.
(20.3 cm)
INFERIOR DE DIÁM.
DEL
ORIFICIO DE
ACCESO PARA
GABINETE
CONDUCTO
*
4 5/8” (11.7 cm)
CUÑAS DE
MADERA
(sólo gabinetes de
fondo empotrado)
*
REDONDO
DE 7 pulg.
(17.8 cm)
6 7/8”
(17.5 cm)
2 1/8”
11” (27.9 cm) (5.4 cm)
CONECTORDEL
REGULADORDE
TIRO/CONDUCTO
10 7/8”
(27.6 cm)
2 5/8”
(6.7 cm)
ORIFICIO DE
ACCESO PARA
LÍNEA
CENTRAL CABLES ELÉCTRICOS
(en el fondo del gabinete)
Observe la cuña de madera adicional y el tornillo de montaje cerca
del frente del gabinete, sobre la línea central del gabinete.
7
Quitelos2tornillosquesujetanelconectordelreguladorde
tiro/conductoalacampana.Quiteelconectordelregulador
detiro/conductodelinteriordelacampana.
P
ARAINSTALACIONESCONCONDUCTOS:pasedirectamenteal
paso12.
MODELOS QP330BL•QP330SS•QP330WW
QP336BL•QP336SS•QP336WW
QP342BL•QP342SS•QP342WW
Página 22
11 ÚNICAMENTEENINSTALACIONESSINCONDUCTOS:
Compreunjuegodedos(2)filtrosparasistemassinconductos
paralascampanasde30pulg.(76cm)(ModeloBPPF30)ypara
lascampanasde36pulg.(91.4cm)(ModeloBPPF36)ounjuego
detres(3)filtrosparasistemassinconductosparalascampanas
de42pulg.(107cm)(ModeloBPPF42)consudistribuidoro
minoristalocal.Siguiendolasinstruccionesqueacompañanalos
filtrosparasistemassinconductos,acopleéstosalosfiltrosde
malladealuminio.
DESVIADOR
PARASISTEMAS
SINCONDUCTOS
PARAINSTALACIONESSINCONDUCTOS:pasedirectamenteal
paso“INSTALELACAMPANA”.
PLACAREDONDA
DEAGUJEROCIEGO
DE7pulg.(17.8cm)
(tambiéndesmontela
placaverticalde3¼x
10pulg.[8.3x25.4cm])
ÚNICAMENTEENINSTALACIONESSINCONDUCTOS:
Delalistadepiezas:Fijeeldesviadorparasistemassin
conductosalacajadeairecon2tornillosy2arandelas.
8
TORNILLOS
PLACA
HORIZONTAL
DE3¼X
10PULG.
(8.3X25.4CM)
PLACAVERTICAL
DEAGUJEROCIEGO
DE3¼X10PULG.
(8.3X25.4CM)
PLACADE
SISTEMASIN
CONDUCTO
12 ÚNICAMENTEENINSTALACIONESCONCONDUCTOS:
Retirelasplacasdeagujerociegoverticalde3¼x10pulg.
(8.3x25.4cm),horizontalde3¼x10pulg.(8.3x25.4cm),
oredondade7pulg.(17.8cm),segúncorrespondaasumétodo
deconductos.
BORDE
SUPERIOR/
POSTERIOR
DELA
CAMPANA
PLACADE
SISTEMASIN
CONDUCTO
CONECTORDELREGULADORDE
TIRO/CONDUCTODE3¼X10PULG.
(8.3X25.4CM)
PIVOTE
DELA
ALETADEL
REGULADOR
ç
RANURA
9
PLENOPARA
SISTEMASSIN
CONDUCTOS
PLACADEL
CONDUCTO
REDONDODE
7PULG.(17.8CM)
ÚNICAMENTEENINSTALACIONESSINCONDUCTOS:
Quite2tornillosquesostienenlaplacasinconductoalpleno
sinconductoyquitelaplaca.
TORNILLOS
13
PLACADE
SISTEMASIN
CONDUCTO
10
ÚNICAMENTEENINSTALACIONESSINCONDUCTOS:
Inserteelextremocortodelaplacasinconductoenlaranura
delplenosinconducto.Fijeconlos2tornillosquequitóen
elpaso9.
ÚNICAMENTEENINSTALACIONESCONCONDUCTOS:
Acopleelconectordelreguladordetiro/conductode
3¼pulg.x10pulg.(8.3x25.4cm)(siestáusandoelconducto
de3¼pulg.x10pulg.[8.3x25.4cm])olaplacaredonda
de7pulg.(17.8cm)(siestáusandoelconductoredondo
de7pulg.[17.8cm])porlaaberturadelagujerociego.
Notas:
Paraacomodarlosconductosdescentrados:elconectordel
reguladordetiro/conductode3¼x10pulg.(8.3x25.4cm)puede
instalarseaunadistanciahastade1/2pulg.(1.3cm)desde
elcentrodelacampanahaciacualquierlado,ylaplacadel
conductoredondode7pulg.(17.8cm)puedeinstalarsea1/2pulg.
(1.3cm)desdeelcentrodelacampanahaciacualquierlado.
Instaleelconectordelreguladordetiro/conductode3¼x10pulg.
(8.3x25.4cm)conelpivotedealetadelreguladormáscercano
albordesuperior/traserodelacampana.
MODELOS QP330BL•QP330SS•QP330WW
QP336BL•QP336SS•QP336WW
QP342BL•QP342SS•QP342WW
Página 23
INSTALELACAMPANA
CONECTEELCABLEADO
ADVERTENCIA
Parareducirelriesgodeunadescargaeléctrica,desconecte
elsuministroeléctricoalpaneldeservicio.Bloqueeelpanel
deservicioopóngaleunaetiquetadeseguridadparaevitar
quealguienconecteaccidentalmentelaenergíaeléctrica.
TORNILLO
DETIERRA
CUBIERTADE
LACAJADE
CABLEADO
ELÉCTRICO
ORIFICIO
CIEGODEL
CABLE
ELÉCTRICO
14
Quitelacubiertadelacajadecableadoeléctricodelinterior
delacampanayelcorrespondienteagujerociegodel
cableadoeléctricodesdelapartesuperiorotraserade
lacampana.
CABLEELÉCTRICO
DELACASA
18
Conecteelcableeléctricodelacasaalcableadodela
campana:cableNEGROconNEGRO,BLANCOconBLANCOy
VERDEoSINFORROaltornillodetierra.Vuelvaacolocarla
cubiertadelacajadecableadoeléctrico.
19
Vuelvaafijarelrecipienteinferiorconlos6tornillosquequitó
enelpaso6.
INSTALELASBOMBILLAS
HERRAMIENTA
DEVENTOSA
BOMBILLA
DE
HALÓGENO
CABLEELÉCTRICO
DELACASA
(1)
EMPUJAR
HACIA
ADENTRO
(2)GIRAREN
SENTIDODELAS
AGUJASDELRELOJ
TORNILLOS
DELPANELDE
ILUMINACIÓN
15
Tiendaelcableeléctricodelacasaentreelpaneldeservicio
ylacampana.Conecteelcableeléctricoalacampanaconla
abrazaderaapropiada.
16
Cuelguelacampanadelos(4)orificiosdemontajeinsertados
parcialmenteenlasposicionesdelgabinete(mostradoenlas
ilustracionesdelapartado“PREPAREELLUGARDONDESE
VAAINSTALARLACAMPANA”).Labolsadepiezascontienelos
tornillosdemontaje.Deslicelacampanahacialaparedhastaque
lascabezasdelostornillosdemontajequedenconectadasenel
extremoangostodelosorificiostipobocallavequeestánenlaparte
superiordelacampana.Aprietebienlostornillos.Agregueelquinto
tornillodemontajeenelagujerocentraldelacampanayapriete
confirmeza.
17
ÚNICAMENTEENINSTALACIONESCONCONDUCTOS:
Conecteelsistemadeconductosalacampanaypongacintapara
conductosenlasunionesparafijarlasysellarlas.Asegúresedeque
elconectordelreguladordetiro/conductoentrealosconductosy
queelreguladordetiropuedaabrirseycerrarselibremente.
PANELDE
ILUMINACIÓN
PRECAUCIÓN:Lasbombillaspodríanestarcalientes.
Consultelainformaciónadicionalenlospaquetes
debombillas.
20
Instalelas(4)bombillasdehalógeno(incluidasconla
campana).Utilicebombillasdehalógenoconescudoprotector
de120V,50W(MR16conbaseGU10).
NOTA:Laherramientadeventosa(incluidaconlacampana)
sirveparainstalaryquitarbombillasdeluz.
Alineelasclavijasdelabombillaconlaaberturadediámetro
grandeenelreceptáculo,empujelabombillahacialacampana
yluegogirehacialaderechahastaqueestéfirmementeasentada.
Laposicióndelreceptáculodelabombilla(profundidad)es
ajustable,ypodríanecesitarajustecuando:
a) Ciertasmarcasdebombillasseandifícilesdeinstalar.
b) Labombillasobresalgademasiadopordebajodelpanelde
labombilla.
MODELOS QP330BL•QP330SS•QP330WW
QP336BL•QP336SS•QP336WW
QP342BL•QP342SS•QP342WW
Página 24
PIEZASDESERVICIO
SOPORTEDEL
RECEPTÁCULO
DELALÁMPARA
15
1
12
14
16
11
10
PANELDE
ILUMINACIÓN
TORNILLOS
21
17
4
18
GARANTÍA
Garantíalimitadaporunaño
Broan-NuTonegarantizaalconsumidorcompradororiginaldesusproductosque
talesproductosestaránlibresdedefectosenmaterialesomanodeobraduranteun
períododeun(1)añoapartirdelafechadelacompraoriginal.NOEXISTENOTRAS
GARANTÍAS,EXPLÍCITASOIMPLÍCITAS,INCLUYENDO,ENTREOTRAS,GARANTÍAS
IMPLÍCITASDECOMERCIALIZACIÓNOAPTITUDPARAUNPROPÓSITOPARTICULAR.
Duranteesteperíododeunaño,Broan-NuTone,asucriterio,repararáoreemplazará
sincargoalgunocualquierpiezaoproductoqueseencuentredefectuosobajo
condicionesnormalesdeusoyservicio.LAPRESENTEGARANTÍANOCUBRELOS
TUBOSFLUORESCENTESNISUSARRANCADORES,FILTROS,CONDUCTO,TAPONES
DETECHOOPAREDESYDEMÁSACCESORIOSDECANALIZACIÓN.Estagarantíano
cubre(a)mantenimientoyservicionormales,ni(b)ningúnproductoopiezasquese
hayansometidoausoinadecuado,negligencia,accidente,mantenimientooreparación
inadecuada(nohechaporBroan-NuTone),instalaciónincorrectaoinstalaciónen
contradelasinstruccionesdeinstalaciónrecomendadas.
Laduracióndecualquiergarantíaimplícitaselimitaalperíododeunaño,comose
especificaparalagarantíaexpresa.Algunosestadosnopermitenlimitacionesen
cuantoaltiempodevencimientodeunagarantíaimplícita,porloquelalimitación
antesmencionadapodríanoaplicarseausted.
LAOBLIGACIÓNDEBROAN-NUTONEDEREPARAROREEMPLAZAR,ACRITERIO
DEBROAN-NUTONE,SERÁELÚNICOYEXCLUSIVORECURSODELCOMPRADOR
BAJOESTAGARANTÍA.BROAN-NUTONENOSERÁRESPONSABLEPORDAÑOS
INCIDENTALES,RESULTANTESOESPECIALESQUESURJANDELUSOO
DESEMPEÑODELPRODUCTOOENRELACIÓNCONELMISMO.Algunosestadosno
permitenlaexclusiónolimitacióndedañosincidentalesoconsecuentes,porloque
lalimitaciónantesmencionadapodríanoaplicarseausted.Estagarantíaleotorga
derechoslegalesespecíficos,yustedpodríatenerotrosderechosquevaríanentre
estados.Estagarantíasustituyetodaslasgarantíasanteriores.
Paratenerderechoalserviciodelagarantía,usteddebe(a)notificaraBroanNuTonea
ladirecciónynúmerodeteléfonoqueaparecenabajo,(b)proporcionarelnúmerode
modeloylaidentificacióndelapiezay(c)describirlanaturalezadecualquierdefecto
enelproductoopieza.Enelmomentodesolicitarserviciocubiertoporlagarantía,
debedepresentaruncomprobantedelafechaoriginaldecompra.
Broan-NuToneLLC,926W.StateStreet,Hartford,Wisconsin53027
www.broan.com800-558-1711
Broan-NuToneCanada,Inc.,1140TristarDrive,Mississauga,OntarioCanadaL5T1H9
www.broan.ca877-896-1119
Rev.08/2007
5
13
8
6
ÚNICAMENTEENINSTALACIONESCONCONDUCTOS:
InstaledenuevolosfiltrosdealuminioquequitóenelPaso5.
ÚNICAMENTEENINSTALACIONESSINCONDUCTOS:
Instalelosfiltrosdealuminioylosfiltrossinconducto
(comprados,einstaladosenelpaso11).
3
9
Paracambiarlaprofundidaddelosreceptáculosdelasbombillas:
-Quiteelrecipienteinferior(veaelpaso6).
-Quitelos2tornillosdelpaneldeiluminaciónyelpanelde
iluminación.Dejelostornillosaunlado.
-Afloje2tornillosquesostienenelsoportedelreceptáculo
delalámparaalpaneldeiluminación.
-Ajusteelreceptáculo/soportealaprofundidaddeseada.
-Vuelvaaapretarlostornillosconfirmeza.
-Vuelvaacolocarelpaneldeiluminaciónyelrecipienteinferior.
2
7
CLAVE N.º
PIEZA N.º DESCRIPCIÓN
1
2
3
4
5
6
7
8
9
10
11
12
13
14
97017727 Placaredondade7pulg.(17.8cm)(incluyepiezasdemontaje)
97018256 Montajedeinterfazdelusuario,colorblanco(incluyeinterfaz,placade
identificación,piezasdemontaje)
97018257 Montajedeinterfazdelusuario,colornegro(incluyeinterfaz,placade
identificación,piezasdemontaje)
99528258 Placadeidentificación,blanca
99528259 Placadeidentificación,negra
97018251 Juegodecapacitor(incluyetuercasdealambre,tornillodemontaje)
97018225 PaneldelucesDERECHOcolorblanco(incluyepiezasdemontaje)
97018226 PaneldelucesDERECHOcolornegro(incluyepiezasdemontaje)
97018227 PaneldelucesDERECHOdeaceroinoxidable(incluyepiezasdemontaje)
97018205 Juegodefiltrosde30pulg.(76cm)(2porbolsa)
97018206 Juegodefiltrosde36pulg.(91.4cm)(2porbolsa)
97018207 Juegodefiltrosde42pulg.(107cm)(3porbolsa)
97018220 Ruedadeventilador(incluyetuercademontaje)
97018223 Juegodemotor(incluyemotor,aislantes,piezasdemontaje)
97017728 Conectordelreguladordetiro/conducto(incluyelaspiezasdemontaje)
97018229 PaneldelucesIZQUIERDOcolorblanco(incluyepiezasdemontaje)
97018230 PaneldelucesIZQUIERDOcolornegro(incluyepiezasdemontaje)
97018231 PaneldelucesIZQUIERDOdeaceroinoxidable(incluyepiezasdemontaje)
97017731 Portalámpara(incluyeportalámpara,tuercasparaalambre,
tornillosdemontaje)
97018233 Soporteparaportalámpara
97018239 Recipienteinferiorde30pulg.(76cm)(incluyepiezasdemontaje)
97018240 Recipienteinferiorde36pulg.(91.4cm)(incluyepiezasdemontaje)
97018241 Recipienteinferiorde42pulg.(107cm)(incluyepiezasdemontaje)
97018242 Placadedeslizamientosinconductos(incluyeempaquey
piezasdemontaje)
97018243 Desviadorsinconductos(incluyelaspiezasdemontaje)
97018244 Placasinconductos(incluyelaspiezasdemontaje)
97018260 Tablerodecircuitos
97018262 Transformador(incluyelaspiezasdemontaje)
97018224 Bolsadepiezas
99010353 Juegodefiltrossinconductopara30pulg.(76cm)(2filtrosdecarbón
y8clipsdefiltro)
99010354 Juegodefiltrossinconductopara36pulg.(91.4cm)(2filtrosdecarbón
y8clipsdefiltro)
99010360 Juegodefiltrossinconductopara42pulg.(107cm)(3filtrosdecarbón
y12clipsdefiltro)
99526707 Herramientadeventosa
97018252 Sensordecalor
97018253 Fusible
97018261 Juegodecablesdelistón(contiene3)
15
16
17
18
Nosemuestra.
Nosemuestra.
Nosemuestra.
Nosemuestra.
Nosemuestra.
Nosemuestra.
Alpedirpiezasderepuesto,indiqueelNo.DEPIEZA,noelNo.DECLAVE
99527291C